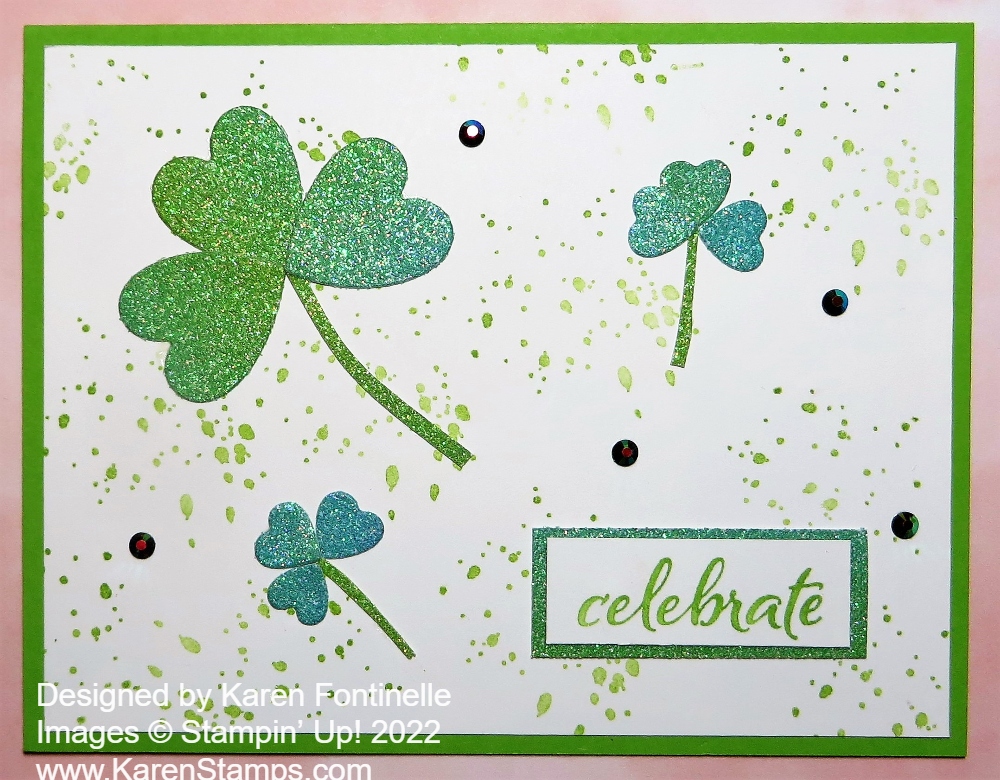
Happy St. Patrick’s Day! I had several other ideas for St. Patrick’s Day cards but ended up with this St. Patrick’s Day Glittery Shamrocks Card. I think it is so fun to make a shamrock with hearts! I knew I had several kinds of glimmery paper so I thought I would use that somehow!
This is just a simple card, just some die-cutting involved. If you don’t have any heart dies you can use a heart punch or just cut them out by hand. I used the Sweet Hearts Dies in the Spring Mini Catalog to die cut all the glittery hearts. I used the Rainbow Glimmer Paper. I had just enough greenish edge scraps to die cut all my hearts! This paper is so fun!
The card base is Granny Apple Green, which is one of the coordinating colors with the Rainbow Glimmer Paper. The layer is Basic White. Before I glued on the shamrocks, I randomly stamped the dots in the Color & Contour Stamp Set with Granny Apple Green ink. The stems of the shamrocks are just cut out by hand, tiny little strips of green.
I looked through a lot of stamp sets and decided on the word “Celebrate” in the Celebrate Sunflowers Stamp Set. I didn’t want to stamp the whole thing so I just used the Granny Apple Green Stampin’ Write Marker in the Brights family to color only the word I wanted and then stamped. I just stamped it on a Basic White scrap, trimmed it down and adhered it to another scrap of the greenish Rainbow Glimmer Paper.
For even more glitter and glimmer, I decided to add some kind of rhinestones or jewels. I decided to try the Evening Evergreen green jewels in the 2021-23 In Color Jewels. They don’t show up in the photo but in the right light, they are green rhinestones!
Don’t forget to wear green today and have fun celebrating St. Patrick’s Day!
The Celebrate Sunflowers Stamp Set and Sunflower Dies are available this month, until March 31, as a Bundle with an extra discount during the Savings Are in Bloom promotion! You can also get the Mini Stampin’ Cut & Emboss Machine at a 20% savings, but you can buy select Bundles even if you don’t get the machine.
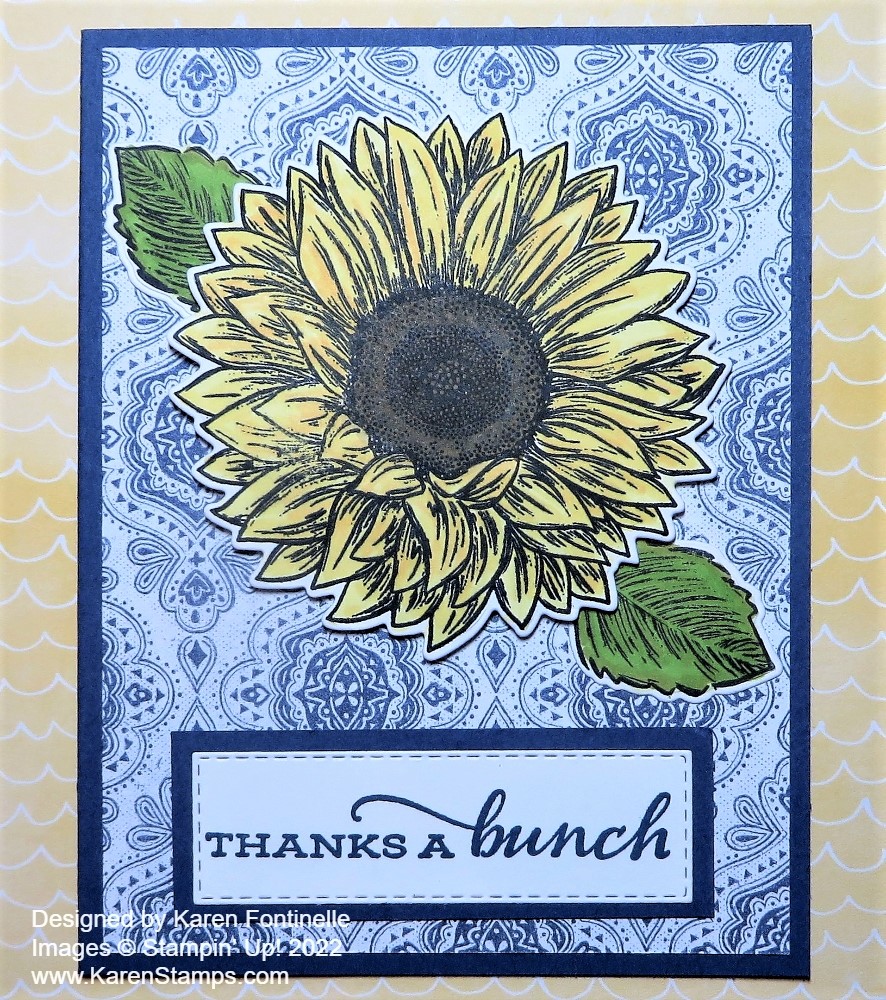
This card came about because I wanted to make a card with the sunflowers set and dies. As I was looking through my designer paper the other day I came across this blue print designer paper in the Heart & Home Designer Series Paper. I thought maybe it would look good with the yellow sunflower. However, when I went to make the card, I thought maybe the print was not a good background for the sunflower. I simply turned the paper over to the wood design and that was fine. However, you never know when you are designing a card! As I went to put adhesive on the blue print side, I decided I really wanted to use it, so I did! Is it too much or just something different?! I don’t know! But I think I like it for now!
The card base is Misty Moonlight, a color I wanted to use before it retires soon. Yellow and blue always look good together. The sunflower is stamped in Memento Ink and then colored with Stampin’ Blends. I started with Light and Dark Daffodil Delight markers and added a bit of Mango Melody. The center is Light and Dark Soft Suede with some black dots that darken it up. The leaves were colored with Granny Apple Green, Light and Dark, but also added some Light Old Olive for a little darker green.
The sunflower is popped up with Stampin’ Dimensionals and the two leaves are adhered flat on the card, stuck under the sunflower a bit. The greeting in the Celebrating Sunflowers Stamp Set is stamped in Misty Moonlight ink on Basic White and die cut with a Stitched Rectangle Die. I was going to use the next larger rectangle for a Misty Moonlight layer but I wanted something narrower so I just cut a rectangle myself from the cardstock.
Be sure to check out the Bundles that are available this month during this promotion!
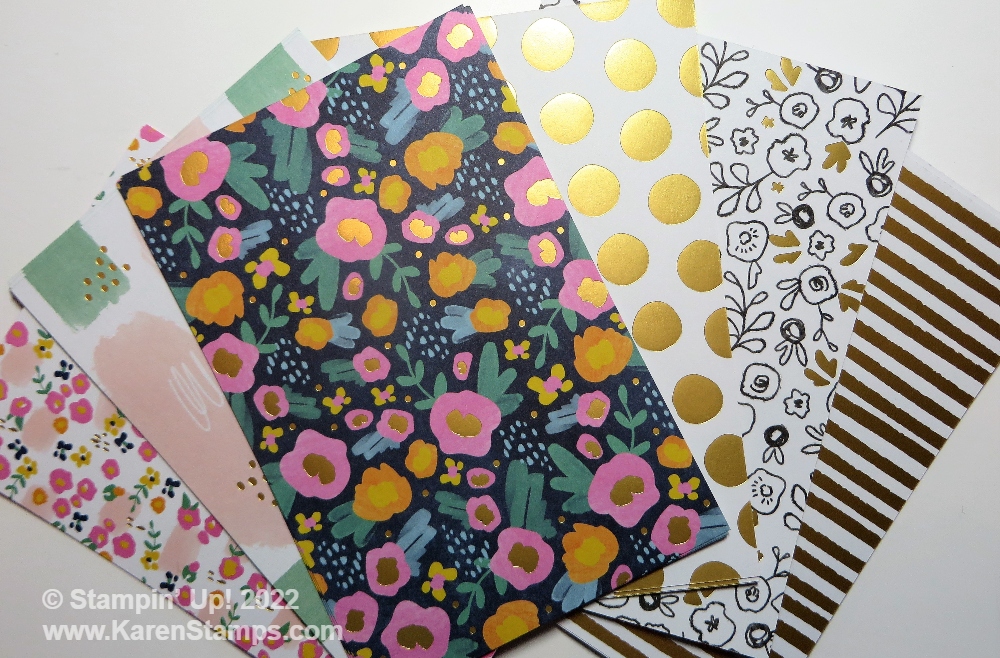
If you missed the Abstract Beauty Collection in the Spring Mini Catalog on pages 48-49 I think you should go back and look those pages over! There are some interesting and different products! Even without the stamp set and dies, all the rest of the products can be very fun to play with and you can still make cards as I did with this Abstract Beauty Card For a Friend.
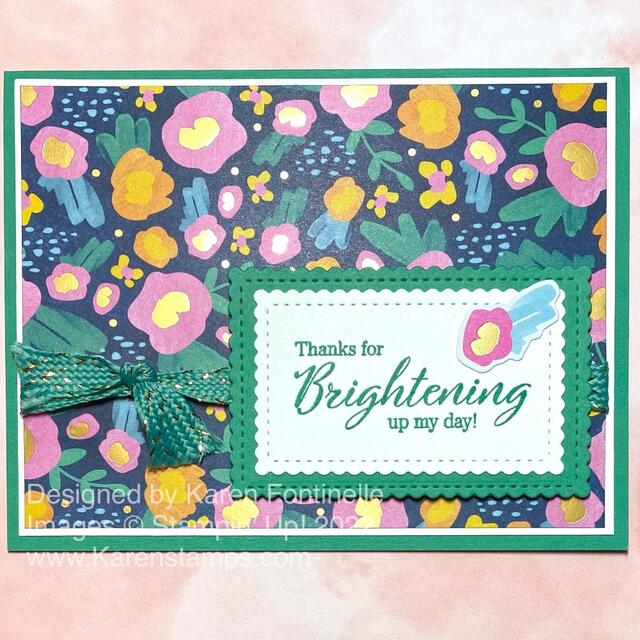
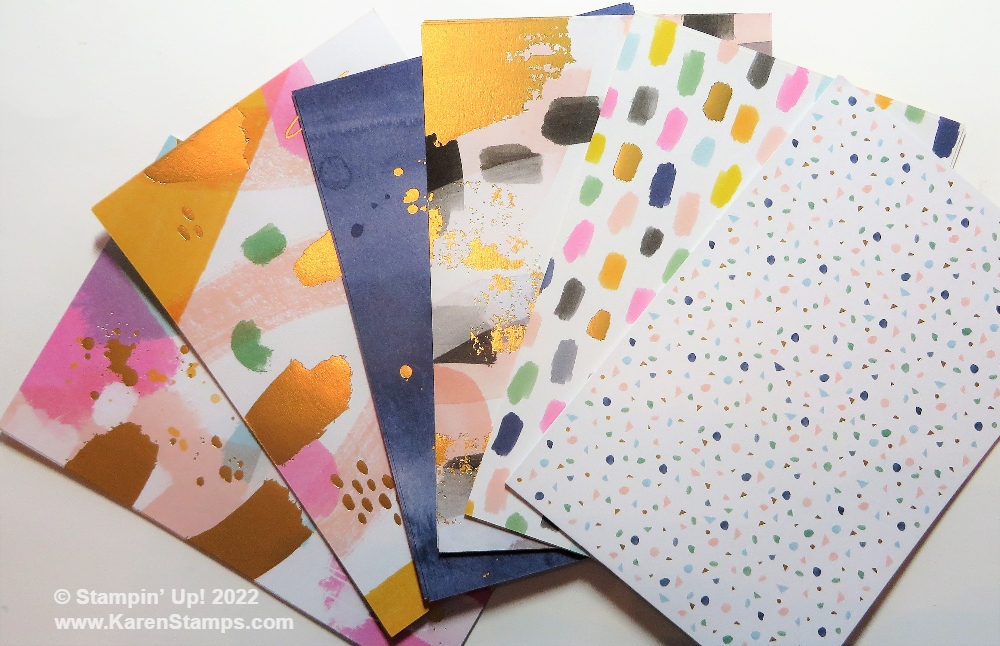
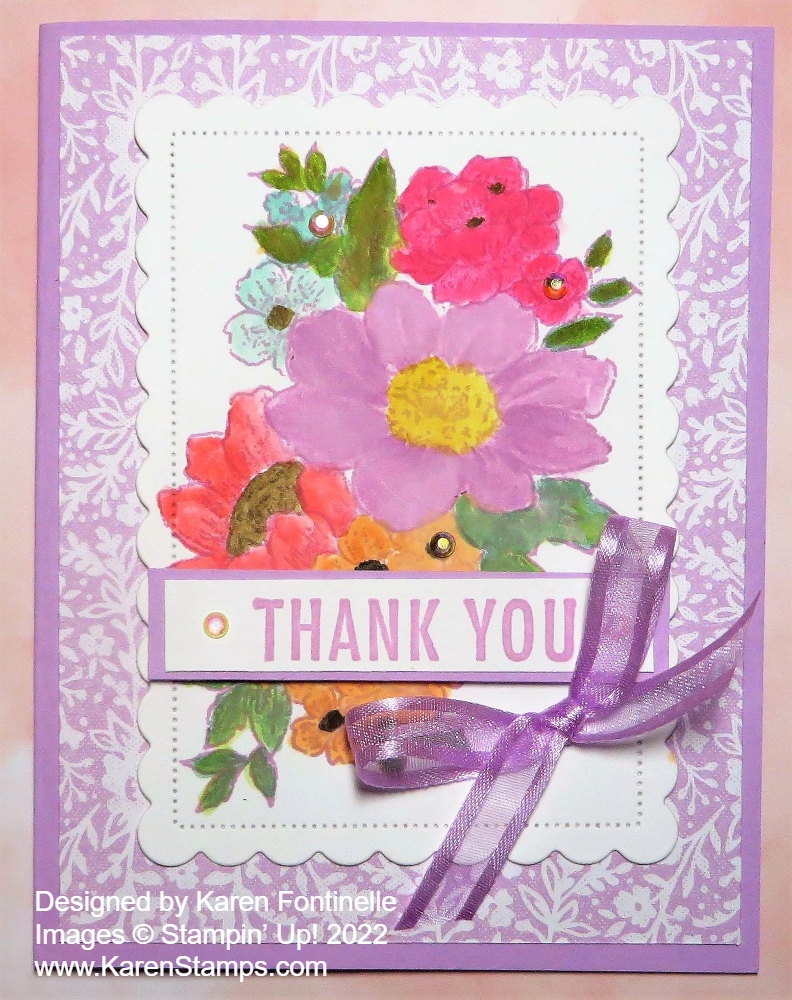
The reason I made this card was that I LOVED this particular paper in the Abstract Beauty 4″ x 6″ Specialty Designer Series Paper. I loved the dark blue background with the bright pink flowers and gold foil accents. Actually, this card didn’t photograph very well because of the glare from the foil so the card is really prettier and brighter in person. Did you notice the paper size is 4″ x 6″? It’s a different size to use for scrapbooking, cardmaking, and any other projects. I kept the card design simple so I didn’t have to cut much off this pretty paper!
The card base is Just Jade, one of the “old” In Colors that will be retiring soon. It’s a pretty green, so I wish we weren’t losing it. To help set off the designer paper a little bit, I added a layer of Basic White underneath it, just a tiny margin, so the Jade card base would show, too.
The greeting is from the Sale-A-Bration stamp set, Special Moments. I stamped it in Just Jade Ink and die cut the Basic White and the Just Jade layer with the rectangles in the Stitched So Sweetly Dies. Before I adhered the greeting, I wrapped around some ribbon, just adhering the ends to the back of the designer paper. I used the Just Jade and Gold 3/8″ Braided Ribbon. Then I just tied on an extra piece of ribbon to the left of the greeting in a knot.
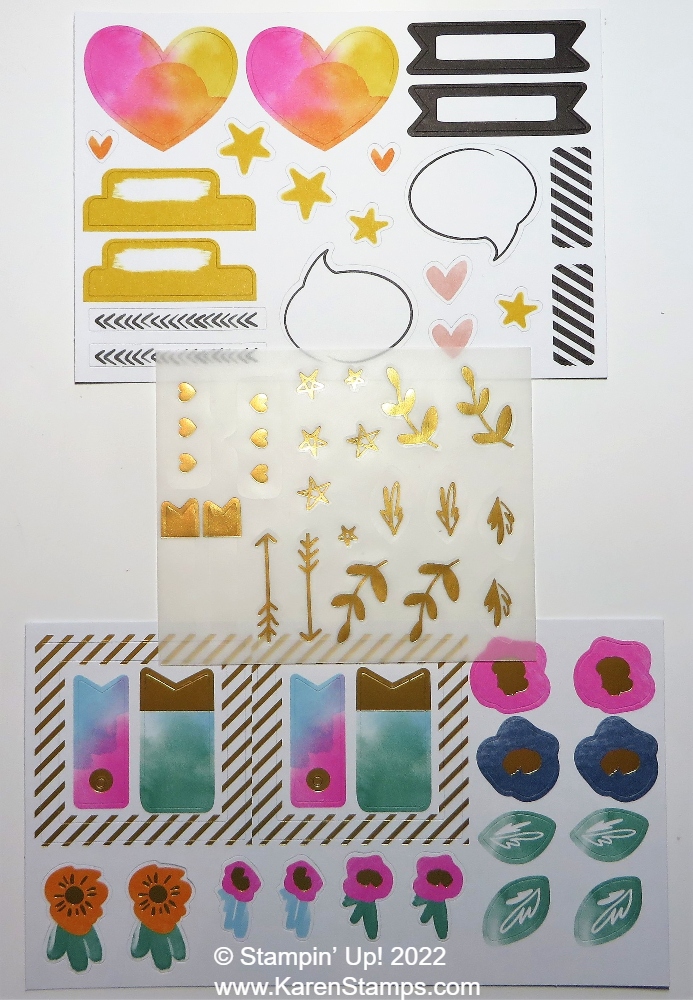
In the Abstract Beauty Suite is a package called the Abstract Beauty Ephemera Pack. This is a fun package of assorted preprinted and precut elements that you can just add to your project as embellishments. On my card, just adding a flower and leaf to the corner of the greeting seemed like just enough with the bright, busy paper in the background.
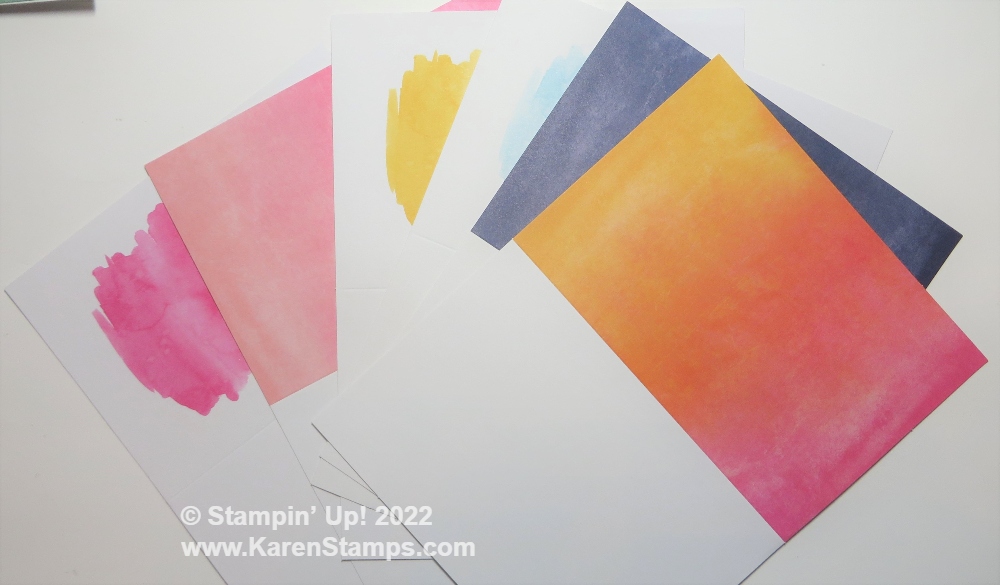
There are also Adhesive-Backed Hexagons to stick on where you need a little something. There are also Abstract Beauty Cards and Envelopesthat have some watercolor design on them which allows for more stamping or embellishing! Use the Ephemera Pack if you like for embellishing the cards. Just have fun!
This is a simple card with a basic design, but the Abstract Beauty Designer Paper makes it so beautiful! I have to laugh at the sentiment, “Thanks for Brightening up my day!” I think the pretty paper will brighten up the recipient’s day!
As soon as the current Paper Pumpkin Kit goes out after the 10th of any month, the next Paper Pumpkin Kit is revealed! This Paper Pumpkin Kit for April 2022 looks perfect for spring!
Growing through life can also mean growing pains. Whether people are climbing their career ladder or moving out for the first time—change can be simultaneously thrilling and scary—but isn’t that what makes life beautiful? Because new beginnings, after all, are simply new adventures. Let your loved ones know you’ll be there to support them through all of life’s chapters!
The Change is Beautiful kit contains enough supplies to create 9 stunning cards with a unique folding technique to commemorate moments of change. The designs are inspired by the natural cycles of change found in nature.
ABOUT THE KIT
Name: Change Is Beautiful
This kit includes:
Change is Beautiful Photopolymer Stamp Set
Melon Mambo Classic Stampin’ Spot®
Printed card bases
Printed envelopes
Printed, shaped die cuts
Iridescent sea glass
Dimensionals
Card size: 4-1/4″ x 5-1/2″ (10.8 x 14 cm)
Coordinating Stampin’ Up! colors: Balmy Blue, Basic Black, Bermuda Bay, Crushed Curry, Evening Evergreen, Granny Apple Green, Melon Mambo
Don’t miss out on this kit! Paper Pumpkin is a gift you send yourself (or a loved one or friend!) once a month. Wouldn’t it be great to find a treat just for you in your mailbox?! No planning, no missing supplies, just open the box and start crafting! Even adhesives are included. Follow the directions or use the contents to put your own spin on the project. Easy for anyone, even beginners, and no big stash of craft supplies required!
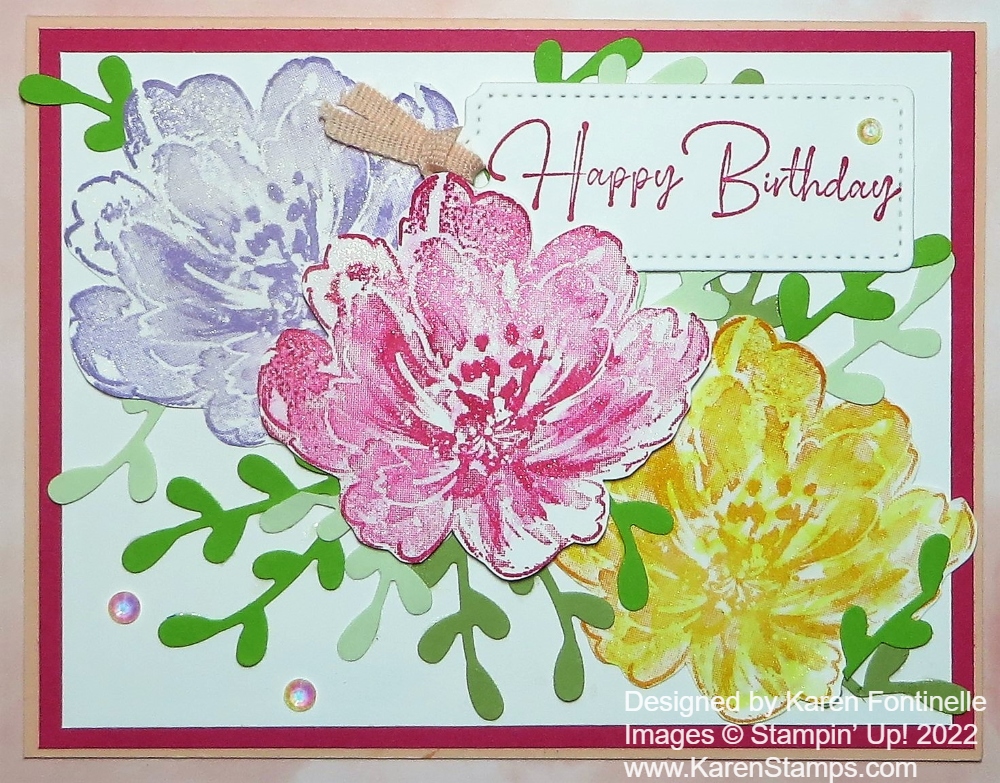
Sometimes you don’t know exactly where you are going with a card idea, or what you thought of doesn’t work out very well, yet in the end, something works out and you come up with a card you are happy with like this Flowing Flowers Trio Birthday Card!
The card base, which is difficult to see in the photo is Petal Pink with a layer of Melon Mambo, and then Basic White for the card front and flowers. The Flowing Flowers Stamp set is a beautiful one! This is a Distinktive** stamp set; it has a special texture that gives added depth and dimension in a single step, creating photo-realistic images. **Patent pending. In other words, the stamp does all the work and will stamp surprisingly beautiful! If you look at it after inking it, it will look like you missed some areas. You can stamp on scrap paper just to make sure and then reink it for your card or project. Some areas will be darker, some lighter, and some blank. It’s a surprise when you stamp it and see how pretty the image is!
For this card, I stamped several Flowing Flowers but ended up using just three of them. One is Highland Heather, one is Melon Mambo, and one is Mango Melody. I stamped them and then cut them out with Paper Snips. If I had known for sure how the card would come together, I could have stamped the two flowers on the ends straight onto the card front and then added the separate middle flower. But I didn’t know that at first! The flowers may look complicated to cut out but you don’t need to cut right on the lines and in some spaces, there aren’t any lines so just cut it out free and easy! I usually like to leave a tiny margin of white around the stamped image anyway so you don’t have to be precise.
The middle flower is popped up with Stampin’ Dimensionals and the other two adhered right on to the cardstock. There are no leaf stamps in the stamp set, so I just used the Sprig Punch to quickly punch out a bunch of leafy sprigs. I used three different green cardstock – Granny Apple Green, Pear Pizzazz, and Soft Sea Foam. I just tried to scatter them around tucking them underneath the flower edges.
There wasn’t much room for a greeting, but I stamped the “Happy Birthday” on Basic White and die cut it with one of the Tailor Made Tags. It seemed to fit best tucked in the upper right corner, just barely tucked under the Melon Mambo flower. It also has a piece of the Petal Pink 1/8″ Cotton Ribbon Combo Pack.
Check out the Flowing Flowers Stamp Set. There are no dies, so you can just buy the stamp set and not worry about spending extra money on the dies! With that Distinktive style, you will stamp beautiful flowers on your cards and projects. Here is another card I made recently with the other major flower stamp in the set.
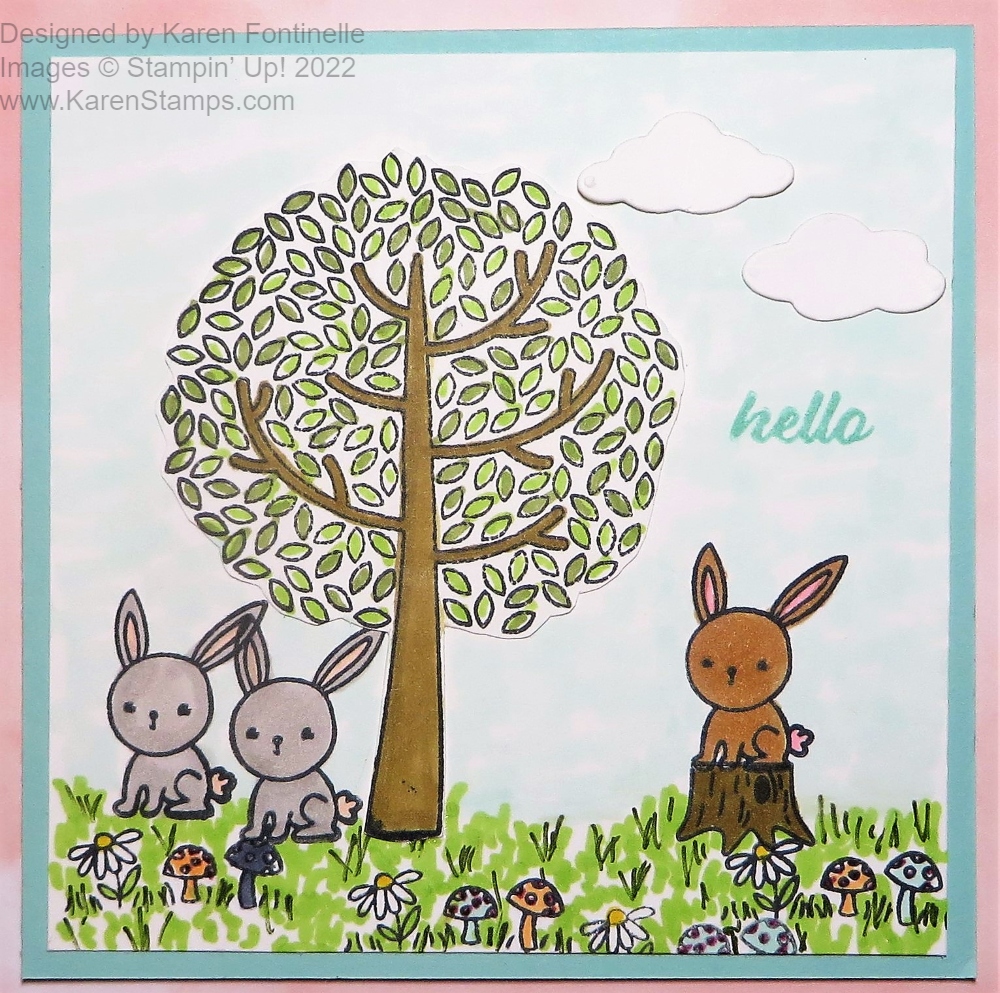
I’ve been wanting to play with this new stamp set in the Spring Mini for a while now and finally, I got my chance to make this Friends of the Forest Bunnies Hello Card! I didn’t “plan” it very well, actually, in making it. I stamped the tree knowing I would cut it out, but I stamped the bunnies directly on the card front hoping it would all work out in the end! That’s the fun of it sometimes!
The card base is Pool Party, one of my favorite colors. I thought a square card would suit the little scene I planned to make so the card base is 4 1/4″ x 4 1/4″. The Basic White cardstock layer is 4″ x 4″. All this card takes is some stamping and some coloring and it’s not that complicated even though it may look tedious! It’s all in what you enjoy!
The stamps are in the Friends of the Forest Stamp Set in the January-June 2022 Spring Mini Catalog on page 19. It’s not a stamp set with a lot of fanfare except for the Deer Punch coordinating with the deer stamp. No dies, no matching designer paper, but maybe that’s why the set appealed to me besides the cute forest animals! Just simple stamping.
I stamped the tree with Memento Ink on Basic White and colored it in with Stampin’ Blends. The trunk and branches are colored with Light and Dark Soft Suede and the leaves with Light and Dark Granny Apple Green plus a bit of Light Mossy Meadow. You might think “Oh, I can’t color all those leaves!” but I just dabbed each one with some green, scattered around so there would be the different shades of green in the leaves. Don’t worry about perfection or staying in the lines. Just hit each one with a bit of green! I cut out the tree with Paper Snips, again not being perfect with the leaves, just wiggling my scissors around the edge going in and out the tiniest bit.
The bunnies would be fun to cut out but I just took a chance and stamped them on the card where I thought I wanted them to be. Two are colored with a Light and Dark Gray Granite and the other one with one of the new Natural Tones Blends, #500 plus a little shading with Light Soft Suede. The insides of the ears are pink. The tree stump is Dark Soft Suede. I also stamped the grass, flowers, and mushroom stamp several times and colored those in. But I needed more grass so I just drew in little sprigs of grass with two shades of the Granny Apple Green and then the Dark Mossy Meadow Blend. They are just little lines and squiggles, no big deal.
I couldn’t leave the background just white, so I just squiggled in sky with the Light Pool Party Stampin’ Blend. It’s fine if some white shows because that’s how skies look. Just squiggle in the color with the side of the marker here and there and don’t worry about it. You can fill in more if you want and it will dry lighter.
Since I didn’t have much space, I stamped the “hello” greeting directly on the front of the card. This word is in the Hello Ladybug Stamp Set. Had I messed it up, I would have stamped it on a small die-cut or rectangle and placed that over the boo-boo! There is always a way to fix your stamping! As I was getting ready to photograph my card, I noticed two little die-cut clouds from the Brilliant Rainbow Dies so I adhered those in the sky.
My Friends of the Forest Bunnies Hello Card is just a fun little springtime card that I could also use for Easter. Go take a look at this stamp set if you’ve missed it in the Spring Mini and see if you “need it” in your “collection”!
Time is getting short! The deadline for signing up for Paper Pumpkin is Thursday, March 10th! It’s easy to sign up and there is no risk or obligation. Try it out and see how you like it! Or if you get busy, just skip a month. And if you have a subscription and HAVE skipped a month, be sure you reactivate your subscription if you want to get this Beyond the Horizon Paper Pumpkin Kit! If you bought a prepaid subscription, or do buy one, be sure to set up your account by March 10th.
“From the hands and hearts of our in-house artisans to you—our fellow crafters and creators—comes this month’s breathtaking kit. The Beyond the Horizon Paper Pumpkin Kit includes watercolor prints and designs inspired by the beautiful nature around us to create nine cards and coordinating envelopes. And paper pieces that perfectly coordinate with the New Horizons Suite Collection in the January–June 2022 Mini Catalog.
Don’t forget the FREE stamp set inside (yes—that’s two stamp sets in one kit!) as our way of saying THANK YOU to all of our wonderful Paper Pumpkin subscribers.
With all these marvelous materials and more, we can’t wait to see how you take this kit far beyond the horizon!”
ABOUT THIS MONTH’S KIT
Name: Beyond the Horizon
Details:
This month’s kit contains enough elements to create 9 cards—3 each of 3 designs—and 9 coordinating envelopes. This all-inclusive kit includes printed card bases, die-cut paper pieces, embellishments, adhesive, and more!
The Beyond the Horizon Paper Pumpkin Kit includes a Misty Moonlight Classic Stampin’ Spot!
This kit’s stamp set is perfect for any occasion. With sentiments that say “thanks”, “hello”, “thinking of you,” and so many more, you’ll be able to use this stamp set year round.
And if you thought one stamp set was great just wait—this month’s kit comes with a BONUS stamp set for FREE! That’s two stamp sets in one kit! It’s our way of saying THANK YOU to you our Paper Pumpkin subscribers.
The deadline is March 10th but do it today so you don’t forget! This is my personal link so you don’t have to look up my name. If you have a Demonstrator you already work with, please ask them for their link.
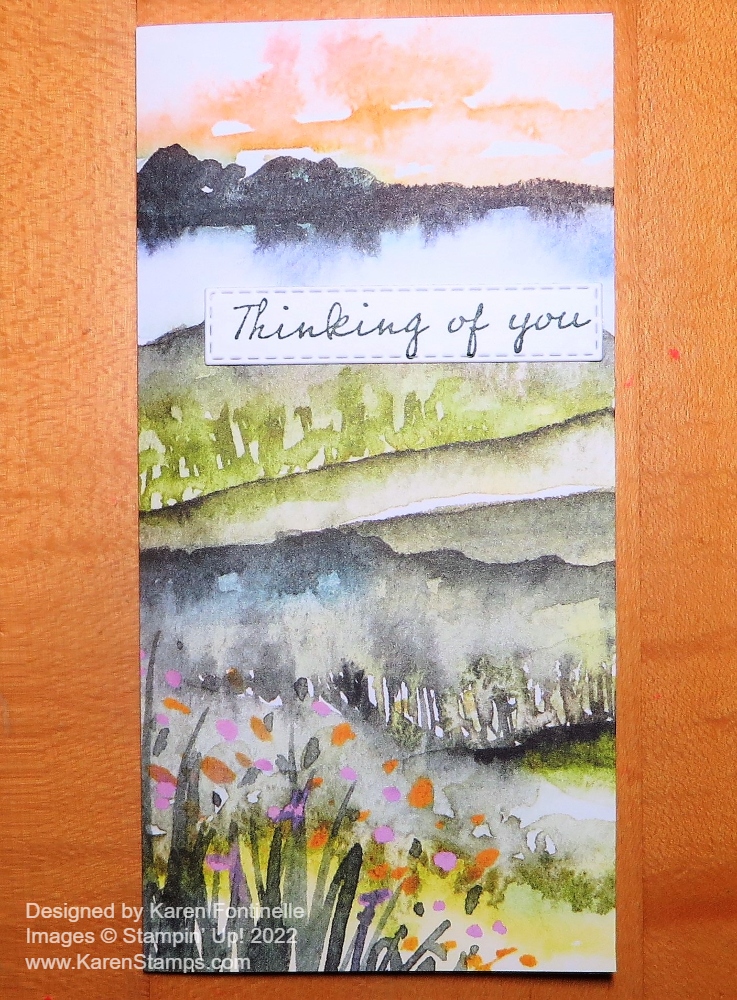
This designer paper is a star on its own and I have to say this card, New Horizons Slimline Thinking of You Card, was probably the simplest, yet beautiful card I have ever made! This particular sheet of paper may be the prettiest in the package although you could argue that for almost any sheet. This card came about because looking at this particular 6″ x 6″ paper I hated to cut it smaller to make a regular card so I got the idea to make a slimline card, with no margins, so I could just cut the square paper in half and keep the pretty design of the paper intact.
I used the Basic White Thick Cardstock to make the base for this card since it is a little heavier. The designer paper is the New Horizons 6″ x 6″ Designer Series Paper in the New Horizons Suite Collection in the Spring Mini Catalog on pages 42-43. You might even overlook this Suite if the paper patterns don’t appeal to you at first glance but they are WOW papers! The card base is cut at 6″ x 6″ and scored at 3″ to make the slimline card. Rather than have a little white margin around the designer paper, I didn’t want to waste even a fraction of an inch of the designer paper so I cut it at 3″ x 6″ to adhere directly on the full card front. It’s best to use the Multipurpose Liquid Glue to give yourself some “wiggle room” before it dries to get the designer paper perfectly aligned on the card base.
I chose the “Thinking of You” greeting in the On the Horizon Stamp Set. I almost stamped it directly on the designer paper on the card in a lighter space but I decided it might not show up as well so I stamped it on a strip of Basic White in Evening Evergreen ink. It was then die cut with the small, narrow Stitched Rectangle die. The photo you see at the top of this blog post is the plain, unembellished card. I felt that it didn’t really need anything else. It took just a couple minutes to make, I loved it and felt it was a beautiful card yet so simple and quick to make.
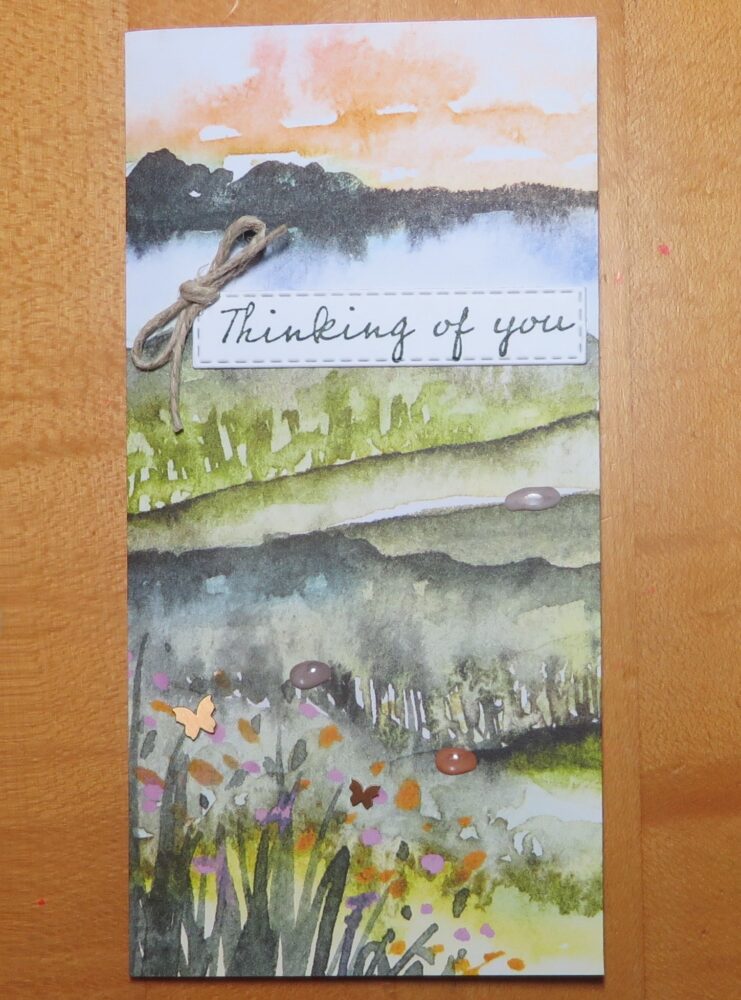
But then I thought, this card could be “stepped up” a little bit if people wanted to do that. It’s hard to resist not adding some embellishments to any card we make because we have so many supplies and ideas! I just added a few things to my original card, barely perceptible actually in all the design of the paper. But they are there to enjoy and I think it works.
Here is my stepped-up card with a few embellishments. You can see the very small bow on the greeting tied with some Linen Thread (or maybe it is some thicker twine). It is adhered with a Mini Glue Dot.
Next, I added the amazing Pebbles Enamel Shapes. These are to die for! If you look closely you can see a light gray one just at the bottom edge of the light green, a darker gray just above the flowers, and a Cinnamon Cider colored one above the flowers a little to the right.
I also thought a couple of Brushed Brass Butterflies should be flying around the flowers. These are great embellishments because they are lightweight and flat, perfect for mailing! You can see a larger one above the flowers on the left and a smaller one about in the middle.
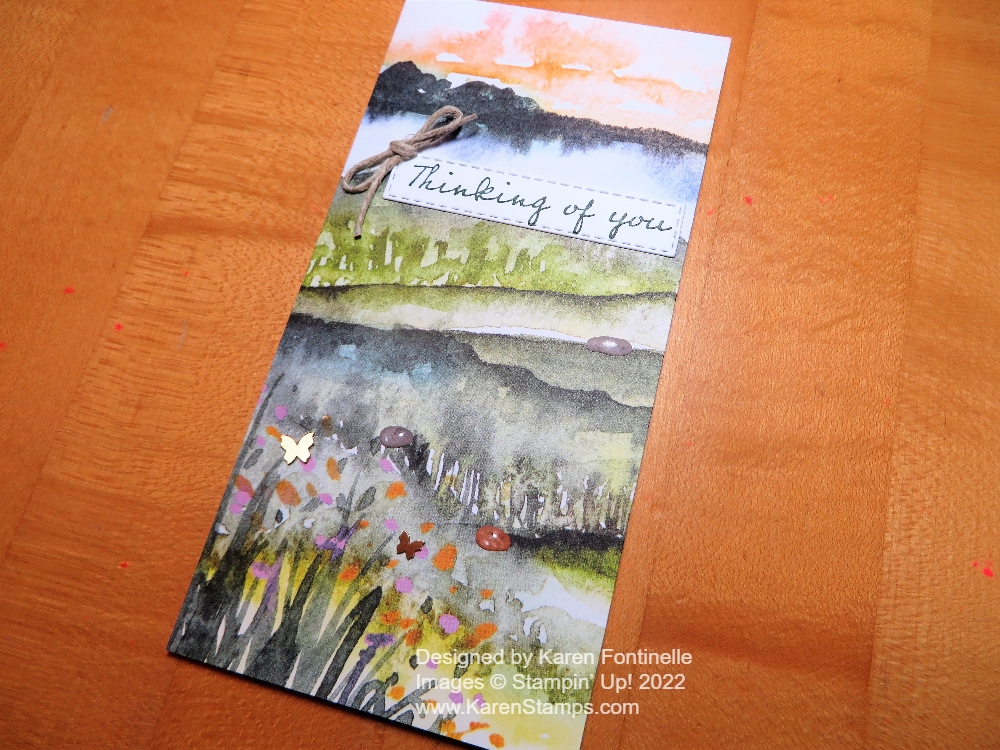
Even though the original card is perfectly fine as is, if you want to add embellishments you can without taking away from the beautiful New Horizons Designer Series Paper. The pebbles and butterflies are very subtle embellishments if you want to use those. As I write this, this designer paper is “Low Inventory” so if you want some, I would hurry and order it! If you already own it, I would hurry and get it out and make some cards like this New Horizons Slimline Thinking of You Card.
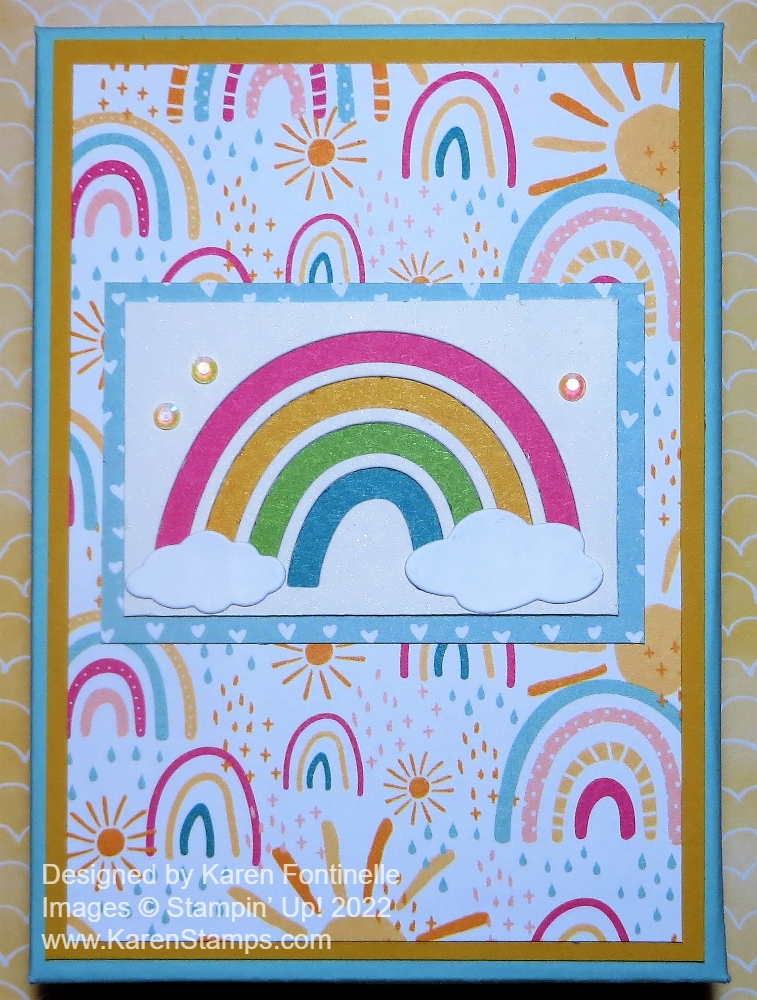
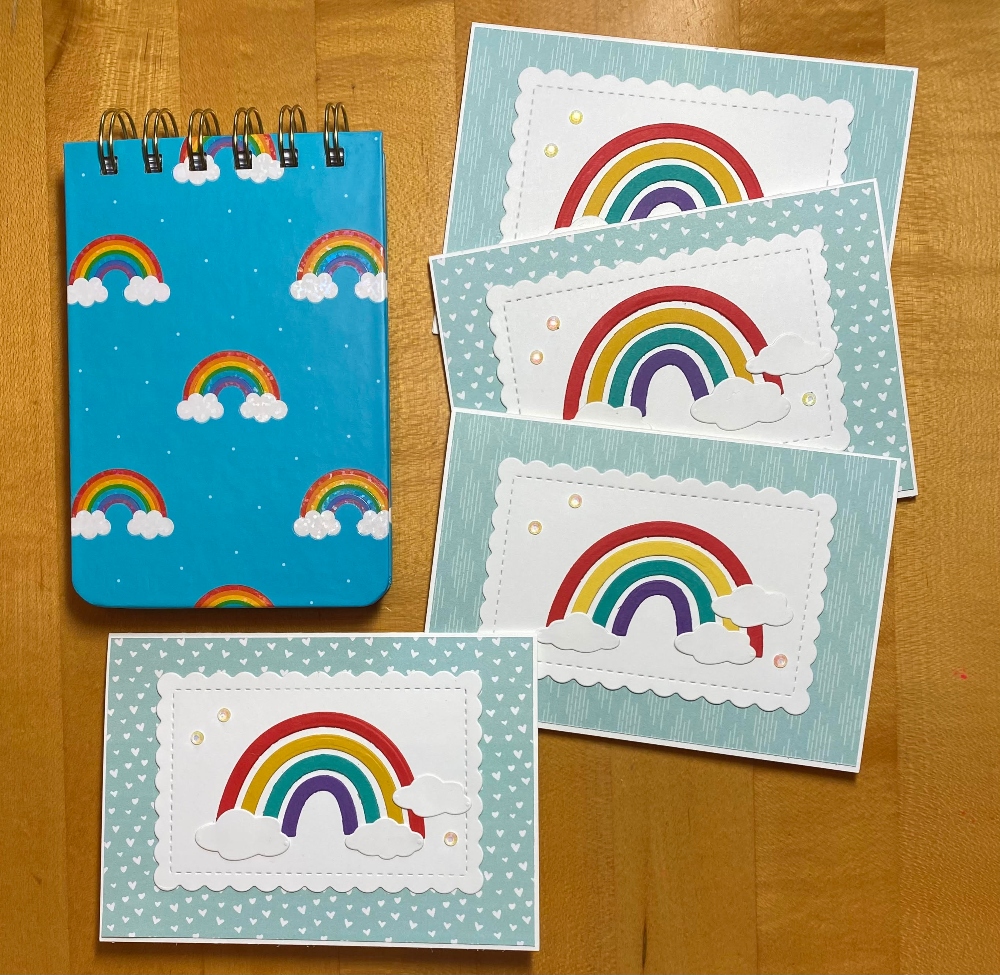
Recently I needed a birthday gift for someone, and after finding a little notebook at the bookstore that nearly matched our Sale-A-Bration Sunshine & Rainbows 6″ x 6″ Designer Series Paper, I got an idea! I bought the notebook and then made four note cards to match! Next, I needed some kind of box or bag to put the note cards and envelopes in so the photo above is the top of the gift box I made.
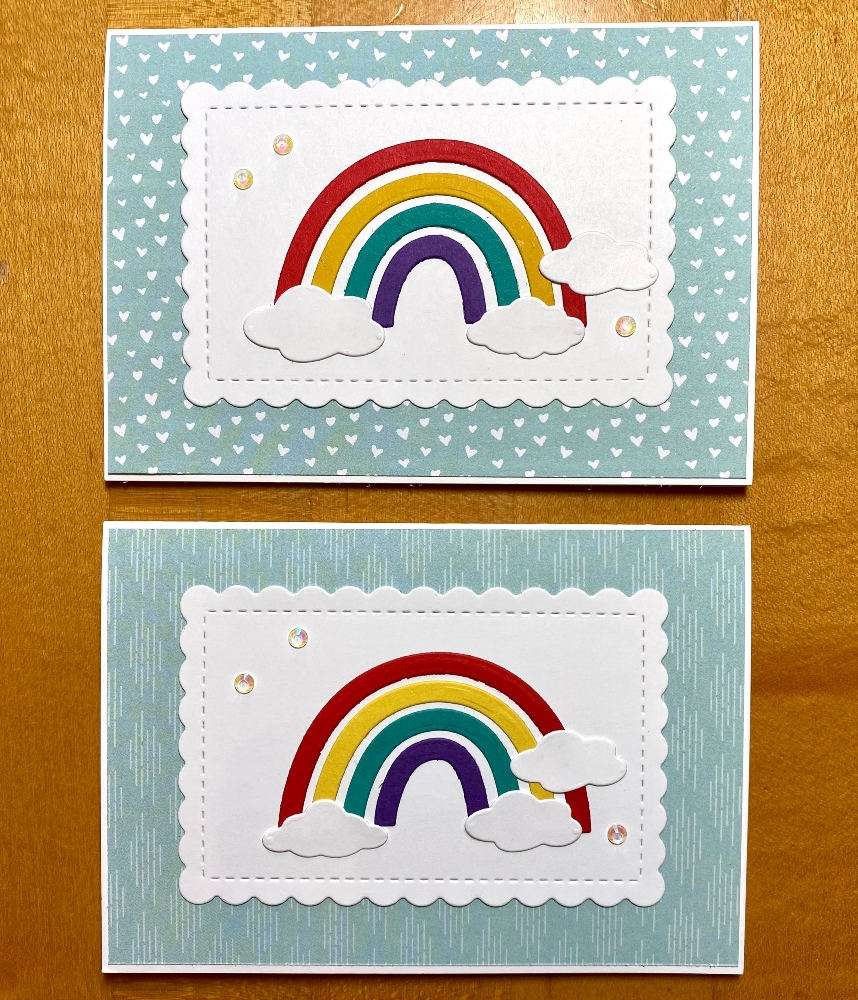
To make these cards I just used the Note Cards & Envelopes which made it so easy! You should really keep a package or two of these on hand! I have used them many times. The designer paper on the note cards are two different patterns in the Sunshine & Rainbows Designer Paper that was available during Sale-A-Bration which just ended. Perhaps you already have some from Sale-A-Bration. I die cut the rainbow pieces with the Brilliant Rainbow Dies. You can use whatever colors of cardstock or designer paper that you like. I used Poppy Parade, Crushed Curry, Bermuda Bay, and Gorgeous Grape. I was trying to copy the colors in the rainbows on the notebook as best I could. I also die cut the little clouds with the dies. I adhered the rainbows to a scalloped rectangle die cut, one of the Scalloped Contours Dies. I also added some Iridescent Rhinestone Basic Jewels to each note card.
After I had the note cards made, I wanted a cute bag or box to put the note cards and envelopes in. There are lots of box ideas out there online and once you know the basic principles you can vary the size box and lid that you need to make. I found one from the Paper Pixie that was specifically made for note cards so I used those measurements and then, of course, decorated the box lid to match my cards.
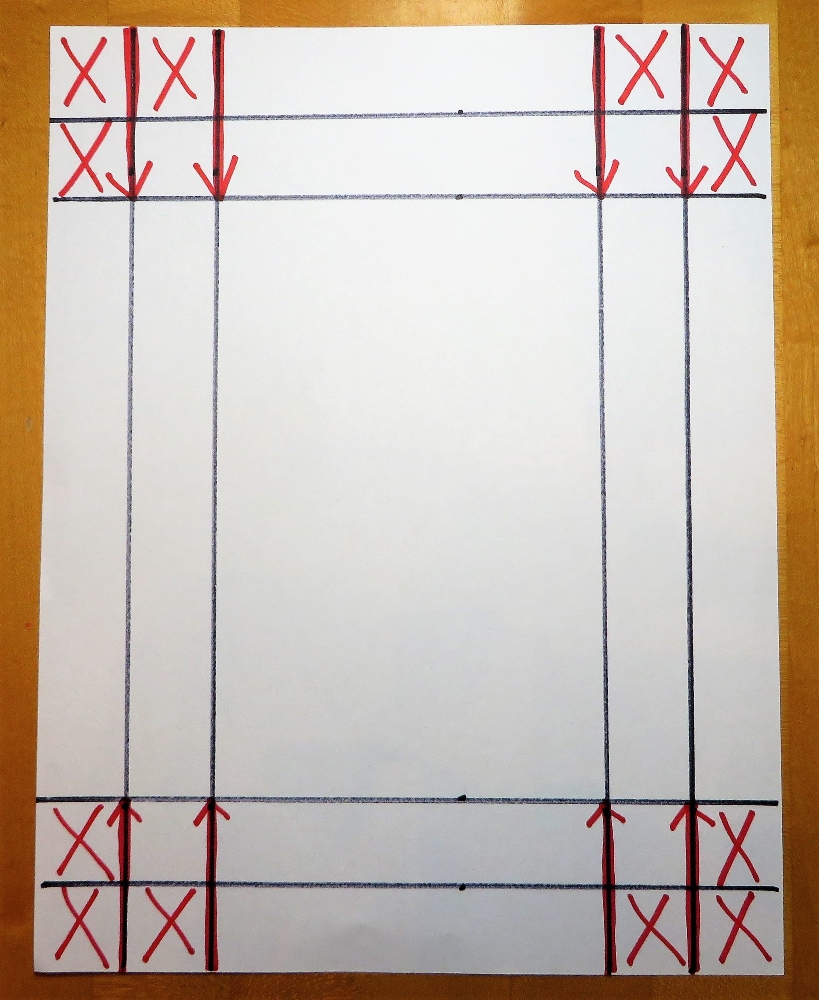
Here is the diagram, basically the same idea for the box bottom and the lid. Each has different measurements but you score and cut the same way on each. I tried making a more professional sketch on the computer but it was a mess and this was easier to just draw it!!
The box bottom starts with a piece of cardstock that is 7 3/4″ x 9 1/4″. Score at 1″ and 2″ on all four sides.
The box lid measures 6 3/8″ x 7 7/8″ but just a “smidge” less on each measurement, just a sliver! Score at 5/8″ and 1 1/4″ on all sides.
Crease and fold all score lines on the box and the lid. Use a Bone Folder if you have one to get a good crease. Then open the folded cardstock back up and following the diagram above, cut from the bottom up to the scoreline on each red line with the arrow. Turn the paper and do the same to the other end. Then cut off the squares where the X’s are. After that, you can see how the sides and tabs will fold in and form the box and the lid.
It’s probably best to use Tear & Tape to adhere the box and lid, but Multipurpose Liquid Glue works, too. Or use Stampin’ Seal+ to hold everything together. Apply the Tear & Tape to the outside edge of all the sides. You can use a bit of Multipurpose Liquid Glue on each tab to hold those in place first.
Before you assemble the box lid, you might want to decorate it first, but you could assemble it first, too. For my lid, I used a layer of Crushed Curry Cardstock under a layer of the Rainbow & Sunshine DSP. Then I die cut the rainbow with Basic White and fit it over one of the big rainbow patterns in the package. Just cut out a full rainbow carefully, they are placed closely together! Just cut a rectangle shape of the rainbow, don’t cut out the actual rainbow. Place the die-cut white piece over the DSP rainbow and adhere carefully. I also layered this on a piece of the DSP that matched one of the cards. To embellish I die cut a couple of white clouds and added some Iridescent Rhinestones.
Making a box is easier than writing about it so just give it a try! It’s handy to know how to make a box out of cardstock in case you need one for a gift or storage.
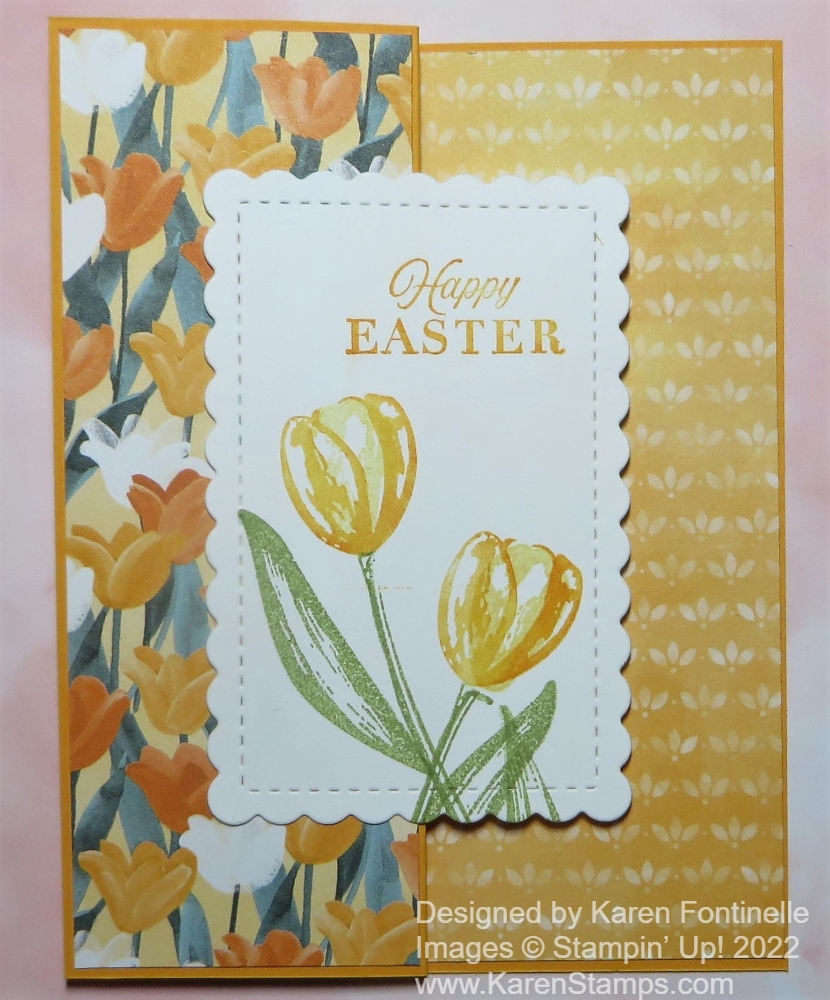
The Flowering Fields Designer Series Paper has so many pretty sheets in it! It’s pretty difficult to choose which one to work with! This day, this page with the yellowish tulips is the one that spoke to me! This is just a simple Flowering Fields Z-Fold Easter Card with the designer paper and a little stamping making a bright card for spring.
The card base is Mango Melody, one of the coordinating colors in the designer paper. To make the Z-Fold, just score the front of the card in half, at 2 1/8″ and fold back on itself. It’s really easy and the recipient will think you made an extra-special card! The tulip designer paper on the front panel is cut at 5 3/8″ x 2″. The opposite side of the tulip paper is the one I adhered inside the card. It is cut at 4 1/8″ x 5 3/8″. You could also use the normal layer sizes of 1/4″ margins instead of 1/8″.
On Basic White cardstock I stamped a couple of tulips with the Flowering Tulips Stamp Set. This was two-step stamping using So Saffron and Mango Melody inks for the flowers and Pear Pizzazz for the stems and leaves. After stamping on the Basic White, it was die cut with one of the Scalloped Contours Dies to make this scalloped rectangle. I situated the die so that the flowers would be down lower on the die cut to leave room for a greeting. I found the “”Happy Easter” greeting in the Celebrating You Stamp Set in the Spring Mini Catalog. It is stamped in Mango Melody ink. This piece was then adhered to the front of the card, right on the fold. Be sure to only put adhesive on half of the piece and the other side shouldn’t have any adhesive on it so it doesn’t stick to the inside of the card.
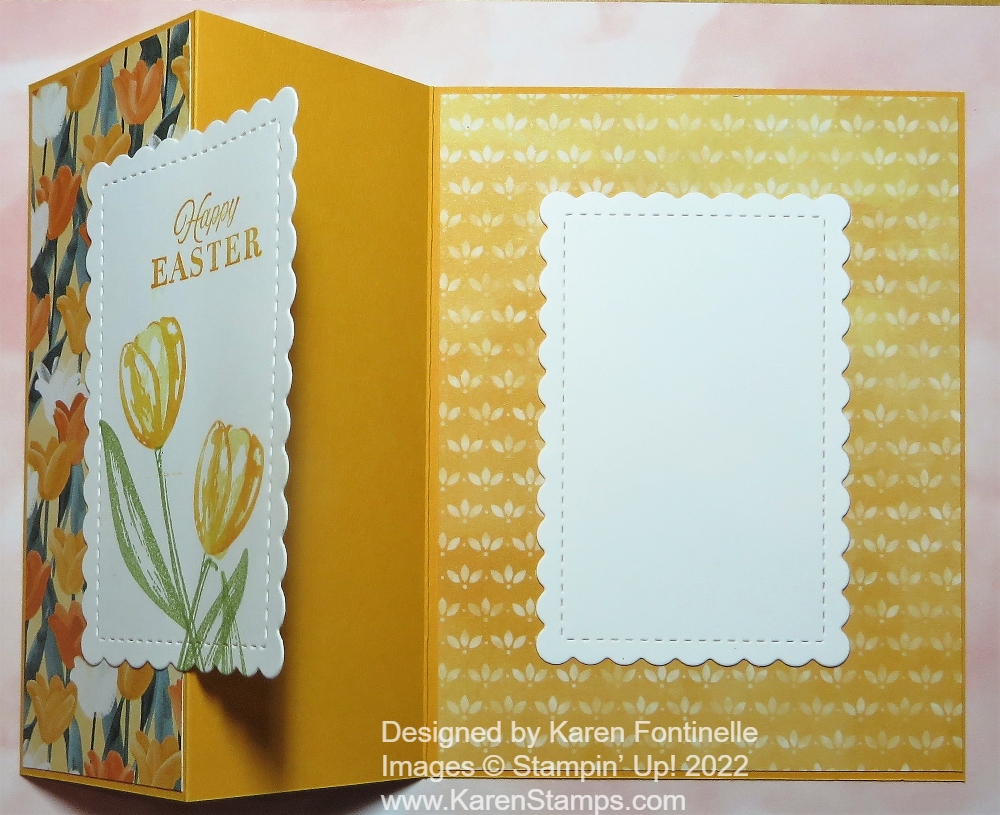
For the inside of the card, I die cut another Basic White piece the exact size of the scalloped rectangle on the front of the card. I made sure that it was perfectly placed behind the front piece so that it wouldn’t show underneath from the front. To do this I put adhesive on the back of the scalloped rectangle and then held it perfectly behind and against the front rectangle. Then I folded the back of the card over so that the rectangle would then adhere to the inside of the card. It worked! You’ll understand when you actually do it. Now a message can be stamped on the inside of the card or a note written and it won’t be sticking out from the front of the card!
I always say these Z-Fold cards look like something really special but they are easy to make! No one has to know! I hope you will feel inspired with this Flowering Fields Z-Fold Easter Card and make your own, even with different paper and theme! Try it!
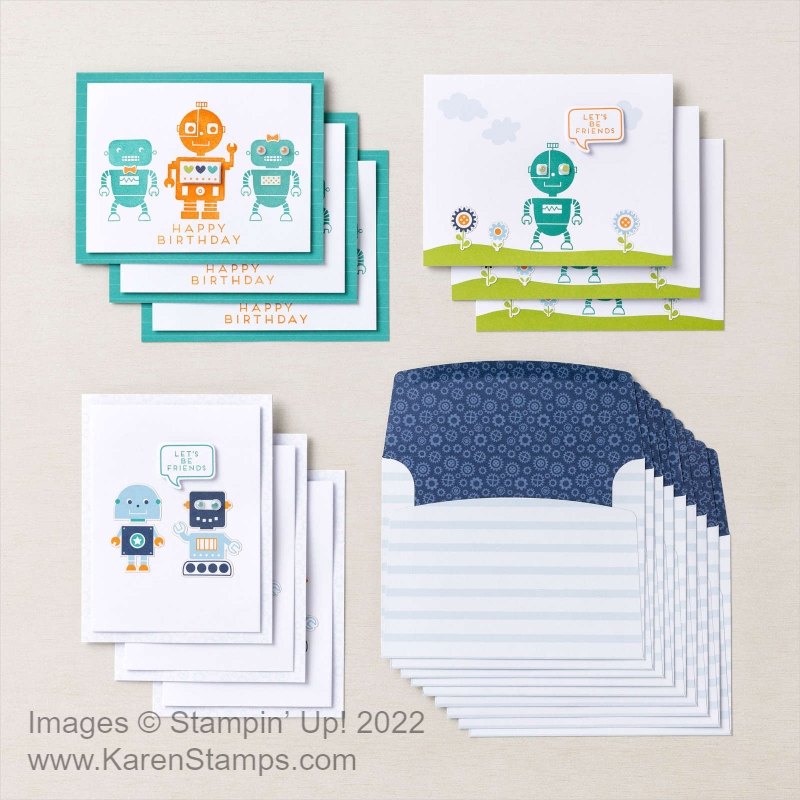
There’s a new Kit in the Stampin’ Up! Kits Collection! It’s called the Robot Buddies Kit and looks like a fun one to me! With the Robot Buddies Kit, configure cards featuring cute robots and robot-themed images that kids will love. Combine your bandwidth to craft this kit together for some offline fun with these awesome, friendship-themed robots! But I think anyone of any age can enjoy these cute robots so go ahead and get it for yourself!
DETAILS
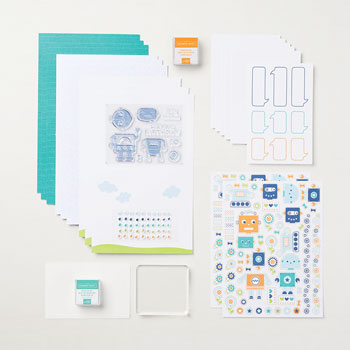
Kit includes 9 card bases—3 each in 3 designs—and 9 envelopes
Includes sticker sheets and printed die-cuts to decorate with
Includes two Classic Stampin’ Ink Spots in Bermuda Bay and Pumpkin Pie
Finished card size: 5-1/2″ x 4-1/4″ (14 x 10.8 cm)
Coordinating colors: Balmy Blue, Bermuda Bay, Granny Apple Green, Night of Navy, Pumpkin Pie
Watch this video with Sara Douglass showing you how the kit goes together! Of course, you can play and change it up however you like! So many creative possibilities with these little robots!
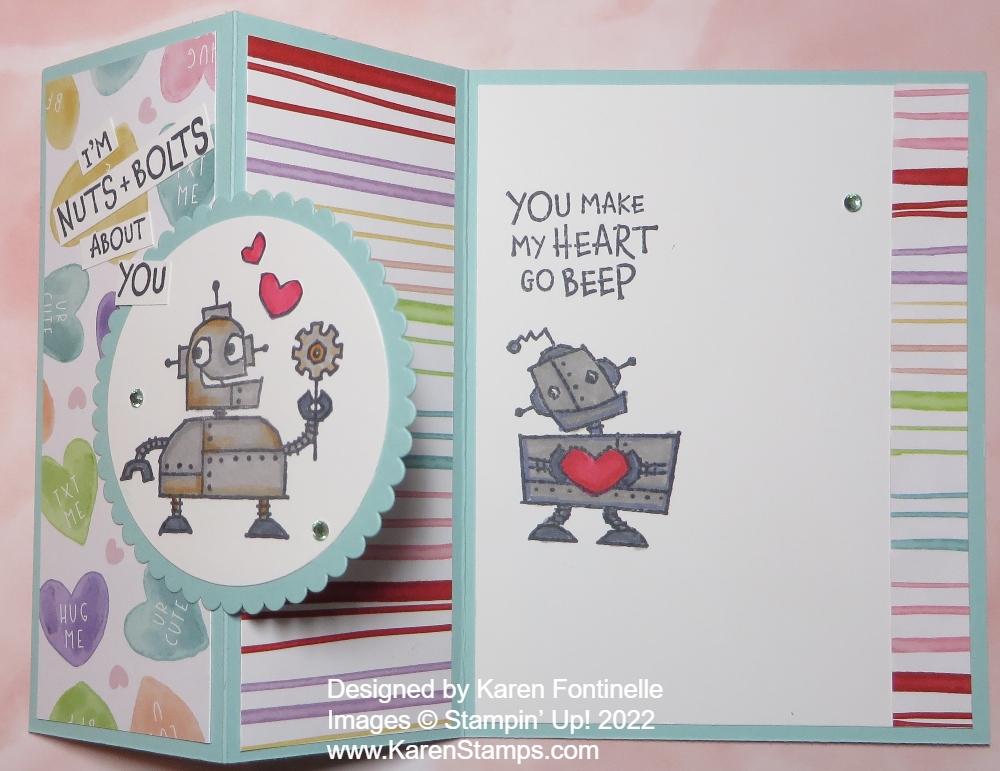
If you enjoyed or even thought about the Nuts & Bolts Stamp Set in the Spring Mini Catalog the Robot Buddies Kit will be another fun addition to your stamp collection! I found that stamp set to be really fun to use on cards, mostly on valentines at the time but could be used for birthdays or other fun cards for kids or adults! Click on the photos below to see my card ideas using those robots and you might see the possibilities for this Robot Buddies Kit!
I didn’t think I was “into” robots, but I had a lot of fun making these and other valentines in February so I am convinced the Robot Buddies Kit will be a fun one for you!
This Blessings of Home Watercolored Flowers Card card was intended to be a Fresh Freesia monochromatic card but took the step of coloring in the large flower with Fresh Freesia and then it was down the rabbit hole! I could have started over because it wasn’t turning out how I intended but I just kept going. I don’t know if that was a mistake or not!
Once I colored in the one flower even though it was purple it just didn’t seem right. So I thought I would color in the other flowers and leaves lightly. But that didn’t look good. Luckily, the paper held up well to my coloring/watercoloring so that was good.
I stamped the flower bouquet in the Blessings of Home Stamp Set with Fresh Freesia ink and then die cut it with one of the Scalloped Contours Dies. To color in the bouquet, I used the Water Painter and picked up ink from the ink refills in the lid of the ink pads I used. Some of the colors I used were Polished Pink, Pool Party, Flirty Flamingo, Mango Melody, Soft Succulent, Daffodil Delight, Soft Suede, and Granny Apple Green.
I realized the reason these flowers and leaves don’t look quite right is that the image is stamped in Fresh Freesia and not in Memento Black ink. With black ink, you see the outlines and the little texture lines in the images even though you color over them. Stamping in a light color of ink makes it look entirely different.
The card base is Fresh Freesia with a layer of the Heart & Home Designer Series Paper in a Fresh Freesia color. I just adhered the floral die cut flat on the card but you could pop it up. The greeting is in the Blessings of Home Stamp Set. However, I didn’t want to use the entire stamped greeting so I covered up the bottom line with a sticky note and inked up just the “Thank You”. Then I removed the sticky note and stamped it on a strip of Basic White. I layered that on a piece of Fresh Freesia and popped up the greeting with Dimensionals.
For embellishing, I tied a bow with the Fresh Freesia 3/8″ Open Weave Ribbon but I thought of putting it on an angle on the corner of the bouquet. Then….you guessed it…I added several Iridescent Rhinestone Basic Jewels on the ends of the greeting and here and there on the flowers!
Here is another card I stamped with the same Blessings of Home Stamp Set and colored with Stampin’ Blends Markers and had stamped in Memento Black ink so it has a whole different look.
All in all, the card has a little different look and it wasn’t what I envisioned when I began! But there are no mistakes in stamping, so I think it turned out okay and I like it fine!
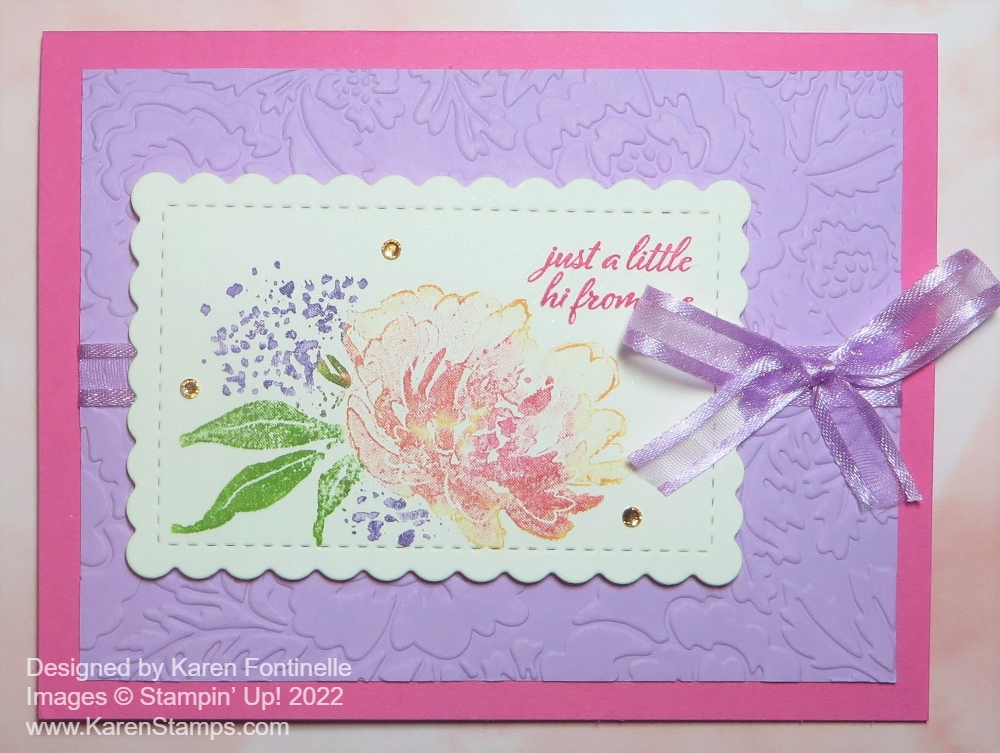
One of the stamp sets I ordered a while back from the Spring Mini Catalog was the Flowing Flowers Stamp Set. Here is the first card I finally got around to making with it, the Flowing Flowers Just a Little Hi Card! I thought the flowers were pretty and I liked the sentiments. This is one of the Stampin’ Up! Distinktive stamp sets that have a lot of texture right in the stamp. One of these stamps really does a lot of work for you! There is a single larger flower but I kind of liked this smaller flower with leaves.
One of my favorite papers, besides Real Red, is the Shimmery White cardstock. I thought its slight glimmer might be just right with this softer flower. This paper is great for stamping, of course, and also watercoloring since it can handle the moisture a bit better than Basic White.
To stamp this flower, I used my Stampin’ Write Markers (sometimes they feel neglected because I use the Stampin’ Blends markers so often!). I colored on the flower with Mango Melody, then Melon Mambo over most but not the top edges. The little dots are Gorgeous Grape and the leaves Granny Apple Green. Don’t forget to “huff” on your stamp – that means breathe on it – to remoisten the ink since it takes a bit of time to color on all parts of the stamp with different colors. I like the way the two colors on the flower blended and still show both.
This stamped flower is die-cut with the third-largest scalloped rectangle die in the Scalloped Contours Dies. I love this die with the scalloped edges and stitched look. Before adhering to the card, I stamped the greeting right in the corner of that die-cut piece. I used one of the many greetings in the Special Moments Stamp Set which is a Sale-A-Bration stamp set that you can earn FREE with a $100 purchase TODAY ONLY! TODAY is the last day of Sale-A-Bration. This is a great stamp set with all kinds of sentiments. I almost overlooked it, actually, in the Sale-A-Bration Brochure. I’m glad I was able to get it. The greeting is stamped in Melon Mambo ink.
The card base is Polished Pink, one of the 2021-23 In Colors. It needed a layer so I chose a piece of Fresh Freesia cardstock and cut it a little smaller to show off more of the Polished Pink. I embossed it with the Pretty Flowers Embossing Folder. Since I wanted to add some Fresh Freesia 3/8″ Open Weave Ribbon, I moved the stamped piece over to the left side a little bit so there was room for a bow on the right side. For a finishing touch, I placed three Champagne Rhinestone Basic Jewelsaround the flower for a little sparkle!
Today is your last chance to earn FREE products during Sale-A-Bration! Be sure you check your Wish List and see what else you want or need. Speaking of need, you can stock up on adhesives, cardstock, ink refills …. all those basics that we need to keep in stock. Get them while you can earn more free products!
Also, remember that during Sale-A-Bration you canJOIN Stampin’ Up! as a Demonstrator,and besides getting a good deal on the Starter Kit (choose $125 worth of products and pay only $99!), you also get to choose two FREE stamp sets!
This is the last day of February and the last day of Sale-A-Bration! Don’t miss it!
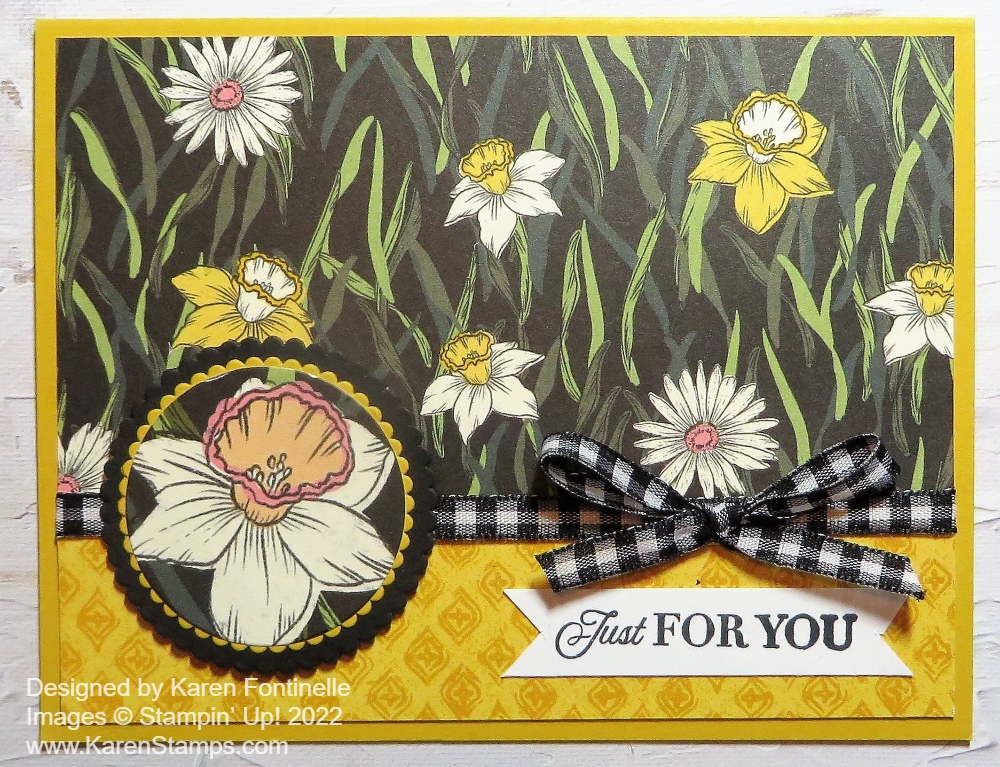
This is the last weekend for Stampin’ Up! Sale-A-Bration and I ended up using the Daffodil Afternoon Designer Series Paper once again! I had seen another card on Instagram I liked and after I copied that one, a piece of the designer paper peeking out of the papers on the table just called to me to make another card!
This Daffodil Afternoon Designer Series Paper is only available during Sale-A-Bration until February 28. With a $50 purchase, you can choose this paper from the Sale-A-Bration Brochure. This paper is designed with smaller flowers like you see on the pattern I used, plus larger images of daffodils like the one I added to the card.
The card base is Crushed Curry Cardstock. Daffodil Delight is another coordinating color so you have your choice of yellows. For the card layer, I chose this pattern of smaller flowers and then used the opposite side of that paper for the bottom portion for a little contrast. That strip is 5 1/4″ x 1 1/4″. I wrapped around a piece of the 1/4″ Black & White Gingham Ribbon. Even though the papers are busy, this thin ribbon still stands out even not being a solid color. I tied a bow separately and glued it to the card with Mini Glue Dots.
Being influenced by the card I made before this one, I decided to die cut a scalloped circle and another die cut circle showcasing one of the larger daffodils from one of the other papers. I ended up making a layer under the daffodil of a Crushed Curry scalloped circle. Since I had an extra larger Basic Black scalloped circle I added that underneath the Crushed Curry which helped it all stand out a little more against the floral background and popped it up with Stampin’ Dimensionals.
The greeting is stamped from the Celebrating You Stamp Set, a stamp set with all sorts of greetings and sentiments. It’s in the Spring Mini Catalog on page 65 so don’t overlook it! We always need more words for our cards!
This is a simple, basic card design but always looks good when you make it! In this case, the pretty paper on my Daffodil Afternoon Just For You Card is doing all the work! Remember, Sale-A-Bration ends on Monday, February 28th so get your free stuff with every $50 purchase while you can!
I’d like to invite you to join my Stamping With Karen Mailing List to keep up with news from Stampin’ Up! and to be inspired with new stamping projects, tips, techniques, and more from me! There is always something new with Stampin’ Up! from products to catalogs and early releases of new products and I know you’ll want to know all about it.
I send out a newsletter every Tuesday with at least one free project idea plus the latest Stampin’ Up! news and updates. Stampin’ Up! usually posts updates to Demonstrators every Tuesday morning so a newsletter on Tuesday from me has the news “hot off the press”!
Stampin’ Up! puts out an Annual Catalog once a year (coming SOON in May!), plus two “Mini” catalogs a year {that aren’t so “mini”) plus the big promotion called Sale-A-Bration. Right now that is coming to an end but there are a couple of early releases of new products available to tide us over until new catalog time in May! These catalogs give you lots of products you will be excited about, want to learn about, and want to see all the ideas for cards and projects possible! Get on my Mailing LIst to keep up with these exciting events and know what to expect.
Keep up with news about the new Paper Pumpkin Kit every month and subscribe if you want to join in the fun of having a project already planned and prepped for you in the cute Paper Pumpkin box! Always sign up or skip a month if you want by the 10th of any month.
As a special gift to my Mailing List subscribers, every year before the holidays I send out my “12 Weeks of Christmas” newsletters, with one new holiday project each week leading up to Christmas. These are ONLY for my subscribers and you won’t find them on my blog or anywhere else
If you are on my blog, you will see a red sign-up box in the top right corner where you can simply put your name (or first name) and best email. If you are on your phone, you probably need to scroll way down to get to the sidebar things. OR you can go to my sign-up page HERE.
When you do sign up, you will receive an email with a link to a free gift from me!
I hope you will enjoy the card and project ideas I send out in my weekly newsletter. Even if you never make the project, maybe just seeing ideas will do your crafty heart good! I know it does mine! I’m all about the ideas!!
Let’s stay connected and in touch with each other over our favorite thing to talk about…..stamping with Stampin’ Up!