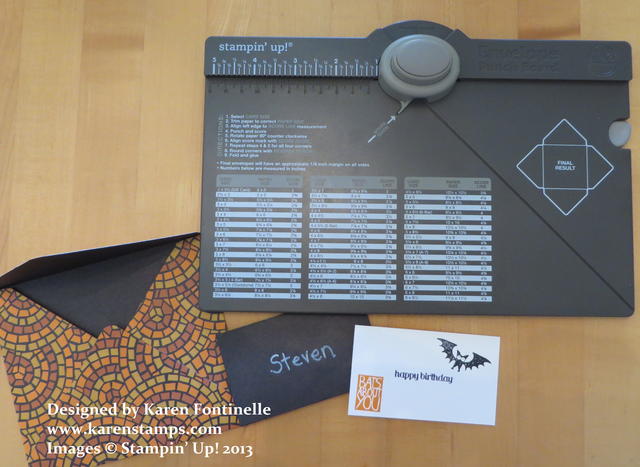
Stampin’ Up! has introduced the Envelope Punch Board to customers and it’s a must have! You can make your own envelopes to fit your custom cards, up to 66 different sizes!
I tried mine out with some retired Halloween designer series paper. I’m probably the only person who couldn’t follow the directions correctly so I was glad I wasn’t using my new paper! The chart they printed on the front of the board shows the size of paper you need to cut for the size card you have made and the measurement of where you start with scoring your paper. My mistake was I continued to put the paper at that measurement on all four sides, which was wrong! You just do it the first time and after that you line your paper up with the line that juts out from the bottom left of that top punch button. It’s very easy. Line up your paper in the right place and punch that button. It will make the shape you see on the right of the punch board. Then just fold on the score lines and you have an envelope!
You may need to trim the point of the top or bottom flap. If you like it rounded, there is a built-in rounder in the top part of that punch button on the board. Or you can trim it with your scissors or fold it over….whatever works for your size envelope.
The first envelope I made is for a regular size card. The second one is the smallest one you can make. I used the same paper but put the black color on the outside. That envelope actually fits a gift card, but since I have a son with a birthday the day before Halloween, I made a little greeting card to put inside! I used the new stamp set Halloween Hello in the Holiday Catalog for the images on the card plus the birthday greeting from Itty Bitty Banners.
You may have overlooked it in the Holiday Catalog, but there is a White Stampin’ Chalk Marker that is so fun to use on dark or black paper! You can see I used to write my son’s name on the envelope since it would show up so well on the black! I spent hours and hours as a girl writing on my blackboard in the basement and playing school so I LOVE anything related to chalk!!
Once you fold your envelope on the score lines just use some adhesive, being careful to put it so that it just holds the envelope flaps together and not the inside of the envelope!
This new tool is really fun to use. I bet you won’t be able to make just ONE envelope with the new Envelope Punch Board! Put it on your order today at my Stampin’ Up! Online Store!

