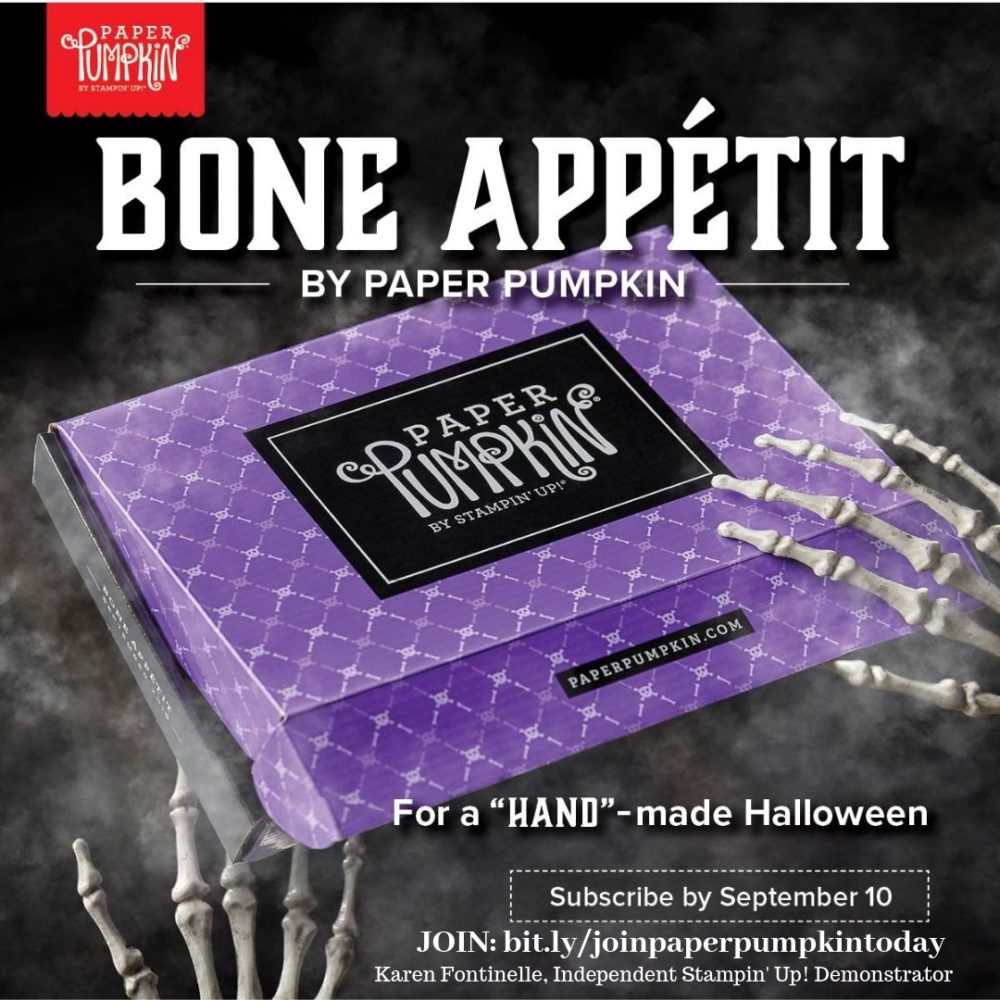
Halloween is nearly here, which means that Paper Pumpkin has been busy, busy, busy. Stampin’ Up! thought you might like “a hand” with your frightful festivities, so they designed September’s kit, Bone Appétit, with YOU in mind. I can’t wait for this kit!!!
This kit includes 20 food-safe treat boxes, a unique and exclusive Halloween stamp set, and a spooky, special-edition box. September’s kit also gives new meaning to the word “handmade.” (Cue the scary laughter!)
So don’t be in the dark this Halloween. Subscribe at paperpumpkin.com by September 10 to get in on the fun. Find my name to be on my list: Karen Fontinelle
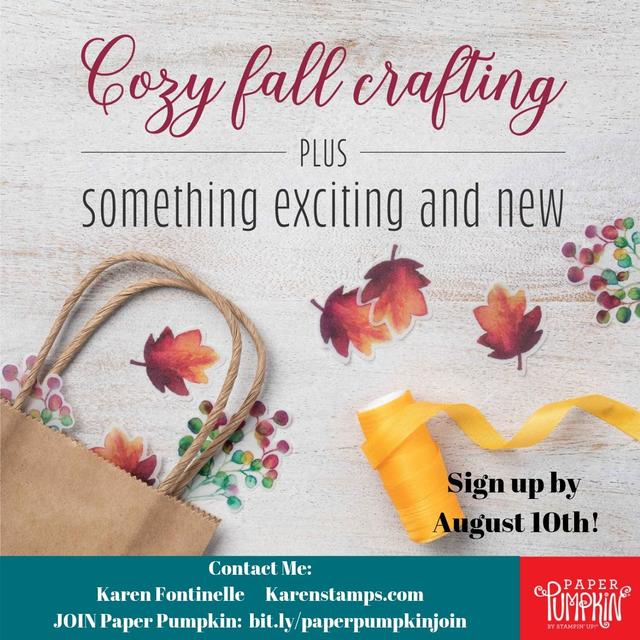
The August Kit is a special one. While most subscribers enjoy cardmaking, sometimes Stampin’ Up! likes to change it up and have a different kind of project. But often crafters will also make cards to go along with the project. So this month, there is the opportunity for the best of both worlds! The August Kit includes 6 gift bags and 12 gift tags with a fall theme! But if you are also interested in cards, you can purchase the Gift of Fall Add-On Bundle for only $10 in the Stampin’ Up! Online Store. You will see it listed in the left sidebar. But you must be a Paper Pumpkin subscriber to order it!
The Gift of Fall Add-On Bundle is a separate purchase for those who would like to convert their August Paper Pumpkin kit into cards.
The Gift of Fall Add-On Bundle card designs offer a great sneak of the designs and elements to come in the August kit.
Once you have completed the August kit, you will have extra kit components so you can easily combine them with the add-on without having to purchase additional kits.
This is a great time to sign up and be a Paper Pumpkin subscriber with holidays coming up!
Try it! You will probably like it! All kits are guaranteed by Stampin’ Up! You can skip a month or cancel completely any time. Just go into your account by the 10th of any month.
JOIN PAPER PUMPKIN NOW! TODAY IS THE LAST DAY FOR THE AUGUST KIT!
I wanted a little thank you gift for someone and one of the easiest things to make is a Clear Tiny Treat Box filled with candy! Chocolate of course! This is one of the things that I LOVE to make since years ago when I saw the idea. That is, covering candy nuggets with a 1″ x 3″ strip of designer paper (being careful not to get adhesive on the actual candy, only the paper!). We used to put them in tins that had to be specially ordered, but now we have the Clear Tiny Treat Boxes that work!
The Clear Tiny Treat Boxes come sixteen to a package and come flat, so storage is no problem. They come wrapped in some plastic to protect from scratches. Just open and crease all the flaps, then assemble and decorate! These boxes are food safe and acid free. They are sized 2″ x 2″ x 2″. Perfect for a candy treat or small gift.
The fun way to decorate candy pieces like these chocolate nuggets is to cut a strip of designer paper (or stamped or decorated cardstock, but designer paper is easiest) that is 1″ x 3″. Just wrap around the candy and apply adhesive to the overlap. I like to use the Multipurpose Liquid Glue, carefully. Keep any adhesive off the candy.
To decorate this Tiny Treat Box, I wrapped a piece of Pressed Petals Specialty Designer Series Paper around the box. Make it as narrow or wide as you want, but you won’t need the full 12″ strip. Start by just wrapping around, creasing on the corners, then cut off the excess and adhere. Depending on your design, if you are putting something on the front of the box like this box, start the end on the front of the box and that junction will be covered by the flower. Otherwise, put the ends on the back of the box.
To decorate the front of the box I made a washi tape flower as I described in THIS POST. The new Pressed Petals Specialty Washi Tape comes with a roll of individual flower petals that you can peel and stick however you like or make a flower like this one! I added a few small rhinestones to the flower center. You can add one of the Perennial Essence Flower Centers if you have them.
The ribbon wrapped around the box is the Gold 3/8″ Metallic-Edge Ribbon, one of my favorites because it is so versatile. The little greeting is stamped with the Itty Bitty Greetings Stamp Set on Very Vanilla and partially layered over a piece of Merry Merlot Cardstock. You can use the Tailored Tag Punch to punch the flagged ends. Just adhere with Mini Glue Dots.
This is a fun and easy thank you gift to personalize for someone! Put the Clear Tiny Treat Boxes on your next order and keep them on hand for when you need to give a little gift like this Clear Tiny Treat Box with Pressed Petals.
It’s time to sign up for Paper Pumpkin and get your August Kit in the mail in just a couple weeks! This kit will be most welcome because it will give us a taste of fall colors! The kit includes 6 gift bags and 12 gift tags. Some Paper Pumpkin subscribers like to have a variety of projects throughout the year, not just cards. Other subscribers only want cards.
Well, this month Stampin’ Up! has solved that problem! If you are a Paper Pumpkin subscriber, you will get this August kit with the gift bags and tags AND you have the option to purchase an Add-On Kit to make cards!
The Gift of Fall Add-On Bundle is a separate purchase for those who would like to convert their August Paper Pumpkin kit into cards.
The Gift of Fall Add-On Bundle card designs offer a great sneak of the designs and elements to come in the August kit.
Once you have completed the August kit, you will have extra kit components so you can easily combine them with the add-on without having to purchase additional kits.
You will need to purchase the add-on bundle in the Online Store. You will not be able to add it to a Paper Pumpkin subscription purchase.
The price for the add-on bundle is $10.00 and is available for Paper Pumpkin subscribers only. This add-on is available beginning August 1, while supplies last!
Watch this video to find out more about the August Paper Pumpkin Kit:
Don’t miss out! Remember, once you get the kit you can make whatever you want with the materials inside. And every month, alternative ideas are posted online if you want to try something different. Sometimes I made the project as described and then I might look online and see what else I could do and try one or two of those ideas.
You could use these gift bags for back-to-school teacher gifts or even back-to-school treats for your own kids. Maybe favors for a small party or dinner or make them and save for closer to Halloween. Cut them up and make cards!
Stampin’ Up! guarantees all kits so there is no risk. If Paper Pumpkin is not for you, contact Stampin’ Up! (The nicest people take your calls!) Or cancel any time just by going into your account and stopping your subscription. If you like it but need to take a break, just go into your account and skip a month or two. The magic date to make any changes is always the 10th of the month. Kits are billed and sent out a few days after the 10th.
Sign me up for THIS Paper Pumpkin Kit for sure!!! (Of course, I am already signed up!) For one thing, when the kit arrives at my house it will be so ungodly hot in the middle of August here in Houston, Texas that I will be thrilled to think about fall! Just don’t miss the deadline of August 10th to sign up, the sooner the better. This may be a really popular kit since there are clues and looks like lots of cuteness, so please sign up early if you can.
If you want some clues, keep reading! Then decide to subscribe (or order a Prepaid Subscription in the Online Store!) Watch this video to find out a little about the kit! Or cover your eyes if you want to be surprised!
Did you catch the new twist to the August Paper Pumpkin Kit? There will be an “Add-on” that can be purchased beginning August 1st in the Stampin’ Up! Online Store!
August Kit Information
Makes 6 fall-themed gift bags
Makes 12 fall-themed gift tags
Coordinating colors: Blackberry Bliss, Calypso Coral, Crumb Cake, Crushed Curry, Merry Merlot, Mint Macaron, Old Olive, Pretty Peacock, and Soft Suede
Add-On Information
Gift of Fall Add-On Bundle (item 152885) Price: $10.00
Includes 24 card bases of 2 different designs with coordinating envelopes (notecard size)
Not included with an August Paper Pumpkin subscription
Important note: The Gift of Fall Add-On Bundle is not needed to complete the August kit projects.
If you like fall, especially after, or during, a hot summer, you will really enjoy this kit, looking forward to colored leaves and cooler temperatures!
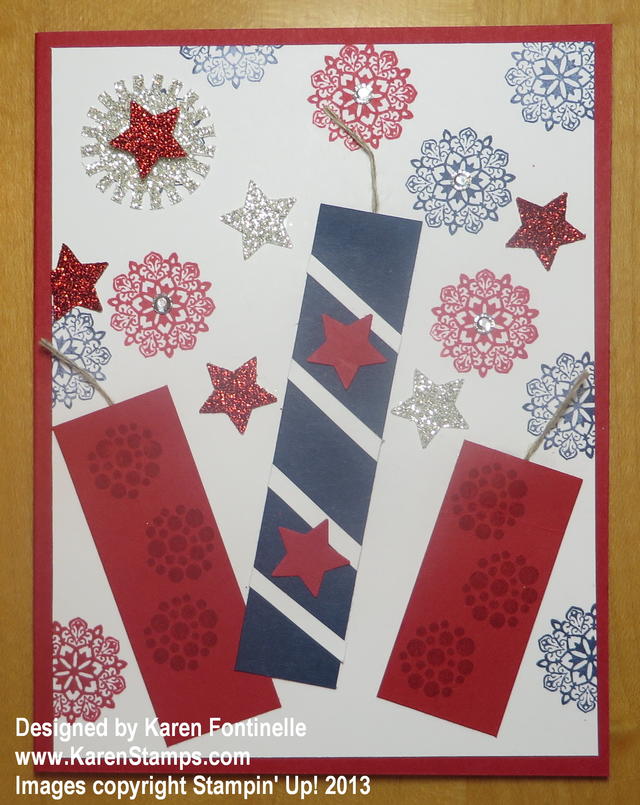
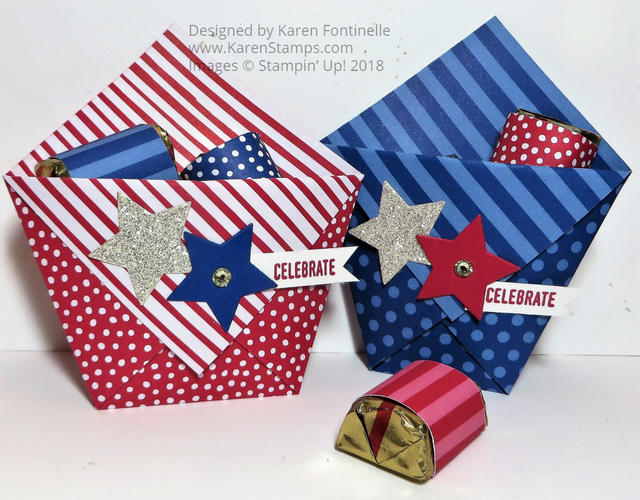
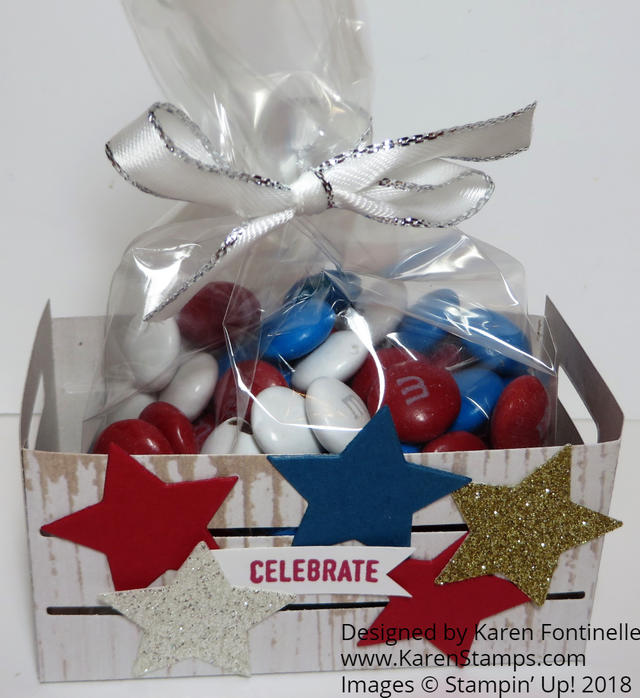
Use a paper towel roll or something similar, maybe a tall round tin, and decorate like Uncle Sam for the 4th of July. Fill it with candies for a party favor or hostess gift!
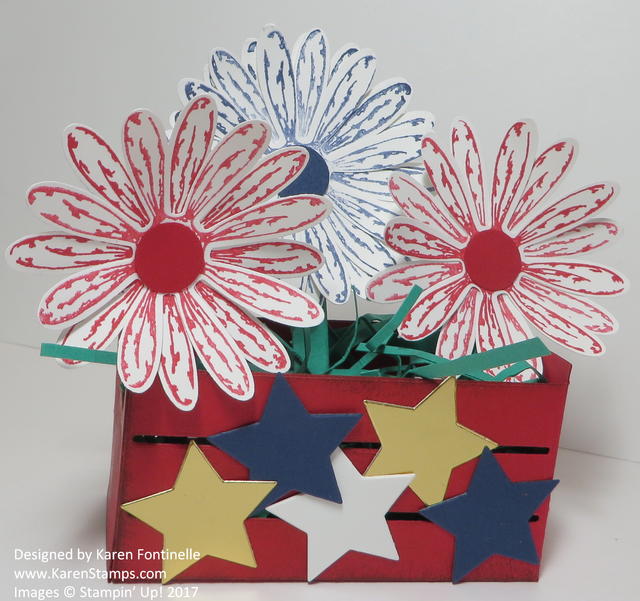
If you have the Wood Crate Dies, you can make this easily and use the Daisy Punch, too! If you don’t own the Wood Crate Dies, just make a little box or use a little box you have. Make some patriotic flowers (and maybe add some candy!) and you are set!
These are really easy to make! You can make a small one with a piece of 6″ x 6″ piece of paper or a larger one with a 9″ square piece of paper. Decorate for a patriotic treat and add candy. You can easily change this up for any occasion!
Another crate but you could also just do a cello bag of candy or some other treat! Fill it with some red, white, and blue candies, tie on a ribbon and maybe add a 4th of July tag!
I hope these past projects give you some ideas for whatever 4th of July projects you would like to make for decorations or treats!
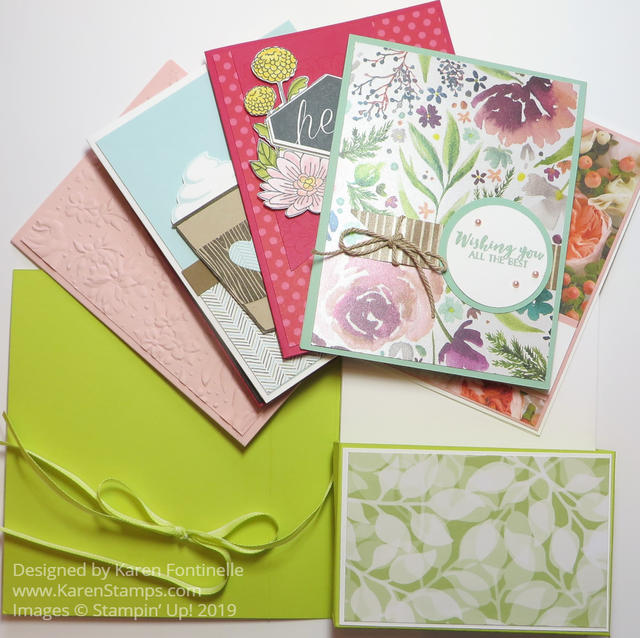
If you are giving an assortment of your stamped greeting cards to someone, a nice way to present them would be to Make an Easy Card Box For a Gift. It’s just a little box inside to hold the cards and is simple to make.
Just follow this scoring and cutting diagram and instructions.
For the card box cover, start with a piece of cardstock 6″ x 10 1/4″. Score this at 4 1/2″ and 5 5/8″.
To make the box, cut a piece of cardstock 4″ x 11″. Score this at 2 1/4″, 3 1/4″, 7 3/4″ and 8 3/4″. Turn and score the long side at 1″. Then cut up to the scoreline as you see in the photo above.
Crease and fold all the score lines. Assemble the box with the two pieces coming together in the back. Adhere to the inside back of the cover. Adhere a piece of designer paper to the front of this box.
Decorate the front of the cover (best to do this before adhering the box inside!). Tie a ribbon around to tie and close or make a belly band to match.
A gift of cards is always going to be welcome so make the presentation nice! You could put them in a cello bag and tie with a pretty ribbon and tag, or just as easy, make a card holder like this one to give your gift!
Every Tuesday I send out a newsletter with one or more stamping projects (usually more!) and the latest Stampin’ Up! news. As Demonstrators, we get a Weekly Update every Tuesday morning from Stampin’ Up! which is perfect because I can pass along any news to you in my weekly newsletter.
With the Last-Chance retirement list out now and the new Stampin’ Up! Catalog about to go live, now is the perfect time to make sure you are connected with a Demonstrator to keep you up to date on Stampin’ Up! news, new product information and ideas for using those new stamps and accessories!
An extra bonus is that at Christmas time I send out my “12 Weeks of Christmas” holiday emails to all my subscribers. These are extra, separate emails with one holiday project per week to inspire you to start working on your holiday cards, gifts and finally, packaging! You can copy the project exactly, get an idea for something to make on your own, or simply enjoy seeing a new project. I’m almost as happy seeing stamping ideas as I am doing the stamping! I just love new inspiration!
When you sign up for my Mailing List you will get a FREE GIFT, a list of gift-wrapping ideas to save a trip running out to the store for wrapping paper or gift bags. Just use whatever supplies you have. The ideas are timeless, you don’t have to have the exact paper or stamps.
I would love to have you join my mailing list because I love sharing Stampin’ Up! with others, not to mention talking about stamping ideas! Do it today and you will be set for some of the most important dates of the stamping year!
Click the button below or sign up in the red box on the right on my blog.
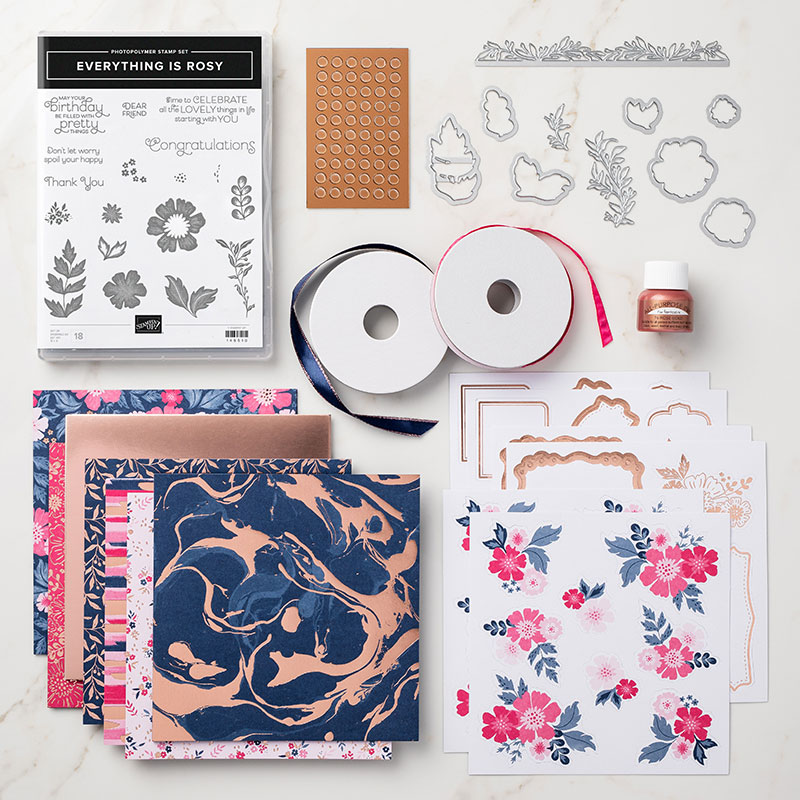
Remember, the Everything Is Rosy Product Medley is available only during the month of May, while supplies last. This is a whole collection of coordinating products, which is one of Stampin’ Up!’s strong points in their product lines. It’s also exclusive, as you won’t find these products anywhere else. It comes with Rose Gold accents and Shimmer Paint. Have you noticed how much Rose Gold jewelry is out in stores now? It’s the new trend. Rose Gold is a mixture of gold and copper to produce that pinkish look.
Here are a couple samples by Stampin’ Up to show what you can do with all these products in this collection.
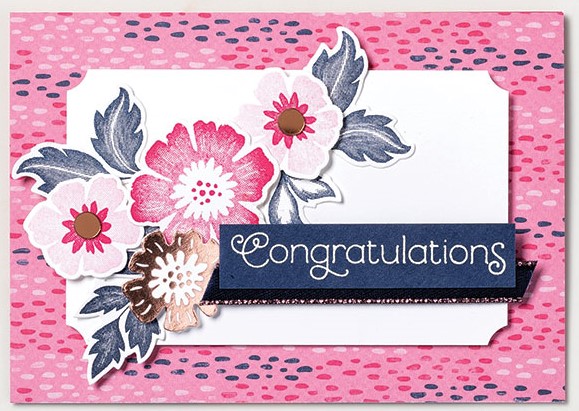
This card is made with the designer paper, die cut flowers, rose gold foil, and more. With the congratulations greeting it would be perfect for graduation!
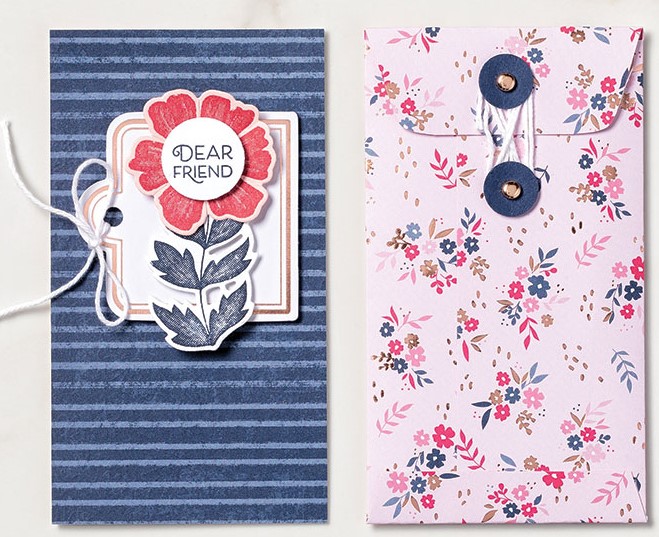
This fun card is made with the Whisper White Narrow Note Cards and Envelopes. The card is decorated with die-cut stamped flowers and an already die cut tag. Wouldn’t you love to get this card with such a cute decorated envelope?!
This Everything is Rosy Product Medley is only available during May so don’t delay if you really want this product. I know you will be able to make gorgeous cards and projects with all these products. It may look pricey but consider all that you are getting for that price. Everything you need in one box to start creating! All you have to do is enter this one number on your order! #150059 It can be a belated Mother’s Day gift for yourself! Why not?!
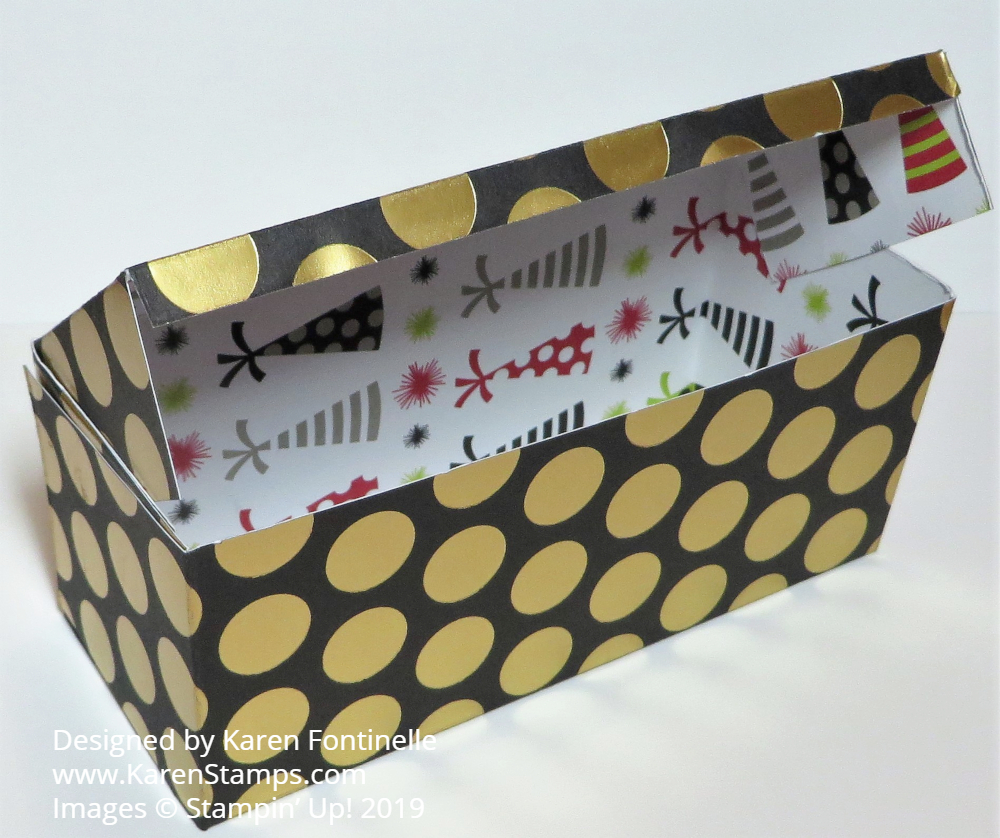
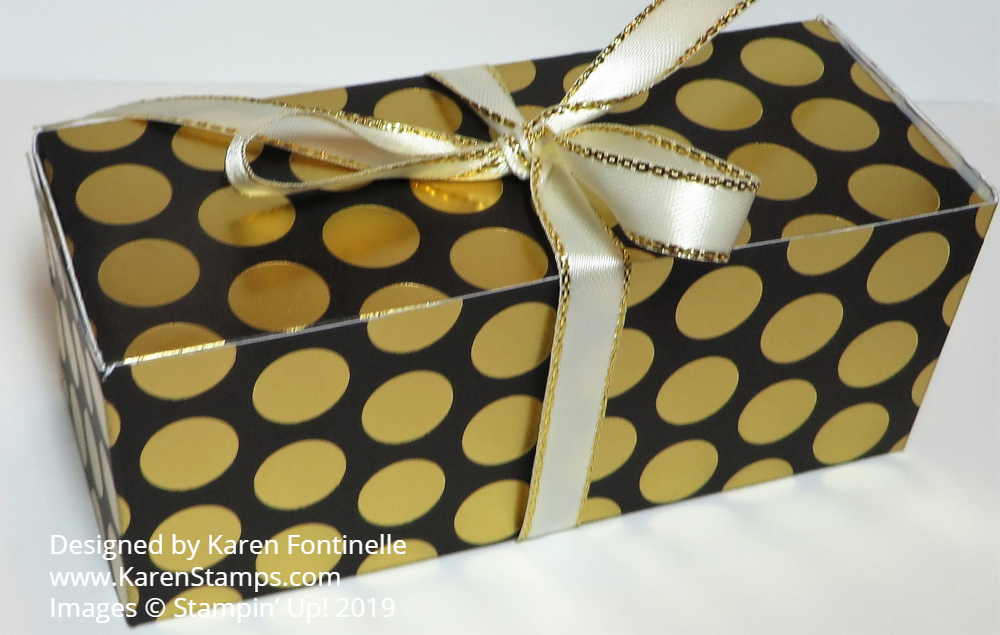
We’re entering a season of when you might have a lot of gift-giving occasions what with graduations, teacher gifts, engagements, and weddings so here is an easy Broadway Bound Handmade Gift Box. This designer paper is especially good to use because it is a heavier designer paper so it can stand up to be a box. It’s on the Last-Chance List so if you want some festive paper in your collection, be sure to pick this up! It’s the Broadway Bound Specialty Designer Series Paper which has party designs on one side and gold foil designs on the other.
This box is easy to make. This is a lesson is watching your patterns, as you can see on the inside of the box. The outside didn’t matter but the party hats are going sideways! Not that it is a huge problem, but you want to try to have your patterns going in the correct direction! So I should have turned my paper the other way when I scored it.
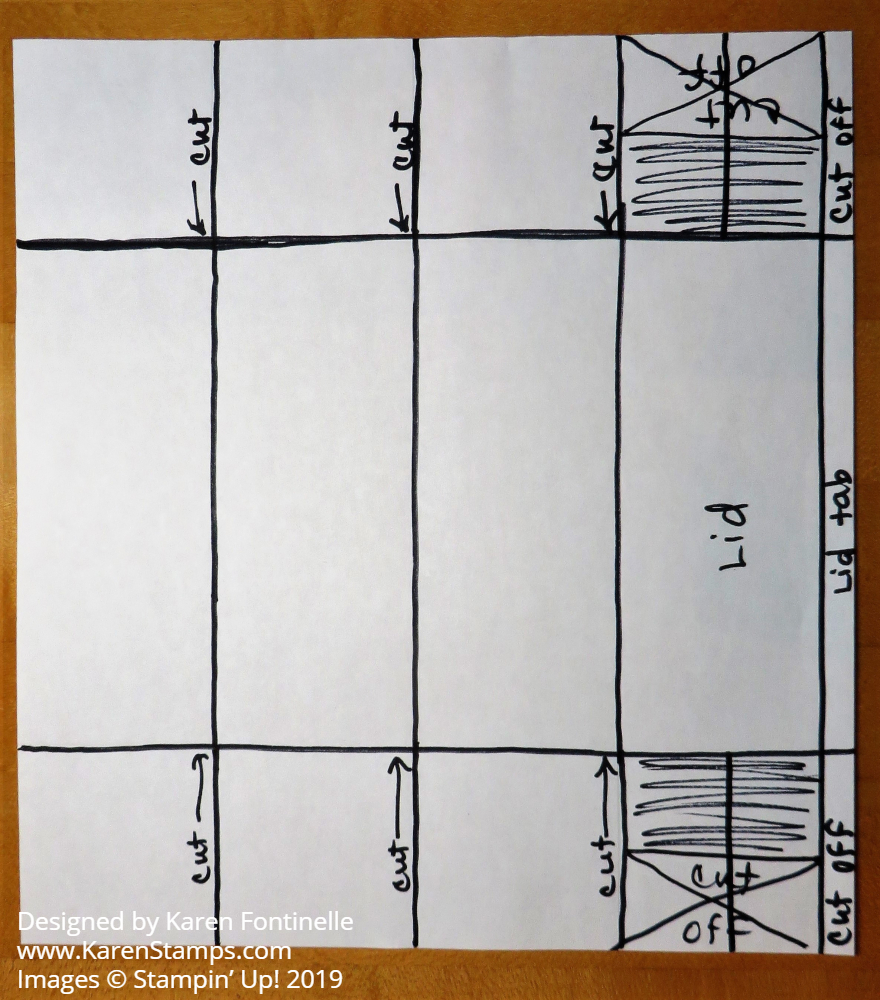
Here are the dimensions. Start with paper, whether cardstock or designer paper, 9″ x 8 1/4″ Score the long side at 2″ and 7″. Score the short side at 2″, 4″, 6″ and 8″. So essentially it is a 2-4-6-8 box, just on its side!
Here is a diagram. Start with the 9″ side up at the top of the Stampin’ Trimmer or the Simply Scored Scoring Tool. Score down at 2″ and 7″. Then turn the paper so the 8 1/4″ is at the top and score at 2″, 4″, 6″, and 8″. That will leave the 1/4″ edge. Cut off that little narrow corner. Cut up on both sides of the paper the score lines to the 2″ and 7″ score lines. Now that first tab next to the 1/4″ edge…..cut off half of that on each…..just eyeball it. That makes the tabs to close the box. Crease and fold on all the lines and assemble the box. You’ll see how it goes once you start folding. Use some strong adhesive on the ends to hold close.
That’s how easy it is to make a little gift box. Much quicker and easier than running out to the store for one! If you use plain cardstock, you can add layers of designer paper or stamp it first if you want to jazz it up. No matter what paper you use, you can make a small gift box like this Broadway Bound Handmade Gift Box.
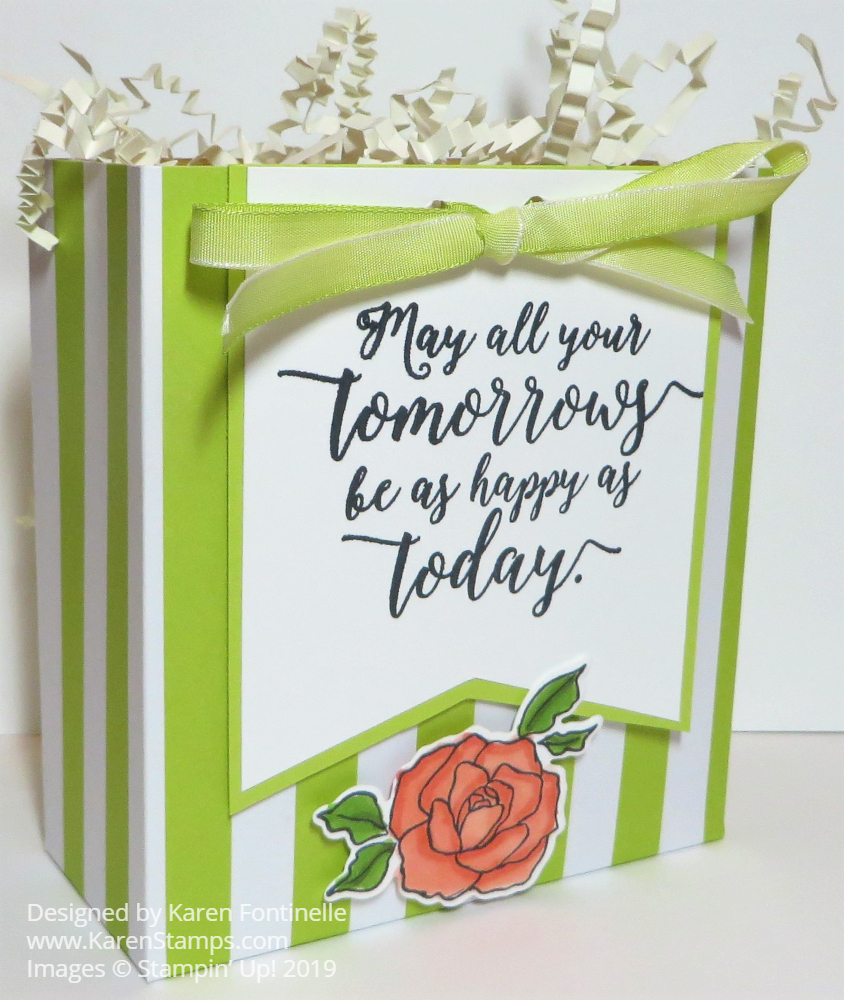
Today I am showing you this Broadway Bound Gift Bag For Graduation. Of course, it could be for any gift-giving occasion, but graduations are coming up soon! Since sometimes graduation gifts are smaller in size, maybe a gift card, maybe some jewelry or cash, this small gift bag would be perfect. You can pinch in the sides and pull the top sides together to close the bag. Lots of variations.
This gift bag is mostly like the 2-4-6-8 box we all make a lot, but the dimensions are a little different just to make it wider. This happens to be the striped pattern in the Broadway Bound Specialty Designer Series Paper. This paper is on the Stampin’ Up! Last-Chance List so get it before it is gone! Make sure any pattern on any paper is going in the direction you want it to go on your project when you cut your paper and when you score, depending on the project.
Start with a 6″ x 12″ piece of paper. Score at 4″, 5 3/4″, 9 3/4″, and 11 1/2″. Turn the paper so the short edge is at the top and score at 1 3/4″. This will make the bottom flaps of the bag. Cut those short bottom tabs up to the 1 3/4″ score line. Cut off the little 1/2″ tab on the bottom. Fold on all the score lines and crease well with the Bone Folder. Adhere the tab on the end to the other side to assemble the bag. Then adhere the flaps on the bottom. I used the Tear & Tape Adhesive.
You can decorate these little bags in many ways. I liked the sentiment in the Colorful Seasons Stamp Set so I stamped that and cut the piece to make a banner. It is layered on a piece of Lemon Lime Twist to match the bag. The bow is Lemon Lime Twist 1/4″ Ombre Ribbon. At this point, I thought about adding some sequins to the banner, but since I had this flower already colored and cut out from the Tea Together Stamp Set, I used it as an embellishment on the bag!
The bag is all ready for a gift! Very easy to make and no rushed trips to the store for a gift bag! It’s a great way to use some of your hoarded designer series paper! Think about making your own little gift bag like this Broadway Bound Gift Bag For Graduation.
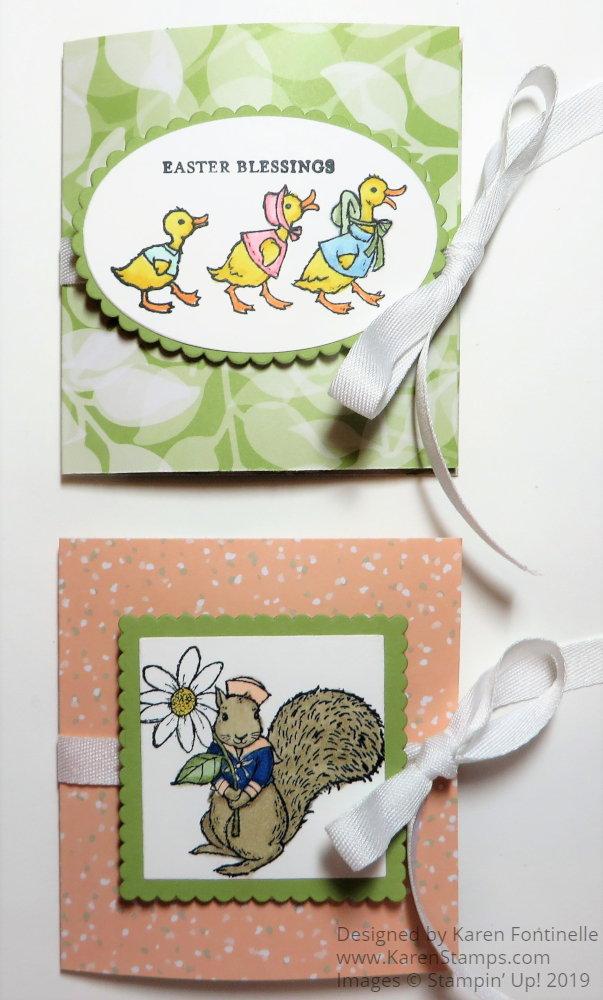
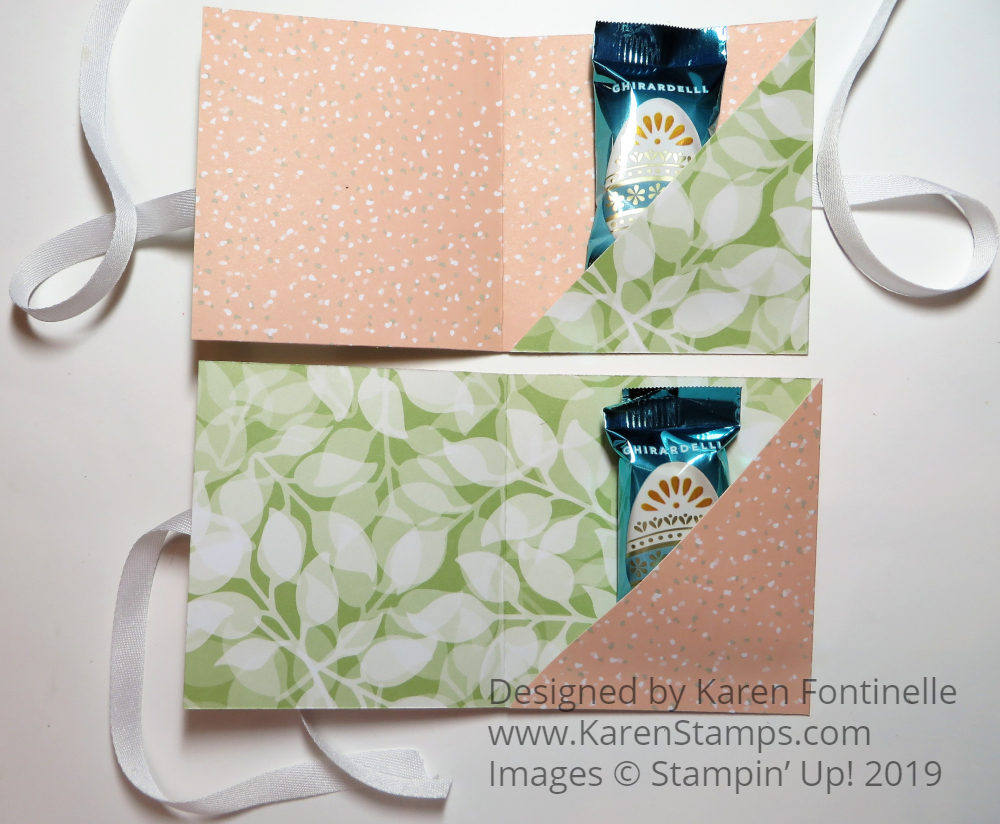
If you are looking for some easy little Easter candy treats, these Easy Easter Folded Candy Holders might be just what you are looking for! The basic holder is so simple to make and then you can add whatever you want for the front design.
You can modify the measurements any way you like to suit what you are putting inside. Besides a piece of candy, you could put a tea bag or a small cookie or maybe even a gift card. As I said, just change up the dimensions.
My sample starts with a piece of paper 9 3/4″ x 3 1/2″. Mine uses the Floral Romance Specialty Designer Series Paper. I used the same piece of paper, just opposite sides for the front of the candy holder. When you use designer paper you get to see the opposite side of the paper on the inside. However, you could also use cardstock for the holder and use designer paper for a layer on the front or embellishment. Score the paper at 3 1/4″ from each end. This divides the paper into thirds. The end section on the right-hand side will have a diagonal cut. This piece will fold over and be adhered at the bottom to form a pocket. This is where you can put a piece of candy or tea bag or something. I used Tear & Tape Adhesive.
On my candy holders, I stamped images from theFable Friends Stamp Set. These were each colored with Stampin’ Blends markers (although I almost used Watercolor Pencils for a change!) and then die cut and layered on cardstock.
In order to have the ribbon going around to tie the candy holders closed, I popped up the images on the front of the holder withStampin’ Dimensionals at the top and bottom. That way I could run ribbon underneath, in between the Dimensionals, and around the back. I put a little bit of Snail Adhesive on the back underneath the ribbon to hold it in place. The ribbon is the Whisper White 3/8″ Classic Weave Ribbon. (One advantage of white ribbon is that you can dye it another color with reinkers or maybe markers to match something!)
If you want to see the same kind of candy holder made for Christmas one year, click HERE.
You can make these candy holders for any occasion, of course, and make them as simple or fancy as you like. These work particularly well for the square Ghirardelli chocolate candy. I had these Ghirardelli chocolate eggs, which do fit, but they are not flat like the squares. Use whatever you like or modify the measurements on the candy holder to fit your kind of candy or treat. Go have fun making a few of these easy Easter folded candy holders.
This Easter Wood Crate Candy Holder With Chick would be fun to make as a treat holder just using some dies and glue! Something a little bit different than a bunny! Make the paper crate, add some Easter grass or paper shred and put in some Easter candy! You have a little treat for someone or put it at each place setting on your Easter table for dinner.
To make the crate I used the Wood Crate Framelits Dies and the Wood Textures Designer Series Paper Stack. Just cut two pieces with the wood crate die. The die scores the paper as it cuts so all you have to do is crease and fold and assemble with some Multipurpose Glue. If you don’t own the Wood Crate Dies just make some other little basket or box by scoring and folding.
The chick is copied from one I made many years ago on THIS little Easter basket. Back then we had a Scalloped Circle Punch, but you can use the scalloped Circle Dies. For the wings, I just cut a scalloped circle into portions. I sponged all the pieces. For the little feathers on top of his head and for his feet, I just found some shapes on some dies that would work or maybe you could use the Blossom Builder Punch. Whatever you have with something resembling the shapes you need! The little beak is just cut by hand. The eyes are punched with the Cookie Cutter Builder Punch and just colored with a black marker. The chick is adhered to the wood crate with a couple of Stampin’ Dimensionals.
You can use whatever color card stock you like or other designer paper. Make the chick with whatever shapes you can punch or die cut. You can also add an Easter greeting on the front. It’s just a cute little treat idea for holding some Easter candy treats or for a little home decoration. Have fun making your own Easter treats to give to some family members, friends or neighbors!
Here is an easy paper Easter Basket anyone can make, so easy in fact that you can make THREE little Easter baskets for treats! At least here are three different ideas for you to show you what you can make!
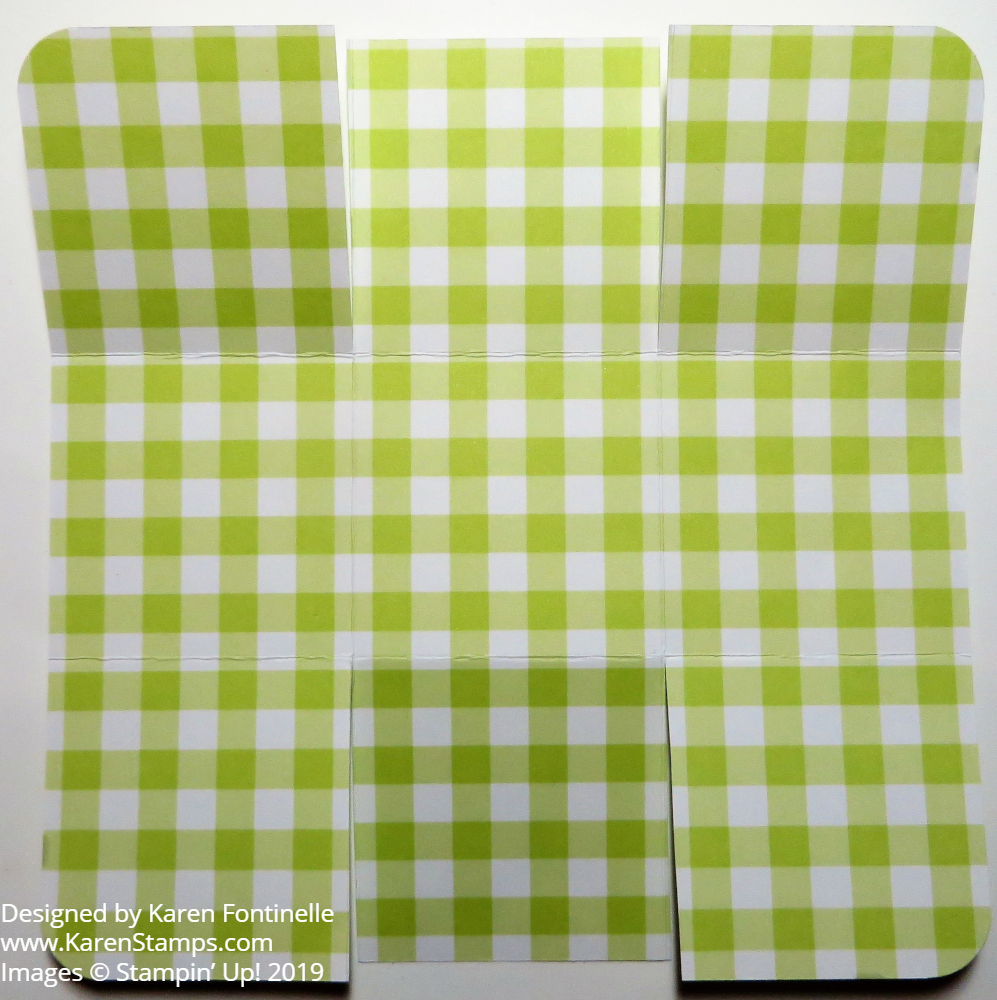
Just start with a 6″ x 6″ square piece of paper (I used a sheet of Gingham Gala 6″ x 6″ Designer Series Paper) and score like a tic tac toe. Score at 2″ and 4″, then turn and score at 2″ and 4″. Cut up on the two vertical score lines up to the horizontal score line. Do the same on the opposite side. See the diagram below. Cut a handle of about 8 1/2″ x 1/2″.
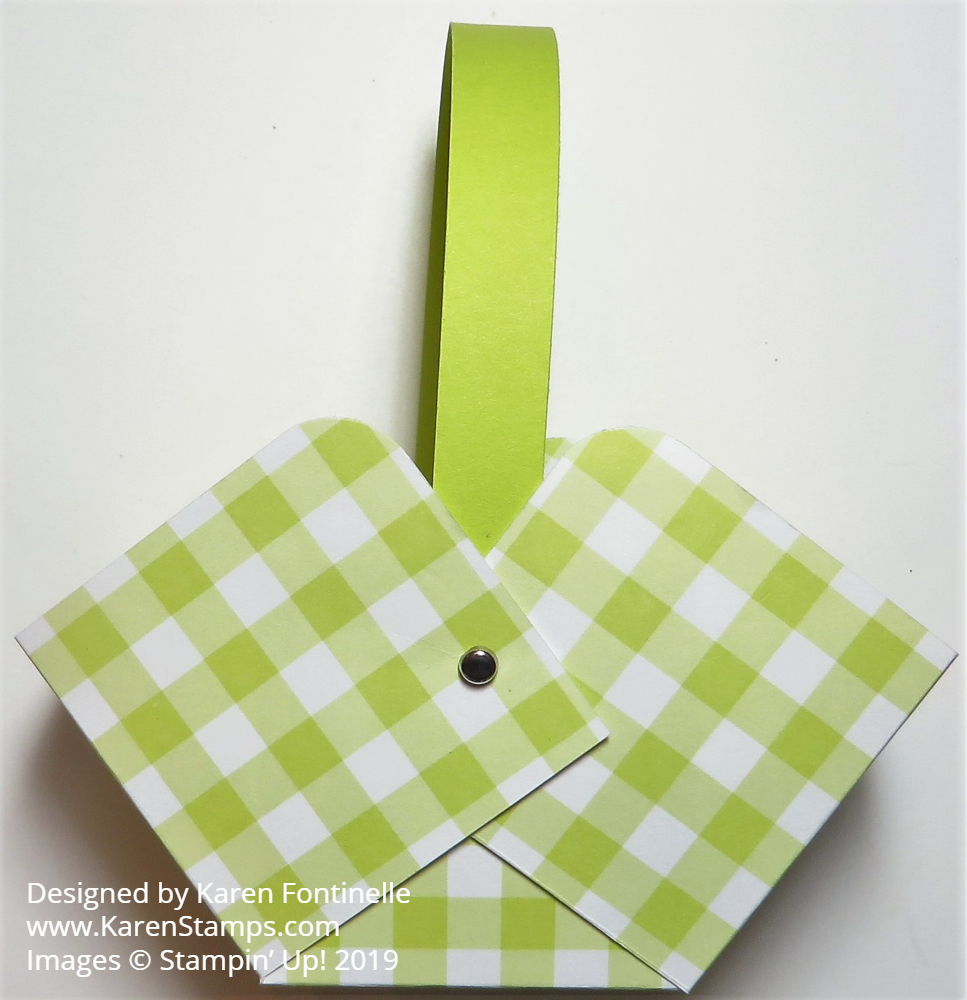
Crease and fold all score lines. If you like, use the Detailed Trio Punch to round all four corners. Or you can leave them as is. Form the paper into a basket and use brads or glue to hold the sides and handle together. The handle goes in between the two side flaps and the center flap. That hides it a little bit on the inside.
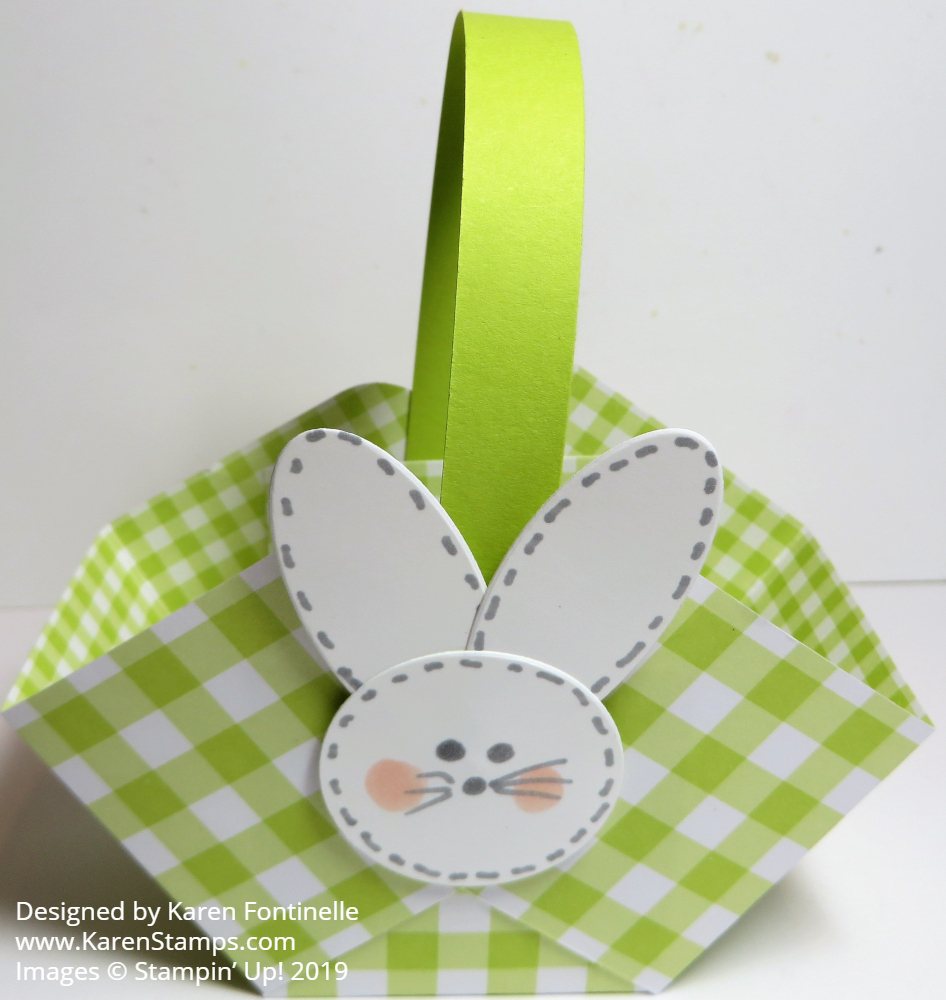
Decorate however you like. I made a bunny face with a Circle Die and two Oval Dies (or you could use punches) and then used the tip end of Stampin’ Blends markers to draw on the pieces to make a face. Just adhere to the side of the basket with Stampin’ Dimensionals.
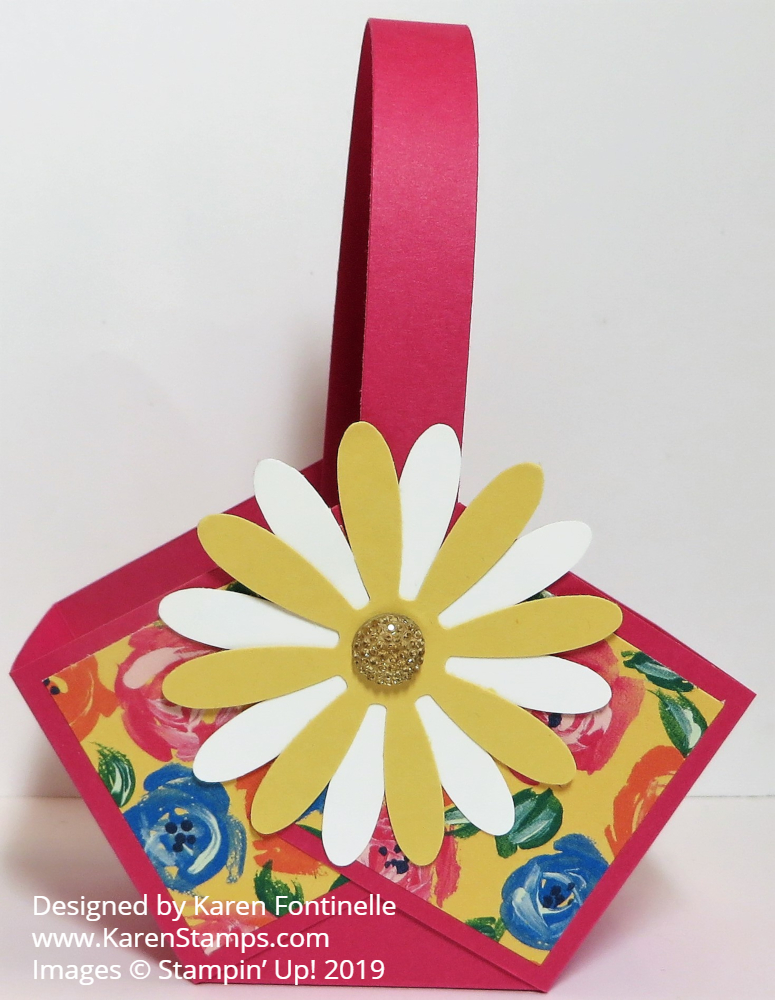
If you would like to use cardstock for the basket and decorate with some designer paper, this is how you would do it! I used Melon Mambo Cardstock and Garden Impressions 6″ x 6″ Designer Series Paper. Everything else is the same as the gingham bunny basket.
For this basket, I used the Daisy Punch to punch two layers and adhered the flower to the side of the basket. I added a Gold Faceted Gem to the center.
Now just fill the basket(s) with some Easter grass or paper shred and fill with some delicious Easter candy! These would make cute treats for someone or a cute table favor for Easter dinner.
Are you on my Stamping With Karen Mailing List yet? If not, sign up today so you don’t miss out! Every Tuesday I send out a newsletter with any Stampin’ Up! news and offers, plus projects with complete instructions.
This is a good way to keep up with all things Stampin’ Up! so you don’t miss any good offers. I also try to choose projects to put in my newsletter that you would enjoy making or at least give you an idea for something you can make on your own.
And when you do sign up, you will get an email with a link to a FREE GIFT! This gift has ideas for easy gift-wrapping that we all need sometimes at the last minute!
At Christmas time I send out special holiday emails with a new project each week leading up to Christmas called “The 12 Weeks of Christmas”.
With it getting close to “new catalog” time (can you believe it?!) you will want to stay on top of all the breaking news!
Just click the link below and put in your first name and email. It’s just that easy!