Category Archives: 3-D, Gifts & Things

Make an Easy Triangle Box For a Treat With Year of Cheer Paper

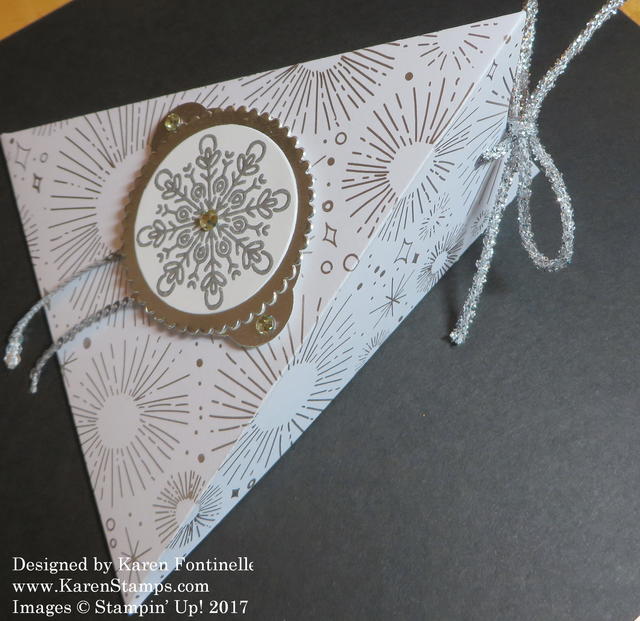
Year of Cheer Triangle Box Side

If you need a cute little gift box for a treat or small gift, try making this easy triangle box with the Year of Cheer Designer Paper. I learned to make this triangle box a long time ago and it is SO easy!  You can vary the size, decorate it for any kind of occasion, make it as plain or simple as you want….it’s up to you! And did I say it was quick and easy?!

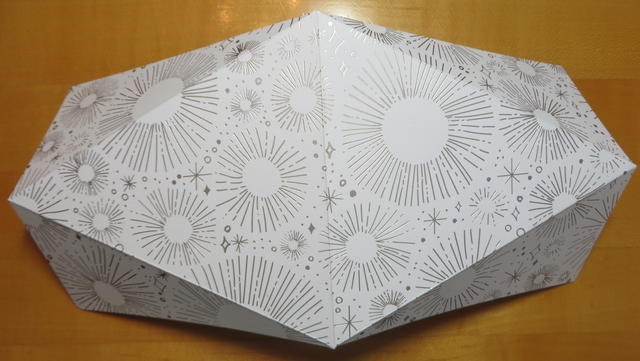
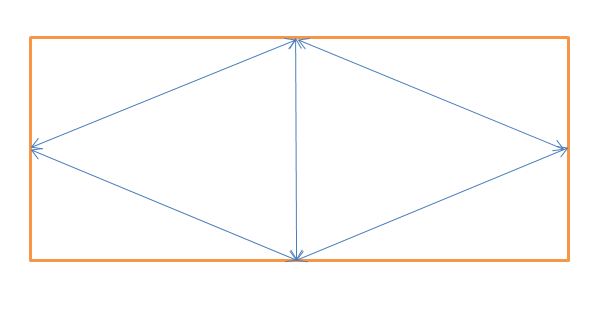
My sample starts with a piece of the Year of Cheer Specialty Designer Series PaperThis is beautiful paper with foil designs, one-sided, and perfect for special cards and projects. I used a  piece of paper cut 5″ x 10″.  All you have to do is score the paper at 5″, then mark on the short ends the center spot which would be 2 1/2″. Score from the 5″ score line to the center mark on the short ends on each side on each end.

This is what the scored paper will look like:

Triangle Box Scored

Fold all the score lines and practice folding into the triangle box shape. Then on each end you will need to punch holes so that you can tie all the ends together once you put the contents inside.

Here is one of my older posts with a diagram of how to score the box. You do the same thing even if the size is a little different.

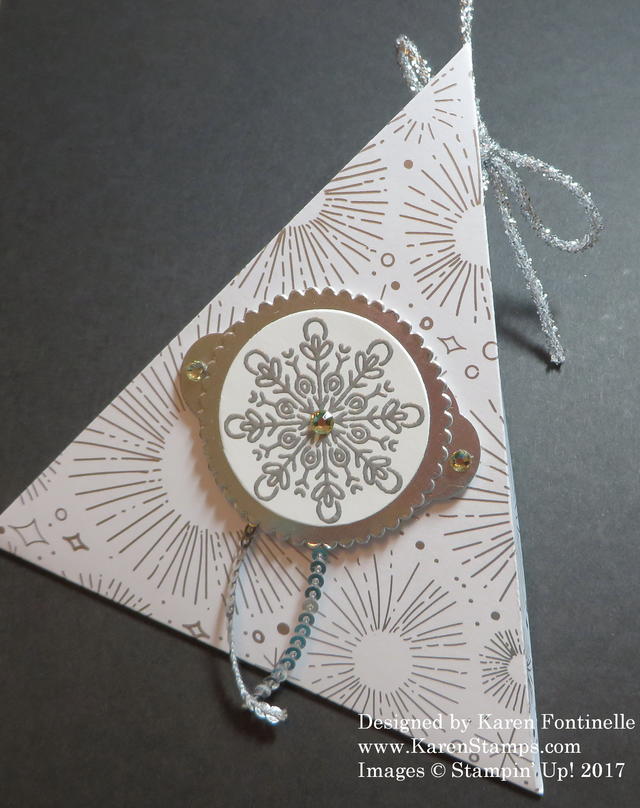
Year of Cheer Triangle Box Front

To decorate this triangle box, I embossed a snowflake image from the Cheers to the Year Stamp Set with the Heat Tool and Silver Stampin’ Emboss Powder. I punched out the snowflake with a Circle die that fit around it with a Silver Foil scalloped circle die. After adhering these two pieces together, I layered that piece on a piece of Silver Foil punched with the Pretty Label Punch.  I embellished this snowflake piece with a piece of Silver Mini Sequin Trim and Rhinestone Jewels.  The triangle box is tied with a piece of Mini Tinsel Trim.

Make an Easy Triangle Box For a Treat With Year of Cheer Paper for a small gift or a candy treat inside! It’s easy to make and the Year of Cheer Paper is elegant for any occasion!

SHOP STAMPIN’ UP! ONLINE HERE!

Don’t Miss Out on Paper Pumpkin This Month!

Join Paper PumpkinToday!

Click photo to subscribe!

We’re getting close to November 10th and that’s the last day to sign up for November’s Paper Pumpkin Kit!

Why should you sign up for Paper Pumpkin?

  • It’s fun to get the Paper Pumpkin box in the mail just for you!
  • Even those people who aren’t big crafters often like to make holiday projects. Paper Pumpkin makes that easy with all supplies included right in the cute box!
  • It’s a treat for experienced crafters to just open the box and GO! No designing a project or pulling out supplies. It’s all in the box!
  • Each kit is easy enough for anyone, crafter or non-, old or young, male or female! Get an extra kit and make yours together or send one to a loved one far away.

What’s special about the November Paper Pumpkin Kit?

  • When you open the box you will find ten little somethings that you might want to hang by the chimney with care—or on a wrapped gift or a neighbor’s door!
  • You won’t have to figure out something to make, just open the box!
  • You must subscribe by November 10 at 11:50 PM (MT) to get this Santa-approved kit!  Do it today so you won’t forget!

(Last month there was an opportunity for Paper Pumpkin subscribers or those who subscribed after the 10th of the month to purchase the “past” October kit in the Stampin’ Up! online store, but they sold out in 30 minutes! No guarantee there will be extra kits this month! Don’t depend on this opportunity. Go ahead and subscribe now! If it turns out you are really unhappy with your kit, contact Stampin’ Up! and let them help you.)

Paper Pumpkin Season of Style Banner New

Subscribe today and you will be billed Nov. 13 and kits will ship out!  You will receive an email that that your Paper Pumpkin Kit is on its way! Even if you were a past subscriber, this might be a good time to renew your subscription to get what promises to be a cute kit for the holidays!

Click HERE to subscribe with my personal link!

Last Minute Halloween Ideas

Here are some of my favorite Halloween posts from last year all in one place, if you need some last minute Halloween ideas!  If you don’t have this year’s Halloween stamps and paper, perhaps you have ones from last year or you can just use something else. Substitution is easy! It doesn’t always have to be “Halloween” paper or stamps.  Just use the ideas!

Halloween Witch's Boot Candy Treat Holder

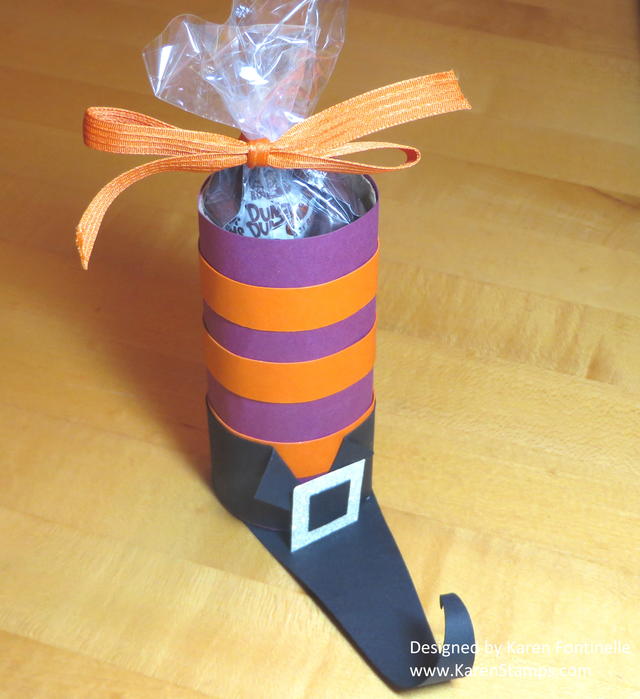
Halloween Witch’s Boot

Easy to make with a toilet paper roll or paper towel roll! Very cute and fun to make!

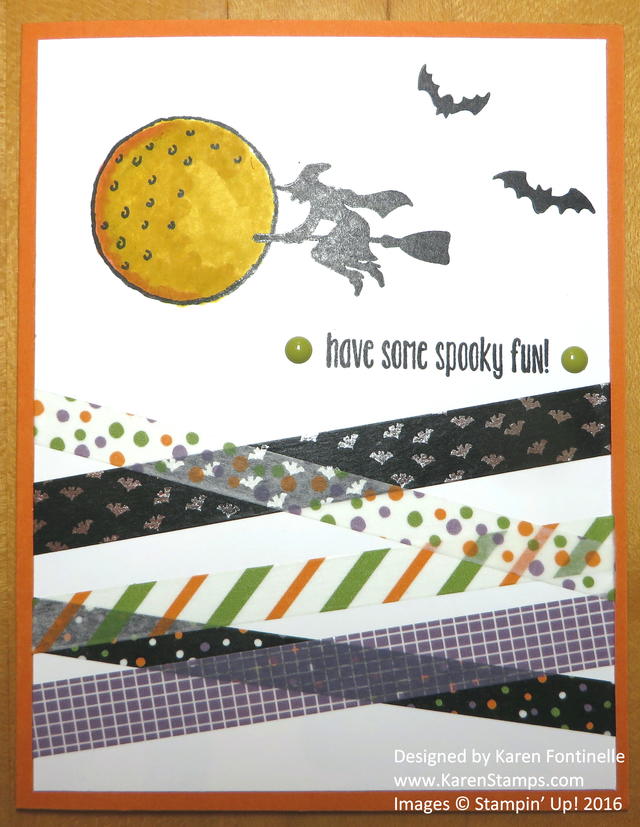
Halloween Night Washi Tape Halloween Card

Halloween Night Washi Tape Halloween Card

Use some washi tape, whatever you have, criss-crossing at the bottom of the card and do a little stamping at the top!

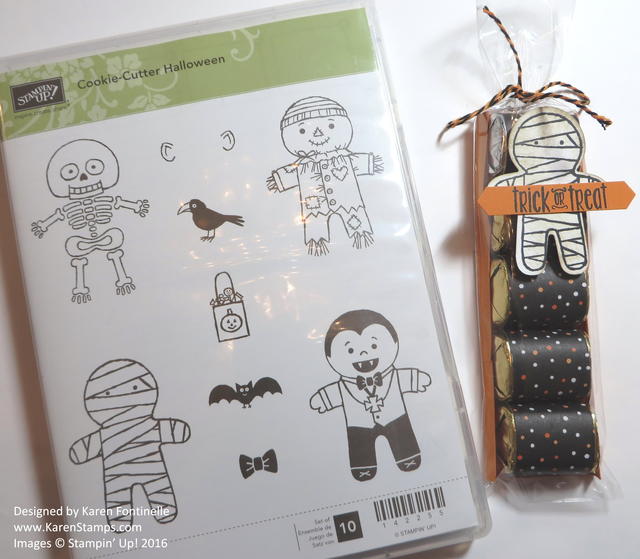
Halloween Chocolate Candy Treat Bag

Halloween Chocolate Candy Treat Bag

Even if you don’t have the narrow cello bag, use the idea of wrapping chocolate nugget candies with designer series paper for a Halloween treat!

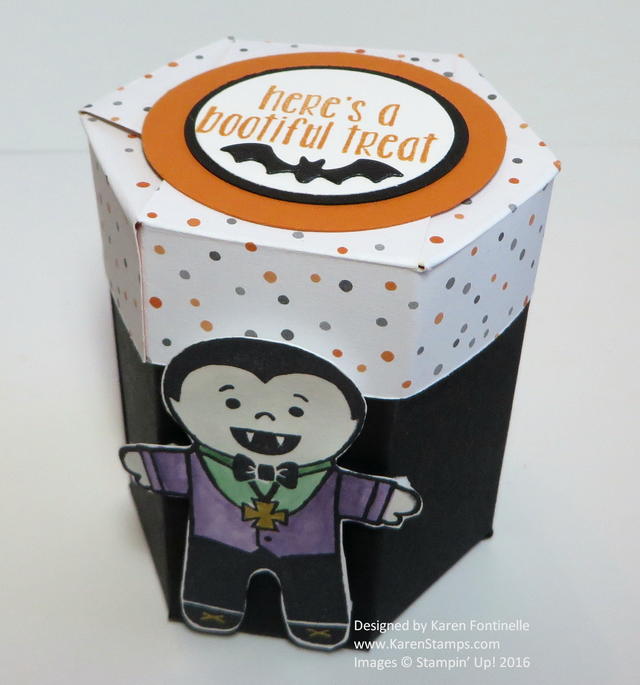
Halloween Small Hexagon Box

How to Make a Halloween Small Hexagon Box

This cute little hexagon box isn’t as hard as it looks!  Give it a try for any occasion!

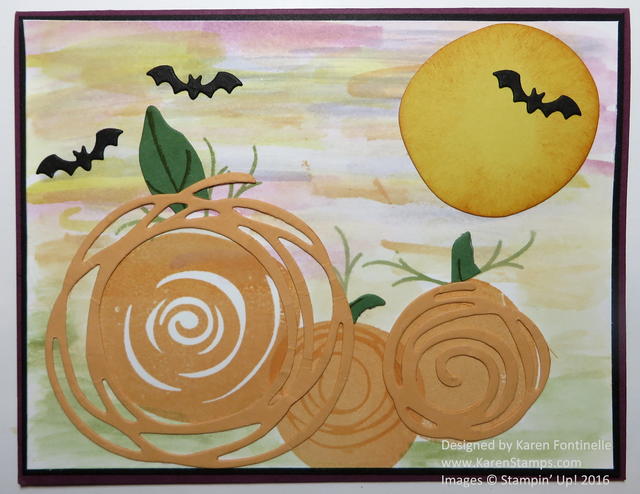
Swirly Bird Pumpkins Halloween Card

Swirly Bird Pumpkins Halloween Card

Use the Swirly Scribbles dies to make pumpkins for Halloween!

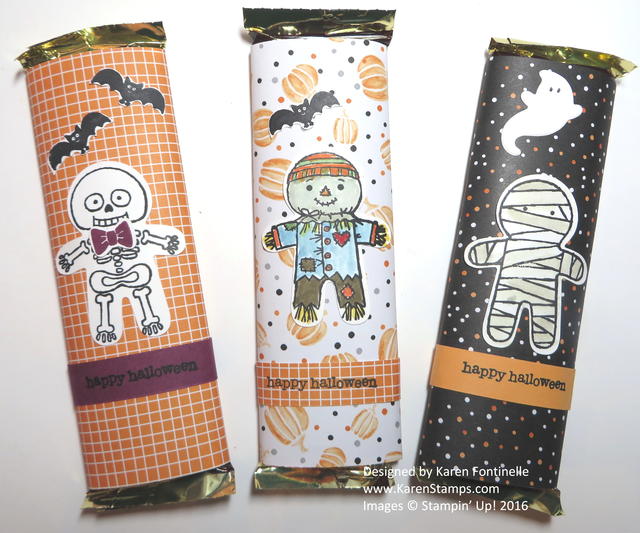
Halloween Night Candy Bars

Halloween Night Candy Bars

Decorate candy bars of any size with designer paper and Halloween images.

I hope you can use these ideas to inspire your own ideas with the materials you have! Actually most of these could be used as Christmas ideas or for a birthday party.  Just change the colors, the paper, the images.

Have fun making some last minute Halloween treats for family, friends, or your trick-or-treaters!


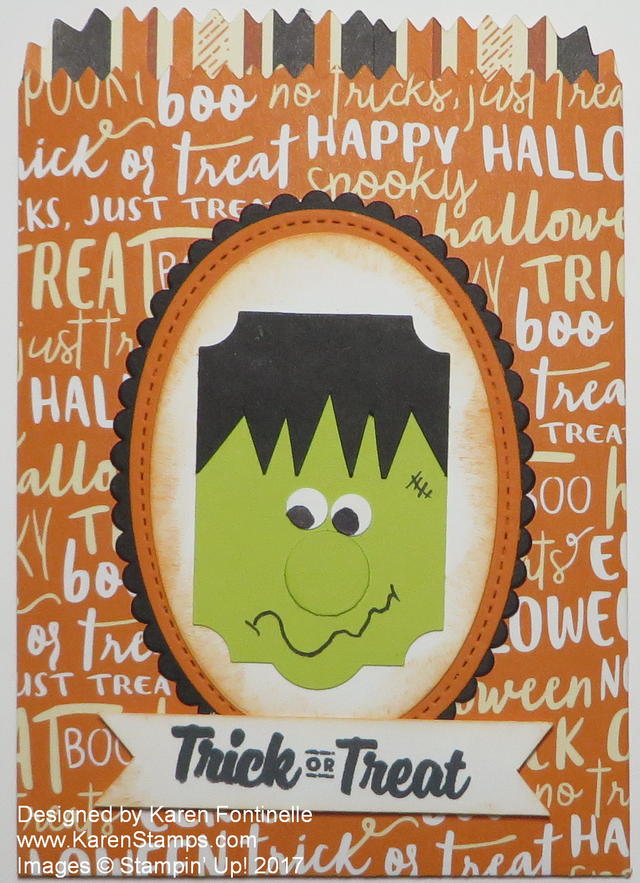
Frankenstein Mini Treat Bag For Halloween

Frankenstein Mini Treat Bag For Halloween

As I was reading something online, I saw a mention of Frankenstein, and I realized with Halloween almost here, I’d almost forgotten about Frankenstein.  We used to make lots of fun cards with one of the original steel dies we used to have, the Top Note Die.  It was perfect for a Frankenstein head!  But as I glanced through some images of Frankenstein to refresh my memory of how his face looked, I noticed people were using various punches to make Frankenstein, perhaps a little smaller though!  I saw one candy project using the Everyday Label Punch, and decided to make a Frankenstein face with that punch.

The face turned out small, naturally, using a punch, and I could have added it to many different things, like the Clear Tiny Treat Box for one thing.  Since I love the Mini Treat Bag Thinlits Dies so much, I decided to make a Mini Treat Bag out of the Spooky Night Designer Series Paper and make the Frankenstein face the focal point.

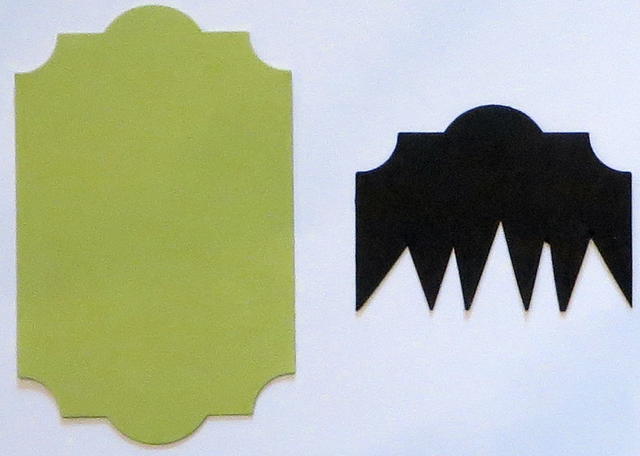
This is how you start using the Everyday Label Punch to make the Frankenstein face:

Everyday Label Punch for FrankensteinI punched one label out of Lemon Lime Twist Cardstock and one out of Basic Black. The Basic Black one I cut in a little less than half and then just snipped the bangs with my Paper Snips. Then I glued the black hair piece on top of the green face piece. I suppose you could leave the “lump” on top of his head, but I cut mine off, just following along that straight line on top.

For the Frankenstein face, I used the 1/2″ Circle Punch for his nose and sponged it with a little bit of Lemon Lime Twist Ink. For the eyes, I missed having the Owl Punch and forgot that would have been good to use for the eyes.  Use whatever punch that you have to punch out the white eyes.  You can punch smaller dots for the eyes, but the simpler thing to do is just color in the black part of the eyeballs with a black marker.  I used my 1/4″ Handheld Punch for the white eyes. They are a little small but that’s okay.  Just draw on his mouth and scar with a black marker.

To make Frankenstein stand out on the Mini Treat Bag, I just layered him on an Oval die cut, also one with the scalloped edge, and one of the Stitched Shapes Framelit Dies.  The greeting is from the Spooky Cat Stamp Set.

Check out Stampin’ Up! Online for all your papercrafting and stamping supplies!

Halloween Candy Corn Treat Boxes

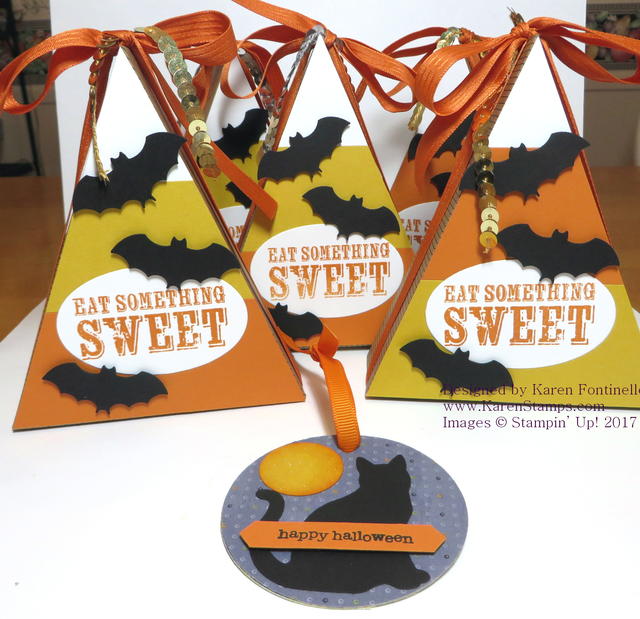
Halloween Candy Corn Treat Boxes

Someone asked me to make some kind of treat boxes for a school festival, and these Halloween Candy Corn Treat Boxes are what I came up with after looking at a whole bunch of ideas online. As it turned out, these were made with the boxes in a Paper Pumpkin Kit a couple of years ago. The kit came out in time for Thanksgiving and the boxes were designed to look like a piece of pie. Since it’s usually just three of us at Thanksgiving, I saw no need to make these boxes so of course I saved the kit. Sometimes hoarding is good!

Even if you don’t have an old Paper Pumpkin Kit with pie shaped boxes, you can easily make your own triangle boxes yourself out of cardstock.  You can see one I made HERE in this post.  Just cut a strip of cardstock, score in half, then score from the halfway mark on each side to the middle point at each end.

Triangle Box Drawing

I pretty much copied the sample box I saw online. Instead of trying to cut the colored cardstock strips to an exact length and angle, which which have been a little difficult to measure ahead of time, I just adhered each “too big” strip onto the box lid and then trimmed off the excess length with scissors.  Just make the strips whatever width you like, no need to measure.  Just fit them on the box.

The bats were punched with a retired Bat Punch from Stampin’ Up!.  The greeting, as it turns out, after I searched through many old stamp sets, was from a Paper Pumpkin Kit!  Even when you make the project, you still have an exclusive little stamp set to keep! After filling the box with some candy corn in a cello bag, I closed up the box and tied the Pumpkin Pie ribbon around the sides and added a bit of Gold Sequin Trim. We used to have bigger sequin trim but now we have Mini Sequin Trim.

Just for an extra surprise in the box, I decided to make the little black cat Halloween ornament.  All that took was to die cut a circle out of lightweight cardboard and cover with designer paper.  In this case I used some retired paper. Then I used the Cat Punch, a small circle for the moon and sponged the edges, stamped the greeting from Teeny Tiny Wishes (still one of the best stamp sets!) and punched the greeting with the Classic Label Punch.

This was such a fun project to make! Try your hand at making the triangle box!  You can make so many variations for treats or small gifts for most any occasion!

SHOP STAMPIN’ UP! ONLINE HERE!

Join Paper Pumpkin Today to Get the “A Season of Style” Kits!

Christmas MailboxWouldn’t you like to get a special box in your mail in a couple of weeks?  Join Paper Pumpkin by October 10th and one of the two coordinating holiday papercrafting kits will be on its way to you!

Paper Pumpkin is the kit from Stampin’ Up! that comes in your mailbox once a month with a complete project inside for you to make. Everything you need is included –  paper pieces, exclusive stamp set, and ink spot to use.

For the first time, Stampin’ Up! is offering two coordinating Paper Pumpkin kits, one for October and one for November.  Each kit stands on its own, so you don’t HAVE to have both, but surely you want to!

Watch Carrie from the Home Office explain about the two kits!

Click HERE  for my Personalized Link for you to use!  

Paper Pumpkin Season of Style Banner

If you want to make some holiday projects without buying a lot of supplies or designing a project, these kits are for you!

If you are a new crafter or have never been a crafter, these kits are for you because they are easy enough for anyone.

If you tried Paper Pumpkin before, these kits are for you to try again!  Holiday projects are always the best!

If you are an experienced papercrafter and/or stamper, these kits are for you! Fun to just open the box for a change and have a project ready to go! Nothing for you to plan unless you want to change up the planned project with your own spin on it! The supplies are for you to use however you like!

JOIN PAPER PUMPKIN TODAY! JUST CLICK HERE!

Join by October 10th to receive the October Paper Pumpkin Kit!

Join by November 10th to skip the October Kit but get the November Kit!

Join by October 10th to get both the October and November Kits plus all the ones following! You won’t miss a thing!

You know you would love to make some holiday projects yourself!  Sign up for Paper Pumpkin and know that some cards and gifting projects will be coming your way!


Don’t Miss My 12 Weeks of Christmas Emails!

Don't Miss My 12 Weeks of Christmas Emails!The “12 Weeks of Christmas” is a series of emails I send out to my mailing list subscribers annually.  It is my gift to them for being on my list and receiving my emails about Stampin’ Up! news and offers plus projects to make complete with directions.

The holiday emails are much the same, with one holiday project each week and the complete tutorial. It’s really fun if you love ideas, and I do!!  I hope you will join us!

The only way you can receive these emails is to be on my Stamping With Karen Mailing List!  Sign up on my blog at www.KarenStamps.com or right here in the Sign Up box below!  Week One has already gone out, but get in on the other 11 weeks right now!  Next issue at 1:00 pm Wednesday, October 11th. Don’t miss it!


Subscribe to My Mailing List! 

Exclusive Projects

Stampin’ Up! News & Updates

FREE Welcome Gift!

We respect your email privacy

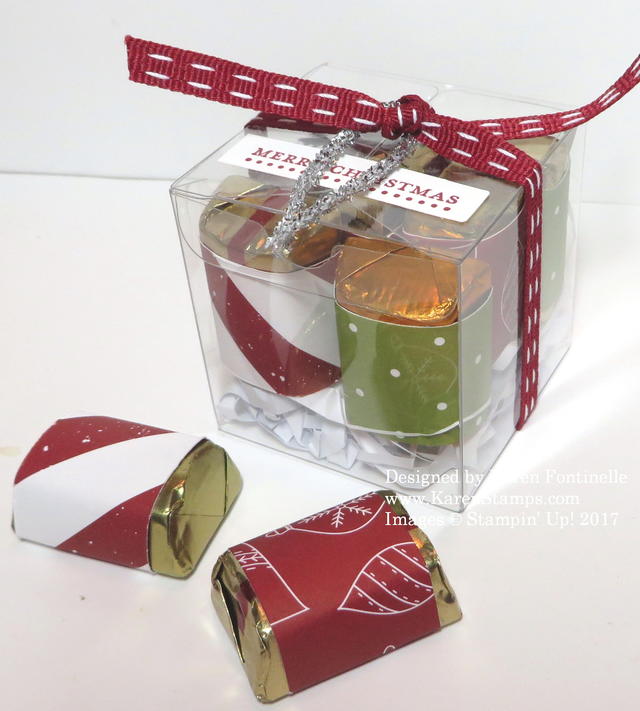
Christmas Tiny Treat Box

Christmas Tiny Treat Box

It’s time to stock up on the Clear Tiny Treat Boxes for making something like my Christmas Tiny Treat Box or treat boxes for any other occasion. They are very easy to decorate and fill with candy or a small gift.

These little boxes are really handy to have.  They are small and come flat so storage is no problem.  Just pull off the plastic protecting their surface and assemble.  Be sure to crease the score lines well on the boxes.  I usually fold  back and forth where I can to get a good crease.  That makes for a “sharper” box.

Decorate the Tiny Treat Boxes any way you like!  For Christmas, like the box above, you might easily wrap some Christmas designer paper around the outside around the sides. Another variation might be to wrap the paper from top to bottom, covering the lid and decorating that way. After wrapping the Be Merry Designer Series Paper around the outside of the box, I also wrapped a piece of Cherry Cobbler 1/4″ Double-Stitched Ribbon around the the middle and simply tied in a knot,  You really can’t decorate a small gift box quicker and easier than this! And if you wanted to, you could embellish way more than this!

If the gift or treat or favor is for a birthday, of course just wrap with birthday or generic paper, tie on some ribbon, maybe add a greeting or an embellishment or tag, and you have something quick and ready to go for the recipient.

Here are some Halloween Tiny Treat Boxes With Spooky Cat in THIS POST that I made in August to get ready for Halloween. Just think of the possibilities!  You get 16 boxes that are food safe, 2″ x 2″ x 2″ and only cost $7.50. Good to order some and keep on hand, even if you don’t have a specific occasion in mind at the time.  They will be useful for lots of things.

And don’t forget, the Be Merry Designer Series Paper is one of the papers in the Buy 3 Get 1 Free DSP Sale going on now all month in October.

Stock up during the special offers going on now!

Shop Stampin’ Up! today online HERE!


You Won’t Want to Miss These Stampin’ Up! Specials!

Designer Paper Sale 2017

October is a great month at Stampin’ Up! with some special sales going on!  If you love our designer series papers, guess what?  You get to look at the list of papers on sale and choose which three from the list you purchase and which one is free!  That means you can pay for three $10 paper stacks, and get a $13 Specialty paper for free if you like!  And you can order as many (and get as many free) as you would like!

The Details:

  • Sale period: October 1–31, 2017
  • All order types qualify for this promotion.
  • There is no limit to how many times participants can buy three packages of Designer Series Paper and get one free during this sale.
  • Participants can choose which three packages of Designer Series Paper they will order from the sale items and which package to receive for free.
  • Designer Series Paper purchased as part of a Starter Kit does not qualify for this sale.
  • Designer Series Paper ordered with Stampin’ Rewards does not qualify for this sale.

Designer Series Paper Sale Items

AND THAT’S NOT ALL!!

World Cardmaking Day page1
World Cardmaking Day page2

Only for ten days, October 1-10, you can choose these stamp sets and Note Cards for 15% off!

Also, purchase a Fast Fuse and receive two refills FREE!

Click on the images above for a more readable copy!

Check out these specials at my Stampin’ Up! Online Store!  They all begin today, Sunday October 1, 2017.  The World Cardmaking Day specials are only good for ten days, Oct. 1-10.

SHOP STAMPIN’ UP! ONLINE HERE!

Quick and Easy Way to Decorate a Gift Box

Quick and Easy Way to Decorate a Gift Box

They say “presentation is everything” and that was true yesterday when I opened a box of skincare products I had ordered! I was probably more excited about the packaging than the products! Within the mailing box was a blue gift box and inside lots of that “shred” with my products plus a very nice kraft box (like you get jewelry in) filled with samples with the company name embossed in gold on the top. I knew I was going to save it in case i needed it for a gift, especially at Christmas.

Today, I looked at that box and thought, I might as well decorate it in a quick and easy way and it will be ready to go for the holidays and really won’t need any other giftwrapping. Consider looking for gift boxes like these I know you have around your house and get some ready for Christmas or a birthday or any occasion!

Even though I made this into a Christmas box, I used the fallish paper, Painted Autumn Designer Series Paper, but I used a side that just has green stripes and could be used for any project.  Nothing seasonal about it.  I layered it on a piece of coordinating Garden Green Cardstock. I used the Gold 3/8″ Metallic-Edge Ribbonwhich is a beautiful ribbon with that gold edge. I tied that around, laid on pieces of the Mini Tinsel Trim in Red and the Gold Mini Sequin Trimmade a knot, and then tied a bow. Actually, it looked pretty enough with just the knot and the trim pieces. So if you feel you are not good at bows, just tie a nice knot!

The tag is stamped in Real Red Ink from the Merry Little Labels Bundle.  With the Bundle, you get the stamp set and the coordinating Everyday Label Punch. You’ll want this punch to make this nicely shaped tag.  Might as well save 10% on the Bundle if you like the stamp set!  To layer the tag on a piece of Real Red Cardstock punched with the Everyday Label Punch, I just trimmed down the Very Vanilla stamped piece, even though I cut off the cut little design at the top and bottom of the tag.  That makes it fit on the layer, and then I added two round gold Metallic Enamel Shapes.

All in all, it took just a few minutes to make this quick and easy decorated gift box!

(Don’t order any designer paper until Sunday!  Just sayin’!)

But when you are ready to order some stamping and papercrafting supplies, just go to my Stampin’ Up! Online Store and shop! It’s easy to set up an account and then you are ready to go any time you want to order! It’s time to get started on those holiday craft projects and cards!

And if you need ideas, you will want to sign up for my Stamping With Karen Mailing List! Beginning next week, I will be sending out a special email every week with a new holiday project and tutorial and the only way you will be able to receive this is to be on my mailing list!  This is a special gift to my wonderful subscribers that I love doing every year!  (If you are already on my mailing list, no need to do anything, you will receive the holiday emails, too!)

Sign up for my Mailing LIst HERE to receive the “12 Weeks of Christmas” Emails!  Sign up before Wednesday, October 4 at 1:00 pm in order to receive the first issue.  You don’t want to miss out!  I have that email and project ready to go! It’s just waiting for your name and email to be included!!


Subscribe to My Mailing List! 

Exclusive Projects

Stampin’ Up! News & Updates

FREE Welcome Gift!

We respect your email privacy

Make Christmas Crafting Easy With TWO Season of Style Paper Pumpkin Kits

Paper Pumpkin Season of Style Banner New

Can you believe TWO exciting, holiday-themed kits in a row?! That will be the October and November Paper Pumpkin Kits! The way to receive BOTH of them is to subscribe to Paper Pumpkin by October 10th! Each kit stands alone, but I’m sure you will want to have both!

These Season of Style Paper Pumpkin Kits are designed for EVERYONE so you don’t have to worry if you are not already a crafter or if you think you are not artistic!  This is the perfect, fun time to try Paper Pumpkin when we all need as many holiday cards and gifting items as possible!  Order more than one kit and give one as a gift or invite several friends to order, and you can all get together and work on your kits!

Are you someone who always plans to make time for Christmas crafting but somehow you never get it done?   Stampin’ Up! makes it easy for those happy holiday dreams to come true with October and November’s back-to-back coordinating kits. They include everything you will need to quickly and easily make two full kits of merry and bright Christmas projects—without having to set aside a huge block of time.

Subscribe to Paper Pumpkin TODAY so you don’t miss out!  Just do it and it’s off your “to-do” list!

Halloween Witch Trick or Treat Candy Treat Box

Halloween Witch Trick or Treat Candy Treat BoxHere’s a fun Halloween Witch “Trick or Treat” Candy Treat Box to make for Halloween! I think it is the witch on this project that makes it interesting (although I could have made her face better I think!).

Remember the little Fall Treat Bag I made the other day on THIS blog post?  This treat box is made the exact same way, except it is not as tall and I left it open instead of closing the top! This box is about 3 1/4″ tall. I made it with the witch’s hat pattern in the Spooky Night Designer Series Paper.  For the treat inside, I used a Cello Bag to hold some chocolate candy (of course!) and tied with the Basic Black 3/8″ Shimmer Ribbon.  You can make your own “shred” to put in a gift bag or a treat box like this one by just cutting very narrow strips of cardstock and then crumbling it up in your hands as tight as you like!  The greeting is stamped from the Spooky Cat Photopolymer Stamp Set. I even sponged it a little with Pumpkin Pie ink.

Let’s talk about the witch!  I took out a scrap of Lemon Lime Twist Cardstock to possibly punch with a Circle Punch for the witch’s face.  This particular scrap already had a piece punched out with the Pretty Label Punch.  I saw that and thought that, at least, the bottom portion, lengthwise, could look like a witch’s face with a chin! Do you see it??

Lemon Lime Twist Punch outThat’s how I came up with the witch’s face using the Pretty Label Punch!  Then I just cut a triangle and an oval for her witch’s hat and added a small strip of the Pumpkin Pie 1/4″ Stitched Ribbon on her hat band. For her black hair, I just cut a scrap of Basic Black Cardstock and snipped it to look like hair for each side.  No special directions, just play it by ear!  I could have drawn on her face better but I didn’t give it much thought!  I was excited to make her face out of the Pretty Label Punch!

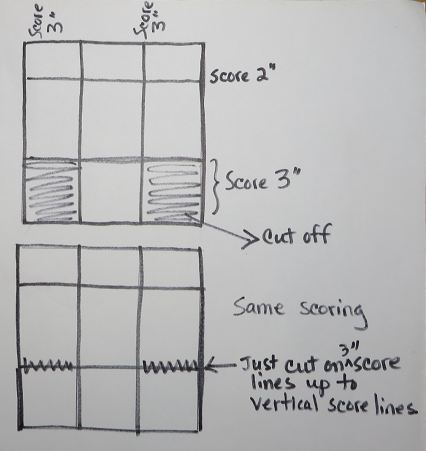
Box Diagram

Remember, check out my blog post HERE to see all the directions for making this box, but above you see the diagram.  For this box, since I wanted it to be shorter than the fall treat bag, I made it shorter than the 6″ width, about 5 1/4″.  The paper is 12″ long.  Score for the bottom flaps with the paper lengthwise at 2″.  Then turn the paper sideways, like the diagram, and score at 1″, 3 3/4″, 6 1/2″ and 9 1/4″. Cut out that little section I have marked with light blue. Fold and crease all the scored lines and assemble the box.

Don’t forget to subscribe to Paper Pumpkin so you get your October and November holiday kits in the mail!  Join Paper Pumpkin HERE!

Shop Paper Pumpkin Today!

Be Sure You Get the “12 Weeks of Christmas” Emails! Coming Soon!

Christmas MailboxWhether we want to believe it or not, Christmas is coming soon! We always want stamping and papercrafting ideas for the holidays, the more the better! Every year I send out a weekly email leading up to Christmas with one project idea and complete instructions and supply list to my mailing list subscribers. This is an “extra” for my subscribers and only they will receive these projects.  They won’t be on my blog or social media. I love doing this for them!

We usually begin with card ideas for the first several weeks, then move on to gift ideas and closer to the “last minute”,  gift bag ideas, tags and wrapping ideas! Copy them exactly or use them for inspiration to come up with your own ideas….or if you’re like me, just enjoy seeing more ideas! I’m all about the ideas, even if I can’t make everything!

If you would like to receive my upcoming “12 Weeks of Christmas” emails beginning SOON, please join us! Sign up for my Mailing List today! It’s the red box in the upper right corner of my blog!  You also get a FREE GIFT available to all subscribers any time, when you sign up.

(If you are on mobile, you might need to scroll down near the end of the blog posts.)

If you are already one of my subscribers, you don’t need to do anything!  You will automatically receive my 12 Weeks of Christmas emails when I begin sending them out!

JOIN MY STAMPING WITH KAREN MAILING LIST TODAY!

 Keep up with Stampin’ Up! news and offers, get stamping ideas on a regular basis PLUS the 12 Weeks of Christmas special emails! We’d love to have you!

Quick and Easy Fall Treat Bag For Candy or a Gift

Quick and Easy Fall Treat Bag For Candy or a GiftIf you need a quick and easy fall treat bag for some candy or a gift, making this little bag out of some pretty designer paper or cardstock is about as easy as it gets!  It uses half a sheet of 12″ x 12″ paper and then is scored and cut, folded and glued.  Leave it open at the top or tie shut with a ribbon or something else and you’ve got a cute little treat bag. Make it for any occasion by changing the paper and the greeting or decoration.

Start with a 12″ x 6″ piece of designer paper or cardstock to make this bag. I used a piece of the beautiful Painted Autumn Designer Series Paper  (I love this paper!!). Place the paper lengthwise in the Stampin’  Trimmer or Simply Scored board.  Score at 2″.  This will make the bottom of the bag. Next turn the paper the other way to score four times:  at 1″, 3 3/4″, 6 1/2″ and 9 1/4″. Fold and crease all the score lines with the Bone Folder. It really helps to get a good crease.

Now starting at what will be the bottom flaps of the box, the 2″ scored section, cut those four score lines up to the original 2″ score line. So you will have one little section that is 1″ wide and the rest are 2 3/4″ wide. Cut off the little 1″ section. This diagram isn’t drawn to scale but it gives you the idea! (And I learned a new skill!)  Cut out the light blue portion and cut up on the short score lines at the bottom to the horizontal score line to make the bottom flaps.Box Diagram

Put adhesive, something strong like Fast Fuse, Multipurpose Liquid Glue or Tear & Tape on that remaining 1″ strip. If you have the paper flat on the table, you can just fold over the opposite end and adhere it to that 1″ portion. Do this instead of fumbling with it in a box shape in your hands.

Punch two holes in the top, if you like and tie with a ribbon.  I used the Lemon Lime Twist 1/4″ Ombre Ribbon.  The greeting is stamped from the Labels to Love Stamp Set, stamped on Whisper White in Lemon Lime Twist Ink. Then it is punched out with the 1 3/8″ Circle Punch. The background is a piece of Lemon Lime Twist Cardstock punched with the Pretty Label Punch. I adhered the greeting on to this label, popped it up on Stampin’ Dimensionals on to the bag, and added some Gold Faceted Gems for some bling!

This is a very quick and easy treat bag you can make for fall or Thanksgiving or any occasion for a small gift or a candy treat!  Leave it open or close it up.  It will only take you a few minutes to make and the recipient will think it is fantastic!  If you think your friends would be interested in this blog post, you can share by clicking the buttons below!

Shop Stampin’ Up! for all your papercrafting needs!


Quick and Easy Gift Bag To Make

Quick and Easy Gift Bag To MakeLast night I needed a generic gift bag for a little care package for a friend whose house flooded during Hurricane Harvey, so this is the quick and easy gift bag I made that suited the purpose!

I found a medium size kraft gift bag that happened to have a business name printed on it.  That wouldn’t do, of course, so I cut a piece of the Fresh Florals Designer Series Paper Stack to cover the printing. If I was going to take a little more time with it, I probably would have put a layer of cardstock underneath the designer paper. But this was fine.

Next I stamped two daisies from the Daisy Delight Photopolymer Stamp Set in the same color as the paper, Berry Burst and punched them out with the Daisy Punch.  You can buy both the punch and the stamp set together in the Daisy Delight Photopolymer Bundle and save 10%. I guarantee you, you will also want the coordinating Delightful Daisy Designer Series Paper. Rather than stamping a center for the daisies, I layered them with Stampin’ Dimensionals and used a Gold Faceted GemThese Silver and Gold Faceted Gems are different than other adhesive “dots” we have had, very rich looking!  You have to have them in your stash!

This is what I love about stamping!  Instead of feeling like I didn’t have an appropriate gift bag and running out to buy one, I just found something I already had and decorated it in a very simple fashion and it was good to go!  It only took a few minutes.  I probably couldn’t have gotten out of my neighborhood to go to a store that fast!  You know that a gift bag you decorate yourself, however simple or elaborate, will bring a smile to the recipient over the standard gift bags in the stores! (and if it doesn’t, then they are not “worthy”, as we like to say!!)

Save a few of these little shopping bags you probably receive at least in some of the stores where you shop, or you can buy a bunch at the craft store.  Then you have those on hand to decorate with paper and embellishments for any occasion! You also can make a quick and easy gift bags!

SHOP STAMPIN’ UP! ONLINE HERE!