Category Archives: 3-D, Gifts & Things

Wondrous Wreath Wine Bottle Tag for Thanksgiving

Wondrous Wreath Wine Bottle Tag for Thanksgiving

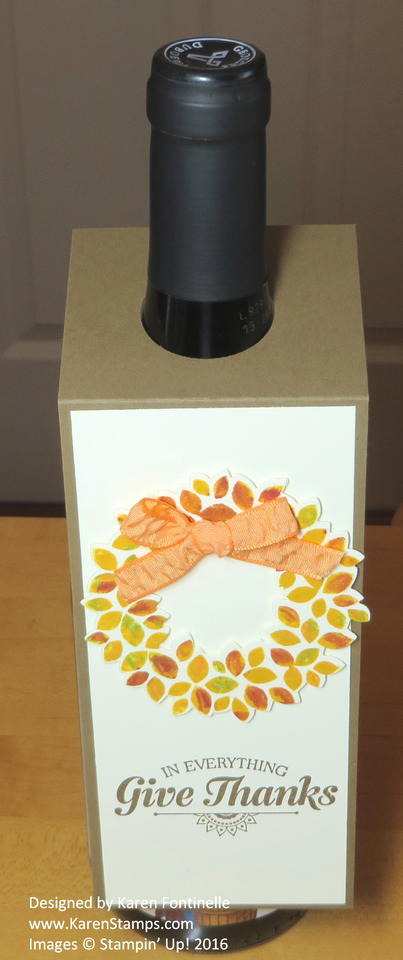
If you are taking a bottle of wine or another beverage to your Thanksgiving dinner for the host or even if you just want to fancy up your own wine bottle, make a tag to decorate the bottle, something like this Wondrous Wreath Wine Bottle Tag for Thanksgiving.  It is so easy and won’t take you more than a few minutes to make a simple one. Of course you can embellish it to your delight, but if you are short on time, just make the tag and stamp something simple on it. That’s it!  Your host or hostess will be thrilled!

To make the bottle tag, cut a piece of cardstock 9″ x 3″ and score at 2 1/2″. Punch a hole in the small portion using the 1 3/8″ Circle Punch. Add a Very Vanilla layer to the tag base of 8 3/4″ x 2 3/4″ and stamp or decorate.  I used the Wondrous Wreath Stamp Set and die cut with the Wonderful Wreath Framelits Dies. To get the multi-colored fall colors, I first stamped the wreath in Crushed Curry and then took Stampin’ Write Markers to color in various leaves randomly with Old Olive, Pumpkin Pie and a little Cherry Cobbler, I added a bow of Peekaboo Peach and popped the wreath up with Stampin’ Dimensionals,  The greeting is stamped from the Suite of Seasons Stamp Set (on sale now, 25% off!). I’m so glad I purchases that stamp set for myself on the sale because I have used it many times already!

If you aren’t taking a bottle of wine, perhaps your hostess would enjoy a few cards that you made and are hoarding in your craft room!  Put them in a cello bag and tie on a ribbon or make some easy pretty presentation!

Don’t forget about the Online Extravaganza during the Thanksgiving Holiday!  Stampin’ Up! Online will be open all through Thanksgiving!
Thanksgiving Punch Art Turkey Candy Bar Wrapper

Thanksgiving Punch Art Turkey Candy Bar Wrapper

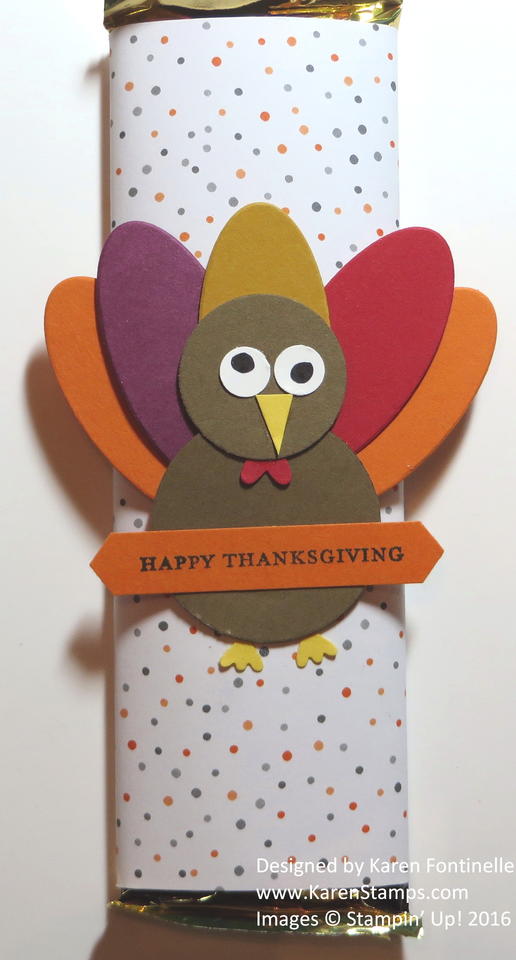
If you want a quick and easy favor for your Thanksgiving dinner, try this Thanksgiving Punch Art Turkey Candy Bar Wrapper. Just get some chocolate bars and wrap them in designer paper.  I used this generic sheet from the Halloween Night Specialty Designer Series Paper.

To make the punch art turkey to fit on the candy bar, I used the 1 3/8″ Circle Punch for the body and the 1″ Circle Punch for the turkey head. The feathers were cut out with the Layering Ovals Framelits Dies  and Big Shot, but you could also use an oval punch. The turkey feet are punched with the feet of the Owl Punch!  What would we do without the Owl Punch?! The eyes are also punched with the Owl Punch but I just colored in the pupil with a black marker. The red waddle on the turkey is the little heart from the …..Owl Punch! Just cut the beak freehand.

The Thanksgiving greeting is from the ever-useful stamp set, Teeny Tiny Wishes and punched with the Classic Label Punch.  I still love and use the Teeny Tiny Wishes Stamp Set a lot.  It has almost every greeting in it that you could possibly need.

Just a fun punch art turkey to make for a  Thanksgiving candy bar wrapper or you could make the same one on a Thanksgiving card. Play with the idea and make something fun!

Shop Stampin’ Up! Online 24/7


Thanksgiving Candy Turkey Cookie Favor

Thanksgiving Candy Turkey Cookie Favor

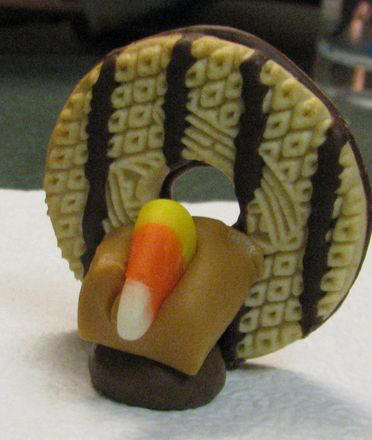
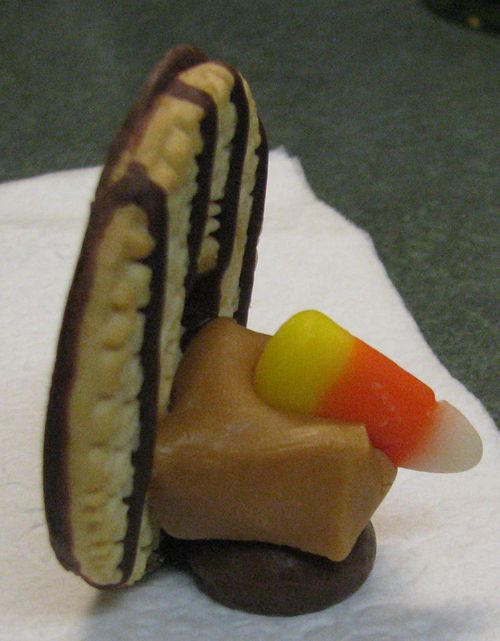
This Thanksgiving Candy Turkey Cookie Favor is not made with stamps, ink, or paper but it still is one of my favorite things at Thanksgiving! I think I found the idea in a family magazine way back when my kids were little and I made lots of them for preschool parties and elementary school or Scouts or whatever at Thanksgiving. There are similar ideas out there, usually involving Oreos, candy corn and frosting as glue. Those are cute, too, but I always thought these were the easiest to make and so cute!!

You will need Keebler Fudge Stripe Cookies, Hershey Kisses, candy corn and Kraft Caramels (or whatever similar brands you find at your store).

Unwrap several Hershey Kisses and have them sitting on a plate or napkin so they are ready, with a cookie and candy corn handy also. Put a caramel on a plate nad microwave it just a few seconds until it is slightly soft, but not melted or too soft. When the caramel comes out of the microwave, plop it on top of the Hershey’s Kiss. Immediately “smoosh” the cookie against the backside of the caramel until it sticks. Take the candy corn on edge and stick it into the caramel! There you have a turkey!

These turkeys are so fun to make for Thanksgiving! To make multiples, just have your ingredients ready to go. You can soften several caramels at a time on a paper plate in the microwave, maybe about six. You want to be able to work quickly when the caramels come out of the microwave so you can stick everything together. Have extras on hand because there will be some broken cookies! And you will need to kind of test your microwave and caramel softening factor to get the timing right. So just have extra ingredients on hand. And of course you can eat any malfunctions or leftover ingredients!

You can place these at each setting at your Thanksgiving table. If you want to add a placecard with someone’s name, can probably do that one way or another. My, how I used to like making placecards for family dinners when I was little!!

Pick up these ingredients at the store and try your hand at these Thanksgiving Candy Turkey Cookie Favors! Something different for Thanksgiving!

Thanksgiving Candy Turkey Cookie Favor Side

Don’t forget the Stampin’ Up! Online Extravaganza starting Monday, November 21!  Lots of products and special bundles on sale up to 40% off all week plus a Flash Sale on Monday ONLY, plus another Flash Sale on the last day, November 28. Get your wish list ready this weekend so you don’t waste time on Monday! You may be cleaning and cooking, but you deserve a break and some shopping!

Download the Online Extravaganza List HERE.

Shop Stampin’ Up! HERE!

(On Monday when you click the store link you will undoubtedly see a banner about the Online Extravaganza but it’s not there today yet.)


Ghirardelli Chocolate Candy Treat Holders

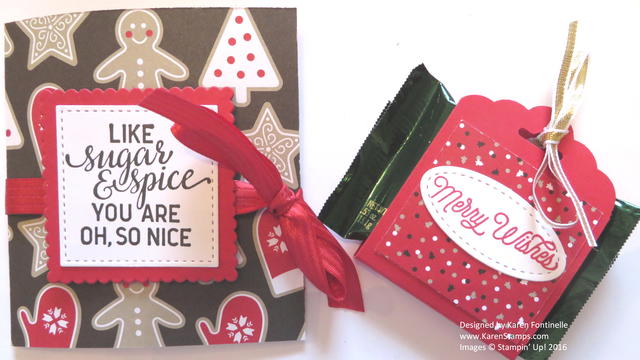
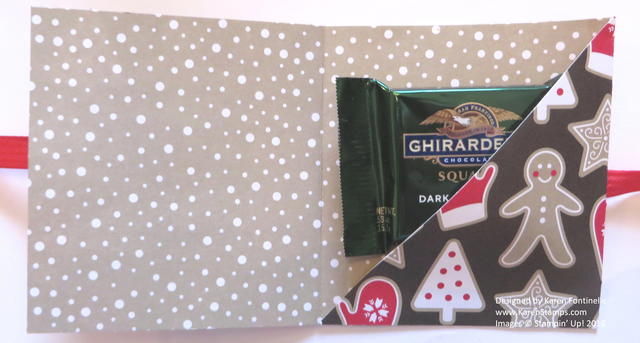
Ghirardelli Chocolate Candy Treat HoldersWhile we are on the subject of chocolate (from yesterday!), here are two more versions of Ghirardelli Chocolate Candy Treat Holders. Honestly, once you get started on these, you hate to stop! So many possibilities!

The first candy treat holder on the left is a folded over piece of Candy Cane Lane Designer Series Paper, cut 9 3/4″ x 3 1/2″. It is scored at 3 1/4″ from each end so that the paper is scored in thirds.  That gives a flap to fold on the inside to hold the candy (you could also do this for tea bags) that is trimmed at a diagonal so you can see the candy. Use an adhesive to hold the bottom of the triangle shut to hold the candy like Fast Fuse. Then just decorate the front of the candy holder however you like. I used the new Stitched Shapes Framelit Dies to cut out the greeting from the Oh What Fun Photopolymer Stamp SetThis stamp set is one that is on sale during the month of November.  You will be able to get lots of use out of this stamp set making your holiday cards and projects.

Ghirardelli Chocolate Folded Candy Treat Holder Inside

The smaller chocolate candy treat holder is cut 5 1/2″ x 2″ with each end punched with the Scalloped Tag Topper Punch. Then it is scored at 2 5/8″ and 2 7/8″. Fold, put the candy inside, perhaps with a Glue Dot to hold it inside, and tie with a ribbon at the top. I used the Gold 1/8″ RibbonI chose a piece of the Candy Cane Lane Designer Series Paper for the small piece on the front of the candy holder. The little greeting is from the Oh What Fun Stamp Setdie cut with the new Stitched Shapes Framelit Dies.  You DO want these dies in your collection!

Go stock up on some candies you can use in your holiday crafting, then have fun making all kinds of cute things like these Ghirardelli Chocolate Candy Treat Holders.

Shop Stampin’ Up! Online 24/7 for all your crafting needs!

Easy Ghirardelli Candy Holder

Easy Ghirardelli Candy Holder

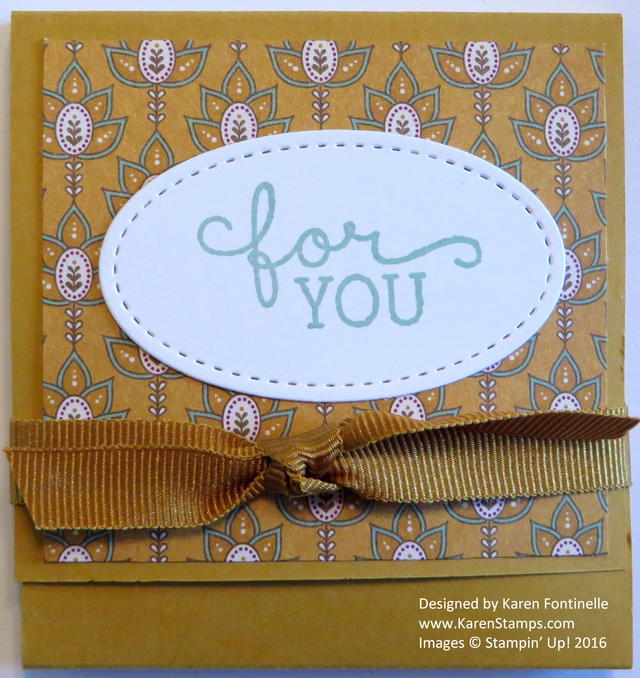
Here is an easy Ghirardelli Candy Holder for you to make, perhaps as a little table favor for your Thanksgiving guests or really for any occasion.  All you need are the basics on how to make this and you can decorate and embellish for any occasion. The other day I came across one of these I had made a long time ago for Valentine’s Day and I thought it was time for an update!

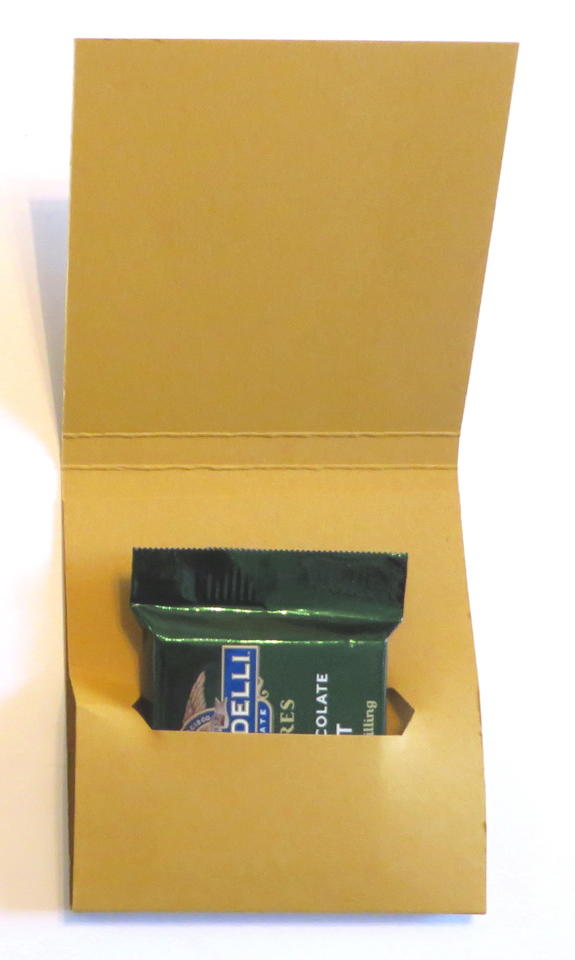
I cut my Delightful Dijon Cardstock 3″ x 9 5/8″. Actually, once you have the idea, you can modify the measurements to whatever you like. Then I scored this strip at 2 3/4″, 3″, 6 1/4″ and 6 1/2″. We used to use the Word Window Punch (retired) for the candy slot so today I tried the Classic Label PunchBefore you punch, fold on all the score lines and see how the packet will go together. I made the area that was a bit shorter to be the top flap. Therefore the longer area went inside and was punched to make the candy slot. From the bottom of the strip then I inserted it into the punch all the way, being careful on the sides to make sure it was centered. In this case, the punch was as wide as the paper, but you still need to make sure where the punch is in relation to the paper. After punching, I adhered the punched flap just about 1/4″ below the inside score line and used Fast Fuse Adhesive to hold it. If you are using SNAIL Adhesive, I would probably put the SNAIL on both areas that I was adhering.  I think that makes it hold better and stronger if you need that.

Candy Holder Inside

Now once you have the basic candy holder made, you can decorate it however you like! If you don’t find the exact greeting you want, just look through your stamps and surely you will find something generic you can use.  I opted for this “For You” greeting from the Birthday Blooms Stamp Set.  I’ve used that greeting over and over because I love the font and it suits almost any occasion.

I stamped the greeting on Whisper White and die cut with the Big Shot and the wonderful new Stitched Shapes Framelit Dies. Yes, you are going to love these new dies when you order them!  These dies put just a little bit of a stitched look around the shape. Many times it is just a little something that you need to make your card or project “pop” and these dies will do that! I could have put an oval layer behind the greeting, but for one thing, there wasn’t much space and for another, it looked good the way it was! I stamped it in Mint Macaron ink because that is one of the coordinating colors of the designer paper. Cut some designer paper for the front flap, leaving either a 1/4″ or 1/8″ border around the outside.  Since my outside flap was 2 3/4″ x 3″, I cut the designer paper, a pattern from Petals & Paisleys, to 2 1/2″ x 2 3/4″. I think this paper is beautiful for all your fall and Thanksgiving projects!

To finish my candy holder project, I used a piece of Delightful Dijon ribbon in the Ribbon 3/8″ Trio Packjust tied around to hold the flap down, in the Stampin’ Up! Holiday Catalog.  You can view the catalog online or if you would like your own hard copy, please email me at Karen@KarenStamps. com.  I’ll be happy to mail one to you. It’s not too late to enjoy the Holiday Catalog and enjoy you will!

So go hit the “craft supply” section in the candy department and pick up some candies you know you can use during the holiday season, starting now! These square chocolates are good for a lot of projects!

Shop Stampin’ Up! for color coordinated paper and ink!


5 Ways to Relieve the Election Stress

American Flag with AMERICA

Here are 5 ways to relieve the election stress the day after!  Whether you are celebrating or disappointed today, take some time for yourself, and of course, Stampin’ Up! has all the perfect things! We all know stamping is therapy!

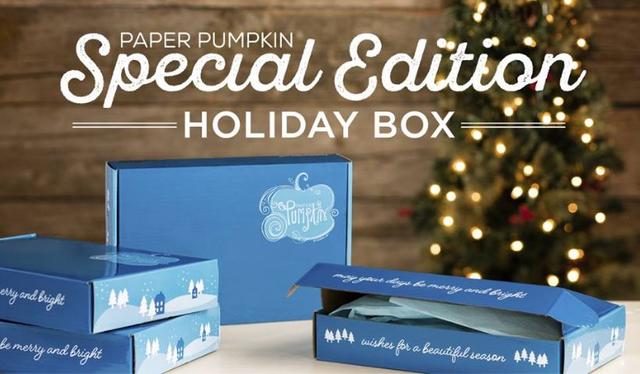
  1.  Join Paper Pumpkin and have stress-free crafting time once a month when your Stampin’ Up! kit arrives in the mail! All supplies are included in the box (normally red!).  All you have to do is sit down and craft! It comes with a video and directions. Subscribe by tomorrow to get the November Kit in this Special Edition Holiday Box. Stampin’ Up! says if you like the box, you’ll love what’s inside!  Can’t wait! Click HERE!Stampin' Up! Paper Pumpkin Special Edition Holiday Box

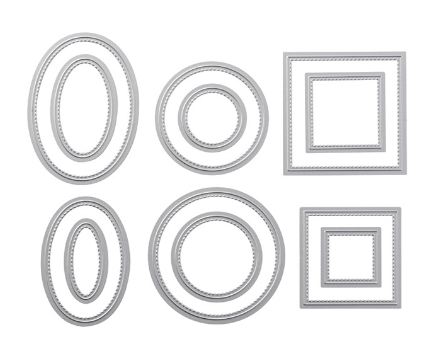
2.  Treat yourself to the brand new Stitched Shapes Framelits Dies that just came out November 1st.  These will be in the new annual catalog later on so this is an exciting pre-release! Mine are coming today!! And of course get yourself a Big Shot, too, if you don’t have one!  I use mine almost everyday!

Stitched Shapes Framelits Dies

3.  Order anything you want from Stampin’ Up! Go ahead, your husband said you could after the election! See, even Stampin’ Up! says on their banner, “now do something nice for you!” Click HERE to shop!Stampin' Up! Do Something Nice for Yourself

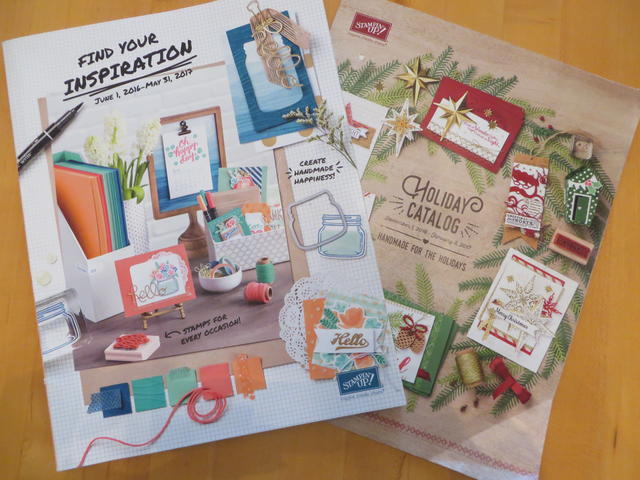
4.  Sit down with the therapeutic Stampin’ Up! catalogs and enjoy the inspiration! Every time you look through the catalogs you will notice a new idea or want to try something you see! Best reading material on the planet!!

Stampin' Up! Catalogs

5.  STAMP!!  Go ahead!  Just sit down with your supplies at hand and STAMP!  That stamp and block in your hand can work miracles! Just STAMP! Get your desk all messy with your paper, ink and stamps, then stand back and admire all the beautiful colors and materials!

Stampin' Up! messy desk

There you go!  The 5 ways to relieve election stress!  Hope you enjoy your day!

Shop Stampin’ Up! HERE for post-election stress relief!


Decorated Christmas Votive Holder

Decorated Christmas Votive Holder

The other day I was at a holiday market and I saw a round votive holder with a piece of burlap wrapped around the middle and some other embellishments attached so that inspired my Decorated Christmas Votive Holder. Stampin’ Up! no longer carries the wide burlap ribbon , but we do have this 5/8″ Burlap Ribbon which is very soft, flexible and easy to use. For a little accent I also wrapped around the Real Red 3/8″ Stitched Ribbon. I love red and I love this ribbon!  Stampin’ Up! really has the best RED, don’t you agree?!

To decorate the votive, I decided on the Christmas tree in the Santa’s Sleigh Stamp Set.  The tree is really too tall for the votive but the design was such that I could cut the top off the tree and it still looked fine. I also stamped the red bows that come in the set and colored with a Real Red Stampin’ Write Marker and adhered to the tree. (Both the Real Red & Crumb Cake Markers can be purchased in the Holiday Catalog). You can’t see it in the photo, but I also felt compelled to play with both Wink of Stella Glitter Brushes!  I applied a little of the Gold Wink of Stella to the tree branches and some Clear Wink of Stella to the bows. Those glitter brushes are dangerous – once you start using them you can barely make yourself stop, they are so much fun! For the star on top of the tree, I used a retired star punch and Gold Glimmer Paper.

I think there are so many possibilities for decorating little votive holders for Christmas like this one. Pick up a few at the store, get out your stamping stuff, and see what you come up with!  They will make nice little gifts.

It’s not too late to get a Stampin’ Up! Annual Catalog and Holiday Catalog if you are interested in Stampin’ Up! products! Just email me at Karen@KarenStamps.com and I can mail the catalogs to you.

One more thing — if you are not on my Mailing List, be sure to sign up in the red sign-up box in the upper right of my blog (or in the pop-up box!) so that you get my monthly emails with projects and Stampin’ Up! news and specials PLUS right now the rest of my 12 Weeks of Christmas emails. You will also get a free gift just for signing up! Do it right now so you don’t forget!

Shop Stampin’ Up! Online HERE!

Gift Wrap Ideas With Cellophane Bags


Enjoy this video from Stampin’ Up! and get wonderful gift wrap ideas and maybe just gift ideas themselves using the 6″ x 17″ Gusseted Cellophane Bags.  These are pretty large bags, given the 17″ length, so you can stick a large gift or treat inside! Think about when you are ready to make special treats for the neighbors or a group of friends, wouldn’t these bags be perfect to use for your holiday mix, special bread or cake, bag of cookies or candy, bottle of wine, and more? Just put your gift inside,  tie with a pretty ribbon and add a cute tag! If you don’t want the bag quite so long for a smaller gift, just cut off some of the length.

For another gift presentation when you want the gift to be hidden, just wrap pretty tissue paper all around the gift and insert it in the cello bag! You can also stamp on the outside of the bag if you use Stazon ink.

Remember, presentation is everything!! No matter what the gift, a big part of the thrill will be how you wrap and present the gift, and we stampers have all kinds of materials and ideas to make that the best part!

6x17 Cellophane Bag Gift Wrap

6x17 Cellophane Bags

Stampin’ Up! also carries other sizes of cellophane bags. These are nice bags, completely clear and crisp, not that kind of thick, cloudy, cheaper looking kind of bag you can sometimes buy at other places.

Get On My List for 12 Weeks of Christmas!

12 Weeks of Christmas Holiday Emails

Now that Halloween is over, you know Christmas is just around the corner and the time to be working on cards and gifts is here! Every week I send out a special holiday email to my mailing list subscribers with a new holiday idea! We have already done four weeks of cards!  Next up are gift ideas and then gift wrap ideas. You can still get the rest of my 12 Weeks of Christmas emails if you sign up today! The next issue goes out in less than 24 hours!  You don’t want to miss any!

Join my Mailing List in the red box in the upper right side of my blog, or in the pop-up that may appear on your screen! It’s easy and no obligation! Join us today!

12 Week of Christmas – Week 5 – goes out tomorrow!  

Sign up in the red box on the right!

NEW!! Stitched Shapes Framelits and Stamp Sale!

Something brand new for November from Stampin’ Up!  And a stamp sale!

Stitched Shapes Framelits Banner

Not only are stitches a classic trend, they illustrate the quality, precision, and extra care taken when creating a piece. Giving a stitched gift shows just how much you value that relationship. Now you have the opportunity to purchase Stitched Shapes Framelits ahead of their official release in the 2017-2018 annual catalog and get 25% off coordinating stamp sets. These stamp sets bring out the beauty of the framelits.

Stitched Shapes Framelits Dies Flyer

With Stitched Shapes Framelits you can make paper stitches in seconds, turning any project into one that is stitched from the heart. And there’s more great news…although the 25% off stamps sets ends November 30, you will still be able to get the Stitched Shapes Framelits after that date.

Stitched Framelits and Stamps Flyer

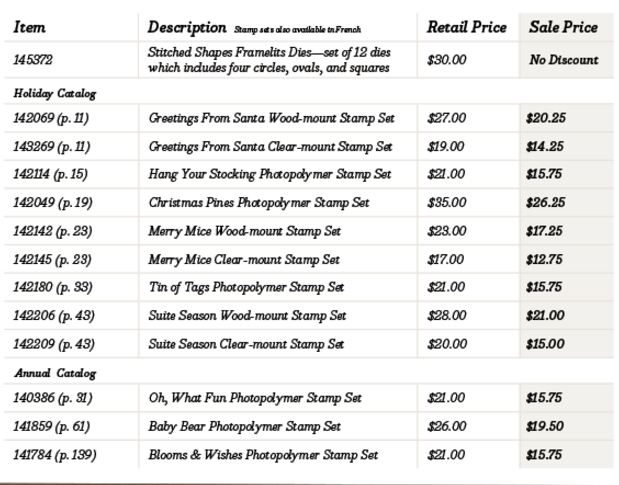
Item

Description

Retail Price

Sale Price

145372

Stitched Shapes Framelits Dies—set of 12 dies which includes four circles, ovals, and squares

$30 USD

No discount

142069 (HC p. 11)

Greetings From Santa Wood-mount Stamp Set

$27 USD

$20.25 USD

143269 (HC p. 11)

Greetings From Santa Clear-mount Stamp Set

$19 USD

$14.25 USD

142114 (HC p. 15)

Hang Your Stocking Photopolymer Stamp Set

$21 USD

$15.75 USD

142049 (HC p. 19)

Christmas Pines Photopolymer Stamp Set

$35 USD

$26.25 USD

142142 (HC p. 23)

Merry Mice Wood-mount Stamp Set

$23 USD

$17.25 USD

142145 (HC p. 23)

Merry Mice Clear-mount Stamp Set

$17 USD

$12.75 USD

142180 (HC p. 33)

Tin of Tags Photopolymer Stamp Set

$21 USD

$15.75 USD

142206 (HC p. 43)

Suite Season Wood-mount Stamp Set

$28 USD

$21 USD

142209 (HC p. 43)

Suite Season Clear-mount Stamp Set

$20 USD

$15 USD

140386 (AC p. 31)

Oh, What Fun Photopolymer Stamp Set

$21 USD

$15.75 USD

141859 (AC p. 61)

Baby Bear Photopolymer Stamp Set

$26 USD

$19.50 USD

141784 (AC p. 139)

Blooms & Wishes Photopolymer Stamp Set

$21 USD

$15.75 USD

*AC refers to the annual catalog; HC refers to the holiday catalog.

Details:

  • Stitched Shapes Framelits available beginning November 1, 2016
  • November 1-30, 2016: select stamp sets 25% off
  • Stamp sets also available in French
  • Ordering Deadline (25% off stamp sets): November 30, 2016, by 11:50 PM (MT)

Shop Stampin’ Up! HERE!


Last Minute Halloween Ideas

Layered Letters Alphabet Spooky Halloween Card

I thought I would look back and give you some last minute Halloween ideas with stamp sets and supplies you might have from last year if you don’t have the most recent ones. We gotta work with what we have, right?! Of course all you really have to do is change paper or colors or stamp sets to take an idea of things you don’t have and make something similar.

Above you see my Layered Letters Alphabet Spooky Halloween Card from last year using the Layered Letters Alphabet.  Love that! I used some Halloween colors and added some googly eyes. Click the link for the card for all the details on the blog post.

Trick or Treat Watercolor Wash Halloween Card

On my Trick-or-Treat Watercolor Wash Halloween Card I simply used the Watercolor Wash Background Stamp colored with various markers for the background.  You could also just pick up some ink refill with the Aqua Painter or a paint brush to make a similar background! Then just stamp over it with some greetings and embellish as you desire. Click the link for the card for all the details.

Easy Halloween Eyeball Card

Now here’s an easy Halloween card anyone can make or put on a treat bag or box for Halloween! It’s my Easy Halloween Eyeball Card! Click on that link for all the specifics!

Halloween Happy Haunting Sour Cream Containers

My goodness, don’t forget about the Sour Cream containers like these Halloween Happy Haunting Sour Cream Containers! These have been popular since I first became a Stampin’ Up! Demonstrator and still are! So easy to make.  Click the link for the directions.

If you still need more ideas, just click on the Categories drop down box on the right side of my blog and choose Halloween. You’ll be able to go back in time and see lots of projects!

Get the best in papercrafting supplies at Stampin’ Up! Online!

How to Make a Halloween Triangle Treat Box

Halloween Triangle Treat Box

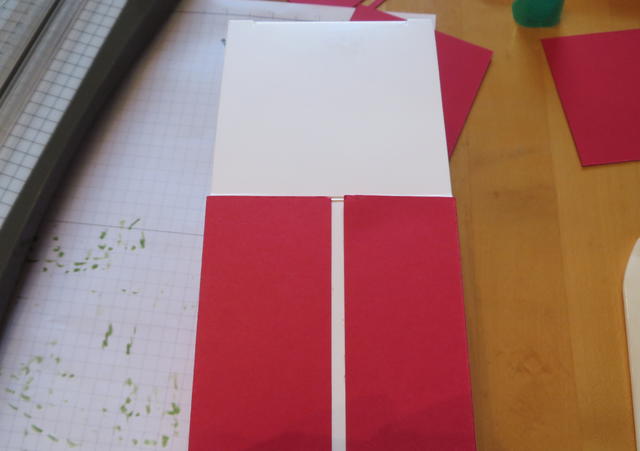
Here is how to make a Halloween Triangle Treat Box, one of my favorite treat boxes to make! I have been making these triangle boxes for years and find them so easy to make! Just take a rectangular piece of paper, score it in half, then score from the middle of each end to the outside edge of that center score line. Fold, punch holes in the ends for ribbon, and decorate.

Check out the photo below to see how it is scored and folded.How to Make the Halloween Triangle Treat Box

For this particular box, take a piece of cardstock or designer paper cut 8 1/2″ x 4 1/2″.  Score at 5 1/2″.  On the ends of the paper, mark the center measurement lightly with a pencil.  Score from this mark to the side of the center score line. See my imperfect drawing below for the general idea:Triangle Box Drawing

Just fold on all the score lines and use a hole punch to make holes in the ends for ribbon to tie or I suppose you could just adhere it shut after you put the candy or gift inside, maybe with Tear & Tape Adhesive. To tie mine together, I used the Halloween Night Baker’s Twine. The designer paper is the Halloween Night Specialty Designer Series Paper. To decorate the box, I stamped the mummy image from Jar of Haunts Stamp Set. The greeting is from Spooky FunThe greeting is punched out with the Classic Label Punch.

That’s it!  Try making bigger and smaller sizes of this box, although I think this size is pretty good. Couldn’t be easier!  You can use it for any occasion!

If you need a last minute treat box, try this Halloween Triangle Treat Box or save the idea for the next occasion when you need a box for a candy treat or small gift!

Shop Stampin’ Up! Online or contact me to put in your order for you!               I’m happy to!

Halloween Witch’s Boot Candy Treat Holder

Halloween Witch's Boot Candy Treat Holder

Here’s a Halloween treat holder I made a couple of years ago and it was so popular I thought I would post the photo again. It’s the Halloween Witch’s Boot Candy Treat Holder! I saw the idea online and had no directions, but I just figured it out on my own. I thought it was such a cute idea and we all have those empty toilet paper rolls or paper towel rolls around the house frequently. (Personally I think I’d rather use a paper towel roll!)

I wrapped Rich Razzleberry card stock around the roll, adhered with Multipurpose Liquid Glue.  Before I tried wrapping the roll I pulled the cardstock over the edge of my kitchen table a few times, which has a rounded edge, just to break up the fibers a little bit and make it easier to roll. You could use a bone folder or just anything rounded to get the paper to “relax”. For the sock stripes, you can use Pumpkin Pie 1/2″ strips of card stock. For the top of the boot, I just wrapped around a piece of Basic Black and folded back the corners. The buckle is a piece of Dazzling Diamonds Glimmer Paper (you could use any color Glimmer Paper) with a small square piece of Basic Black right in the center which makes it look like a buckle without having to actually MAKE a buckle! The “shoe” part is easy to make. Measure the roll diameter and then make the black paper slightly wider. Cut it at a diagonal as you see, Put glue on the bottom of the roll and stick it on the black card stock. When the glue is dry, you can trim off the excess in the back. Roll up the toe a little bit. There you have it! Put a little treat inside the boot.

This could be a little Halloween gift for someone, or a table decoration or party favor. Have fun making your Halloween Witch’s Boot Candy Treat Holder!

Shop Stampin’ Up! for the best in stamps, ink, paper, and accessories!

Halloween Chocolate Candy Treat Bag

Halloween Chocolate Candy Treat Bag

These Halloween Chocolate Candy Treat Bags are fun and easy to make, if you need a simple treat to make.  Actually you can make these candy treats for ANY occasion – just cover a chocolate nugget candy with designer paper! These narrow cello bags from Stampin’ Up! are fun to use, but if you don’t have them, just put the candies in any little bag, tie with a ribbon, and make a tag and you have a  cute little gift!

The Cookie Cutter Halloween Stamp Set gives you so many choices with the characters you can stamp. Don’t forget, you can still use the scarecrow through the fall and for Thanksgiving so don’t put away this stamp set after October 31! And if you are thinking ahead to Christmas (surely you are!), get the Cookie Cutter Christmas Stamp SetYou will want the Cookie Cutter Builder Punch to go with it, so you might as well get the Bundle and save 10%.

To make the cute candies, I used the Halloween Night Specialty Designer Series Paper to cover the chocolate nuggets.  You just need a 1″ x 3″ strip of paper.  I adhered them on the back of the candy with a Mini Glue Dot. The adhesive is only on the paper, not touching the candy.  I have made tons of these candies through the years for gifts or treats. For Christmas, of course, use Christmas colors or Christmas paper. For birthdays, use some other design. Whatever! And remember, some of the patterns in the Halloween Night paper can be used beyond Halloween, so keep it out and handy after Halloween!

These narrow cello bags are the 2″ x 8″ Cellophane Bags. They are only $3 for 50 bags! Remember, if you want to stamp on cello bags, use Stazon Ink. Check out all the different sizes and kinds of cello bags Stampin’ Up! offers because they are so handy to have on hand!

To make a little tray to hold the candies in the bag, cut a piece of cardstock 2″ x 5″.  Score 1/4″ along each long side to make the tray.  This will fit inside the bag. Cut a piece of ribbon or twine about 12″ long to tie the bag. Embellish as desired! Make a bunch and put them together assembly line style.

Halloween Treat Bag Pieces

Think ahead to Thanksgiving or Christmas or New Years and think about making some chocolate candy treat bags like this one!

Shop Stampin’ Up! Online HERE!

Cello Halloween Jar of Haunts Candy Treat Bags

Cello Halloween Jar of Haunts Candy Treat Bags

Need more last minute Halloween ideas like these Cello Halloween Jar of Haunts Candy Treat Bags?  This is what I came up with late last night!

Do you ever have late night stamping sessions when you should be calming down and getting ready for bed?  Isn’t that when you feel the most creative?! And then when you do go to bed, you can’t fall asleep because your mind is still swirling with creativity!

Although this size of cello bags is retired, there are other kinds and sizes of cello bags you can use. You do need Stazon Ink to stamp with because it dries on cello bags and plastic items like these treat bags. As with other times, what I thought I was going to stamp and make changed into some other idea as I was working on the project! It happens! As I started putting in my “filler” paper and candy, I got the idea to stamp the empty jar from the Jar of Haunts Stamp Set. Originally I was going to stamp the eyeballs randomly on the bag or an image from the Spooky Fun Stamp Set. But then I saw the jar and thought that would look like the candy in the bag was inside the jar. And then I thought the greeting would be cute stamped inside the jar! That’s how this came about!

The filler paper is just scraps of cardstock, run through the old Crimper we used to have, and then cut into thin strips with the Fringe Scissors. You can cut the strips with whatever scissors or paper cutter you have, it’s just that the Fringe Scissors do several strips at one time. Then, moosh the strips of paper all up with your hands and much as you can, and you have “filler”. I think there’s another name for it but I can’t think of it. Just a little something to take up space and add some color in a gift or treat bag.

The ribbon tying the bag is the Kraft Rope Trim unraveled into three pieces or rope!  I saw that idea online, so always be thinking outside the box with every product! I like the frazzled look of it rather than smooth for this Halloween treat bag!  The tag is made with the Tags & Labels Framelits Dies and Big Shot.  The greeting is in the Jar of Haunts Stamp Set.

Such fun tricks and treats you can make for Halloween!

Shop Stampin’ Up! Online 24/7!