Category Archives: 3-D, Gifts & Things

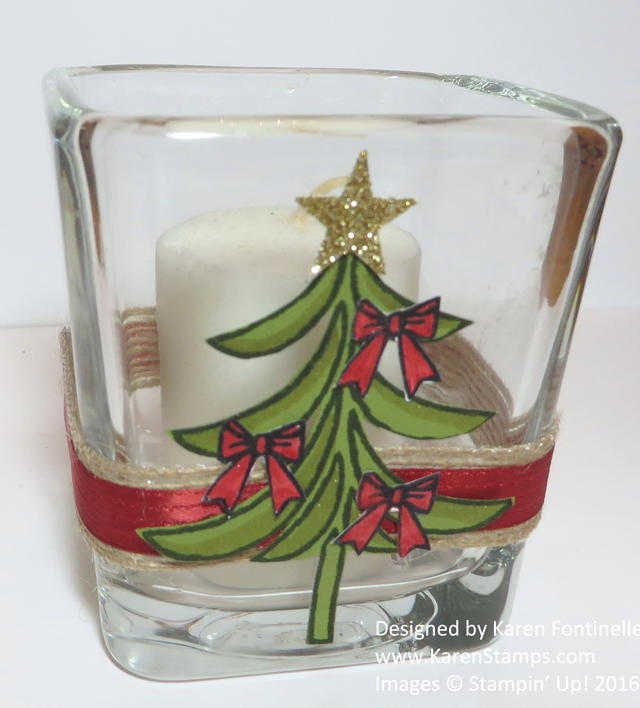
Decorated Christmas Votive Holder

Decorated Christmas Votive Holder

The other day I was at a holiday market and I saw a round votive holder with a piece of burlap wrapped around the middle and some other embellishments attached so that inspired my Decorated Christmas Votive Holder. Stampin’ Up! no longer carries the wide burlap ribbon , but we do have this 5/8″ Burlap Ribbon which is very soft, flexible and easy to use. For a little accent I also wrapped around the Real Red 3/8″ Stitched Ribbon. I love red and I love this ribbon!  Stampin’ Up! really has the best RED, don’t you agree?!

To decorate the votive, I decided on the Christmas tree in the Santa’s Sleigh Stamp Set.  The tree is really too tall for the votive but the design was such that I could cut the top off the tree and it still looked fine. I also stamped the red bows that come in the set and colored with a Real Red Stampin’ Write Marker and adhered to the tree. (Both the Real Red & Crumb Cake Markers can be purchased in the Holiday Catalog). You can’t see it in the photo, but I also felt compelled to play with both Wink of Stella Glitter Brushes!  I applied a little of the Gold Wink of Stella to the tree branches and some Clear Wink of Stella to the bows. Those glitter brushes are dangerous – once you start using them you can barely make yourself stop, they are so much fun! For the star on top of the tree, I used a retired star punch and Gold Glimmer Paper.

I think there are so many possibilities for decorating little votive holders for Christmas like this one. Pick up a few at the store, get out your stamping stuff, and see what you come up with!  They will make nice little gifts.

It’s not too late to get a Stampin’ Up! Annual Catalog and Holiday Catalog if you are interested in Stampin’ Up! products! Just email me at Karen@KarenStamps.com and I can mail the catalogs to you.

One more thing — if you are not on my Mailing List, be sure to sign up in the red sign-up box in the upper right of my blog (or in the pop-up box!) so that you get my monthly emails with projects and Stampin’ Up! news and specials PLUS right now the rest of my 12 Weeks of Christmas emails. You will also get a free gift just for signing up! Do it right now so you don’t forget!

Shop Stampin’ Up! Online HERE!

Gift Wrap Ideas With Cellophane Bags


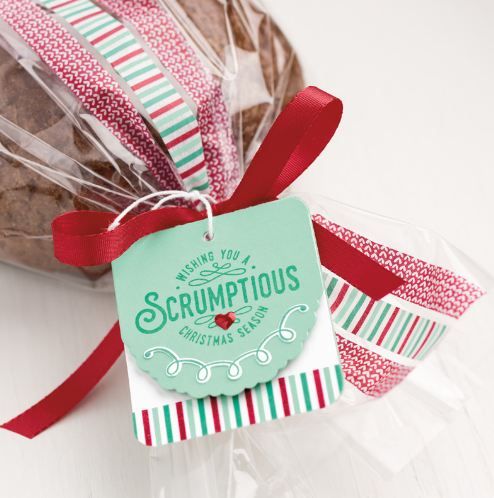
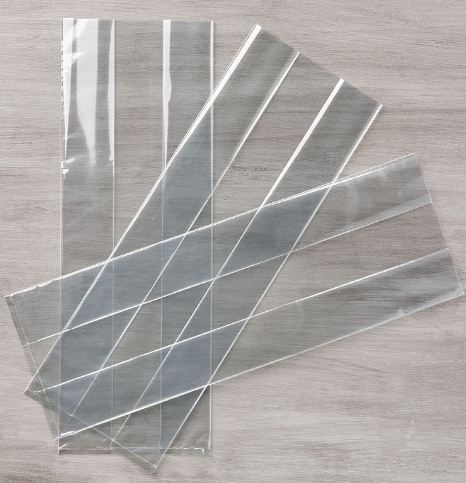
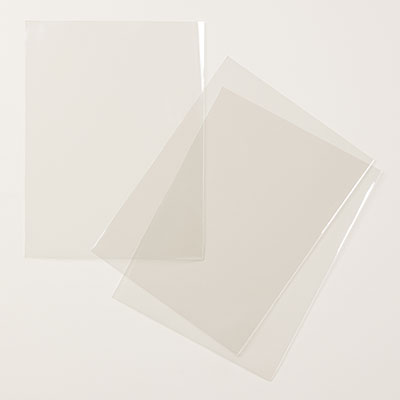
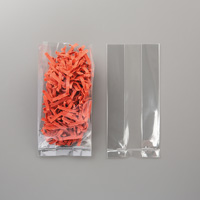
Enjoy this video from Stampin’ Up! and get wonderful gift wrap ideas and maybe just gift ideas themselves using the 6″ x 17″ Gusseted Cellophane Bags.  These are pretty large bags, given the 17″ length, so you can stick a large gift or treat inside! Think about when you are ready to make special treats for the neighbors or a group of friends, wouldn’t these bags be perfect to use for your holiday mix, special bread or cake, bag of cookies or candy, bottle of wine, and more? Just put your gift inside,  tie with a pretty ribbon and add a cute tag! If you don’t want the bag quite so long for a smaller gift, just cut off some of the length.

For another gift presentation when you want the gift to be hidden, just wrap pretty tissue paper all around the gift and insert it in the cello bag! You can also stamp on the outside of the bag if you use Stazon ink.

Remember, presentation is everything!! No matter what the gift, a big part of the thrill will be how you wrap and present the gift, and we stampers have all kinds of materials and ideas to make that the best part!

6x17 Cellophane Bag Gift Wrap

6x17 Cellophane Bags

Stampin’ Up! also carries other sizes of cellophane bags. These are nice bags, completely clear and crisp, not that kind of thick, cloudy, cheaper looking kind of bag you can sometimes buy at other places.

Get On My List for 12 Weeks of Christmas!

12 Weeks of Christmas Holiday Emails

Now that Halloween is over, you know Christmas is just around the corner and the time to be working on cards and gifts is here! Every week I send out a special holiday email to my mailing list subscribers with a new holiday idea! We have already done four weeks of cards!  Next up are gift ideas and then gift wrap ideas. You can still get the rest of my 12 Weeks of Christmas emails if you sign up today! The next issue goes out in less than 24 hours!  You don’t want to miss any!

Join my Mailing List in the red box in the upper right side of my blog, or in the pop-up that may appear on your screen! It’s easy and no obligation! Join us today!

12 Week of Christmas – Week 5 – goes out tomorrow!  

Sign up in the red box on the right!

NEW!! Stitched Shapes Framelits and Stamp Sale!

Something brand new for November from Stampin’ Up!  And a stamp sale!

Stitched Shapes Framelits Banner

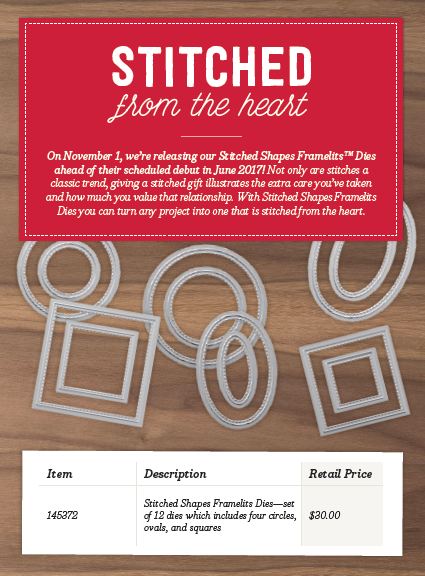
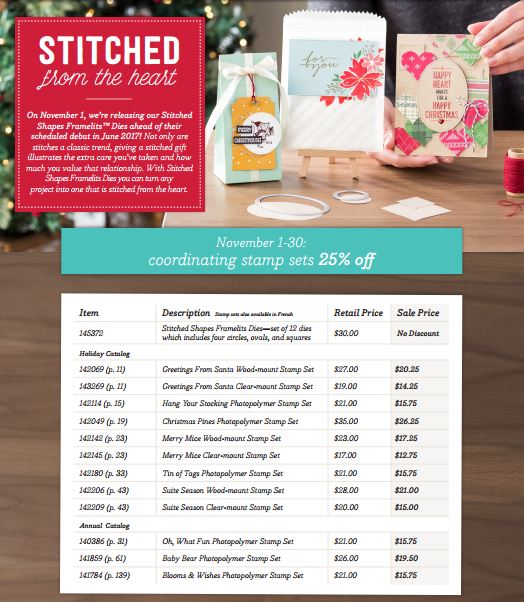
Not only are stitches a classic trend, they illustrate the quality, precision, and extra care taken when creating a piece. Giving a stitched gift shows just how much you value that relationship. Now you have the opportunity to purchase Stitched Shapes Framelits ahead of their official release in the 2017-2018 annual catalog and get 25% off coordinating stamp sets. These stamp sets bring out the beauty of the framelits.

Stitched Shapes Framelits Dies Flyer

With Stitched Shapes Framelits you can make paper stitches in seconds, turning any project into one that is stitched from the heart. And there’s more great news…although the 25% off stamps sets ends November 30, you will still be able to get the Stitched Shapes Framelits after that date.

Stitched Framelits and Stamps Flyer

Item

Description

Retail Price

Sale Price

145372

Stitched Shapes Framelits Dies—set of 12 dies which includes four circles, ovals, and squares

$30 USD

No discount

142069 (HC p. 11)

Greetings From Santa Wood-mount Stamp Set

$27 USD

$20.25 USD

143269 (HC p. 11)

Greetings From Santa Clear-mount Stamp Set

$19 USD

$14.25 USD

142114 (HC p. 15)

Hang Your Stocking Photopolymer Stamp Set

$21 USD

$15.75 USD

142049 (HC p. 19)

Christmas Pines Photopolymer Stamp Set

$35 USD

$26.25 USD

142142 (HC p. 23)

Merry Mice Wood-mount Stamp Set

$23 USD

$17.25 USD

142145 (HC p. 23)

Merry Mice Clear-mount Stamp Set

$17 USD

$12.75 USD

142180 (HC p. 33)

Tin of Tags Photopolymer Stamp Set

$21 USD

$15.75 USD

142206 (HC p. 43)

Suite Season Wood-mount Stamp Set

$28 USD

$21 USD

142209 (HC p. 43)

Suite Season Clear-mount Stamp Set

$20 USD

$15 USD

140386 (AC p. 31)

Oh, What Fun Photopolymer Stamp Set

$21 USD

$15.75 USD

141859 (AC p. 61)

Baby Bear Photopolymer Stamp Set

$26 USD

$19.50 USD

141784 (AC p. 139)

Blooms & Wishes Photopolymer Stamp Set

$21 USD

$15.75 USD

*AC refers to the annual catalog; HC refers to the holiday catalog.

Details:

  • Stitched Shapes Framelits available beginning November 1, 2016
  • November 1-30, 2016: select stamp sets 25% off
  • Stamp sets also available in French
  • Ordering Deadline (25% off stamp sets): November 30, 2016, by 11:50 PM (MT)

Shop Stampin’ Up! HERE!


Last Minute Halloween Ideas

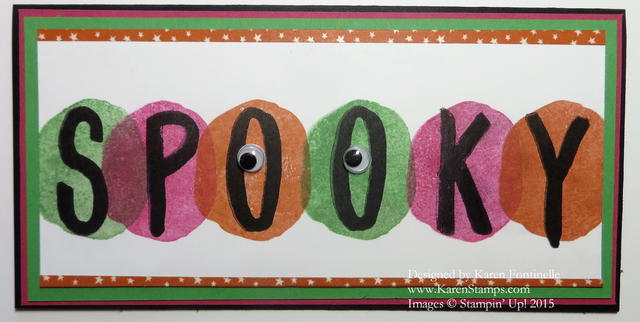
Layered Letters Alphabet Spooky Halloween Card

I thought I would look back and give you some last minute Halloween ideas with stamp sets and supplies you might have from last year if you don’t have the most recent ones. We gotta work with what we have, right?! Of course all you really have to do is change paper or colors or stamp sets to take an idea of things you don’t have and make something similar.

Above you see my Layered Letters Alphabet Spooky Halloween Card from last year using the Layered Letters Alphabet.  Love that! I used some Halloween colors and added some googly eyes. Click the link for the card for all the details on the blog post.

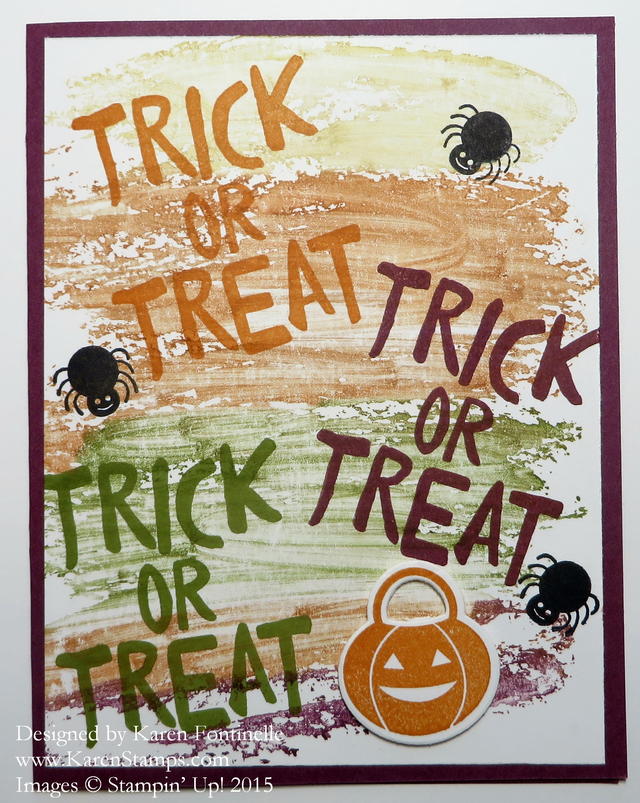
Trick or Treat Watercolor Wash Halloween Card

On my Trick-or-Treat Watercolor Wash Halloween Card I simply used the Watercolor Wash Background Stamp colored with various markers for the background.  You could also just pick up some ink refill with the Aqua Painter or a paint brush to make a similar background! Then just stamp over it with some greetings and embellish as you desire. Click the link for the card for all the details.

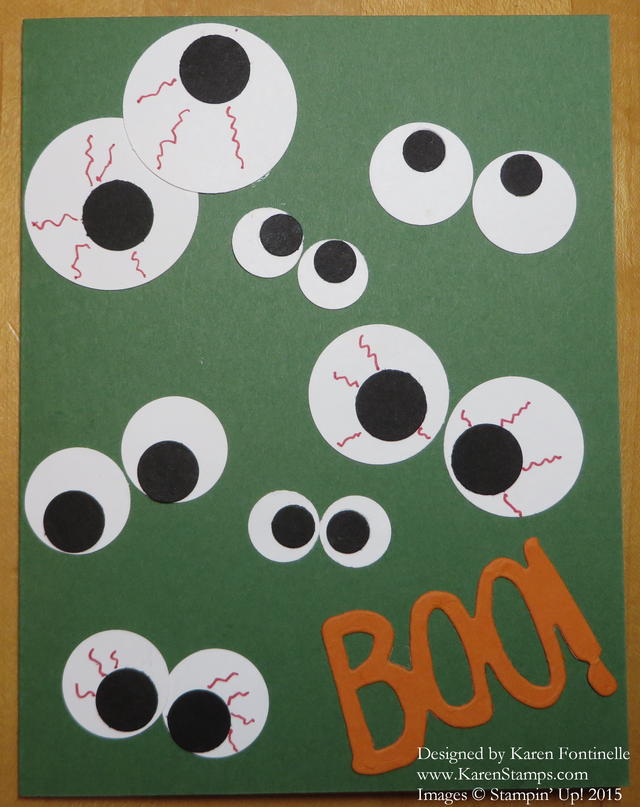
Easy Halloween Eyeball Card

Now here’s an easy Halloween card anyone can make or put on a treat bag or box for Halloween! It’s my Easy Halloween Eyeball Card! Click on that link for all the specifics!

Halloween Happy Haunting Sour Cream Containers

My goodness, don’t forget about the Sour Cream containers like these Halloween Happy Haunting Sour Cream Containers! These have been popular since I first became a Stampin’ Up! Demonstrator and still are! So easy to make.  Click the link for the directions.

If you still need more ideas, just click on the Categories drop down box on the right side of my blog and choose Halloween. You’ll be able to go back in time and see lots of projects!

Get the best in papercrafting supplies at Stampin’ Up! Online!

How to Make a Halloween Triangle Treat Box

Halloween Triangle Treat Box

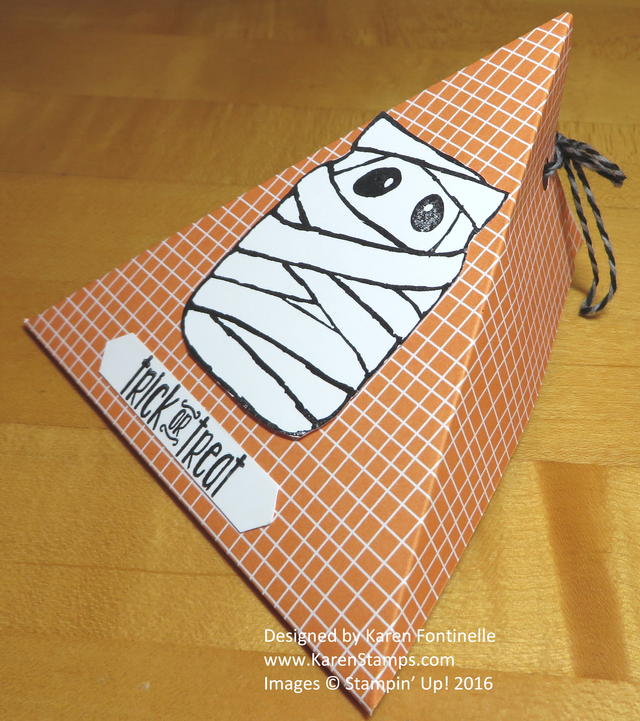
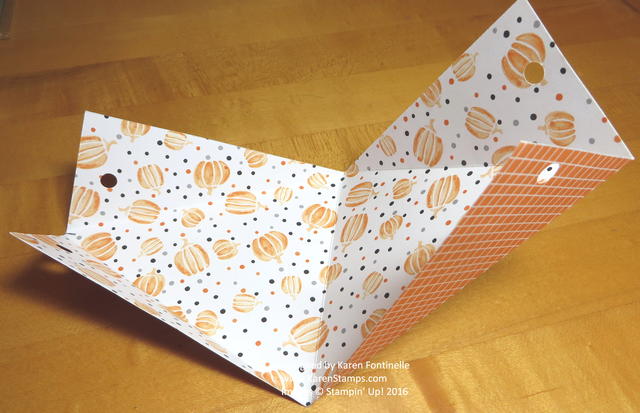
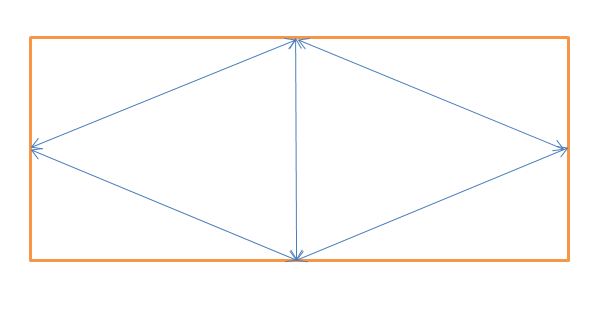
Here is how to make a Halloween Triangle Treat Box, one of my favorite treat boxes to make! I have been making these triangle boxes for years and find them so easy to make! Just take a rectangular piece of paper, score it in half, then score from the middle of each end to the outside edge of that center score line. Fold, punch holes in the ends for ribbon, and decorate.

Check out the photo below to see how it is scored and folded.How to Make the Halloween Triangle Treat Box

For this particular box, take a piece of cardstock or designer paper cut 8 1/2″ x 4 1/2″.  Score at 5 1/2″.  On the ends of the paper, mark the center measurement lightly with a pencil.  Score from this mark to the side of the center score line. See my imperfect drawing below for the general idea:Triangle Box Drawing

Just fold on all the score lines and use a hole punch to make holes in the ends for ribbon to tie or I suppose you could just adhere it shut after you put the candy or gift inside, maybe with Tear & Tape Adhesive. To tie mine together, I used the Halloween Night Baker’s Twine. The designer paper is the Halloween Night Specialty Designer Series Paper. To decorate the box, I stamped the mummy image from Jar of Haunts Stamp Set. The greeting is from Spooky FunThe greeting is punched out with the Classic Label Punch.

That’s it!  Try making bigger and smaller sizes of this box, although I think this size is pretty good. Couldn’t be easier!  You can use it for any occasion!

If you need a last minute treat box, try this Halloween Triangle Treat Box or save the idea for the next occasion when you need a box for a candy treat or small gift!

Shop Stampin’ Up! Online or contact me to put in your order for you!               I’m happy to!

Halloween Witch’s Boot Candy Treat Holder

Halloween Witch's Boot Candy Treat Holder

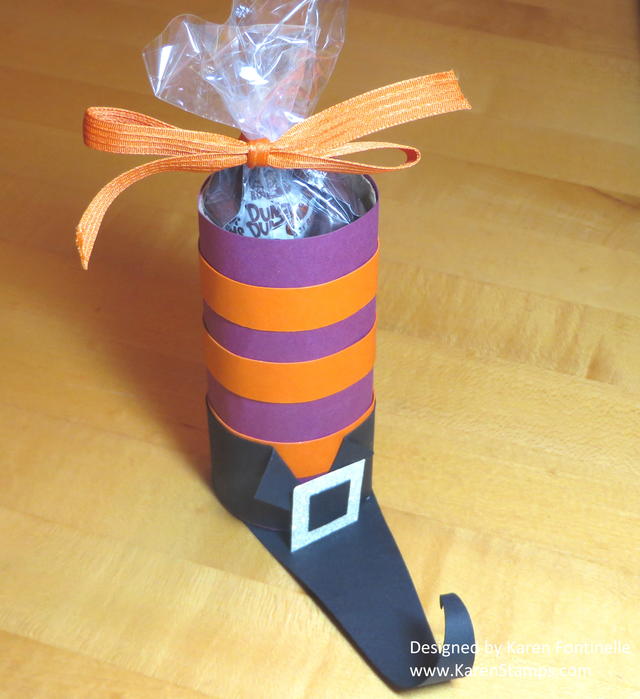
Here’s a Halloween treat holder I made a couple of years ago and it was so popular I thought I would post the photo again. It’s the Halloween Witch’s Boot Candy Treat Holder! I saw the idea online and had no directions, but I just figured it out on my own. I thought it was such a cute idea and we all have those empty toilet paper rolls or paper towel rolls around the house frequently. (Personally I think I’d rather use a paper towel roll!)

I wrapped Rich Razzleberry card stock around the roll, adhered with Multipurpose Liquid Glue.  Before I tried wrapping the roll I pulled the cardstock over the edge of my kitchen table a few times, which has a rounded edge, just to break up the fibers a little bit and make it easier to roll. You could use a bone folder or just anything rounded to get the paper to “relax”. For the sock stripes, you can use Pumpkin Pie 1/2″ strips of card stock. For the top of the boot, I just wrapped around a piece of Basic Black and folded back the corners. The buckle is a piece of Dazzling Diamonds Glimmer Paper (you could use any color Glimmer Paper) with a small square piece of Basic Black right in the center which makes it look like a buckle without having to actually MAKE a buckle! The “shoe” part is easy to make. Measure the roll diameter and then make the black paper slightly wider. Cut it at a diagonal as you see, Put glue on the bottom of the roll and stick it on the black card stock. When the glue is dry, you can trim off the excess in the back. Roll up the toe a little bit. There you have it! Put a little treat inside the boot.

This could be a little Halloween gift for someone, or a table decoration or party favor. Have fun making your Halloween Witch’s Boot Candy Treat Holder!

Shop Stampin’ Up! for the best in stamps, ink, paper, and accessories!

Halloween Chocolate Candy Treat Bag

Halloween Chocolate Candy Treat Bag

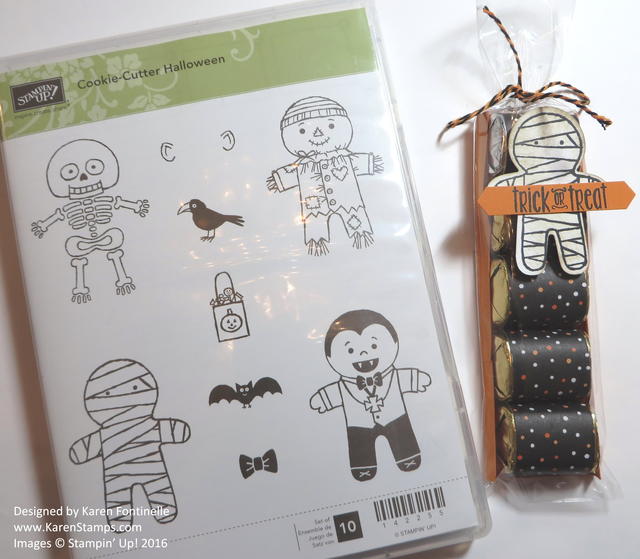
These Halloween Chocolate Candy Treat Bags are fun and easy to make, if you need a simple treat to make.  Actually you can make these candy treats for ANY occasion – just cover a chocolate nugget candy with designer paper! These narrow cello bags from Stampin’ Up! are fun to use, but if you don’t have them, just put the candies in any little bag, tie with a ribbon, and make a tag and you have a  cute little gift!

The Cookie Cutter Halloween Stamp Set gives you so many choices with the characters you can stamp. Don’t forget, you can still use the scarecrow through the fall and for Thanksgiving so don’t put away this stamp set after October 31! And if you are thinking ahead to Christmas (surely you are!), get the Cookie Cutter Christmas Stamp SetYou will want the Cookie Cutter Builder Punch to go with it, so you might as well get the Bundle and save 10%.

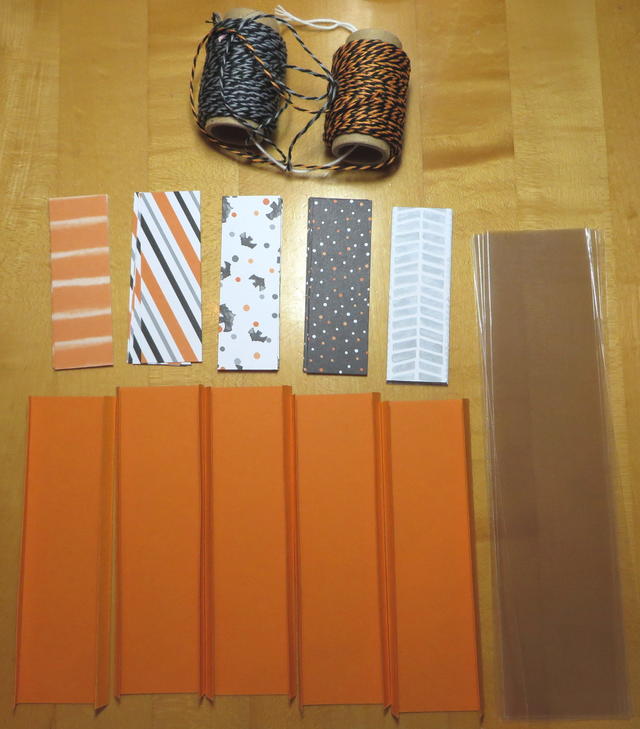
To make the cute candies, I used the Halloween Night Specialty Designer Series Paper to cover the chocolate nuggets.  You just need a 1″ x 3″ strip of paper.  I adhered them on the back of the candy with a Mini Glue Dot. The adhesive is only on the paper, not touching the candy.  I have made tons of these candies through the years for gifts or treats. For Christmas, of course, use Christmas colors or Christmas paper. For birthdays, use some other design. Whatever! And remember, some of the patterns in the Halloween Night paper can be used beyond Halloween, so keep it out and handy after Halloween!

These narrow cello bags are the 2″ x 8″ Cellophane Bags. They are only $3 for 50 bags! Remember, if you want to stamp on cello bags, use Stazon Ink. Check out all the different sizes and kinds of cello bags Stampin’ Up! offers because they are so handy to have on hand!

To make a little tray to hold the candies in the bag, cut a piece of cardstock 2″ x 5″.  Score 1/4″ along each long side to make the tray.  This will fit inside the bag. Cut a piece of ribbon or twine about 12″ long to tie the bag. Embellish as desired! Make a bunch and put them together assembly line style.

Halloween Treat Bag Pieces

Think ahead to Thanksgiving or Christmas or New Years and think about making some chocolate candy treat bags like this one!

Shop Stampin’ Up! Online HERE!

Cello Halloween Jar of Haunts Candy Treat Bags

Cello Halloween Jar of Haunts Candy Treat Bags

Need more last minute Halloween ideas like these Cello Halloween Jar of Haunts Candy Treat Bags?  This is what I came up with late last night!

Do you ever have late night stamping sessions when you should be calming down and getting ready for bed?  Isn’t that when you feel the most creative?! And then when you do go to bed, you can’t fall asleep because your mind is still swirling with creativity!

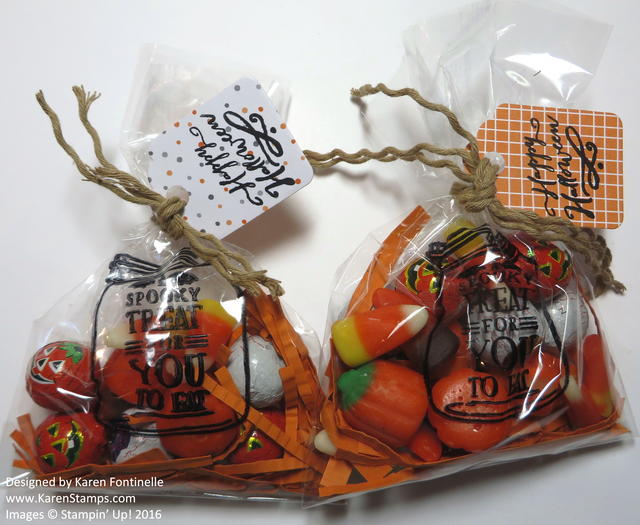
Although this size of cello bags is retired, there are other kinds and sizes of cello bags you can use. You do need Stazon Ink to stamp with because it dries on cello bags and plastic items like these treat bags. As with other times, what I thought I was going to stamp and make changed into some other idea as I was working on the project! It happens! As I started putting in my “filler” paper and candy, I got the idea to stamp the empty jar from the Jar of Haunts Stamp Set. Originally I was going to stamp the eyeballs randomly on the bag or an image from the Spooky Fun Stamp Set. But then I saw the jar and thought that would look like the candy in the bag was inside the jar. And then I thought the greeting would be cute stamped inside the jar! That’s how this came about!

The filler paper is just scraps of cardstock, run through the old Crimper we used to have, and then cut into thin strips with the Fringe Scissors. You can cut the strips with whatever scissors or paper cutter you have, it’s just that the Fringe Scissors do several strips at one time. Then, moosh the strips of paper all up with your hands and much as you can, and you have “filler”. I think there’s another name for it but I can’t think of it. Just a little something to take up space and add some color in a gift or treat bag.

The ribbon tying the bag is the Kraft Rope Trim unraveled into three pieces or rope!  I saw that idea online, so always be thinking outside the box with every product! I like the frazzled look of it rather than smooth for this Halloween treat bag!  The tag is made with the Tags & Labels Framelits Dies and Big Shot.  The greeting is in the Jar of Haunts Stamp Set.

Such fun tricks and treats you can make for Halloween!

Shop Stampin’ Up! Online 24/7!

Need More Christmas Trees For Your Home?

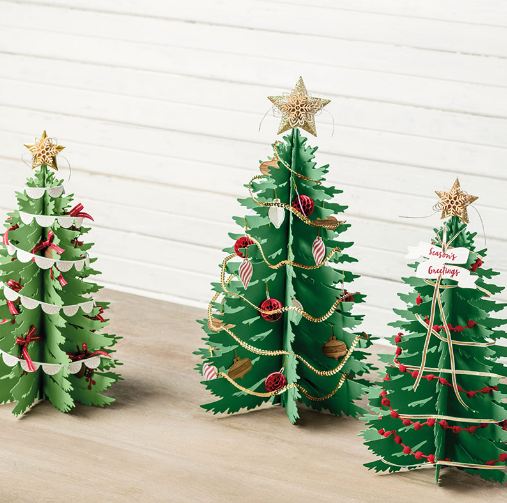
Stampin' Up! Paper Christmas Trees Kit

Images © Stampin’ Up! 2016

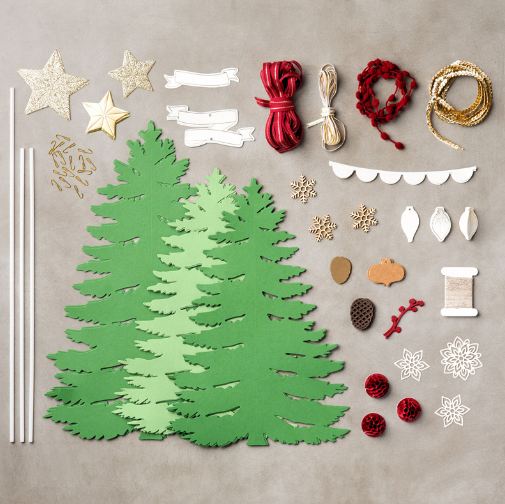
Don’t forget that Stampin’ Up! has extra Christmas trees for your holiday home decor in the Forever Evergreen Project Kit in the Stampin’ Up! Holiday Catalog. There’s always another little nook or cranny where you need a little Christmas, so you could use this kit for your own crafting fun and have something useful at the end.

Here are the contents of the kit:

Stampin' Up! Christmas Trees Kit Contents

Images © Stampin’ Up! 2016

Watch the video below with Carrie Cudney of the Stampin’ Up! Home Office show you how this kit goes together!

These Stampin’ Up! kits are great because the project is already designed for you! If you like, add on the Forever Evergreen Photopolymer Stamp Set.

Order this Forever Evergreen Project Kit today and you’ll be ready way before Christmas!

Halloween Night Mini Treat Bag

Halloween Night Mini Treat Bag

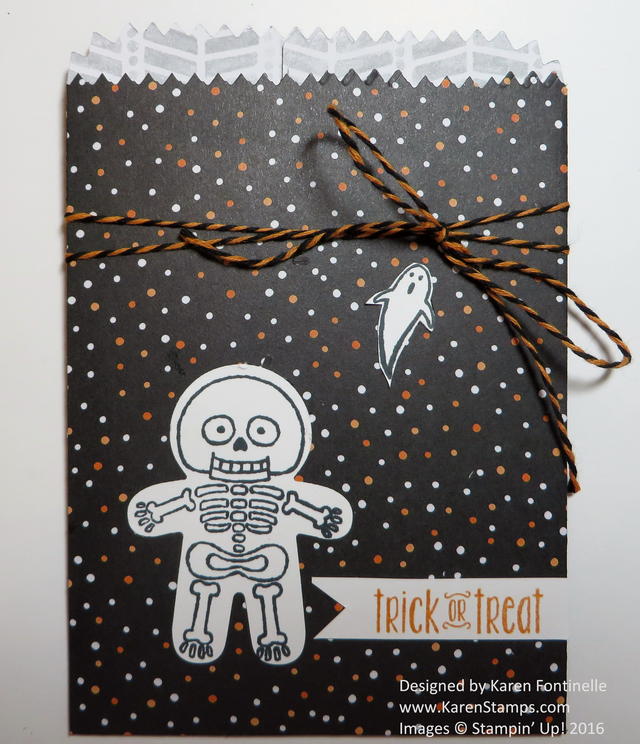
I’ve said it before, and I’ll say it again, one of my favorite Stampin’ Up! products in the catalog are the Mini Treat Bag Thinlits Dies.  I just think the little bags you can make for treats, for money, for gift cards, and used as envelopes are the cutest things and so versatile.

On this Halloween mini treat bag, I used a piece of the Halloween Night Specialty Designer Series Paper for the bag.  You could really use either side of the paper for this project! I also stamped the skeleton in the Cookie Cutter Halloween Stamp Set and punched out with the Cookie Cutter Builder Punch.  So easy!  Then I stuck him on the front of the bag for decoration as well as tying around some Halloween Night Baker’s Twine.  The greeting is stamped from the Spooky Fun Photopolymer Stamp Set and made into a little banner.  The ghost I thought would be cute, from the same stamp set!

Just put a candy treat inside or a Halloween note card or whatever you like!  Just be sure it is spooky when you make this Halloween Night Mini Treat Bag!

Get all of these supplies at the Stampin’ Up! Online Store!

Stampin’ Up! Fancy Frost Textured Designer Paper

Stampin' Up! Fancy Frost Textured Designer Paper

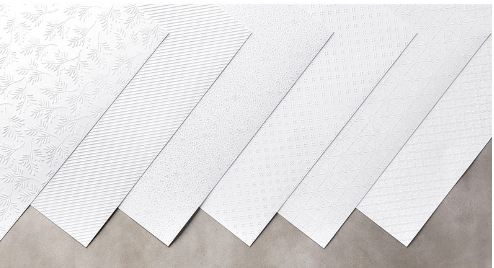
Have you seen this beautiful textured paper in the Stampin’ Up! Holiday Catalog, the Fancy Frost Specialty Designer Series Paper?  It is different than anything Stampin’ Up! has every had that I can remember!  You might think at first glance that it is embossed paper but it is not. The designs are dry embossed on the paper and they are beautiful! The photo above certainly does not do them justice. Watch the video below.  You can leave the paper plain white or you can add color to the raised patterns!

If you want to try this beautiful paper, just add it to your order when you shop at the Stampin’ Up! Online Store!

Less Than 24 Hours Until My 12 Weeks of Christmas Holiday Emails Begin!

!2 Weeks of Christmas Banner


Do you love to get ideas for handmade Christmas cards, holiday gifts, gift wrap ideas and holiday tags?

If so, then you will want to be on my Stamping With Karen mailing list!  In less than 24 hours, I will begin sending out my 12 Weeks of Christmas Holiday Emails, and the only way you can get them is to be on my mailing list!

Sign Up in the red Mailing List sign up in the upper right corner of my blog!

Every week on Wednesday at 1:00 pm Central Time you are going to receive via email a holiday project idea complete with instructions and list of supplies. We will start with Christmas cards, then some gift ideas, and finally wrapping ideas, bags and tags.  You can copy these ideas or use them for inspiration to come up with your own creations!

The 12 Weeks of Christmas emails are a gift from me to my newsletter subscribers! I appreciate your loyalty and interest and hope that you enjoy these extra holiday ideas! These projects will not be seen on my blog, Facebook page or anywhere else, just in this special email. By the end of twelve weeks, you will have twelve wonderful holiday projects that you can complete or be inspired by!

If you would like to receive these 12 Weeks of Christmas Holiday Emails, you must be subscribed to my mailing list by October 5th at 1:00 pm Central time or you will not receive these great projects!

Sign up in the red Mailing List Box in the upper right side column of my blog! You will also get a free gift just for signing up!

*If you already receive my regular newsletters, then you are already on my list and will be getting the 12 Weeks of Christmas emails. You do not need to do anything!

I hope you will join us for 12 terrific holiday ideas! There’s nothing I like better than looking for more and more ideas!

Stamping with Karen 12 Weeks of Christmas

Paper Pumpkin Halloween Test Tube Candy Treats

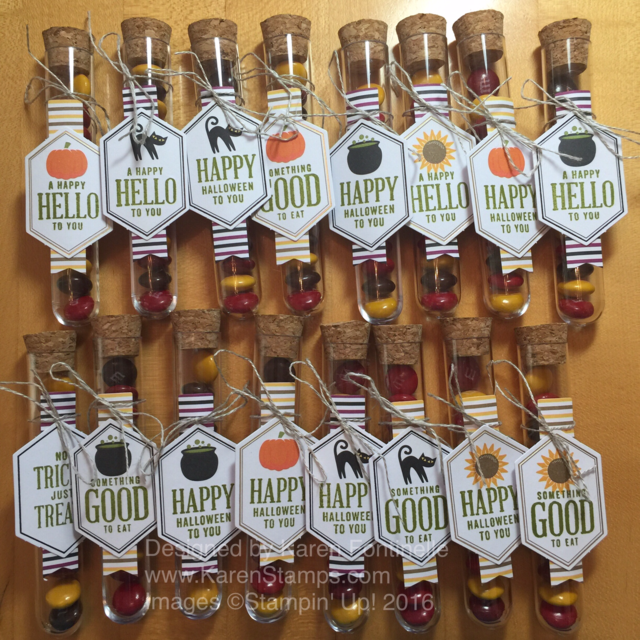
Paper Pumpkin Halloween Test Tubes Candy Treat

Yesterday I got around to playing with my September 2016 Paper Pumpkin Kit and here is what I made!  I still have some extra tags and banners that I can use to make some other cards. Lucky for me that I had enough CANDY to fill all these test tubes!!! As I worked on these test tube treats, I started thinking of people I could give them to besides my kids, so don’t worry that maybe you don’t have children, grandchildren or trick-or-treaters to pass them out to! Think about taking one or a few along to a doctor appointment, or give to a couple of your neighbors, or take along to a restaurant and give to a good server in addition to a tip, or the drive-thru window at a coffee or fast-food place, there are just all kinds of ways to pass them out to people!

This was such a cute project and so easy to make! I know in the past Demonstrators have loved getting their hands on these fun test tubes to make various treats, so how great to just get them delivered in a Paper Pumpkin Kit!

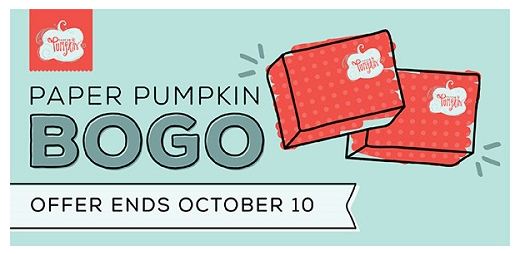
paper-pumpkin-bogo-ends-october-10

Lucky for new subscribers, Stampin’ Up! has a deal for you!  Subscribe to Paper Pumpkin now (by October 10th) which pays for the October kit and you will receive the November kit FREE! Just use Promo Code:  BOGO

ALSO:  Once you subscribe, you can go to the Stampin’ Up! Online Store, click on Paper Pumpkin and then Past Kits. These are only available to subscribers. A “Kit” means you get the full kit including stamp set. A “Refill” means you get the supplies but not the ink spot or stamp set. But you can still substitute with stamps you have in many cases and still make cute projects with the supplies! The cute Paper Pumpkin Kit from last year with the Halloween treat bags is available as I write this! So subscribe and then grab the past kits or refills that you missed!

Click HERE to Join Paper Pumpkin today!

(You deserve it!)

Best Tips and Tricks for Using Fast Fuse Adhesive by Stampin’ Up!

Celebrate World Card Making Day Stampin' Up! Specials

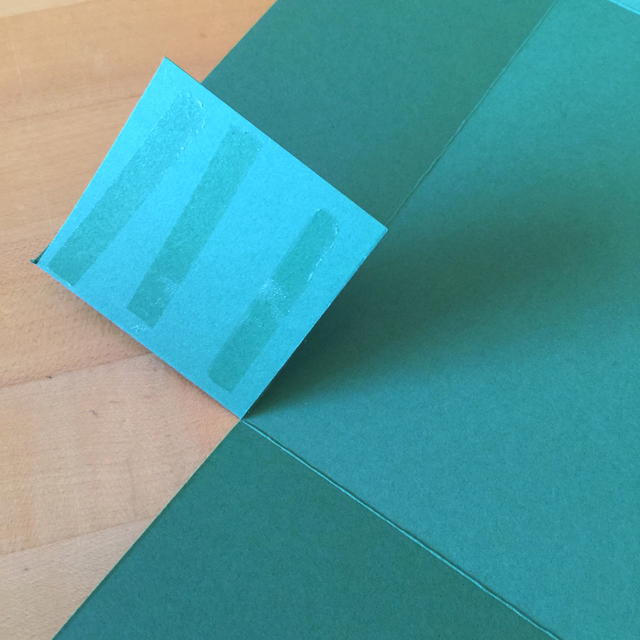
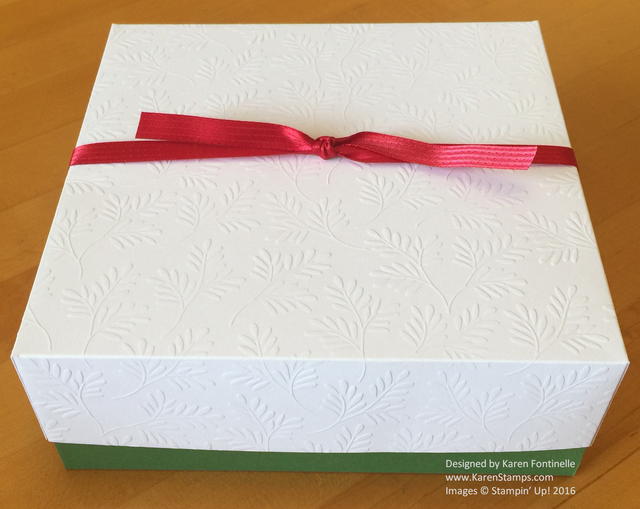
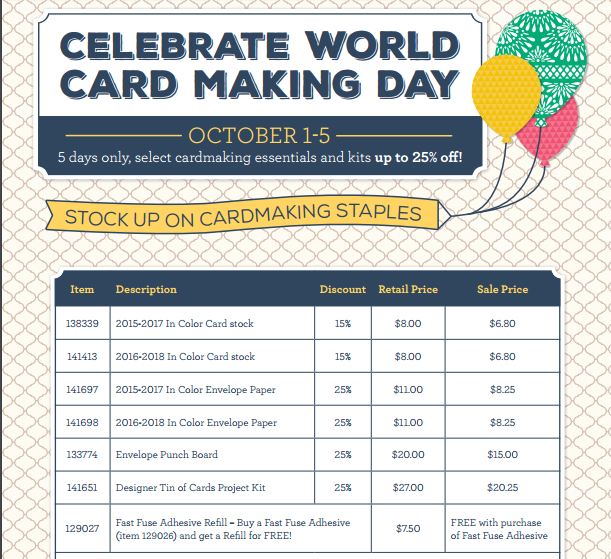
Stampin’ Up! has special offers for you to celebrate World Card Making Day except the specials last through Wednesday, October 5th! One of the deals is to buy a Fast Fuse Adhesive and get a refill FREE (a $7.50 value!)! Fast Fuse works great where you want a strong hold, like making a box yourself!

Fast Fuse Adhesive for Box

Handmade Box Embossed Paper


When Stampin’ Up! first came out with Fast Fuse a few years ago, I did not have much luck with it, admittedly! I probably ruined a few rolls of adhesive before I got the hang of it, and even then, I didn’t always have the hang of it!  If it worked for me, it was probably just luck. But then I watched some videos online and kept playing with it, and now I can say I really like Fast Fuse!  I probably even use it more than I use SNAIL Adhesive.  So if you have had the same experience and written off Fast Fuse, I would urge you to watch these videos below and see if you can pick up some tips you may have forgotten or never knew about how to use Fast Fuse.

This first video shows the basics of using Fast Fuse and how to fix it if the adhesive has “snapped back” from not breaking at the end of your adhesive line. She says to not open the case!  Even now I sometimes have to roll that little applicator to get the adhesive back in place or pick off the gooby stuff aroun the opening on the case. But otherwise, it works fine and these things are an easy fix.

This second video is Donna Griffith from the Home Office showing how to make a box out of cardstock, which is a great video anyway, but later in the video she also gives tips about using Fast Fuse. If you only want to see that part, skip to about 6:40 in the video. (But I think watching how she makes this cute box is well worth your time and enjoyment!)

Donna suggests not putting your finger on the top of the Fast Fuse case like we are used to doing with SNAIL. I’m not positive that you can’t use it with your finger on top, but use a light pressure. I have been trying to remember to NOT put my finger on the top like Donna suggests. Just try it and see what you think. It was good for me to find that first video above again and listen to how this adhesive really works, even if you have been using Fast Fuse. It’s a good review.  I think Fast Fuse works well when you want a really good “stick”. But since it does stick so well, there’s no playing around when adhering your two things.  If you need a little time to move one layer or image around to get it just right, then you might prefer the Multipurpose Liquid Glue which allows for a little bit of repositioning before it sets up.

Here are all the other #WCMD Special Offers from Stampin’ Up!

World Card Making Day Stampin' Up! Discounts

So many great things to shop for at Stampin’ Up!  Check out these World Card Making cardmaking essentials through October 5th, the Designer Series Paper Buy 3 Get 1 Free Offer, the Holiday Catalog, the Clearance Rack and more!  Just click HERE to shop Stampin’ Up! Online!