Category Archives: 3-D, Gifts & Things

Making Festive Flurry Ornaments

Festive Flurry Ornament Kit from Stampin' Up!

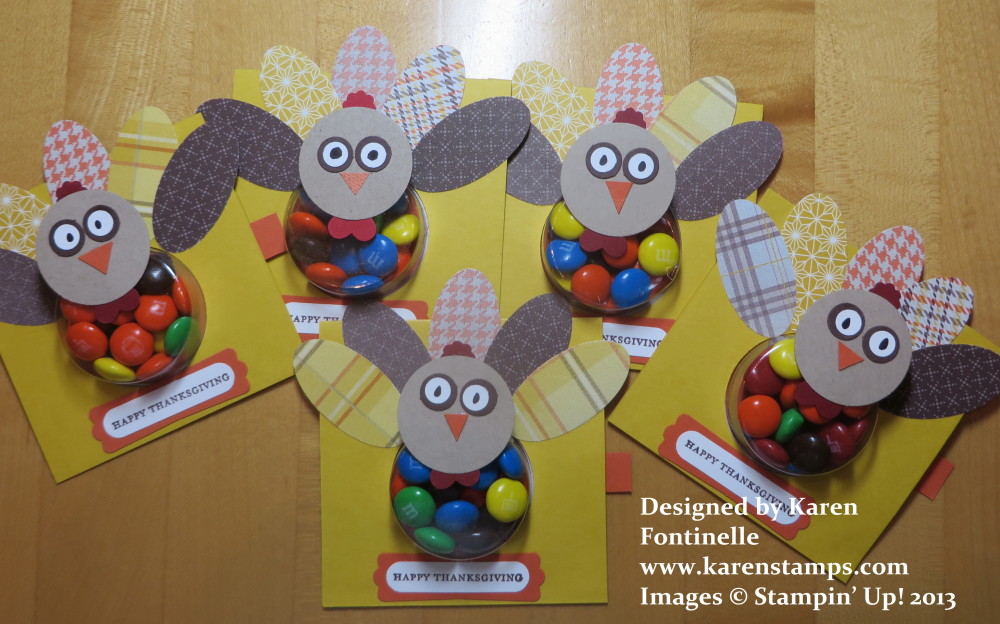
No snow in Houston except on my kitchen table where I played with my Stampin’ Up! Festive Flurry Ornament Kit and made some of the beautiful ornaments. Once you assemble these ornaments you can use them as ornaments, as package toppers, on a super-fancy card, or string them together to make a garland. Lots of ways to use them which you will think of as you make them!

There are no written instructions in the kit but there is a good video from Stampin’ Up! you can watch. I would say be a little more patient with the hot glue as you “squish” your ornament together toward the center than on the video because I’m sure in the interest of time, they didn’t make you wait and watch the full time it takes for the hot glue to set up in the video. If you have the Stampin’ Up! Silicone Craft Sheet it makes it a little easier to work with the hot glue.

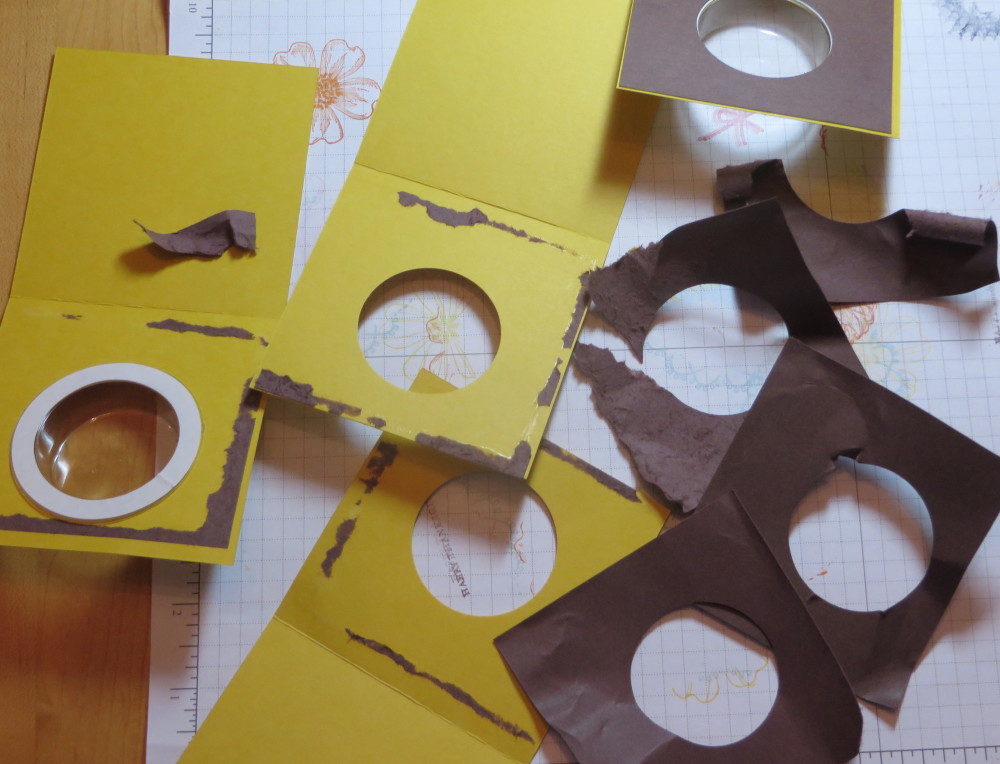
Let’s start at the beginning! You will receive ten sheets with die-cut pieces to make your ornament plus a stack of the glitter layer pieces. Just punch out the pieces. You will see two of the pieces, the blue snowflake and the glitter snowflake are pre-scored so that is helpful. Carefully fold on these score lines. Those narrow tips are a little delicate so take your time and remember nothing has to be perfect! I suggest doing the longest points with the fold lines so the fold is “up” and the smaller ones with the  fold “down”. It’s going to be almost like rosettes you have probably made in the past, one fold up, one fold down and so on. Check to make sure you have all the pre-scored lines folded around the ornament and then “practice” squishing them toward the center hole. Once you are sure they will all fold and work together correctly, it’s time to glue. You can put a puddle of hot glue on your silicone craft sheet and then place the snowflake so the center hole is in the glue and “squish” the ornament toward that center and hold until the glue sets and you can safely set it aside. Once you have the blue snowflake and the silver glitter one made in this fashion, you can layer all the ornament pieces together and that is the easy part! Don’t forget the beautiful large rhinestone in the center! Attach a piece of ribbon on to the back if you want to make a hanger.

I also tried, as another demonstrator suggested, just putting glue around the inside edges of the center hole and not using the big puddle of hot glue, and then squishing it to the center. This did seem to hold just as well and didn’t take as long to set up as the big puddle of hot glue.

And for my last try, I attached the snowflake to a small circle on the back as I was gluing it, punched or the center you punch out of the blue snowflake. I thought this worked the best, maybe gave it a little stability while the glue was setting up.

Once you discover what works easiest and best for you and what you want to make, I think you’ll be able to breeze through these ornaments just fine. You will find the Stampin’ Up! video on the sale page for the Festive Flurry Ornament KitThese are SO beautiful you MUST give them a try!!

Festive Flurry Ornament

No Mistakes in Stamping!

Turkey FavorsThere are no mistakes in stamping.  There are no mistakes in stamping.  Well, maybe not in stamping, but sometimes in pasting!!  This was my project with the Circle Treat Cups that I had to rip apart because I realized I hadn’t put the treat cups in the punched out circle yet!

But it all worked out!  Just cut out my Chocolate Chip paper and redid it! Do you like all my cute turkeys for my Thanksgiving table today?!

Turkey Favors for Thanksgiving

 Happy Thanksgiving!

Fun Making Christmas Gift Boxes

Extra-Large Kraft Gift Box with Gift Bow and Tag

‘Tis the season (or almost!) for making pretty gift wrap boxes for the holiday gifts we have shopped for or handmade for our friends and family. Why not get a head start with the Stampin’ Up! Extra-Large Gift Boxes?  They come three in a package and are one of the Weekly Deals, if you order by tonight. Just fold them up into their box shape and start decorating!  It needn’t be elaborate, unless you want it to be. Here I have just adhered pieces of the Season of Style Designer Series Paper to the top and sides of the box.  On the top, I layered it on a piece of Cherry Cobbler card stock but the sides are just the designer paper.  And before I put the Christmas tag on, the decorated box could be for any other occasion, not just Christmas! Also on the Weekly Deal, ending Monday November 18, is the Gift Bow Bigz L Die. Grab it for a discount today and you can easily make the double bow like on the top of this box. It probably only took me about ten minutes to decorate this box!  Nothing could be simpler!

For the little tag in the corner of the gift box, I used one of the MANY tags in the Season of Style Designer Journaling Tags package in the Holiday Catalog. I chose one and made a little card to layer it on and stuck it on the top of the box.  Now all I have to do is write the “to” and “from” inside when I see what gift is going in the box! Of course I had to add a little bling with two small Rhinestone Jewels on the snowflakes. You can use these die-cut printed tags for scrapbooks, photo albums, even cards.  You’ll enjoy playing with them!

Don’t delay, check out the Weekly Deals ending today! You’ll probably want all the items! But even if you miss the sale, they are still good values to have.

Go to my Stampin’ Up! Online Store and get your order in!  Let me know if you have any questions! From the Home Page of my store, be sure to check all the categories in the left sidebar. Don’t forget the Clearance Rack either!

Extra-Large Kraft Gift Box with Gift Bow

Decorate Your Kraft Gift Box with Daydream Medallions

Daydream Medallions Kraft Gift Box

The Christmas season is just about upon us, and soon it will be time to wrap all those gifts!  Get a head start by purchasing the Extra-Large Gift Box #132147 (3 in a package) in the Stampin’ Up! Holiday Catalog and then decorating to your heart’s content.  Make it simple or make it fancy! If you order by Monday November 18 you can get a discount on the kraft gift boxes and also the Gift Bow Bigz L Die #129977 during the Weekly Deals!  The Gift Boxes are food safe, so you can fill them up with homemade goodies if you like! They come flat and then you fold and assemble.  You will be surprised how large they are! They measure 4 3/8″ x 6″ x 6″. And of course you can use kraft gift boxes any time of year so they aren’t just for Christmas!

I chose to decorate my gift box with a series of stamps in the Daydream Medallions Stamp Set. I stamped each stamp in alternating colors and cut out with the Floral Frames Framelits DiesI also cut out the matching color card stock with the dies for a layer. The largest framelit (which doesn’t have a matching stamp) I used to cut out the Champagne Glimmer PaperThere’s also a little bit of Glimmer Paper punched with a small scallop punch under the smallest layer.  And then I had to top the design with a Large Pearl Basic Jewel!  Just perfect! The ribbon is the Cherry Cobbler 1″ Grosgrain Stitched Edge Ribbon in the Holiday Catalog. I thought the box still needed “something” so I stamped some vine images from the Forever With You Stamp Set in Soft Suede.

Check out the Stampin’ Up! Weekly Deals which end Monday night! Order your Extra-Large Gift Boxes and Gift Bow Bigz L Die. Might as well get the Burlap Ribbon as well!

Daydream Medallions Kraft Gift Box Top

Daydream Medallions Topper


My Digital Studio New Downloads & More!

Every Tuesday there are new digital downloads for the Stampin’ Up! digital design software called My Digital Studio. These are extra designs you can purchase to add to your content on My Digital Studio or even other kinds of design software. This week Stampin’ Up! has added a new twist:  some of the downloads include an online class to show you how to use My Digital Studio!

Stampin’ Up! will continue to release new classes and coordinating exclusive digital downloads every month, on the last Tuesday of the month. You can go to my Stampin’ Up! Online Store to view the projects and techniques to see what is included in the content.

Each class includes an exclusive digital download and instructional project-based video training that will guide users through a number of different techniques as they create a variety of projects in MDS. My Digital Class prices will vary depending on the content included.

MDS Downloads1 Nov 12 2013

MDS Downloads2 Nov 12 2013

MDS Downloads3 Nov 12 2013

MDS Downloads4 Nov 12 2013

You can order any of these downloads and past ones at my Stampin’ Up! Online Store!

Make Beautiful Festive Flurry Ornaments with an Easy Kit

Festive Flurry Ornament Kit

Images copyright Stampin’ Up! 2013

A new kit from Stampin’ Up! and I can’t wait to get my hands on it!

Add a little festive flare to your holiday decorating with the new Festive Flurry Ornament Kit! Top presents, embellish cards, create a wintery garland, or trim the tree. How you use them is up to you!

The kit includes everything you need (minus adhesive) to create 10 snowflakes, including
* 10 feet of Soft Sky Ribbon
* Printed cardstock – die cut and scored, ready to be assembled (Soft Sky, Crumb Cake, Whisper White Cardstock and Silver Glimmer Paper)
* Large Rhinestone Basic Jewels (40)

Order this kit from my Stampin’ Up! Online Store HERE.

Watch the video below!  All you have to do is punch out the snowflakes, fold where scored and glue together with a glue gun! Then let your imagination run and decide how you will use them!


Decorating a Baby Gift Bag

Decorating a baby gift bag

While I had this shiny blue gift bag, it needed something to be appropriate for a baby gift.  I just stamped a panel to put on the front of the bag. The animals are from the retired stamp set “Animal Stories” (do you have it in your stash?). Even the greeting is retired but from one of my all-time favorite, how-can-we-live-without-it stamp sets, “Sincere Salutations”. Of course the panel still needed some jazzing up. I used some pieces of the Silver Glimmer Paper die cut with the  Tasteful Trim Bigz Die for the top and bottom edges and tied some Silver 1/8″ Ribbon in the Holiday Catalog around the panel.

You can do this with any plain gift bags you have.  I like to save the handled gift-bag-type bags you sometimes get at stores or you can buy at the craft store. Then you can use those for gifts after you decorate them!

If you are looking for a similar cute animal stamp set, perfect for baby cards and gifts, try Zoo Babies available in wood- or clear-mount.

Witches’ Brew Designer Series Paper Framed Art for Halloween

Witches' Brew Designer Series Paper Framed Art

HAPPY HALLOWEEN!!

Happy Halloween!  Today is the day!  I can’t believe October 31st is here and with it, the end of all things crafty for Halloween!  I don’t think I got my fill of making cards and treats for Halloween. Today’s project is probably the easiest thing you can make with Stampin’ Up! designer paper!  Two of the sheets in the Witches’ Brew Designer Series Paper are this printed design with lots of Halloween treat words on it.  Just cut it apart and you can frame this top portion of the sheet!  It fits perfectly into a cheap frame.  If you have a larger frame, just use a larger piece of card stock or designer paper as a mat behind it.  You could also add some extra elements and embellishments to this sheet and even leave the glass off for a real 3D piece of framed Halloween art!

You can still order this Witches’ Brew paper and save it for next year! Go ahead and make the frame and you’ll have a pleasant surprise next year when you get out your Halloween decorations!

It’s probably going to be a wet and muggy Halloween night here in Houston! It is raining like crazy and supposed to keep up all day.  With our flat landscape, that’s not good for streets that flood easily.  But I hope it stops so I will have some trick-or-treaters at my door tonight!!  Usually I have quite a few!

Last Thank You Thursday Stampin’ Up! Deal

Thank You Thursday Chevron Ribbon Deal


Get these colors of Chevron Ribbon on sale, today only!

Basic Black, Calypso Coral, Crushed Curry, Island Indigo, Smoky Slate 

Place your order today before you get busy with Halloween! Don’t forget the Weekly Deals as well!

Have a safe and fun Halloween!

Halloween Treat Bag Idea

Halloween Treat BagYes, it is almost Halloween!! Here is a Halloween treat bag idea that you could easily do!  Just grab a 4″ x 6″ Medium Cello Bag, decorate the outside, and fill with delicious Halloween candy! I applied some strips of Witches’ Brew Designer Washi Tape (so fun!) to the front of the bag and added a tag to the front.  The stamp is from the Halloween Bash stamp set. To get the multi-colors on the stamp, I inked up the border with my Pumpkin Pie Stampin’ Write Marker and the words with Basic Black. Breathe on the stamp before you stamp on Very Vanilla card stock to remoisten. I cut out around the edge with my Paper Snips (on sale on the Weekly Deals this week until Monday!).  The black background is easy to cut out with the smallest of the Labels Collection Framelit Dies.  Just adhere with Mini Glue Dots. Tie the bag with some 1/8″ Pumpkin Pie Taffeta Ribbon and you are all set!  Easy to make for class parties, neighbor gifts, treats for your kids, etc.

Check out the Weekly Deals at my Stampin’ Up! Online Store!


Decorated Halloween Candy Tin

Halloween Candy Tin

What could be more fun than decorating some candy and a tin for Halloween? I had this tin with the clear window on top in my “stash” but if you couldn’t find an exact match, I’m sure any tin or container would do. I have always loved these tins because they make sure cute, quick and easy gifts to make up in minutes for someone. Of course you could use different types of candy or other contents in the tin, but this is just to give you some ideas!  I used Hershey Nuggets for my candy and wrapped each one with a 1″ x 3″ strip of designer series paper. You just want to be sure when using adhesive and candy that you don’t let the adhesive make contact with the candy. I just used a Mini Glue Dot to secure the strip of paper to itself so it is not attached to the candy piece.

To decorate the tin, I just took a strip of designer paper and wrapped it around the tin for a bellyband. You could also layer it on a strip of card stock if you wanted. For the flower on top, just use one of the flower punches to punch about three or more flowers or even one of the scallop punches. Crinkle up each layer of the flower if you like that look, then reopen and layer one on top of the other.  Secure in the center with a brad of some sort (looks like I used a retired one!). Adhere to the bellyband with Stampin’ Dimensionals or Mini Glue Dots.

The Witches’ Brew Designer Series Paper was used in this project. My friend I gave this gift to really liked the little skulls on the paper!

If you would like some Witches’ Brew paper for your Halloween projects and cards, now is the time to order some! Just go to my Stampin’ Up! Online Store here for all your stamping supplies!

***Don’t forget the 25% Off 25 Stamps Offer only available through October 28th!***

Halloween Framed Art for a Friend

Halloween Framed Art

We got back home Saturday from a wonderful fall vacation to Michigan! There has been no sign of fall here in Houston, Texas except for the date on the calendar, so to see REAL fall, with colored leaves beyond expectations, cooler (okay, sometimes COLD!) weather, that overcast fall look was just a wonderful change! The people up there decorate for fall, not just Halloween, because it IS fall there!  I saw so many pumpkin stands and corn shucks and fall flowers plus Halloween decorations. I loved it all!

The Halloween framed art above was a gift for my friend we were visiting. I happened to have a frame with a square opening of 10″ x 10″  so I was able to use 2″ squares for the “art”. As you can see, I made two elements 2″ x 4″ to fit into the design.  Some of the stamps were retired ( I couldn’t resist going through some of my “old” Halloween stamp sets) and some designs were ideas I got online or at least got me started on my own ideas.  It was fun to make and an easy project for anyone to make.  Make it as small or large as you want.  Check to see what picture frames you already have in your stash and start there.  You could do something with four squares or 16!  Whatever you like! There’s a glare because I did put the glass in the frame but you can also omit the glass, especially if you want to put a lot of 3D layers on your art.

I’ll tell you more about my trip when I get all the photos sorted out. The trees were unbelievably gorgeous – if they weren’t at “peak” color, I don’t know how they could be any more beautiful. A lot of my photos were shot through the car windshield or passenger window, sometimes through the windshield wiper and raindrops!  Here’s a sneak peek of some trees along the highway when we first arrived!  I just held my camera in my hands at all times as we were driving!

Fall trees in Michigan

Fright Night and Zombie Party for My Digital Studio

Halloween Downloads for My Digital Studio

Images copyright Stampin’ Up! 2013

My Digital Studio isn’t just about scrapbooking!  Look at the great things you can make for a Halloween party with these two new downloads, Fright Night Ensemble #135642 and Zombie Party Printables #135713.

Stampin’ Up! adds new downloads to the collection every Tuesday!  Be sure to check every week! Even if you don’t own My Digital Studio, you can still use the download if you have some other design software, such as Photoshop.

Stampin’ Up! started a new blog feature on the My Digital Studio blog, called Our Favorite Things. The Stampin’ Up! My Digital Studio Team is sharing their favorite Halloween downloads! Can you even begin to imagine what you could do with all these downloads?!

If you want to see their favorites on their blog post, check it out HERE.

You might like to look around www.mydigitalstudio.net and see all the information that is there for demonstrators and customers alike.  You’ll be able to learn anything you want about My Digital Studio right there, but really it is almost intuitive enough that you won’t have much trouble just learning on your own!

Here’s My Digital Studio in my Stampin’ Up! Online Store.

Make Your Own Holiday Gift Tags Easily and Early!

Pop & Place Holiday Gift Tags

Images copyright Stampin’ Up! 2013

The other day I told you about the new Stampin’ Up! Pop & Place Holiday Gift Tags and the coordinating Christmas Tagables Photopolymer Stamp Set and the combination bundles you can purchase. These all look to me like a fun way to get a head start on your gift wrapping by making these tags NOW so they will be ready when you start wrapping your holiday presents!

Watch this video from Stampin’ Up! that shows you what you get with this new product and then go to my Stampin’ Up! Online Store to place your order!

Simply Created Spooky Halloween Banner

Spooky Halloween Banner

One thing I easily passed up in the Holiday Catalog  was this Build a Banner Simply Created Kit.  But after seeing several banners created at the Stampin Up! Convention this summer, it was one of the first things to go on my next order!  The Build a Banner Kit has the canvas pennants with grommets and all the stencils.  All you need to do is decorate it!  To make that easy for you, purchase the Halloween Banner Simply Created Accessory Kit and you’ll have everything you need!

I found it worked well to use Sponge Daubers to dab on the ink from the ink pad over the stencils onto the pennants.  Most videos show using alcohol and reinkers sprayed on (lightly!) with the Spritzers, but some people were having trouble with that, and it just seemed easier and cleaner to use the sponge daubers.  I think the Black Stazon works better than the Basic Black, although then you have to scrub that Stazon off the stencil!

This might look like a complicated project, but I really found it pretty simple and quick.  I could have made two more rosettes on my own, but I mostly stuck with what came in the kit, although I used my own modifications a little bit.

Put these supplies to make a Halloween banner on your next order!  I’m sure you will enjoy making one!

Here are some close-ups!  You can use your own imagination and decorate yours how you like.

Spooky Halloween Banner close-up

Spooky Halloween Banner Close-up end

Please order your supplies on my Stampin’ Up! website HERE or contact me with your order.

Pop’ N Cuts Dress Form and Card Base Birthday Card

Pop n Cuts Birthday Card

These Pop’ N Cut Dies were introduced in the Stampin’ Up! Spring Catalog and honestly, I didn’t pay much attention to them.  I think I had already added so many things to my order that by the time I got to their page in the catalog I wasn’t interested. I didn’t take any time to see what they were about, although I did order the Dress Up Framelits Dies.  Those seemed easy enough.

But then as so often happens, I started to see really cute things other people made and also watched some videos made by the designer of the dies, Karen Burniston. That’s when I put them on my next order!  The shape of the Card Base Pop’ N Cuts Die is a Stampin’ Up! exclusive, made with the decorative edge and made so you can tuck it into the slits to close. You can use just this without the pop up portion.

Pop n Cuts Birthday Card Inside

The pop up portion is easy to do once you get the hang of it. You want to be careful not to fold things that shouldn’t be folded.  In order to get the pop up going, it works best if you get your fingers behind that table part and then you will see and feel where the score lines are and how to get the pop up to pop up!

Dress Form Pop n Cuts Inside Card

Once you get the pop up popped up, you can adhere it to the card base.  Just be careful to see where the adhesive should go and shouldn’t go.  I haven’t gotten the hang of that yet! Even though I think I’m being careful, I always get adhesive where it shouldn’t be!  But as long as you pay a little bit of attention, you’ll be okay!  Then you can embellish and decorate your card however you like on the inside and on the front!

Pop n Cuts Birthday Card Side View

This is what the pop up looks like from the side.  You want to get that rectangle shape from the side.  That’s how you know you have it right!  Once you get that shape, then the rest will take care of itself.

These Pop’ N Cut dies are easy enough to use and fun besides!  You can also trim that dress shape off the pop up and add another piece of card stock for a gift card holder or for a message or other design.

Here are the Pop’ N Cuts dies I used plus the framelits:

Just go to my Stampin’ Up! Online Store any time! Just think what magical cards you can make with the Pop’ N Cuts Dies!