Category Archives: 3-D, Gifts & Things

3″x 3″ Gift Tags

3" x 3" Gift Tags

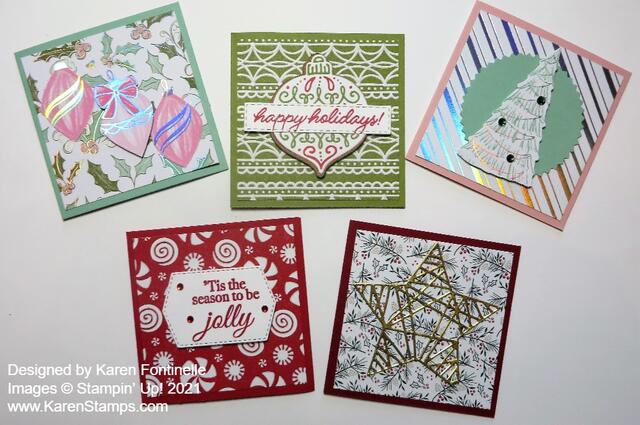
If you are wrapping gifts right about now and you don’t have much time to stamp, for lots of fun I suggest making these 3″ x 3″ Gift Tags! On some presents, the hanging tags aren’t quite right or you’d like to write a little note, so make some of the gift tags or gift cards to enclose with your gift. You may even already have some 3″ x 3″ envelopes to put them in.

These are simply made with a 3″ x 6″ piece of any cardstock, scored at 3″ in the middle and folded to make the 3″ x 3″ card. Then embellish to your heart’s desire! I barely had to go to any work on these because I had some scraps, some greetings, some die cuts that I had made but hadn’t used just sitting on my table. All I had to do was make the card base and add some scraps of 2 3/4″ square designer paper or maybe just a strip, pieces from other designer paper that had already been cut out by hand or die-cut, and maybe a greeting or two! Add a few jewels if you like for some sparkle!

No need to go into the exact details of how I decorated these! I’m sure you also have scraps and pieces you can use or you can quickly stamp or cut some out! For sure these are super fun to make! I think you could make a ton of them in just half an hour or so!! If you want just a tag, just cut a 3″ x 3″ square of cardstock and write the “To: and From:” on the back of that. Punch a hole in the corner of these cards and put some ribbon or twine through to tie on your package unless you are using an envelope. Bet you can’t make just one!!

Christmas Votive Home Decor

Christmas Votive Home Decor

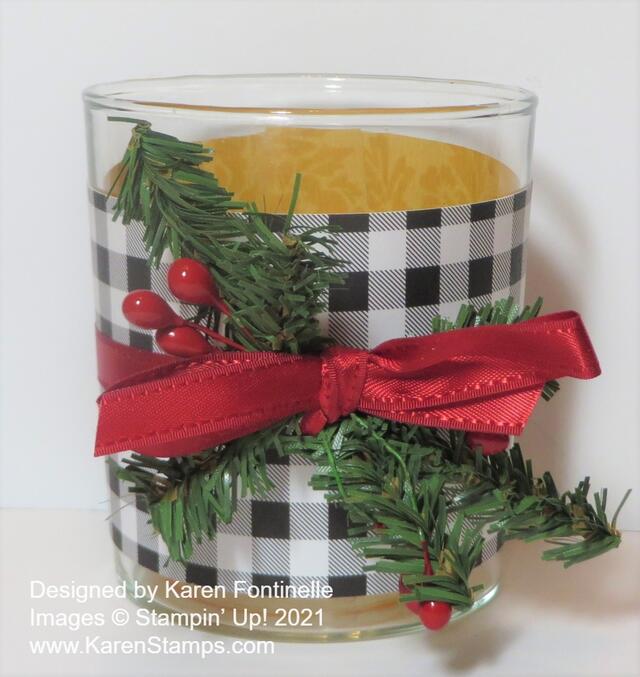
If you want to make a quick and easy gift for someone or even just a little decoration for your home, make a glass votive holder into a decorated piece of home decor for yourself or someone else! You probably even have a votive holder somewhere around your house or you can pick one up at almost any store.

Last year I made one with the retired Buffalo Check Background stamp with black ink on Real Red cardstock. I really loved the look. This year it seems like a black and white check is quite popular so I redid the votive holder. I found a piece of black and white check paper in the Pattern Party Designer Series Paper that is available free as Host Reward in the Stampin’ Up! Annual Catalog. Of course, you will have to judge the size of paper you need to use for your votive holder. Mine is about 2 1/2″ wide and wraps around the glass. If the glass tapers a little bit at the bottom the paper won’t fit around perfectly but that’s okay. Wrap it around as well as you can. I also tied a Real Red ribbon around to hold the paper in place. You can simply tie a bow, or for Christmas, I added some bits of artificial greenery and red berries. You could add a tag with a greeting or name, a little wreath instead of the greenery, maybe a small ornament, whatever you like and have in your stash!

Add a small votive candle or tea light and you have a cute little gift for someone! Wrap it up or put it in a cello bag and tie it with a ribbon. Just the presentation can take the gift up a few notches!

Christmas is coming VERY soon now, but it’s fun to make a few things for gifts or your own decorations for the holidays! This is the time of year we have looked forward to all year! Take some time to make those things you wanted to “get around” to making!

You Will Need Gift Card Holders!

You know you will need at least a few gift card holders for holiday gifts, so here is one version you can easily make! It is basically a strip of cardstock, folded in the middle with a slit so that a gift card can be inserted, and then decorate and personalize for the occasion. You will need gift card holders throughout the year so keep in mind how easy it is to make your own rather than just using an envelope.

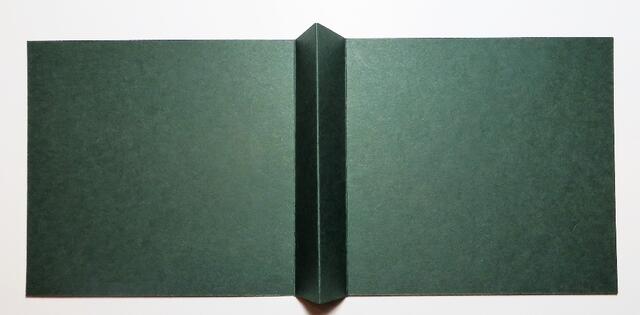
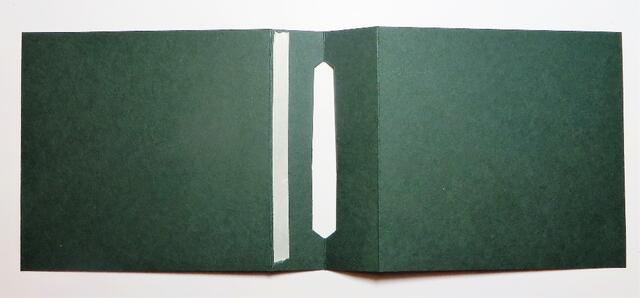
Start with a strip of cardstock that is 4 1/4″ x 11″. That is basically cutting a piece of cardstock in half, vertically. Score at 4 1/2″, 5 1/2″, and 6 1/2″. As you crease these score lines and use your Bone Folder on those folds, the center score line will be popped up (mountain fold) as you see in the photo above. This is where the gift card will eventually be held. It will be like a card opening on the side with this center fold inside the card.

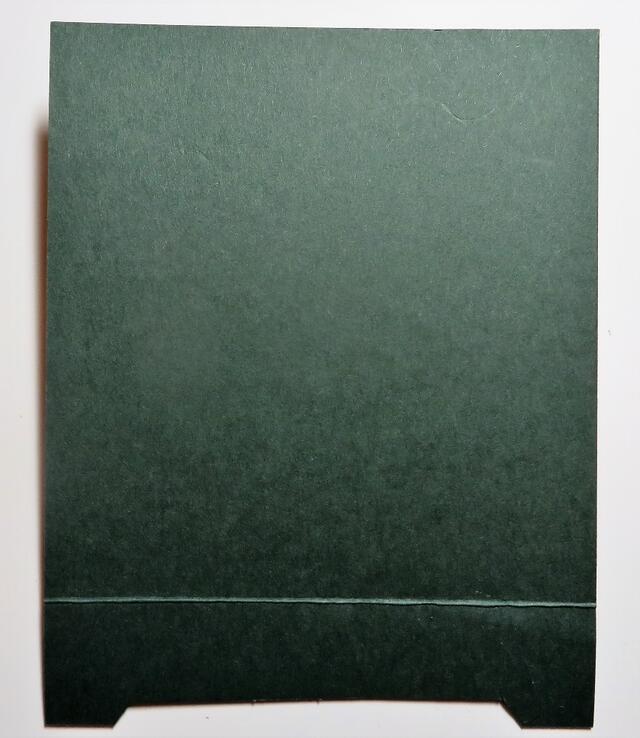
The next step is to cut a slit in that center fold to hold the gift card. I used my retired Classic Label Punch which was so perfect for a project like this. If you do not have the Label Punch, use your scissors to cut your own opening or use something like a craft knife. The opening does not go all the way across, of course. You just need it to be wide enough to hold the gift card, so have your gift card or any card or credit card handy so you can measure correctly.

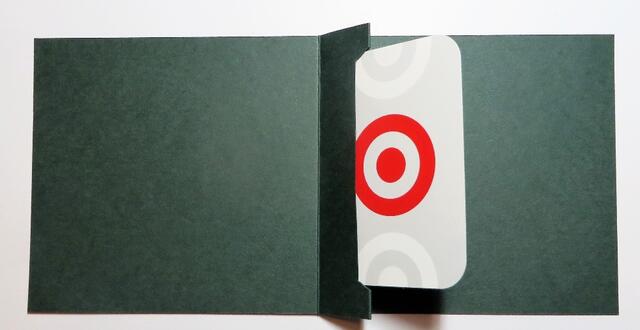
In this photo above, you can clearly see the opening I punched right on that center score line. It doesn’t have to be that wide and you can use scissors or die or whatever you have available. To hold that pocket closed, place a piece of Tear & Tape as close to the side score line away from the slit. You can insert the gift card so that you can see how the gift card fits in the slot. Then remove it, remove the liner from the Tear & Tape and fold back on the score line to adhere.

Gift Card Holder with Card

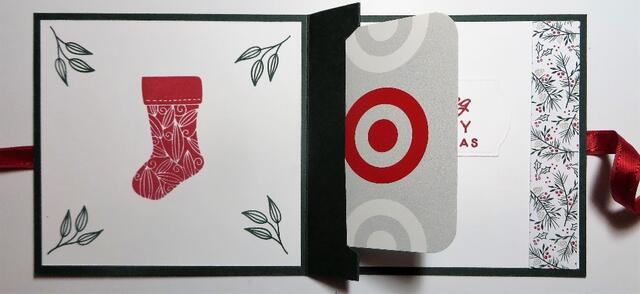
The gift card will fit in there far enough but not all the way down because of the tape. In this way, it can pop up when the card is opened!

Gift Card Holder Inside

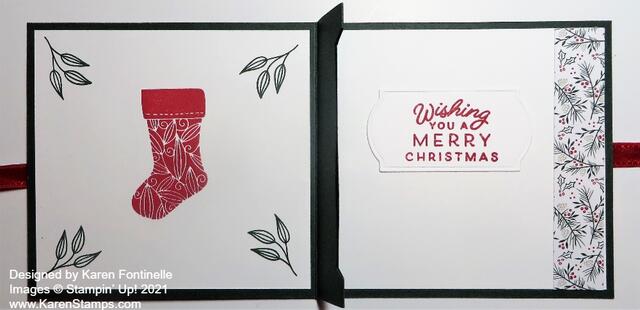
Now the fun part of decorating the inside. I cut Basic White layers of 4″ x 3 3/4″ for each side and stamped the left side with the stocking and leaves in the Tidings and Trimmings Stamp Set in Real Red and Evening Evergreen. On the right side, I already had a stamped and die-cut greeting in my scraps so I just adhered that to the center, plus a little strip of the Tidings of Christmas 6″ x 6″ Designer Series Paper on the right side that matches the front of the card.

Gift Card Holder Open

In the photo above you can see how the gift card pops up when the card is opened. That makes it a special treat for the recipient!

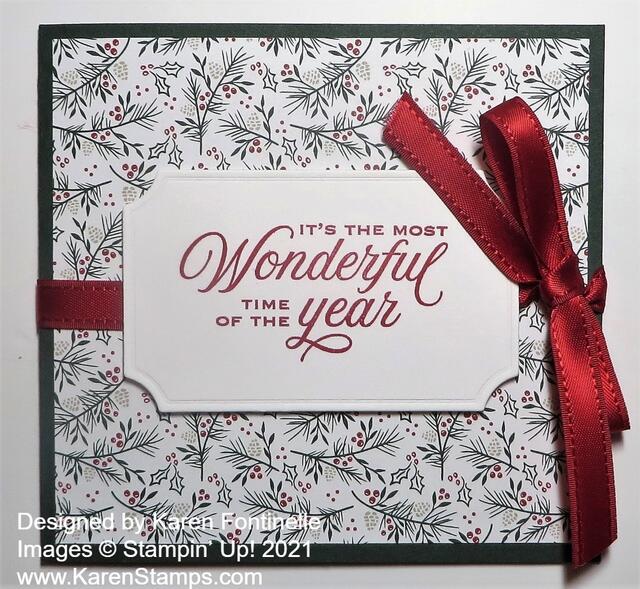
Gift Card Holder Front

For the front of the gift card holder, which is essentially a card, I used a base of Evening Evergreen and a layer of Tidings of Christmas Designer Series Paper. The greeting is stamped in Real Red ink from the Tidings and Trimmings Stamp Set and die cut with one of the Tasteful Labels Dies. If you want to add ribbon to tie the card shut, when the greeting is adhered, just place the Stampin’ Dimensionals in the four corners of the die cut and not in the center. That way the ribbon can be slid underneath the popped-up greeting and tied on the side.

There are other designs for making gift card holders but this is one you can try! It looks very nice but keep in mind that it IS easy to make! Don’t let the pop-up slot in the middle scare you! For other occasions, just change the colors, paper, greeting and you are good to go!

Painted Christmas 2-4-6-8 Gift Bag

Painted Christmas 2-4-6-8 Gift Bag

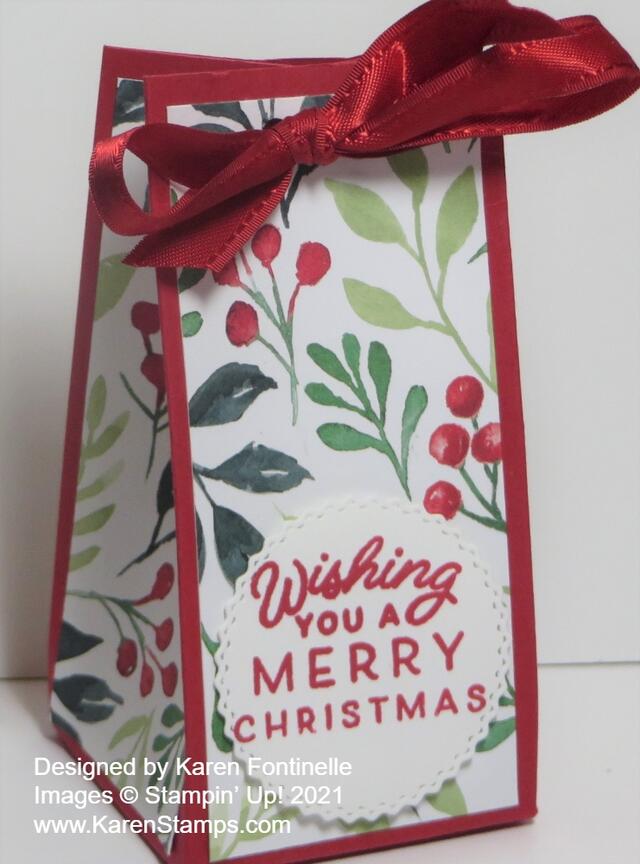
The time is rapidly approaching when we will need all shapes and sizes of gift bags and boxes so here is a basic, quick, and easy Painted Christmas 2-4-6-8 Gift Bag. You can vary the measurements if you need something taller or larger. But learning how to make a 2-4-6-8 box (or bag) is a basic every stamper should know!

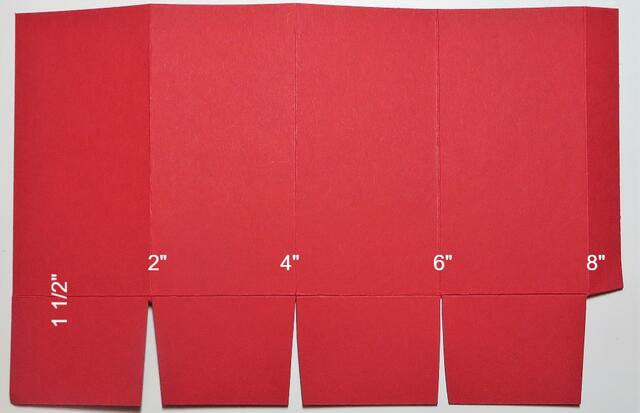
Here’s how to score your paper. This paper is 8 1/2″ x 5 1/2″. Just score at 2″, 4″, 6″, and 8″ which leaves the narrow little 1/2″ strip on the end which will be the tab to glue the box together. Then turn the paper and score at 1 1/2″ to form the bottom flaps. Cut off that smallest little section on the 1/2″ flap and cut up on the score lines to the 1 1/2″ score line to make the flaps at the bottom.

Diagram 2-4-6-8 Box

I used Real Red Cardstock because I wanted to use designer series paper on the side panels for decoration. I used the Painted Christmas Paper to cover each panel. Since each panel is 2″ wide by 4″ long, I cut the designer paper at 1 3/4″ x 3 3/4″. It’s easiest if you adhere the DSP pieces to the bag panels while the paper is flat before assembly.

Just crease and fold all the score lines to make it easy to assemble. If you are using patterned designer series paper with a pattern, be sure to think about the direction of the paper before you score and cut.

You have the choice of leaving the top open if you like or pinch it closed like I did, pushing in on the sides to indent a little. Punch holes in the top for ribbon or use some kind of clip instead to hold the top closed.

Here is another bag I made recently in THIS POST.

Just add a tag or adhere a greeting and decorate additionally however you like!

Don’t forget today is FREE SHIPPING at Stampin’ Up! all day with a $50 minimum order!

GO SHOP!

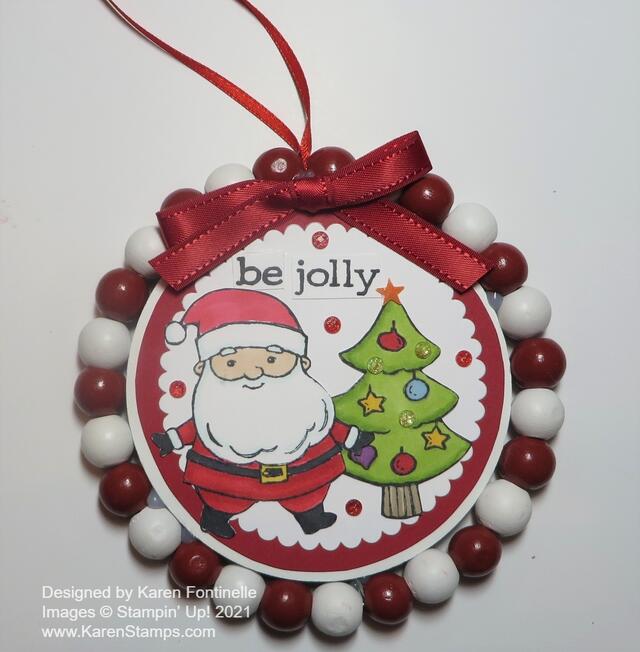
Be Jolly Altered Christmas Ornament

Be Jolly Altered Christmas Ornament

This Be Jolly Altered Christmas Ornament came about after watching some of these crafty gals on Instagram buy something cheap and junky at one of those dollar-type stores and then remake it into something cute for their holiday decorations! Usually, when I walk into one of those stores, all I see is junk and a mess, and I don’t come up with any creative vision for what I am seeing in there.

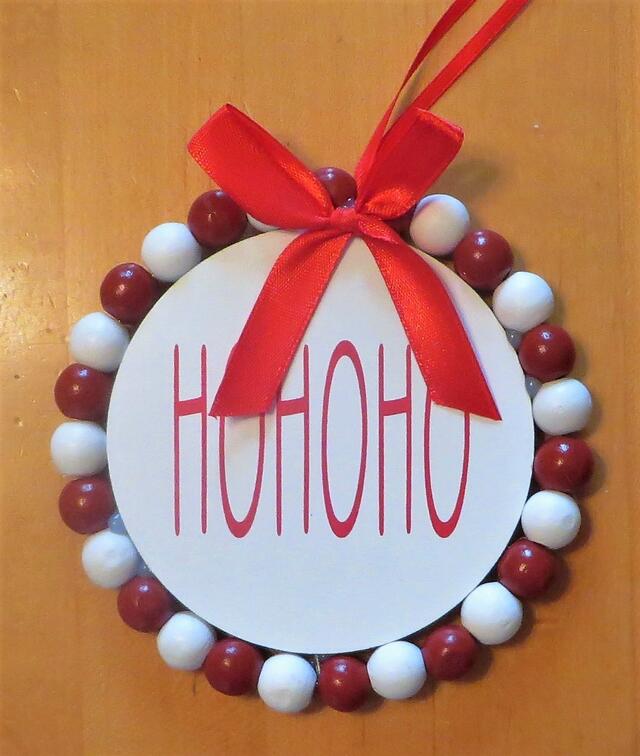
However, one day I saw this ornament pictured below at Walmart and although it was pretty cute as it was, that creative process came over me and I thought it would be cute to redo the front of the ornament and the beads would make it extra cute! Wooden beads seem to be pretty popular these days!

Ho Ho Ho Ornament

I thought the Be Jolly Stamp Set would be a perfect set with which to redo this ornament. We didn’t have a large enough circle die to cover the printed side of this ornament so I ended up finding a little bowl in the cabinet that fit inside this circle the size I wanted and just traced around it on Real Red Cardstock and cut it out by hand. The white scallop circle IS cut with the Layering Circles Dies. I wanted to use the white on the original ornament as a border margin, then layered the scalloped circle with some of the Real Red showing.

On a scrap of Basic White Cardstock I stamped the Santa and the Christmas tree in the Be Jolly Stamp Set with Memento Ink so I could color with Stampin’ Blends alcohol markers. You can use whatever colors you like. On the Santa, I used Real Red but Cherry Cobbler would be good, too. The Christmas tree is colored with the Granny Apple Green Combo and the ornaments with Real Red, Daffodil Delight, Balmy Blue, and one of the purples! I forget which one I used.

The greeting is stamped from the set. Since there wasn’t much empty space on the front of the ornament for the greeting, even this short one, I stamped it and then cut the words apart and glued them on separately. It is a fun design idea to do this, but also very practical sometimes when you really don’t have much space! You can space out the words on your project, they don’t have to be right together in a line. Mine are the tiniest bit offset.

For a final touch, I added some Elegant Faceted Gems to the tree plus an orange star from the Cute Stars Adhesive-backed Sequins. Yes, it is an orange star but I hoped on the ornament it would seem to be yellow or gold! Close enough! These star sequins are discounted as I write this on the Last Chance List for the Holiday 2021 Catalog. Of course, I couldn’t stop with just those gems on the tree, I had to add some red ones from the Wonderful Gems package scattered around. Sometimes you have to know when to stop, but being overly festive for the holidays is usually a good thing! These Wonderful Gems are also discounted right now.

I also have to add that on the back of the ornament, I add a Real Red die cut circle with a Basic White circle on top of that so there would be a place to stamp or write a message or a “To: From”. I also realized that I could have left the “Ho Ho Ho” side as is and decorated the “back” side. However, sometimes the back side is a little messier than the front so it just depends. I really liked the “Ho Ho Ho” side and hated to cover it up even though I wanted to! I guess it reminded me of the Rae Dunn products everyone is so crazy about.

The Be Jolly Stamp Set is also retiring although not discounted. It is a cute set I have enjoyed using. It’s so fun to color in but you could also use it in a monochromatic way on a card if you didn’t like coloring. And you could use any coloring techniques you like!

If you are out shopping and see an ornament or decoration with better potential being altered with Stampin’ Up! materials and your expertise, like this Be Jolly Altered Christmas Ornament, go for it! See what you come up with!

Santa Suit Christmas Gift Bag

Santa Suit Christmas Gift Bag

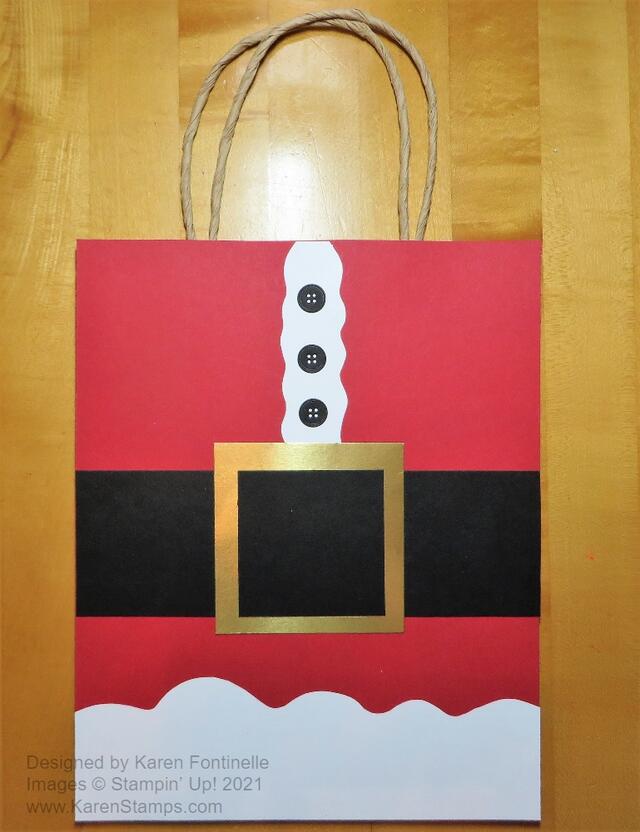
It soon will be time for gift bags and this Santa Suit Christmas Gift Bag is an easy one for you to make out of a plain kraft shopping bag! So fun for Christmas!

You may already have some handled shopping bags like this one in your stash of bags from certain stores or you can purchase a package of bags at the craft store. If they have the store name or design on the side, it will get covered up anyway so it is okay.

For this bag, I just measured the front side of the bag, which was 6″ x 8″, and cut a piece of Real Red Cardstock to cover the whole front for Santa’s red suit. Then I started at the bottom with the fur on the bottom of his red jacket. I just cut a 6″ wide piece of Basic White Cardstock a few inches wide and cut the curves freehand with scissors. They don’t have to be perfect and if you don’t like the look, just redo a few of the curves to even things out a little.

The Basic Black Santa belt is about 2″ wide. You can make yours narrower if you like. The trick to making a belt and belt buckle is to first cut the strip for the belt. Then cut the Gold Foil for the buckle a little wider than the belt, but just a solid square. To look like the black is going through the belt buckle, just cut a square of Basic Black to adhere to the top of the gold foil square. Just line it up even with the black strip and you’ll have a belt and buckle!

For the buttons, I looked through my dies for small circles, but I came across the button dies in the All Dressed Up Dies. They were perfect, but you could use some retired circle punches or just cut out little circles. I realized I probably should have some white fur on his jacket so I just cut a narrow piece of Basic White. Again, the fur doesn’t have to be perfect, fur isn’t perfect.

Attach a tag to the handle and you are all set with a great Santa Suit Christmas Gift Bag for a special, fun gift for someone!

Thanksgiving Wine Bottle Label

Thanksgiving Wine Bottle Label w Flowers

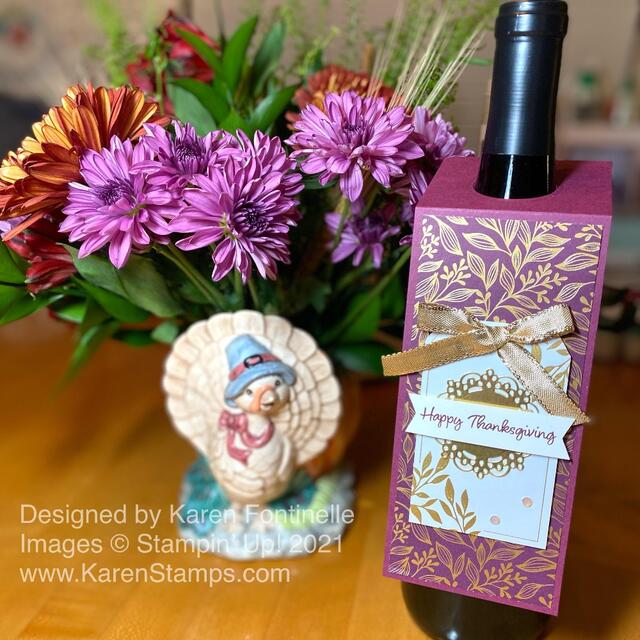
If you need a little something to make for Thanksgiving, make a Thanksgiving Wine Bottle Label like this one to decorate your own bottle of wine or to take to your hostess! This label that you just hang on a wine bottle is pretty easy to make and of course, you can make one in a thousand different ways!

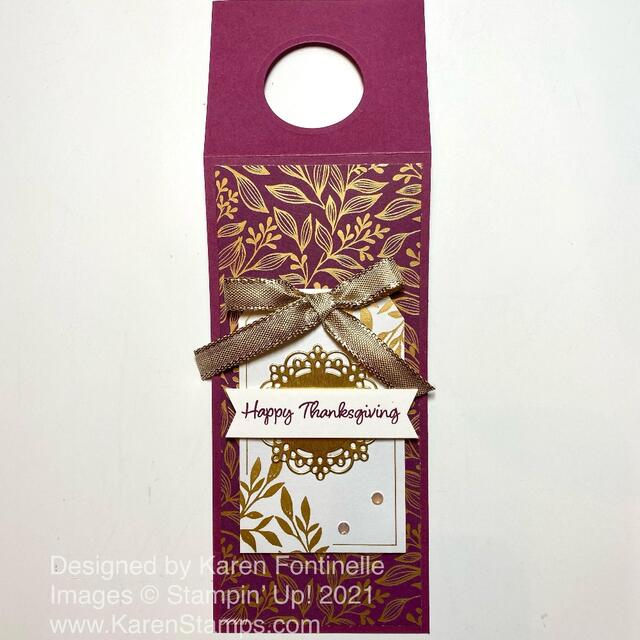
This label starts with a piece of Rich Razzleberry cardstock that is 3″ x 9″. Score it at 2 1/2″ to make the top fold and die cut or punch a hole in the center to go over the bottle. I used a small circle die in the Layering Circles Dies or you could use your old retired 1 3/8″ Circle Punch. This makes the hanger label go over the wine bottle. You can adjust the length or the top hole or fold. Decorate however you like!

To decorate I used the Blackberry Beauty Specialty Designer Series Paper in the Holiday Mini Catalog. It’s been difficult to keep in stop and not available as I write this, but perhaps you have it already. The gold foil accents are beautiful and make the paper. I cut it at 2 3/4″ x 6 1/4″ to layer on the front.

The tag is in the Blackberry Beauty Ephemera Pack and I added a small, die cut fancy doily from the Encircled in Beauty Dies in Gold Foil. I stamped the greeting from the Banner Year Stamp Set in Rich Razzleberry ink and adhered it over the gold doily after punching the banner ends with the Tailored Tag Punch. The gold doily is adhered to the tag which I popped up on Stampin’ Dimensionals.

For a little embellishment, I tied a bow with the Gold 3/8″ Shimmer Ribbon and adhered it with Mini Glue Dots. And for just a little more, of course, I had to add a couple of Elegant Faceted Gems at the bottom of the tag.

It might sound like this wine bottle hanger took a while to make but it really was quite easy! Here’s another one I made five years ago! Whether you are going somewhere for dinner and taking a gift or just want to make something special for your own wine bottle, make a quick and easy wine bottle label like this one for Thanksgiving!

Thanksgiving Wine Bottle Label

Gifts Galore Treat Packages November 2021 Paper Pumpkin

Paper Pumpkin Kit November 2021 contents

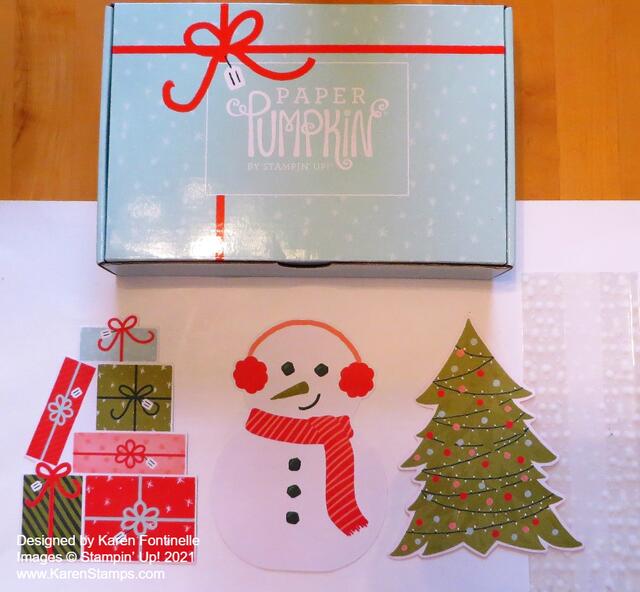
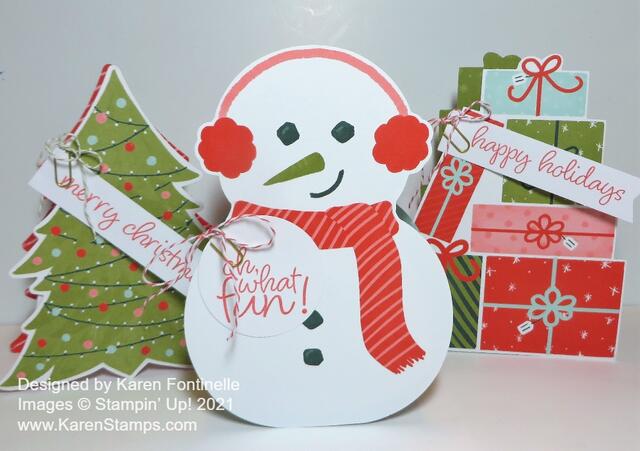
Yesterday I was able to take some time to work on my Gifts Galore Treat Packages in the November 2021 Paper Pumpkin Kit. This is really a super cute kit with so many fun ways to use the supplies in the kit. Of course, it is designed to make these nine double-sided treat packages that hold a cello bag inside filled with whatever kind of treats you put in the bag! But if you wanted to, you could make twice the number of treat packages by just using one image on the front of the little box instead of on both sides. You could make cards instead of treat packages. You could use them for scrapbook pages. These are just adorable images!

In this kit, the contents included little boxes to fold up to put in between the two cutout images. These are very easy to put together with the included Tear & Tape adhesive. Then just adhere the cutout images to the front and back of the little box. The kit also included printed cello bags for the treats.

There are tags to stamp with a greeting and attached to the package with a little paper clip and a twine bow. Such a cute stamp set as well included in the kit!

Paper Pumpkin November 2021 Kit Treat Packages

I don’t know why the snowman has a green nose, but I plan to fix that! It’s still cute but I don’t know why the carrot nose is green! I’ll just cut a nose out of Pumpkin Pie orange cardstock and replace it. I may add some rhinestones or jewels to the Christmas tree.

I usually like to make part of the Paper Pumpkin Kits are designed, and then I sometimes like to look and see what alternate ideas are out there that I might want to try or copy. This kit was particularly easy to make!

I don’t know if there will be any extra full kits or refills available for purchase in the Online Store, but if you are interested, you have to subscribe to Paper Pumpkin and then you will be eligible to purchase extras or refills, if any are available. You can choose any month to skip if you don’t want an upcoming month’s kit. And all the kits are guaranteed by Stampin’ Up! No risk and no obligation! Give yourself the gift of Paper Pumpkin and get a treat in your mailbox each month!
Check Out Paper Pumpkin Here!

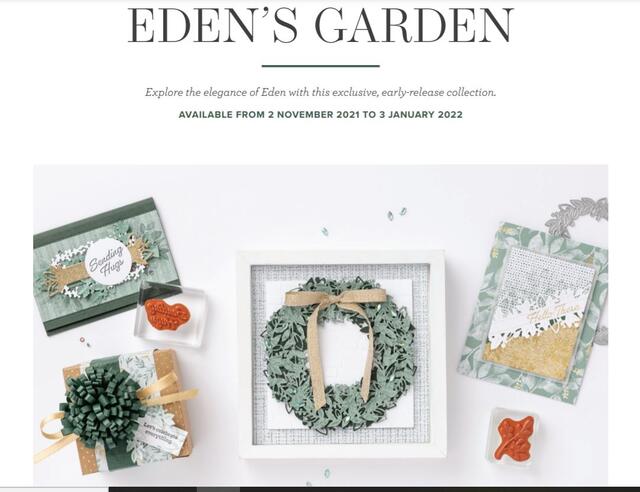
Early Release! Eden’s Garden Collection

Eden Garden Flyer top

The tale of the Garden of Eden transcends the boundaries of a single belief system. Numerous accounts and adaptations of Eden’s events have appeared in Christianity, Judaism, Islam, legends and lore, ancient mythology, and more! No matter how the story is shared, the essence of Eden remains the same: it’s a place of paradise. Filled with fruitful and flourishing foliage, stillness and serenity, and an air of mystery, Eden is an ethereal utopia!

Enter and explore Eden with the Eden’s Garden Collection! This delightful and desirable collection includes early-release products from the January–June 2022 Mini Catalog—a bundle of stamps and dies that’s blooming with beauty and bounty. Plus, exclusive products you can’t uncover anywhere else—a pack of paper patterned with green and gold, a set of specialty sheets for gift-giving and textured touches, and a sparkling set of gleaming gems!

Eden Garden Flyer2
Click to View!

Just as the timeless tale can be told in a variety of versions, these paradisical products can be used to create projects for any occasion—and they make the perfect papercrafting companion.

Eden Garden Flyer3
Click to View!
Eden Garden Flyer4
Click to View!

PRODUCT DETAILS

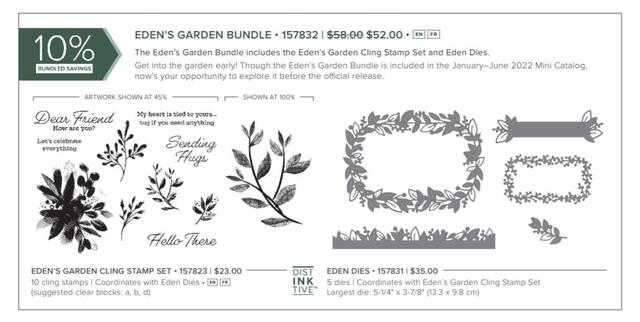
EDEN’S GARDEN CLING STAMP SET 157823
Early-release product from the January–June 2022 Mini Catalog. $23.00

EDEN DIES 157831
Early-release product from the January–June 2022 Mini Catalog. $35.00

5 dies
Largest die: 5-1/4″ x 3-7/8″ (13.3 x 9.8 cm)
Coordinates with Eden’s Garden Cling Stamp Set

EDEN’S GARDEN BUNDLE 157832
Includes the Eden’s Garden Cling Stamp Set and Eden Dies; an early-release product from the January–June 2022 Mini Catalog. $52.00

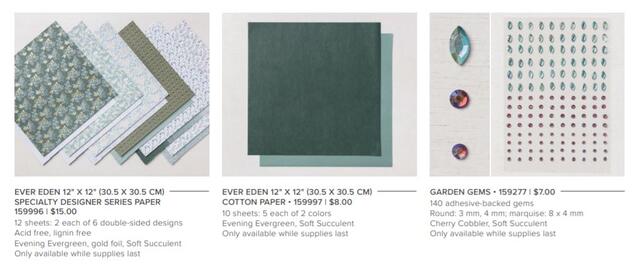
EVER EDEN 12″ X 12″ (30.5 X 30.5 CM) SPECIALTY DESIGNER SERIES PAPER 159996
Exclusive specialty Designer Series Paper; available only during the Eden’s Garden promotion. $15.00 12 sheets: 2 each of 6 double-sided designs Evening Evergreen, gold foil, Soft Succulent. Only available while supplies last.

EVER EDEN 12″ X 12″ (30.5 X 30.5 CM) COTTON PAPER 159997
Exclusive cotton paper; available only during the Eden’s Garden promotion $8.00

10 sheets: 5 each of 2 colors
Evening Evergreen, Soft Succulent
Only available while supplies last.

GARDEN GEMS 159277
Exclusive embellishments; available only during the Eden’s Garden promotion. $7.00

140 adhesive-backed gems.
Round: 3 mm, 4 mm. Marquise: 8 x 4 mm.
Cherry Cobbler, Soft Succulent
Only available while supplies last.

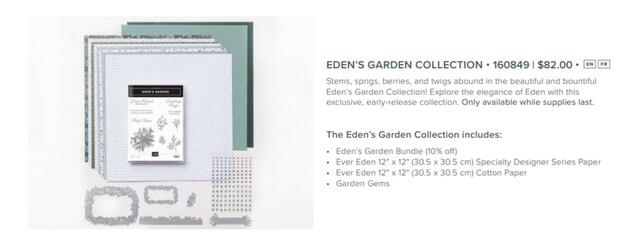
EDEN’S GARDEN COLLECTION 160849
The entire exclusive, early-release collection!

Stems, sprigs, berries, and twigs abound in the beautiful and bountiful Eden’s Garden Collection! Explore the elegance of Eden with this exclusive, early-release collection. Only available while supplies last. You get all these things:

  • Eden’s Garden Bundle (10% off)
  • Ever Eden 12″ x 12″ (30.5 x 30.5 cm) Specialty Designer Series Paper
  • Ever Eden 12″ x 12″ (30.5 x 30.5 cm) Cotton Paper
  • Garden Gems

Click Here to View Entire Flyer!

SHOP NOW!

Don’t Miss the November Gifts Galore Paper Pumpkin Kit!

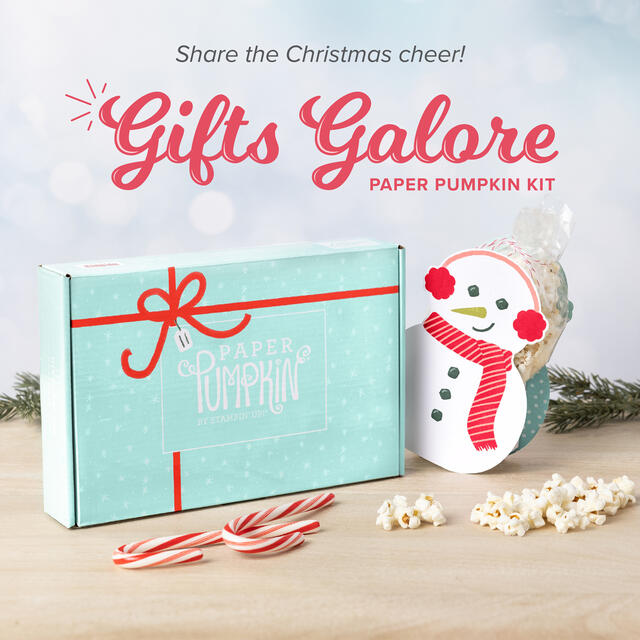
We all love to see piles of presents on Christmas morning. Make that your reality with the Gifts Galore Paper Pumpkin Kit! With classic Christmas sentiments, bright and festive colors, a sweet snowman, a tree with all the trimmings, or a playful pile of presents, you’ll have everything you need to make eye-catching treat packages that are sure to spread Christmas cheer. Each Gifts Galore box contains enough supplies to create nine treat packages—three each of three designs—and nine food-safe bags that are adorably styled for easy Christmas gifting. There’s plenty of joy to share with Gifts Galore! 

DETAILS

  • Kit contains enough supplies to create nine treat packages—three each of three designs—and nine food-safe bags. 
  • This all-inclusive kit includes printed die cuts, die-cut boxes, cellophane treat bags, adhesive, and more!
  • Includes an exclusive stamp set and a Classic Stampin’ Spot
  • Coordinating colors: Evening Evergreen, Flirty Flamingo, Old Olive, Pool Party, Poppy Parade

Every kit is guaranteed by Stampin’ Up!  No risk, no obligation. Easy to try out!  

Deadline Wednesday, November 10, 2021

 JOIN PAPER PUMPKIN TODAY!

Or you can purchase a Prepaid Subscription if you want to add a subscription choice to your Stampin’ Up! order.

Make a Double Treat Holder

Treat Holder Front

I was looking for some kind of treat holder that could serve as a little favor maybe at your Thanksgiving table and I came across this idea, a Double Treat Holder. I think I first saw this idea years ago at a Stampin’ Up! Convention I attended (in person, back in the day!) and I know I have made some since then. It’s really a cute idea! There is a pouch on each side front and back and if you want to, you can even add a cookie or something in between the two sides! What a great treat idea!!

Oh, I just found a post I made about this first treat holder I saw at a “Regional” Stampin’ Up! event…..shorter and smaller than Convention! The design is a little bit different than this one, but it is the same idea! Check it out HERE.

This design is easy and uses a 6″ x 6″ piece of designer paper, or you could use a piece of cardstock. You do need a Paper Trimmer to score the fold lines or the Simply Scored scoring board. It is best if you can find a designer paper that on both sides it doesn’t matter which way the pattern goes. However, the treat partially covers up the paper and the recipient probably isn’t going to care if the pattern goes at a diagonal when it is meant to go straight! Hopefully I can show photos and describe the directions well enough here but you can find lots of videos online, too.

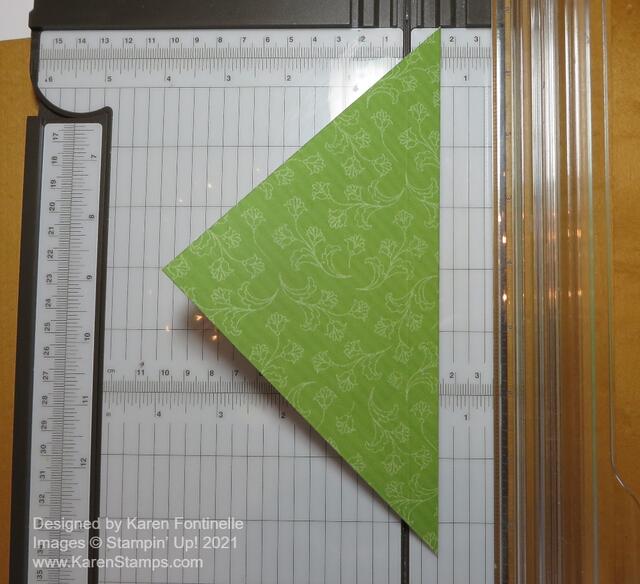
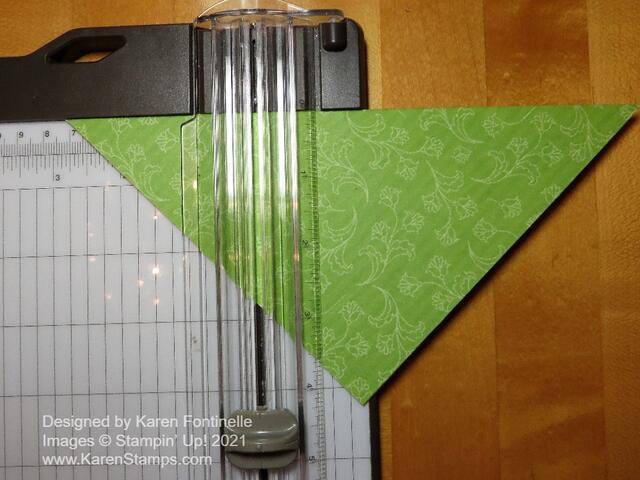
Fold the 6″ x 6″ designer paper in half as you see in the Paper Trimmer to form a triangle. After folding it into the triangle, you will score 1/2″ inside that fold. You can see the fold line is lined up at 1/2″ on the right side of the cutting track. Score and then turn the paper over to score at 1/2″ on the other side unless you can see the scoring well enough from just doing it on the front side. Just don’t tear your designer paper with too much pressure!

Treat Holder Folded Half

Now turn the paper so the fold line is at the top and score at 2 3/4″ on each end of the triangle and on each side of the paper if you need to.

Treat Holder Side Scoring

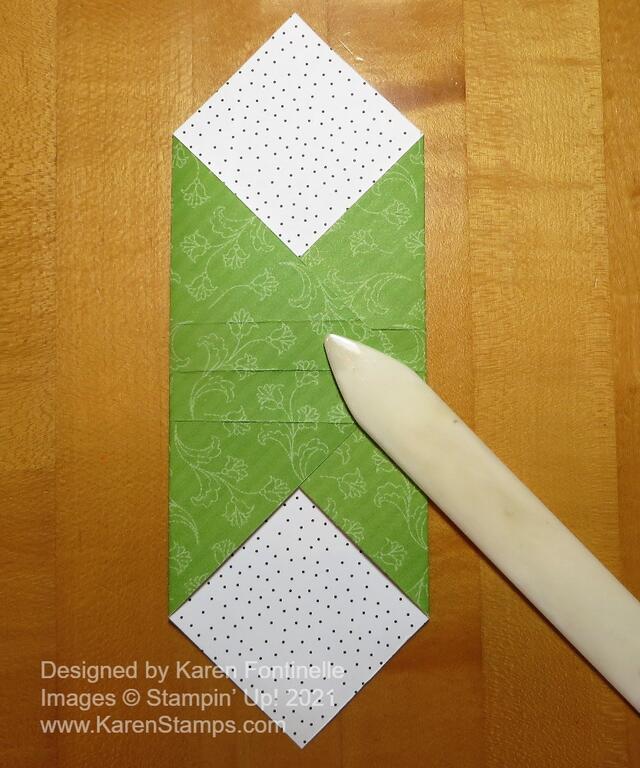
After creasing all the score lines, open up the paper and fold the side points in as you see below. You can also see three score lines in the middle. The middle one is actually the center fold line. I put my Bone Folder there just to hold it closed, but it is good to use a Bone Folder or whatever you have to get nice, good creases.

Treat Holder Sides Folded

Then just fold the top and bottom of that piece, with the pouches, backward to form the treat holder with the space in the middle. The center line is just flat in the middle and you fold on those outer score lines and match up the point at the top. Hold the top points together and use a hole punch to punch a hole for ribbon or staple or clip or whatever you want to do. No adhesive required until you decorate the front!

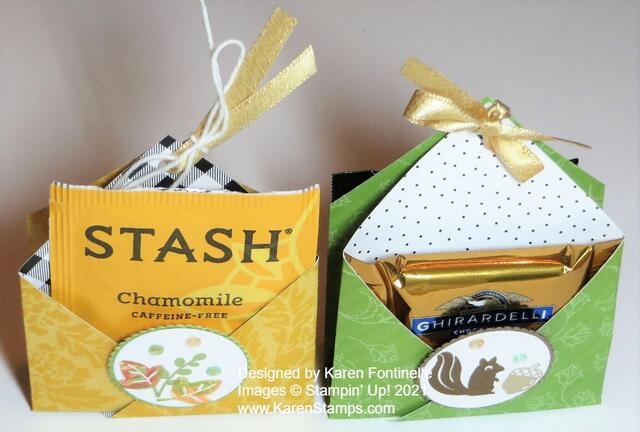
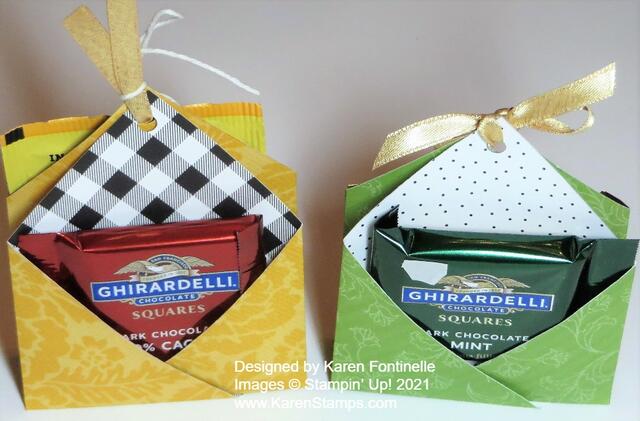
This is the backside of two treat holders using two different paper patterns. These were from the Pattern Party Host Designer Series Paper. A chocolate square or tea bag fit nicely in each pocket, front and back!

Treat Holder Back

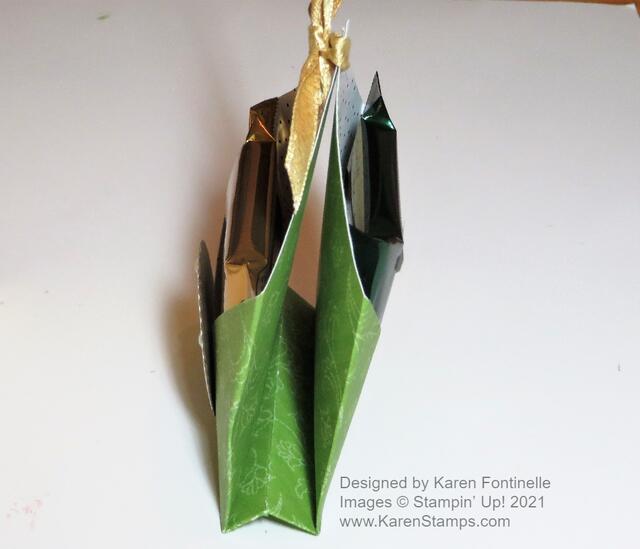
Here is the view from the side where you could package up a cookie or two in a cello bag and stick it in the middle of the treat holder!

Treat Holder Inside

And to decorate the front of my treat holder I used images from the Banner Year Stamp Set! Then I die cut a circle and scalloped circle for a layer from the Layering Circles Dies to fit right on the front with a couple of gems! That’s the only place you need adhesive and I used Stampin’ Dimensionals on the back.

So fun! Let me know if you try them! A good way to use up some 6″ x 6″ designer paper or cut up a 12″ x 12″!

Treat Holder Front

Eden’s Garden Is Here!

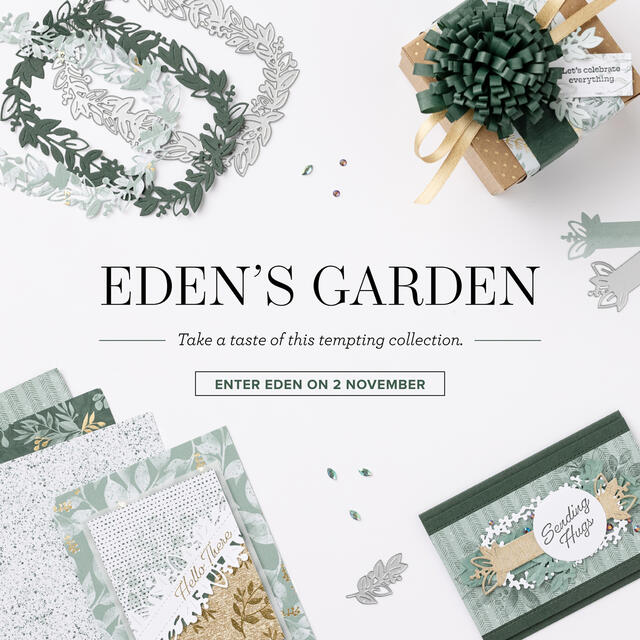
Eden's Garden Square Ad

The tale of the Garden of Eden transcends the boundaries of a single belief system. Numerous accounts and adaptations of Eden’s events have appeared in Christianity, Judaism, Islam, legends and lore, ancient mythology, and more! No matter how the story is shared, the essence of Eden remains the same: it’s a place of paradise. Filled with fruitful and flourishing foliage, stillness and serenity, and an air of mystery, Eden is an ethereal utopia!

And you can purchase these new products TODAY!

Enter and explore Eden with the Eden’s Garden Collection! This delightful and desirable collection includes early-release products from the January–June 2022 Mini Catalog—a bundle of stamps and dies that’s blooming with beauty and bounty. Plus, exclusive products you can’t uncover anywhere else—a pack of paper patterned with green and gold, a set of specialty sheets for gift-giving and textured touches, and a sparkling set of gleaming gems!

Just as the timeless tale can be told in a variety of versions, these paradisical products can be used to create projects for any occasion—and they make the perfect papercrafting companion.

PRODUCT DETAILS

EDEN’S GARDEN CLING STAMP SET 157823
Early-release product from the January–June 2022 Mini Catalog. $23.00


EDEN DIES 157831
Early-release product from the January–June 2022 Mini Catalog. $35.00

5 dies
Largest die: 5-1/4″ x 3-7/8″ (13.3 x 9.8 cm)
Coordinates with Eden’s Garden Cling Stamp Set

EDEN’S GARDEN BUNDLE 157832
Includes the Eden’s Garden Cling Stamp Set and Eden Dies; an early-release product from the January–June 2022 Mini Catalog. $52.00

EVER EDEN 12″ X 12″ (30.5 X 30.5 CM) SPECIALTY DESIGNER SERIES PAPER 159996
Exclusive specialty Designer Series Paper; available only during the Eden’s Garden promotion. $15.00 12 sheets: 2 each of 6 double-sided designs Evening Evergreen, gold foil, Soft Succulent. Only available while supplies last.


EVER EDEN 12″ X 12″ (30.5 X 30.5 CM) COTTON PAPER 159997
Exclusive cotton paper; available only during the Eden’s Garden promotion $8.00

10 sheets: 5 each of 2 colors
Evening Evergreen, Soft Succulent
Only available while supplies last.


GARDEN GEMS 159277
Exclusive embellishments; available only during the Eden’s Garden promotion. $7.00

140 adhesive-backed gems.
Round: 3 mm, 4 mm. Marquise: 8 x 4 mm.
Cherry Cobbler, Soft Succulent
Only available while supplies last.

EDEN’S GARDEN COLLECTION 160849
The entire exclusive, early-release collection!

Stems, sprigs, berries, and twigs abound in the beautiful and bountiful Eden’s Garden Collection! Explore the elegance of Eden with this exclusive, early-release collection. Only available while supplies last. You get all these things:

  • Eden’s Garden Bundle (10% off)
  • Ever Eden 12″ x 12″ (30.5 x 30.5 cm) Specialty Designer Series Paper
  • Ever Eden 12″ x 12″ (30.5 x 30.5 cm) Cotton Paper
  • Garden Gems

AVAILABLE TODAY, NOVEMBER 2, 2021!

SHOP NOW!

Triangle Halloween Treat Box WIth Ghosts

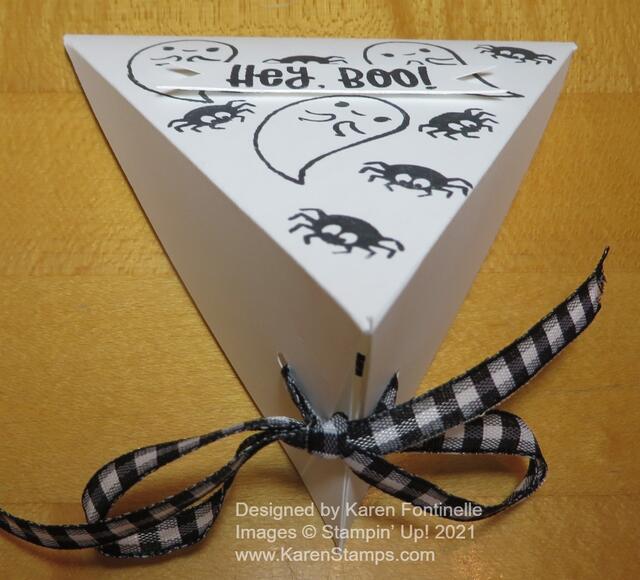
Triangle Halloween Treat Box Front

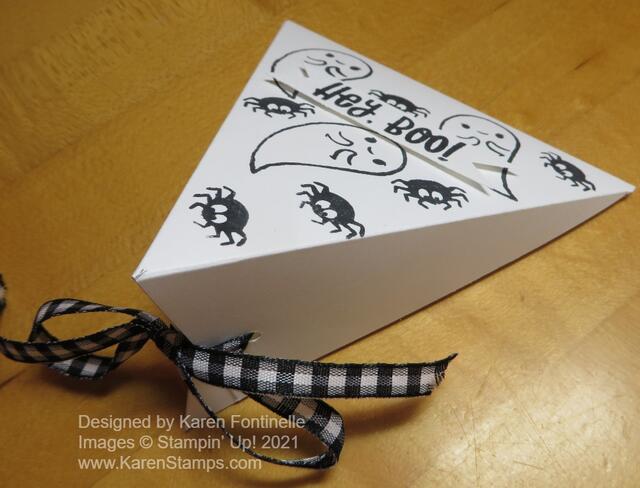
This may look slightly fancy, but it is really an easy treat box to make! This one was especially easy since it was white cardstock and I just stamped ghosts and spiders on it!

You can vary the size once you know how to make this box, but these are the measurements of the sample I made. I used a piece of Basic White Cardstock that is 4″ x 8″. Actually, there is no reason you couldn’t make it 4 1/4″ x 8 1/2″ so you don’t have to cut off a 1/2″ strip! But you’ll see after you make it.

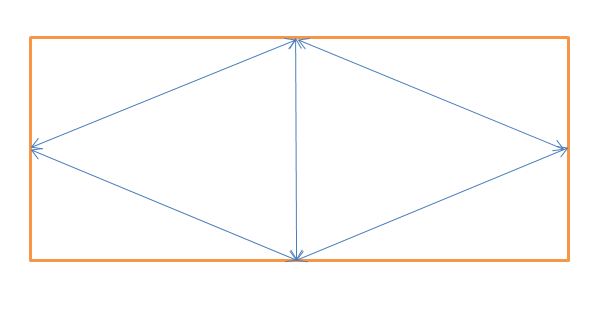
Score the strip of paper in the center at 4″. Then on each end, make a pencil mark in the center at 2″. This part may seem tricky, but it really is not. Place the paper on your Paper Trimmer so you can score at a diagonal from that 2″ center mark down to the center scoreline.   Just angle the paper on your Stampin’ Trimmer so that both the center score line and the center point on the end are on the track on the Trimmer and then score. See the diagram below.

Triangle Box Drawing

Crease all the score lines and see how your box will go together. Determine which area will be the top of the box and then you can stamp on it or decorate. I used the Cutest Halloween Stamp Set to stamp several ghosts and spiders. The greeting is stamped on a strip of Basic White and then I just flagged the ends with my scissors and adhered it with Mini Stampin’ Dimensionals.

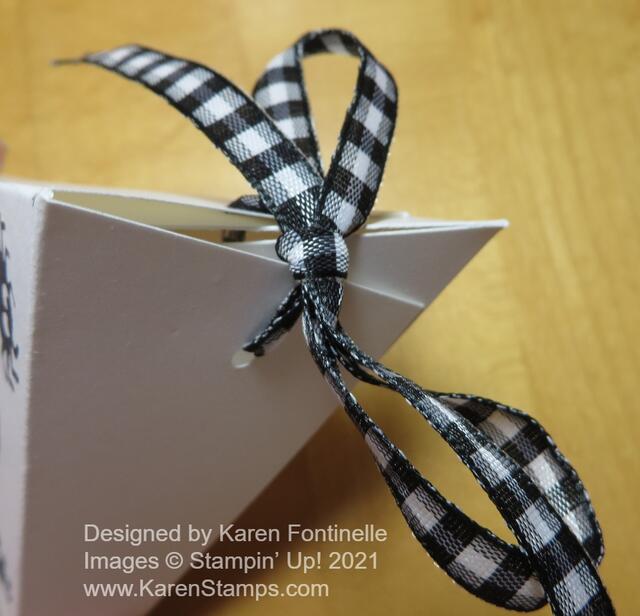
With whatever hole punch you have (or a sharp object!) punch holes in the pointy end so that you can insert ribbon and tie it shut. Be sure to put your candy or gift inside first! I used the Black & White 1/4″ Gingham Ribbon.

Triangle Halloween Treat Box Tied

You can make these triangle boxes smaller or larger. Here is one I made three years ago! I think they are fun to make because they are really so easy and so versatile. You can make them for any occasion!

Triangle Halloween Treat Box WIth Ghosts

Even if you don’t have much time, you can make these pretty easily and quickly! Try one so you will have it in your repertoire!

HAPPY HALLOWEEN!

Cute Halloween Treats To Make

Cute Halloween Treats

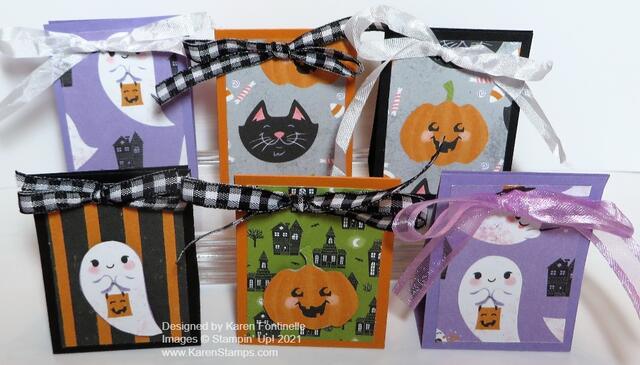
If you want to make some quick and easy little Halloween treats either for friends or for trick-or-treaters, these Cute Halloween Treats are for you!! These were so fun to make and an easy way to use up some of your Halloween paper!

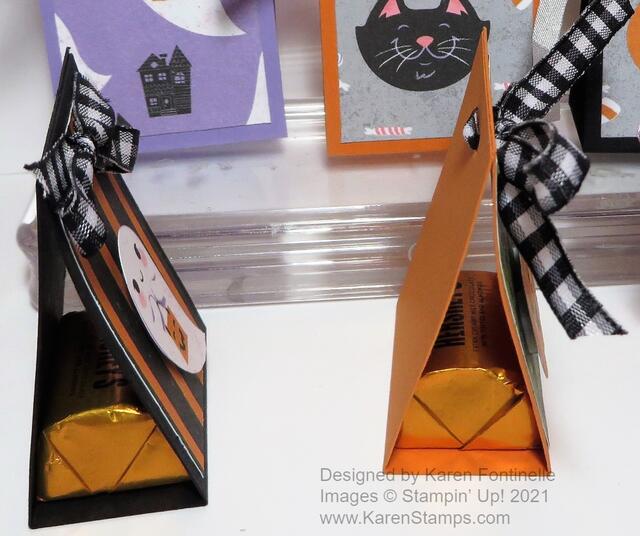
These are little things and we all know little things are so darn cute! Just cut a strip of cardstock at 1 3/4″ x 5 1/2″. Score the paper at 2 1/4″ and 3 1/4″. This makes a little space so it will sit flat and so it will hold a piece of candy inside. Those really good chocolate Nuggets work really well!

You could stamp a background on these or you could just cut a piece of designer series paper. I used my Cute Halloween 6″ x 6″ Designer Series Paper. You just need little pieces of designer paper. Mine are 1 1/2″ x 2″ to fit on the front. On a couple, I cut out a ghost and a pumpkin and popped those up on Stampin’ Dimensionals on the front of the designer paper. You can do anything you want to decorate these little treats!

Whatever candy you use inside, you might want to use a Glue Dot to hold it in place. You don’t want to use anything that would touch the candy inside so just be careful. Then punch two holes in the top and tie a ribbon through. Or you could use some other way to close them at the top like some little clip or even staple them closed.

You could also make this type of treat larger by making it wider and taller on the front and back. Just do the math and you can figure out what size you would want to make.

Once you make one or two I bet you can’t stop! They are easy and except for tying ribbon through little holes, they are quick to make!

Have some Halloween fun and make some little treats!

HAPPY HALLOWEEN!

Love, Santa Tag Kit Christmas Card

Love, Santa Tag Kit Christmas Card

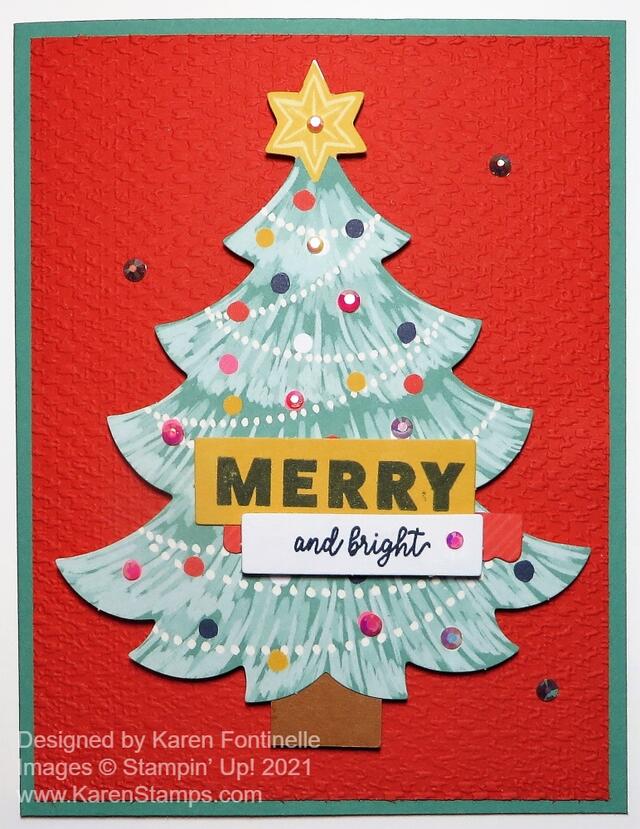
The other day I had so much fun making all the tags in the Love, Santa Kit to be ready for holiday gift-wrapping! But if you didn’t need all the tags, you could use some (or all!) to make Christmas cards to send like this Love, Santa Tag Kit Christmas Card.

To make this card, I use clipped off the hole at the top of the tree that would hold the string to tie on a tag. You could also leave the hole and string attached and adhere it rather loosely to the card so that maybe the recipient would remove the tag and use it themselves or hang it on their Christmas tree. When I was growing up we used to get a Christmas card from someone who was quite wealthy and the fancy card could be used as an ornament on the tree! I’ll always remember that!

To make this card, I relied on the coordinating colors listed in the Love, Santa Tag Kit so I chose Just Jade for the card base and a layer of Poppy Parade. That layer I embossed using the Tasteful Texture 3D Embossing Folder. You wouldn’t have to do it but it adds a little “something”. Just because I wanted to, I added a tree trunk from Cinnamon Cider Cardstock to the base of the tree. Then I adhered the tree to the front of the card with Stampin’ Dimensionals®. If you thought, or you wanted, the recipient to remove the tree from the card and use it as a tag or ornament, I would just adhere it with maybe two Dimensionals, maybe even the Mini Dimensionals or cut the Dimensionals down to a smaller size, top and bottom, and tell them how to carefully remove the tag.

The tree tag already had some jewels adhered to it that came with the kit, but I also added some to the Poppy Parade layer of the card. I couldn’t resist! It’s for Christmas anyway and that calls for sparkle and glimmer wherever possible!

On the inside, adhere a layer of Basic White with a stamped message and maybe some other stamped image or strip of designer paper to decorate and sign your name or write your own personal message.

This Love, Santa Tag Kit is a fun one to work with because the tags are such “happy” and colorful images. Even though it is for making tags for gifts, as you can see, you can use some or all of them for card fronts and make some quick cards to send! Or use them on the extra Love, Santa Treat Bags! Even if you don’t want or can’t get the kit, you might be interested in these cute treat bags with images printed in white that coordinate with the tags and are food safe. If you are someone who makes special treats for the holidays to give to neighbors and friends, these bags would be perfect! Even if you have a regular gift, wrap tissue paper around it and put it in the cello bag and tie on a tag! I know a gift shop that gift wraps items like this.

It’s time to be shopping for supplies you need for Christmas cards, projects, and gifts! We should all be trying to get an early start on all our holiday tasks to keep ourselves from getting rushed at the last minute! If you already have the Love, Santa Tag Kit be sure to put it together and enjoy yourself!

SHOP STAMPIN’ UP!