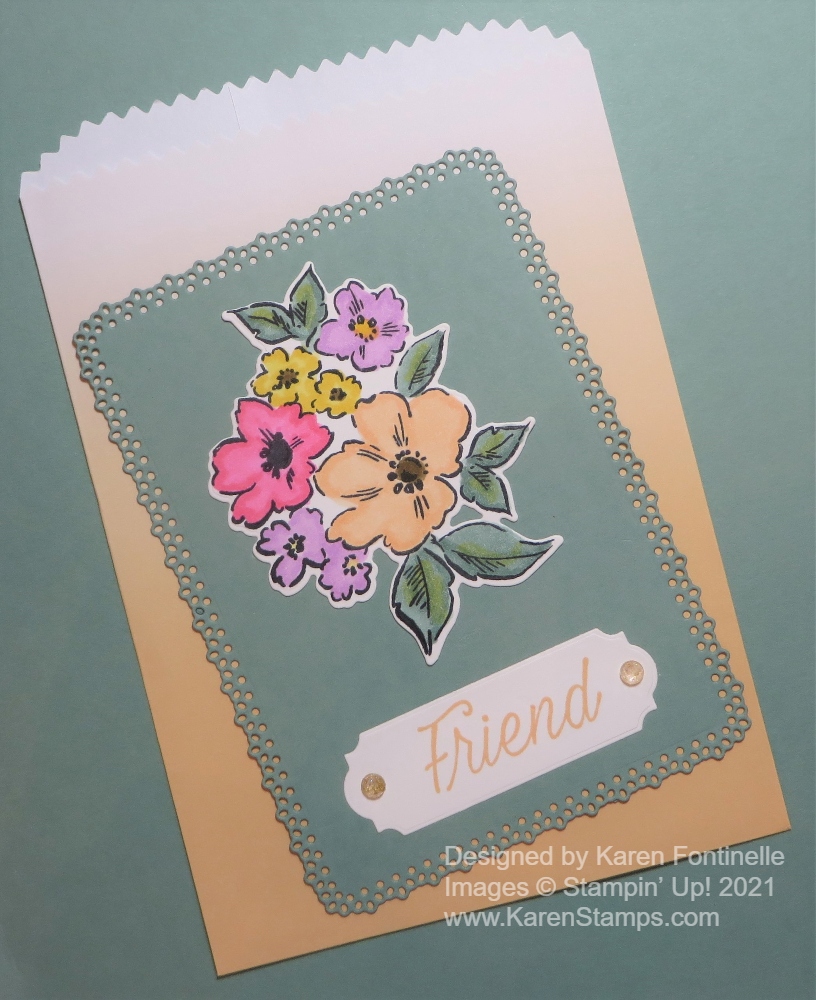
When you need a gift for a friend at the last minute, it’s nice to have something on hand to use, like this Ombre Gift Bag For a Friend. No running to the store and looking for the right kind of packaging and theme. You can make your own!
This is an Ombre Gift Bag in the new In Color Pale Papaya. The pack of 20 gift bags comes in an assortment of all the new In Colors. Just decorate however you like, a lot or a little. You can add a little gift or maybe a special treat. Fold over the top or leave it as is. The bags are 4 3/4″ x 7″ and are food safe! Just picture a big, yummy cookie in that bag!
For this Ombre Bag, I die cut Soft Succulent Cardstock with the largest Ornate Layers Die. The flowers are stamped from the Hand-Penned Petals Stamp Set. I colored in all the flowers with Stampin’ Blends Markers in Pale Papaya, Daffodil Delight, Polished Pink, Fresh Freesia and the leaves with Soft Succulent plus a tiny bit of yellow. You can add flower centers in whatever colors you like. The flowers are die-cut with the Penned Flowers Dies. Only use the outline die, not the center part, to cut out this bouquet. You can buy both the stamp set and dies together in the Hand-Penned Petals Bundle and save 10%.
I found the word “Friend” in the Daisy Lane Stamp Set and stamped it in Pale Papaya Ink. Then I die-cut it with a die in theOrnate Frames Dies. Originally, I was going to layer it on another die-cut but that made it too big and I didn’t want to detract from the flowers. I added two Genial Gems to the greeting and the Ombre Gift Bag For a Friend was finished!
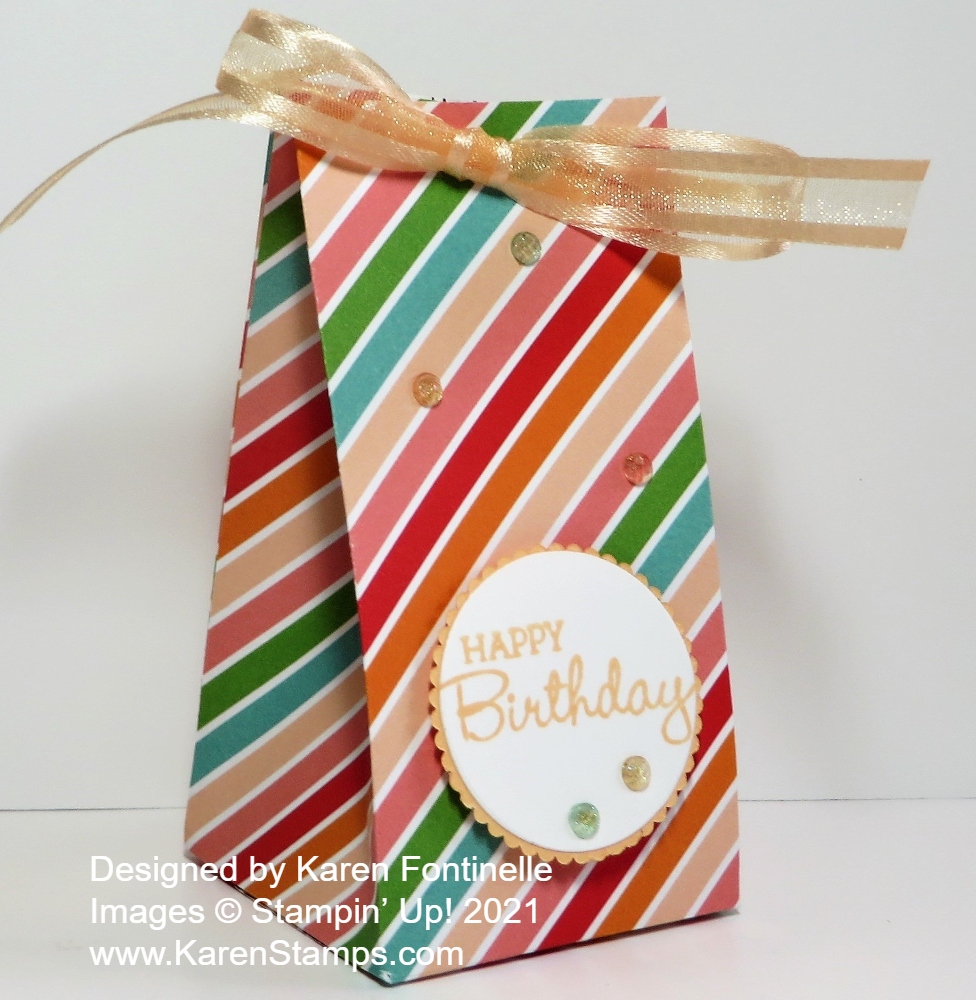
If you are able to get this Pattern Party Designer Series Paper, I think you will really enjoy using it as I did making this Pattern Party 2-4-6-8 Birthday Gift Bag! I thought this festive diagonal stripe would make a fun gift bag, at least for a small gift or treat, and certainly a 2-4-6-8 gift bag (or box) is easy enough to make!
The Pattern Party Designer Series Paper is an item you can choose as one of your Stampin’ Rewards with an order of $150 or more. That’s a big order but maybe some friends would like to go in on the order with you and you could divide up the paper because it’s a big package! Twelve different designs and four pages of each!
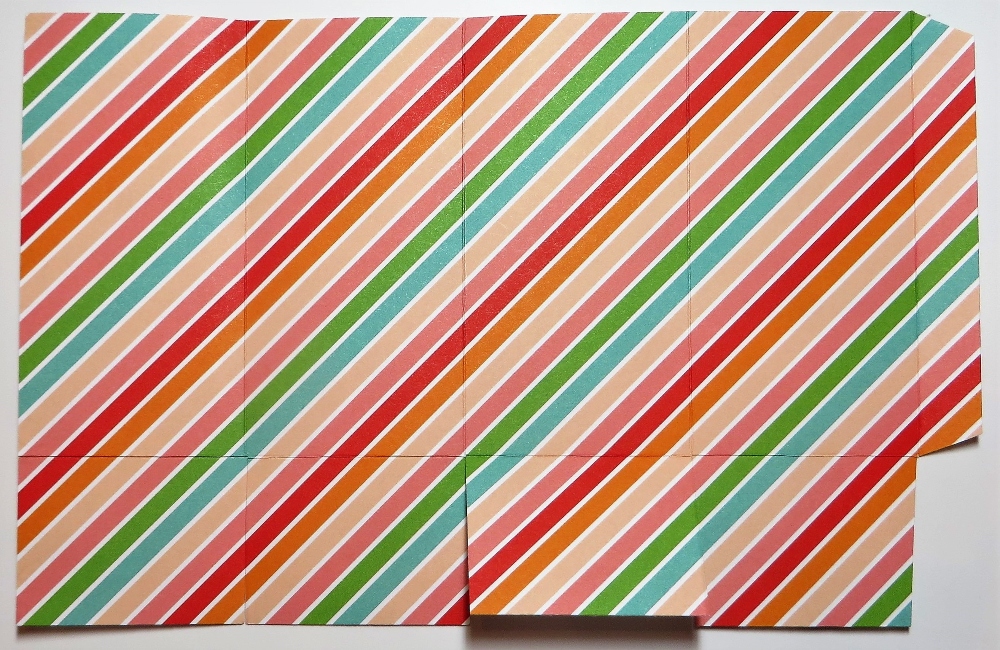
We’ve made this bag a bunch of times before but even I have to go back and review the directions. It is very easy though! Once you know how to do it, you can vary the size by using a larger or smaller piece of paper. Always be sure the pattern of the paper is going in the direction you want it to go in so you don’t end up with upside down flowers or animals or a stripe going sideways when you wanted it to go up and down.
For this gift bag, I started with a piece of paper 8 1/2″ x 5 1/2″. I just scored it at 2″, 4″, 6″ and 8″ going across the paper. Then I turned it and scored at 1 1/2″ for the bottom tabs of the bag. Trim off the little 1/2″ bottom piece and cut on the 2″, 4″, 6″, and 8″ score lines for the bottom flaps up to the 1 1/2″ score line. Difficult to see in the photo below but you can get the idea.
Assemble the box, putting adhesive on that 1/2″ piece on the side. You can just fold over the other side of the bag with it laying flat on the table. You don’t have to try to maneuver it in your hands! Apply adhesive to the bottom flaps, first doing a “test” to see which way you want the flaps to go in before you glue. Then pay attention to where the seam is and try to have that face the back. Fold in the bottom flaps, trying to make the front of the bag look nice.
To decorate this bag, I stamped “Happy Birthday” in the Pansy Patch Stamp Set in Pale Papaya Ink. Then I die cut it with one of the Layering Circles Dies and layered it on a scalloped circle die in Pale Papaya Cardstock. It’s perfect fit! I needed something big enough to fit the greeting but not too big for the bag! I popped that up with two Stampin’ Dimensionals.
For the top of the bag, you can leave it open, or kind of squeeze in the sides and pinch the top together. Punch or poke some holes in the top for ribbon. I used the Pale Papaya 3/8″ Open Weave Ribbon to tie the top closed in a bow. Have I said how much I love that ribbon?! Then for a little extra, I added some of the Genial Gems on the greeting and on the bag. These come in two colors, Pale Papaya and Mint Macaron but I think you can use them even without matching colors.
Knowing how to make a 2-4-6-8 bag is something you should know how to do as a papercrafter! They are fun to make, not to mention useful when you need some cute packaging for a small gift or treat! Here’s a very similar one made for Valentine’s Day. Being able to make an easy gift bag just might save you a trip to the store!
How about a little Christmas in April using the Tag Buffet Kit?! While things are kind of quiet holiday-wise, think about getting this Christmas tag kit at a discount and make some tags for Christmas gifts ahead of time! I know I have had to go to the store at the last minute to buy more tags for Christmas gifts. Or you can even make these tags or parts of them and stick them on Christmas cards! Get a head start!
This Tag Buffet Project Kit is on the Stampin’ Up! Clearance Rack right now. The Tag Buffet Stamp Set is no longer available but you can use any stamp set that has Christmas greetings with these tags. There is no stamping involved except for the greeting, so really you could skip any stamping and just use the images. I really think this tag kit is beautiful and I enjoyed making my Christmas tags when the kit came out in the past Holiday Catalog 2020.
The kit comes in a cute holiday box. All you have to do is layer the kit contents to make the tag and thread the string through the top. Or use the pieces to make Christmas cards or any other project!
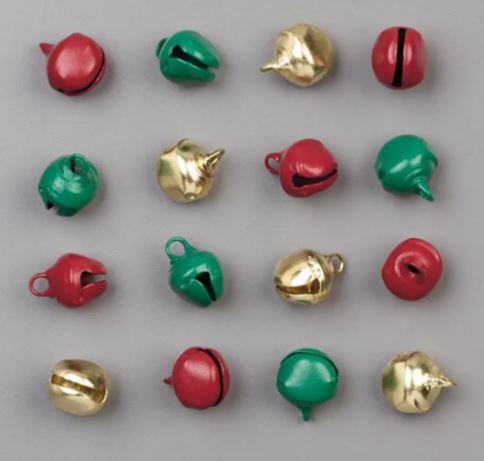
Also on the Clearance Rack are these little Jingle Bells! You can get these for only $3.00 and add them to your Christmas tags! Or add them to any other holiday packaging when the time comes! Order a bunch and make a jingle bracelet for the holidays!
If you want any more details, read my blog post when I made my Tag Buffet Project Kit HERE.
You will also find other Christmas ribbons and even the Plush Poinsettia Specialty Papers on the Clearance Rack right now! Be sure you check it out while you are shopping! I already have my extra Tag Buffet Project Kit! If you don’t use all the designed pieces on each tag, you can probably use some of your own supplies and expand the number of tags you can make! Last year I enclosed a tag in a few Christmas cards that I sent out just for a little surprise gift inside my card. Remember, anything can sell out at any moment, but since now the big rush of the first day is over, I think you have a moment to look around on the Clearance Rack, not to mention the Last Chance Products and pick up some bargains for your stash!
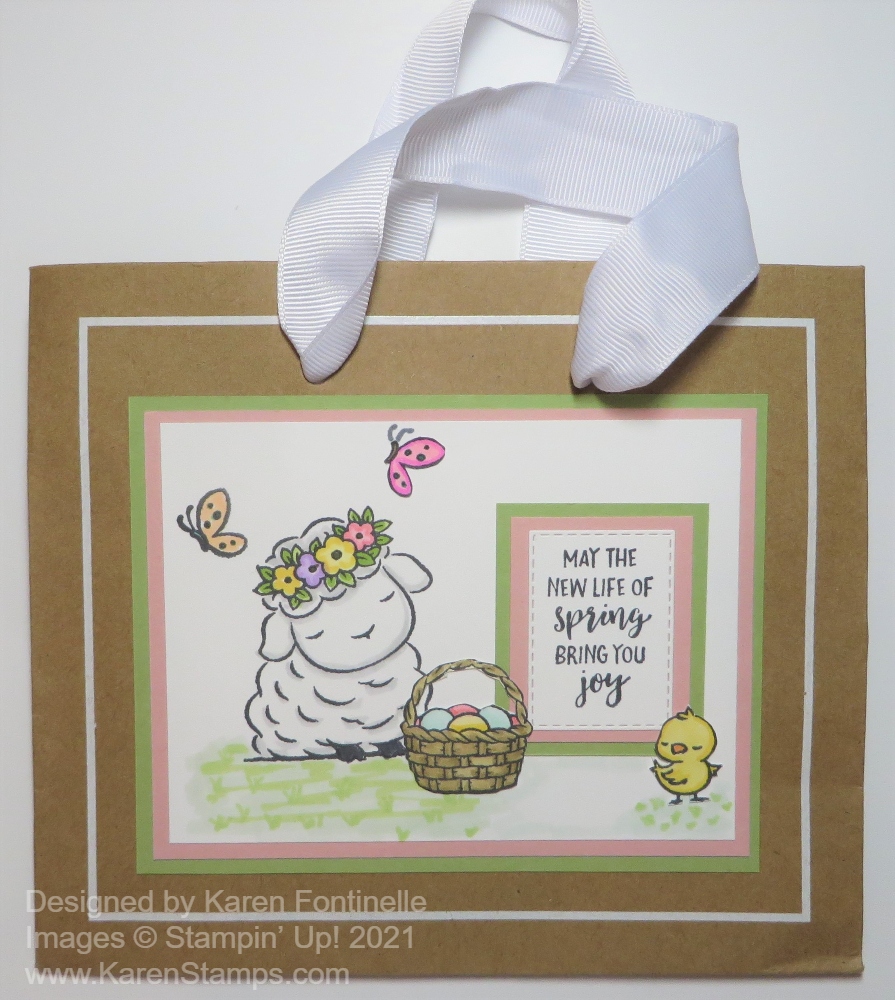
Something I think is fun to do is to take a shopping bag you got at a store and turn it into a gift bag, like this Altered Spring Lamb Gift Bag. The other day when I was cleaning out my “bag of bags”, I came across this small kraft shopping bag I got at one of my favorite gift shops. This bag is about 6″ x 7″ which was perfect for adding this stamped panel to the front of the bag! Even if the bag has printing, such as the name of the store or company, just cover it up with your stamping elements.
This bag already had the white border line around the bag with the store name printed in the middle. This was the perfect size to add my stamped decoration for the front of the bag and turn it into a spring gift bag, maybe for Easter
It was really like making a card, I just made the piece to fit the front area of the bag. The lamb is from the Springtime Joy Stamp Set, very popular right now with Easter coming up soon! The lamb is stamped in Memento Black Ink so I could color him with Stampin’ Blends Markers.
When I looked at the greetings in the stamp set, it seemed I should place the lamb off to the side and put the greeting, layered, right there on the other side. I wanted the lamb to be white, but I used the Light Smoky Slate Stampin’ Blend to just add a bit of color by the fluffs of wool and here and there. Then I also colored the flowers and leaves.
The greeting is stamped and then die-cut with a die in the Stitched So Sweetly Dies. For the layers underneath I just cut out rectangles with my Paper Trimmer.
For embellishments, I stamped a butterfly off to the side of the lamb and colored it with Stampin’ Blends. I also stamped the basket of eggs, colored it, and then cut out with Paper Snips. I decided not to pop it up with Dimensionals and just glued it down flat next to the lamb. Also, that little chick is so cute, I stamped, colored and cut him out and glued him down at the corner of the greeting. Now after all this, if you get a smudge of ink on your work, just add another butterfly to cover it up!
The whole decorative piece is layered on Blushing Bride and then Pear Pizzazz Cardstock. It is centered inside that white border line and looks perfect on this shopping bag turned into a gift bag! You can do this for any occasion! If you don’t have a cute little shopping bag, you can purchase plain bags at the craft store and decorate those. This is especially fun (and useful!) to do before Christmas so you have plenty of gift bags ready for gift wrapping like this Christmas bag.
Look through your bags and see if you have some shopping bags you can alter for whatever occasion you need like this Altered Spring Lamb Gift Bag I did using the Springtime Joy Stamp Set, perfect for a small Easter treat or gift!
I like to recommend that stampers and papercrafters make some gift bags to have on hand like this Easy Sale-A-Bration Paper Blooms Gift Bag. It just might save you a last minute trip to the store when you want a cute gift wrap for a small gift or treat! It probably only takes about 5 minutes to make an easy gift bag and you can personalize it for the recipient or for the occasion.
When I looked through the Paper Blooms Designer Series Paper in the Sale-A-Bration Brochure, I assumed it would be all florals with some plain designs on the back. But this sheet of paper really caught my eye with these big circles of various colors all over the sheet! It looked so fun and I thought making a gift bag would be a good way to use it.
To make this gift bag, start with half a sheet of designer paper, 12″ x 6″. Using your Paper Trimmer or Simply Scored scoring board, score the paper going across at 3 1/2″, 5 1/2″, 9″ and 11″. Then turn the paper and score at 1 1/4″ and 5 1/2″. Pay attention to the design on your paper so it doesn’t come out upside down. If you are planning to turn that narrow scored area at 5 1/2″ (which leaves 1/2″ to turn down for the top edge and reveal the paper design on the inside), make sure that pattern is also going to work and go in the proper direction.
After scoring, cut on the score lines at the bottom up to the score lines going across. Cut off the smallest little area on the bottom of the bag flaps. You’ll see which part it is. That will leave a 1/2″ edge to adhere to the other side of the bag. Assemble the bag. I used Multipurpose Liquid Glue for that “wiggle room” it gives you but the Stampin’ Seal+ would also be good.
Here’s another gift bag I made a couple of years ago, decorated a little differently to give you another idea.
To decorate the bag a little bit, although it was cute as it was, I cut out some flowers from another sheet of the Paper Blooms Paper. These were easy flowers to cut out and I only needed these two!
If you like this paper, you can get it free with a $50 Stampin’ Up! purchase if you choose it for your Sale-A-Bration FREE product. Be sure to shop by Sunday, February 28th!
This is a quick and easy project to make with this paper. Follow these directions for this Easy Sale-A-Bration Paper Blooms Gift Bag and then you can make even more gift bags with other paper in your stash!
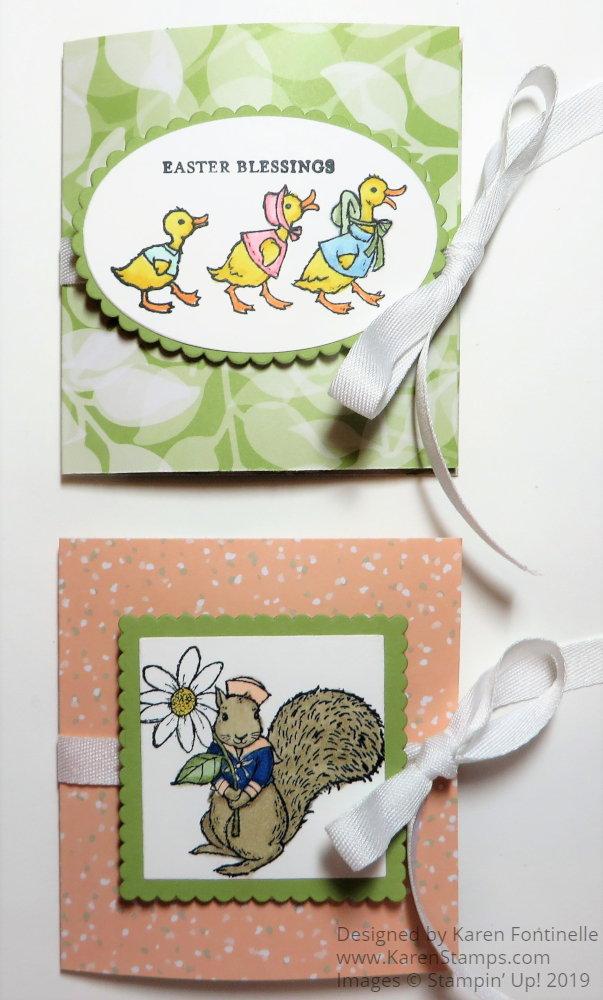
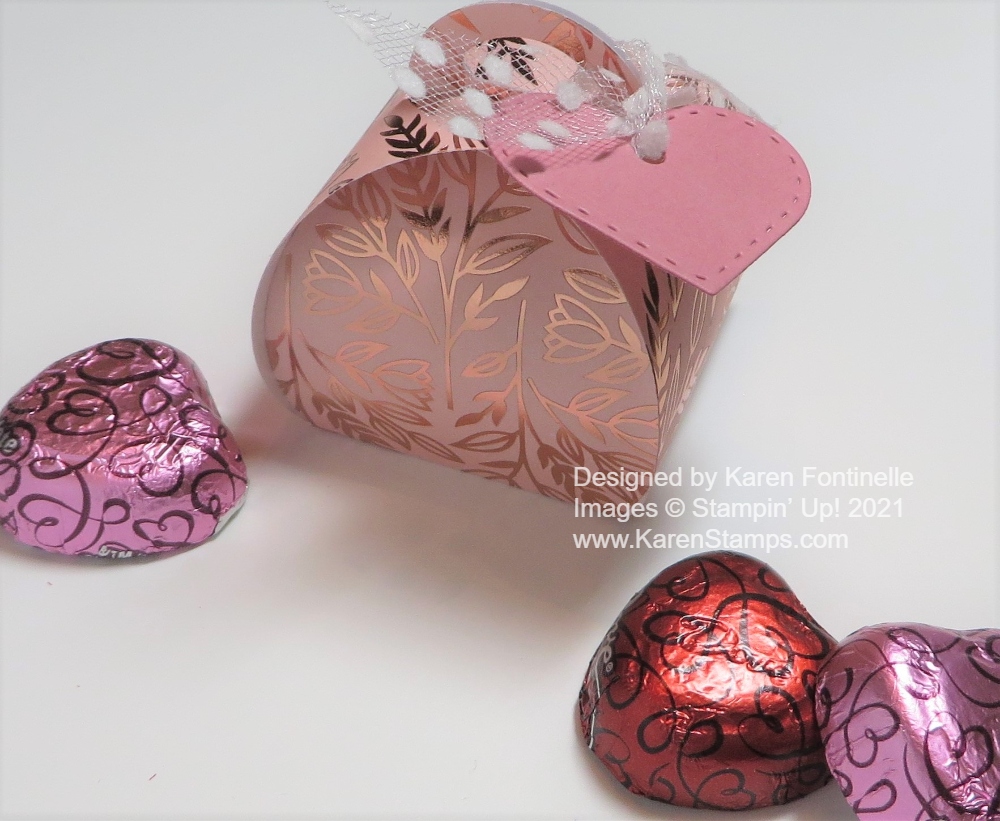
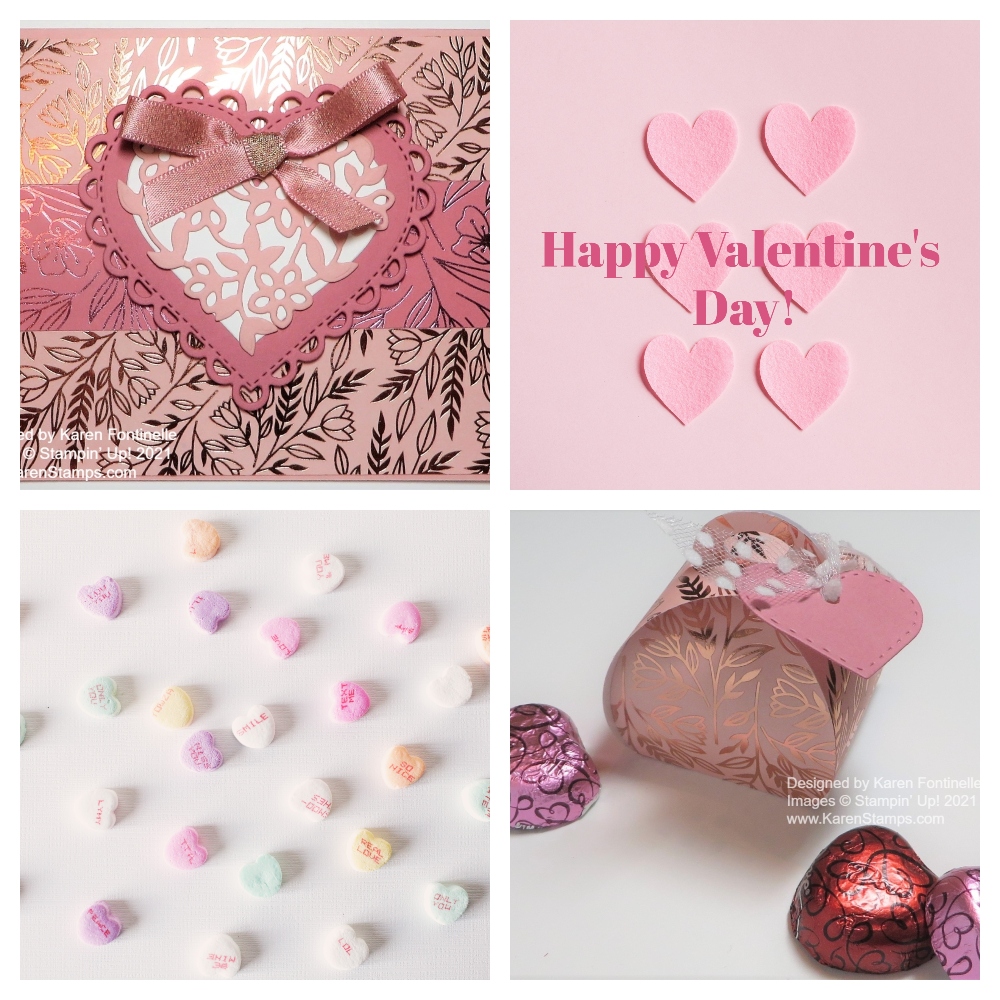
Don’t forget about the cute little boxes you can make easily for some Valentine candy, even at the last minute! Any cardstock or designer paper you have will work, but for Valentine’s Day you might want to use some fancy designer paper!
This cute little box is made with the Mini Curvy Keepsakes Box Dies. You just need a piece of 6″ x 6″ paper for the box. Then you can also die-cut a little heart in the same set to tie onto the box. Just cut the paper, fold on the score lines, then assemble. Push down on the two handle pieces and fold over the two slit pieces to hold the box together. Be sure to put your treat in first!
I used the pretty Love You Always Specialty Designer Series Paper with the foil accents. The die-cut heart is Rococo Rose Cardstock. I tied it on with the Whisper White 5/8″ Polka Dot Tulle Ribbon. That’s all there is to it! You could use this little box for Valentine candy or maybe a little table decoration or party favor. You can get very creative with this Mini Curvy Keepsakes Box and make all kinds of creations.
This little Mini Curvy Keepsakes Box For Valentine’s Day matches the card I made with the Love You Always Specialty Paper here in this post! Make a matching set!
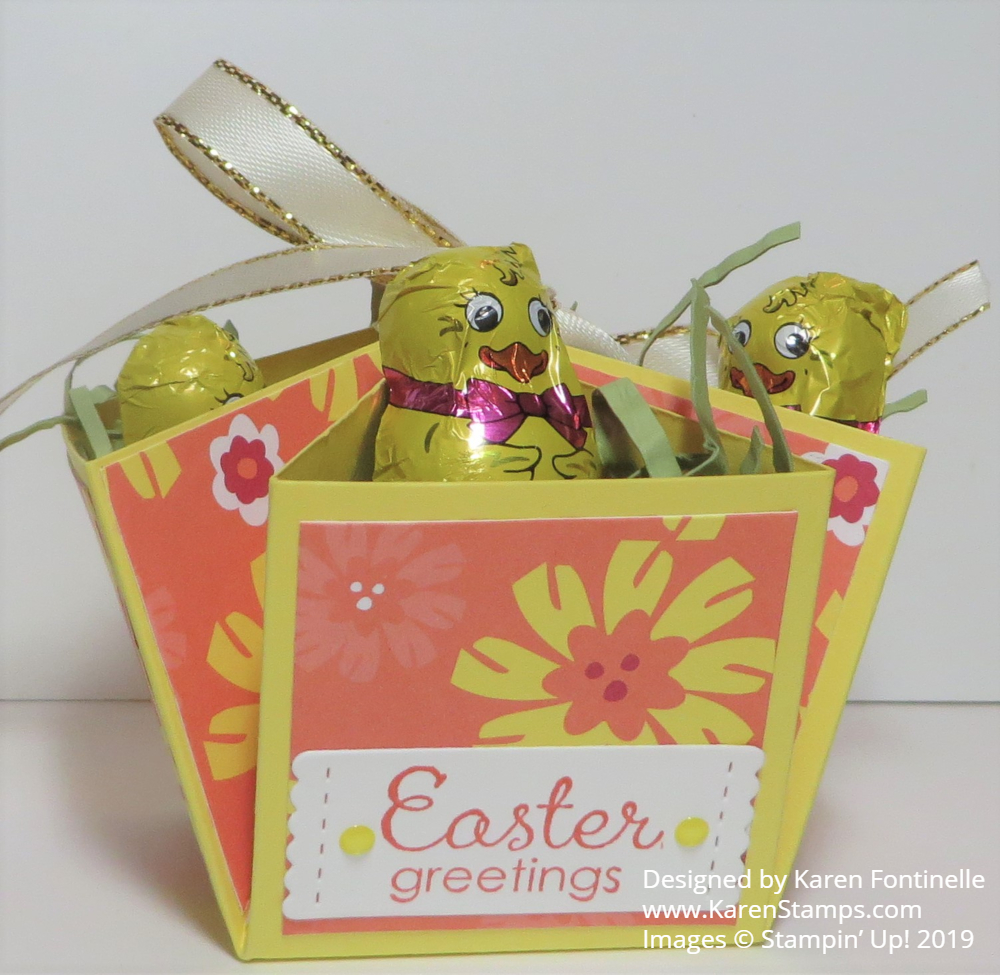
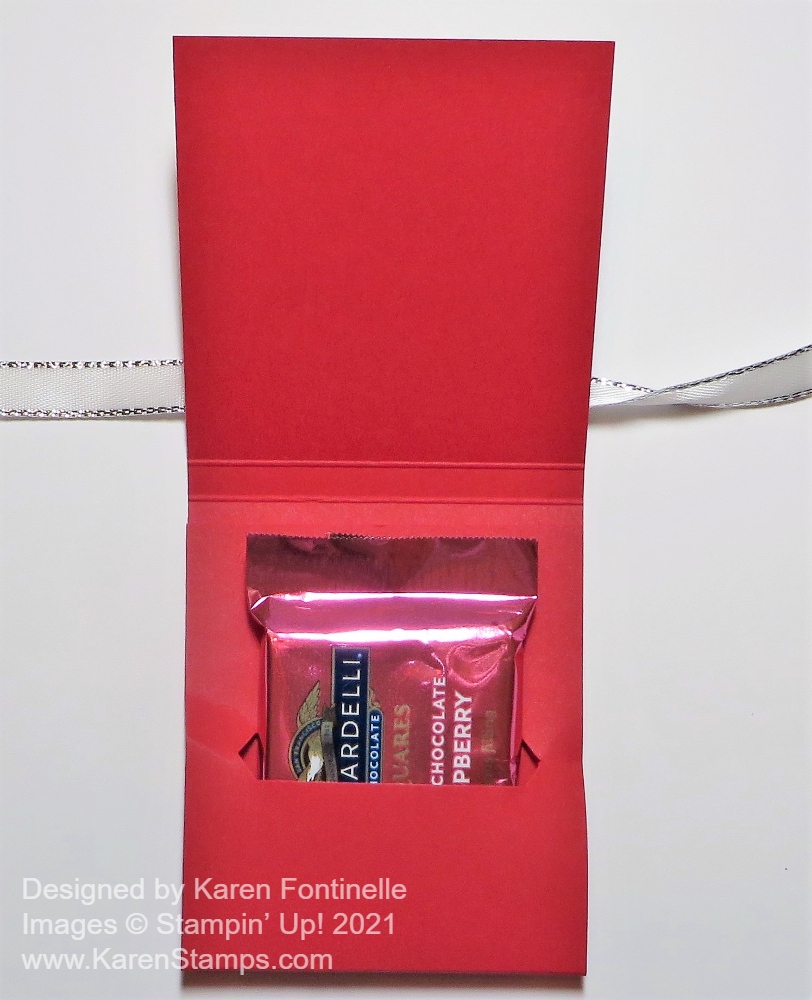
These Valentine’s Day Chocolate Candy Holders have been around a long time and I probably make them every year! I’ll link to some other ones I have made a little later. Once you have the pattern and the idea, you can run wild with decorating them for any occasion! Maybe party favors, or a little favor at a dinner party (when we can have dinner parties again!), or a stocking stuffer at Christmas, or a treat in an Easter basket! Whatever you want to make!
These Valentine’s Day Chocolate Candy Holders are just a strip of cardstock wide enough to hold your candy, with a slit inside to hold the candy if that works or space to place the candy and maybe secure with a tiny bit of adhesive. The cardstock is scored so that it will fold but have space for the chocolate. Put some adhesive on the inside of the bottom of the strip with the punched slit, and adhere. Then decorate the front and tie a ribbon around to secure.
Here are the particulars, if you are interested, for these projects.
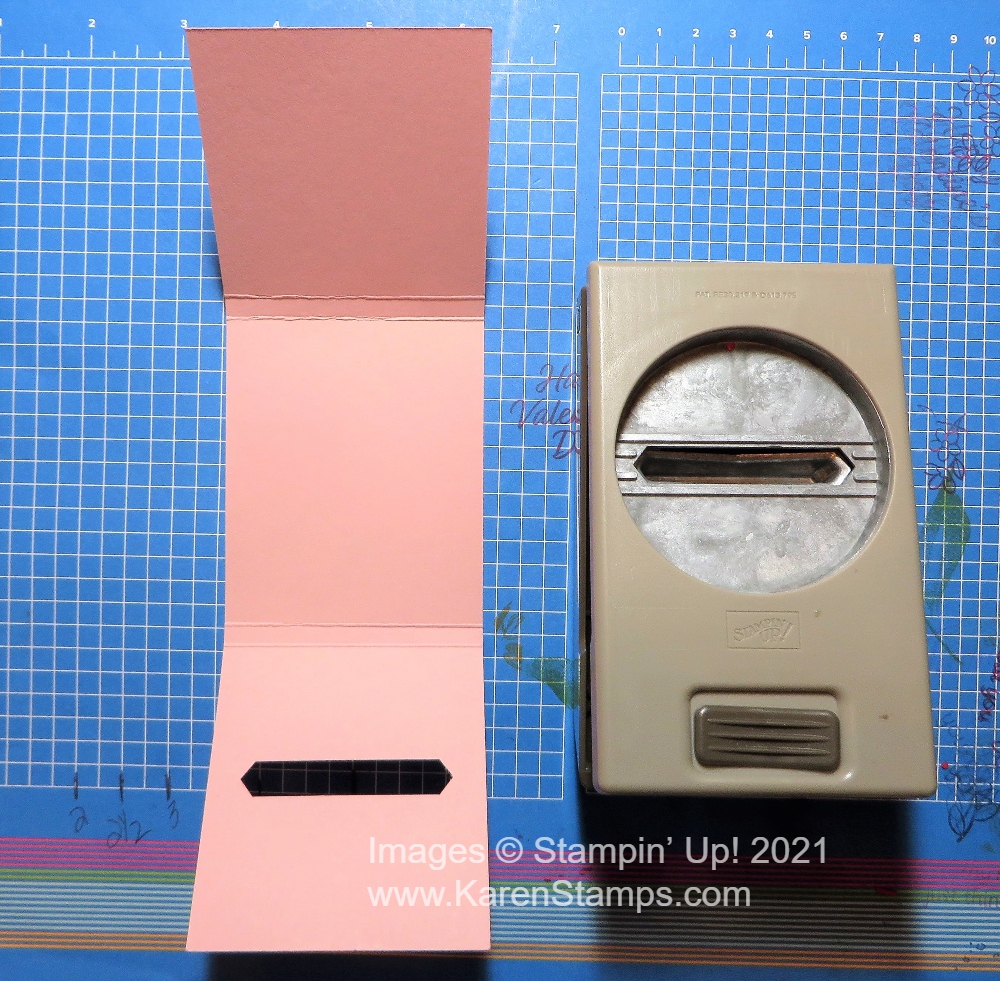
Start with a strip of cardstock cut at 9 5/8″ x 2 3/4″. Score at 2 3/4″ and 3″; 6 1/4″ and 6 1/2″. With these measurements, you could get three strips out of one sheet of cardstock. Fold and crease on the scored lines. Open the strip back up and you will see above and below the score lines, one section is shorter than the other. You want the longer section to be the one that folds up to the inside.
Once you have identified the longer section, use the Classic Label Punch on that flap, inserting as far as you can, centered, to punch the opening for the chocolate. Put a piece of Tear & Tape at the bottom of the strip so you can fold up that flap and adhere to the inside, not quite up to the score line. You will want to stand the candy holder on the table making sure the bottom is flat as you adhere that flap.
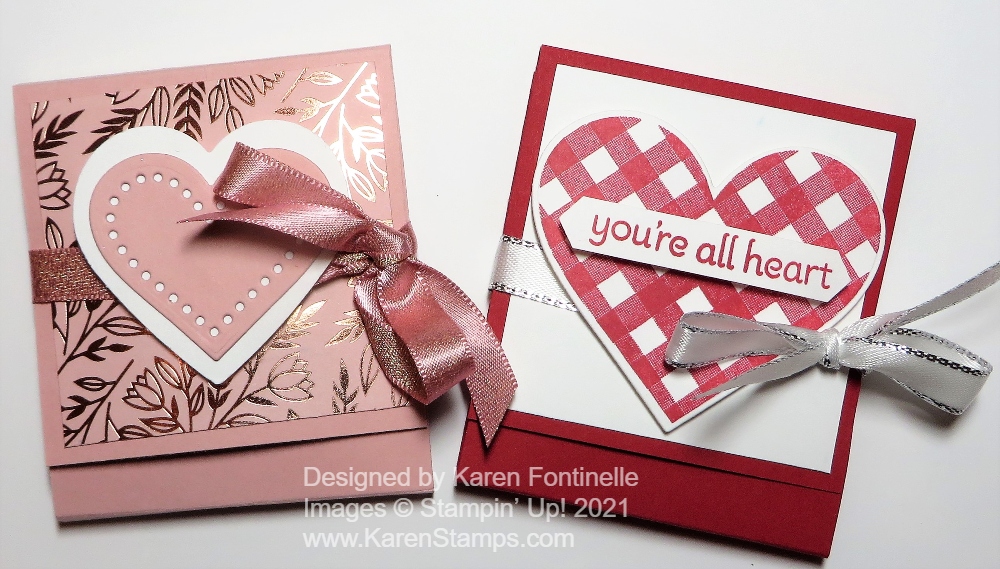
The pink holder on the left is made with Blushing Bride Cardstock with a piece of the Love You Always Specialty Paper (2 1/2″ x 2 1/2″) adhered to the front of the candy holder. Then I simply layered two die-cut hearts popped up on Stampin’ Dimensionals so I could tie a ribbon (the Blushing Bride 3/8″ Metallic Ribbon) around to hold it closed. There are some other patterns more like a matchbook where you just slide the top into the little fold-up pocket at the bottom. But even then, you might like a ribbon to hold it all together.
The red candy holder on the right is made the same way. It has a piece of Basic White Cardstock on top, decorated with a stamped and die-cut heart from the Lots of Heart Stamp Set and Many Hearts Dies. (Get both in the Lots of Heart Bundle and save 10%!). The greeting is also in that stamp set and is punched out with the Classic Label Punch that you used on the inside for the slit to hold the candy. The heart is popped up on Dimensionals, again, to allow room for the ribbon to wrap around the candy holder.
If you would like more ideas, here are a couple of candy holders I made last year. These are so much fun to make, I know you will enjoy this project! They are perfect, of course, for Valentine’s Day, with a nice piece of chocolate on the inside! Try your hand at my Valentine’s Day Chocolate Candy Holders because they are quick and easy to make when the holiday is getting close!
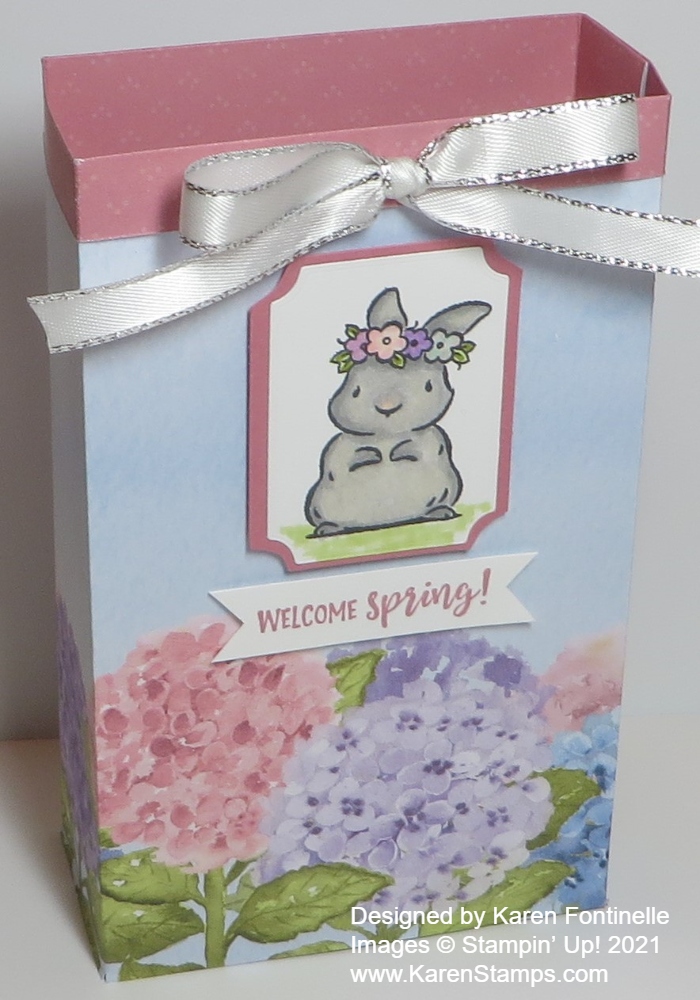
Spring will be coming even though many places are in the midst of a very cold winter right now, so I combined hydrangeas and a bunny for spring in this Springtime Joy Gift Bag. This would be cute for Easter treats or a gift or for Mother’s Day in May or any other time!
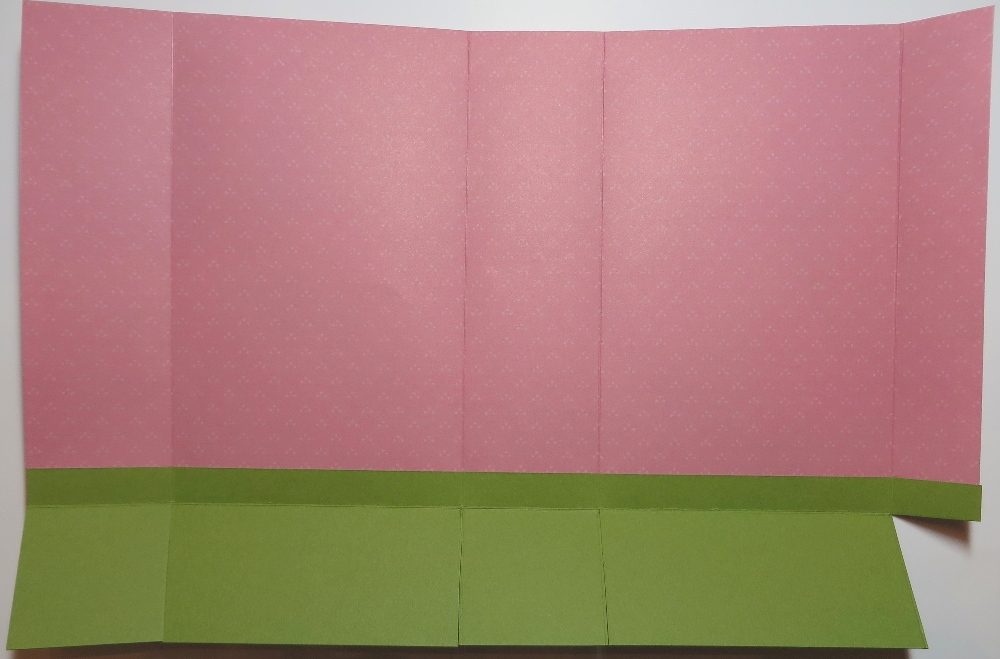
I started off wanting to make this gift bag with the Hydrangea Hill Designer Series Paper just as you see, with the border of hydrangeas at the bottom of the bag with room in the plain area for a greeting or whatever I would come up with. I wanted to use that sheet that has the borders of hydrangeas at the top and bottom. Shortly, I realized that if i scored the paper like normal, most of the hydrangea images would end up at flaps at the bottom of the gift bag! So I had to engineer an extra piece of cardstock at the bottom to make the bottom flaps without cutting into the hydrangeas!
I did a little math and added on a 12″ strip of Old Olive cardstock to the bottom of the hydrangea piece.
To make this gift bag, I cut the designer paper at 6 3/4″ x 12″. Make sure your hydrangeas are where you want them before you cut! The Old Olive piece is 2 1/4″ x 12″. I adhered just 1/2″ of the Old Olive to the designer paper because I wanted 1 3/4″ to be the bottom of the gift bag.
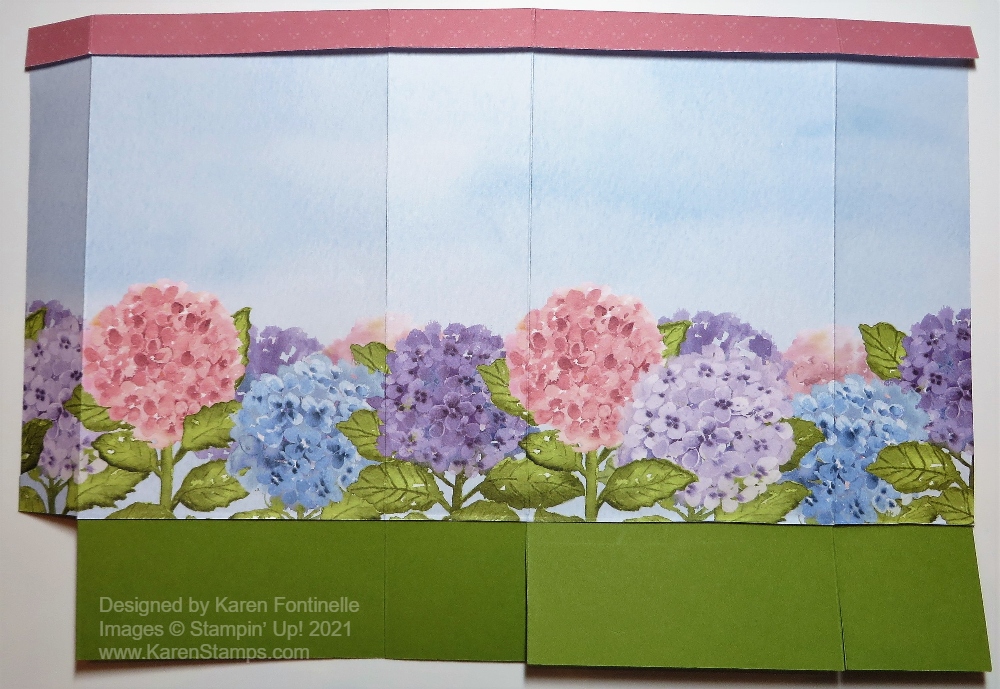
Score the bag and Old Olive piece at 1 3/4″, 5 1/2″, 7 1/4″, and 11″. Then turn the paper and score the Old Olive portion at 1 3/4″ and 8″. This gives a 1/2″ lip at the top of the bag I folded over to show the inside color of the bag for contrast.
Cut up from the bottom on all the scored lines up to the edge of the designer paper. Normally this would all be the same paper, of course! Then cut off just the little narrow piece of the Old Olive as shown in the photos above.
Next, crease all the score lines, fold and assemble. Put some adhesive on that narrow side about the cut-off piece and fold the other side over to make the seam. Form into a box shape and fold in the flaps at the bottom, applying as much adhesive as you think necessary to close the bottom of the bag. Reach in from the top of the bag with a ruler or bone folder to press down from the inside on those bottom tabs to make sure everything is stuck together well.
Once you have the bag made, you can embellish however you like. You can even punch some holes in the top and tie ribbon through to hold the bag closed. Just pinch in the sides a little to get the top to close. But on my bag, I just tied a separate bow and adhered it with a couple of Mini Glue Dots.
The little bunny is from the cute spring stamp set, Springtime Joy. You’ll find it in the Spring Mini Catalog on page 22. I stamped the little bunny (the lamb was too big!) in Memento Ink and colored in with several Stampin’ Blends markers. For the bunny, I just used the light and dark Smokey Slate plus a little Crumb Cake and then pink and purple flowers for the little crown. I die cut the bunny with a die in the Tasteful Labels Dies. I wanted a layer underneath it so I just cut a Rococo Rose rectangle to fit underneath and with my Paper Snips, cut those curved corners after I adhered the two pieces together. I popped up the bunny with Stampin’ Dimensionals. The greeting is from the same Springtime Joy Stamp Set and stamped in Rococo Rose Ink to match the paper.
I think it’s a cute little bag, a relatively easy gift bag to make. You’ve probably made one just the same way. With the rest of that same sheet of hydrangea paper, check out the cards I made in this post. It would have been nice if the cards fit in the bag, and I could have made them smaller, but I just made regular size cards as a separate project! I can use this little bag as a decoration around Easter time or as a gift! Just think of this Springtime Joy Gift Bag filled with chocolate Easter eggs or a chocolate bunny!
It’s time to be a part of the Stamping With Karen Mailing List since we have the new January-June 2021 Mini Catalog (I call it the Spring Mini!) plus it is Sale-A-Bration, the big Stampin’ Up! promotion during which you can earn free products with every $50 or $100 purchase! These catalogs, along with theStampin’ Up! Annual Catalog, give you lots of products you will be excited about, want to learn about, and want to see all the ideas for cards and projects possible!
Keep up with news about the new Paper Pumpkin Kit every month and subscribe if you want to join in the fun of having a project already planned and prepped for you in the cute Paper Pumpkin box! Always sign up or skip a month if you want by the 10th of any month.
If you are on my blog, you will see a red sign-up box in the top right corner where you can simply put your name (or first name) and best email. If you are on your phone, you probably need to scroll way down to get to the sidebar things. OR you can go to my sign up page HERE.
You will receive an email with a link to your free gift from me.
I send out a weekly email every Tuesday afternoon with the latest Stampin’ Up! news and offers plus stamping ideas with a supply list and directions. Even if you never make the project, maybe just seeing ideas will do your crafty heart good! I know it does mine! I’m all about the ideas!!
Let’s stay connected and in touch with each other over our favorite thing to talk about…..stamping with Stampin’ Up!
I wished as hard as I could yesterday, but none of the rare Texas snow reached down to my part of the state, or even city! Outside of Houston, to the north and to the west got a few inches of snow which looked beautiful but it just didn’t come my way. Just rain ALL day and cold. Just not cold enough for snow! It’s been three years since we have seen snow, and I can tell you even a few flakes can be quite exciting here!
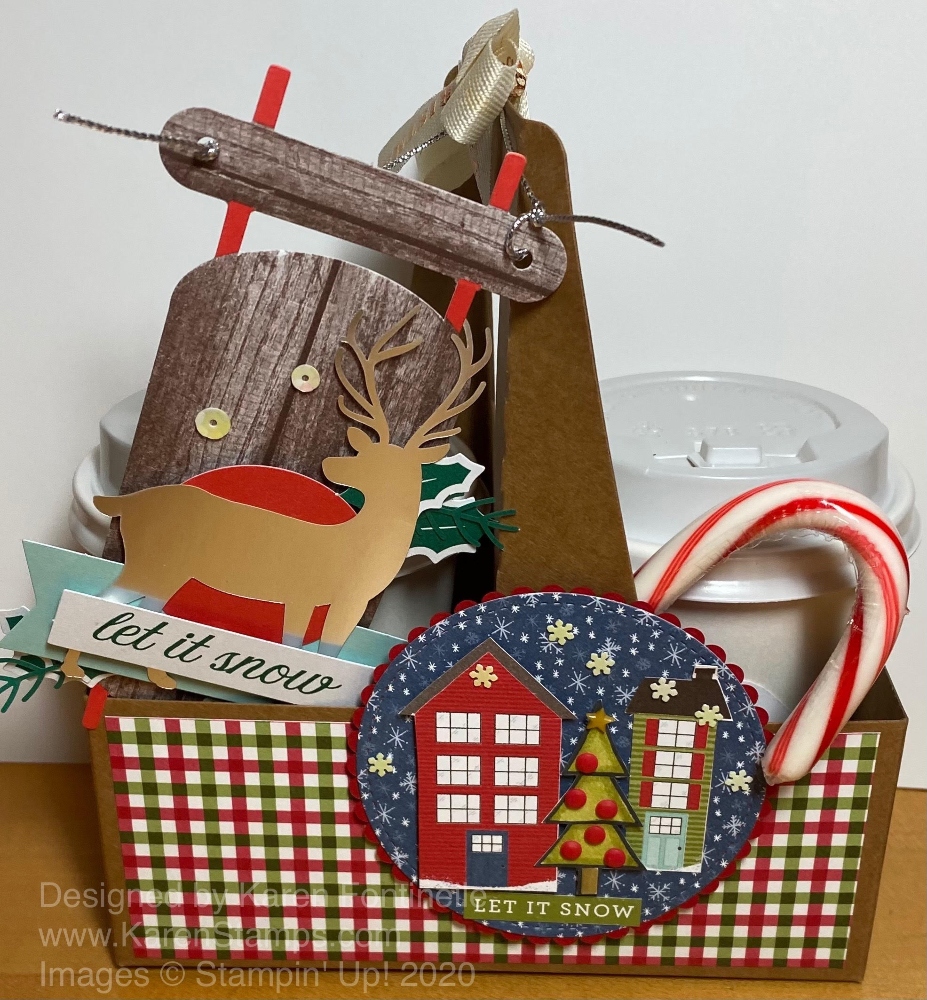
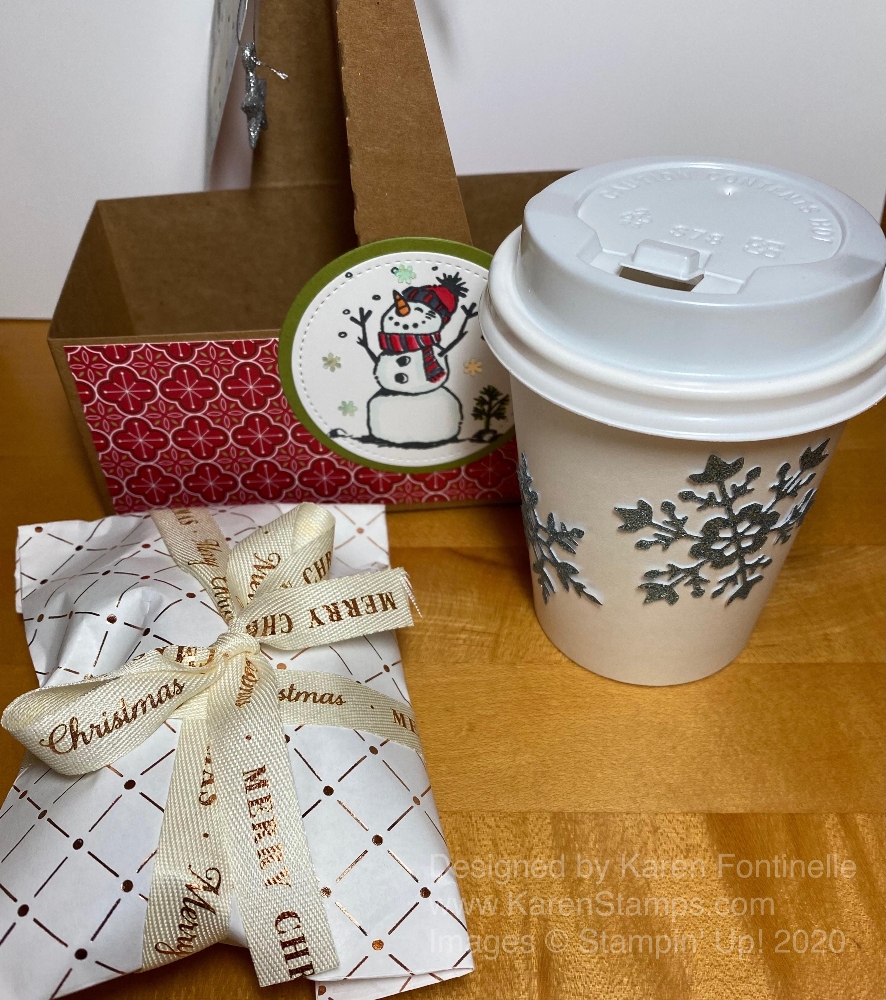
The cold and the snow reminded me of Christmas gifts I made using the Mini Coffee Carrier (retired) and the Mini Coffee Cups. Inside the cups I put a package of hot cocoa mix and plenty of candies (and maybe even a little cello bag of marshmallows). When I ran out of cups, I improvised with some retired bags from last year.
I decorated each Mini Coffee Carrier differently and decorated the cups as well. I didn’t own the dies to wrap paper around the cups so I had to decorate them some other ways because it is next to impossible to just wrap paper around a cup like that!
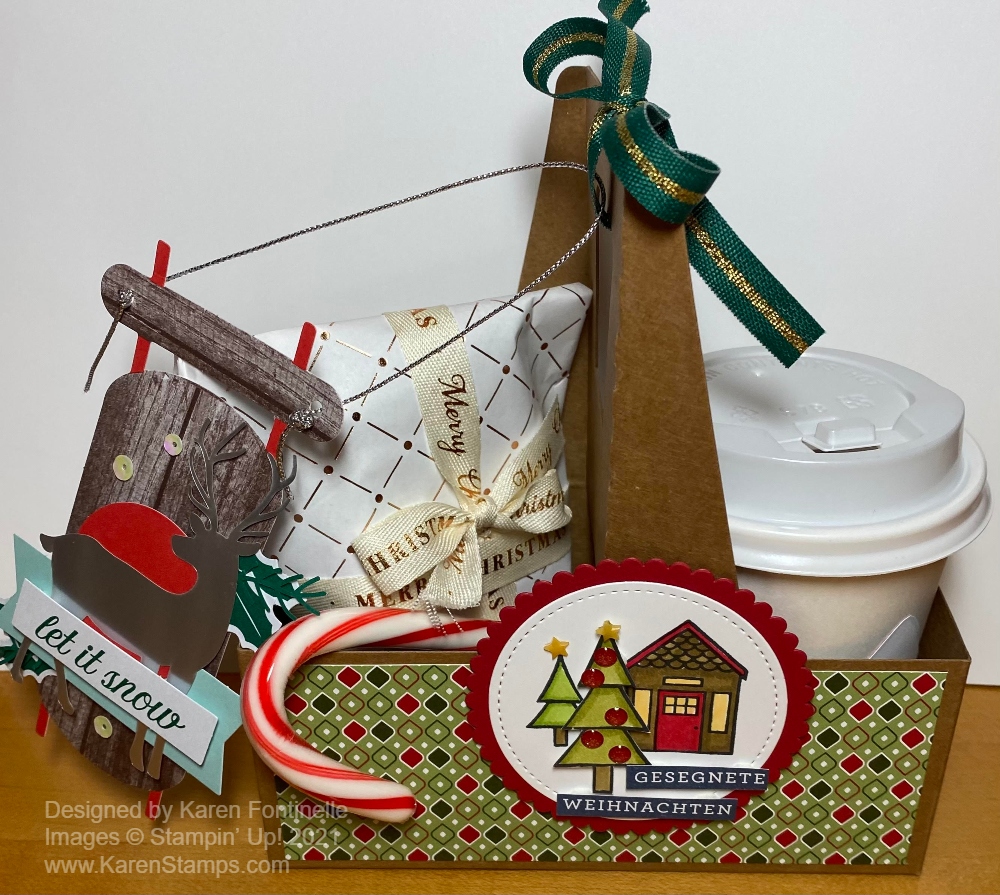
In the top photo, I used some Heartwarming Hugs Designer Series Paper (retired) to decorate the Mini Coffee Carrier and cut out some houses from the Trimming the Town Designer Paper (retired) plus a stamped and colored tree with some red enamel dots for the decoration. In my gift wrap I found tags I made last year from a Stampin’ Up! kit. How great was that to pull out some cute tags I had already made and were ready to use!
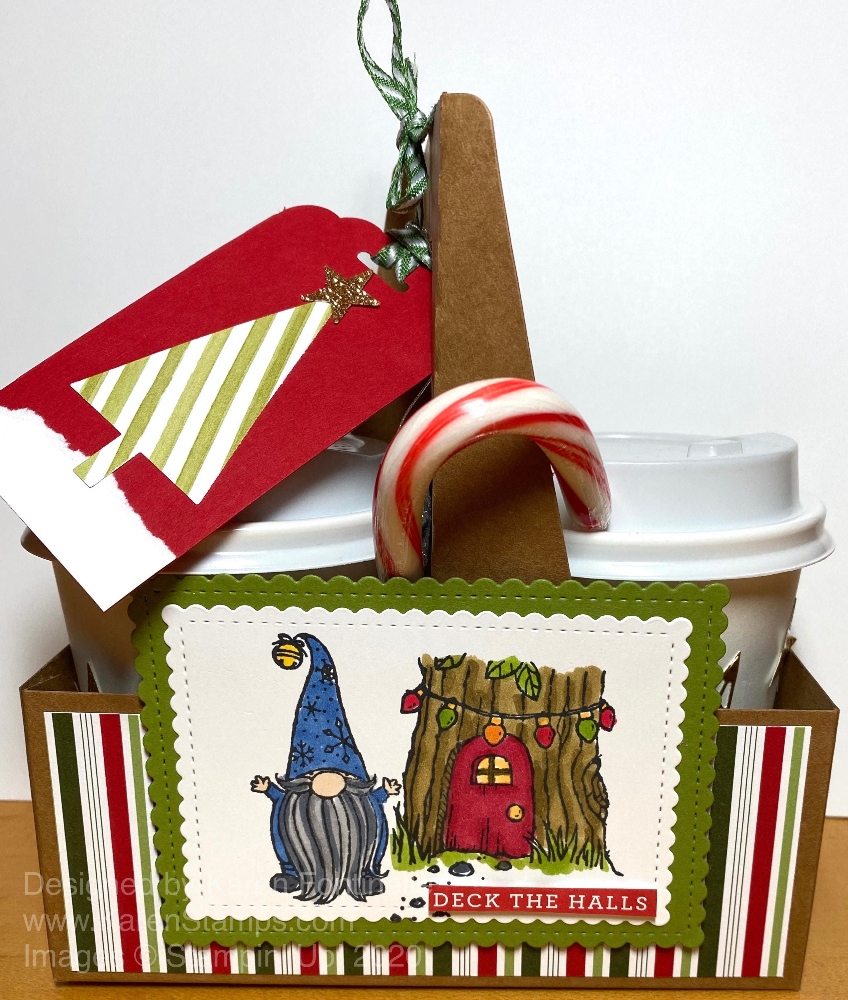
Here’s one made with the cute Gnome For the Holidays Stamp Set (retired) and colored with Stampin’ Blends! You can use lots of different shapes and sizes of die cuts for the focal point on these carriers.
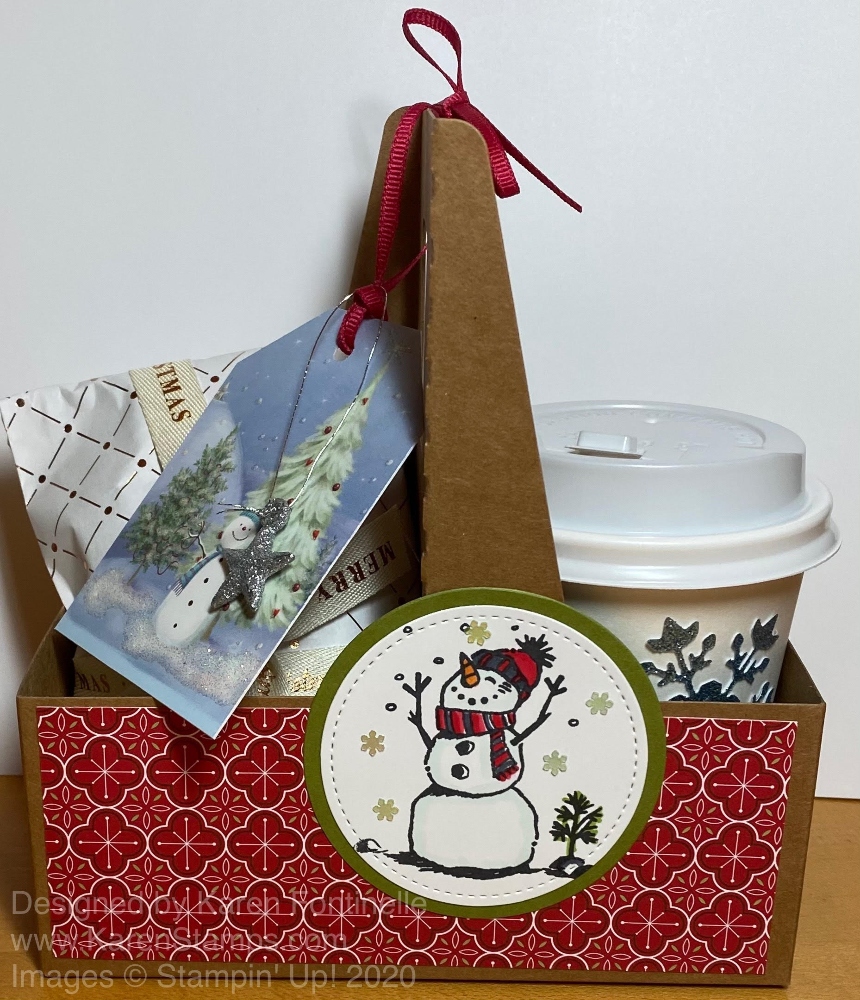
I’ll miss this Snowman Season Stamp Set! I used some adhesive Snowflake Sequins (retired) around him. I also used the Glitter Star Ornaments (retired) on each Mini Coffee Carrier, just tied around the handle. I decorated the cup with a big die-cut snowflake from the So Many Snowflakes Dies. I ran out of cups so I just put the treats in a retired gift bag and tied some retired Christmas ribbon from last year around the package to make it look festive.
You might notice some German words on this one! That’s because it was for my son who took German in high school and went to Austria for his semester abroad back in college. One sheet of the Trimming the Town Designer Paper had all Christmas words in many languages plus English printed in thin strips so I just found a German phrase on there to use and cut out the words! He also got a package wrapped in Merry Christmas ribbon from last year instead of a cup, but I think that was cute as well!
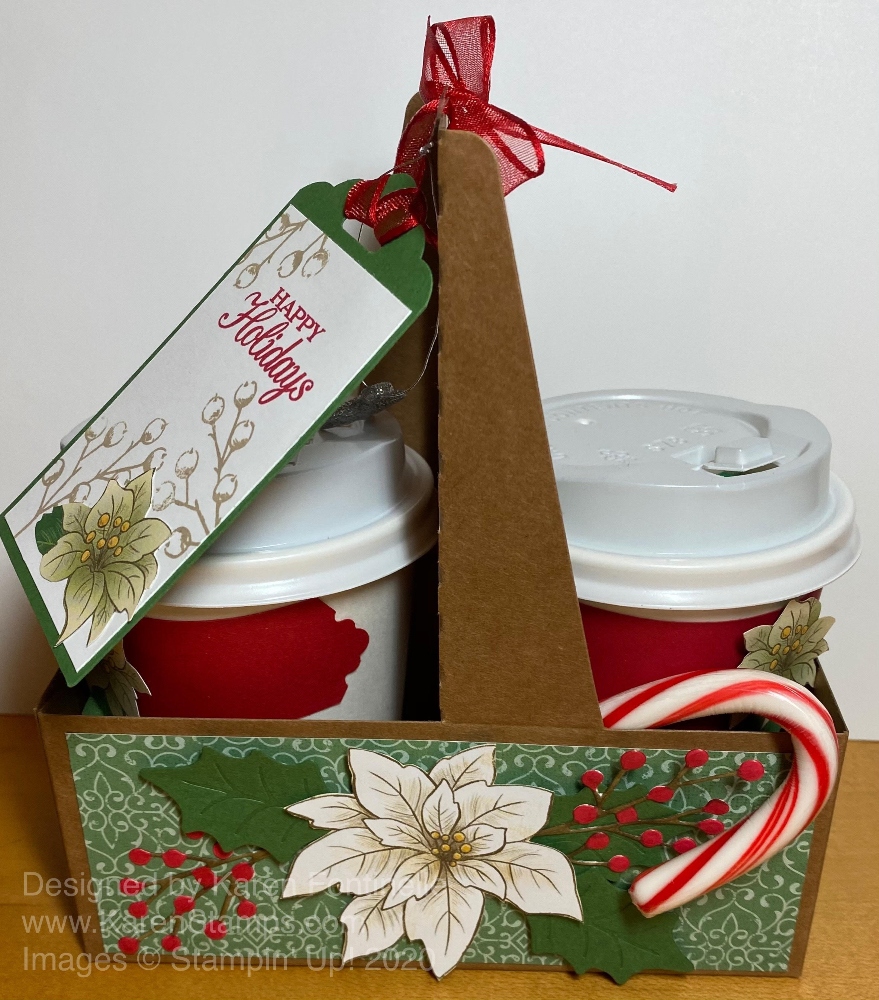
This Mini Coffee Carrier with a poinsettia is one I posted HERE back in November. You can see more details about these Mini Coffee Carriers on that post, if you already purchased some and have some extras to use.
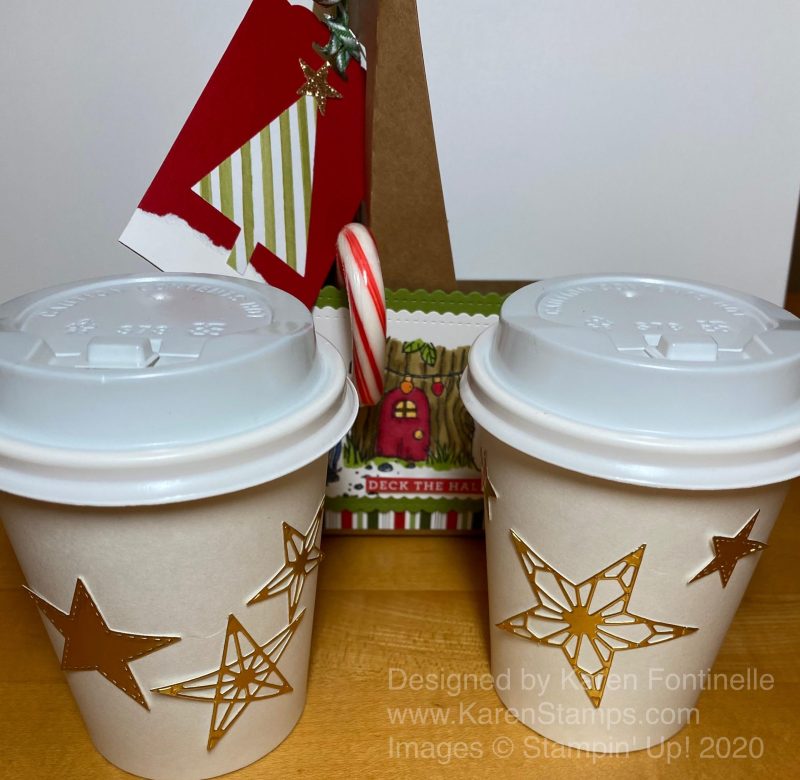
And here’s how I decorated some cups just by cutting out images from the large paper in the Trimming the Town DSP that had the town scene with the mountains in the background, people ice skating, etc.
If you didn’t get to use your Mini Coffee Carriers and Cups, maybe you can think about ways to decorate them for next Christmas or even during the year with other papers and decorations, maybe for a birthday or other celebration. These were fun to make and easier than I would have thought! Once you get going, the ideas start flowing!
I didn’t get my snow yesterday but I’ll keep hoping!
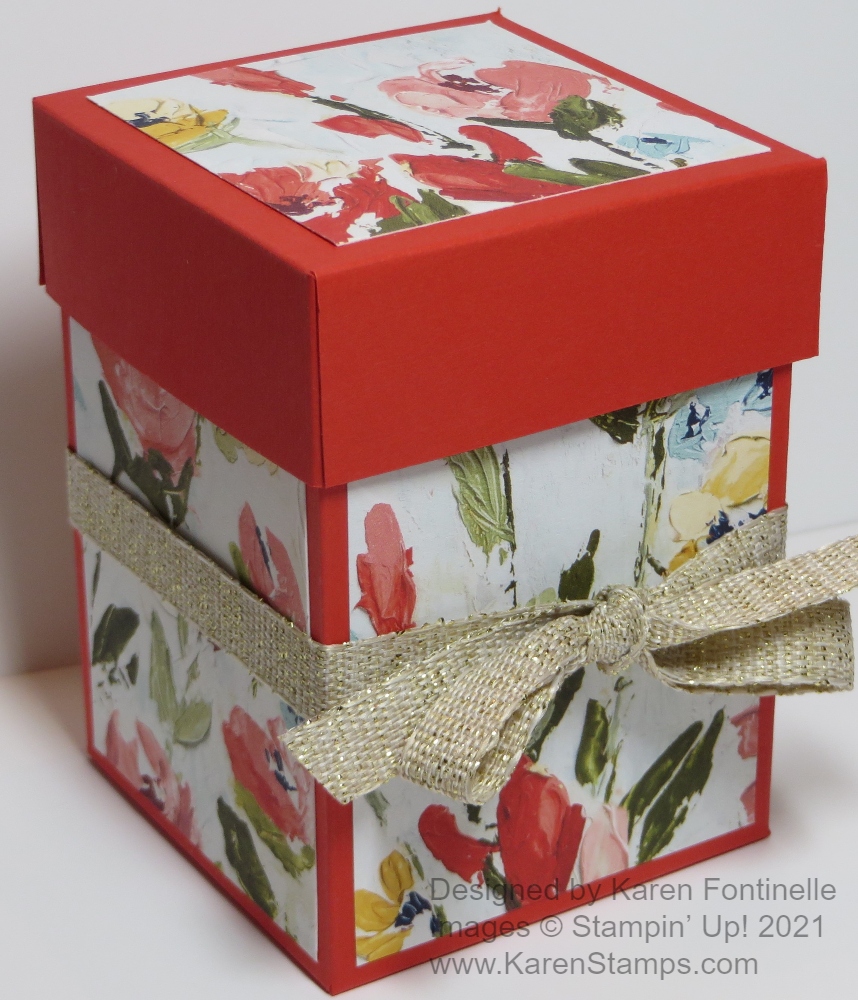
Doesn’t this Fine Art Floral Small Gift Box make you want to find a reason to give someone a gift? It’s a basic pattern to make the box and the new Fine Art Floral Designer Series Paper will make any project look gorgeous! You will be able to purchase this paper tomorrow, January 5th from the new January-June 2021 Mini Catalog with all kinds of new products for spring. Although we enjoyed the Holiday Catalog, it feels good to have a fresh start with this new Spring Mini!
This box is easy to make and you can modify it for a shorter size or just adjust the measurements if you want it a little narrower or wider.
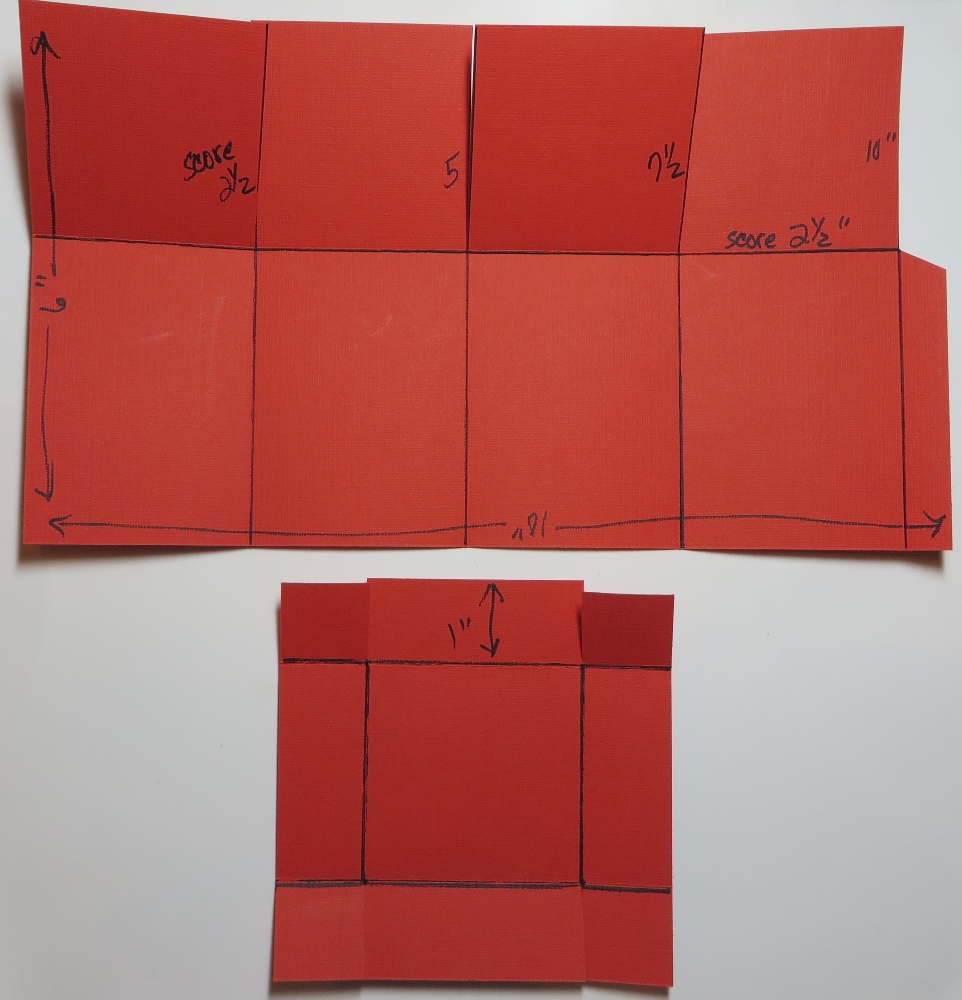
My drawing isn’t perfect but along with the measurements I think you can follow along.
Box piece: 10 1/2″ x 6″ (on my diagram above I wrote 10″ going all the way across the paper but it is 10 1/2″.)
Scoring across the paper in landscape position, score at 2 1/2″, 5″, 7 1/2″ and 10″. Turn the paper to portrait position (narrow edge, up and down), score at 2 1/2″ to form the bottom flaps of the box.
I used Poppy Parade Cardstock but if you happen to use designer paper to make the box itself, make sure you check if there is a pattern than needs to go a certain direction.
Cut up on all those score lines in landscape position from the bottom up to the 2 1/2″ score line going across. This makes the bottom flaps for the box. On my diagram, those are the flaps at the top of the picture. Cut off that little 1/2″ piece at the end.
For the box lid, cut a piece of cardstock 4 1/2″ x 4 1/2″. Now if you score at 1″ on all sides, you may find that the lid will be too tight to fit on the box without squishing the box inward. So what I did is I scored just a “smidge” outside the 1″ mark. So actually I scored at 15/16″ instead of exactly 1″. That gave me the tiniest bit of extra space for the lid to fit properly. Cut up to the score line as you see in the diagram.
To decorate the box, I used the new Fine Art Floral Designer Series Paper. You can modify these measurements if you want less of a margin on the box. For the sides of the box, I cut 4 pieces of designer paper at 3 1/4″ x 2 1/4″. For the lid, cut a piece at 2 1/4″ x 2 1/4″. You could also put the paper on the sides of the lid, but I wanted to let the Poppy Parade show. Remember to pay attention to the direction of the pattern.
Poppy Parade is one of the colors that coordinates with the designer paper but there are many others! Usually there are just a few colors that coordinate with the designer paper but this one has many colors! I chose this particular pattern of the paper because the flowers were a little smaller and would fit better on the box.
To finish my box, I tied a piece of the new Fine Art 3/8″ Ribbon around the middle of the box. This ribbon is gold in color and very soft. I could also have tied it up around the box so the bow would be on the top of the lid. Or I could have stamped a greeting and added it to the front of the box. Whatever you want to do to embellish your box, although with this beautiful paper, it doesn’t need much!
This paper and ribbon will be available tomorrow, Tuesday January 5 but don’t forget to check the retiring holiday products in the Year-End Giant Closeout in the Stampin’ Up! Online Store. And there are just a few things left on the Clearance Rack! Today is the LAST DAY for the Closeout!!
Make a few gift boxes here at the beginning of the year and you will have some handy for those gift-giving occasions coming up in the new year! Try this Fine Art Floral Small Gift Box just to get the idea and then you can modify it for whatever you need!
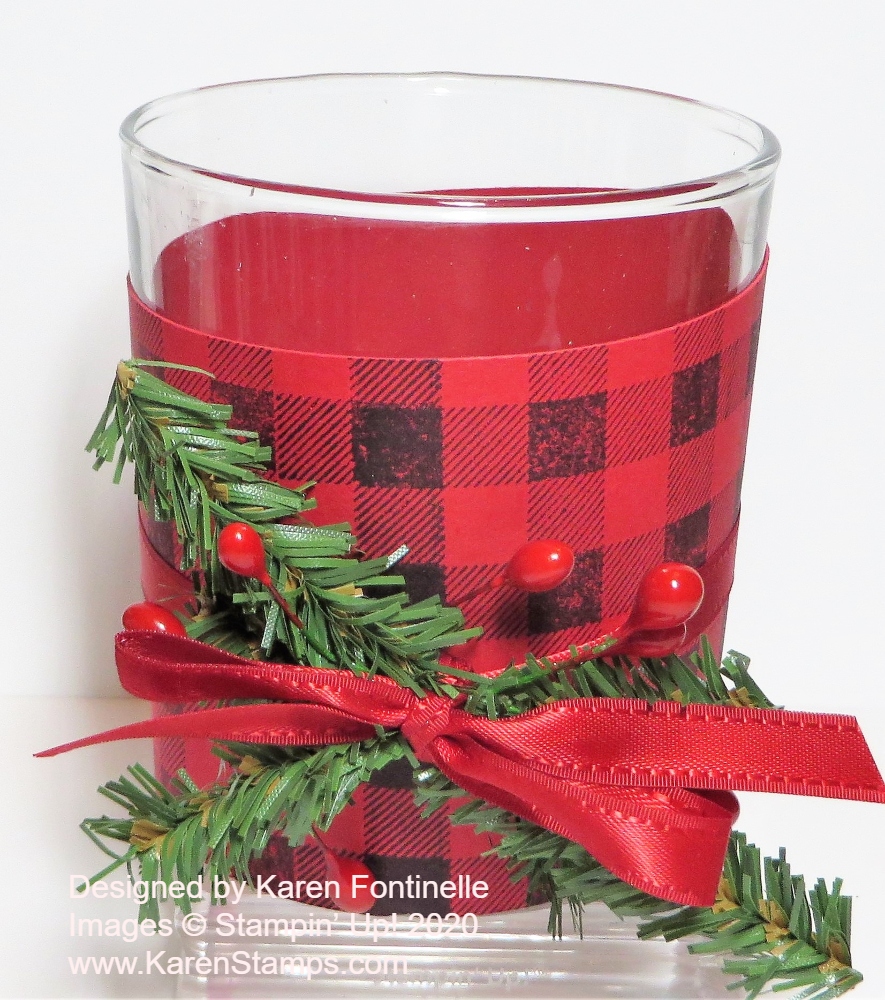
I was watching someone’s Instagram “story” and saw in her home these black and white buffalo check candles. I think black and white is trendy in some Christmas home decorations this year. It gave me the idea to decorate a glass candle holder I had with a red and black buffalo check which is a little more traditional.
If you have a real candle, a flameless candle (even better), or a votive or candle holder of some kind, you can decorate it with your papercrafting supplies. We can do so much with our stamping supplies! That is why it is such a great hobby!
I haven’t used it in awhile, but I got out my Buffalo Check Stamp. This is a large background stamp, as we used to call them. You can purchase either the “cling” or the “wood-mount”. If you choose the cling, you need the largest acrylic block on which to mount it. I have always liked to use my background stamp stamp-side up, ink it up, and then lay the cardstock I am stamping on top of it. Then I take a scrap paper to cover the cardstock so I can rub all over with my fingers to make sure every area gets inked up.
This stamp was a little tricky but I got lucky! Obviously I wanted to line up the pattern going around the strip of cardstock that was going to go around my votive holder and it worked! Somehow I managed to lay down the strip in just the right place, at least close enough.
For decoration, I wrapped around a piece of Real Red Satin Ribbon and then tied on some pieces of greenery I had in my craft stash. I also had some of those red berries that I stuck in there. Maybe I could have added some other embellishments I have but I stopped with this. I could also have added a greeting on the candle. You can do so much with a project like this yet keep it very simple.
Look around your house and surely you will find some votive holders or maybe vases or who knows what that you can decorate for the holidays for little decorations in your home or maybe on your holiday dinner table. Here’s another votive holder I decorated by cutting out images from the fall Gilded Autumn Designer Series Paper. Just use your imagination and you will come up with a fun decoration for a Christmas candle or votive or even to give one as a gift!
How about making some Snowman Gift Tags for your presents you may be furiously wrapping at the last minute?! Here are three ideas you can use! Everyone loves snowmen!
As I was wrapping my gifts, I came across the center Layered Snowman Gift Tag that I had made several years ago. Sometimes we save the tags from packages we open and I put them away until the next year. Then we can reuse them as long as we check the “To:” and “From:” on the tags so there are no mixups! I decided to update my snowman tag.
This is a fun tag to put on a package! Much better than those plain To & From tags you buy, 1000 in a package and have to tape on!
To make this tag, I die cut the largest circle in the Layering Circle Dies and then chose two smaller dies (about every other size) for the body and head. I sponged the edges with Balmy Blue Ink just a little and popped them up on Dimensionals. Just make a hat out of a piece of Basic Black and the brim with a piece from the Classic Label Punch with the ends cut off.
To decorate the hat I just cut a sprig from a Forever Flourishing Die and the three little Real Red flowers from a die in the Budding Blooms Dies. There are certainly a whole lot of other leaf shapes and flowers, whether die-cut, punched, or cut out by hand that you could use! I added the tiniest Gold Glitter Enamel Dots to the flower centers.
The snowman face I just drew on with markers. The ribbon is Seaside Spray Metallic Ribbon to represent the snowman’s scarf. Punch a hole in the top if you want to tie on a ribbon for a tag or even just use the snowman as a decoration on a package!
This Snowman Season tag is really easy since it just uses one ink color, Balmy Blue. First I made a tag out of Balmy Blue Cardstock with the Scalloped Tag Topper Punch and then added a layer of Whisper White. I stamped the one snowman fromSnowman Season in Balmy Blue and added the “To: From:” at the bottom. I used the Silver 3/8″ Metallic Edge Ribbon for the tie (one of my all-time favorite ribbons!).
This tag I made a little fancier since the other two were pretty simple. But this one is still simple! I just cut a 3″ x 4″ rectangle of Balmy Blue Cardstock and layered with a piece of Whisper White. The snowman from Snowman Season is stamped with Memento Ink and I did the little bit of coloring with various colors of Stampin’ Blends, even a tiny bit of Balmy Blue around the sides of the snowman for shading and to look a little cool and icy. I also just scribbled some Balmy Blue under the snowman to look like snow. Some glitter would have been nice, too! The snowflakes are stamped from the set and the greeting is from the set. I cut the words out separately after stamping so I could arrange them on the tag. Then I added some Adhesive-Backed Snowflakes (which may be sold out now but you can use other gems and jewels!) for a little more bling!
Once you get started making tags, you might not be able to stop because you will come up with more and more ideas and they don’t have to be fancy! If your packages are wrapped already, you might consider having fun stamping and making tags for next year AFTER Christmas when you maybe have some free time! These Snowman Gift Tags are fun and easy to make and the gift recipient will likely enjoy them!
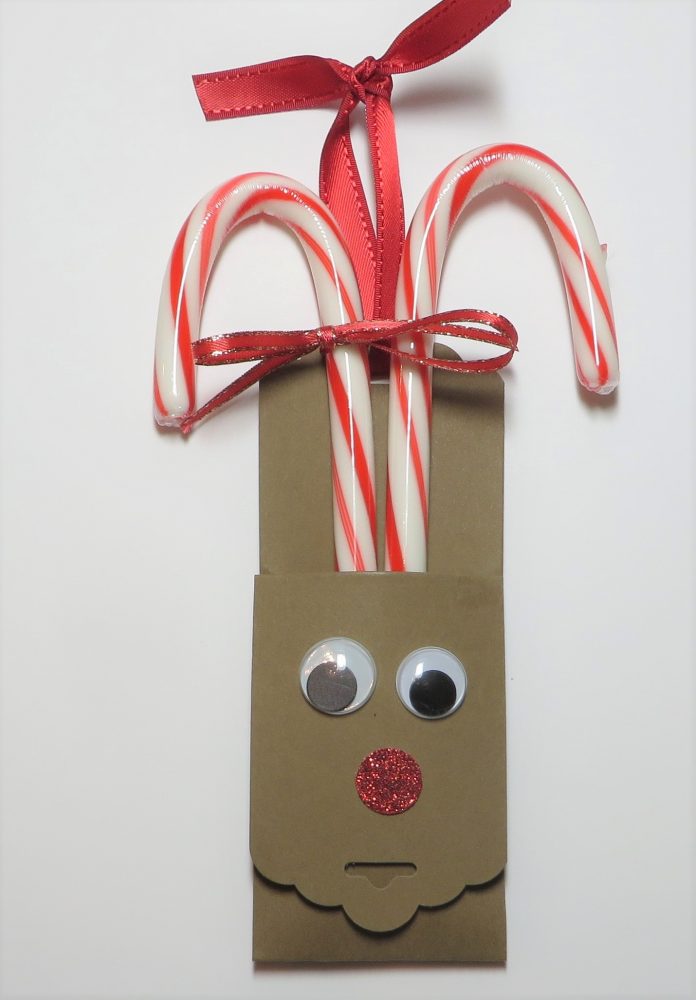
Here’s a cute Reindeer Candy Cane Treat I found online looking for candy treat ideas. This isn’t what I intended to make at all, but once I saw it I had to make it since I did have a box of candy canes! I did see lots of different versions, this one I believe was made by a Demonstrator in the UK. She used a 12″ x 12″ piece of cardstock whereas I used a regular size of cardstock, forgetting that hers was larger! But it all turned out all right in the end!
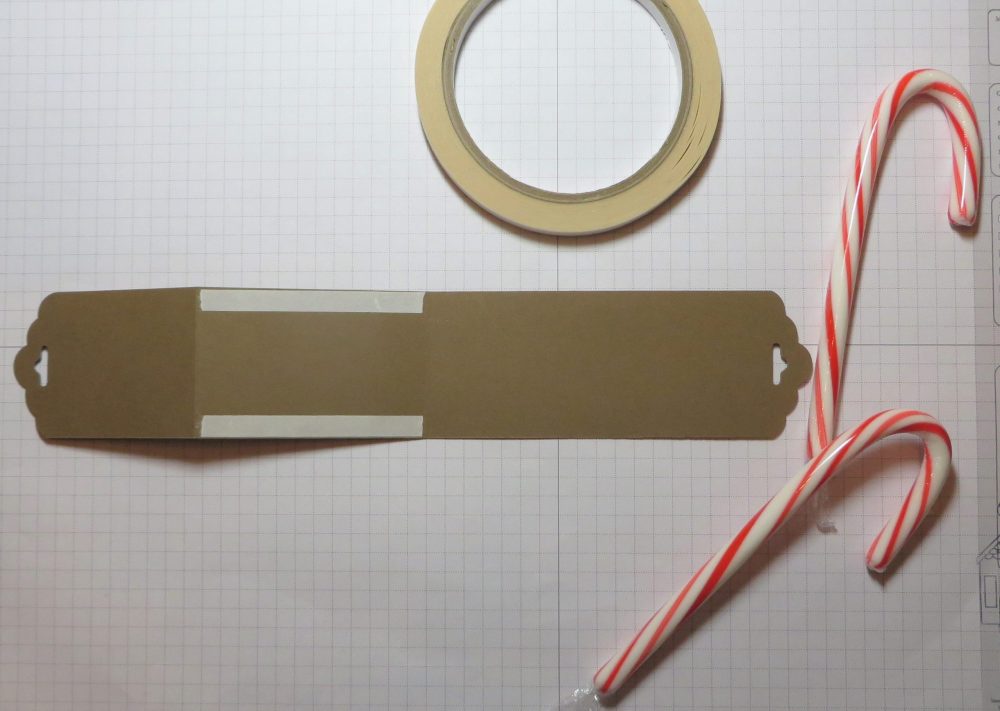
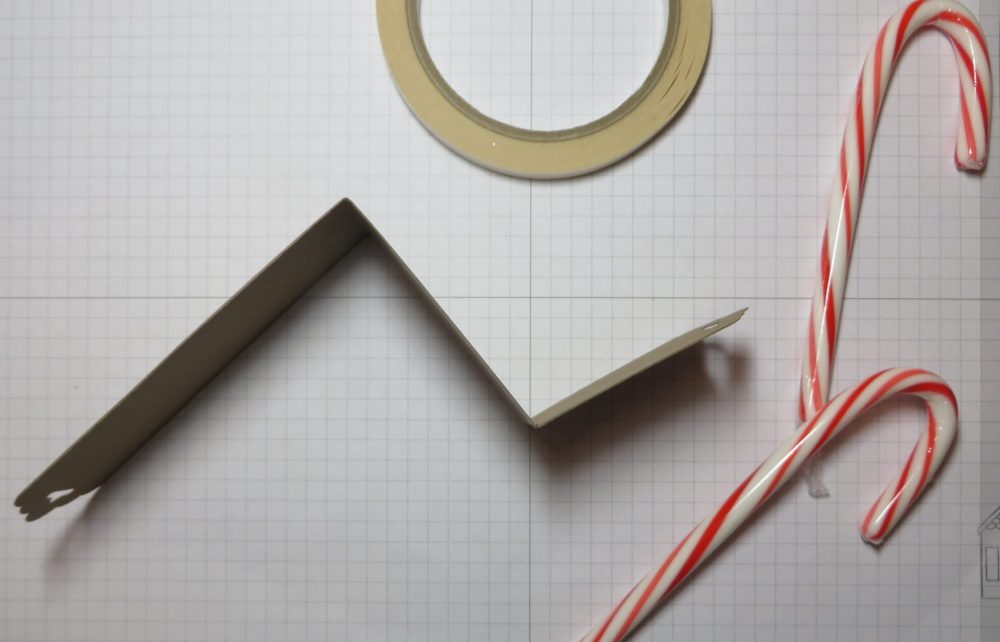
To make the Reindeer Candy Cane Treat, cut a strip of cardstock 11″ x 2″ (just a smidge under 2″ so it fits in the punch!). Each end is punched with the Scalloped Tag Topper Punch. Score at 2 3/4″ and 5 3/4″. Add strips of Tear & Tape to form the pocket to hold the candy canes.
Fold on the score lines in a zig zag fashion.
Fold the bottom portion up to form the pocket. The front tag punched end will become the reindeer face!
I punched a 1/2″ circle out of retired Red Glimmer Paper. You could use any red cardstock, foil paper, or the velveteen paper. Use whatever you have. For the eyes, I used some googly eyes I had in my drawer. Of course you can use small circles of white and black for the eyes.
Insert the two candy canes into the pocket. Tie a red ribbon in the punched hole at the top. I also added a bow around one candy cane just for fun.
Just play with this idea and see what you come up with! Use what colors and materials you have. I think it makes a really cute and quick and easy reindeer candy cane treat!