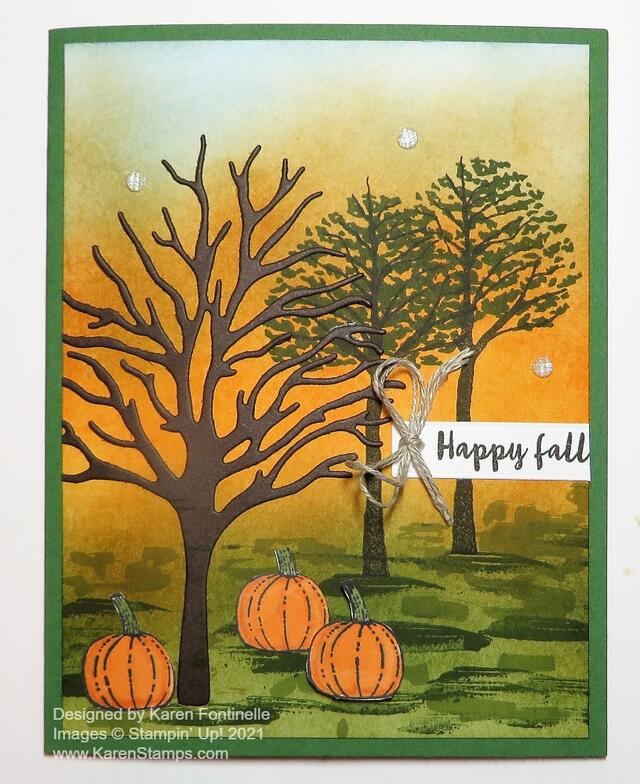
Last night we were out for a walk and the sky inspired me to make this Beauty of Friendship Fall Trees Card. We can’t really see the pretty sunsets very well because we aren’t up high enough and our neighborhood now has lots of big trees in the way. But last night as we were walking back to the house the silhouettes of the trees against the bits of the orange-ish sky we could see in between the trees was really pretty.
I knew that kind of a “sunset” card would likely turn into a Halloween card, but actually I think being a fall card is just perfect! The greeting is in the Banner Year Stamp Set. The full saying is, “Happy Fall, y’all!” but because of space I just cut off the last word and lined it up with the edge of the front layer of the card. I think it also covered up an ink smudge! And I added a bow with Linen Thread.
The card base is Garden Green. The card layer is Basic White. I used my Blending Brushes to add ink to the Basic White. I would say just pull out a bunch of ink pads you think you might want to use! I started with the sky with a light Balmy Blue but added a bit of Smoky Slate gray. Next I added some yellow below the sky. I used some Crushed Curry as well as Mango Melody. For the grass I used Pear Pizzazz, but then stamped with the little “mound” stamp in the Beauty of Friendship Stamp Set. It could be used for grass or dirt or just a little something when you need some texture or something extra. Some I stamped directly, using Mossy Meadow Ink and some I stamped off. I got a little carried away with the stamping and didn’t notice my block had ink on it and I was getting some smudges everywhere!! But there’s always a way to doctor things up a little bit with more stamping or more color or covering up or something! I decided the orangish sky needed to be a deeper color because when we were out walking it was getting darker outside quickly so I added some Pumpkin Pie ink. There are no right colors and layers, etc. just play and experiment. Just keep going and you’ll get to where you want to be.
I was almost afraid to stamp on my beautiful sunset background and indeed, I did mess up the first tree I stamped! Luckily, I was able to stamp the second tree to covered up some of the branches that didn’t come out! I stamped some green leaves from the stamp set over those two small trees. I used Early Espresso Ink.
However, the large tree is die cut with the Beautiful Trees Dies out of Early Espresso Cardstock. I thought about using Basic Black but used the brown color. I didn’t try to add any leaves to this tree because I wanted the sky to show through (even though leaves are not falling here yet in Houston!).
Of course this fallish looking card just screamed for some pumpkins here in October! I stamped just the smallest pumpkin from Pretty Pumpkins with Memento Ink, cut them out, and colored with Stampin’ Blends. I glued two down directly on the card and one is popped up on Stampin’ Dimensionls®.
To cover up a smudge or two and just because who doesn’t love adding some gems to a card, I added three of the smallest Elegant Faceted Gems in pearlescent white. The other colors in the package are Clear and Petal Pink. I thought about just using one of the largest ones to look a little like the moon coming up, but you know, you can’t resist adding gems once you start so it had to be three!
Here’s a tip: Before cutting out something intricate like the die-cut tree, add Adhesive Sheets to the back of the cardstock so you already have adhesive on the back and don’t have to add tiny dots of Multipurpose Liquid Glue to the back! It never occurs to me until right before I go to adhere it!
You can use a card like this all this month and through November for fall, Halloween, and Thanksgiving! I hope you will get out your Blending Brushes or Stamping Sponge piece and make your own sunset, like on this Beauty of Friendship Fall Trees Card.

