Category Archives: Big Shot

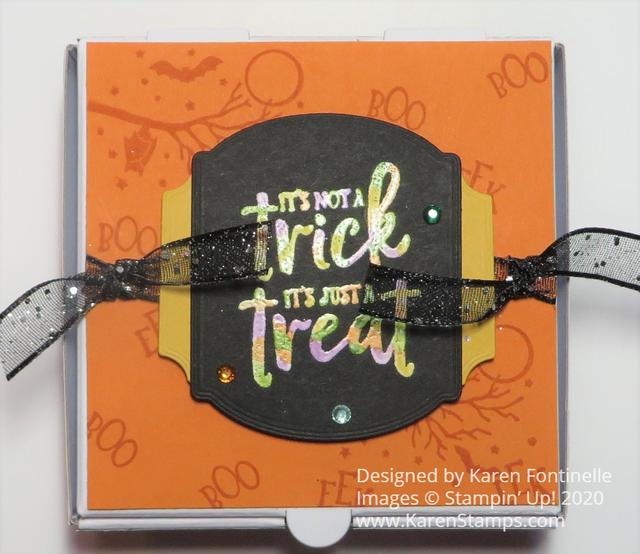
Halloween Mini Pizza Box Colored Embossing

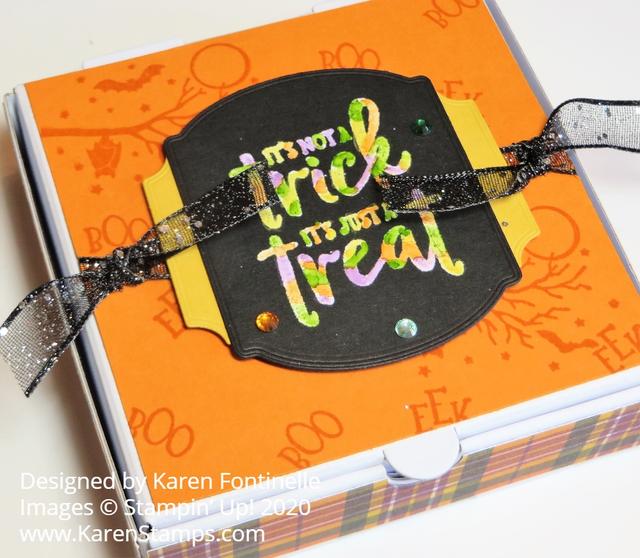
Here’s a technique you can try if you want to make a Halloween treat box like this Halloween Mini Pizza Box Colored Embossing treat box. It’s a fun way to color the greeting on the box to make it look a little more interesting or spookier for Halloween!

The technique involved is easy. You can use it for greetings or other images. Just emboss with Versamark Ink and White Stampin’ Emboss Powder the way you normally would, using your Heat Tool to melt the powder.
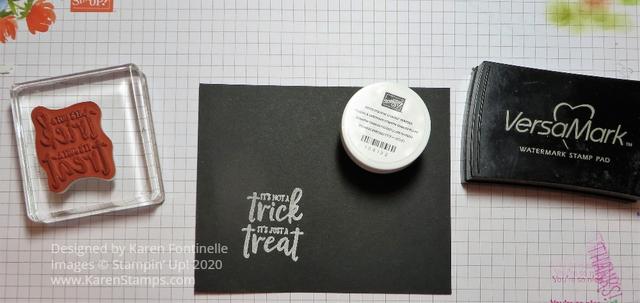
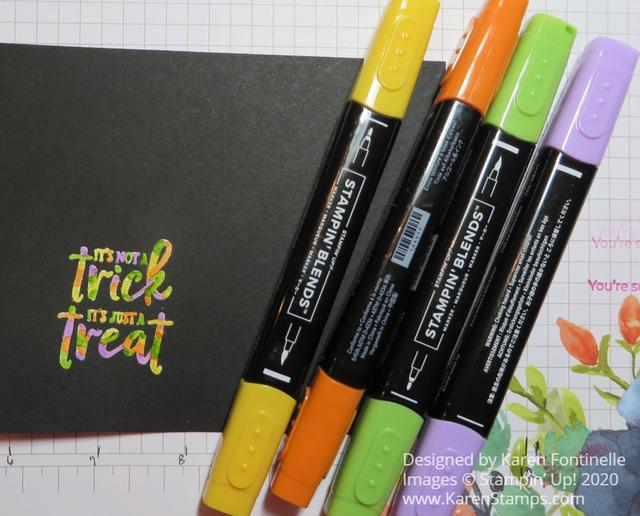
After embossing, let cool for a second and then color right over the white embossed areas with Stampin’ Blends markers. Try not to get off the embossing or it will show on the paper, even black. If you do get some marker ink on the paper, use the Color Lifter to “move” the color back over very lightly. For this Halloween project, I used multiple colors on the Halloween sentiment.
I had a similar project on my recent newsletter, so if you would like to get ideas like this and more delivered every Tuesday to your Inbox, just sign up for my Mailing List in the red box in the right sidebar or scroll all the way down on your phone to get to it.

This project is made with the Mini Pizza Box. These are handy to have on hand. They are unassembled and store flat. You get 8 food-safe boxes, 3 1/2″ x 3 1/2″ in size. You can easily put the box together, the decorate for whatever occasion. Put some cookies inside, 3″ x 3″ notecards, or some other small gift or treat.

For this box, I stamped a piece of Pumpkin Pie Cardstock for the lid with images from the Ghoulish Goodies Stamp Set. Around the sides of the box, I used pieces of the Plaid Tidings Designer Paper. Since the paper is only 6″ wide, I cut four individual strips of paper. I was even fastidious enough to match the plaid lines before cutting, but you wouldn’t have to be so perfect.

The embossed sentiment is cut out with one of the Tasteful Labels Dies. For a little layer behind the sentiment I die cut another shape from the same dies and cut it in half so a little bit would show under the side of the sentiment. Before adhering the Pumpkin Pie paper to the top of the box, I adhered ends of the Black 3/8″ Glittered Organdy Ribbon to the underside and popped up the greeting with Dimensionals. Then I tied on a little knot on each side of the greeting with the ribbon. Love this Glittered Ribbon! For a little bling, I added three Holiday Rhinestones that I thought kind of matched the Halloween colors.
Who knows what kind of treats we will be able to give out this Halloween or if there will be trick-or-treating or Halloween parties, but these Mini Pizza Boxes are one of those good things to always have in your stash for when the need arises when you want to give a little treat or gift. Or order more if you have a certain occasion or gathering.

Here is another example of how to use these Mini Pizza Boxes for just a gift, not necessarily a certain occasion. I used the Peaceful Poppies Designer Series Paper (retired) to decorate this box and the Poppy Moments Dies.

These Mini Pizza Boxes are fun to decorate for many occasions. Try this fun technique of heat embossing white powder and then coloring with Stampin’ Blends markers right over the embossing to make this fun project, Halloween Mini Pizza Box Colored Embossing.

Arrange a Wreath Happy Birthday Card

Arrange a Wreath Happy Birthday Card

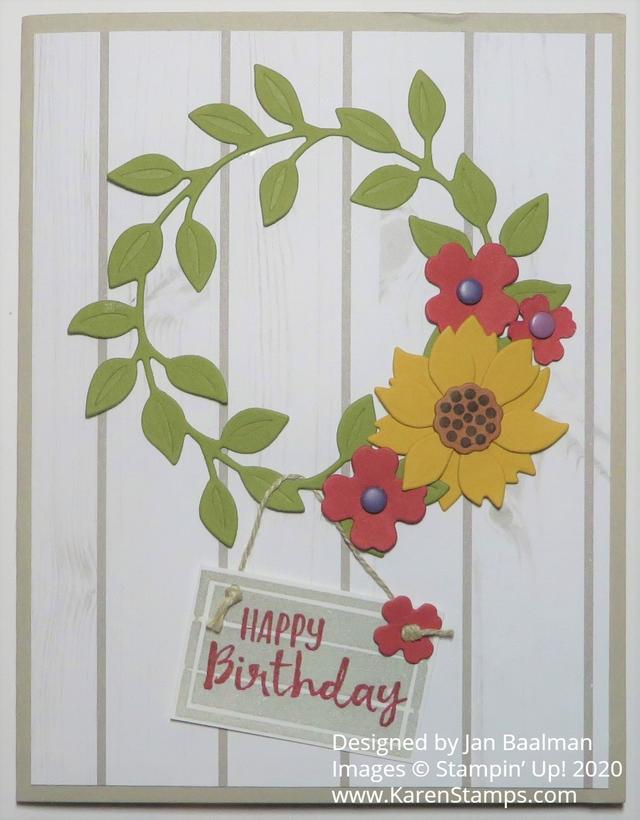
I got several very nice cards for my birthday a couple of weeks ago and this Arrange a Wreath Happy Birthday Card was made by my dear, long-time friend who got me into Stampin’ Up! in the first place!

I still remember stopping by her house when we were in town to go to a wedding shower and her taking just a few minutes to show me some projects she had made at a party by this company called Stampin’ Up! that I had never heard of. I barely knew anything about rubber stamping and had not been successful in my stamping attempts with stamps from the craft store, but her projects were so cute!! She had just received her Starter Kit but hadn’t opened it yet and we didn’t have time that day anyway. When I went back later in the summer for our friend’s wedding, I got to spend time stamping with her and fell in love with it! I didn’t really want to go anywhere else or do anything else, just stay at her house and stamp or look at the cards and things she had made. A few months later, I think, I signed up to be a Demonstrator.

This card was made with the Arrange a Wreath Stamp Set and Wreath Builder Dies. You can purchase both together in a Bundle and save 10%. I have seen some really cute cards made with this Bundle so I just might have to purchase it myself someday!

The card base is Sahara Sand with a layer of designer paper. You could choose something from the In Good Taste Designer Series Paper that might look similar. The wreath is die cut with the Wreath Builder Die out of Old Olive Cardstock. Then you can diecut some flowers from the set in any colors you like to decorate the wreath She used some enamel dots for the flower centers. I think the little Happy Birthday sign hanging from he wreath is so cute!

Obviously you can use this wreath for LOTS of occasions and all the seasons of the year, making this a very versatile stamp set. I love this card!

The latest reports about Hurricane Laura are that Houston is “out of the cone” so we should just have minimal effects, maybe some bands of rain and some gusty winds. The storm will go in around the Texas-Louisiana border which is certainly bad for those people. I just hope our power stays on! We’ve been lucky through many storms but you never know when your power might go out seemingly for no reason! We were making hurricane preparations anyway when it looked like it was coming directly here, so we have batteries and candles and lanterns and a ton of chocolate chip cookies I baked last night!

Take a look at the Arrange a Wreath Bundle for your next Stampin’ Up! order. You’ll find it in the Stampin’ Up! Annual Catalog on page 127 with the dies on page 173. Don’t forget to use your Bonus Coupons from July by August 31 when they expire.

SHOP STAMPIN’ UP! ONLINE TODAY!

Gnome For The Holidays 3 Gnomes Christmas Card

Gnome For The Holidays 3 Gnomes Christmas Card

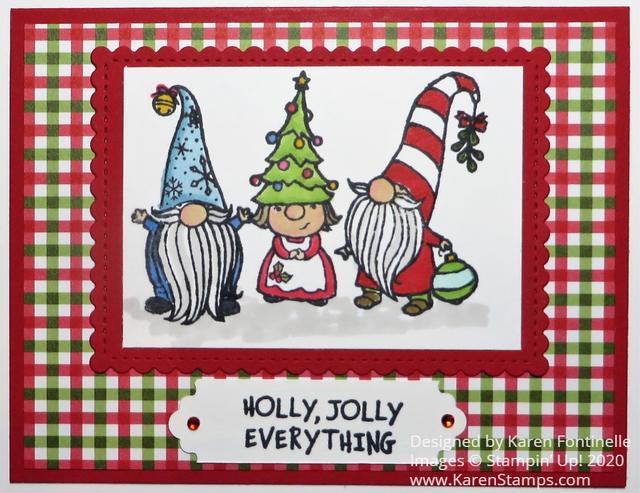
This little gnome stamp set is just too cute so I made a Gnome For The Holidays 3 Gnomes Christmas Card. All three gnomes have come together to send holiday wishes on this card!

To make this card, I stamped each gnome in the Gnome For the Holidays Stamp Set side by side. Even though they are cling stamps, you can stamp them close together and likely not overlap them. The gnomes are stamped in Memento Ink because I knew I would use my Stampin’ Blends to color them in. I stamped them on a large scrap of Whisper White, not exactly knowing how I would die-cut them to put them on the front of the card.

After looking through my dies and the large size I needed to fit in all the gnomes, I decided to just cut the paper into a rectangle that would fit inside the Stitched So Sweetly scalloped rectangle die that I could use as a layer. Then I looked through the Heartwarming Hugs Designer Series Paper to see what paper I wanted to use with the gnomes. I really liked this red and green plaid!

The card base is Real Red with the Heartwarming Hugs DSP layer and then the gnomes focal point on top of that. I decided not to pop up anything but you could.

After adhering all the layers together, I stamped the greeting, also from the Gnome For the Holidays Stamp Set. I cut the strip down to 3/4″ wide and used the Lovely Labels Pick a Punch to punch each end of the greeting. Then I added a Red Rhinestone Basic Jewel to each end for a little “bling”!

You likely will want to put a Whisper White layer inside the card unless you want to stamp on the Real Red cardstock base. You could stamp one gnome or the house on this Whisper White piece or adhere a strip of the matching designer paper along the bottom edge.

If you like coloring and wanted to make a few more of these Gnome For The Holidays 3 Gnomes Christmas Cards, you could make this card pretty easily (except for lots of coloring!). Always plan to make multiple cards of the same design assembly-line fashion because it goes faster that way!

You will find the Gnome For the Holidays Stamp Set in the August-December 2020 Mini Catalog on page 23. It’s a simple little stamp set and has fun greetings. Here is a link to the first gnome Christmas card I made! I really like the little Christmas lights on the gnome house! So cute!

Be sure to use your July Bonus Coupons by August 31 on your Stampin’ Up! order!

SHOP STAMPIN’ UP! ONLINE HERE!

Snowflake Splendor With So Many Snowflakes Dies

Snowflake Splendor With Many Snowflakes Dies

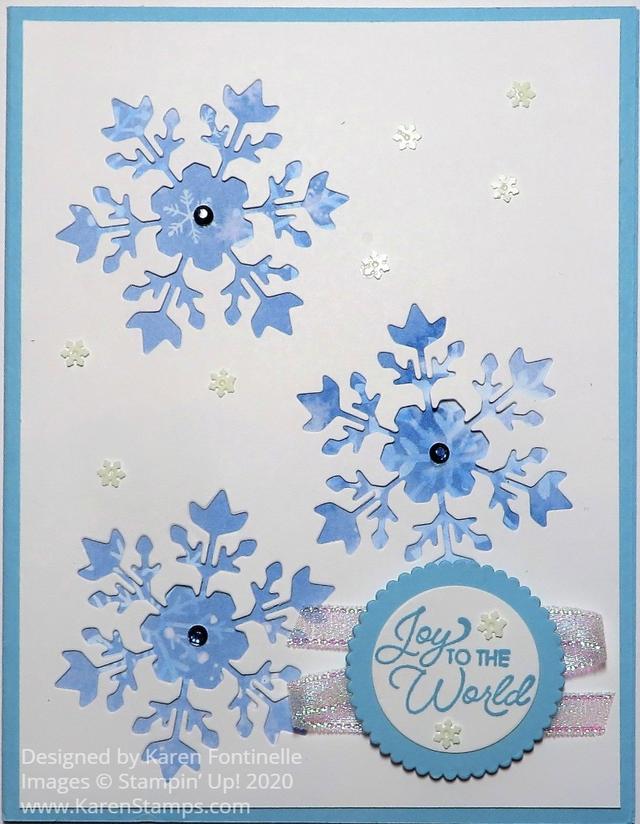
Brand new designer paper, dies, ribbon, and even a new die-cutting machine to make this Snowflake Splendor With Many Snowflakes Dies card for the holidays! Actually, I am hoping the snowflakes will cool me off in this very hot Houston weather!

This card is actually pretty simple! The card base is Balmy Blue Cardstock and I used the new Snowflake Splendor Designer Series Paper as a layer underneath the die-cut snowflakes. The snowflakes are die-cut out of Whisper White Cardstock (Shimmery White Cardstock would be really pretty, too!) using the So Many Snowflakes Dies. As a bonus, I now have three beautifully die-cut snowflakes to use on another card or project!

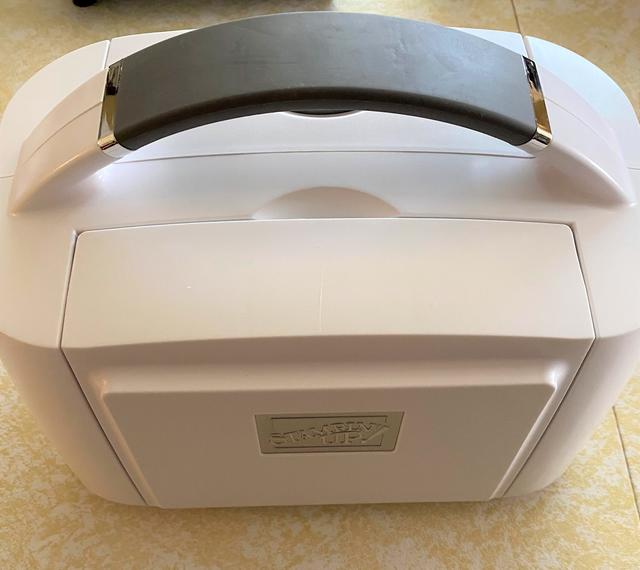
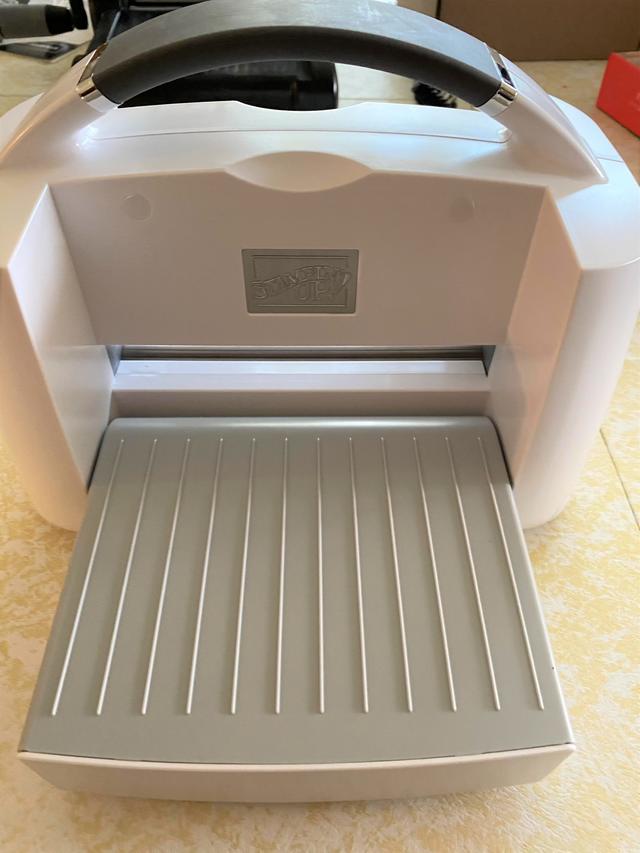
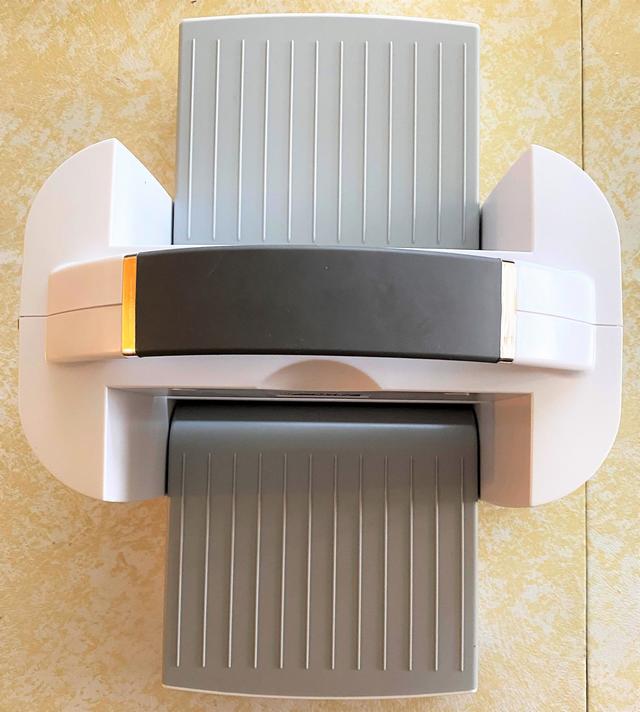
The new Stampin’ Cut & Emboss Machine, pictured in the Stampin’ Up! Annual Catalog is almost available! It will be available to customers on September 1, which is coming up soon! It IS available for preorder for Demonstrators (which is always a good reason to sign up!), but only the large machine. The cute Mini is not available and we don’t have a date yet. Mine just arrived and I’ve only played with it a little bit! I will post some quick photos I took of it, but I didn’t have the handle attached to it yet!

Stampin' Cut & Emboss Machine Closed
Stampin' Cut & Emboss Machine Open
Stampin' Cut & Emboss Machine Both Sides

The Stampin’ Cut & Emboss comes separately from any order you also placed with it, in a box of its own, very well packed. There are some instructions and I encourage you to read them. The handle assembly instructions are just drawings, as most manuals are these days, but there is important information in the written information just inside the cover. Please read it so you don’t void your warranty and keep it handy. Be sure to save the little wrench that comes with the machine you need to attach the handle because you may need it in the future possibly.

The machine itself is gorgeous, especially the silver embossed Stampin’ Up! logos! It’s so nice the way the platform folds up on each side for storage or just to take up less space wherever you have it. Since mine is always out on the dining room table, this might neaten things up a bit!

The platform and plates are numbered and have directions printed on the platform for the sandwiches to use for dies, thinner embossing folders and the 3D embossing folders. That is so great! Before you start, though, take a good look at your beautiful, new clean clear plates with no marks on them yet!! Just admire the beauty before they get messed up with die-cutting marks! LOL!

I found the machine to work very well and did I mention how pretty it is?! My Big Shot is still working but is ten years old and has been overhauled once by my husband a few years ago so I wonder how much longer until it konks out. I will certainly keep it as it may work for many more years, but I did have to have the new one!!

But back to the card! I die-cut the three snowflakes and then tried various designer papers underneath to see what I liked. If you want to be real persnickety, you can see if you can line up any snowflake designs underneath your die-cuts. I kind of did that and drew a pencil line around the Whisper White die-cut layer on to the designer paper and cut it out by hand, but even that wasn’t perfect so I don’t know that I would bother with that again.

The greeting is stamped in Balmy Blue Ink and die cut, as well as the Balmy Blue Cardstock layer, with the Layering Circles Dies. I was trying to make the whole greeting as small as possible to avoid covering up my die-cut snowflakes, so if you were making this same card, you might try to plan ahead with the greeting and try to arrange your dies so you have the space available that you want for your greeting. It doesn’t hurt, though, if a tiny corner of the snowflake is covered. The greeting is from the Itty Bitty Christmas Stamp Set.

Since I had just received the Snowflake Splendor 1/4″ Ribbon, I wanted to use it and just zig-zagged it behind the greeting before adhering with Stampin’ Dimensionals. The ribbon is a little stiff and is making the greeting pop up so I probably need to work on that a little bit!

For some bling I added some Holiday Rhinestone Basic Jewels in Night of Navy to the center of each snowflake. You could use other things, too. Then I added a few Snowflake Sequins randomly on the card front and on the greeting. The Take Your Pick is handy for picking up these tiny snowflake sequins and placing them on the teeny tiny dot of Multipurpose Liquid Glue. I hope this Snowflake Splendor With Many Snowflakes Dies card has cooled you off from the summer heat and gotten you in the mood for holiday cardmaking!

Shop Stampin’ Up! Online in the New Store! Make sure you see my name as your Demonstrator since this is a new site. If you have questions, just let me know!

Gilded Autumn Gather Together Card For Fall

This Gilded Autumn Gather Together Card For Fall is one I created by copying a fall card I made last year with the same stamp set but using this year’s new designer paper! You can take any card or project you’ve made in the past and update it with a new greeting, new colors, new paper, new embellishments.

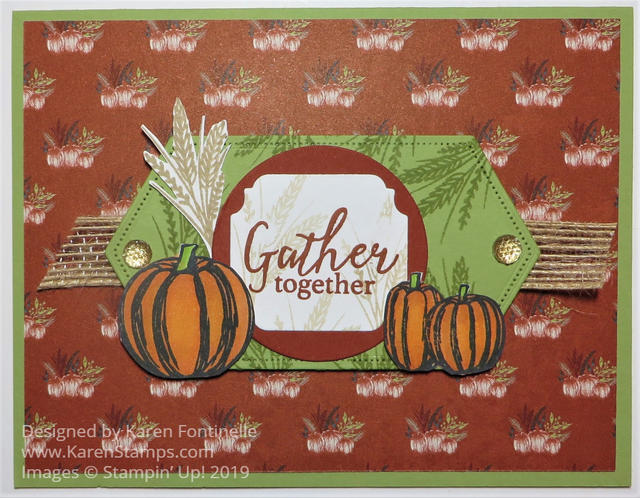
Here is the card I was copying from last year. Click the card to see the blog post.

Gather Together Fall Card on the First Day of Fall

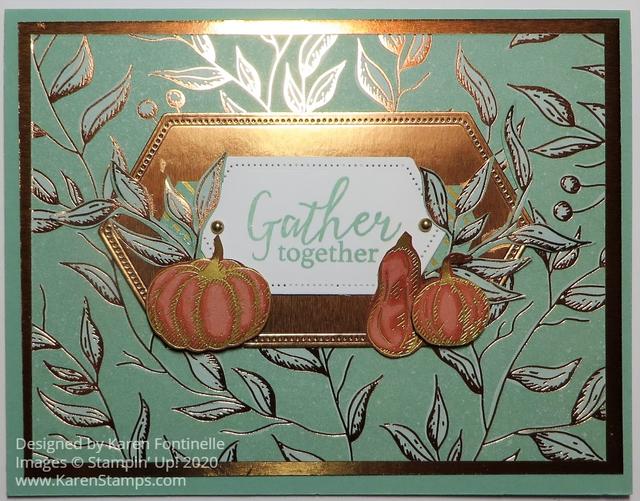
The new Gilded Autumn Specialty Designer Series Paper in the Holiday August-December 2020 Mini Catalog is just beautiful this year with its earth tone colors and some copper and gold foil accents. I really like this paper! For the card base, I used Mint Macaron Cardstock because it goes with the pattern I wanted to use. This leafy pattern is what I used to cut out some leaves as embellishments.

Under the leafy pattern designer paper, I put a layer of Copper Foil. If you want to cheat, you can die-cut a piece out of the center of the foil, which will be hidden underneath the designer paper, if you want to use every bit of the foil sheets!

For the center of the card, to match the one from last year, I cut out a Copper Foil piece from the Stitched Nested Labels Dies. You can choose whichever size works best for your card.

The greeting, from the Gather Together Stamp Set, is stamped on Whisper White Cardstock in Mint Macaron Ink and die cut with a smaller Stitched Nested Labels Die. I added a little Gold Metallic Pearl on each side. The pumpkins and one gourd are cut out with Paper Snips by hand from the paper in the Gilded Autumn selection. I love the pattern with all the pumpkins and gourds! I just cut out three of them and a few leaves and adhered them to the front around the greeting. That’s all there is to it! Seems pretty simple, right?!

What is it about fall that makes us all so excited to expect it and to make fall projects like colored leaves and pumpkins and more?!

Be sure to check out the Gilded Autumn Specialty Designer Series Paper in the new Stampin’ Up! Online Store because the photos of the paper are really great! Next best thing to seeing them in person!

The Gilded Autumn Paper and the Foil Sheets are so pretty that’s almost all you need on this Gilded Autumn Gather Together Card For Fall.

Blossoms In Bloom You Are Special Card

Blossoms In Bloom You Are Special Card

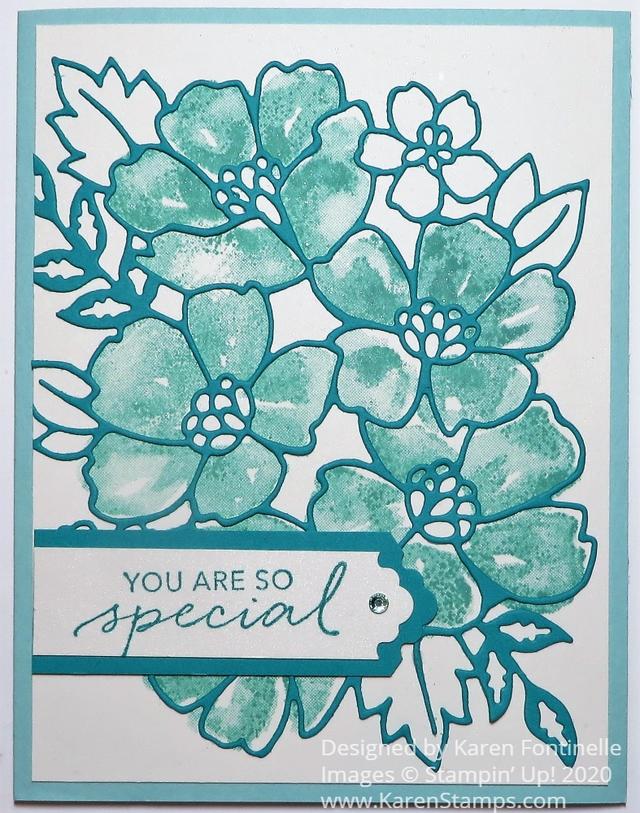
I don’t know what blossom or flower this is in this blueish color, but since it is art it can be anything, right? It all began with die-cutting some designer paper for the fuller layer underneath the outline layer but that didn’t seem to be what I was looking for. Sometimes if you original idea doesn’t work out, you just have to keep going and see what else you can come up with and that’s how this Blossoms In Bloom You Are Special Card came to be!

When you get right down to it, this card is pretty simple to make! The floral outline is die-cut with the Many Layered Blossoms Dies. The die is almost as big as the card front! If you think of it ahead of time, it would be a good idea to use the Adhesive Sheets on the cardstock before you die-cut it so that it will be like a giant sticker and you don’t have to worry about adhering it. I used teeny tiny dots of Multipurpose Liquid Glue but it is a little tedious!

The card base is Pool Party Cardstock, which I didn’t choose until I had the front of the card made! The floral die-cut is Coastal Cabana Cardstock. To add some color, I stamped the blossoms in the Blossoms In Bloom Stamp Set in Pool Party Ink.

I think if you are making a card like this you need to take a minute to think about the direction you want things to lay out in since everything is so large. Since I had the outline die cut first, I laid that down on my card front to see which leaf was going at the top and which way everything was pointing. Then I would know pretty close how to stamp the blossom image that would go underneath the die. It’s not something you can plan perfectly, but just so you get things pretty much how they are going to fit in the end.

The front layer of the card is Shimmery White Cardstock because at first, I thought I might do some watercoloring. Shimmery White Cardstock holds up better to water than Whisper White Cardstock. Plus it is the prettiest paper with its very subtle glimmer. It’s a little more toward the ivory or off-white color than pure white but you can really use it for either way.

The greeting is stamped from the Tasteful Touches Stamp Set. I used the Lovely Labels Pick A Punch which makes two different fancy ends to several sizes of paper strips. You can punch a 1/2″, 3/4″ or 1″ strip of paper. Just stick the length of cardstock way into the punch to get the fancy end. If you want to be extra careful, turn the punch over before punching and make sure the strip is all the way in and centered how you want it. Sometimes a tiny wiggle can get it off-center. I also cut a layer with the same punch with just a wider strip of paper. For a little bling, I used one Clear Epoxy Droplet. I think it was the perfect little bit of pizzazz on the card!

Don’t forget to use your July Bonus Coupons this month! You will see where to enter them on your order. I think you have to do one at a time if you have several to use. You can use all the coupons you have on one order, but you have to enter them one at a time. Before you submit your order, you will see that the coupon amount was taken off. Just remember, if you have a large order and reach Hostess rewards, when you enter your coupons that will bring down your total and you might have to add more to earn the Stampin’ Rewards.

Here is another way to use the Blossoms in Bloom Stamp Set along with the Many Layered Blossoms Dies. You can purchase the stamp set and dies. Then you will be all set to make something like my Blossoms In Bloom You Are Special Card.

Prized Peony All-Occasion Square Card

Prized Peony All-Occasion Square Card

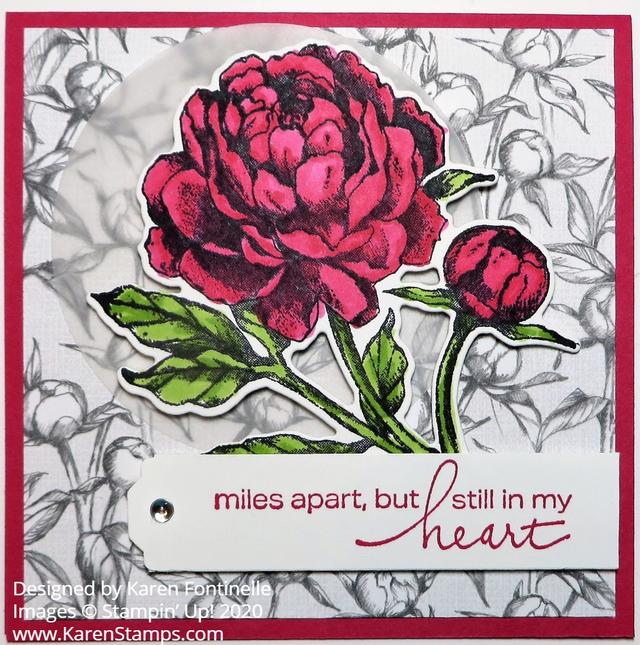
I started out looking at the peony designer paper but couldn’t come to a decision of what card design to make, so I looked in the Stampin’ Up! Annual Catalog at the Peony Garden Suite for ideas. Finally I settled on this Prized Peony All-Occasion Square Card that was inspired by a square card I saw on page 84.

It’s really a very easy card. I cut the Melon Mambo card base to 8 1/2″ x 4 1/4″ and folded in half. The Peony Garden Designer Series Paper is cut at 4″ x 4″ for a layer on the card base. I wanted something not too plain in the background but not too big that the big flower would not stand out.

The focal point on the card is the stamped and die-cut Prized Peony. I stamped it in Memento Ink and colored in with Melon Mambo Combo Stampin’ Blends markers and the leaves with the Granny Apple Green Combo Stampin’ Blends markers. The flower is stamped with the Prized Peony Stamp Set and cut out with the Peony Dies. You can purchase both together in the Prized Peony Bundle and save 10%.

Now there is a package of Square Vellum Doilies in the Suite, which I bought, but I couldn’t find them! So I substituted a large die-cut Vellum Cardstock circle to put behind the peony. Normally it is difficult to glue down vellum because the adhesive almost always shows in some way behind it, but in this case, I knew I could put some adhesive on the vellum behind where the flower would go and it wouldn’t show at all. The peony is popped up on Stampin’ Dimensionals®.

The greeting is stamped from the Lovely You Stamp Set in the Annual Catalog on page 22 with Melon Mambo ink. I lined one end up with the edge of the card layer on the right and punched the other end with the Lovely Labels Pick a Punch. (This punch on backorder but coming next week). You can purchase the Lovely You Stamp Set and Lovely Labels Pick a Punch in a Bundle for a 10% savings (but backordered as I write this). This greeting is popped up also with Stampin’ Dimensionals right over the stem of the peony. For a little bling I added a Clear Epoxy Droplet to the tag.

You can change the colors, the paper, and the greeting to make a similar card for another occasion. Sometimes it is fun to make a square card instead of our usual design just for a something a little different!

Here is another card I made with the Prized Peony Stamp Set and die using a different pattern of the Peony Garden Paper and using different colors.

There are so many possibilities with this Peony Garden Suite for cards and other projects that you will enjoy making like this Prized Peony All-Occasion Square Card.

Ghoulish Goodies Halloween Clear Tiny Treat Box

Ghoulish Goodies Halloween Clear Tiny Treat Box

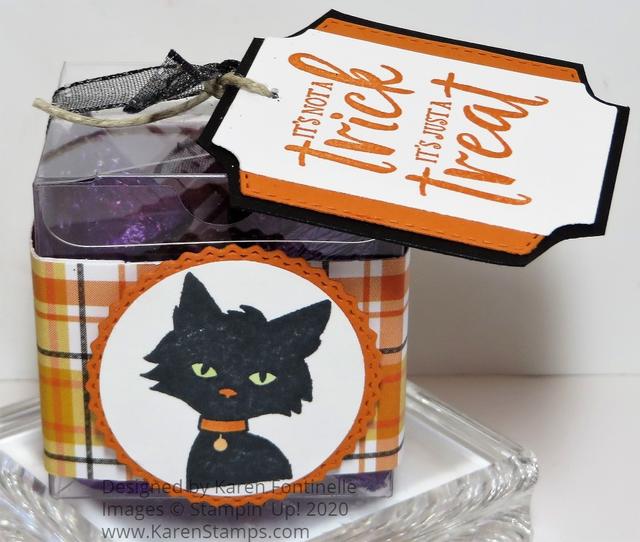
For my first, of probably many, Halloween posts for this year, here is a Ghoulish Goodies Halloween Clear Tiny Treat Box. Who knows what Halloween will look like in this pandemic year, but you can still make Halloween treats for your family or even yourself! Thank goodness the grocery stores are still able to deliver craft supplies, such as chocolate candy for treats!

As always, I love and highly recommend keeping a package or two of the Clear Tiny Treat Boxes on hand! They are only 2″ x 2″ x 2″ but food safe and have enough room for a decent treat without being too big. Or add some other small gift inside for any occasion. These boxes come flat, protected by a piece of plastic you remove, then assemble and decorate. Couldn’t be easier!

For this Halloween treat box I wrapped around a piece of the Plaid Tidings 6″ x 6″ Designer Series Paper. Now you may have figured out that a 6″ long strip will not wrap all the way around the box. I cut two strips, then realized I needed the plaid design to march up if I wanted to be picky about it (and of course most of us do!). Actually my strips were only about 1/8″ off so I matched them up, adhered the ends together then trimmed off the excess on each side. It worked fine. Or you can wrap the 6″ strip around from the front to each side and add another piece for the back. Make it longer so you can adhere the ends inside the side pieces to make it look neater.

The tag is stamped in Pumpkin Pie ink on Whisper White with a stamp in the Ghoulish Goodies Stamp Set. What a perfect saying for Halloween treat packages! I die-cut it with a die in the Tasteful Labels set of dies. Then I wanted some kind of layer, so I cut another label which was too small, but I cut it in half lengthwise and added it to each side of the treat tag. This is the Pumpkin Pie piece. To cover up the back, I adhered the whole thing onto a rectangle of Basic Black with just a small margin and simply cut those corner curves by hand. Doesn’t have to be perfect! The tag is already almost too big for the treat box so I couldn’t keep adding larger layers.

To attach the tag and further decorate the box, I used the beautiful Black 3/8″ Glittered Organdy Ribbon. It’s almost too pretty to use on a treat box but it does look great! I punched a small hole in the top of the tag, put a piece of Linen Threat (or whatever twine I had laying around here) through the tag and tied it on to the ribbon, then finished tying the ribbon in a know. You could do a bow instead.

To decorate the front of the box (and to use another new stamp!), I stamped the black cat from Ghoulish Goodies. Then I colored in its eyes with a Granny Apple Green Stampin’ Blend marker and the collar with Pumpkin Pie. I just punched out the cat with my 1 1/2″ Circle Punch and then layered it on a die-cut from the Tasteful Labels Dies again. Love those scalloped circles in that set!!

Put your treat or gift in the box before you tie it up! Luckily I had fresh chocolate kisses wrapped in purple (dark chocolate), perfect for Halloween! These candies are meant for crafting, of course! (Or for after lunch or dinner as a digestive, of course!).

Here’s a super-simple treat I made with the Clear Tiny Treat Boxes recently.

Yes, it’s time to start having fun with Halloween because now that it is August, it is really almost September and you know Halloween isn’t far behind! Check out the Ghoulish Goodies Stamp Set and others in the new holiday mini, August-December 2020 Mini Catalog. If you need a copy, send me your contact information at Karen@Karenstamps.com Then you can start making your own Ghoulish Goodies Halloween Clear Tiny Treat Box or something similar!

Gilded Autumn Fall Thanks Card

Gilded Autumn Fall Thanks Card

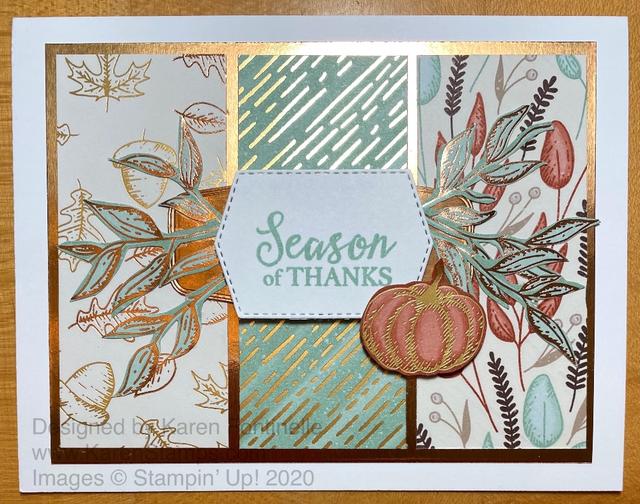
I was anxious to play with this gorgeous designer paper in the new August-December 2020 Mini Catalog from Stampin’ Up! The designs are so pretty, the colors beautiful, and all of it accented with copper and gold foil. How can you resist?

This beautiful paper is the Gilded Autumn Specialty Designer Series Paper in the new Holiday Catalog. You’ll find the whole Gilded Autumn Suite on pages 44-46. All Suites in this catalog get a three-page spread! The Suite contains the Beautiful Autumn Bundle with stamp set and three punches, ribbon, Brushed Metallic Cardstock, and Acorn Trinkets. You can order the whole thing with one Suite number or order any of the products individually.

I loved the sample in the catalog on page 44 with the three panels of designer paper on it, center of page. I changed mine a little bit and figured out my own measurements. The card base is Whisper White, although you could also use Very Vanilla. The Copper Foil layer underneath the designer paper is cut at 5″ x 3 3/4″. The strips of designer paper are cut at 1 1/2″ x 3 1/2″ so there is a tiny margin around the edges and in between the pieces. You can vary this and have the papers side by side or even a little larger with a larger foil layer underneath. When I finished gluing these pieces with my new Stampin’ Seal+ I ended up trimming just a slight bit off the side of the copper foil just to even things up.

The greeting is stamped from the Gather Together Stamp Set, a “returning fave” it says in the catalog, from last year in Mint Macaron Ink! We all did love that stamp set and cards we made with that set last year so I’m glad it is back! I die cut it with one of the Tasteful Labels Dies and used another longer one to cut out a strip of Copper Foil to go behind it. This is a great die set!

The catalog sample card has some greenery sticking out from the side of the greeting. I don’t know how they did theirs, but I just cut some greenery out from one of the sheets of the Gilded Autumn Paper. It wasn’t so easy, but it worked! And I put it on both sides of my greeting.

And then, just because I loved the paper with pumpkins and gourds, I had to cut out a pumpkin and add it to the card. I wasn’t sure! What do you think? I popped it up with a Dimensional to match the greeting that was also popped up, but I put the Dimensional only in one spot to it would be even with the greeting. I meant to add some sequins or some little bling but I forgot!

Here is a card I made last year with the Gather Together Stamp Set. I think I could use this same basic layout and make something with the new Gilded Autumn Paper! I might try that!

I think it is a fairly easy card to make, especially if you use my measurements and don’t have to figure it out. Maybe you could die cut some other greenery for a similar look without cutting by hand if you didn’t want to do that. You could die cut the greeting in a different shape. Lots of possibilities with this Gilded Autumn Fall Thanks Card.

Remember, we have a new look to the Online Store! If you haven’t used it yet, you need to either KNOW your password to get into your account if you want to order (you can look around without logging in) so you can type it in manually OR you need to click on the “Forgot Your Password” Button to reset it. After that you can have the site remember the password….and maybe a good idea to write it down!

SHOP STAMPIN’ UP! ONLINE!

Poinsettia Petals Merry Christmas Card

Poinsettia Petals Merry Christmas Card

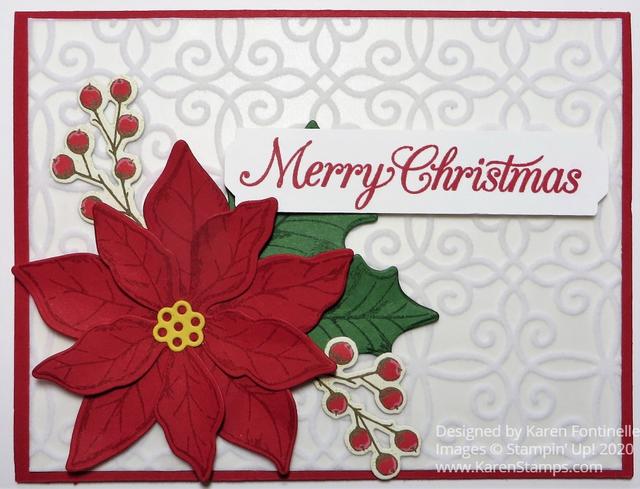
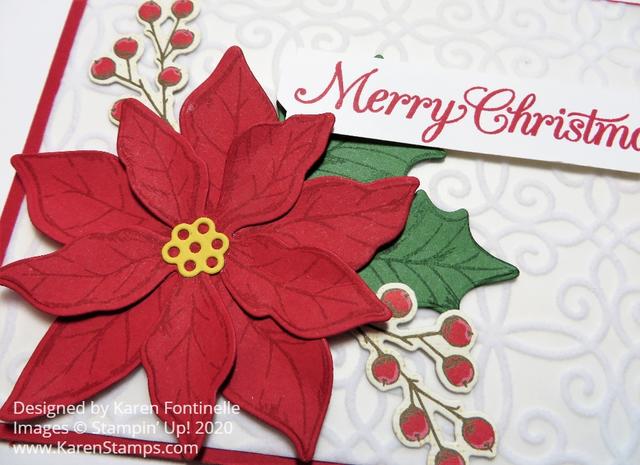
I finally had some time to play and make this Poinsettia Petals Merry Christmas Card. Not knowing exactly what I would ultimately need, I stamped extra flowers of two sizes, many leaves of two sizes, and the yellow flower centers. This worked out well because I was able to make two cards, slightly different, and I already had the pieces stamped and cut out.

If you like poinsettias during the holidays, this whole Poinsettia Place Suite is for you! The papers, stamps and dies in this suite just provide so many opportunities for cardmaking and creativity!

To make this card, I used a Real Red card base. Real Red has always been my favorite Stampin’ Up! color. You will not find a more perfect “red” color anywhere! I’m still not happy that they moved it out of the Brights Family and put it in the Regals!

I was going to put a Whisper White layer on the card base, but then I decided to add the beautiful Plush Poinsettia Specialty Paper on top of the Whisper White. This Plush Poinsettia Paper is just gorgeous! It has very pretty flocked designs on six sheets, 2 each of 3 designs.

Next I assembled my poinsettia stamped with the Poinsettia Petals Stamp Set in Real Red Ink on Real Red Cardstock. I used the largest flower for the bottom layer and the next smaller one for the top. On the bottom flower, I tried out the embossing piece for the leaves in the Poinsettia Dies. The flower center is Daffodil Delight Cardstock. Before I glued the poinsettia petals together I kind of folded the petals a little bit and worked them with my fingers a little bit just to make them stand up a little bit and not be completely flat. Same with the Garden Green leaves, also die cut.

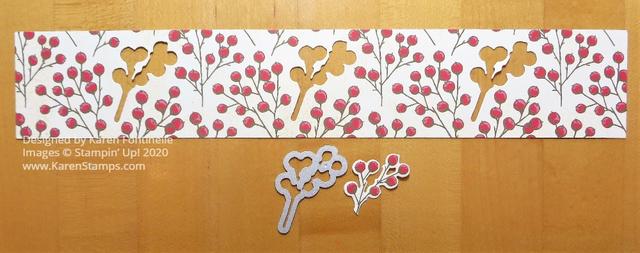
In the catalog, I saw that on one of the card samples the poinsettias had little red berry sprigs stuck out the sides of the flower. I noticed there was a die for them and I discovered it matches up with certain sprigs on the one patterned designer paper in the Poinsettia Place Designer Series Paper. I actually cut a strip of the designer paper all the way across and was able to die-cut three of the sprigs out of the strip. When you study the paper, you will find the exact sprigs that fit in the die and you will see how they repeat across the 12″ x 12″ paper. See the photos below.

Poinsettia Place Designer Paper Red Sprigs

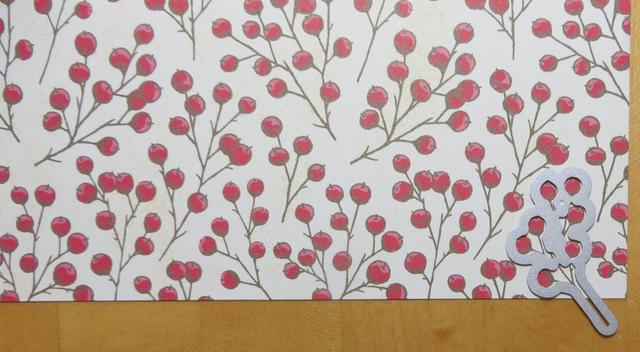
Here you can see how I found one with a partial sprig that I could still die-cut and use on the corner of this paper so that was handy!

Poinsettia Place Paper Red Sprigs Die
See how the die fits the sprig in the lower right corner of the paper.

After die-cutting the cute sprigs, I just stuck a couple under the flower.

The greeting is also in the Poinsettia Petals Stamp Set. I happened to pull out a 3/4″ wide strip of Whisper White Cardstock and stamped the greeting in Real Red Ink. Then I used the new Lovely Labels Pick A Punch. I tried ideas for a green layer under the greeting, but decided I liked it as it was.

Poinsettia Petals Merry Christmas Card Closeup

You can purchase the Poinsettia Petals Stamp Set and Poinsettia Dies in the Poinsettia Petals Bundle and save 10%! That discount is also included in the price of the Suite if you decide to get the whole thing. Or you can order whichever products you would like individually.

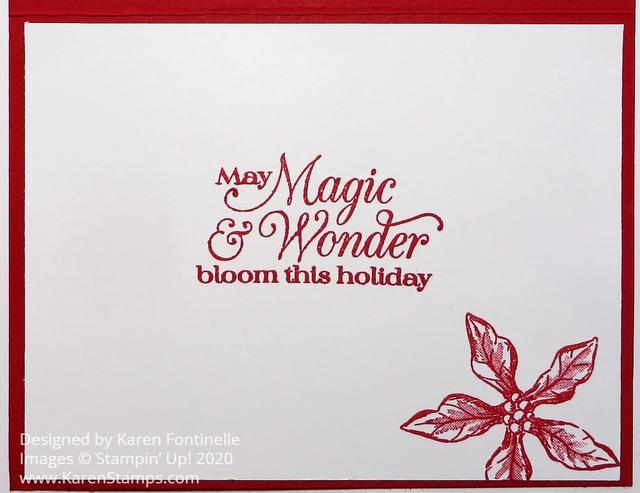
And for the inside of the card, add a Whisper White layer for a greeting or personal note. This greeting is also in the stamp set and I stamped the smallest poinsettia in the corner.

Poinsettia Petals Merry Christmas Card Inside

Nothing says Christmas like poinsettias, so if you like them, get an early start on your poinsettia cards and projects this year. Use my Poinsettia Petals Merry Christmas Card for your inspiration or I’m sure you will come up with many of your own ideas!

SHOP STAMPIN’ UP! ONLINE IN THE NEW STORE HERE!

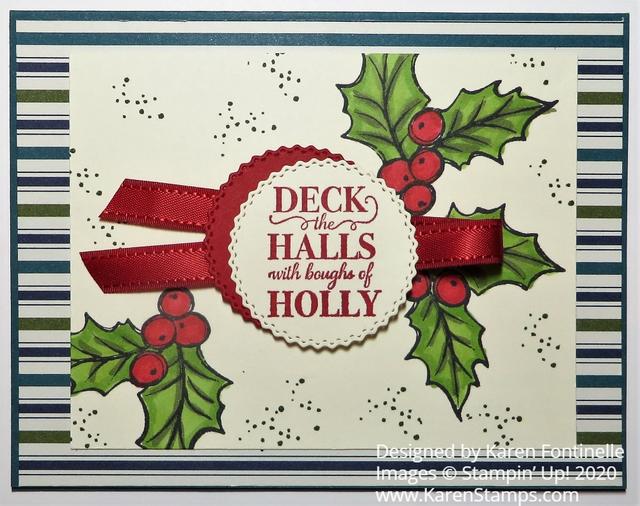
Christmas Gleaming Deck the Halls Holly Card

Christmas Gleaming Deck the Halls Holly Card

If the designer paper on this card looks familiar, it’s because it was in the Holiday Mini Catalog last year! This paper and the stamp set was carried over as were a few other products from last year into the upcoming August-December 2020 Mini Catalog. I had too many ideas in my head with too many new things and couldn’t think of a single card to make so I looked at the new holiday catalog and “got inspiration” for this Christmas Gleaming Deck the Halls Holly Card on page 19. And then I changed it up a little bit!

The card base is Pretty Peacock, one of the 2019-2021 In Colors. Then I used this striped pattern of the beautiful Brightly Gleaming Specialty Designer Series Paper (150429) for the card layer. I only left a 1/8″ margin around the edge of the card.

The focal point of the card is this Very Vanilla layer stamped with images from the Christmas Gleaming Stamp Set, also on page 19. I stamped the holly leaves in Memento Ink and colored them with Stampin’ Blends markers. I used Granny Apple Green with a touch of Daffodil Delight first on the leaves and a little bit of Mossy Meadow to draw over the leaf veins. The berries are Real Red, of course!

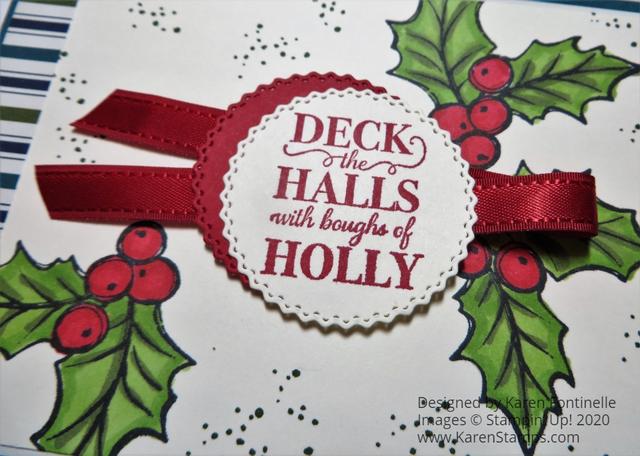
The greeting is stamped in Real Red Ink and die cut with the Tasteful Labels Dies. I loved the circle die in this set. After it cuts out the circle with the pretty edge, there is also a pretty edge left on the paper you cut the circle out of. I cut out another circle out of Real Red to layer behind the greeting, off center since it is the same size as the greeting.

Before I adhered the greeting to the Very Vanilla panel, I thought it needed a little something more so I used the stamp with tiny dots and stamped that randomly in Mossy Meadow. I added a piece of Real Red 3/8″ Double-Stitched Satin Ribbon folded over so it sticks out behind both sides of the greeting and layer. I popped up this greeting with Stampin’ Dimensionals®. I think it would also be fun to spritz the card with Champagne Mist Glimmer Paint in a Spritzer. I might try that if I make some more of this design!

After you get your new Holiday Catalog products and you make a Christmas card you really like, you might want to make maybe 5 cards and then you’ll have five cards made real easily and you can still make multiples of other designs! I usually like to make several different designs of cards!

On the inside of the card you will want to put a Very Vanilla layer since the card itself is a dark color. You can stamp a greeting for the inside of the card or use a strip of the designer paper or stamp one of the ornaments from the stamp set. You could also stamp an ornament on the envelope while you have everything out!

Don’t forget to use the wonderful Stampin’ Up! catalogs for inspiration! Copy exactly or change it up if you get a slightly different idea.

The August-December 2020 Mini Catalog (otherwise known as the Holiday Mini!) goes live Tuesday, August 4th! If you don’t have a copy you will be able to view it online on that day or just see all the products in the Online Store! If you already have this designer paper and stamp set from last year, you can duplicate this Christmas Gleaming Deck the Halls Holly Card right now!

Christmas Gleaming Deck the Halls Holly Card Closeup

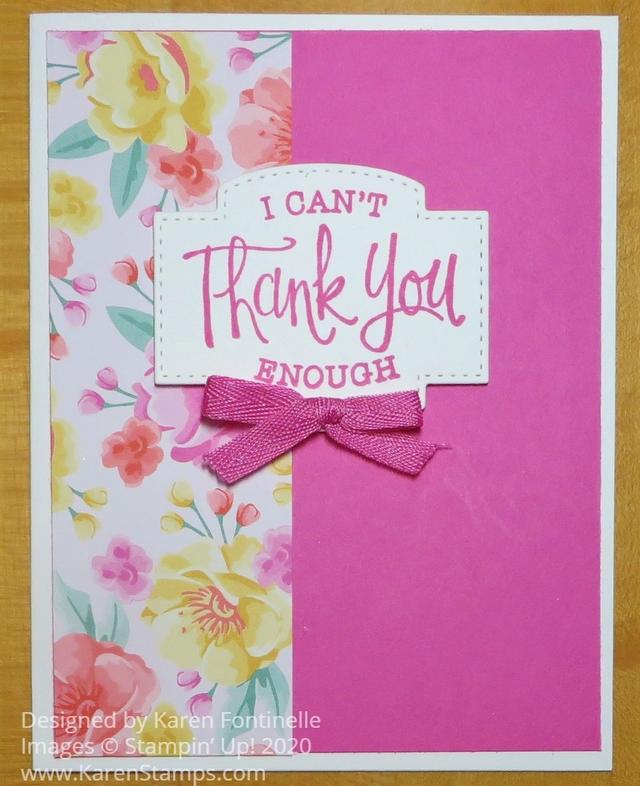
Flowers For Every Season Thank You Card

Flowers For Every Season Thank You Card

If you are in need of a cheerful, bright, and happy card, you most likely will want to choose this designer paper I used on my Flowers For Every Season Thank You Card. The bright florals on this piece of designer paper goes with the new In Color, Magenta Madness and that’s about all you need!

The card base is Whisper White with a Magenta Madness layer. I added a strip of the Flowers For Every Season 6″ x 6″ Designer Series Paper just to the side. You can make it whatever width you want. Almost any of the papers in this package are sure to brighten someone’s day!

The greeting is stamped with Magenta Madness ink on a piece of Whisper White Cardstock with the So Sentimental Stamp Set. This greeting fits perfectly in this die from the Stitched So Sweetly Dies. I love the stitched border around this die!

This is such a simple card design! Anyone can make it and you can change the greeting for lots of other occasions. And for just a little embellishment, I tied a bow with the Magenta Madness 1/4″ 2020-2022 In Color Ribbon and adhered it with a couple of Mini Glue Dots.

If you like the Flowers For Every Season Designer Series Paper, here is another card I made using this paper.

When you need some quick and easy cards, this card is the way to go!

This is the last week for Bonus Days at Stampin’ Up! For every $50 you spend in July, you will earn a $5 coupon to use in August! Bonus Days ends Friday, July 31!! Don’t delay!

Shop Stampin’ Up! Online Here!

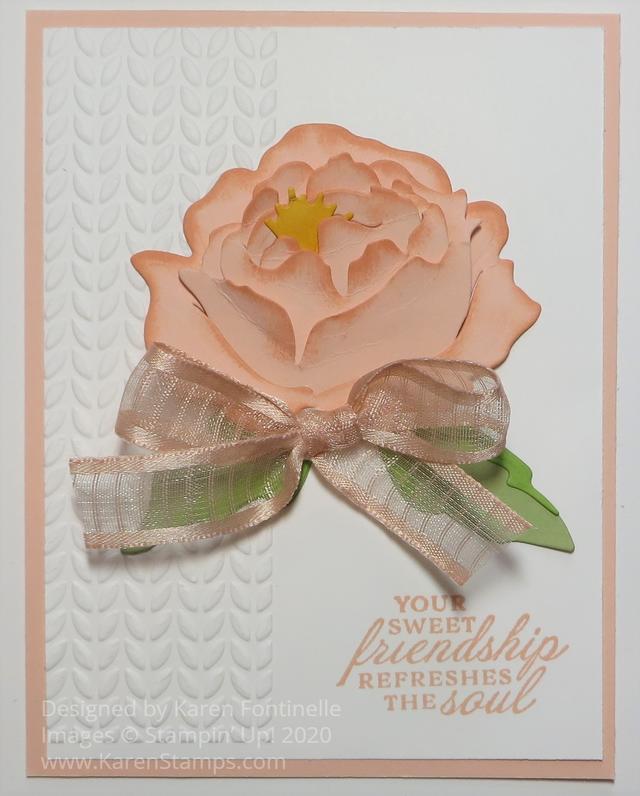
Prized Peony 3D Flower Friendship Card

Prized Peony 3D Flower Friendship Card

I finally tried out the new Peony Dies to see how difficult it would be to make this Prized Peony 3D Flower Friendship Card. And you know what? It wasn’t difficult at all! If I had just gotten the die set and hadn’t seen other videos describing how to use the dies, I don’t know what I would have thought! But really, it is extremely easy to die cut these peony petals and put them together to make a beautiful flower!

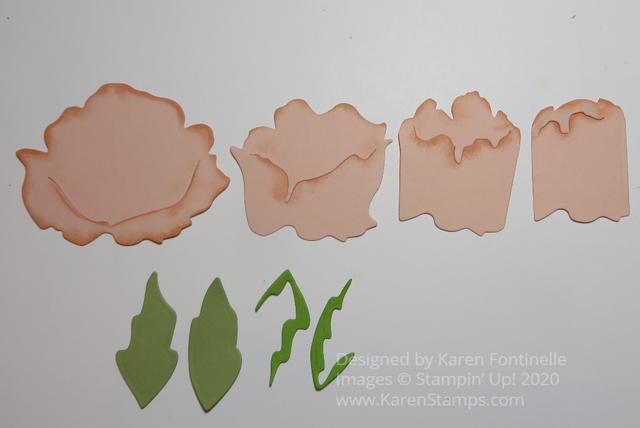
Peony Die Cut Pieces

Here are the die-cut pieces, made with the Peony Dies. The flower petals are Petal Pink and sponged with some Petal Pink Ink. The leaves were Pear Pizzazz and Granny Apple Green.

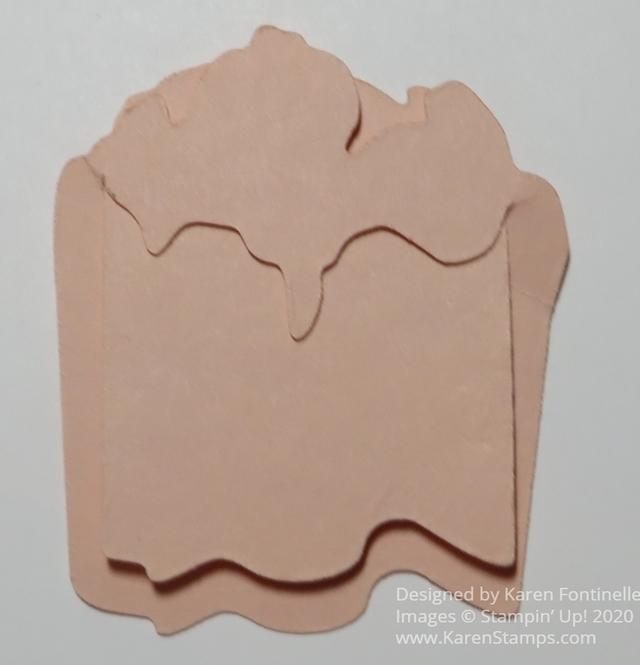
Peony Pieces Assembly on Back

To assemble the flower, use the pieces in order by size. You can start either with the largest piece or the smallest piece. Just slide them inside each other, lining up the bottom edges of each piece. Look at the photo above. This is the back side of my flower with just two pieces. I didn’t push the one piece down all the way so you could see how the bottom edges match! You can see all the curves and imagine pushing that piece down even with the other piece. The bottom edges would line up perfectly! Do that with all four pieces and you will have assembled your peony!

Leave the assembled pieces exactly how they are….flat. OR foof them up a little bit to make the flower look 3D! Use a Bone Folder or even your fingers to try to kind of lift or roll the petal edges. You can also stick some Stampin’ Dimensionals and Mini Dimensionals behind the petals to left them up.

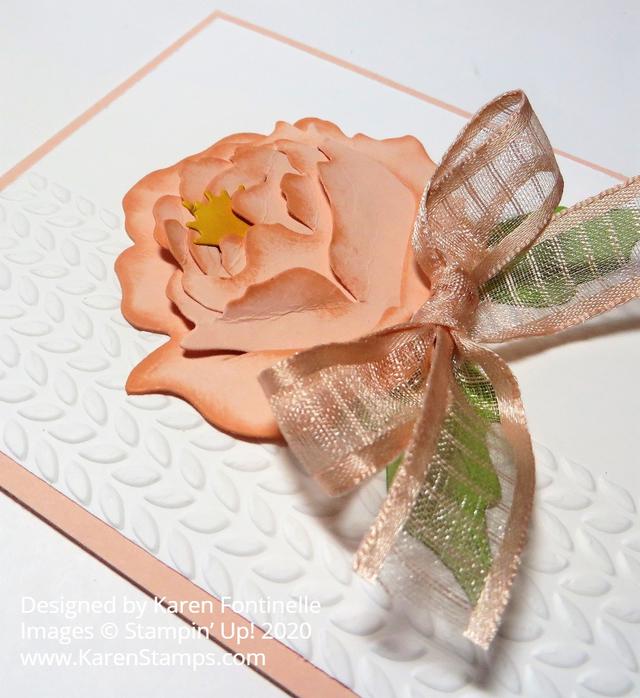
Prized Peony 3D Flower Friendship Card Closeup

In the photo above, not only does the shading give some definition to the flower, but lifting up the petal edges really adds something!

The card base is Petal Pink with a layer of Whisper White. I used one of the Greenery Embossing Folders to emboss just the left side of the Whisper White. The peony is popped up with Stampin’ Dimensionals with the leaves underneath. Then I decided to have a ribbon tied around the lower portion of the card and attach a bow. But that seemed to take away from the flower, so I pulled off the strip of ribbon and just tied a bow to put at the base of the flower.

Then I risked everything (don’t do as I do, do as I say!) and stamped the greeting on the otherwise finished card! If I had messed up I would have just stamped the greeting on another piece of paper and made a layer and covered up my mistake. But it’s not a good idea to do the stamping when the rest of the card is finished! You can imagine why! By then it might be too late, like with this flower, to use the Stamparatus to make sure my stamping was perfect. I got lucky and stamped the greeting in the Prized Peony Stamp Set right on to the card!

You can get the Prized Peony Stamp Set and the Peony Dies together in a Bundle, the Prized Peony Bundle, and save 10%! And if you want it ALL, get the Peony Garden SUITE! Just put in the number for the Suite (154129) and get everything without having to put in all the item numbers! But if you only want some of the items, you can certainly just add those to your order as usual.

Do NOT be afraid of the Peony Dies because they are as simple as can be! Order whatever peony products you like! If you order by July 31, you will receive Bonus Coupons to use in August for every $50 you spend on an order in July! After you place your Stampin’ Up! order, watch for the email that contains your coupon codes. Make sure you get this email and keep track of it so you don’t lose those codes. So nice to get a little extra something when you order!

SHOP STAMPIN’ UP! ONLINE HERE!

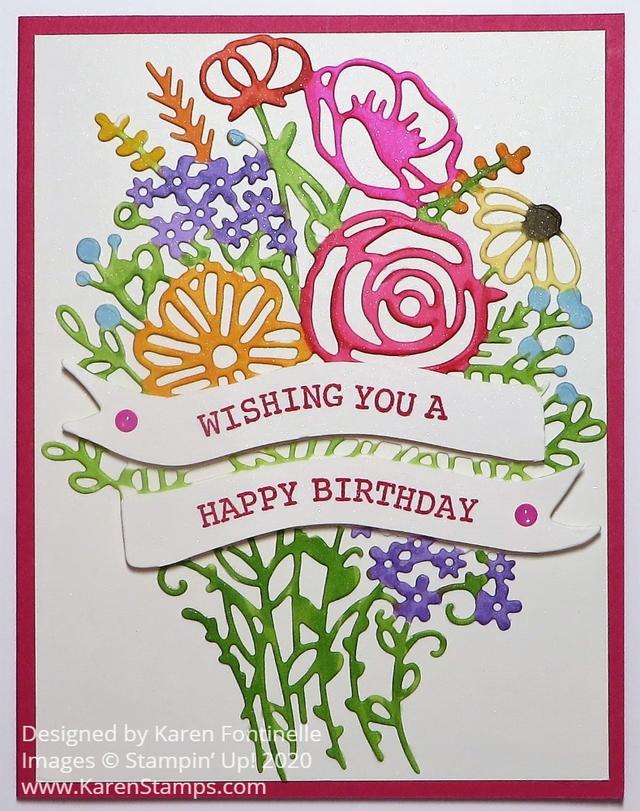
Banner Blooms Colored Flowers Birthday Card

Banner Blooms Colored Flowers Birthday Card

This Banner Blooms Colored Flowers Birthday Card is another example of how I did something different than I planned to! I originally thought I would color this die-cut by sponging on some color, maybe in a very soft look. But when I went to actually color on the die-cut, I grabbed my Stampin’ Blends markers instead and went to town!

When I stamp, I am always, always, always using Grid Paper on my table. It is handy for lining things up and especially for measuring quickly and easily. When I took a decorative painting class years ago, the teacher had us put down a towel on the table and after that, I couldn’t paint unless I had a towel underneath my project! Now you can even choose from several kinds of Grid Paper from Stampin’ Up!, even colorful ones! For coloring these die-cut flowers, I needed a plain white paper underneath (and you always need a paper underneath when coloring with Stampin’ Blends because they do bleed through the paper) so I could see the die-cut well. I simply turned my Grid Paper over to the other side.

This card uses Melon Mambo Cardstock for the card base. I chose it after coloring the flowers. I used Shimmery White Cardstock, my favorite, for the die-cut and also for the card layer, because it is good to color on and it has a very subtle shimmer to it. The paper is very pretty all on its own!

I die cut the flower bouquet with the Banner Blooms Dies. This die is really different from the ones we have had. I found that it works best placing the die cutting side up with the paper on top rather than face down on the paper. I don’t know why, but it does! I also ran it through my machine three times and after that, almost all the pieces popped out on their own and the few that were left I used the Take Your Pick Die Brush Tip to roll over the die cut piece and also over the die to get out just a few pieces of paper that remain in the die.

As I said, I planned to use maybe Sponge Daubers to lightly sponge on ink colors on the flowers and leaves over the die, not really being precise, just adding color. But then I grabbed my Stampin’ Blends Markers and had fun coloring the whole thing! I didn’t try to be absolutely perfect but used mostly the brush tips of the markers to quickly color in the different areas. On the really narrow areas, I used the tip ends of the markers. I usually started with the Light color and also added the Dark for a tiny bit of shading. Since I LOVE coloring with these markers I didn’t find the coloring tedious.

To make the banners going across the bouquet, just stamp the greeting in the Hand-Drawn Blooms Stamp Set on a scrap piece of paper. Then line the die up over the stamped greeting (but you don’t need a full piece of paper or you’ll be wasting it). You will end up with the portion with the stamped banners. Then just trim these off the rest of the bouquet and adhere to the bouquet you have just colored. The greetings in the stamp set are doubled-up to fit perfectly on the banner areas. You could also cut out the banners and use stamps from other sets that would fit.

The banners are stamped in Melon Mambo ink. I popped them up on Stampin’ Dimensionals®. I added two Magenta Madness 2020-22 In Color Enamel Dots to the banners.

The whole bouquet is adhered to the card with lots of teeny tiny dots of Multipurpose Liquid Glue. I placed the bouquet on the Silicone Craft Sheet which held it steady and it didn’t matter if a little glue got on the craft sheet.

A good thing to use for delicate die-cuts like this is the Adhesive Sheets which you adhere to the paper before die-cutting and it turns the die-cut into a sticker when you remove the backing paper. I just never think ahead to use it!

Here is another card I made with the Banner Blooms Die using Rainbow Glimmer Paper, another great option if you don’t want to color in!

Remember, we only have about a week left of Bonus Days! When you spend $50 on any order, you will receive via email a $5 Bonus Coupon to use on an order in August. No limit to how many coupons you can earn with every $50 you spend! Bonus Days ends on July 31.

SHOP STAMPIN’ UP! ONLINE HERE!

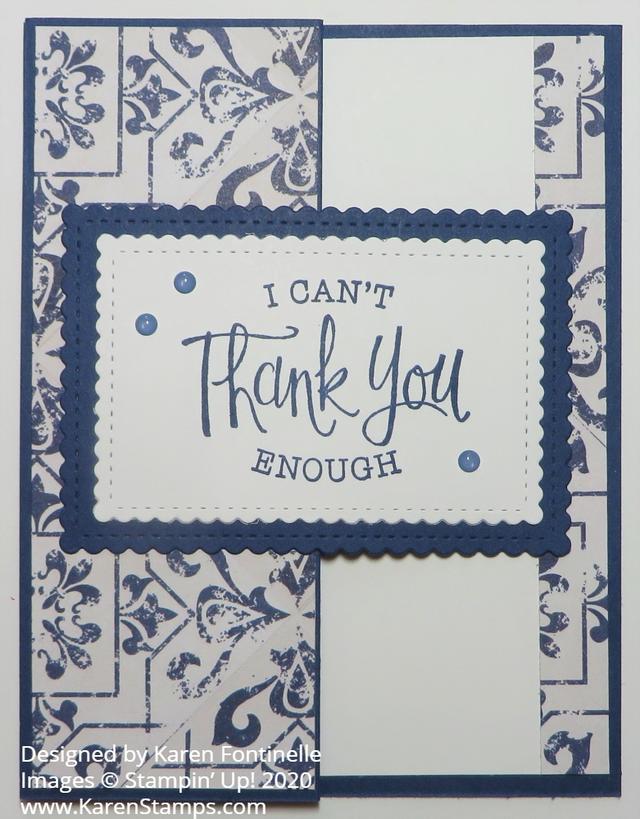
In Good Taste Navy Z-Fold Thank You Card

In Good Taste Navy Z-Fold Thank You Card

I always think it is fun and impressive to make a card with a different fold and this In Good Taste Navy Z-Fold Thank You Card uses the easiest one there is! I was working on another project with this same designer paper which I really like so I used it on this card. You can use any designer paper and change the sentiment for almost any kind of card. You can even change the shape of the greeting layer on the card.

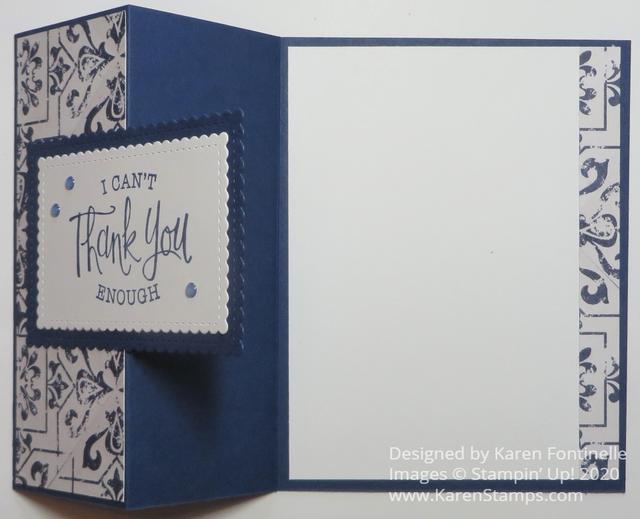
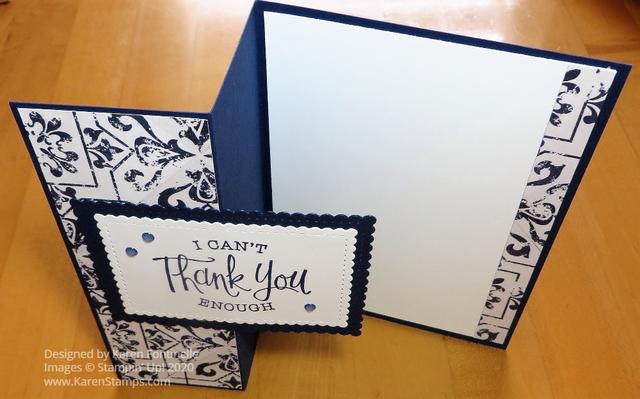
The basic z-fold card is so easy to make! The card base starts off like any card, 8 1/2″ x 5 1/2″, scored and folded at 4 1/4″. But then you will fold the card front back on itself, in half. After scoring the card normally at 4 1/4″, next score the front of the card at half of that, 2 1/8″ and fold that part back like you see in the following photos in this post.

Next, decide on what designer paper you want to use on your card or even stamp the panels you want to add. Just do whatever you like or whatever the occasion requires. This card base is Night of Navy and the designer paper is the In Good Taste Designer Series Paper. This designer paper comes in a large package with many patterns – 12 designs, 2 sheets of each! When I first saw it in the catalog, wasn’t really interested, but after I saw how many different textures were captured on this paper, I was quite intrigued. This Night of Navy print resembles tile or china I think.

Since that folded back front panel measures 2 1/8″ x 5 1/2″, you probably want your designer paper or panel to measure 2″ x 5 3/8″ for a narrow margin around the edge or 1 7/8″ x 5 1/4″ for a wider margin. Figure it just like you would for a card.

Since the cardstock is dark, I added a Whisper White layer inside the card and put a strip of the designer paper along the edge. This was just a scrap, but it is about 1/2″ wide by 5 1/4″.

For the greeting on the front of the card, I wanted to use something kind of large. I chose one from the So Sentimental Stamp Set. It is stamped in Night of Navy ink. The die-cut scalloped rectangles I used are in the Stitched So Sweetly Dies set. When you adhere it to the front of the card, remember to only add adhesive to half of the back of the greeting so it only sticks to that folded front panel and not the rest of the card. If you are going to have a greeting on the inside of the card, you probably want that front greeting to cover up what is inside the card.

For a little bling, I added some Misty Moonlight 2020-22 In Color Enamel Dots. They are not the exact same color as the Night of Navy used on the card, but I thought they were close enough.

I could have added another color with the greeting layer and the enamel dots and ink if I didn’t want it to be the monochromatic look.

Here’s another card I made with the z-fold using really pretty designer paper from 2019, some ribbon, and a different shaped greeting on the front of the card, just to give you another idea.

Here are some other views of this card so you can see how the folds go.

In Good Taste Navy Z-Fold Thank You Card Inside
In Good Taste Navy Z-Fold Thank You Card Folds

Try your hand at making an easy Z-Fold card like this In Good Taste Navy Z-Fold Thank You Card.

SHOP STAMPIN’ UP! ONLINE!