Category Archives: Big Shot

Flower Die Cut Thank You Card with Springtime Impressions

Flower Die Cut Thank You Card with Springtime Impressions

To make this card, I chose the new Garden Impressions 6″ x 6″ Designer Series Paper and picked a coordinating color for the card base, Melon Mambo.  I wanted to see what a designer paper would look like die cut with the new Springtime Impressions Thinlits Dies.  And I think my verdict would be that it looks very pretty! Of course it depends on the paper design, but I chose one that would almost look like I watercolored the die cut flowers. That’s what makes this card so easy, really.  Just run some paper through the Big Shot with this flowery Springtime Impressions Die and you have a beautiful piece to adhere to the card front. Then you are almost done except for adding a greeting and embellishing a little bit if you like.  I can see so many possibilities with this die!  There is also a butterfly die in this set, and that will be really pretty to use as well. Plus this one single little flower that I added to this card!

The greeting is one that is included in the Abstract Impressions Photopolymer Stamp Set and layered on Layering Ovals Fraemelits Dies.  The Abstract Impressions Stamp Set has some nice, and different, greetings in it, not to mention the 2- or 3-step stamping flowers. We had a similar stamp set years ago and the color combinations of ink for stamping the flowers were endless. You don’t have to be precise with stamping the flowers because they are meant to have the “abstract” look!  You can purchase this stamp set and these Springtime Impressions dies in a Bundle, the Abstract Impressions Photopolymer Bundle. Every Bundle saves you 10%!

I could have just had the die cuts and a greeting, but I decided to embellish the card a little bit. I popped the greeting up on Stampin’ Dimensionals and “swished” some Whisper White 1/8″ Sheer Ribbon back and forth behind the greeting. I also added some of the new Share What You Love Artisan Pearls in Petal Pink.

The new Stampin’ Up! 2018-2019 Annual Catalog is LIVE now since Friday so you are free to start shopping!  To see the new catalog online, just go to my catalog page HERE.

If you are interested in purchasing Stampin’ Up! products and would like a complimentary copy of the catalog, please email me at Karen@KarenStamps.com with your contact information. I would be happy to be your Demonstrator!

As you look through the catalog, consider the beautiful Garden Impressions Suite of products. I know you will love using the Springtime Impressions Dies to make easy but pretty cards like this Flower Die Cut Thank You Card with Springtime Impressions.

SHOP STAMPIN’ UP! ONLINE in the NEW CATALOG!!

Quick and Easy Mermaid Card With Myths & Magic

Quick and Easy Mermaid Card With Myths & Magic

Time is running out to get your hands on the stamping products you need to make this Quick and Easy Mermaid Card With Myths & Magic.  Actually, I just noticed time HAS run out on this beautiful Myths & Magic Specialty Designer Series Paper!  It is sold out, just in the last day or two….or an hour ago!  You just don’t know about the items on the retiring list, so best to order what you want as soon as you can.

However, I thought I would go ahead with this card because maybe you already have the paper and can use the idea anyway.  Of course you can use this card idea with any designer paper, ribbon, and greeting! And there are still products in this Myths & Magic Suite in the Occasions Catalog that are on the Last-Chance List that you might want to get.

The card base is Bermuda Bay Cardstock.  I wrapped the Whisper White 1/4″ Organza Ribbon around the designer paper three times. I had thought I would tie a piece of ribbon in a knot on each side of the greeting, but once I had the ribbon tied around, I liked it just that way. You are allowed to change your mind while you are stamping! This ribbon is on the Last Chance List so if you like it and need it, better order it!

The greeting is from the Magical Day Stamp Set in the Myths & Magic Suite.  Even though you can’t get the matching designer paper, the stamp set has the same images that you can stamp and cut out yourself, so it all still works.  Luckily, the stamp set and Magical Mates Framelits Dies come together in a Bundle, the Magical Day Bundle so you can save 10% on the stamp set and dies together.  I stamped the greeting in Memento Black Ink and also in Bermuda Bay ink, then just cut out the tiny banner in Bermuda Bay and glued it over the black greeting. It’s die cut with Layering Ovals.

In addition, in this suite, but on the Last-Chance list, you might want to pick up the Myths & Magic Glimmer Paper and the Myths & Magic Specialty Washi Tape.  This washi tape has glitter!

Be sure to check out the Last-Chance List of retiring Stampin’ Up! products including what is still available in the Myths & Magic Suite in the Occasions Catalog if you want to make a card somewhat similar to my Quick and Easy Mermaid Card With Myths & Magic.

SHOP STAMPIN’ UP! TODAY!


Quick and Easy Gift Bag Idea For Mother’s Day

Quick and Easy Gift Bag For Mother's Day

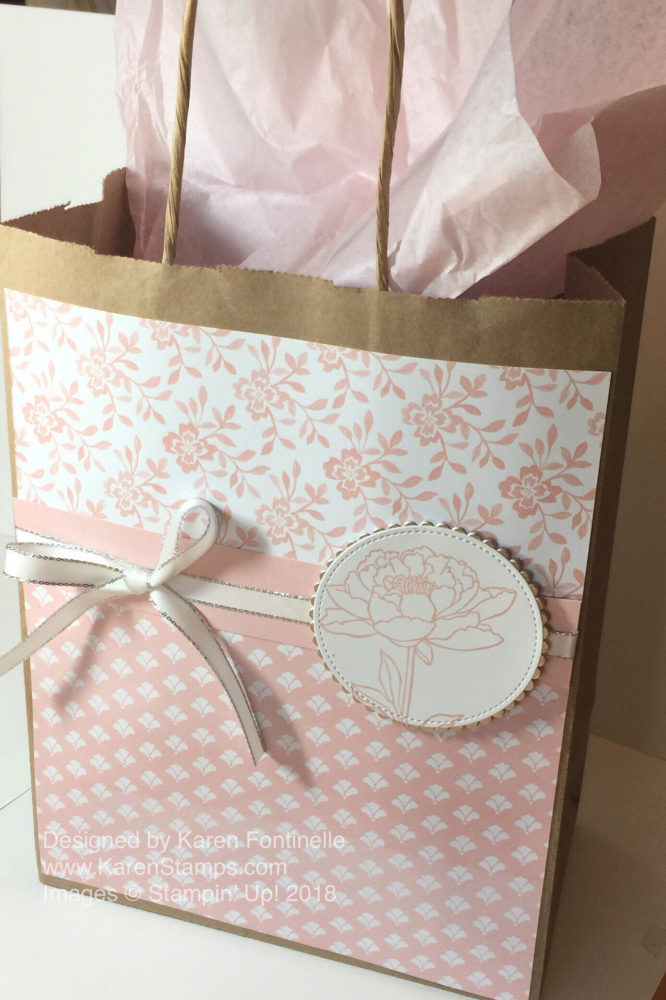
If you need a quick and easy gift bag idea for Mother’s Day or any occasion, this is my favorite project!  Just grab one of those shopping bags you probably have from a store and decorate it!  Even if it has the store’s or business’s name printed on it, you likely will be able to cover it up. This is a great way to recycle these shopping bags we usually save!

Depending on the size of your bag, you will adjust the paper sizes. I just grabbed one sheet of designer paper, cut it the proper width and length, and then cut it into two pieces. In this case, the designer paper is the retiring Fresh Florals (I think it’s sold out!) in the current 2017-2019 In Colors.  The colors are staying but the paper is retiring.  To cover the paper seam, I cut a narrow strip of Powder Pink Cardstock.  Before I adhered it, however, it looked like it needed something, so I added some Silver 3/8″ Metallic-Edge Ribbon and tied a bow. It’s easiest to tie a bow separately and stick on with Mini Glue Dots.

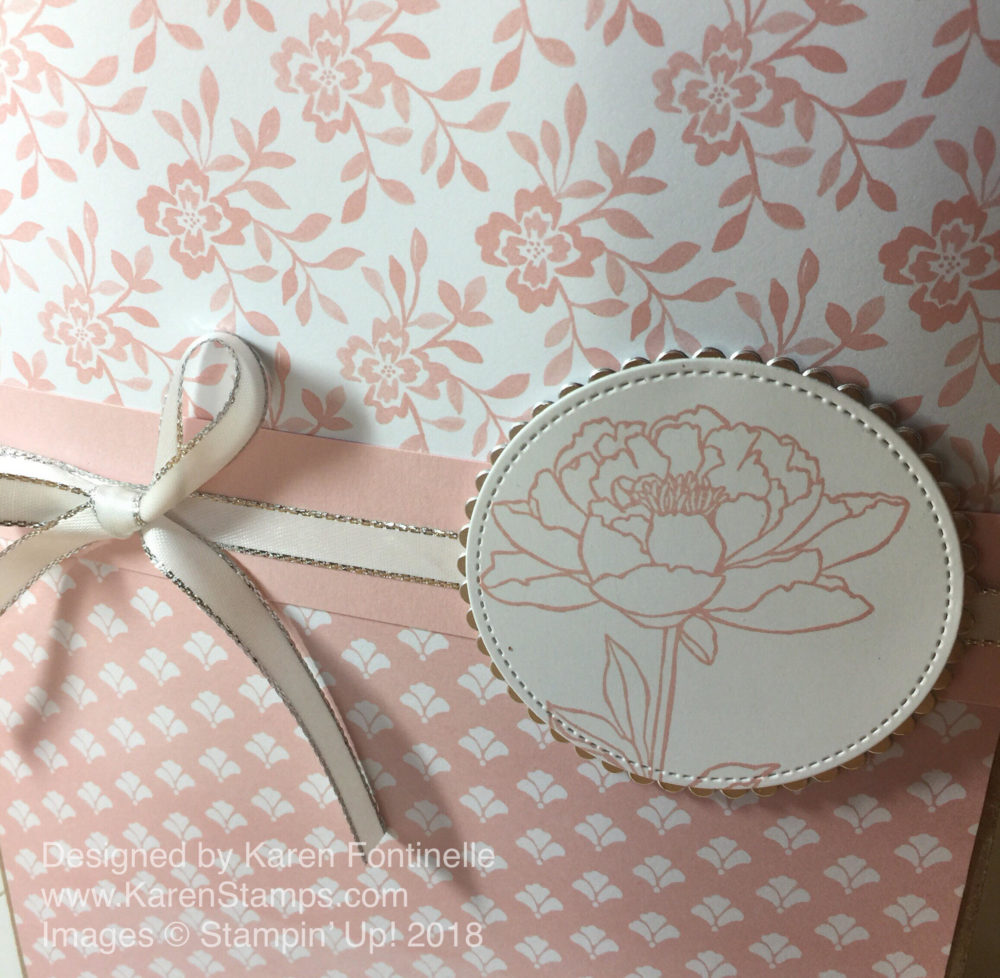
For a little more on the bag, I stamped the retiring You’ve Got This flower just in Powder Pink ink (because I didn’t want to color it in!) and die cut with the Stitched Shapes Framelit Die.  Then to match the ribbon, I layered the die cut shape on a piece of Silver Foil die cut with one of the scalloped dies in the Layering Circle Framelit DIes.  I was planning to put the flower in the bottom corner of the bag, but I then I placed it on the ribbon and liked it better there.  So just play around!

Gift Bag closeup

Even though this paper is sold out, you can use any designer paper or cardstock appropriate for the occasion.  This is a great way to recycle bags like this.  If you don’t have any, you can purchase them at a craft store! Click HERE To see another gift bag I made like this one!

Whenever you need a pretty gift bag, think of this Quick and Easy Gift Bag Idea For Mother’s Day or any occasion!

Petal Passion Just a Note Card

Petal Passion Just a Note Card

I have to admit, the Petal Passion Designer Series Paper was not at the top of my list when the last catalog came out, but I have loved using it as you see on this Petal Passion Just a Note Card.  You can use it as it comes, in plain black and white, or you can do so coloring in, particularly on certain patterns of the paper.

For this card, I started with a card base of Basic Black and layered a piece of Whisper White underneath the designer paper with just a thin margin to help the DSP stand out a bit.  From another sheet of the paper, I chose this one with the small flowers and colored them in with my Stampin’ Blends markers. And then I just cut out around the design with my Paper Snips.  I didn’t try to cut exactly on the lines but left a tiny margin and made sure I didn’t cut a section off.  Then I layered the colored flowers on die cut circles cut from the Layering Circles Framelits Dies out of Whisper White and the Dazzling Diamonds Glimmer Paper.  The greeting is from the Flourishing Phrases Stamp Set.

This is basically an easy card once you know what you are going to make.  However, the Petal Passion Designer Series Paper is retiring as is the Dazzling Diamonds Glimmer Paper so don’t delay if you want some!  Check out the Last-Chance section in the Stampin’ Up! Online Store! You know the rest of May is going to fly by!

SHOP STAMPIN’ UP! ONLINE TODAY!

Embossed Floral Monochromatic Card

Embossed Floral Monochromatic Card

After I received my Share What You Love “Gotta Have It All” Bundle, this Embossed Floral Monochromatic Card was one of the first cards I made because I wanted to try out this new embossing folder.  How easy can it get to make a beautiful card with just an embossing folder and Big Shot?

The embossing folder comes in the largest Bundle, available now to customers as an early release before the new Stampin’ Up! goes live in June. It is called the Lovely Floral Dynamic Textured Impressions Embossing Folder, which means it is one of the heavy, thick embossing folders that really leaves an outstanding impression on your cardstock. It’s a good idea to spritz the cardstock first with water (very fine mist) to loosen the fibers so the embossing folder can do its work.

The paper is the new Grapefruit Grove color, one of the new In Colors for 2018-2020.  After embossing the card layer, all you have to do is add a greeting.  I didn’t add one yet as I was just trying out the embossing folder, but now all I have to do is choose what greeting I want to use when I send the card!

Start looking forward to the new Stampin’ Up! Catalog going live June 1st!  If you are chomping at the bit to buy some Stampin’ Up! products and you do not have a Demonstrator you are working with, please email me and I’d be happy to mail you a complimentary catalog….when I get them!  They are ordered so we just have to wait for them to ship out and get to me!

Check out all the products at Stampin’ Up! including the Share What You Love Bundle, the Last-Chance List, and the bargains on the Clearance Rack!  Soon you will be making cards like my Embossed Floral Monochromatic Card!

SHOP STAMPIN’ UP! ONLINE TODAY!

Easy Birthday Memories Birthday Card

Easy Birthday Memories Birthday Card

Here’s an Easy Birthday Memories Birthday Card that you could make with the delightful Birthday Memories Designer Series Paper if you get it before it retires!  I love red so I was particularly drawn to this pattern in the package!  There also is a coordinating framelits set that goes with this paper.

The Birthday Memories Designer Series Paper is unique because there are some framelit dies that fit some of the images in the paper so you can die cut those. These Birthday Friends Framelits Dies also coordinate with the Birthday Delivery Stamp Set. And the best part is that if you like all three of these items – the paper, the stamp set, and the dies – you can purchase them all in a Bundle and save 10%.  It’s the Birthday Delivery Photopolymer Bundle.  It’s almost always a good idea to go ahead and buy the bundle so you have everything you need! Stampin’ Up! does such a good job of coordinating lots of products with images and colors.

To make this card, I started with a Real Red card base.  If you are following the new Color Revamp, Real Red is not retiring, it is being moved to the Regals color family! Kind of surprising to me, but we’ll see how it works!  As long as they aren’t getting rid of Real Red!

Real Red is actually what taught me the quality of Stampin’ Up! products way back when I was a new customer. I saw no need to purchase the Stampin’ Up! cardstock and went to a craft store to buy paper at a discount.  I was thrilled to find a whole package of red cardstock AND envelopes!  What a deal!  But when I learned how that “red” compared to the Stampin’ Up! Real Red I could tell there was NO comparison!  Stampin’ Up! had the better red by far!  Even more than “by far”!  In my opinion, it is the BEST red anywhere!

I chose this red piece of designer paper for the card front and layered it on a piece of Whisper White with a thin margin, just to help it stand out against the Real Red card base.  Then I die cut a cake from the designer paper with a framelit. Next I needed something to make the cake stand out a bit, so I layered it on a Stitched Shapes Circle Framelit and even layered it lower on the circle rather than in the center. I don’t know why, but I liked it better in that position.

For some bling, I added the Silver 3/8″ Metallic-Edge Ribbon just adhered back and forth behind the circle piece. Then this whole focal piece is popped up on Stampin’ Dimensionals.

For the greeting, which didn’t fit on the circle as I had originally planned, I chose one from the Happy Birthday Gorgeous Stamp Set.  I also stamped “It’s Your Day” and “Happy Birthday” on a piece of Whisper White inside the card.  I could have used a greeting from the coordinating Birthday Delivery Stamp Set, but I happened to have this other stamp set handy.

So all in all, this is an easy birthday card to make, and easy enough to use the layout and just change up the theme and greeting by changing the paper and the sentiment.

This Bundle and all the separate pieces are on the Last Chance List of retiring products, so these will only be available until May 31 at the latest, while supplies last!

SHOP STAMPIN’ UP! FOR ANY PRODUCTS YOU HAVE HAD ON YOUR WISH LIST!

Eclipse Technique 16th Birthday Celebrate Animals Card

Eclipse Technique 16th Birthday Celebrate Animals Card

Sometimes you can just copy yourself as I did with this card because I love this stamp set and wanted to try the Eclipse Technique for a 16th Birthday card with the We Must Celebrate Animals!  Maybe not quite your typical 16th birthday card, but it was what I was in the mood to make that day! I love this stamp set and thought I would try the Eclipse Technique with the numbers.

Sadly, the We Must Celebrate Stamp Set is retiring the end of May.  I didn’t purchase it at first when it came out in the Occasions Catalog, but then I fell in love with it when I saw a lot of samples using it online.  Isn’t that what always happens?!  I even was so daring as to cut the animals apart carefully so I could use them separately, or even put them back together side by side on the acrylic block to stamp this card.

To do the Eclipse Technique, stamp the front of the card first, the do the die cuts. This must be a separate layer so that a darker layer will go underneath to make the numbers show up.  The darker layer underneath can either be the card base itself or just hide a darker layer underneath! After being die cut with the Big Shot, the numbers are then replaced in the space and popped up on Stampin’ Dimensionals.  I used the Large Numbers Framelits Dies, which I am also sad to report are retiring!  They are so great to use for birthdays and anniversaries and other special occasions, like graduations.  The coordinating stamp set, Number of Years Photopolymer Stamp Set is also going out.

Eclipse Technique 16th Birthday Celebrate Animals Card closeup

The card base is Whisper White Cardstock with a layer of Marina Mist.  I put a small layer of Basic Black behind the die cut numbers. The front of the card is colored in with Stampin’ Blends Markers.  The grass is stamped with two stamps from the Sheltering Tree Stamp Set.  First I stamp the large swath of grass and then I go back and stamp with the blades of grass stamp.  Maybe I fill in the empty spaces with a little bit of brown for a little dirt or even another shade of green.  The die-cut “Celebrate” is in the Celebrate You Thinlits Dies that were available during Sale-A-Bration, BUT this set will also be available in the upcoming Stampin’ Up! Catalog.

If you would like to see the same card I made without the Eclipse Technique, please click HERE.

If you love this animal stamp set, be sure to check it out on the Last-Chance list and get it before it is gone!

Some retiring items are already sold out, but you can see the ones that are still available by checking the Online Store rather than depending on the written list.

Try the Eclipse Technique on a card using whatever dies you think you can use, something like my Eclipse Technique 16th Birthday Celebrate Animals Card.


Easy Birthday Memories Birthday Cards

Easy Birthday Memories Birthday Cards

Images © Stampin’ Up! 2018

Take some time to make an assortment of easy Birthday Memories Birthday Cards using the Birthday Memories Designer Series Paper.  This paper, along with the coordinating Birthday Delivery Stamp Set and the Birthday Friends Framelits Dies.  All of these products are on the Last-Chance List of retiring products so don’t delay if you are interested!  And you can buy the stamp set, paper, and dies in a Bundle and save 10%!

The card with the vintage little girl is a z-fold card. All this means is you make the card base as usual, but then score the front of the card base at 2 1/8″, which is down the middle of the 4 1/4″ card front, and fold it back.  So, in essence, you just fold the front of the card back on itself in half!  Then add a front panel of whatever size you like, mainly one that will hide the greeting that you will stamp on the inside!  You can decorate each panel with designer paper or stamp as I did on the front panel.  That little girl always reminds me of paper dolls I used to have as a kid!

The card with the cakes doesn’t need much else since the paper pattern is so bold!  It makes you hungry just to look at that paper with all the beautifully decorated cakes!  Just adhere a layer of the designer paper to the Pacific Point card base with a Real Red layer in between to help the paper stand out.  The greeting is stamped in Real Red with a greeting in the stamp set and die cut with the Stitched Shapes Framelits Dies and layered on a scalloped oval in the Layering Ovals Framelits Dies.  This is popped up on Stampin’ Dimensionals with a bit of Gold Metallic Thread would around behind the greeting in a little “nest”.

The third card uses a simpler pattern in the Birthday Memories package and the birthday fox is die cut right from another piece of the designer paper!  How handy is that?!  You don’t even have to stamp and color the image! To spotlight him and his banner, stamped with a greeting from the stamp set, I die cut a large circle with the Layering Circles Framelits Dies.

All of these cards are pretty quick and easy to make, especially if you just copy mine and don’t think about a design.

Here’s another popular card I made earlier in the z-fold style.  It’s such an easy way to make a card yet the recipient will think you are a true designer!

If you are interested in any of the products in this birthday bundle, be sure to check if out in the Stampin’ Up! Online Store!  Then you, too, can make cards like these Easy Birthday Memories Birthday Cards!

Lovely Inside and Out Multicolored Thinking of You Card

Lovely Inside and Out Multicolored Card

This Lovely Inside and Out Multicolored Thinking of You Card will certainly brighten up your day with the colors I chose! This is one of the stamp sets that is retiring, but I haven’t stamped with very much.  So sad!

What I was really interested in when I bought this Lovely Inside and Out Bundle was the Lovely Words Thinlits Dies.  You can use these dies in many ways, either like I did on the front of this card, just cutting out the word and shape out of a piece of rectangular paper. Or you can cut the word out by itself. You could have used another heart die on the outside of this die to make it an outline heart with the word inside.

Remember, Bundles in the current catalog will all retire as “Bundles”….in some cases, the stamp set and dies will continue on in the new catalog but separately (as there will be Bundles of the new products in the new catalog). In this case, with the Lovely Inside and Out Bundle, the stamp set and dies are all actually retiring, not just the Bundle configuration. So if you want to save 10% on any Bundles in the current catalog or Occasions Catalog, get them now and save 10% before May 31.

This card has a card base of Powder Pink. The Whisper White layer is stamped with two In Colors, Powder Pink and Lemon Lime Twist plus  some So Saffron thrown in for a third color.  The stamp set is called Lovely Inside and Out.  The die cut piece is layered over a piece of Lemon Lime Twist, but to add a little interest in the background, I stamped the scattered dot image in the stamp set, even stamping off first (when I remembered!!). This would make a great shaker card, too, but I was making something simple.  For a bit of bling, I used some Tutti-Fruitti Adhesive-Backed Sequins.  

You could use this card to send just as a “happy” card to send to a friend or someone you know. You never know who could really use a card on the day that it arrives in their mailbox! They won’t care if it is a simple card, just that you thought of them.

Remember, don’t wait too long on retiring products that you want, especially the ones you REALLY want!  Or ask me if something is showing as “Low Inventory” so you can get your order in right away.

Here are the products that are already sold out as of early this morning:

Make some “happy” cards today and mail them out to people!  Whether you hear back or not (and you probably will!) you will have the satisfaction of brightening someone’s day, not to mention the good therapy stamping cards will be for you! Use this Lovely Inside and Out Multicolored Thinking of You Card as your inspiration!

Shop Stampin’ Up! Online!

Check out the Stampin’ Up! Last-Chance Retiring Products!

Stampin' Up! Retiring List Logo 2018

It’s time to shop for the Stampin’ Up! Last Chance Retiring Products!  This includes products from both the Annual Catalog AND the Occasions Catalog!

If it is a lazy, rainy Saturday (or a bright, sunshiney one!) and your taxes are done, take some time to peruse your Stampin’ Up! Annual Catalog and Occasions Catalog and make up your order of retiring (and other!) products that you want before they are gone!

If you don’t have those catalogs and don’t have a Demonstrator you work with and want the hard copies in your hands, please email me at Karen@Karenstamps.com and I’ll put them in the mail to you for your last minute shopping!

Click HERE!  Check out the products in my Stampin’ Up! Online Store!

See things you want?  Don’t hesitate or they might be gone!

Click HERE for the PDF of Annual Catalog Retiring Products!

Click HERE for the PDF of Occasions Catalog Retiring Products!


Relax this weekend and check out the Stampin’ Up! Last-Chance Retiring Products!

Make a Mini Treat Bag Birthday Card

Mini Treat Bag Birthday Card

Make a Mini Treat Bag Birthday Card quick and easy using the Mini Treat Bag Thinlits Dies which are retiring!!  So sad!  I have loved these Mini Treat Bag dies since they came out and have encouraged everyone to buy a set!

You can use these dies to make more than just a treat bag!  Many times I make the bag plus a card to put inside, all of which makes up the greeting card as you see above.  You can also fold the top over and hold closed with a ribbon or belly band with a small gift or candy inside. So many different options.

To make this Mini Treat Bag Birthday Card, I used the Painted With Love Specialty Designer Series Paper.  This paper is in the Occasions Catalog and is retiring. You might have thought it was only for Valentine’s Day since it was in the Occasions Catalog, but this paper can be used lots of ways. Here I did choose the paper with the little hearts because I think it is such a cute pattern. Then I could coordinate with the heart die cut in the MIni Treat Bag Thinlits Dies and also the Watercolor Words Stamp Set.  This stamp set is also on the retirement list and is one of my favorites! I’ve always loved the font, the size and the greetings and images themselves in this set.

I used our Tear & Tape Adhesive, which is staying, to adhere the bag. The die cut puts score lines on the paper so it is easy to assemble.  I used Melon Mambo cardstock for the card inside and the heart on the front, plus Gold Foil for the other heart.  Very quick and easy!  I could even embellish the front of the card more if I wanted to.

See how I made a little treat bag for Halloween in THIS POST by folding over the top of the bag!  You can use the Search box on the right side of my blog to find more examples using the Mini Treat Bag Thinlit Dies.  They are so fun!  I don’t know what will take their place for me!  But we have to give up old products to make room for the new!

Mini Treat Bag Birthday Card with Hearts

Check out the Last Chance Products in the Stampin’ Up! Online Store so you don’t miss out on any of the great retiring products!

You just might want to make a Mini Treat Bag Birthday Card like this one for someone special!


The Stampin’ Up! Last Chance List of Retiring Products Is Here!

Stampin' Up! Retiring List Logo 2018

It’s time to shop for the Stampin’ Up! Last Chance Retiring Products!  This includes products from both the Annual Catalog AND the Occasions Catalog!

Click HERE!  Check out the products in my Stampin’ Up! Online Store!

See things you want?  Don’t hesitate or they might be gone!

Click HERE for the PDF of Annual Catalog Retiring Products!

Click HERE for the PDF of Occasions Catalog Retiring Products!

Sadness and fun at the same time!  I hate to see some of my favorite products leave, but Stampin’ Up! never disappoints!  There are always great new products on the horizon!

Leave a comment below if if you have any questions or opinions of the list! Or email me at Karen@Karenstamps.com.


Petal Palette Narrow Note Cards and Envelopes

Petal Palette Narrow Note Cards and Envelopes

One of the fun new products in the Occasions Catalog are the Narrow Note Cards & Envelopes, so I made these Petal Palette Narrow Note Cards and Envelopes using the Petal Passion Designer Paper and the Petal Palette Stamp Set.

These Narrow Note Cards and Envelopes are just the right size for some stamping fun! I used a sample in the catalog for inspiration (that means to copy!) I cut a piece of the Petal Passion Designer Paper just a tiny bit smaller than the note card to layer on top.  Then I stamped some flowers from the Petal Palette Stamp Set, colored them in, and die cut with the Petals & More Thinlits Dies.  I also die cut a Whisper White circle with the Stitched Shapes Framelits Dies for a background for the flowers.  The flowers on the note cards on the left and rght are popped up on Stampin’ Dimensionals.

The note card in the middle is simply stamped, no die-cutting! I stamped the flowers, colored in with Watercolor Pencils and a Blender Pen. I’ve loved the Blender Pens since I started buying from Stampin’ Up! as a customer!  So they have been around almost forever! Trying to blend the bluish background I had scribbled in, though, was making my paper pill a tiny bit since I was just using Whisper White so Blender Pens are really perfect for smaller areas, like the flowers and leaves, unless you use some other kind of paper, like Watercolor Paper or Shimmery White Paper.

The note card with the blue flowers is colored with Stampin’ Blends markers.  These markers were taken out of the Online Store temporarily. due to supply issues. Hopefully they will be back around the time of the new catalog Fingers crossed! The greeting from the Petal Palette Stamp Set is stamped and then the words cut apart to adhere them on the card. I don’t often think of doing a greeting this way, but it’s a cute idea, something different!

The note card with the pink flowers is colored with a drop of ink refill and my Aqua Painter.  That really is almost all you need for coloring, is a drop or two of ink refill.  You can put that drop in the ink pad lid, on an acrylic block, or on top of the stamp case. The just pick up the ink with the Aqua Painter (make sure you don’t have too much water coming out of your Aqua Painter.  Wipe it off on a towel if you do.) and color.  I love using the Aqua Painter.  You get two in the package.  One has a larger brush and one a smaller brush.  I almost always use the smaller brush.

So even without the Stampin’ Blends alcohol markers, there are other ways to color with Stampin’ Up! products.  It just depends on which method you prefer!

And don’t forget to stamp a few leaves on the note card envelopes!  Remember, these note cards are too small to mail in these envelopes, they are more suited to put with a gift in person or just hand to someone  However, you could also put the narrow note card in a larger envelope and mail. There are always choices!

Shop Stampin’ Up! Online for all sorts of stamps, paper, ink and accessories for your papercrafting projects. Use my ideas with these Petal Palette Narrow Note Cards and Envelopes to make some cards of your own!

Petal Passion Black and White All-Occasion Card

Petal Passion Black and White All-Occasion Card

One of the prettiest products in the Occasions Catalog this spring is the Petal Passion Suite with which I made this Petal Passion Black and White All-Occasion Card.  I have seen so many beautiful cards made with the products in this suite!  It all has that watercolored look, so popular right now!

I had actually already colored this flower on one of the patterns from the Petal Passion Designer Series Paper awhile back.  I used the Stampin’ Blends markers, which unfortunately are not available right now, but hopefully will return maybe in June. You don’t have to have those markers to duplicate this card, though, just use another coloring technique such as the Watercolor Pencils, ink pad and Sponge Daubers, ink refills and Aqua Painter.  You can read the post about my coloring therapy with this paper HERE.

When I saw in my package of Petal Passion papers that I had already colored this flower, I just cut it out and cut the leaves off separately. I chose the white polka dot paper in the collection as the top card layer and layered it on Rich Razzleberry Cardstock since that was what color I had made the flower.

I adhered the flower to the cardfront with Stampin’ Dimensionals to pop it up a little bit and adhered the leaves just flat to the card with Snail Adhesive. For a little pizzazz I found a small  gold doily in the package of Metallic Foil Doilies and cut it in half. Then I adhered each half behind the two sides of the flower.

The greeting is from the Petal Palette Stamp Set.  I think it is such a sweet saying.  It is stamped and then die cut with the Stitched Shapes Framelits Dies and layered on a larger scalloped Layering Oval Die. You could put almost any greeting on this card.  It would suit a lot of occasions.

You will love the stamp set and designer paper in the Petal Passion Suite, not to mention the Petals & More Thinlits Dies.  I always forget about these dies for some reason! Order the products you want from this Suite in the Stampin’ Up! Online Store and make some cards like this Petal Passion Black and White All-Occasion Card.


Oh So Eclectic Springtime Card With Flowers

Oh So Eclectic Springtime Card With Flowers

Images (c) Stampin’ Up! 2018

Somehow this Oh So Eclectic Springtime Card With Flowers came together this morning.  I think I am having withdrawal after Sale-A-Bration ending! Plus we had been on vacation in Arizona for a week, and as of last night I thought I had lost all my mojo, even dropping an ink pad on the floor (luckily it landed ink pad up!).  After thinking so much about the free Sale-A-Bration products, it’s time to go back to the Stampin’ Up! Annual Catalog! Somehow this stamp set and dies, plus paper, popped into my head, but I waited until this morning when perhaps I would remember how to stamp a card!!!

The card base is Peekaboo Peach, one of the In Colors that will be retiring soon. Honestly that group of In Colors wasn’t my favorite so I need to use up some of the cardstock!  If you don’t know what colors to use together, take a look on the back of the package of Designer Paper and see what coordinating colors could be used together.  I chose the Naturally Eclectic Designer Series Paper and Berry Burst was one of the coordinating colors. I used Berry Burst for the layer underneath the Whisper White.

Next I used the Eclectic Layers Thinlits Dies to cut out the rectangular shape and some flowers. You can purchase the Oh So Eclectic Stamp Set along with the dies and save 10% off the purchase price in the Oh So Eclectic Bundle.

And finally I added some Peekaboo Peach 5/8″ Crinkled Seam Binding Ribbon as an embellishment.  This is a fun ribbon to use!  It has a nice feel and the crinkled look is something different.  And it will probably retire since Peekaboo Peach is one of the retiring In Colors. (I assume!)

I left off the greeting until I decide which one I want to use on this card.  It could be almost any occasion, the colors and designer paper have such a happy look to it. Oh, and behind that die cut design I cut a piece of the Naturally Eclectic Designer Paper to adhere behind the open design.  The multi-colored pattern I choose makes a colorful background!

Fun card to make and the die cuts make it easy! Whether you stamp or use die cuts, you can make something springy and happy like this Oh So Eclectic Springtime Card With Flowers.

SHOP STAMPIN’ UP! ONLINE TODAY!