Category Archives: Big Shot

Easter Basket of Flowers Card on a Basket Weave Background

Easter Basket of Flowers Card on a Basket Weave Background

Images (c) Stampin’ Up! 2018 Design by Karen Fontinelle

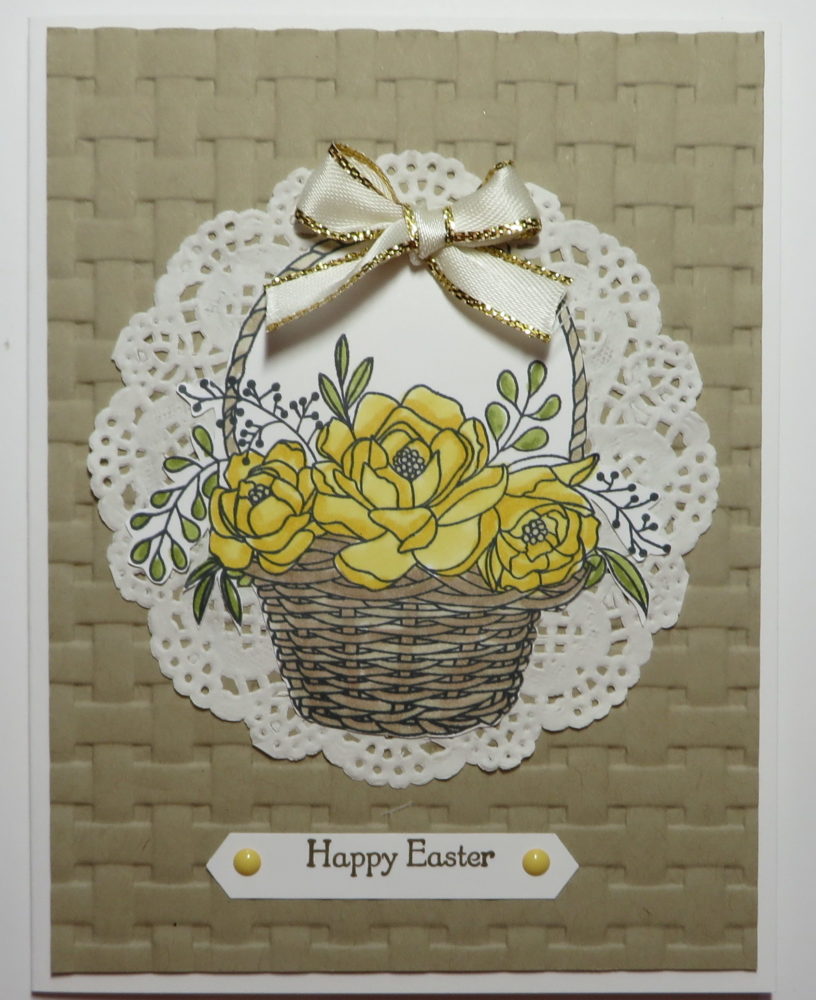
Easter is fast approaching so you might enjoy making an Easter Basket of Flowers Card on a Basket Weave Background. Even if you don’t have these exact supplies, this card might give you an idea for your own creation with whatever supplies you own!

I’ve said it before, but I’ll say it again.  This Basket Weave Dynamic Embossing Folder works magic on a plain piece of cardstock!  You will just gasp when you take the paper out of the folder and see the deep embossing that looks like basket weave!  For best results, spritz some water lightly on the cardstock first, or some people recommend spritzing rubbing alcohol. Rubbing alcohol tends to dry faster but really by the time I run the paper through the Big Shot and work on my card, my paper is dry.  Don’t get it “wet”…just spritz it.

The Basket Weave Folder is available in a Bundle with the Blossoming Basket Stamp Set during Sale-A-Bration with a $100 purchase. And if you would rather pay for it in the future, you will be able to buy the Embossing Folder in the new Stampin’ Up! Annual Catalog.  Either way, I think you will LOVE this embssoing folder!  And of course it is perfect for Easter and Spring cards!

For this card, I embossed Crumb Cake Cardstock for the basket weave background and adhered that to a card base of Whisper White Cardstock.

The basket of Easter flowers is stamped with the Blossoming Basket Stamp Set and colored in.  Even though the Stampin’ Blends markers are not orderable right now, you can use other coloring techniques like the Watercolor Pencils and Blender Pen.  I cut out the basket just around the outside and left the part inside the handle alone. I don’t think it takes anything away from the look of the basket.  Besides, the pretty bow at the top of the basket will catch the eye of anyone looking at the card!  The ribbon is the Gold 3/8″ Metallic-Edge Ribbon.

And for a little something to set off the basket, I pulled out a doily from my stash!  Sometimes a doily or even a piece of a doily is just what a card needs!  This one is the Delicate White Doilies by Stampin’ Up!  I really like the look of the doily on this card!

The greeting is from Teeny Tiny Wishes, the stamp set that has practically every greeting you will need!  It’s punched with the Classic Label Punch and accented with two Enamel Shapes.

There you have it! A card you could use for Easter, for spring, for a birthday, anniversary, and more! Make a card you can send someone for Easter or another occasion like this Easter Basket of Flowers Card on a Basket Weave Background.

Sale-A-Bration Ends March 31st!


Springtime Foils All-Occasion Butterfly Card

Springtime Foils All-Occasion Butterfly Card

This Springtime Foils All-Occasion Butterfly Card  can suit almost any occasion, it would even make a pretty Easter card with an Easter greeting or springtime.  After all, it uses the Springtime Foils Specialty Designer Series Paper, still available this week during Sale-A-Bration.

This is another card I made the the other day when I was making a stack of cards with the Springtime Foils Paper.  This paper is so pretty you almost don’t need to do anything else to it except add a greeting if you like. On this card, I used two different patterns of the paper, side by side (with a tiny bit of overlap). I also colored in the flowers with some of the Stampin’ Blends alcohol markers that unfortunately are not available right now until they get them restocked.

The butterfly is cut with a die we’ve had for awhile, the Butterflies Thinlits Dies. Some dies are just classic and can be used for a lot of things.  This is one of them. I cut the butterfly out of the Copper Foil Sheet.  All of our foil paper is so gorgeous!

The ribbon adds something to the card.  Sometimes I have to remember to tie it around the paper before I glue it down to the card!  This ribbon is the Pool Party 3/8″ Shimmer Ribbon.  Very pretty!

Here is the card from the other day that I made using the Springtime Foils paper and the butterfly.

All this card needs is a greeting before you put it in an envelope!  And really, I think it could just go the way it is and you can write a personal note inside or a greeting.  Not every card has to have a greeting on the front, but that’s what we usually do.

You could make a card design like this with any designer paper you have.  Get into your stash and see what you can make, something like this Springtime Foils All-Occasion Butterfly Card.

Last week for Stampin’ Up! Sale-A-Bration!  Ends March 31.


Make an Easter Card With a Basket of Flower Blossoms

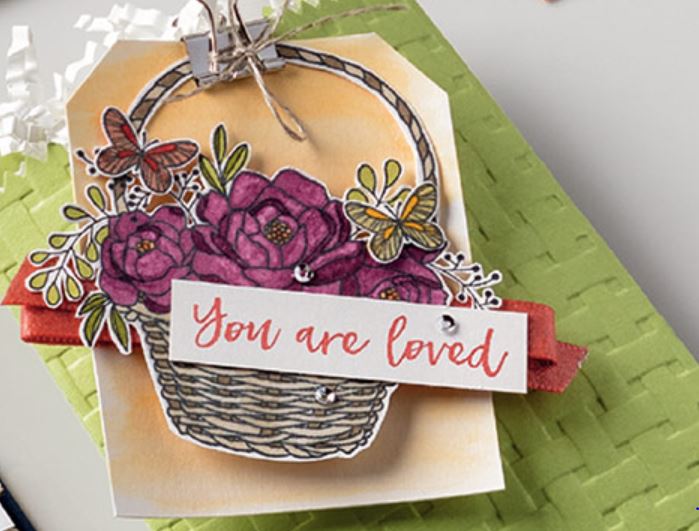
Easter Card With a Basket of Flower BlossomsMake an Easter card with  a basket of flower blossoms using the beautiful stamp, Blossoming Basket. You can earn this stamp set free during Stampin’ Up!’s promotion called Sale-A-Bration! With a $100 purchase, you can earn not only this Blossoming Basket Stamp Set but also the Basket Weave Dynamic Textured Impressions Embossing Folder. Check out the Blossoming Basket Bundle.

The card base is made with Crumb Cake Cardstock. Then I chose Blushing Bride for a pink background layer and embossed it with the Basket Weave Embossing Folder.  I am still saying “Wow!” every time I open up that embossing folder and take out the embossed paper! The Dynamic heavyweight folder really embosses the paper into a deep basket weave!  It’s best to spritz the paper with a little bit of water or rubbing alcohol to dampen the paper fibers to allow for the deep embossing.  It really is stunning!

I stamped the basket with Memento Ink on Whisper White Cardstock, and enjoyed coloring everything in with my Stampin’ Blends alcohol markers

  • Unfortunately, Stampin’ Up! just announced that they will turn off the ordering for these markers on Friday, March 23 at Noon (MT). The good news is that so many people love these markers that they were selling like hotcakes, but the bad news is that was happening at the same time as factories were shutting down in China for Chinese New Year and whatever other difficulties the supplier was having to keep up with the demand. So to take some time to catch up, Stampin’ Up! is making the markers unorderable until the supply is restocked probably the end of May.  You can try getting some of the markers that you want before Friday and get the rest later on.  This way you can still take advantage of Sale-A-Bration even if you have to wait for all your markers.  But do it before the deadline tomorrow!

I die cut the Whisper White paper with the basket using the Lots of Layers Framelits Dies. The Easter greeting is from Teeny Tiny Wishes.  The bow is tied with the Powder Pink 3/8″ Shimmer Ribbon.  And for a bit of embellishment, I adhered two little Subtles Enamel Shapes to the ends of the greeting.

If you want to see one of the first cards I made with this folder and stamp set, please click HERE.

This Basket Weave Embossing Folder is going to be available in the new Stampin’ Up! catalog, if you happen to  miss out during Sale-A-Bration. I’m not sure about the Blossoming Basket Stamp Set, but it will not be bundled with the Folder even if it is.

Of course this Easter Card With a Basket of Flower Blossoms is not just for Easter, just change the greeting or don’t even put on a greeting and you have a beautiful card for any occasion!

How to Make a St. Patrick’s Day Shamrock Card

St. Patrick's Day Shamrock Card

It’s very easy to learn how to make a St. Patrick’s Day Shamrock Card!  Just use hearts! Whether you have a heart punch, heart dies, or simply cut them by hand, put three or four hearts together and you have a lucky shamrock for St. Patrick’s Day!

My card today has a base of Old Olive Cardstock and a layer of a pattern from the Color Theory Designer Series Paper Stack. It provides a greenish background for St. Pat’s but is still neutral enough to add other designs on top.

To make shamrocks, just use hearts!  Or even stamp three hearts together in the shamrock shape and draw on a stem. For my larger shamrocks, I used the Sweet & Sassy Framelits Dies to die cut three hearts each, and then I just cut a stem with my Paper Snips.

For the little shamrocks, I used the strip of hearts die in the Mini Treat Bag Thinlits DiesThat die is great because you can cut seven hearts in one pass! I didn’t do a very good job on my stems, maybe I should have just drawn them in!

I thought the Gold 1/8″ Ribbon around the bottom for an accent. This has been one of my favorite and most useful ribbons of all time! I always have some on hand. Beginning tomorrow, Stampin’ Up! is adding some catalog items that can be chosen for a Sale-A-Bration reward, and this gold ribbon is one of the choices with a $50 purchase!

I still wanted a little more gold on my card, so I added the Painted Love Gold Vinyl Stickers little hearts. These are high quality, beautiful stickers.  Might be worth keeping some in your stash for those times when you need a little something on a card or project.

Beginning tomorrow, March 15, Stampin’ Up! will have even more choices for the end of Sale-A-Bration (yes, the end is near….March 31st!). There are certain catalog products that you can choose with every $50 or $100 purchase as your free reward item.  You must use the number provided on this flyer below, not the catalog number, so be sure you are not charged for the item and then you know you did it right! The page isn’t set up yet, so I don’t know how it will look on the ordering system.

MORE CHOICES FOR SALE-A-BRATION! STARTS MARCH 15.

Easter Bunny Tiny Treat Box For Candy

Easter Bunny Tiny Treat Box For Candy

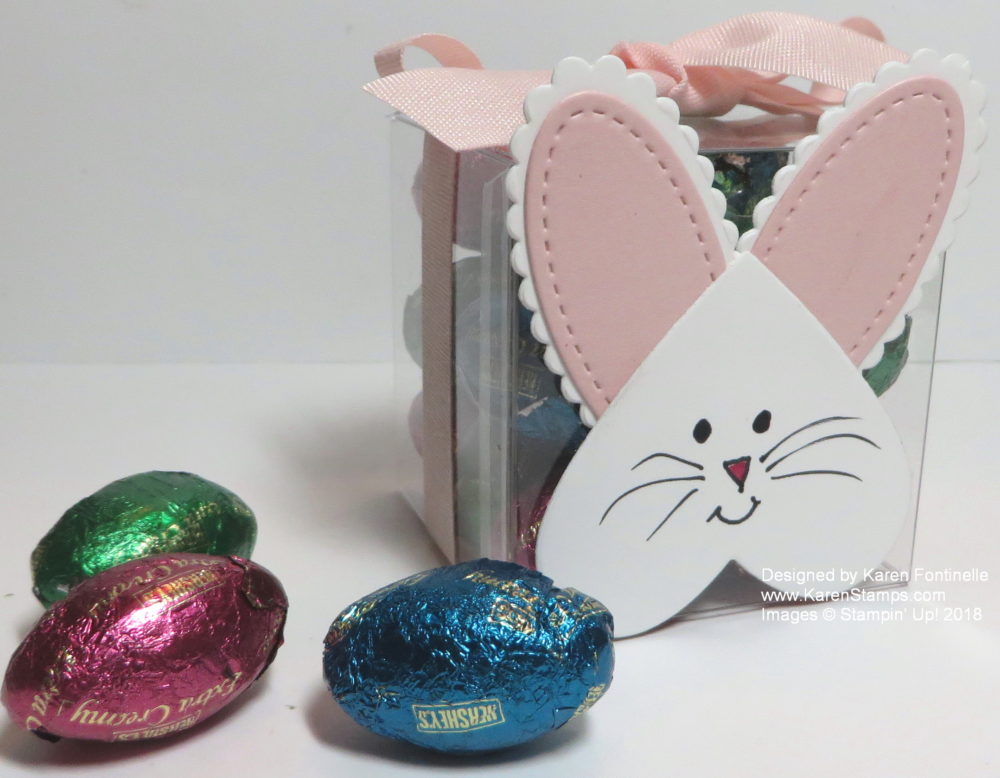
Here’s a fun Easter Bunny Tiny Treat Box for candy or even a small Easter gift! It’s so handy to keep some of the Clear Tiny Treat Boxes on hand for making cute little treat boxes or party favors like this one for any occasion.

The Clear Tiny Treat Boxes come flat so storage is not a problem.  They are small, just 2″ x 2″ x 2″ and even food safe.  But that size is big enough to make a cute project out of them.  Just assemble when you are ready and fill with your special treat or gift!

For Easter, I made this cute punch art bunny!  Just use one of the heart die cuts in the Sweet & Sassy Framelits Dies for the bunny face, or you can use a heart punch if you have one the right size.  For the ears, I used a small oval from the Stitched Shapes Framelits Dies and then layered on a scalloped oval die cut from the Layering Ovals Framelits Dies.  I just drew on the face myself.  Use oval punches for the ears if you prefer.

After you put the treat in the box, just tie with a ribbon! I used the Powder Pink 1/2″ Finely Woven Ribbon, which is a beautiful light pink color and has such a nice feel to it. In fact, I think I have used up my roll so it’s time to order more!

Speaking of ribbon, if you need or want any of the 2016-2018 In Colors that will be retiring in May (at least if Stampin’ Up! follows their usual routine!), whether you need ink refills, cardstock, any ribbon with those colors or designer paper (well, usually most designer papers retire!), I would suggest ordering what you need in those In Colors right now before everyone else is thinking about it.  As soon as that retirement list comes out, people rush to order, especially the ink refills, and later on you will end up paying a higher price on an auction site! I know it is early to think about retiring products and the list won’t come out until May, but that’s only a month and a half away!  Beat the rush so you won’t be disappointed.

But right now, we have Easter coming up, so if you want some easy cute treats for your family, your guests, teachers, co-workers, try this Easter Bunny Tiny Treat Box and impress everyone!

Animal Critters Celebrate With We Must Celebrate Stamp Set

Animal Critters Celebrate With We Just Celebrate Stamp Set

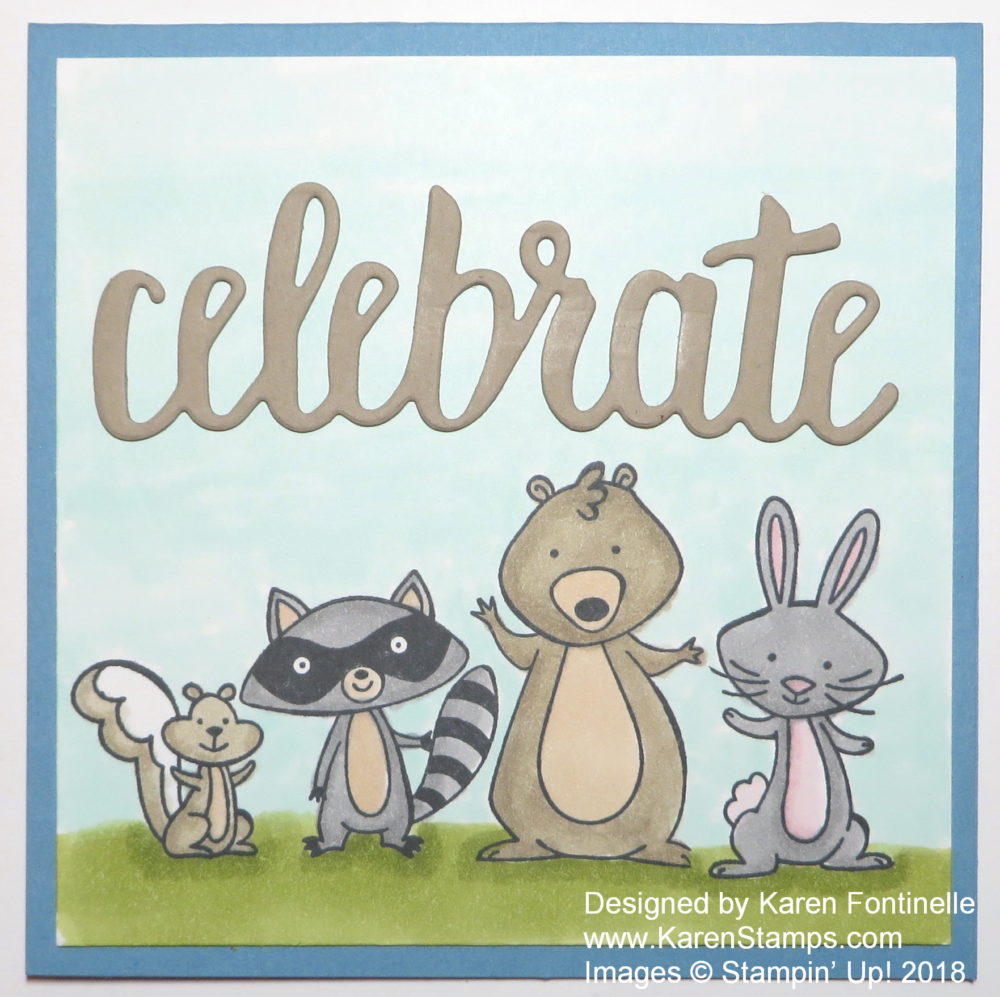
These Animal Critters Celebrate With the We Must Celebrate Stamp Set in the Occasions Catalog!  Aren’t they so cute?!  Actually I passed this stamp set up at first until I saw so many cute samples with these cute animals!  Then I had to have it!

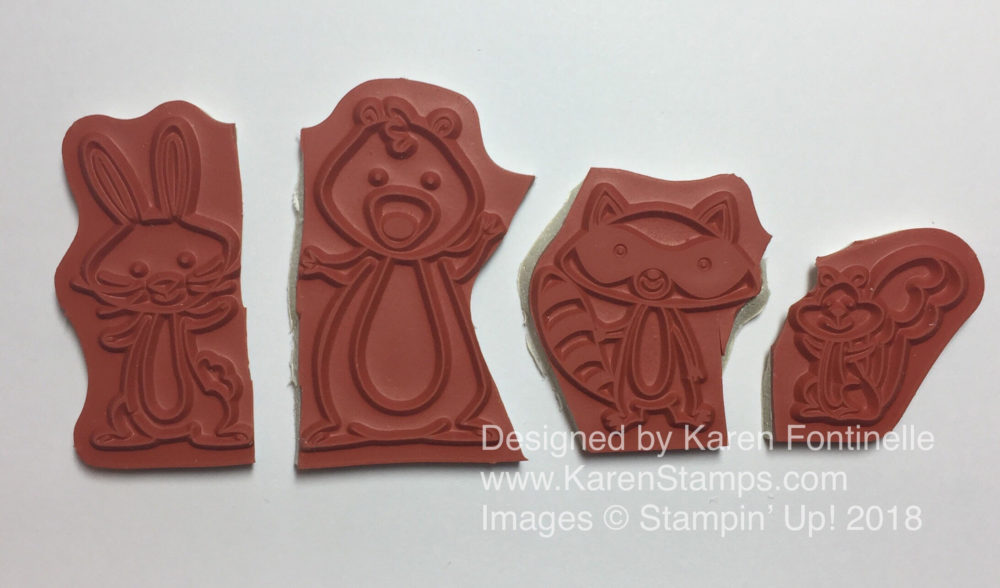
The animals all come attached on one stamp, but, if you want, and if you are very careful, you can cut the animals apart. Actually if you are very careful, you can line the stamps back up on one block and stamp them all together, which is what I did on this card!  Then you can have it both ways, but it is very hard to alter your stamp like this! And the bunny is perfect to use right now for Easter and spring.

We Just Celebrate Animals Cut Apart

I happened to have a scrap already-folded square card so I stamped it and colored everything in with Stampin’ Blends markers. Of course the color shows through on the other side of the paper, so it was showing on the inside of the card.  I decided to just cut that front of the card off and layer it on a card base of Marina Mist Cardstock.

Next, for a greeting, I used my new Celebrate You Thinlit Dies.  You can earn it free during Sale-A-Bration with a $100 purchase.  I die cut the word “Celebrate” from Crumb Cake cardstock.  I like the word and the color on the card to complement the animals and critters. Very simple card, really, but cute!

Whatever you are are celebrating, I think you can use the We Must Celebrate Stamp Set to celebrate with these animals and critters!

Easter Basket and Bunny Easter Card

Easter Basket and Bunny Easter Card

There’s a lot to talk about on this Easter Basket and Bunny Easter Card. Such a fun time to make cards, for Easter and for spring.  You can use bunnies, baskets, and flowers! Easter is coming soon, April 1st!

The bunny is from the We Just Celebrate Stamp Set.  Yes, the animals in that stamp set are all attached, but I……cut them apart!!!!  It was a nerve-wracking decision, but I did it and I think I managed to do it perfectly. Some parts of the stamps are pretty close together so you have to be very, very careful.  I wanted to be able to use the animals separately, not always all in a line. The stamp is very cute either way, but I did cut them apart!  Yikes!  So the Easter bunny is stamped separately and then cut out with my Paper Snips.  Actually, I cut the animals apart with my Paper Snips. I figured they were narrow enough to cut in between the animals.

The basket is made with the Basket Weave Dynamic Textured Impressions Embossing Folder.  This folder is available FREE during Sale-A-Bration in a Bundle along with the Blossoming Basket Stamp.  This embossing folder is fantastic in the bold way it embosses that basket weave look.  It’s best to spritz the cardstock with water to moisten the fibers and make them easier to be pressed into the embossing folder.

I figured this embossing folder would be great for making Easter baskets or just any baskets on cards and projects, and I assumed I would need to cut out a basket shape by hand.  But then I saw a tip from another Demonstrator about using the Coffee Cups Framelits Dies to cut out a basket shape!  I used the one that looks like the bottom of a cupcake or muffin.  For the handle, I used two oval dies to cut out the handle shape and trimmed it down a tiny sliver at the bottom to make it fit the basket.

For another tip, I cut the Easter eggs out of the Sweet Soiree Specialty Designer Series Paper, using some scraps I had.  I wondered if there was any chance there was a very small oval die in all of my Big Shot dies……and there was!  In the Coffee Cups Framelits Dies!  It is in there to fit one of the stamps in the Coffee Cafe Stamp Set.  I cut a bunch of Easter eggs since I had the scraps and I’ll use them on other cards as well.

The greeting is from Teeny Tiny Wishes. I wasn’t sure where I wanted to put it on the card so it ended up being like a tag on the basket! The designer paper layer is also Sweet Soiree.  The card colors I used were Soft Sky and Old Olive.

Get out some paper, ink and stamps and make some Easter cards and be sure to mail them! Easter is right around the corner.  I hope this Easter Basket and Bunny Easter Card gets you in the mood!

Easy Elegant Mini Treat Bag with Springtime Foils Paper

Elegant Mini Treat Bag with Springtime Foils Paper

I’ve said many times before how much I love the Mini Treat Bag Thinlits Dies, so today I made this easy elegant Mini Treat Bag with the beautiful Springtime Foils Paper. You can earn this gorgeous paper FREE with a Sale-A-Bration order of $50 or more. Now’s the time to get it before Sale-A-Bration ends March 31.

The Mini Treat Bag Thinlits Dies have always been one of my favorites! I think the bags turn out so cute and are easy to make, plus you can vary the look of the bag by folding the top over or cutting it down, adding a belly band or tying with a ribbon…..so many options! They are perfect for just a greeting on a card inside or inserting a gift card, candy treat or small gift! Very easy and simple.  All you need is a Big Shot and these dies which come with lots of pieces to use for many different projects!

When you use the Springtime Foils Designer Series Paper, you will automatically have an elegant project, no matter what you do with it!  And the best part…..it’s FREE!  Just spend $50 on Stampin’ Up! products and choose a free Sale-A-Bration product! This paper should be one of your top choices (although they are all wonderful choices this year!).

Here is another Mini Treat Bag I made with the Birthday Memories Designer Series Paper and put some punched balloons at the top of the card inside. So many occasions you can use these dies for!

To accent the bag, I colored a flower from another pattern of the Springtime Foils Paper with my Stampin’ Blends markers and cut it out with my Paper Snips.  To color the flower I used the Pink PIrouette Blends plus the Light Rich Razzleberry marker.  Honestly the Light Pink Pirouette colors so lightly on this glossy paper that you can barely see it.  I just thought it would be fun to add some other color, the Rich Razzleberry, so see what the blended flower would look like.  The leaves are colored with the Old Olive markers.

This flower is then layered on a piece of Blushing Bride Cardstock, die cut with the Stitched Shapes Framelits oval die and then layered on a piece of Silver Foil die cut with one of the scalloped Layering Ovals Framelits Dies. For a tiny bit more bling, I added a piece of the Silver Mini Sequin Trim.

Shop Stampin’ Up! Online HERE and earn your Sale-A-Bration rewards with every qualifying order!  No limits! Choose a free Sale-A-Bration product with every $50 increment on your order, and if you reach $100 or more, you can either choose two $50 rewards or one $100 higher-value reward!

Browse the Sale-A-Bration Brochure HERE!

Browse the 2nd Release of Sale-A-Bration products HERE!

You can use any kind of cardstock or designer series paper to make a mini treat bag such as this one, of course. But if you can earn this Springtime Foils Designer Series Paper during Sale-A-Bration, I think you will find it to be beautiful paper and worth your choice! Then go ahead and make some elegant cards and projects like this Easy Elegant Mini Treat Bag with Springtime Foils Paper.


Sweet Soiree Monochromatic All-Occasion Card

Sweet Soiree Paper Back of Card

The Sweet Soiree Specialty Designer Series Paper can be used to make any kind of card, like a monochromatic all-occasion card.  I would say MANY occasions! The paper is simply beautiful!  One side has silver foil accents and the other side is regular designer paper. So the question is, can you actually NOT use the silver foil side and use the “plainer” side??!  How can we possibly hide this beautiful floral paper enhanced with silver accents?!  It’s almost like Stampin’ Up! has wasted time printing something on the opposite side because who is going to use that side!

Sweet Soiree Monochromatic All-Occasion Card

Well, when I flipped through the papers in the package, this side of the accented paper caught my eye!  But why would I use THIS side and cover up the really gorgeous side? Because in that moment, I liked this side and wanted to make a card with it.  So what’s a girl to do?  Make a monochromatic card using this Calypso Coral colored paper, ink and ribbon!  Yes, I did it!  As you can see in the top picture, I adhered the ribbon to the back of the paper and put lots of Fast Fuse on that beautiful design so that I could use this Calypso Coral floral print side! Does it kill you to do that?? Yes, it’s difficult, but I think the other pretty papers deserve a chance to make a pretty card!

I decided to just keep this card simple and monochromatic (one color).  The card base is Calypso Coral and the ribbon is the Calypso Coral 1/4″ Ombre RIbbon.  I did use a thin border of Whisper White under the designer paper just to make it stand out a bit more.

The greeting is from the Petal Palette Stamp Set and stamped in Calypso Coral Ink. I die-cut it with the Big Shot and the Stitched Shapes Framelits Dies.  Then I die-cut a scalloped oval shape on which to layer the greeting with the Layering Ovals Framelits Dies.

This simple layout is one of the best to use for new stampers learning to make cards and even for us experienced stampers who could just use a simple design sometimes instead of going overboard! Sometimes we think we can’t just make a simple card when we have all these supplies!

If you want to see another idea, THIS CARD uses almost the same layout with just a little more embellishing, uses the silver-foil accented side of paper, and uses the same Calypso Coral paper and ribbon! Maybe it will give you more ideas!

I think monochromatic cards often have a simple beauty to them being the one color so try a card like this Sweet Soiree Monochromatic All-Occasion Card.

SHOP STAMPIN’ UP! ONLINE FOR THE BEST IN PAPERCRAFTING PRODUCTS!

Make Your Own Soda Pop Bottle Greeting Cards and Projects

Make your own soda pop bottle greeting cards and projects with the fun Bubble Over Photopolymer Bundle from Stampin’ Up! This Bundle comes with the Bubble Over Stamp Set and the Bottles & Bubbles Framelits Dies together saving you 10%! Add a little more to your order and you can earn the Bubbles & Fizz Designer Series Paper FREE during Sale-A-Bration!

If you are new to Stampin’ Up!, Sale-A-Bration is the annual promotion, a favorite of everyone’s, where you can earn a FREE Sale-A-Bration product with every $50 purchase! This year Stampin’ Up! has added a $100 choice or two as well! And there are other benefits as well, like an extra $25 in Stampin’ Rewards with a $250 or more order, and a chance to earn two FREE stamp sets if you decide to join Stampin’ Up! as a Demonstrator!

This Bubble Over Bundle is of particular interest to me because I’d always heard my dad talk about when his father owned a “soda factory” in the small Illinois town where he grew up. They would deliver “sodie” (as I sometimes heard it called) to various school picnics, homecomings, etc. around the area. I’m not really sure how else it was sold. My dad enjoyed sometimes getting to drive the delivery truck (even though he was underage to be licensed at the time, but back in those days I doubt it mattered!). It turns out it was my great-grandfather who started this soda bottling works. I’d always heard my grandpa invented a certain flavor soda that everyone liked, although I don’t recall ever having any.

Amazingly, through a Facebook group about this town, I discovered that people were collecting and selling these bottles on Ebay!  In fact, there are plenty of bottle collectors and bottle cap collectors out there! Since I have discovered this, I have purchased several different glass soda bottles on Ebay, some with my great-grandfather’s name on them, some with my grandfather’s name.  I even found a photo of the inside of the bottling works and several of decorated cars in homecoming parades advertising the company! It is just so amazing to me that I have found these treasures that are part of my family history! If only I could tell my dad and grandparents!!!

You can make lots of cute cards and other projects with this Bubble Over Bundle and the FREE Sale-A-Bration paper, Bubbles & Fizz! Wouldn’t these be fun card ideas for teenagers?  And certainly the bottles might hold something other than soda!!  The bottles can be embossed with clear embossing powder to look like shiny glass.  The bottles can be die cut out of vellum cardstock to look like glass or frosted bottles.  These products would also make great birthday, congratulations, and celebratory cards and gifts!  Lots of creative ideas!

Watch and enjoy the Stampin’ Up! video above, and be inspired to make your own soda pop bottle greeting cards and other projects!

If You Love Baskets You Must Have This Blossoming Basket Bundle!

Blossoming Basket Snip

If you love baskets and aren’t spending $100 on your Stampin’ Up! order, don’t watch the video below!  Now you can’t say I didn’t warn you! Yesterday Stampin’ Up! added three more items available for Sale-A-Bration, and one of them is the Blossoming Basket Bundle, available FREE with a $100 order! I would guess that it will be one of the most popular Sale-A-Bration items because you can make beautiful cards and projects with it!

In this Bundle, you get the the Blossoming Basket Stamp Set AND the Basket Weave Dynamic Textured Impressions Embossing Folder.  This is one of those heavier embossing folders that really puts a deep impression in the paper, particularly if you mist the paper with water lightly first.  You can have fun watercoloring the flowers and basket, or coloring in with your favorite technique.  There are lots of ways to color! Even if you are not an artist you will look like one! Watch the Stampin’ Up! video below with Shannon at the Home Office and see the fun of this Bundle! You will want to make sure your order is $100 or more so you can choose this for Sale-A-Bration, so it’s a good time to stock up on adhesives or paper or any accessories you have been wanting, not to mention stamps!

Wouldn’t that be a beautiful Bundle to have for spring and Easter cards?  You can use it for birthdays or weddings or upcoming graduations perhaps!  And as Shannon showed us, you can cut the flowers away and do something separately with them or even pop them up over the basket!

Think about adding a Prepaid Paper Pumpkin Kit to your order to boost your total so you can get this Blossoming Basket Bundle!

If you have a long list for your Stampin’ Up! order, be sure to consider this Blossoming Basket Bundle.  I’ve already seen some demonstrators cut the embossed piece in a circle, which makes it look like a pie crust!  How creative!  And I’m sure there will be even more creative ideas as everyone gets this folder in their hands!

SHOP STAMPIN’ UP! ONLINE HERE!

Quick and Easy Gatefold Valentine Card With Hearts

Quick and Easy Gate Fold Valentine Card With Hearts

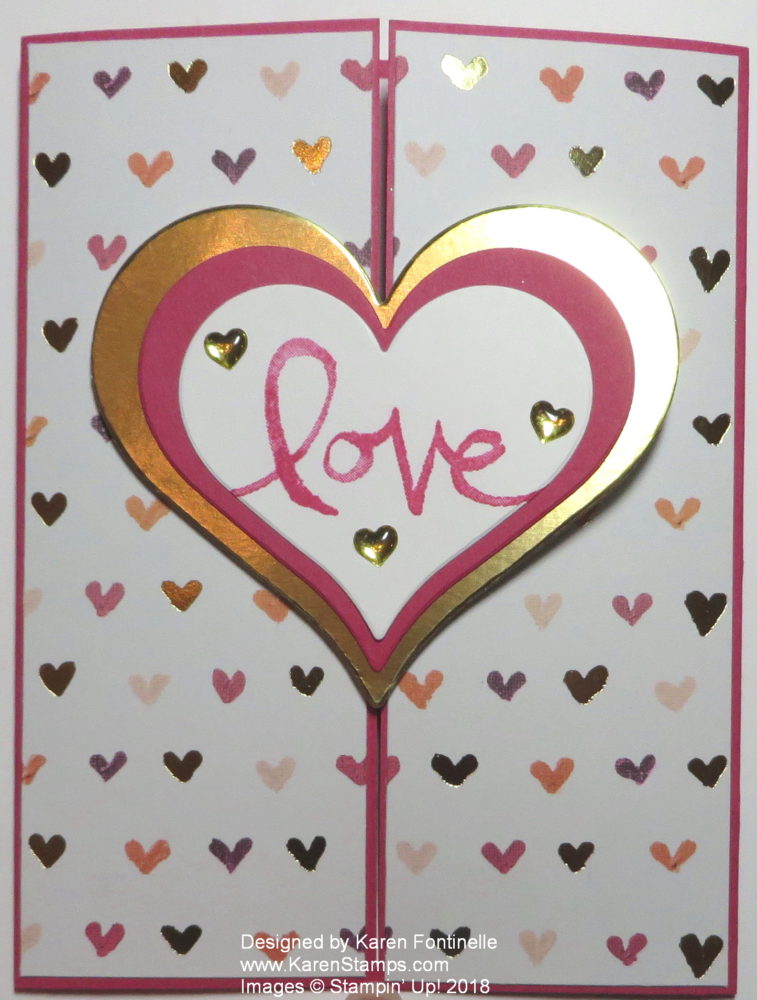
Here is a quick and easy gatefold Valentine card with hearts for Valentine’s Day!  A gatefold card is something different to make and your recipient will think it is something exceptional! This card, in fact, will only take you a few minutes to make!

Start by cutting a sheet of cardstock in half like you always do – but don’t score it in the middle. instead score at 2 1/8″ from each end.  That will leave a 4 1/4″ center area like a usual card and then the two flaps on the front that close that are 2 1/8″ wide each, which covers that center area!  Very easy!

To decorate the card, cut two strips of designer paper, such as this Painted With Love Specialty Designer Series Paper, at 2″ x 5 3/8″, which leaves a very narrow little margin on each side. For inside the card, just cut a piece of Whisper White Cardstock to layer on the Melon Mambo Cardstock at 4″ x 5 1/4″. I stamped a heart from the Watercolor Words Stamp Set on the inside panel.

For the hearts on the front of the card, I used the Sweet & Sassy Framelits Dies (hearts) to cut the largest heart from Gold Foil, the next smaller heart from Melon Mambo, and the smallest heart from Whisper White.  On the white heart, I stamped the “Love” from Watercolor Words. When you adhere the hearts to the front of the card, remember that you only want to put adhesive on the side that will attach to the left “gate” of the card. Don’t adhere to both sides or you won’t be able to open the card!  I used Stampin’ Dimensionals but you could also use any adhesive, just being careful where you put the adhesive.

The card looked perfectly fine at that point, but just because I wanted to, I added some Metallic Enamel Shapes, a few of the gold hearts on to the Whisper White heart.

This is an easy card to make. Just do the basic and then embellish a little bit.  You can do as much as you like.  You can see a wedding card I did several years ago with this same fold HERE.

Change up your routine a little bit and make a gatefold card like this Quick and Easy Gatefold Valentine Card With Hearts.  

Shop Stampin’ Up! & Sale-A-Bration!

Valentine’s Day Party Pandas Mini Treat Bag

Valentine's Day Party Pandas Mini Treat Bag

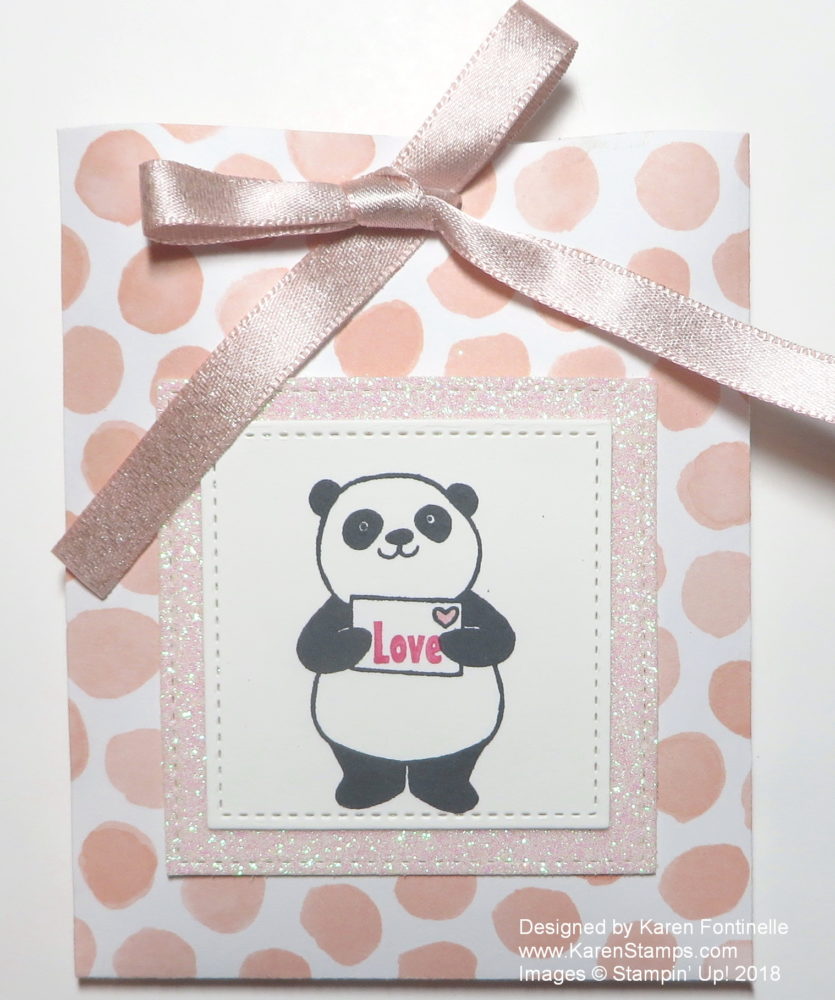
How about a cute Valentine’s Day Mini Treat Bag stamped with one of the Party Pandas? This mini treat bag is big enough to hold a few pieces of candy inside, a gift card, a small gift or just a note! You can make it for Valentine’s Day, but really it could be used for lots of occasions!  And one of the best parts is that you can get the Party Pandas Stamp Set FREE during Sale-A-Bration with a $50 purchase of Stampin’ Up! products!

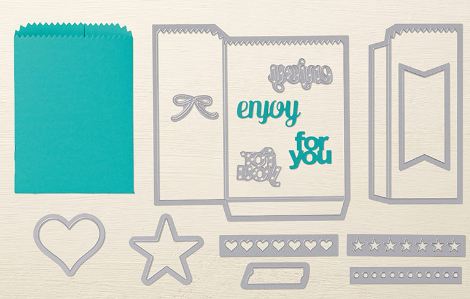
It’s so easy to make a treat bag with the Mini Treat Bag Thinlits Dies.  These dies have always been one of my favorites!  I also like the other pieces that come in the collection besides the two pieces that make up the treat bag.

Mini Treat Bag Thinlits Dies

For the Party Pandas treat bag, I made the treat bag with a paper in the Whole Lot of Lovely Designer Series Paper.  I figured the pink dots could be used for Valentine’s Day but also for other occasions.  I did trim off the top edge of the bag since I was going to tie the bag shut with the Powder Pink 3/8″ Shimmer Ribbon.

The Panda is stamped with the Party Pandas Stamp Set available during Stampin’ Up! Sale-A-Bration!  You can’t buy this stamp set, you have to earn it! You earn it with a $50 purchase, which is easy to do, and then you choose a special Sale-A-Bration product for your FREE product!  I think the pandas are probably one of the most popular Sale-A-Bration sets this year! The panda is just stamped in black ink.  (I used Memento Black.)  Just color in the little heart on the envelope with a pink marker.  I stamped just the word “Love” from the stamp in the set and inked it up with the Melon Mambo Marker.  I got lucky and stamped it in just the right place!

Next I die cut the panda with the Stitched Shapes Framelits Dies and layered on a piece of the Iridescent Myths & Magic Glimmer Paper in the Occasions Catalog. This glimmer paper was also die cut with the larger square in the Stitched Shapes Dies.  The paper almost seemed to take on a little bit of the pink from the paper and the ribbon!

Here is another Mini Treat Bag I made last summer with the Birthday Memories Designer Series Paper.  I put a card inside the bag for the birthday card.  There are so many ways you can use these treat bags!

If you need a little Valentine Treat Bag, you can make one yourself with the Mini Treat Bag Thinlits Dies out of any paper you choose. Best of all, with a $50 purchase, you can choose the Party Pandas Stamp Set for your free Sale-A-Bration item and make all kinds of cute cards and projects with the pandas.

If you like this project and want to share it with your friends, you can click one of the social media buttons right below this post! Or leave me a comment!

Shop Stampin’ Up! Online During Sale-A-Bration!

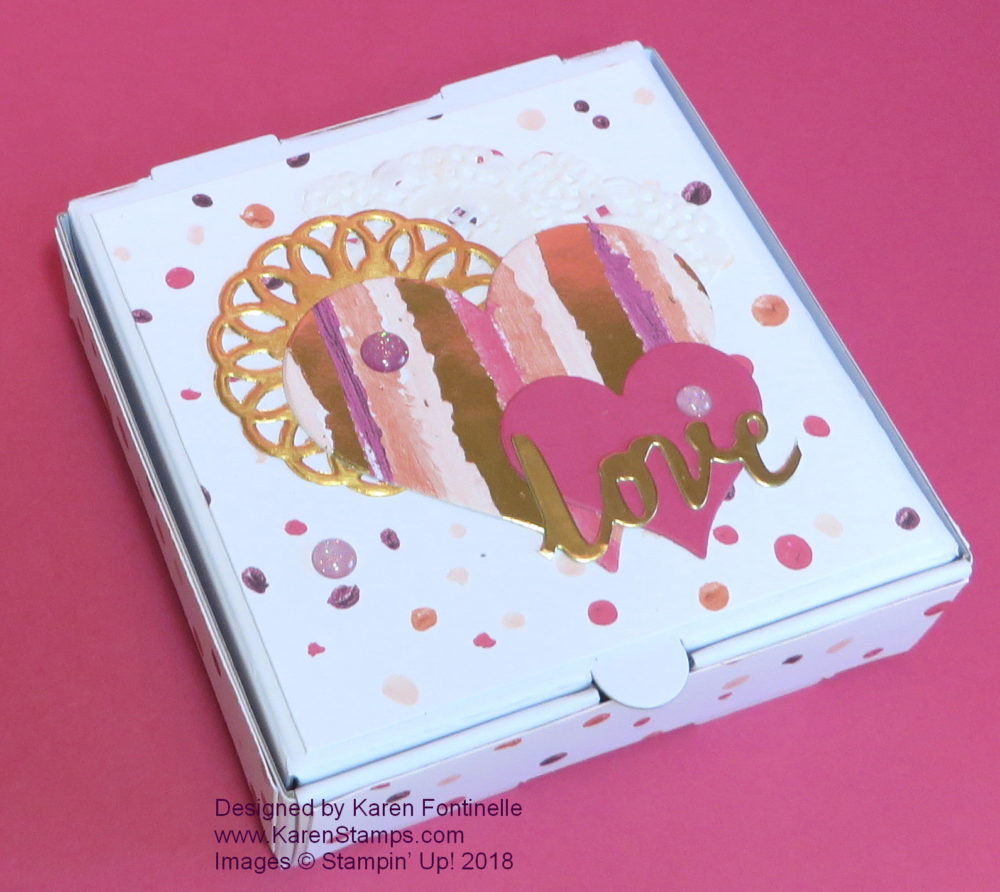
Make a Valentine Treat Box With a Mini Pizza Box

Valentine Treat Box with a Mini Pizza Box Embellished

Here’s an easy project for Valentine’s Day or any occasion –  Make a Valentine treat box with a Mini Pizza Box from Stampin’ Up!  Use a small box to decorate with paper and embellish to put a special treat inside!

Did you know you can still purchase the Mini Pizza Boxes that were in the Stampin’ Up! Holiday Catalog?  They are on the Carryover List of products that are still available at least until the next Annual Catalog comes out.  Then we will see which products continue on in the new catalog or if they are retired. Anyway, you will still find the Mini Pizza Boxes in my Online Store! You will find all the Carryover Products listed in the Online Store under Holiday Favorites.

The Mini Pizza Boxes come flat in the package so storage is not a problem.  Then just fold on all the scored lines and assemble the pizza box. Decorate however you like for whatever occasion! For this box, I chose to use the Painted With Love Specialty Designer Series Paper.  Even though one side of each sheet has gold foil accents, today I chose to use the side without the gold foil. Just cut a square slightly smaller than the top of the lid and individual strips to adhere on the sides of the pizza box.  You can make them the same or contrasting.

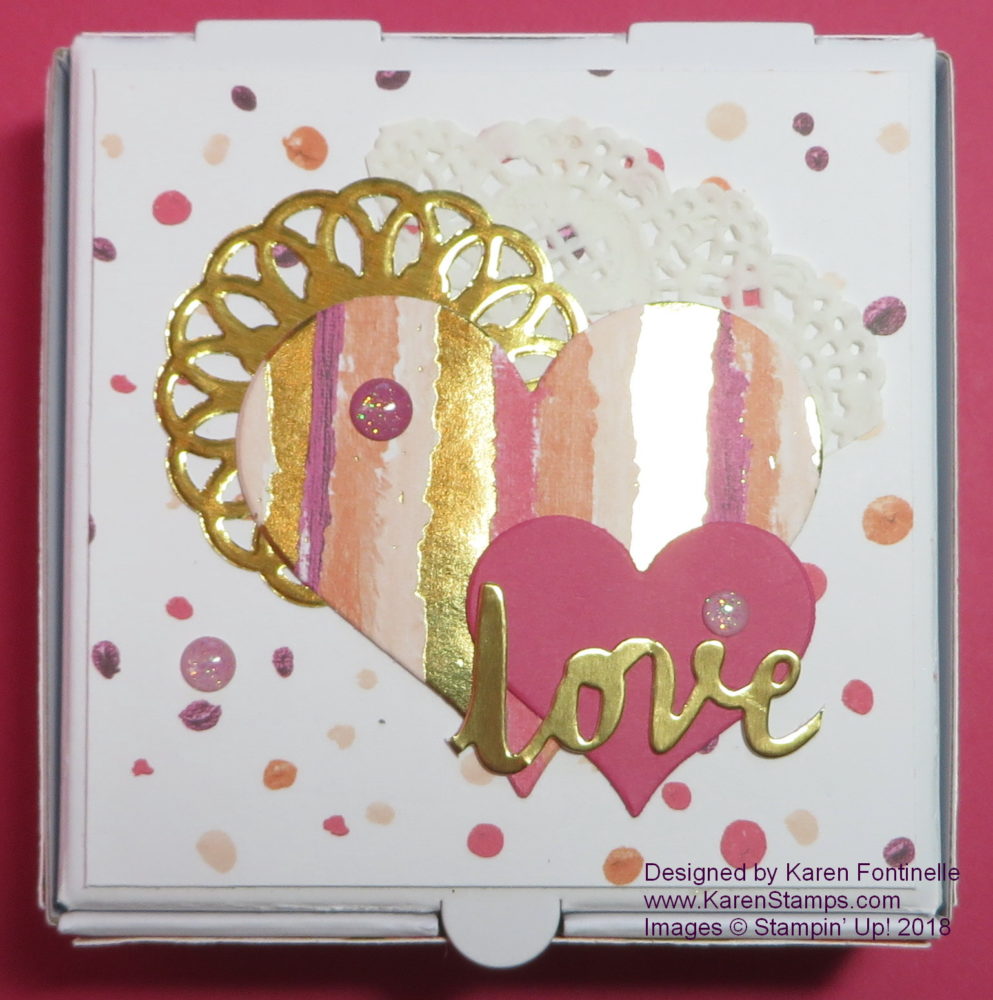
For the top of the box, I chose some hearts since we are close to Valentine’s Day, but hearts can be for anything! I used the Sweet & Sassy Framelits Dies to cut out the two hearts. If you look closely at these dies, you will see there are two styles of hearts – one sweet, and one sassy, I suppose! One shapes curves inward near the bottom and the other shape just has a straight edge to the bottom point. I don’t know which shape is sweet and which shape is sassy, but you can choose! Sometimes I don’t notice these subleties so in case you are like me, I thought I would point it out. Of course you can mix and match the shapes of the hearts however you like!

I also added two kinds of doilies. One is a small gold doily in the Metallic Foil Doilies package.  The other is part of a white doily in the Delicate White Doilies package.  Always good to have embellishments like these on hand for when your project needs a little something And for some extra little embellishments, I stuck on a few of the Glitter Enamel Dots.

At the last minute I added the word “Love” in Gold Foil because I thought the top of the box still needed “something”.  How did I get the word “Love”?  From the Lovely Words Thinlit Dies!  The die cuts out a heart and the word “Lovely”, so I just trimmed off all but the “love” part!  Very easy!  I think it adds just the right thing on this box. The other two words are “hugs” and “friend”.

Do you have some Mini Pizza Boxes that you can make into a Valentine Treat Box with embellishments and designer paper or cardstock?  If not, put them on your Stampin’ Up! order!Valentine Treat Box with a Mini Pizza Box Top Closeup


Flourishing Phrases Sympathy Card

Flourishing Phrases Sympathy Card

It’s always said when we need a sympathy card, but the Flourishing Phrases Stamp Set and the Flourish Thinlits Dies make it easy to come up with a sympathy card idea. Just choose whatever color you think would be appropriate.

In reality, a lot of the pretty cards we make can just have an appropriate greeting added to it, even just “Thinking of You”, and they can serve as a sympathy card.  The Flourishing Phrases Stamp Set does come with the stamp “With Sympathy”. This is a card like one I found on Pinterest that I liked.  It is a simple layout but pretty and not flashy in any way.

The card base is Blushing Bride Cardstock with a Shimmery White Cardstock layer.  Shimmery White paper is so beautiful and such a nice quality.  There is the faintest glimmer to it if the light is right, which I think makes it look like luxurious paper. I think that Flourish Thinlit Die with the flowers and stems is a beautiful die to use for lots of cards. To give the card a little more sparkle, I added some Rhinestone Jewels.

The Whisper White Medium Envelope is stamped with a matching stamp (you see it poking out from the side of the card!). These are the nicest envelopes! Once you are used to using them, if you receive one in the mail, you can pick it out immediately by feel!  No kidding!

Just by changing the greeting, this could also be a beautiful birthday card, Get Well, Thinking of You, Congratulations, any occasion almost!

If you purchased the Flourishing Phrases Stamp Set and the Flourish Thinlits Dies, you would be over $50 and would have earned a FREE Sale-A-Bration product from the Sale-A-Bration Brochure! Check out the choices and add products to your order if you want even more free things!