Category Archives: Big Shot

First Day of the New Stampin’ Up! Catalog!

Good Morning Magnolia Hello Card

Today is the first day of the new 2019-2020 Stampin’ Up! Annual Catalog with new stamps, dies, embellishments and accessories! It’s the day we have been waiting for and the new catalog will be here this afternoon! This morning Stampin’ Up! is working to get the Online Store ready with the new products. It should be ready no later than Noon MT (1:00 PM CT).

I decided to make this card with the Good Morning Magnolia stamp on the front to celebrate the new catalog! I think this suite of products will be a big seller!

The card base is Mossy Meadow with a layer of Magnolia Lane Designer Series Paper. I think this package of paper is just gorgeous! I thought I was going to use two patterns on this card but once I laid this pink layer down I loved the way it looked and that was it! I used the really pretty 5/8″ Organdy Striped Ribbon across the card and under the flower. I may have gotten the last roll of it during our preorder! I was moving my products back and forth between my “order” and my “Stampin’ Rewards” and suddenly it wasn’t available! But I still had it listed on one of those places so I guess it was okay and I got it in my order! It is indeed backordered but they should have more available around June 24th.

I stamped the large magnolia flowers on Whisper White with the Memento Ink and colored it in with Stampin’ Blends. It was nearly dinner time and I was afraid it was going to take me a long time to color in this big flower and leaves, but it went very quickly! You don’t need to be real fussy about it or worry if it is absolutely correct. I think mine turned out fine! I started to cut it out with my Paper Snips when I remembered that there were dies! But I couldn’t find my Magnolia Memory dies, except for a few loose ones! So I obviously own them, I just have to find the rest of the package! In the interest of time and disorganization, I just went ahead and cut it out by hand. Easy enough!

I knew the large magnolia wasn’t going to show up extremely well against the patterned paper, but I liked the look anyway. I added a die cut large circle of Vellum Cardstock to put behind the flower. The magnolia is popped up on LOTS of Stampin’ Dimensionals!

The greeting is also in the Good Morning Magnolia Stamp Set and I die cut that with the new Stitched Nested Labels Dies. I was going to layer it on Mossy Meadow but there wasn’t much space and really, I just liked the greeting by itself. Funny how you don’t always know what card design you are going to come up with until you do!

Happy New Catalog Day (or afternoon!)! Check out the Online Store although expect there to be crowds of people there! Sometimes the website acts up on days like this! Once the Online Store is back up and running today, you can place an order!

Happy Shopping!

Easy Share What You Love Card

Easy Share What You Love Card

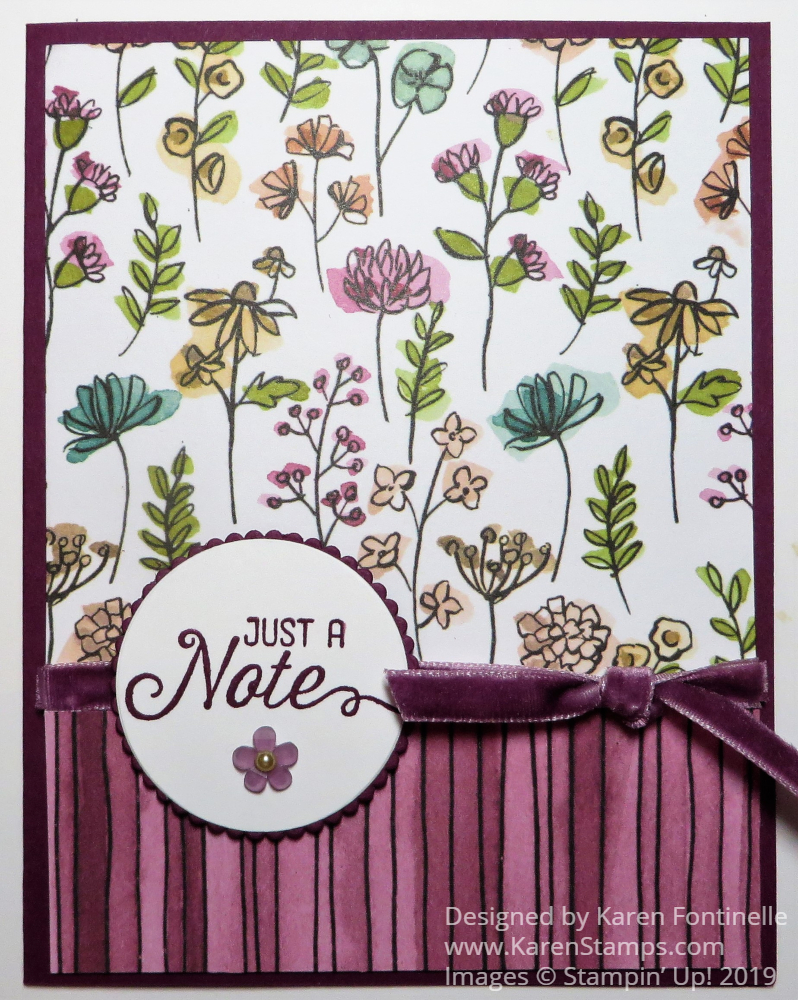
One of the Stampin’ Up! products I hate to see retire very soon is the Share What You Love Specialty Designer Series Paper that I used in this Easy Share What You Love Card. The paper is so pretty, you get a double amount of sheets than in the usual package of designer paper, the designs are handpainted, and some of the sheets have a translucent pearlized finish. It is paper that can be used for a variety of projects, especially being heavyweight designer paper.

One of my favorite patterns in this Share What You Love package of paper is this floral paper with the white background. It is so bright and fresh. The opposite side of the paper has this ombre striped design, so I chose to use both on this card!

The card base is Rich Razzleberry Cardstock. The floral paper is the full size for the layer and then I adhered the striped pattern over the bottom portion. If you really wanted to save paper, you could cut each piece to the exact size you want and then the ribbon would cover the line where they meet. Or you could add a strip of paper over it.

The ribbon is the Rich Razzleberry 1/4″ Velvet Ribbon. I just cut one strip a little longer than the width of the card and adhered it on the back of the card layer, then tied a separate little piece of the ribbon in a knot around the ribbon across the card. This saves a few inches of ribbon that wouldn’t show on the back and saves some bulk.

The greeting is stamped in Rich Razzleberry Ink and is from the Flourishing Phrases Stamp Set. I’m so glad this stamp set is carrying over to the new catalog along with the Flourish Dies. This stamp set has that pretty stem of flowers plus some great sayings to use and very pretty dies.

The greeting is die cut with the Layering Circles Dies and layered on a scalloped circle in the same die set. I popped it up on two Stampin’ Dimensionals since the ribbon is thick. I was going to just add some pearls or rhinestones to the greeting but then I saw the Frosted Flower Embellishments in my drawer. It looked like one of those flowers would be perfect and I think it is! The color is actually Fresh Fig but I think it is close enough to match. For a finishing touch, I added a tiny Artisan Pearl to the center of the flower. To mail, I will probably place a piece of paper towel or crimped computer paper over the card front in the envelope to protect it from the machines sorting the mail.

This is a very easy card to make, especially when you just use the opposite sides of one sheet of designer paper. Then just add a greeting and maybe a ribbon and you have a perfectly fine card to give someone. It only takes minutes to make.

In fact, using this basic plan, you could make an assortment of cards with one package of designer paper. Either make different greetings or save the greeting for when you need to card. This way you have a stash of cards ready to go for when you want to send a card but don’t have time to pull everything out and make a card.

Here is another card made with a full card front of one design from the Share What You Love DSP, using a greeting and the same Rich Razzleberry Velvet Ribbon.

You can make either one of these cards with any designer series paper, so be sure to check the Last-Chance products in the Stampin’ Up! Online Store to see if there are any papers you want to stock up on before they go away. And after you choose your paper, take a look at the ribbons that would coordinate or that you want to replace or stock up on. Take a few minutes to make some cards like my Easy Share What You Love Card.

Stampin’ Up!
Last-Chance Products!

Petal Palette Graduation Congratulations Card

Petal Palette Graduation Congratulations Card

This Petal Palette Graduation Congratulations Card is perfect for this time of year when graduations are just beginning! But this card wouldn’t have to be for a graduation. It could be for any congratulatory occasion….or change the greeting to birthday, anniversary even sympathy.

The Petal Palette Stamp Set has been one of my favorites but it is going away with the new catalog. You can get the Petal Palette Stamp Set on the Stampin’ Up! Last-Chance List in the Online Store. There are also coordinating dies, the Petals & More Thinlits Dies, that you might be interested in.

The card actually has a card base of Shimmery White Cardstock and a layer of Shimmery White Cardstock as well. It is laying on a sheet of Granny Apple Green Cardstock and looks like that is the card base, but it is not. However, it does look pretty so you could use a green card base to match the ink in your leaves.

The flowers are stamped in Memento Ink and colored with Stampin’ Blends in Calypso Coral, but you could use other coloring mediums as well. Then they are die cut with one of the Petals & More Dies.

The leaves are stamped with Granny Apple Green Ink, but I stamped off on my Grid Paper first and then stamped on the card because I wanted them to be light. The greeting also comes from the stamp set and is die cut with one of the dies.

Petal Palette Graduation Congratulations Card Closeup

Even though I began by thinking about a card for graduation, I’m sure you can see how this could be a generic card for many occasions. Check out this card, rather similar, but with the flowers just stamped on the card. Try your hand at a card similar to this Petal Palette Graduation Congratulations Card but remember to check the Last-Chance List and the Clearance Rack!

SHOP STAMPIN’ UP! ONLINE!

Beautiful Bouquet May Day Card

Beautiful Bouquet May Day Card

Happy May Day! It’s May 1st and here is a Beautiful Bouquet May Day Card to celebrate! Back in the “olden days” May Day was celebrated by gathering a bouquet of flowers and making a little basket with which to hang them on a neighbor’s or friend’s door. There used to also be a Maypole, a tall wooden pole decorated with flowers with long ribbons attached at the top that people would hold onto and dance around the maypole. Sounds like a lovely tradition somehow!

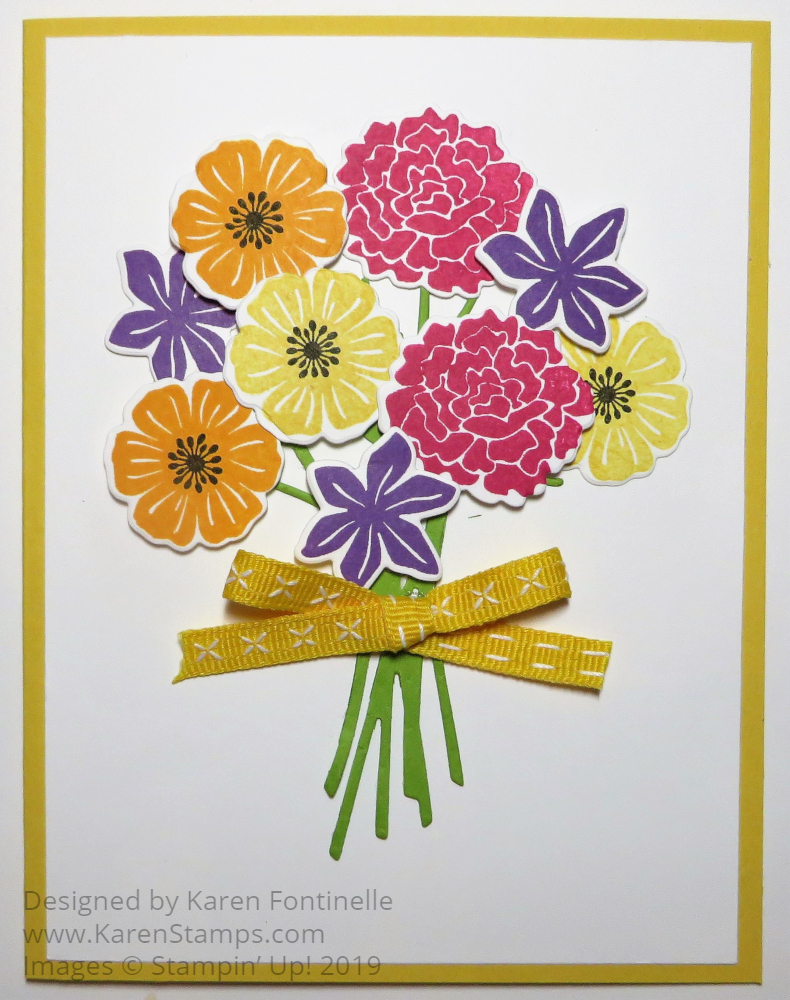
In honor of May Day, I made this card with the Beautiful Bouquet Stamp Set and the Bouquet Bunch Framelits Dies. It was very easy. I just stamped several flowers of each kind in different colors and then die cut them with Beautiful Bunch dies. Some are adhered flat on the card front and some are popped up with Stampin’ Dimensionals. The flower stems are one die cut out of Granny Apple Green Cardstock. I added a bow made with the Daffodil Delight 1/4″ Double-Stitched Ribbon. I didn’t add a greeting yet because I could use this card for many occasions and will add a greeting later.

The card base is Daffodil Delight Cardstock. The flowers are stamped in Melon Mambo, Mango Melody, Daffodil Delight, and Gorgeous Grape. I just chose four colors from the Brights Family for the flowers. Quick and easy!

If you love flowers and like making floral cards, you might be interested in the brand new Everything Is Rosy Product Medley. This product is available TODAY, May 1 through May 31, WHILE SUPPLIES LAST! It may seem a bit pricey, but this product is designed for the crafter who wants “all the stuff” right away, in one package, ready to go, so they have everything they need to start creating as soon as they open the box. The products include stamps, dies, papers, ribbons, die cuts, Rose Gold foil, even Rose Gold Shimmer Paint. Below you will see a list of the products included:

• Everything Is Rosy Photopolymer Stamp Set—
18 stamps; suggested blocks: a, b, c
• Everything Is Rosy Dies—10 dies;
largest die 2-7/8″ x 1″ (7.3 x 2.5 cm)
• 6″ x 6″ (15.2 x 15.2 CM) Designer Series Paper Stack—
48 sheets; 8 each of 6 double-sided designs
• 6″ x 6″ (15.2 x 15.2 CM) rose gold foil paper—8 sheets
• Printed die cuts—2 sheets
• Rose gold die cuts—4 sheets; 2 each of 2 designs
• Rose gold adhesive backed mirror embellishments—
60 embellishments; 1/4″ (6.4 mm)
• Melon Mambo 1/4″ (6.4 mm) Ruched Ribbon—
10 yards (9.1 m)
• Night of Navy/Rose Gold 3/8″ (1 cm) Metallic –Edge Ribbon—
10 yards (9.1 m)
• Rose Gold Shimmer Paint—1/2 oz. (15 ml)

Watch the video below to see for yourself how you can use the collection.

If you are interested in this Everything Is Rosy Medley Collection it might be wise to order it as soon as you can as it is available only while supplies last during the month of May. You can add it to anything else on an order.

150059EVERYTHING IS ROSY PRODUCT MEDLEY

I’m a big advocate for “taking care of yourself” on birthdays and special days, so I give you permission to order this kit for yourself (or for someone else as a gift!) for Mother’s Day! Why not treat yourself?! And no one else has to know!

Celebrate May Day by making a pretty card with flowers and send it to someone AND/OR order the Everything Is Rosy Product Medley!

Animal Expedition All-Occasion Card

Animal Expedition All-Occasion Card

You might not believe this all-occasion card is made with paper called Animal Expedition! This designer series paper is on the Last-Chance List so be sure to pick some up if you like it.

The focus of the Animal Expedition Designer Series Paper is of course animals, very cute, whimsical animals. You might think this paper would only be for children or babies, but it’s for everyone for lots of happy cards and occasions! I didn’t think I had a need for it at first, but then I saw lots of cute samples and of course, had to have it! If you want it all, get the Animal Outing Bundle with the coordinating stamp set and dies. Remember, the Bundle saves you 10%. Although the stamp set is carrying over to the new Stampin’ Up! Catalog in June along with the Animal Friends Dies, you won’t be able to buy them in a Bundle saving 10%. So get them now!

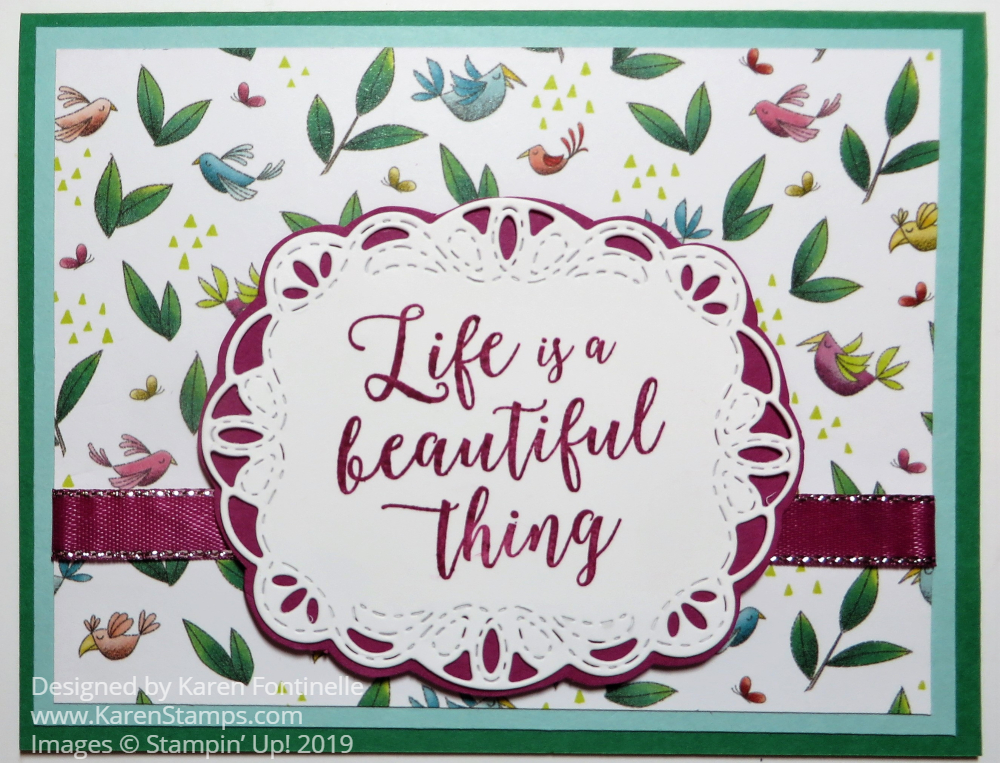
As I looked through the papers before making this card, I almost picked the hippo paper but then this generic paper with just leaves and little birds looked so pretty I had to work with it first! You could use this paper for any pretty card or project, it doesn’t have to have anything to do with animals!

My card base is Call Me Clover Cardstock with a layer of Pool Party and then the designer paper. To match the little birds, I chose the Berry Burst 3/8″ Metallic-Edge Ribbon to embellish the card. For the greeting, I chose a sentiment in the Colorful Seasons Stamp Set. This stamp set will also be in the new catalog! I cut it out with a die in the Stitched Labels Framelits Dies. I wanted to set this piece off a little bit, but there is no layer to match…..so I made my own! I simply put a layer of Berry Burst underneath the fancy die cut and trimmed around the edge. I did this not even wearing my glasses and it turned out fine! I think it adds a good contrast!

Always look through your designer papers, even after you’ve had them a long time and see what is in there that you may have forgotten! Sometimes you will find a generic pattern in a pack that doesn’t have anything to do with the theme of the other papers. Or you will have forgotten what all the paper designs are and you might find something that is perfect for your project!

Click here to see another card I made with the cute Animal Expedition Paper.

Shop the Stampin’ Up! Last-Chance List for the Animal Expedition Paper if you want to stock up before it retires.

Amazing Life All-Occasion Happy Life Card

Amazing Life All-Occasion Happy Life Card

Sad to say, this Amazing Life All-Occasion Happy Life Card is the first time I have used the Amazing Life Stamp Set and now it is on the Last-Chance list! How does that happen? This is a perfectly wonderful stamp set with lots of great greetings, a cute cake, some flowers, and little embellishments.

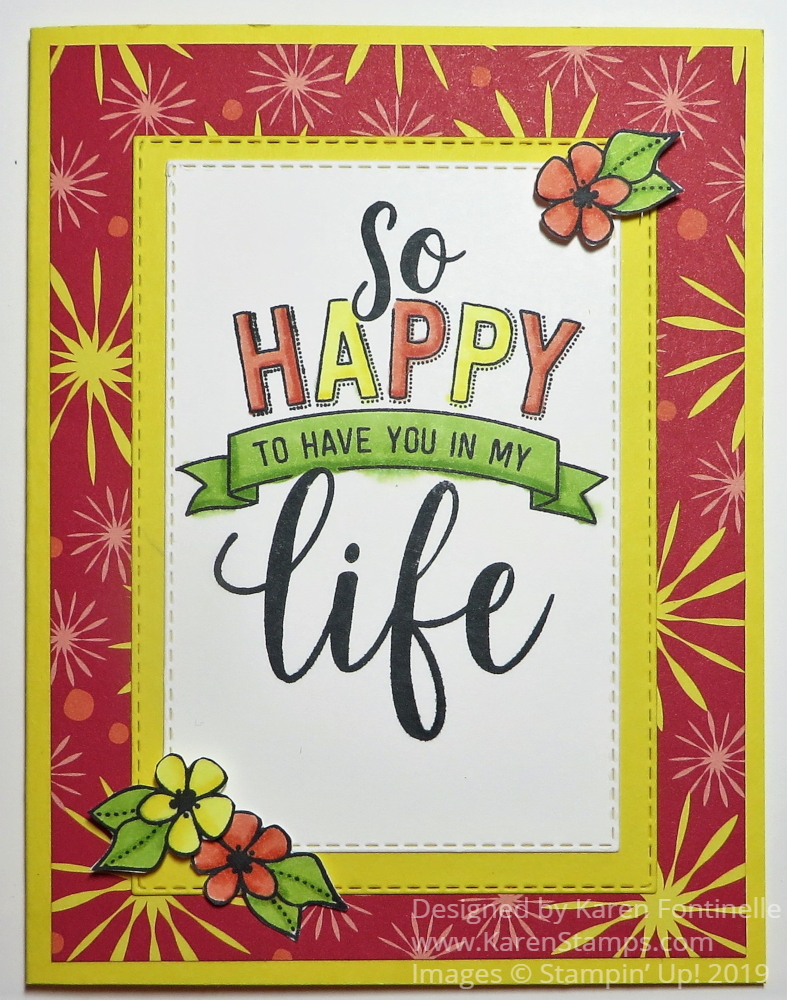
To make this card, since I hadn’t used this stamp set before, I chose a color for the card that I haven’t used very much, Pineapple Punch. I also chose a paper from the Happiness Blooms Designer Series Paper for the layer on the card. It’s not my favorite paper in the bunch, but it works fine on this card. Actually, it is a good lesson on how to use bold patterns that maybe you don’t care for. If you use extra layers which partially cover up the bold pattern, then obviously it is not as noticeable.

I love this large greeting in the stamp set, and it was so much fun to color in. With the designer paper and the colorful greeting, this is such a “happy” card to send to someone! Whose day wouldn’t be brightened by receiving this card?! I stamped the greeting in Memento Ink and used the Stamparatus® for a couple of reasons. Since it was a new stamp, it was possible it might not stamp clearly the first time. With the Stamparatus I could stamp it over and over again (without moving the paper or the stamp) to make sure I got a good image. And I was right to use the Stampartus…..it took several times to make sure everything was stamped fully! I never could have done that without the Stamparatus.

After stamping the greeting on Whisper White, I die cut that piece with the 4th from the largest of the Rectangle Stitched Dies. Then I cut a layer of Pineapple Punch with the next largest die. I love that they both have that stitched edge! You can purchase the Amazing Life Stamp Set and the Rectangle Dies in a Bundle and save 10% if you order before the new catalog.

The flowers are stamped from the set and just cut out with Paper Snips. Even though I was stamping them on scrap paper, I used the Stamparatus and just moved the plate down one lower hinge at a time to get them all stamped on the paper. I didn’t have to do that but it was easy. Two of the flowers are popped up with the Mini Stampin’ Dimensionals.

That’s it! A pretty easy card to make and I always love the opportunity to color with the Stampin’ Blends Markers. If you like this stamp set, stamps are guaranteed to be available until May 24th since Stampin’ Up! manufactures stamps themselves. Although the Rectangle dies carry over to the new catalog, if you want the stamp set and dies, be sure to order the Bundle and save a little bit of money. Make someone’s day by mailing them a bright and happy card like this Amazing Life All-Occasion Happy Life Card.

SHOP STAMPIN’ UP! ONLINE TODAY!

Hurry & Shop the Stampin’ Up! Clearance Rack!

Clearance Rack Banner 2019

The Stampin’ Up! Clearance Rack has been updated so don’t delay, race right over there and see what you want! Some items could go fast! Right now one of my favorite dies is on there…the Mini Treat Bag Thinlits Dies! Make cute little treat bags with the Big Shot and decorate for any occasion.

There are all kinds of punches, dies, trinkets, designer paper, Watercolor Pencils 2, even a little bit of cardstock. There are some kits if you want to get an early start on Christmas cards. Just check it out!

SHOP STAMPIN’ UP! ONLINE HERE!

De-Stress on Tax Day With the Stampin’ Up! Retirement List!

Retirement 2019

Today is Tax Day so I hope you got yours done and sent off to the IRS so this afternoon you can de-stress and relax with the Stampin’ Up! Retirement List later this afternoon at 1:00 PM (MT) when it comes out! You can mark off in the catalog what is going away and decide which Stampin’ Up! products you can’t live without.

Over the weekend the Stampin’ Up! event called OnStage was held in Auckland, New Zealand with local events of one day held in scattered cities around the world. Demonstrators received the next new Stampin’ Up! Annual Catalog, so you can look online and probably find a picture of the cover! They were also allowed to show photos of some of the new stamp sets, paper, and In Colors coming and the prizes and gifts they received. Any Stampin’ Up! event is a fun thing to attend, I can tell you for sure!

Just be thinking ahead if there are things you fear could sell out when the Retirement List comes out today so you are ready to POUNCE! Who knows, of course, but sometimes the In Color refills and cardstock that are going out are the first things to go. Any accessories with those colors are also susceptible! There are new In Colors coming!

The Retiring List is supposed to be released at 1 PM (Mountain Time) (2:00 pm Central) today so give me some time to check it out and get it posted and then come back to my blog and/or Facebook to find out all about it! Get your work done early so you can de-stress with the Retirement List!

Easter Wood Crate Candy Holder With Chick

Easter Wood Crate Candy Holder With Chick

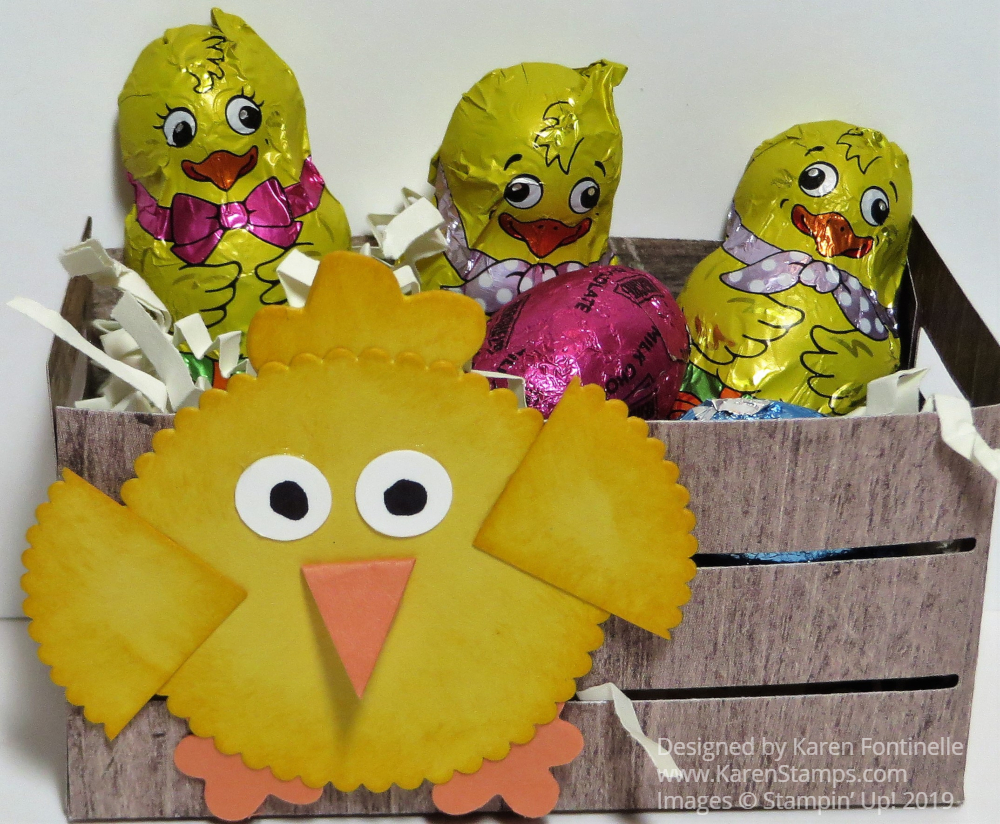
This Easter Wood Crate Candy Holder With Chick would be fun to make as a treat holder just using some dies and glue! Something a little bit different than a bunny! Make the paper crate, add some Easter grass or paper shred and put in some Easter candy! You have a little treat for someone or put it at each place setting on your Easter table for dinner.

To make the crate I used the Wood Crate Framelits Dies and the Wood Textures Designer Series Paper Stack. Just cut two pieces with the wood crate die. The die scores the paper as it cuts so all you have to do is crease and fold and assemble with some Multipurpose Glue. If you don’t own the Wood Crate Dies just make some other little basket or box by scoring and folding.

The chick is copied from one I made many years ago on THIS little Easter basket. Back then we had a Scalloped Circle Punch, but you can use the scalloped Circle Dies. For the wings, I just cut a scalloped circle into portions. I sponged all the pieces. For the little feathers on top of his head and for his feet, I just found some shapes on some dies that would work or maybe you could use the Blossom Builder Punch. Whatever you have with something resembling the shapes you need! The little beak is just cut by hand. The eyes are punched with the Cookie Cutter Builder Punch and just colored with a black marker. The chick is adhered to the wood crate with a couple of Stampin’ Dimensionals.

You can use whatever color card stock you like or other designer paper. Make the chick with whatever shapes you can punch or die cut. You can also add an Easter greeting on the front. It’s just a cute little treat idea for holding some Easter candy treats or for a little home decoration. Have fun making your own Easter treats to give to some family members, friends or neighbors!

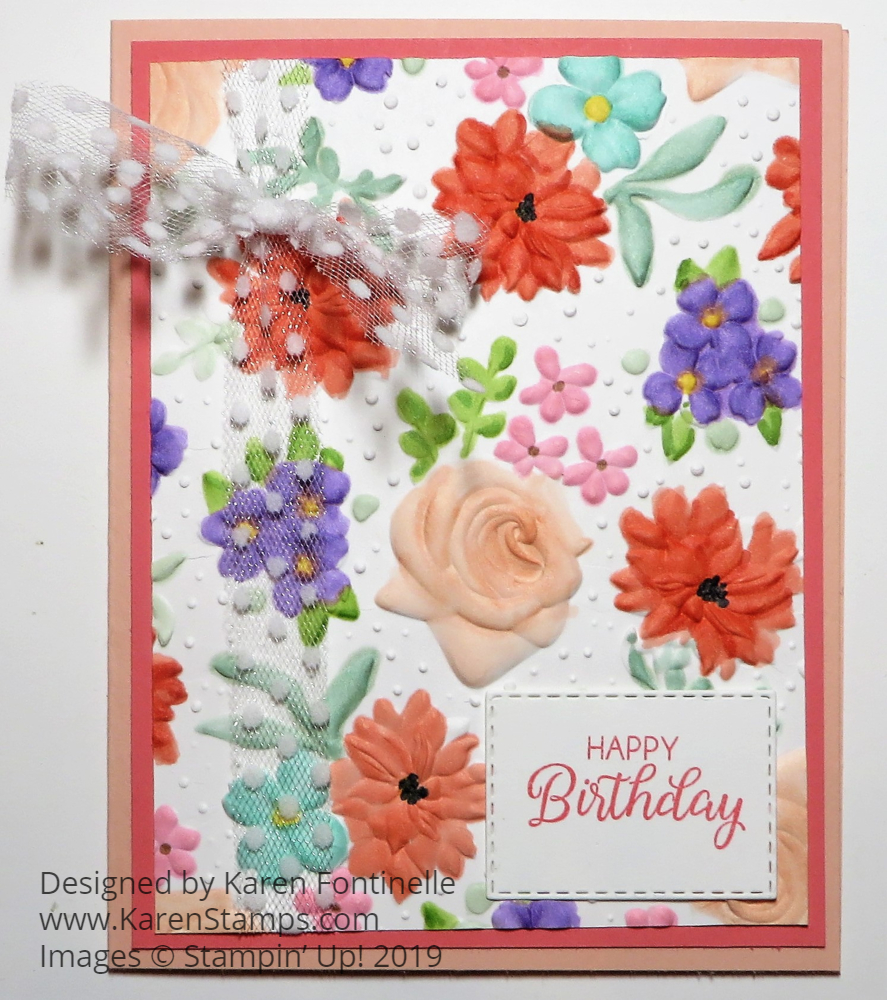
Country Floral Embossed and Colored Floral Birthday Card

Country Floral Embossed and Colored Floral Birthday Card

Cardstock embossed with the Country Floral Dynamic Embossing Folder is perfectly beautiful “plain”, but I was anxious to see what it would be like to color the embossed floral images on this birthday card like I had seen done on some samples.  I think it does make for a beautiful card, but I will tell you honestly that it takes some work and some patience!  As much as I like coloring some outline images and find it very relaxing, coloring on embossed images I found to be a little less relaxing!  But I love using the Stampin’ Blends markers every time so it wasn’t all hard work!

Coloring Country Floral Embossed Paper

Here is what my desk (kitchen table) looked like as I colored the Country Floral embossed card layer! Always be sure you have something underneath what you are coloring with the Stampin’ Blends alcohol markers because it can bleed through the paper.  In using the markers, I usually colored most areas with the light color first and then put in a few accents with the dark color.  Then I went back in with the light color and blended.  It’s really very easy!

Country Floral Embossed Colored Paper

The card base is Powder Pink Cardstock with a layer of Flirty Flamingo.  Then the embossed layer is placed on top of the Flirty Flamingo. I decided to try the Whisper White 5/8″ Polka Dot Ribbon on the card to see if I liked it or if it was too “busy” with all the colored flowers. I decided I kind of liked it!  It is there but really you barely see it so I think it adds something to the card.

For the greeting, I stamped a sentiment from the Beautiful Bouquet Stamp Set.  I didn’t want to take up too much space on the card with the sentiment, so I used the new Rectangle Stitched Framelits Dies.  I chose the smallest rectangle and didn’t add a layer.  After I die-cut this, I really liked how it looked on the card!

You can get the Country Floral Embossing Folder FREE during Sale-A-Bration, only until the end of the month!  Check out the choices in the Online Store today!

DON’T FORGET!  TODAY IS THE LAST DAY!  SIGN UP FOR PAPER PUMPKIN TO GET YOUR BIRTHDAY KIT AND GIFT IN MARCH!

JOIN HERE!

Paper Pumpkin Birthday March 2019 Banner

Image © Stampin’ Up! 2019


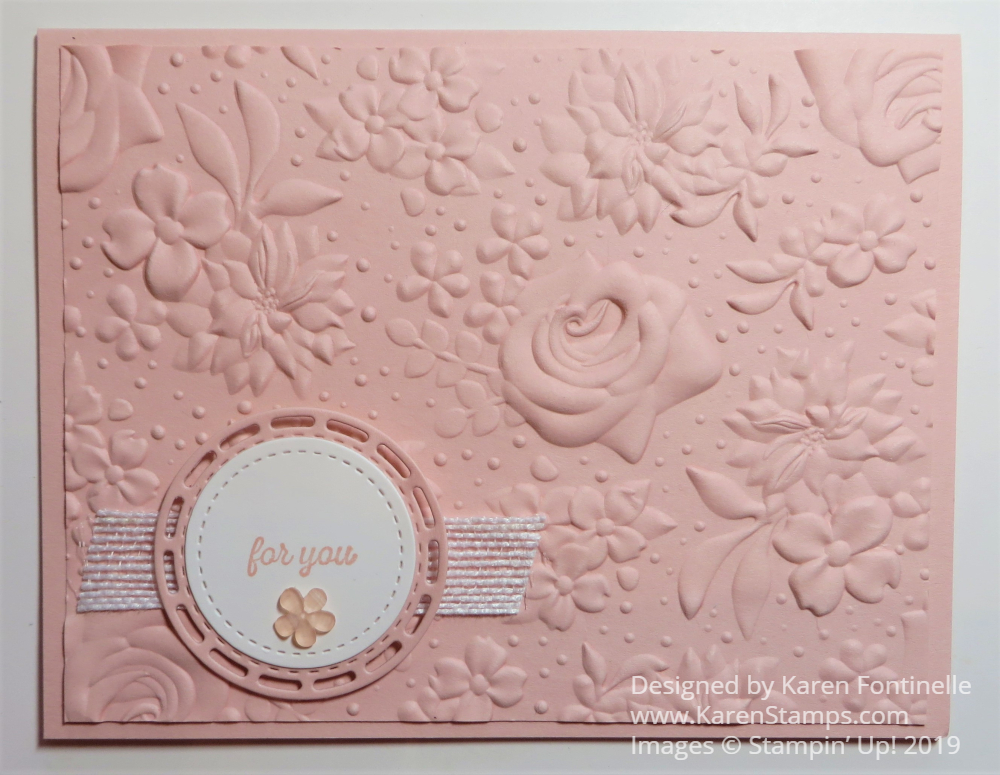
Country Floral Embossed Card For You

Country Floral Embossed Card For You

Uh yes, the Country Floral Embossing Folder is gorgeous, as you can see in this Country Floral Embossed Card For You.  These Dynamic Textured Impressions Folders (the heavy-duty ones!) really give a deep impression and make your work look absolutely beautiful.  This floral folder is available FREE during Sale-A-Bration with a $50 purchase.  If you want to make some easy, pretty cards like this one, this folder will be worth it!  While supplies last, or until March 31…..and some supplies are running out pretty quickly, like the Organdy Ribbon and the framelit dies, Hop Around, for the frog stamp set, So Hoppy Together. So sad!

This card was very easy to make.  I used Powder Pink for the card base and also the embossed piece.  This is one of the 2017-19 In Colors, which will be retiring at the end of this catalog. Keep in mind, sometimes those retiring colors, especially the reinkers go fast, so try to order what you want before the rush.

For the greeting, I used the stamp in the Itty Bitty Greetings Stamp Set. This is a great stamp set to own with lots of greeting choices for almost anything.  It is stamped on Whisper White in Powder Pink Ink and die cut with a Stitched Shapes Framelits Die circle.  This is layered on a fancier die cut circle from the Stitched Labels Framelits Dies.  I put it over on the left side of the card because I didn’t want it to detract from the bigger flower on the embossed piece. To set it off a little bit I used a piece of the Whisper White 5/8″ Flax Ribbon.

Of course, I wanted to have one more little embellishment, but not too much, so I looked in my stash and found the Frosted Flower Embellishments.  Although the flower isn’t the exact same pink, I like the look of one little flower in coordination with all the embossed flowers on the card front.

Don’t wait to order if there are specific items you would like to get because this Sale-A-Bration season has seen lots of backorders and even items selling out.  Who knows what will happen here in the last few weeks!  Remember, Salel-A-Bration does come to an end March 31 and it is already March 8th.  Time will fly!

SHOP STAMPIN’ UP! ONLINE HERE!

Lace Embossed Heart Valentine Card


Lace Embossed Heart Valentine Card

The Lovely Lipstick Foil Sheets are beyond gorgeous, as you can see on this Lace Embossed Heart Valentine Card.  They are something you can earn FREE during Sale-A-Bration with a $50 purchase and you get two colors! Check out this card I made with the Grapefruit Grove Foil Sheet the other day.

Foil is difficult to photograph with the glare so you can expect that the paper in real life is much more beautiful than this photograph can capture!  Not only is the color of the foil gasp-worthy every time you look in the package, but when you use the Lace Dynamic Textured Impressions Embossing Folder you really come up with something fancy!

This card base is the Lovely Lipstick Cardstock with a layer of Whisper White Cardstock embossed with the very pretty Tufted Dynamic Textured Impressions Embossing Folder.  This is another very nice embossing folder to have for when you want a little texture or interest in the background but nothing overwhelming.

The greeting is stamped from the Forever Lovely Stamp Set in Lovely Lipstick Ink.  It is popped up on Stampin’ Dimensionals over the die cut heart.

TIP:  When you are die-cutting and embossing, be sure to do the die-cutting first, then emboss.  If you emboss first, then run the piece through the Big Shot again to die-cut it, you run the risk of flattening out the embossed design.

The little design at the bottom is made of two die cut pieces of the Lovely Lipstick Foil.  It is a die in the Be Mine Stitched Framelits DIes.  It is shorter than the width of the card so I cut two pieces and trimmed off just a tiny piece of a swirl so it would better match the other piece it was connecting with.  It adds a nice little fancy border without taking anything away from the main focal point of the card.  I just used teeny tiny dots of Multipurpose Liquid Glue to adhere that piece.  Adhesive sheets would be good to use!

The large heart is also die-cut with the Be Mine Stitched Framelits Dies.  You might consider the Meant to Be Bundle containing these dies plus the Meant to Be Stamp Set and save 10%.  Not to mention, purchasing the Bundle earns a FREE Sale-A-Bration item!  And if you order another $50 worth of product, you can choose two FREE Level 1 Sale-A-Bration items or 1 of the Level 2 Choices.  What a great deal!!

It’s time to make Valentines so make sure you have all the supplies you need!  Just remember that hearts are for any time, not just Valentine’s Day so don’t hesitate to purchase Stampin’ Up! hearts whenever they have them!  Think of weddings, engagements, anniversaries, even just thinking of you or graduation. Lots of opportunities to use hearts!  And these are lovely ones this year!

Lace Embossed Heart Valentine Closeup

SHOP STAMPIN’ UP! ONLINE HERE!


Embossed Grapefruit Grove Foil Heart Valentine Card

Embossed Grapefruit Grove Foil Heart Valentine Card

How about this Embossed Grapefruit Grove Foil Heart Valentine Card?  Isn’t that foil heart just magnificent?  I’m not bragging, I just love that Grapefruit Grove Foil Paper and embossing it with the Lace Dynamic Textured Impressions Embossing Folder really puts it over the top!

The good news is that the package of Grapefruit Grove & Lovely Lipstick Foil Papers is just gorgeous!  Every time open the package I just gasp at how pretty the colors are!  The bad news is that Stampin’ Up! says it is possible they will run out before the end of Sale-A-Bration, so if you want these foil papers you should order them as soon as possible.  The fact that they are FREE during Sale-A-Bration with a $50 purchase is amazing.

The base of this card is the same color as the first layer.  I wanted to use pink.  I think I used Powder Pink.  The top layer is embossed with the Polka Dot Basics Textured Impressions Embossing Folder.

The foil heart is quite large so it fits nicely on this card.  I put it off to the side so I could use the Whisper White 5/8″ Polka Dot Tulle Ribbon to wrap across the front and tie in a bow.  I love this ribbon!

The greeting is from the Forever Lovely Photopolymer Stamp Set.  I played around with the greeting to see where the best place would be to place it.  When you are designing a card don’t be afraid to move things around, try different things, whatever it takes and you will be able to tell when it all comes together!

Valentine’s Day is in two weeks so you have time to order supplies and make some Valentines!  What could be more fun?!  Remember, the price of postage went up to $.55 although if you have the “Forever” stamps they are fine. Just check the USPS site for all the postage prices.

Shop Stampin’ Up! For Valentine Supplies!


Be Mine Valentine Hearts Card

Be Mine Valentine Hearts Card

Here’s a simple but elegant Be Mine Valentine Hearts Card made with three die-cut fancy hearts and a few little hearts plus a greeting.  The colored hearts are made from the  Grapefruit Grove & Lovely Lipstick Foil Sheets.  I am telling you, when you open this package of foil sheets you will just die over how pretty the colors are!!! The colored hearts on this card are made with the Lovely Lipstick Foil Sheet. It is so beautiful in person. And guess how much they cost?!  They are FREE, with a $50 purchase during Sale-A-Bration!  And we all know it’s plenty easy to spend $50 at Stampin’ Up!

To make the hearts, I used the fancy heart die in the Be Mine Stitched Framelits DiesI probably bought the set because of this fancy heart!  There are lots of hearts and they have the “stitching” on them.  You might miss that in the name of the dies!  They are “Stitched Framelits Dies” and that makes them fancier and prettier!  We can always use hearts in our cards and projects so don’t miss this set!  For a Bundle, go ahead and get the stamp set also,  Meant to Be, so you can save 10% on both!

I used the Multipurpose Adhesive Sheets on the back of the foil so I wouldn’t have to use glue to adhere the hearts to the card. Normally this is a great thing to do with intricate designs that are hard to adhere with glue because there are no large enough areas to apply the glue to. But when I made this card, I had a mess with all the teeny tiny pieces in the die cut edges of the hearts all sticking to my fingers!  I think it was “operator error” somehow. Usually people really like the Adhesive Sheets!  I seldom remember to use them and when I did remember to use them, I couldn’t find them, so there you go!  Maybe I am better off just using glue!

The card itself and the two white hearts are made with the beautiful Shimmery White Cardstock.  This paper is one of my enduring favorites!  It has such a subtle shimmer to it yet it looks much more elegant than just Whisper White.  It is also good for watercoloring if you don’t have the official watercolor paper from Stampin’ Up!.

The little hearts are die cut from the Lovely Lipstick Foil using the die that cuts out a whole grouping of hearts.  I just wanted a few to use somehow on this card.  I placed two inside the white hearts and scattered the others randomly on the card.

I needed a small greeting for this card and I found one in the Itty Bitty Greetings Stamp Set.  This is a great set to own because we can never have enough words!

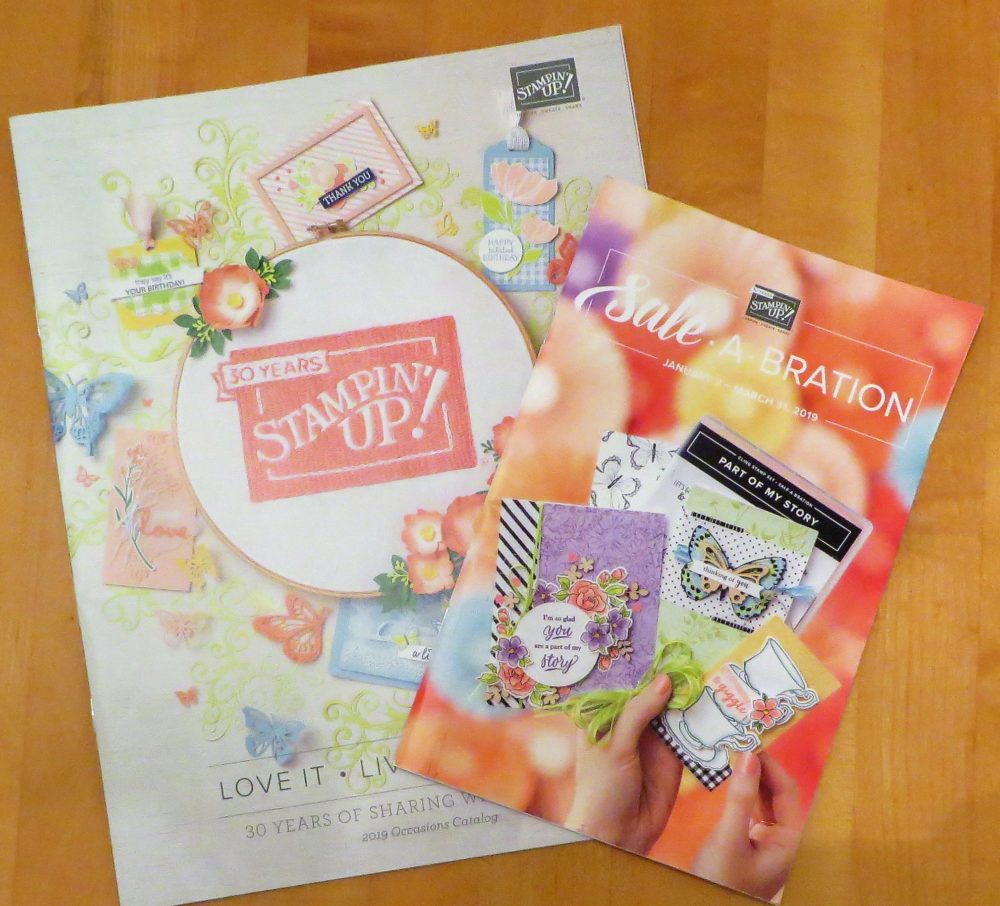
Occasions 2019 and Sale-A-Bration 2019 Catalogs

Check out the great Occasions Catalog and see what you can get for FREE during Sale-A-Bration in the special Sale-A-Bration Brochure!  With every $50 purchase, you earn a free SAB item.  With a $100 purchase, you can choose two items for the two $50 purchases or you can choose one of the special $100 items! At $150 you also earn Stampin’ Rewards plus Sale-A-Bration.  At $250, you earn those PLUS an extra $25 in Stampin’ Rewards! All the information is HERE!

If you are interested in Stampin’ Up! products and would like these catalogs, just send me your contact information and I can mail them out to you.  While you can view them online, nothing beats having a Stampin’ Up! catalog in your hands!

If you need any supplies to make this Be Mine Valentine Hearts Card, you can contact me to put in your order or just go to the Stampin’ Up! Online Store HERE!


Decorated Valentine Tin

Decorated Valentine Tin

Remember when we used to find a lot of crafty things to use at the Dollar Spot at Target?  I haven’t in a while but the other day I found this pretty tin that looked like it could be decorated for Valentine’s Day!  It already has a lot of cut out hearts on the tin so I added a big heart and new ribbon.

To decorate this tin, I cut out several different hearts with the Be Mine Stitched Framelits Dies on page 6 of the Occasions Catalog.  I played around first with the grouping of little bitty hearts, but I wasn’t pleased with that for the tin. If you ever need a bunch of tiny little individual hearts cut out, run that die through the Big Shot and you’ll have lots of little hearts even if you don’t use the grouping!

Next, I cut out one of the large printed hearts from the All My Love Designer Paper. It is one sheet with large hearts and small hearts. You could use this sheet as is or you can cut out all or some of the hearts. I also used the very frilly heart die to cut out a heart to overlay the printed heart.  I liked that on the tin!

In the All My Love Suite in the Occasions Catalog is a package of two ribbons, the All My Love Ribbon Combo Pack.  One spool is Lovely Lipstick 1/2″ Ribbon with a white stitched edge and the other spool is Flirty Flamingo 1/8″ wide ribbon. I used both ribbons to wrap around the tin with the ends meeting in the front.  Then I adhered the heart I’d made over the ribbon ends using Stampin’ Dimensionals on the back.

Decorated Valentine Tin Closeup

A pretty easy way to decorate this Valentine tin a little more!  Since it was already pretty “busy” I didn’t want to add much more.  I could have stamped and adhered a greeting across the front, but I liked it the way it was.  Then just put some candy inside, a candle, notecards or whatever you like.  You could even use it to hold stamping supplies on your craft desk because the hearts aren’t only for Valentine’s Day!

You don’t have to find this exact tin, but you might find something similar, maybe already in your house, like a votive holder and this is one easy way you can decorate it!

Check out the Occasions Catalog All My Love Suite of products!