Category Archives: Birthday

Dress Up Birthday Card

Dress Up Birthday Card

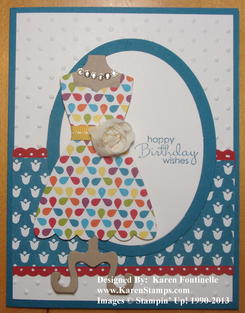
Now that my daughter has received her birthday card, I can post it here.  The paper is retired now, but most things are current for you to make your own card like this. The Dress Up Framelits are so fun to use! Just cut out a dress in whatever paper you like, maybe cut two and then have a different top and bottom to your dress, or even a jacket! Almost like playing with paper dolls!

Use the Oval Collection Framelits to die cut a background.  I used the birthday stamp from Petite Pairs for the greeting.  This stamp set is on sale now in the Grab Your Greetings offer for 25% off.  Be sure to check it out because it is a good sentiment stamp set to own.  The other two choices are good ones, also.

The Real Red border at the top and bottom of the retired designer paper is punched with the Dotted Scallop Ribbon Border Punch.  What I love about this punch is you can show just the tiny scallops on the edge or you can show the dotted part, so versatile!

If you would like to own the Dress Up Framelits and make oh so many cute projects with them, please visit my Stampin’ Up! Online Store here to place your order.

Another Birthday Purse Card

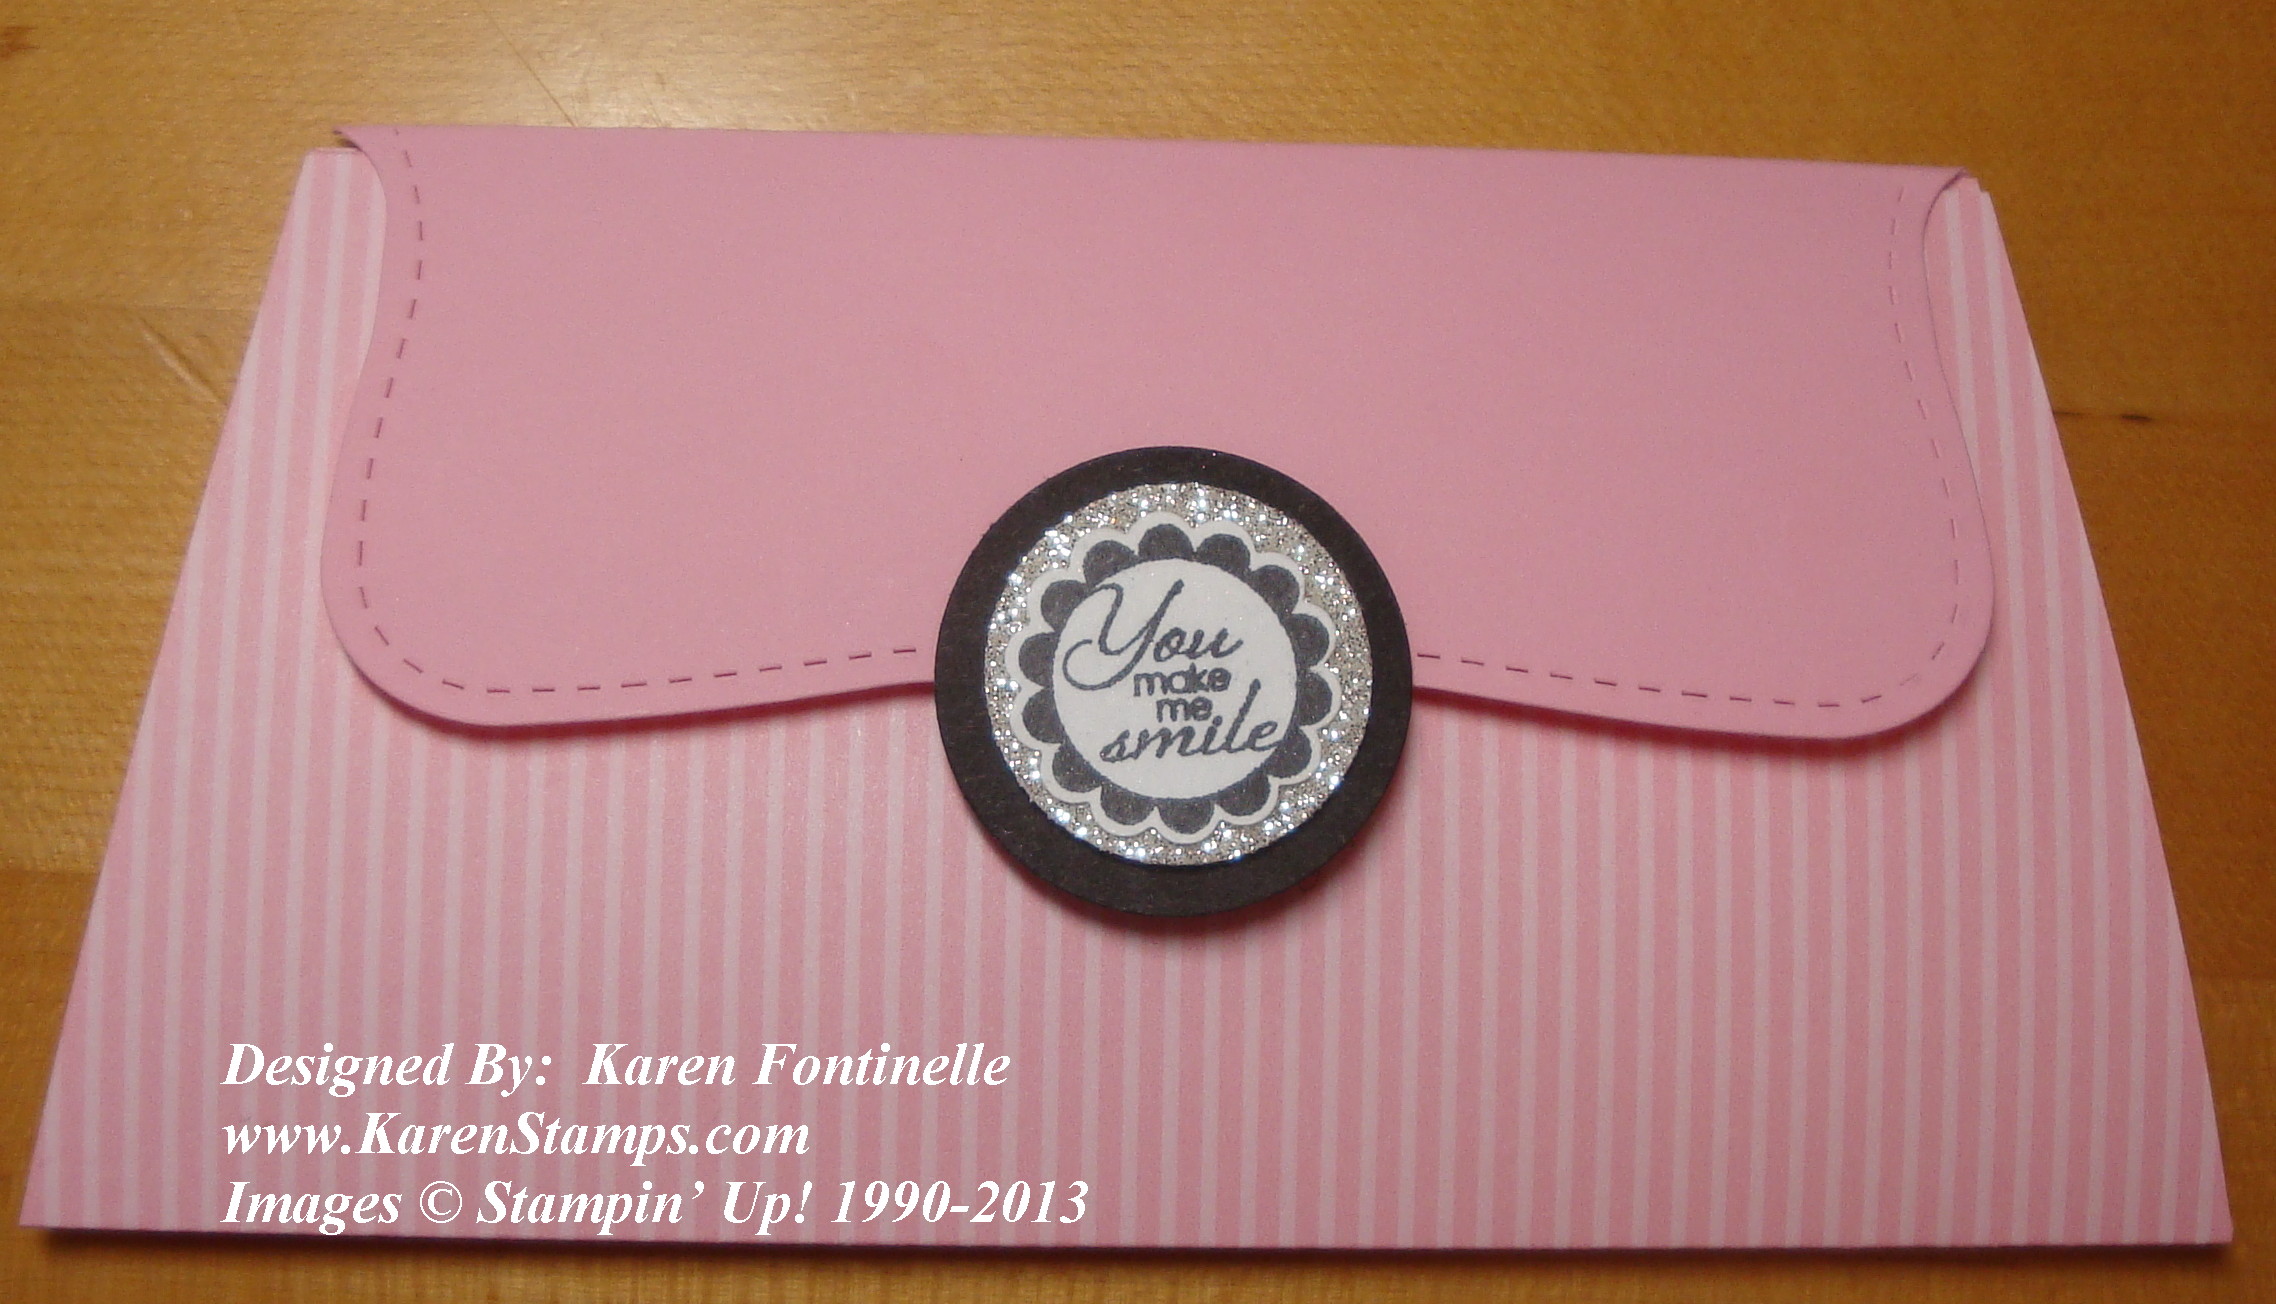
Pink Purse Card

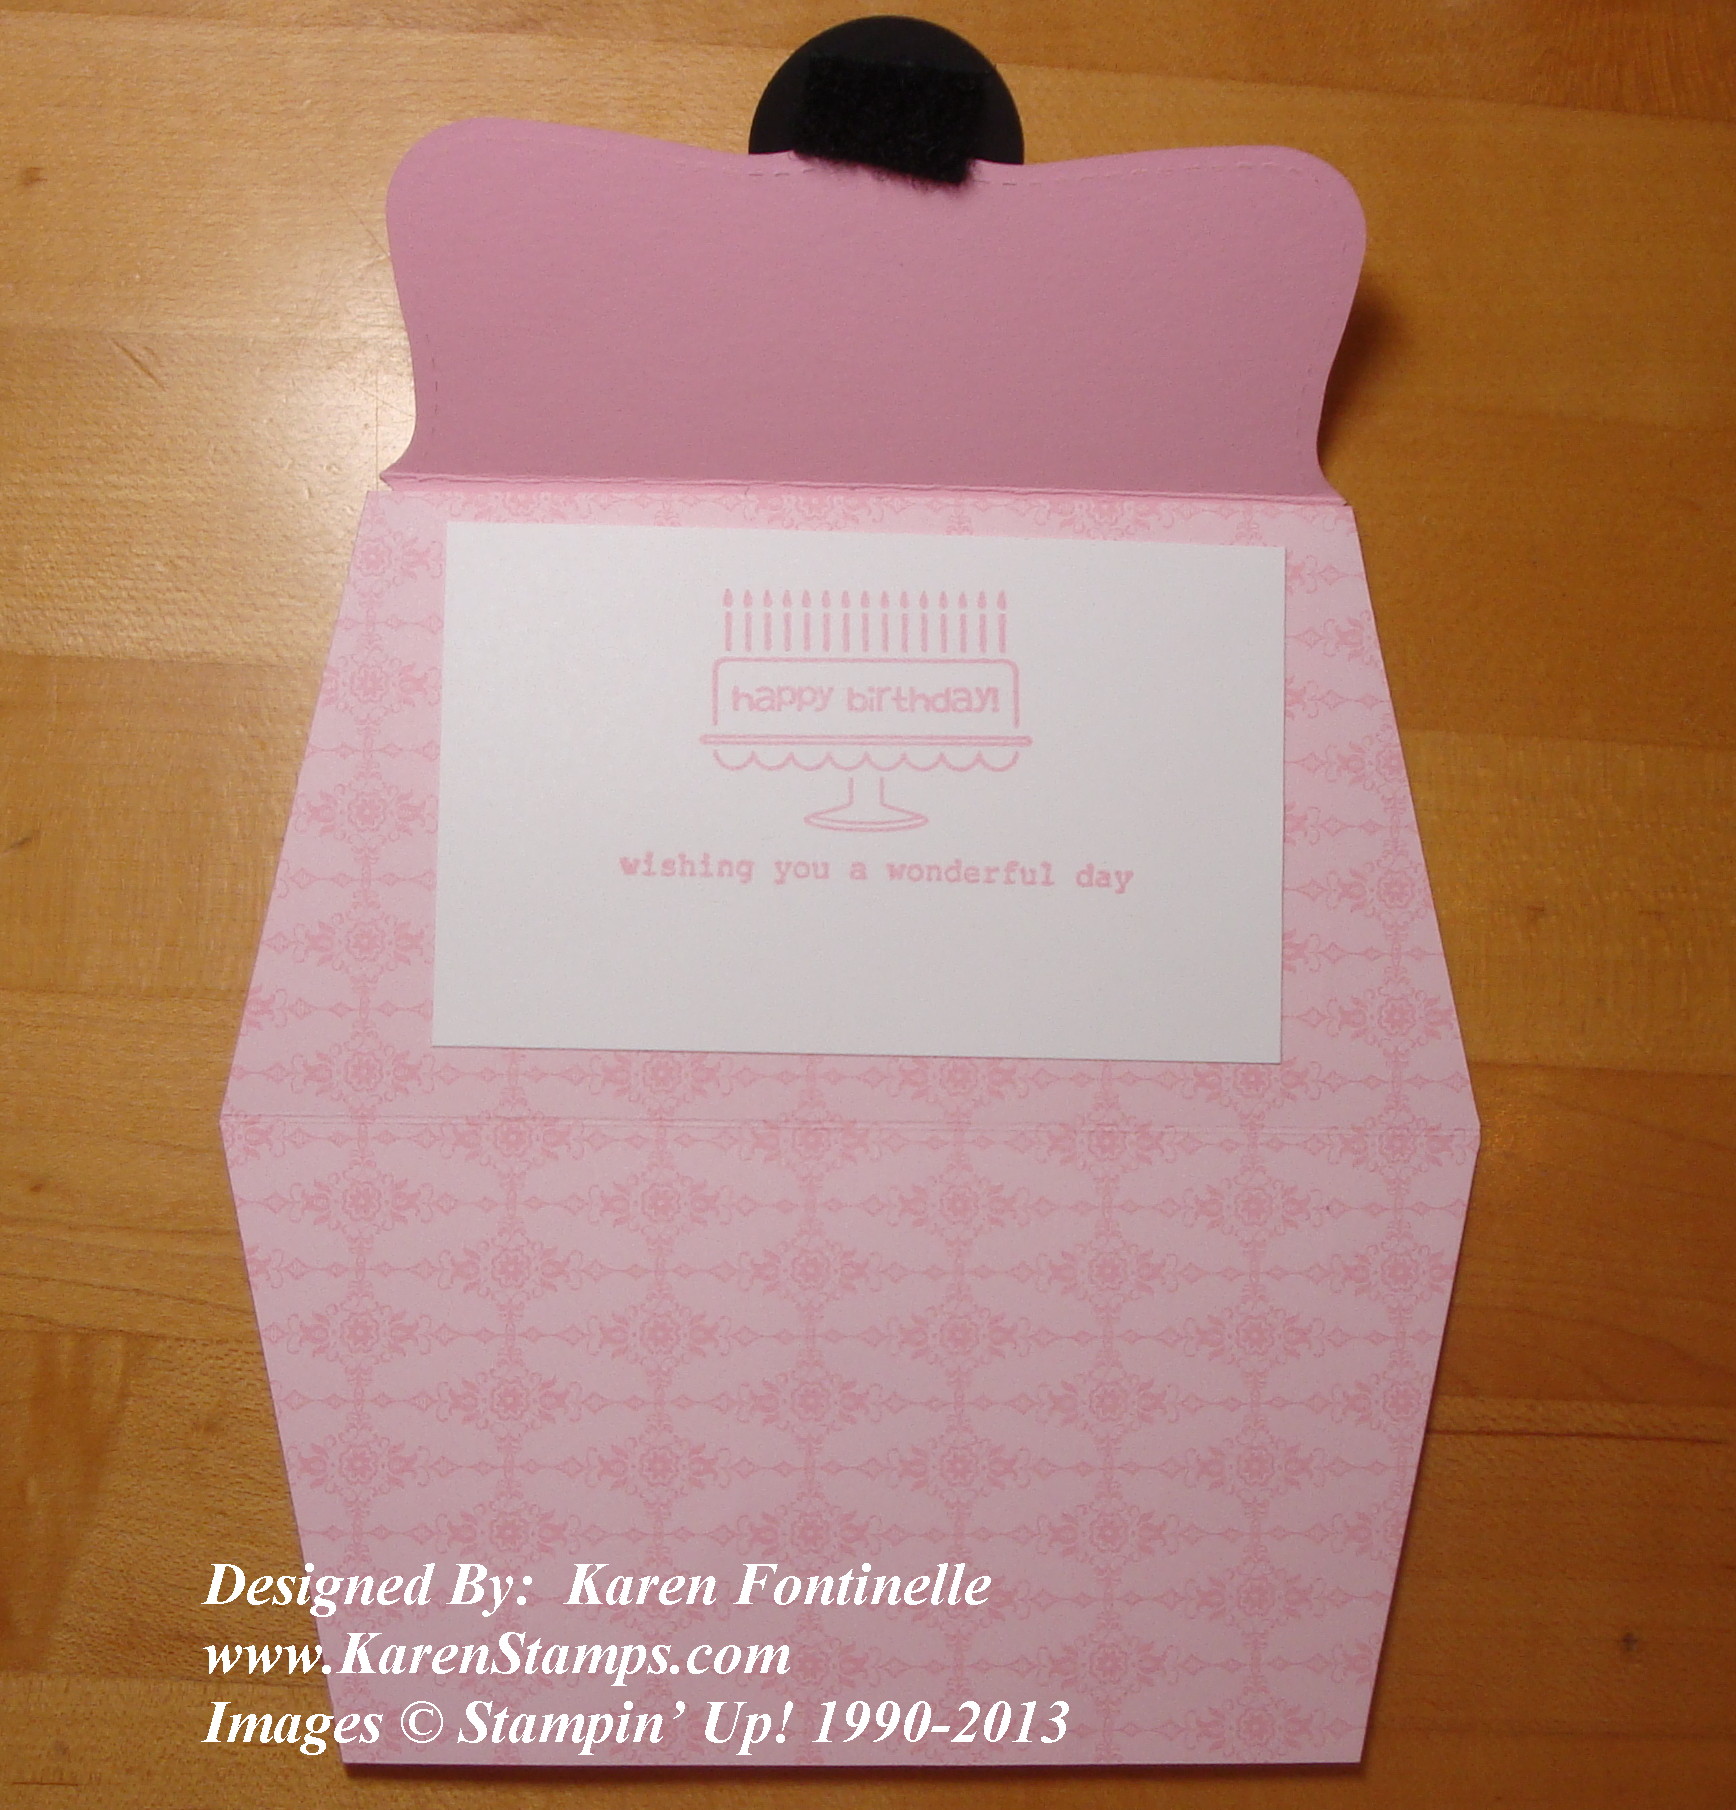
I think these purse-shaped cards make great birthday cards for young girls! They could also be more than a birthday card.  Instead of just putting a greeting on the inside, make a pocket of some sort and turn it into a gift-card holder.  It is graduation time and I read that cash is the most welcome gift!  Make a pocket inside the card and insert cash or a gift card or check.  My grandmother used to always say you can’t give someone a purse without putting a penny in it!  Must be bad luck or something! Even though I made these purse cards for birthdays, think of all the other fun occasions you could make them for and the ways you could change them out!  Make it super-fancy with some Glimmer Paper or a sparkly closure or flower on the front! Make party invitations out of this idea!  It’s one of those projects that once you make one, you want to make more!

You can barely see the fuzzy thing underneath the closure.  That’s a piece of velcro which will hold the card closed.

Shop for Stampin’ Up! supplies at my Online Store!  Be sure to check the Clearance Rack, too!

Pink Purse Card Inside

Make a Purse Card

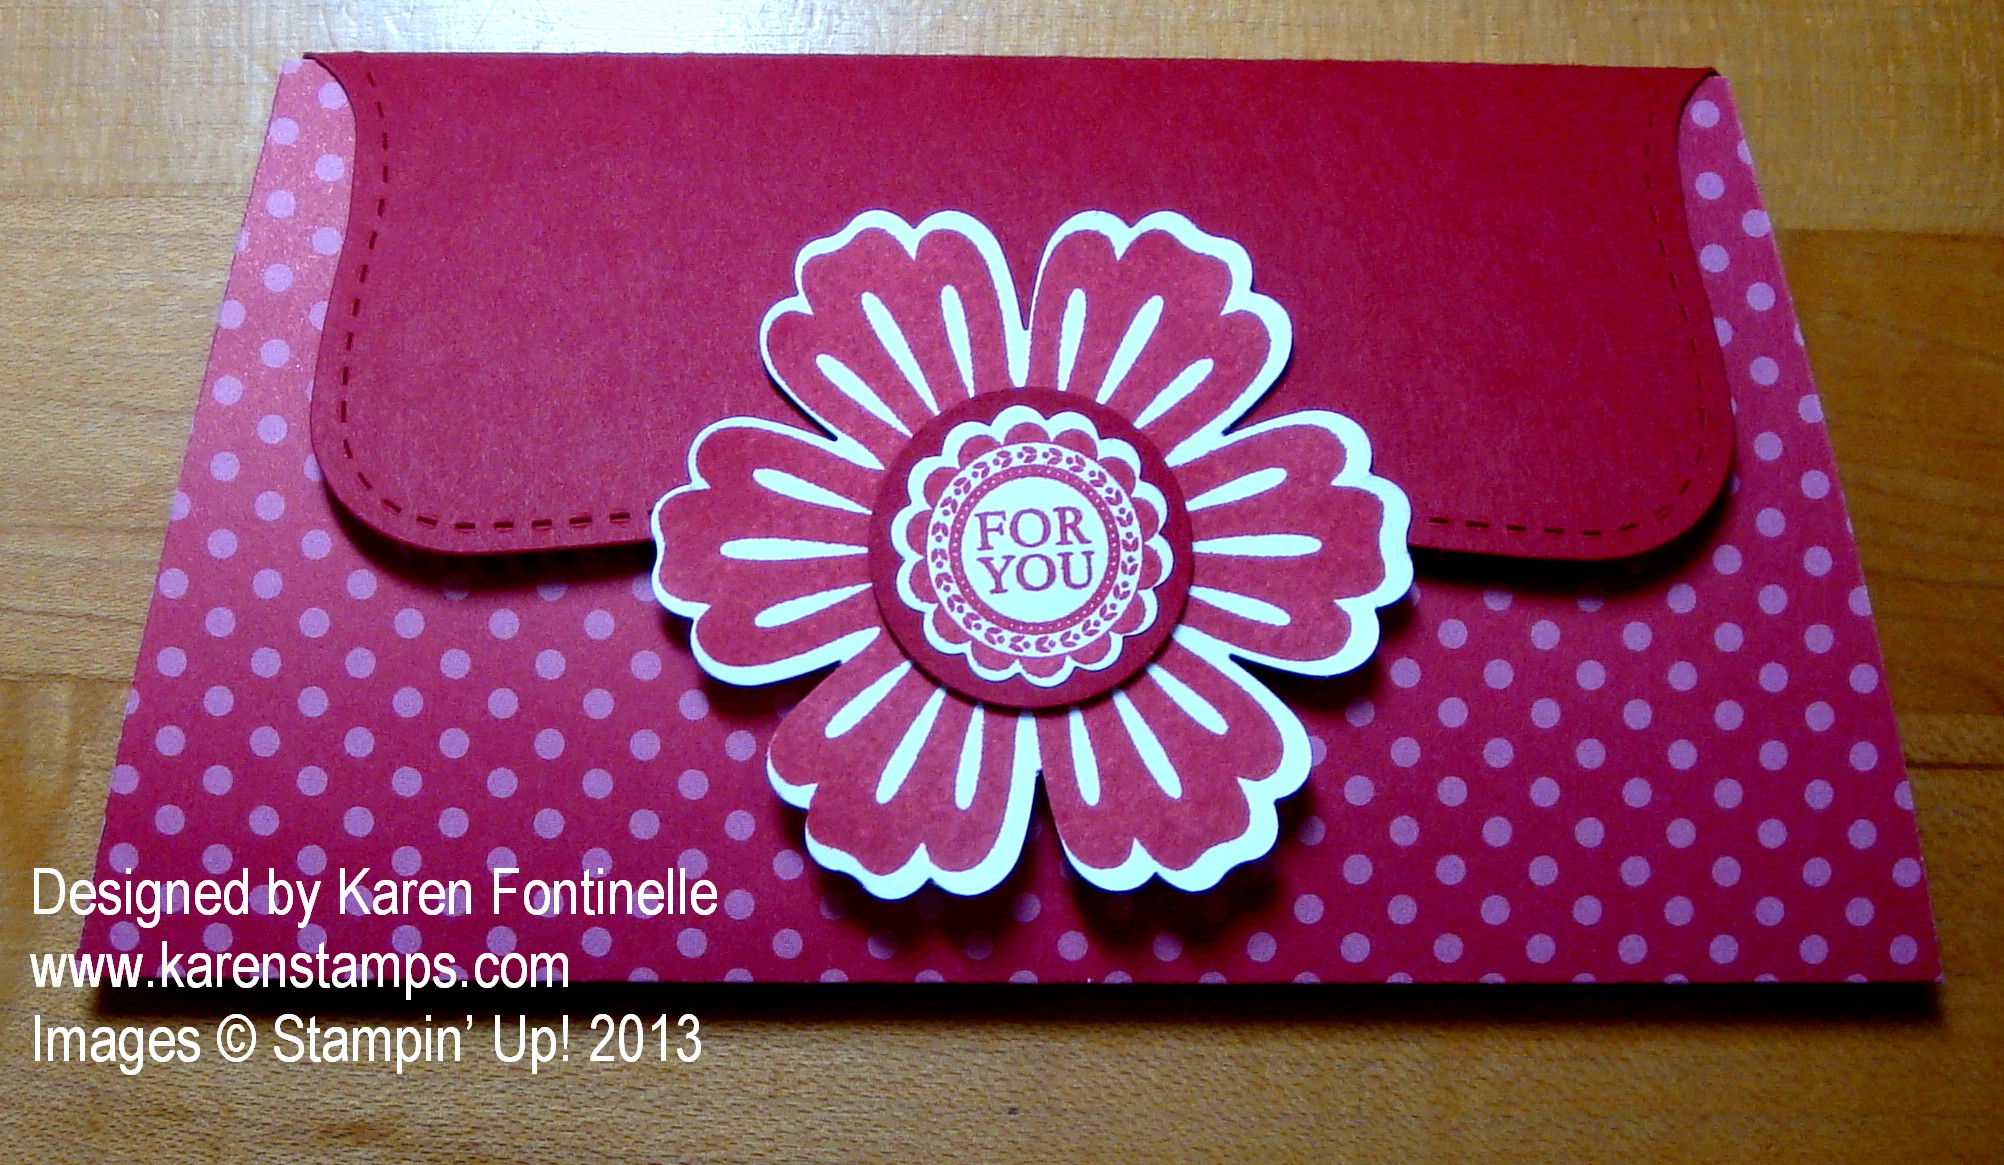
Red Purse Card

When I needed to make birthday cards for my twin nieces I found this idea of making purse cards for them. My cards just fold completely flat, but you could make yours more 3-D. I used a piece of designer series paper for the purse shape so that there would be a nice design on the inside when it was opened.  You could just as easily use card stock.  The Top Note Die folded in half is used for the top closure of the purse.  What would we do without the Top Note Die?! I’m glad it is not retiring next week!

  • Cut out the Top Note Die with the Big Shot. Score and fold in half lengthwise.
  • Cut a piece of designer series paper (DSP) 6″ x 6″. Score at 3″ and fold in half. Be mindful of which way the pattern is going and which side you want on the outside.
  • Now you will need to trim the sides of the purse from the bottom to the top edge on a diagonal. To do this, measure in on the top open edges about 5/8″ from each side. Use your paper trimmer to cut from that point on each side to the bottom edge of the folded side. You know, make it look like a purse shape!
  • Adhere the Top Note Die to the back of the “purse”. Make some sort of decoration for the front closure.  Adhere to front of Top Note Die on the front of the purse. Use a small piece of velcro in order to hold the purse closed.
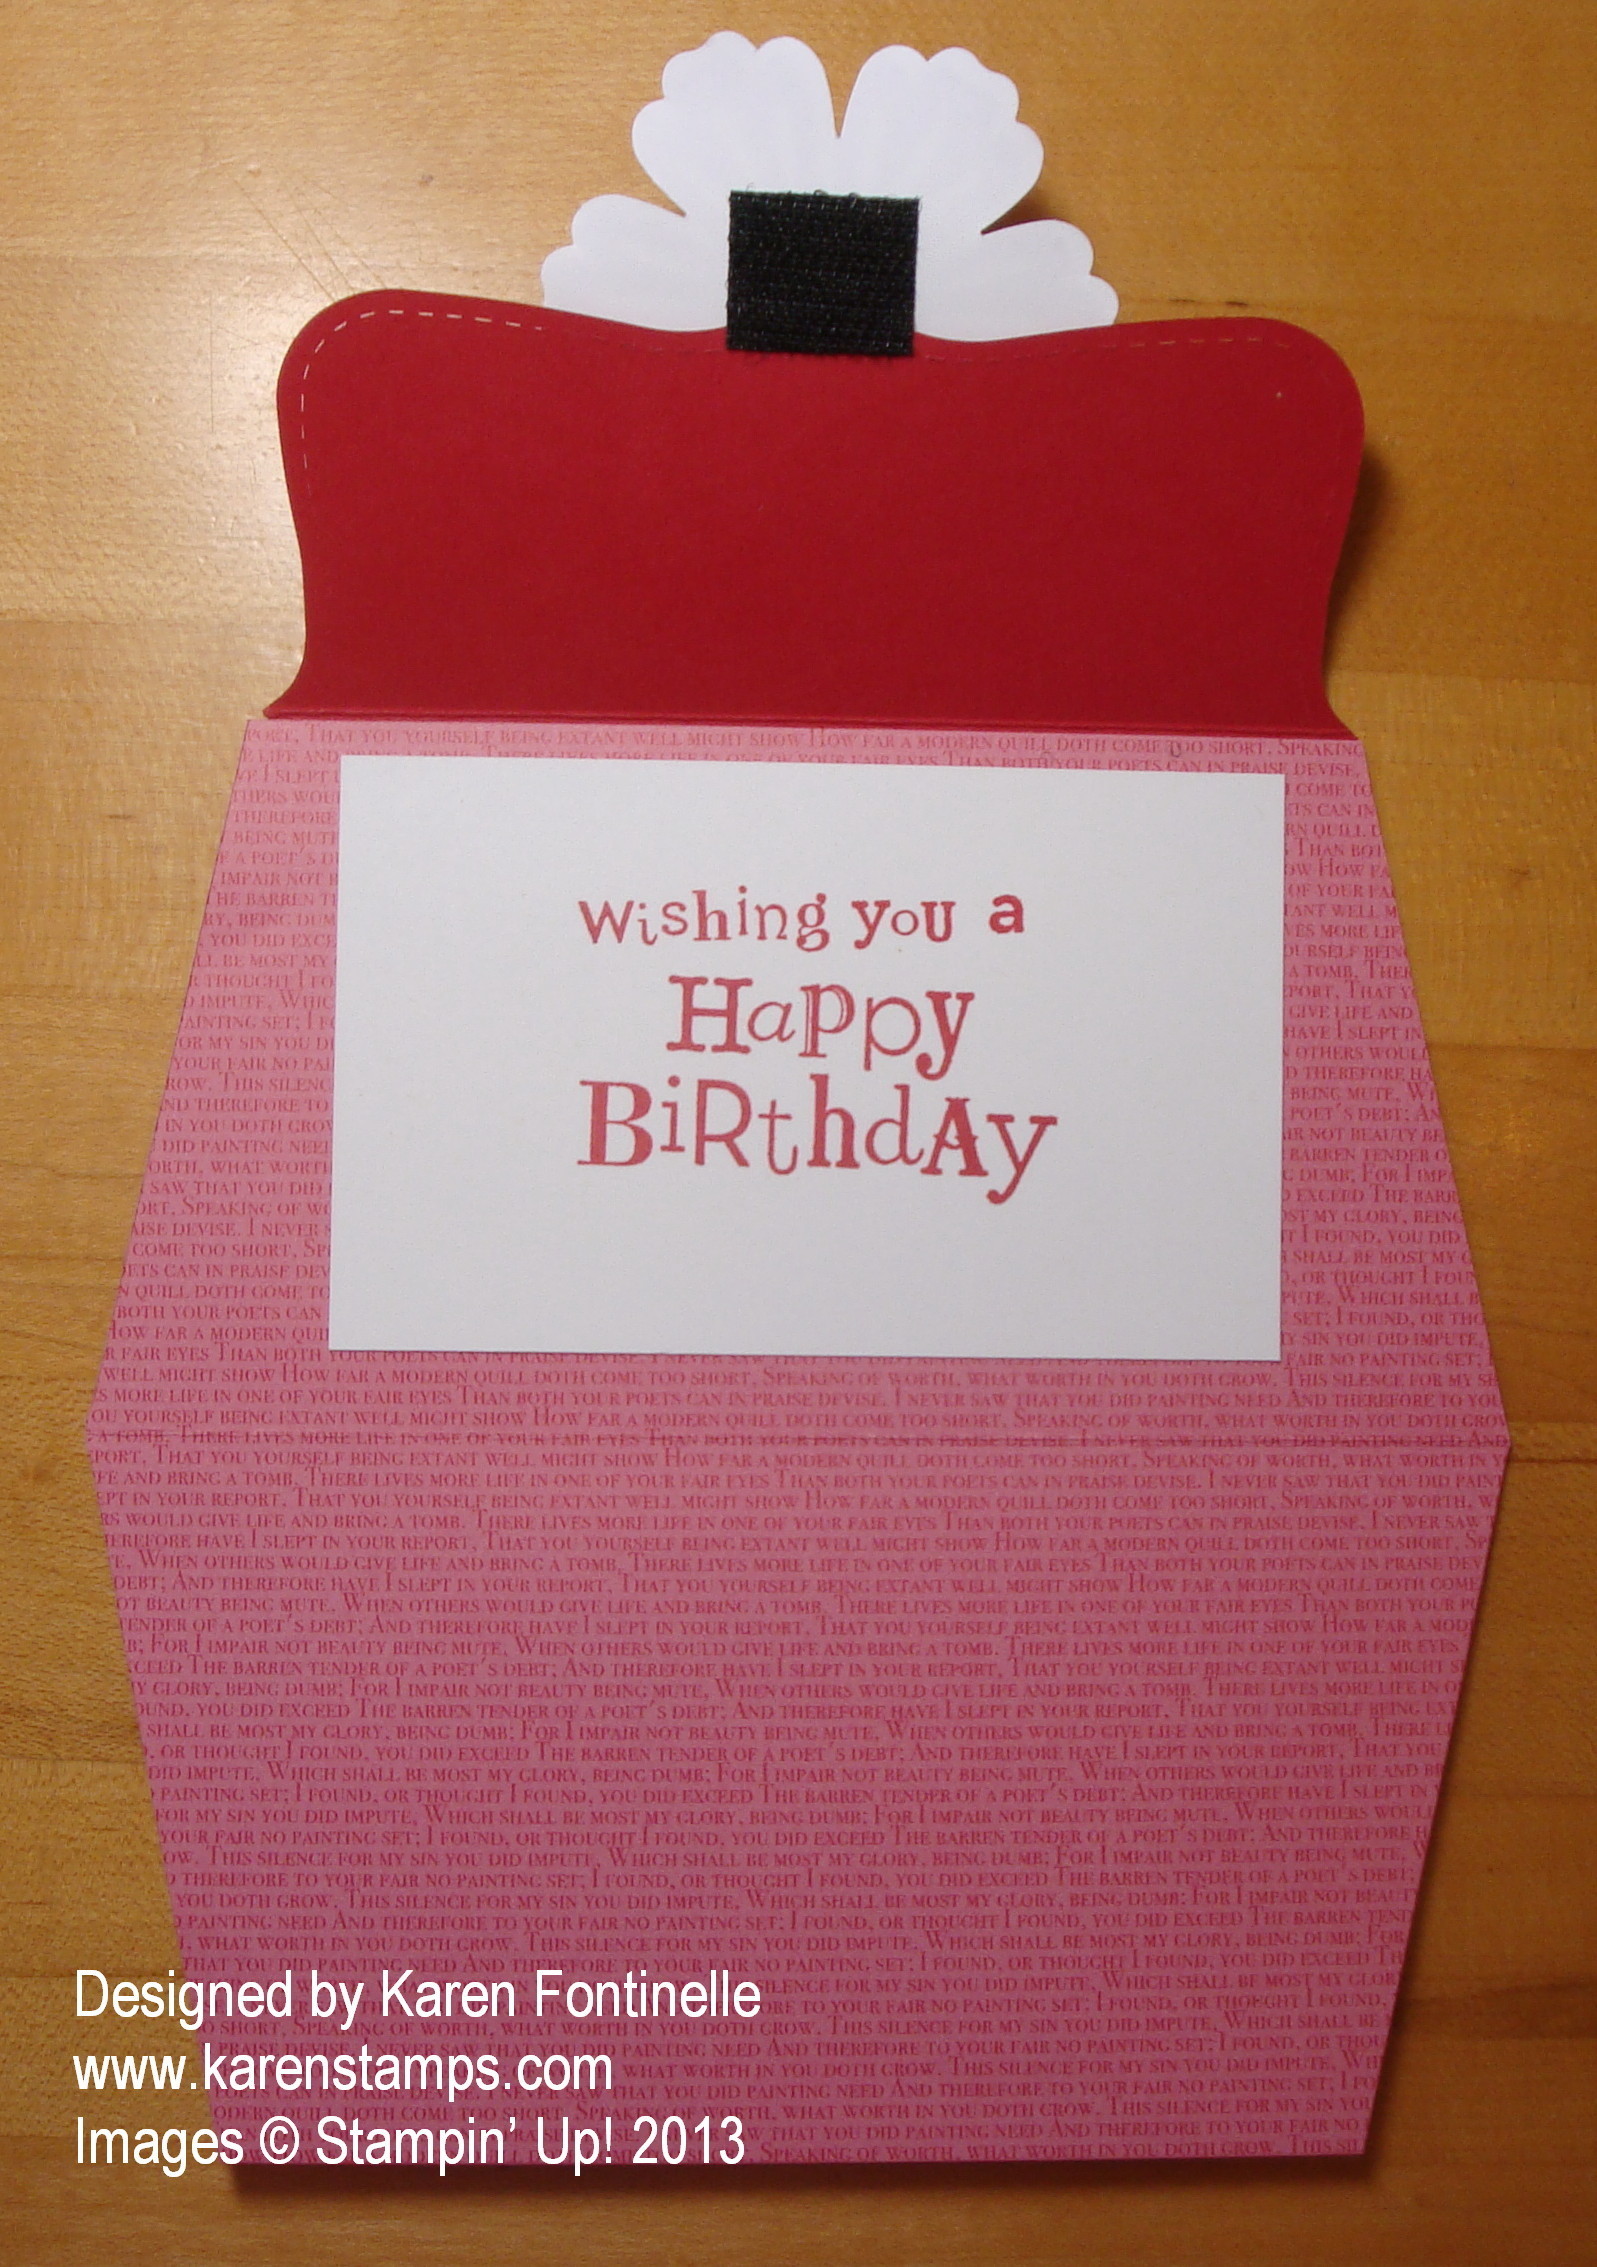
  • Depending on your DSP design, you’ll probably need to stamp the greeting on a plain piece of card stock and adhere to inside of purse card.
  • If you want, you could make some ribbon handles for the top of the purse.

Here is the inside of the card.

Purse card Inside

To order any card-making supplies, just visit my Stampin’ Up! Online Store here. Remember, some stamps and accessories are only available for about one more week!

Make a Gift Bag for Mother’s Day!

Mother's Day Twitterpated Paper Gift Bag

Do you need a pretty gift bag for your Mother's Day gift…or really any occasion? You can use this design and just change out the paper for whatever person or occasion you want a gift bag for. If it's for a man, maybe leave off the paper flower but add a stamped image or greeting instead. You'll think of something!

I just found one of those small brown handled bags that you get now and then at the store.  If you save them, you'll always have a stash to go to when you need a nice gift bag.  Just choose 3 patterns from a pack of Stampin' Up! designer paper and cut one larger piece for the bottom section, one smaller piece for the top and  a piece to go across and cover up that line where the two papers meet and make a cute border. You could leave it as is or you could cut or punch a scalloped edge or whatever to jazz it up.

For my bag, I used three patterns out of the Twitterpated Designer Series Paper. For a pretty accent I added three buttons from the  Designer Buttons Subtles CollectionEach is tied with a small piece of White Baker's Twine. For something at the bottom corner of the bag, I chose to make a flower with the Flower Folds Die and the Big Shot using a pattern from the Twitterpated DSP.

Some of these items are on the Stampin' Up! Retired List so better do your shopping soon!  Anything on the list can sell out at any time so you don't want to be disappointed. Just click that link to go to my store with the retiring products and shop to your heart's content!

New Dolled Up Birthday Kit from Stampin’ Up!

Dolled Up Birthday Kit

Images copyright Stampin' Up! 2013

If you like kits, I'm sure you will love this brand new Dolled Up Birthday Kit Stampin' Up! just released today! It was designed by another demonstrator and then Stampin' Up! made it into a kit! You know anything with the Vanilla Flower Trim is going to be gorgeous!

The Dolled-Up Birthday kit includes the following:

  • Dolled-Up Birthday Clear-Mount Stamp (1)
  • 8-1/2" x 5-1/2" Crumb Cake Cardstock (6 pieces)
  • 2" x 4-1/4" Very Vanilla Cardstock (6 pieces)
  • Very Vanilla Medium Envelopes (6)
  • Tea Lace Paper Doilies (6)
  • Dress Up die-cuts (6)
  • Soft Suede Classic Stampin' Spot (1)
  • Vanilla 5/8" Flower Trim (6 pieces)
  • Sponge Dauber (1)

Get everything you need to make six cards for only $15.95 (item 133913)!*

*Adhesive not included.

To assemble one card, follow these simple instructions:
1. Place the stamp rubber side up and ink with the Soft Suede Classic Stampin’ Spot.
2. Stamp “Happy Birthday” at the bottom of the card front.
3. Ink the Sponge Dauber with Soft Suede ink and gently antique the doily and the edges of the dress form.
4. Adhere the pieces to the card front in this order:
1. Doily
2. Very Vanilla Cardstock
3. Dress form
4. Flower

I think this one is a winner if you like kits and a "girlie" one at that! And nothing says you can't change it up a bit to follow your own creativity!

Find the Dolled Up Birthday Kit in my Stampin' Up! Online Store.


All Dressed Up Belated Birthday Card

All Dressed Up Belated Birthday Card

Do you have trouble getting birthday cards sent out on time? I can know a birthday is coming up for weeks and then still not get the card mailed on time or in enoughtime! That's why I like the greeting in the stamp set All Dressed Up. That's not exactly what it says, but I used parts of it to make the greeting I wanted. The stamp set All Dressed Up is really fun to play with, especially to use the Dress Up Framelits Dies with it and save yourself all that cutting time.  There are lots of ways to play with these dresses,whether you are using the stamped dress or making your own with the Dress Up Framelits DIes.

To make the necklace, I just used a piece of Baker's Twine and a Rhinestone Jewel.

For any stamping supplies you may need, please visit my Stampin' Up! Online Store!

New Bombs Away Birthday! Photopolymer Stamp Set Available

New Photopolymer Stamp Set
Stampin' Up! has released a new photopolymer stamp set called Bombs Away Birthday! Photopolymer means they are completely clear and are to be mounted on the clear blocks. They're very sticky so they stay put on your block.
Bombs Away Birthday! Stamps
Click here for more information!


Click here to see the first Stampin' Up! photopolymer stamp set, Designer Typeset.

Stampin’ Up! Kraft Gift Box Decorated with Patio Party Paper

Stampin' Up! Kraft Gift Box Decorated with Patio Party Paper

The Kraft Gift Boxes offered by Stampin' Up! are so much fun to decorate! On this one I used the Patio Party Designer Series Paper, which I admit I haven't used very much, but wow, I really loved how this turned out with this paper! I just measured the sides and top of the box, cut pieces of the Patio Party DSP and adhered them. With our double-sided designer paper it's so much fun to choose which side to use….well, even difficult at times since they both often look good!  I tied a Primrose Petals Stitched Satin Ribbon around the box and put a paper flower on top.  The paper flower is made with pieces cut from the Flower Folds Die. I punched a 1 1/4" circle for the flower center and put a Subtles Designer Button in the middle to top it off.

All very easy to do with a Stampin' Up! Kraft Gift Box and some designer paper…and my friend loved it!

If I were you, I would stock up on a couple packages of these Kraft Gift Boxes #124106 to use for those small gifts we often have. You get 4 boxes in a package for only $2.95. The boxes are 3.5" x 3.5" x 2.5"

You can order anything you want from Stampin' Up! online here!

Tea for Two Flower Folds Birthday Card

Tea for Two Flower Folds Birthday Card

Recently I had a customer order the Flower Folds Die and it made me realize I hadn't used mine in a while. Maybe it has something to do with spring coming, but I've been having a ball making flower cards with this die. I'm not even making fancy flowers, just die-cutting the flowers out of designer series paper and layering them one on top of the other. I randomly picked the Tea for Two Designer Series Paper and am enjoying the pretty colors that coordinate (although I did use Pool Party which isn't one of the listed colors!).

You can just glue down each flower…but I put glue only in the center of each flower so that I could fold the petals up. Of course when you are mailing, unless you use a special padded envelope, you can't get too dimensional, but the recipient can "poof up" the petals after they receive it! I used a few Mini Glue Dots to adhere the button, tied with a White Baker's Twine bow, to the center of the flower.  The greeting is from the stamp set Perfectly Penned (a very useful set!). Remember, most any of our stamps you can purchase in wood-mount or clear-mount.  The rubber is the same in either case, it's just a matter of personal preference.

Don't forget….you could also cut out fabric flowers with this die!  It's not just for paper! And you can cut several layers at once!

Why not get out something you haven't played with in awhile like I did today with the Flower Folds Die? You might find a new streak of inspiration!

A Birthday Card with the Chalkboard Technique

Birthday Card Chalkboard Technique

Some of us can’t seem to get enough of the chalkboard technique! Here is a birthday card using a banner and the chalkboard technique!

In case you are new to this chalkboard craze, the black card stock is stamped with Versamark ink and embossed with white embossing powder. You could also stamp with white craft ink. Then for me, the fun part is taking a small cloth or sponge or even your finger and smearing a little of that white craft ink onto the card to make it look like an old dusty chalkboard!  The look is not restricted to black card stock…lots of chalk boards were a dark green. Do whatever you want!  It’s your piece of art!

On this card, I used the More Amore Specialty Designer Series Paper in the Stampin’ Up! Spring Catalog, stamped with the Hearts A Flutter stamp set and cut out the banner pieces with the Hearts a Flutter Framelits Dies. Be sure to check out the Bundle if you are interested before you purchase!

Try out this technique!  It’s really fun and I love the look!  Once you are aware of it, you will see it in lots of advertising and lots of places!  Be trendy!  Try the chalkboard technique!

A Framed Birthday Collage for a Friend

Framed Birthday Collage for a Friend
I love how this framed collage turned out for a dear friend's birthday gift! I often pick up frames that I like just in case I come up with a stamping project I can use them for. This white frame intrigued me because of the extra space at the bottom. I thought maybe I could stamp something in that area or do something with it. There were lots of possibilities, but it took having every ribbon I owned out on the table until I came up with this ribbon design that I liked! Of course, the frame would have been fine even plain.
When I need a gift for someone, I often try to see if there is something I can make. With stamping I can make a personalized gift. It saves a trip to the mall for the same old/same old kind of gifts, and I can make something I hope they will like and will be a unique gift that no one else will give them. Rubber stamping opens so many creative opportunities to you and it is an easy skill to learn and do.
To make this I just measured the frame opening and did a little math…and just cutting some scrap paper samples…to see what size to make my squares. Then I just decorated each one with whatever idea I found or thought of. Don't ever let not having an idea stop you….once you sit down and play a bit, your creative juices will start flowing! And often, they overflow once you get going!!
Here is a close-up of the collage.
Framed Birthday Collage for a Friend Close-up
And here is a close-up of all the little tags I made to go in the tiny envelope.
Framed Birthday Collage Tags
Making collages like this to frame is a great gift idea because it is a personalized gift and can be as large or small as you like. Try one!
You can find any supplies you need at my Stampin' Up! Online Store here!

Valentines for Boys (or Robot-Loving Girls!)

Robot Valentines for Boys

Valentines are sometimes all "mushy" but here is a cute idea for valentines for boys! Not that they can't be for girls, too, of course…but in the craft world, it's often more difficult to find "boy" things. Anybody who loves robots will like these valentines…and not just for Valentine's Day either!  They would be just as cute for birthday cards or some kind of birthday party favors. The only bad thing is that the chocolate candy making up the body is pretty tempting and then the robot is kind of destroyed! But that's okay…we have to remember, it is only paper!

Of course I copied the idea from a couple I saw online a long time ago and then made them up my own way. On two, I embossed aluminum foil (the heavy duty kitchen kind) in an embossing folder in the Big Shot.

Embossed Foil

Here are close-ups of the robot valentines. The glare of the foil makes it a little difficult to take photos!

Robot Valentine
Here you can see the two chocolate nuggets forming the body (stuck together with one mini glue dot near the bottom of the candy and some Sticky Strip on the back.

Holding nuggets

Robot Valentine 2

Robot Valentine 3

Use your imagination and make some fun valentines like these! Once you get started, it is hard to stop!

Shop Stampin' Up! Online here at my Online Store!

Chalkboard Technique Birthday Card for a Friend

Chalkboard Technique Birthday Card

I’ve loved chalkboards (I called them blackboards) since I was a girl, so I can’t get enough of making these chalkboard cards! This chalkboard birthday card I made for my friend (and now that I know she received it, I can show it to you!). I got the idea of using the beautiful Framed Tulips Embossing Folder #121809 as a frame for the “chalkboard” online but the card I personalized for my friend. Just stamp with Versamark Ink #102283, emboss with White Stampin’ Emboss Powder #109132 using the new Heat Tool #129053, and my favorite part, rub a little White Craft Ink #101731 on the background with a soft cloth or a sponge (lightly) to give it the look of a real chalkboard with dust!! If you want, you can draw some border lines around the edges with a white Watercolor Crayon or one of the Stampin’ Up! Watercolor Pencils or any white pencil.

I used several stamp sets on this card!

The cute Pool Party button is from a Ribbon & Button Pack (Sycamore Street) #130812 in the Sale-A-Bration Brochure, which you can get FREE with a $50 purchase! The tiny little paper banner is also available FREE from Sale-A-Bration in the Sycamore Street Designer Series Paper pack #127540. You can even get both the designer paper and the Ribbon & Button Pack, plus the coordinating Madison Avenue Stamp Set FREE in a BUNDLE if you host a $400 party! Just get some friends to order with you and you might be able to take advantage of that bundle and lots more for being a hostess!

Just go to my Stampin’ Up! Online Store and place your order at your convenience! Or email me at Karen@KarenStamps.com if you need any help or would prefer me to place your order!

Another “You Are Loved” All-Occasion Card

You Are Loved All Occasions Card

This was just too easy, so I had to make another card with the You Are Loved stamp set! I chose Perfect Plum card stock and ink to give it the monochromatic look, stamped on Shimmery White card stock.  If you enlarge the photo, you might even be able to see the “shimmer” of the paper. Very subtle, very elegant, very pretty! I just used the greeting that was in the stamp set, or you could any other one, and tied a little Whisper White Taffeta Ribbon around the middle.  Beautiful card and couldn’t be simpler to make!

You could make a little package with this stamp set, colored card stock, Whisper White card stock and ribbon to spend $50 and then be eligible to choose a FREE product from the Sale-A-Bration Brochure!

  • You Are Loved Stamp Set (clear) #123779   $23.95
  • Assorted card stock #120954 or a single color  $6.95
  • Whisper White Card Stock  #100730   $6.95
  • Classic Stampin’ Pad (choose a color)  $5.95
  • 3/8″ Whisper White Taffeta Ribbon  #109070   $6.95

Total:  $50.75

Now if you wanted to add on some more items, like adhesive, envelopes, some bling (rhinestones, pearls, glitter, 2-Way Glue Pen), another greeting set, other ink colors, etc. you could spend another $50 and choose a second Sale-A-Bration FREE product!

Shop HERE at my Stampin’ Up! Online Store or contact me if you have any questions!

Patterned Occasions Cupcake Birthday Card

Patterned Occasions Birthday Cupcake Card

Here’s another sample of a card using the Sale-A-Bration stamp set Patterned Occasions. I found this polka-dot embossed card base in my “scraps” and I decided it would be perfect to use with the cute little cupcake in the Patterned Occasions stamp set. I could have stamped the cupcake in just one color and it would have been nice. To get the different colors on the one stamp, I used our Stampin’ Write Markers to color in the stamp. Then it is punched out with the 1 3/4″ Circle Punch and layered on the 2 3/8″ Scallop Circle Punch.  That is popped up on the 2 1/2″ Circle Punch with Stampin’ Dimensionals. The pretty new ribbon is found in the Spring Catalog on page 30, Melon Mambo 3/8″ Striped Organdy Ribbon.

You can get this fun stamp set FREE with a Sale-A-Bration purchase of $50 or more! Just spend $50 or more during Sale-A-Bration (Jan. 22 thru March 22) and choose one of the products in the Sale-A-Bration brochure.  For every $50 you spend, you can choose one product! Spend $150 and get a free pack of Silver Glimmer Paper, in honor of Stampin’ Up! 25th Anniversary year!

Go to my Online Store right now and do some window-shopping!  When you are ready, just place your order online and choose your free Sale-A-Bration item(s) for every $50 you spend before tax and shipping!  Let me know if I can help!