Category Archives: Birthday

Over The Moon Masculine Birthday Card

Over The Moon Masculine Birthday Card

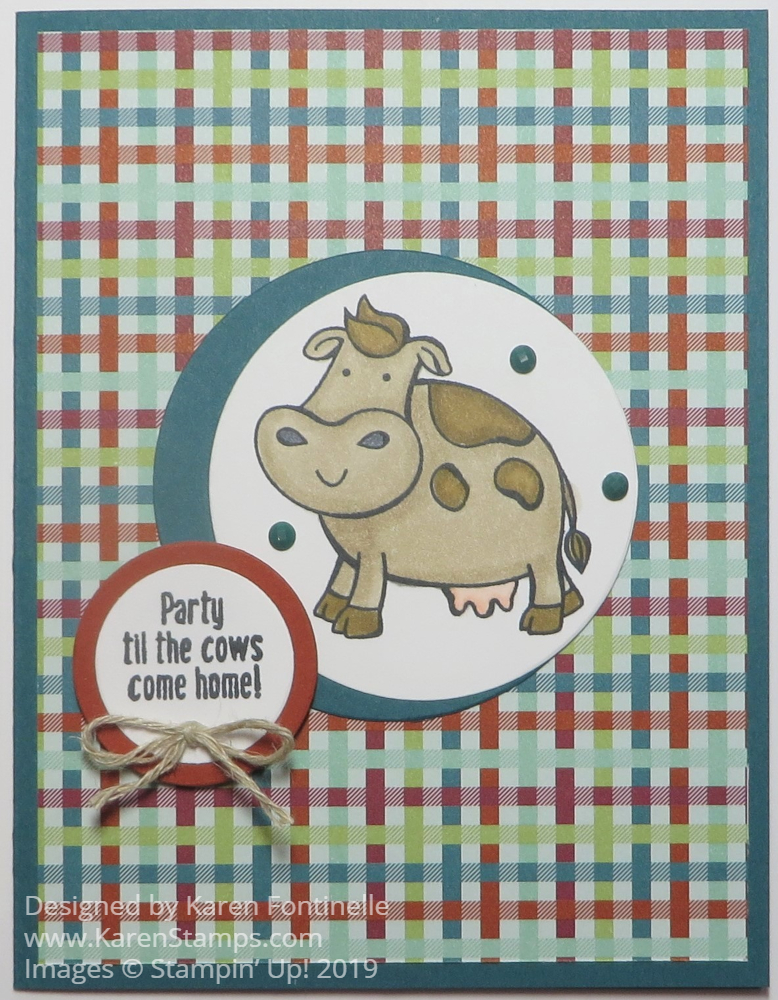
Often times we rack our brains to think of a good masculine card, I don’t know why! I guess more stamps and papers are geared toward women so we find ourselves at a loss when we have to make a card for our husband, son, grandfather, uncle, etc. It took me a while of looking online to come up with this idea, the Over The Moon Masculine Birthday Card, for my brother’s birthday. Not that he has anything to do with cows, but the Over The Moon Stamp Set is so cute I wanted to use it for a whimsical birthday card!

The card base is Pretty Peacock with a plaid design in the Come to Gather Designer Series Paper. The cow is stamped in Memento Ink and colored in with Stampin’ Blends markers. Have I ever said before how much I LOVE coloring with these markers??! I love coloring with these markers! I find it very relaxing! Coloring is good therapy!

After the cow was stamped, I die cut it with a circle in the Layering Circles Dies. Then I cut a slightly larger circle in Pretty Peacock and layered the cow on top of that but not centered. I saw that idea somewhere online and thought I would try it for something different.

I thought the greeting in the set was perfect for a birthday so I stamped and die cut that and layered on a circle of Cajun Craze. I found a little scrap of Linen Thread and tied a small bow for the greeting and stuck it on with a smooshed up Mini Glue Dot. And for a finishing touch, I added three
2019-2021 In Color Faceted Dots in Pretty Peacock.

Here is how I stamped and decorated the inside of the card.

Over The Moon Masculine Birthday Card Inside

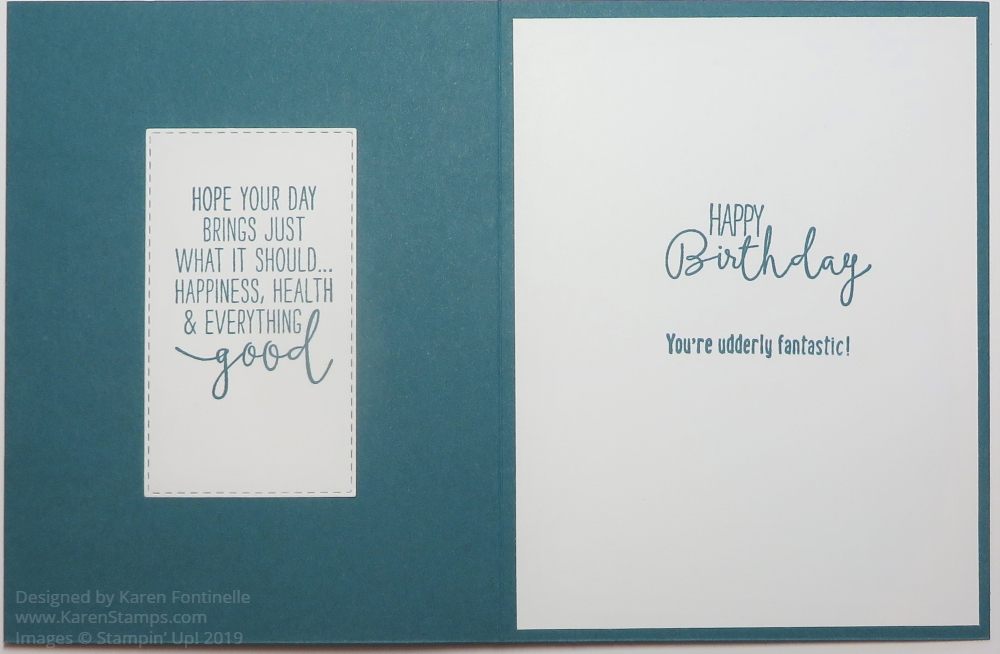
The greetings are from the Special Celebrations Stamp Set and you can guess which one is from the Over The Moon Stamp Set with the cows! Since I wanted to use the long greeting but not fill up the inside of the card, I opted to stamp it and then die cut it with the Stitched Rectangles Dies so I could add it to the inside front cover of the card.

The Over The Moon Stamp Set was one I did not think I needed until I saw some cards made with it. I think it is fun making cards with this stamp set. It’s probably a good idea to have at least one “funny” stamp set in our collection! Check it out in the Stampin’ Up! Online Store!

Mini Curvy Keepsake Box For A Fall Birthday

Mini Curvy Keepsake Box Fall Birthday

Yesterday was my husband’s birthday so instead of a card, I decided to make this Mini Curvy Keepsake Box For A Fall Birthday. I was looking online for ideas, thinking of something birthday-ish or fall-ish and I saw this idea of making a window in the box so you can see the candy or treat inside! I thought that looked pretty cute so that is the main idea I went with!

Instead of cardstock, I used a piece of the Come To Gather Designer Series Paper. I wanted something that would look good on the outside as well as the inside. The inside doesn’t really matter, but if you are making a fall box, you probably don’t want to use a Christmas paper with a generic pattern for the outside and some Christmasy pattern on the inside of your fall box! Depending on the pattern, pay attention to the direction of your paper. Think about which way the design will go on the outside of the box and maybe even the inside of the box.

What you need for this Mini Curvy Keepsakes Box Die is a piece of 6″ x 6″ paper. Then lay the die down with the points diagonally on the paper. If you put any point straight up on the paper, it will not fit.

Mini Curvy Keepsake Box Fall Birthday Die Cut

After die-cutting the box piece and creasing the score lines and folding, I decided on which panel I was going to put the little window. Ultimately I decided on the 1 3/8″ Scallop Circle Punch for the punched hole. Since the area was so small and narrow, I actually die cut a piece of window sheet for one panel and then trimmed that down by hand to fit the area. I just used Snail Adhesive in tiny bits around the hole to hold the window sheet in place.

Mini Curvy Keepsake Box Fall Birthday Window

I just recently made my first box with my daughter on vacation and I couldn’t figure out how to hook the top together! Luckily a video provided the answer! As you are trying to fit the side pieces with the long slits over the “handles”, PRESS DOWN! That lowers the handles, provides the curve to the box and allows the slit pieces to fit over the handles and hold everything in place! Very easy but I didn’t know to do that until I watched a video!

In order to put the candy in the box, I assembled the box except for one side. Then I could put the candy in and fill it up.

Mini Curvy Keepsake Box Fall Birthday Open

Then all was left was to decorate the box! I stamped some leaves with the Gather Together Stamp Set, die-cut some brown stems with a little die in the Mini Curvy Keepsake Box Dies, and punched some stems with the Sprig Punch out of Crushed Curry for some color. I also punched some Old Olive leaves with the Leaf Punch. Then I over-stamped those leaves with the large leaf stamp in the Gather Together Stamp Set.

My birthday greeting is stamped with Pretty Peacock Ink and a stamp from the Itty Bitty Greetings Stamp Set. Then I just die cut the greeting with a die from the Ornate Frames Dies and tied the box handles together with a piece of Crumb Cake Nature’s Twine. I just poked the twine through the hole on my greeting tag and pulled the tag up to the box.

I didn’t initially order these dies to make these Mini Curvy Keepsake Boxes but I’m glad I did as there is a LOT you can do with them! Check them out in the Stampin’ Up! Holiday Catalog!

SHOP STAMPIN’ UP! ONLINE!

Perennial Essence Birthday Gift Box or Bag

Perennial Essence Birthday Gift Box or Bag

You might not believe how easy this Perennial Essence Birthday Gift Box or Bag is to make, and just think what a great impression your gift to someone would make when presented like this! You can leave it open as it is filling it with “shred” or tissue paper to hide the gift inside, or close the top with ribbon or a decorative binder clip or many other ways.

This Perennial Essence Designer Series Paper is so beautiful. You could even frame a sheet of it to look like art! This paper features handpainted impressionistic images in rich colors! You just can’t go wrong on any project using this paper! And guess what?! It’s going to be part of the Stampin’ Up! Designer Series Paper Sale beginning Wednesday, September 4, 2019!

DSP Sale Banner 2019

While we are waiting for the sale day to arrive, here are directions on how to make this easy little birthday gift bag!

Start with a 6″ x 12″ piece of designer paper. Score at 4″, 5 3/4″, 9 3/4″, and 11 1/2″. Then turn the paper long ways and score at 1 3/4″.

Before you do anything, pay attention to any pattern in the paper. That 1 3/4″ area is going to be the bottom flaps of the bag or box, so picture how the paper will look when it is completely made. Even some of this paper you might decide has a bit of a pattern that you want to pay attention to. Cut those flaps up to the 1 3/4″ score line. Crease all the scored lines and fold so you can see how the bag will go together. Cut off that smallest end piece on the bottom that would be 1 3/4″ x 1/2″.

Perennial Essence Paper For Box Scored and Cut

When you fold on all the scored lines, you will be able to assemble the box (or bag). Start with putting a strong adhesive on that narrow flap you see on the far right. Use something like Tear & Tape or Multipurpose Liquid Glue. Think about which side you want for the front of the box depending on where you see the good side of that flap and then try to fold and adhere the flaps on the bottom so that the folded edge is facing the front, if possible. These small details help to make your project finished off perfectly!

I chose to just leave my box open at the top. I tied a bow but just adhered it to the top of the bag with Mini Glue Dots. You could punch holes in the top of the bag and tied the ribbon through. Or you can punch holes in both sides of the bag and close it with ribbon that way. The ribbon I used is the gorgeous Petal Pink 5/8″ Organdy Striped Ribbon.

To decorate the front of the bag/box I die cut a piece of Petal Pink Cardstock from the Petal Labels Dies and then cut an oval for the stamped greeting with the oval that comes in the set. The Happy Birthday greeting is from the Beautiful Bouquet Stamp Set. And I couldn’t leave well enough alone! I had to add a little bling with the Petal Pink Rhinestone Gems.

Here is a similar project I made back in May. Check out THIS POST. You can see how fun and easy this project is!

Start looking over the select designer series papers that will be on sale Sept. 4th, which will be the same day as the Holiday Catalog goes live. None of the Holiday papers are part of the sale, though! Choose 3 papers, then the 4th one you add to your order will be FREE!

I hope you will try this project I made today with the Perennial Essence Designer Paper and see how easy it truly is!

SHOP STAMPIN’ UP! ONLINE!

Broadway Bound Gift Bag For Graduation

Broadway Bound Gift Bag For Graduation

Today I am showing you this Broadway Bound Gift Bag For Graduation. Of course, it could be for any gift-giving occasion, but graduations are coming up soon! Since sometimes graduation gifts are smaller in size, maybe a gift card, maybe some jewelry or cash, this small gift bag would be perfect. You can pinch in the sides and pull the top sides together to close the bag. Lots of variations.

This gift bag is mostly like the 2-4-6-8 box we all make a lot, but the dimensions are a little different just to make it wider. This happens to be the striped pattern in the Broadway Bound Specialty Designer Series Paper. This paper is on the Stampin’ Up! Last-Chance List so get it before it is gone! Make sure any pattern on any paper is going in the direction you want it to go on your project when you cut your paper and when you score, depending on the project.

Start with a 6″ x 12″ piece of paper. Score at 4″, 5 3/4″, 9 3/4″, and 11 1/2″. Turn the paper so the short edge is at the top and score at 1 3/4″. This will make the bottom flaps of the bag. Cut those short bottom tabs up to the 1 3/4″ score line. Cut off the little 1/2″ tab on the bottom.  Fold on all the score lines and crease well with the Bone Folder.  Adhere the tab on the end to the other side to assemble the bag.  Then adhere the flaps on the bottom. I used the Tear & Tape Adhesive.

Check out another bag I made in THIS POST.

You can decorate these little bags in many ways. I liked the sentiment in the Colorful Seasons Stamp Set so I stamped that and cut the piece to make a banner. It is layered on a piece of Lemon Lime Twist to match the bag. The bow is Lemon Lime Twist 1/4″ Ombre Ribbon. At this point, I thought about adding some sequins to the banner, but since I had this flower already colored and cut out from the Tea Together Stamp Set, I used it as an embellishment on the bag!

The bag is all ready for a gift! Very easy to make and no rushed trips to the store for a gift bag! It’s a great way to use some of your hoarded designer series paper! Think about making your own little gift bag like this Broadway Bound Gift Bag For Graduation.

Shop Stampin’ Up! Online Today!

Country Floral Embossed and Colored Floral Birthday Card

Country Floral Embossed and Colored Floral Birthday Card

Cardstock embossed with the Country Floral Dynamic Embossing Folder is perfectly beautiful “plain”, but I was anxious to see what it would be like to color the embossed floral images on this birthday card like I had seen done on some samples.  I think it does make for a beautiful card, but I will tell you honestly that it takes some work and some patience!  As much as I like coloring some outline images and find it very relaxing, coloring on embossed images I found to be a little less relaxing!  But I love using the Stampin’ Blends markers every time so it wasn’t all hard work!

Coloring Country Floral Embossed Paper

Here is what my desk (kitchen table) looked like as I colored the Country Floral embossed card layer! Always be sure you have something underneath what you are coloring with the Stampin’ Blends alcohol markers because it can bleed through the paper.  In using the markers, I usually colored most areas with the light color first and then put in a few accents with the dark color.  Then I went back in with the light color and blended.  It’s really very easy!

Country Floral Embossed Colored Paper

The card base is Powder Pink Cardstock with a layer of Flirty Flamingo.  Then the embossed layer is placed on top of the Flirty Flamingo. I decided to try the Whisper White 5/8″ Polka Dot Ribbon on the card to see if I liked it or if it was too “busy” with all the colored flowers. I decided I kind of liked it!  It is there but really you barely see it so I think it adds something to the card.

For the greeting, I stamped a sentiment from the Beautiful Bouquet Stamp Set.  I didn’t want to take up too much space on the card with the sentiment, so I used the new Rectangle Stitched Framelits Dies.  I chose the smallest rectangle and didn’t add a layer.  After I die-cut this, I really liked how it looked on the card!

You can get the Country Floral Embossing Folder FREE during Sale-A-Bration, only until the end of the month!  Check out the choices in the Online Store today!

DON’T FORGET!  TODAY IS THE LAST DAY!  SIGN UP FOR PAPER PUMPKIN TO GET YOUR BIRTHDAY KIT AND GIFT IN MARCH!

JOIN HERE!

Paper Pumpkin Birthday March 2019 Banner

Image © Stampin’ Up! 2019


One More Day! Don’t Miss Paper Pumpkin’s 6th Birthday!

Paper Pumpkin's 6th Birthday!Don’t miss celebrating Paper Pumpkin’s 6th Birthday so be sure you are subscribed to the March 2019 Paper Pumpkin Kit!  If you previously were a subscriber, you might want to sign up again! And if you sometimes skip a month, make sure you reactivate your account!  Don’t forget!  Sunday, March 10th is the last day to get in on the March Kit!  But do it today!

SIGN UP FOR PAPER PUMPKIN TODAY!

(This is my personalized link to make it easy for you!)

Why should you want to celebrate with Paper Pumpkin in March??

Stampin’ Up! says they are pulling out all the stops for this kit!  You’ll get an adorable kit, a special box, and most importantly, you’ll get TWO stamp sets instead of one.  All for only $19.95 which includes shipping! TWO STAMP SETS!!

Here’s a little bit about the March kit! Because it’s our birthday, we decided to create a kit that is perfect for making ……………!

(Ask me if you want to know what the kit is!  Unless you want to be surprised!)

  • Coordinating colors are Basic Black, Bermuda Bay, Daffodil Delight, Flirty Flamingo, and Poppy Parade.
  • This kit has an element that is sure to “pop”!    ??????
  • The FREE stamp set is even bigger and better than your typical Paper Pumpkin stamp set and can be used on a variety of crafting projects.

You KNOW you want to get this Paper Pumpkin Birthday Kit in your mailbox next month!!

JOIN PAPER PUMPKIN TODAY!

You KNOW you want to have some crafting fun!

If you already have your own Demonstrator and want to sign up under her, just go to www.paperpumpkin.com and find her name.  Otherwise, I am HAPPY to have you!

No risk, no obligation!  Try out Paper Pumpkin for this great kit!  Stampin’ Up! guarantees every kit.

Sign up today so you don’t forget, but the deadline is tomorrow, Sunday, March 10, 2019.


Don’t Miss It! Celebrate Paper Pumpkin’s 6th Birthday!

Paper Pumpkin Birthday March 2019 Banner

Image © Stampin’ Up! 2019

Paper Pumpkin is turning SIX this month! Celebrate with the March 2019 Paper Pumpkin Kit, so be sure you are subscribed!  If you previously were a subscriber, you might want to sign up again! And if you sometimes skip a month, make sure you reactivate your account!  Don’t forget!  You have just ONE WEEK!

SIGN UP FOR PAPER PUMPKIN NOW!

(This is my personalized link to make it easy for you!)

Why should you want to celebrate with Paper Pumpkin in March??

(If you want to be surprised, don’t read any further!!)

Stampin’ Up! says they are pulling out all the stops for this kit!  You’ll get an adorable kit, a special box, and most importantly, you’ll get TWO stamp sets instead of one.  All for only $19.95 which includes shipping! TWO STAMP SETS!!

* Don’t look if you want to be surprised!!

*

*

*

Here’s a little bit about the March kit! Because it’s our birthday, we decided to create a kit that is perfect for making birthday cards!

  • The March kit features eight full-sized, mailable cards.
  • Coordinating colors are Basic Black, Bermuda Bay, Daffodil Delight, Flirty Flamingo, and Poppy Parade.
  • This kit has an element that is sure to “pop”!    ??????
  • The FREE stamp set is even bigger and better than your typical Paper Pumpkin stamp set and can be used on a variety of crafting projects.

You KNOW you want to get this Paper Pumpkin Birthday Kit in your mailbox next month!!

JOIN PAPER PUMPKIN TODAY!

You KNOW you want to have some crafting fun!

If you already have your own Demonstrator and want to sign up under her, just go to www.paperpumpkin.com and find her name.  Otherwise, I am HAPPY to have you!

No risk, no obligation!  Try out Paper Pumpkin for this great kit!  Stampin’ Up! guarantees every kit.

Sign up today so you don’t forget, but the deadline for sure is March 10, 2019.


Celebrate Paper Pumpkin’s 6th Birthday With the March 2019 Kit!

Paper Pumpkin Birthday March 2019 Banner

Image © Stampin’ Up! 2019

Paper Pumpkin is turning SIX and we want you to celebrate with the March 2019 Paper Pumpkin Kit, so be sure you are subscribed!  If you previously were a subscriber, you might want to sign up again! And if you sometimes skip a month, make sure you reactivate your account!  Don’t forget!

SIGN UP FOR PAPER PUMPKIN NOW!

(This is my personalized link to make it easy for you!)

Why should you want to celebrate with Paper Pumpkin in March??

(If you want to be surprised, don’t read any further!!)

Stampin’ Up! is pulling out all the stops for this kit!  You’ll get an adorable kit, a special box, and most importantly, you’ll get TWO stamp sets instead of one.  All for only $19.95 which includes shipping! TWO STAMP SETS!!

* Don’t look if you want to be surprised!!

*

*

*

Here’s a little bit about the March kit! Because it’s our birthday, we decided to create a kit that is perfect for making birthday cards!

  • The March kit features eight full-sized, mailable cards.
  • Coordinating colors are Basic Black, Bermuda Bay, Daffodil Delight, Flirty Flamingo, and Poppy Parade.
  • This kit has an element that is sure to “pop”!    ??????
  • The FREE stamp set is even bigger and better than your typical Paper Pumpkin stamp set and can be used on a variety of crafting projects.

You KNOW you want to get this Paper Pumpkin Birthday Kit in your mailbox next month!!

JOIN PAPER PUMPKIN TODAY!

You KNOW you want to have some crafting fun!

If you already have your own Demonstrator and want to sign up under her, just go to www.paperpumpkin.com and find her name.  Otherwise, I am HAPPY to have you!

No risk, no obligation!  Try out Paper Pumpkin for this great kit!  Stampin’ Up! guarantees every kit.

Sign up today so you don’t forget, but the deadline for sure is March 10, 2019.


Happiness Blooms Birthday Card

Happiness Blooms Birthday Card

After all the reds and pinks of Valentine’s Day, it seemed like a good idea to switch to some bold colors like this Happiness Blooms Birthday Card.  This designer paper wasn’t something I was attracted to at first, but I think it’s a nice change of pace for some bright, colorful projects and cards!

This birthday card starts with the green Call Me Clover, one of the 2018-2020 In Colors, for the card base. Next is a layer of Night of Navy Cardstock, another one of the coordinating colors with the designer paper. I chose the bold paper pattern with the Call Me Clover, Night of Navy, Pineapple Punch and Whisper White colors as the decorative layer. I made it 3″ wide so I could have side margins of other colors.  The designer paper is Happiness Blooms.  This paper has the bold, bright floral designs on one side of the paper and more general designs on the other side.  You are sure to find something that is just right for your cards.

To jazz up the layers, I added a strip of Pineapple Punch Cardstock along each side of the designer paper.  To make it more interesting, I die cut the Pineapple Punch with a die from the Be Mine Stitched Framelits Dies.  It makes a little bit of a stylized scalloped edge.

The greeting is stamped in Night of Navy ink on Whisper White and punched with the Pretty Label Punch.  In order to make it stand out a little bit more, I wanted a Night of Navy layer underneath, but of course the punch would be the same size.  The solution is to punch two labels and then layer those, one a little bit above and one a little bit below the greeting. It works out perfectly on the sides.  Just play with it until you get the layers just right.

The greeting is from the stamp set Hello Cupcakeavailable FREE during Sale-A-Bration with a $50 purchase. This is a great stamp set!  Who doesn’t like a cupcake stamp?  You can do so many things with this set, plus the greetings are very nice to use.

Here is another birthday card I made with the Hello Cupcake Stamp Set and using my Stamparatus® to stamp the greeting perfectly lined up.

Do your Stampin’ Up! order as you normally would, perhaps thinking in terms of $50 increments so you can take advantage of Sale-A-Bration. There is no limit to the number of Sale-A-Bration items you can choose.  You can order from the Annual Catalog, the Occasions Catalog, and even the Clearance Rack!  The Clearance Rack is always worth checking. Remember, an order of $150 earns Hostess Stampin’ Rewards. And during Sale-A-Bration, an order of $250 earns you an EXTRA $25 in product.

The Happiness Blooms Designer Series Paper contains bright and bold papers for some bright and happy cards and projects.  This paper is sure to put a smile on someone’s face who receives it and can be used for many occasions. Order this paper and make a card like my Happiness Blooms Birthday Card and brighten someone’s day!

SHOP STAMPIN’ UP! ONLINE TODAY!

Easy Floral Romance Card

Easy Floral Romance CardIf you want to make a beautiful card easily, just grab the Floral Romance Specialty Designer Series Paper and start creating! Some of the pages are vellum, like this one on this card. It is really beautiful paper that you will love!  The papers of Floral Romance are perfect for weddings, anniversaries, birthdays, or simply to say “Hello” and that you are thinking about that person. Everyone would love to get a personal handmade card in the mail instead of more junk mail!

I started with a card base of Fresh Fig Cardstock because it is one of the coordinating colors and then a layer of Whisper White to be placed under the printed vellum.  I just applied the Multipurpose Liquid Glue to the darkest colors on the backside of the vellum and I don’t think it is showing through.  This printed vellum is great for that!

For the greeting, I stamped with Petal Pink, another coordinating color of the designer paper, on a piece of Whisper White with a stamp from the Forever Lovely Stamp Set. That was punched with the 1 1/4″ Circle Punch and layered on a die cut from the Stitched Labels Framelits Dies.  I used Petal Pink for the circle die cut.

I tried several ribbons to tie around the side of the card but nothing looked quite right so I went with a piece of the Whisper White 5/8″ Flax Ribbon, although it is currently on backorder until mid-February. It is just adhered underneath the circle die cut and greeting.  If you don’t already have the Flax Ribbon, just substitute some other wide ribbon.  If you have narrow ribbon, try winding it back and forth underneath for another look! And of course, a few Petal Pink Basic Adhesive-Backed Sequins.

Here is a birthday card I made using a different pattern of the Floral Romance vellum.

Remember to put the new postage on your envelope and all your mail beginning today! This easy Floral Romance card could be sent for a Valentine, birthday, so many occasions! Just let someone know you are thinking of them!


Hello Cupcake Birthday Card

Hello Cupcake Birthday Card

The stamp set to make this Hello Cupcake Birthday Card can be yours FREE during  Sale-A-Bration!  This is Stampin’ Up!’s biggest promotion of the year since the early days of Stampin’ Up!  Usually, a special promotion doesn’t have a history behind it!

Until March 31, just spend $50 on any Stampin’ Up! products and then choose a FREE product in the Sale-A-Bration Brochure! This Hello Cupcake Stamp Set is one of the popular choices! Just think of all the cute cards you could make with this cupcake!  I really like the greetings and the font, too.

To make my card I used Blushing Bride Cardstock for the card base. Next is a layer of Whisper White on which I stamped the cupcake.  The whole cupcake is actually three pieces….the cupcake wrapper, a bottom piece of the frosting, and the top of the cupcake.  I stamped the cupcake wrapper in So Saffron and the frosting in Blushing Bride.  I stamped some sprinkles in Melon Mambo and colored them in with a Melon Mambo Stampin’ Write Marker. And to fill up space around the cupcake, I stamped the teeny little flowers in the set.

On the side panel of Blushing Bride, I stamped the greeting three times with Blushing Bride ink using the Stamparatus!  When you use the Stamparatus, you can move the stamping plate down one hinge at a time and get perfect placement of the greeting all lined up.   After stamping three greetings, there wasn’t enough space for another one so I just stamped three flowers at the bottom.  Then there is a small strip of Soft Seafoam Cardstock to match some of the Soft Seafoam stamped flowers!

Just for a finishing touch, I added one of the Frosted Flower Embellishments right over the center stamped flower. And one little Share the Love Artisan Pearl in the center looks perfect.

Hello Cupcake Birthday Card Embellishment

The Stamparatus would actually be a good thing to purchase during Sale-A-Bration, plus one other item (because the Stamparatus is $49) to easily earn a Free SAB item.

What’s more fun than shopping for things you want to buy and then getting to choose FREE things?!

SHOP STAMPIN’ UP! ONLINE DURING SALE-A-BRATION!

Easy Floral Romance Vellum Birthday Card

Easy Floral Romance Vellum Birthday CardThis Easy Floral Romance Vellum Birthday Card is an easy to make design and uses new specialty designer paper in the Occasions Catalog. Add a few embellishments if you like and you have a beautiful card ready to mail!

The Floral Romance Specialty Designer Series Paper in the new Occasions Catalog is something special!  You get four different patterns of paper, three sheets each.  Two of the patterns are regular designer sheets of paper.  The other two patterns are vellum!  That gives you the opportunity to use beautiful printed vellum paper for your cards and projects!

These are the two regular printed paper patterns. I forgot to photograph the opposite sides, but they are papers printed on both sides!

Floral Romance Designer Paper Sheets

These two sheets are the printed vellum:

Floral Romance Designer Paper Vellum

For my card, I used the Whisper White Thick Cardstock.  You can use the regular Whisper White, the Thick is just a little sturdier.  I wrapped the Petal Pink/Whisper White
5/8″ Variegated Ribbon around, making sure the ribbon tucked underneath the vellum layer was completely lined up with the ribbon on top so it wouldn’t show through the vellum. I used Snail Adhesive under the vellum and since the vellum is printed, I think we are going to get a break with adhesive in that it pretty much doesn’t show through.  I think I can barely see where the adhesive is through the vellum but I doubt any recipient who isn’t a perfectionist in cardmaking like we are would notice at all.  I haven’t tried Fast Fuse yet or the Multipurpose Glue.

The greeting is stamped in Petal Pink ink from the Itty Bitty Birthdays Stamp Set. This is layered on a die cut piece of Petal Pink and that on a larger oval of Whisper White. I experimented with circle of paper and vellum but the oval is what I liked best.

To embellish the card, I tied a piece of the ribbon on just in a knot and added some Petal Pink sequins from the Basic Adhesive-Backed Sequins.  I think these sequins are good for when you want just a little something, a little bling on your card!  If you need help handling sequins and other embellishments, be sure to order the Take Your Pick Tool.  It comes in handy either with the tacky putty on one end to pick up small things or the other end with interchangeable paper piercer, spatula, small and large stylus.  I’m using mine more and more.  If you have one from years ago from another company, you might want to try this new one that has more “tools” to use!

I definitely recommend this Floral Romance Specialty Designer Series Paper for lots of cardmaking occasions.  Just the paper alone will get you started in making beautiful cards, like this Easy Floral Romance Vellum Birthday Card.

SHOP STAMPIN’ UP! ONLINE HERE!


Gingham Gala Monochromatic Card

Gingham Gala Monochromatic Card

FINALLY I have finished with all things holiday and played with some of my new Occasions Catalog 2019 products to make this Gingham Gala Monochromatic Card.  The first time I saw this gingham designer paper, it was something I wanted to have right away.  As Demonstrators, we get to pre-order new products so we can start working with them in order to be able to help our customers and give you ideas. I’m a little behind but it only took a second to get excited about these new stamps, papers, ribbons, embellishments, & everything!!

This monochromatic card is all about Grapefruit Grove, one of the newest 2018-2020 In Colors that were introduced when the current Stampin’ Up! Catalog came out. This new Gingham Gala 6″ x 6″ Designer Series Paper comes in two sizes of checks, the large check on one side and the small check on the other side. They are beautiful spring colors to work with:  Balmy Blue, Daffodil Delight, Grapefruit Grove, Highland Heather, and Lemon Lime Twist.

The card base is Grapefruit Grove and is layered with a piece of the Grapefruit Grove Gingham paper. The ribbon is one of the free items you can earn during Sale-A-Bration, the annual Stampin’ Up! promotion we all have come to know and love!  Spend $50 and choose a free Sale-A-Bration product! One of the choices is this Organdy Ribbon Combo pack, 5 colors that coordinate with the gingham paper.

The greeting is from the new Itty Bitty Birthdays Stamp Set.  This set is one with the new “Cling Stamps”.  The new stickers for the stamps will REALLY stick to the acrylic blocks!  We will all have a bit of a learning curve with this sticky new stamps so that we treat them right and don’t mess up the foam!  You will be amazed how sticky they are!  But it will be great not to have to worry about them falling off the block as they are being inked up or getting ready to stamp!

For a little bling, I added a few of the new Gingham Gala Adhesive-Backed Sequins.  So great to have these sequins easy to apply since we don’t have to fool with glue!  Just stick them on!

All these lovely new products and many more go live on Thursday, January 3, 2019!  And with every $50 you spend, you get to choose a FREE Sale-A-Bration product in the brochure. Spend $100 and either chose two Sale-A-Bration items or one special choice for spending $100.

Occasions 2019 and Sale-A-Bration 2019 Catalogs

Stampin’ Up! FLASH SALE TODAY ONLY! Select Stamp Sets 15% Off!

Stampin' Up! Stamp Set Flash Sale

Click to view

Stampin' Up! Stamp Set Flash Sale

Click to view

Stampin’ Up! Birthday Sale!! 15% Off These Select Stamp Sets!  One Day ONLY!

Put on your party hats and save!  It’s time for the It’s Our Birthday Stamp Sale!

SHOP THE BIRTHDAY SALE!

For 24 HOURS ONLY, you can save 15% on select stamp sets. This sale will be gone in a flash, so celebrate with Stampin’ Up!!  Don’t miss it!

CLICK HERE to see the list of stamp sets on sale!

  • All selected stamp sets may be applied to Starter Kits.
  • Discount applies to select stamp sets only when purchased individually during the 24-hour promotion period. Bundles featuring stamp sets from the promotion will not be discounted.
  • If you purchased a stamp set prior to the sale, we will not be offering exchanges or credits.
  • In the event that we run out of any stamp sets, we will honor the discounted price as long as the order is closed within the promotion deadlines. You will receive your discounted stamp set as soon we are able to fulfill your order.
  • Sale ends Tuesday, October 23 at 11:50 PM (Mountain Time).

Let me know if you have any questions.  You can add other things to your order along with these sale stamp sets.  Have fun at the stamp birthday party!

SHOP STAMPIN’ UP! STAMP SALE!

Tomorrow! Birthday Flash Sale! Birthday Stamp Sets 15% Off!

Tomorrow, Tuesday October 23!  It’s a Birthday Flash Sale!  Select stamp sets will be 15% off! Check them out and make out your list!

Birthday Stamp Sale 2018 SIgnBirthday Stamp Sale List1Birthday Stamp Sale List2Click HERE or on any of the images above to see the PDF list!

Make sure you are on my Mailing List to keep up with all the Stampin’ Up! news! Sign up in the red box!

Have fun shopping TOMORROW, OCTOBER 23! 

Tomorrow!  ONE DAY ONLY FLASH SALE!