Category Archives: Birthday

Petal Palette Stampin’ Blends Stamped Birthday Card

Petal Palette Stampin' Blends Stamped Birthday Card

In the midst of stamping Easter cards yesterday, I came up with this birthday card stamped with the Petal Palette Stamp Set and colored in with the Stampin’ Blends markers. At first glance, you might not be all that impressed with the Petal Palette Stamp Set (I wasn’t!), but as usual, once I started seeing samples made with this set I was convinced I had to have it!  Besides the images, which are so pretty, there are some very nice words to use in the set.

The card base is Cherry Cobbler Cardstock with a layer of Basic Black.  The flowers are stamped on Whisper White in Memento Black ink and colored in with the Stampin’ Blends markers.  Some of the markers are backordered right now, but I suggest ordering the single markers, even if you want the whole collection, because then you will receive all of the markers that are available now and Stampin’ Up! will ship the backordered ones when they are resupplied. Even if they are backordered, I would suggest putting them in your Shopping Bag now so you will be first in line to get them when they come in stock.

I chose a greeting from Picture Perfect Birthday and die cut with the Stitched Shapes Framelits Dies.  Then that is layered on a scalloped oval die cut from Layering Ovals from Gold Foil. For some extra pizzazz I wound up some Gold Metallic Thread adhered to the back of the greeting.  This thread is only $3.00 so a great thing to have on hand or add to your order when you need a little bit more!

On the inside I put a piece of Whisper White cardstock since the Cherry Cobbler is so dark, and stamped one other flower from Petal Palette.

There you have it!  An easy birthday card made with stamping Petal Palette flowers and coloring in with Stampin’ Blends markers!

Shop Online at Stampin’ Up!

Make Your Own Soda Pop Bottle Greeting Cards and Projects

Make your own soda pop bottle greeting cards and projects with the fun Bubble Over Photopolymer Bundle from Stampin’ Up! This Bundle comes with the Bubble Over Stamp Set and the Bottles & Bubbles Framelits Dies together saving you 10%! Add a little more to your order and you can earn the Bubbles & Fizz Designer Series Paper FREE during Sale-A-Bration!

If you are new to Stampin’ Up!, Sale-A-Bration is the annual promotion, a favorite of everyone’s, where you can earn a FREE Sale-A-Bration product with every $50 purchase! This year Stampin’ Up! has added a $100 choice or two as well! And there are other benefits as well, like an extra $25 in Stampin’ Rewards with a $250 or more order, and a chance to earn two FREE stamp sets if you decide to join Stampin’ Up! as a Demonstrator!

This Bubble Over Bundle is of particular interest to me because I’d always heard my dad talk about when his father owned a “soda factory” in the small Illinois town where he grew up. They would deliver “sodie” (as I sometimes heard it called) to various school picnics, homecomings, etc. around the area. I’m not really sure how else it was sold. My dad enjoyed sometimes getting to drive the delivery truck (even though he was underage to be licensed at the time, but back in those days I doubt it mattered!). It turns out it was my great-grandfather who started this soda bottling works. I’d always heard my grandpa invented a certain flavor soda that everyone liked, although I don’t recall ever having any.

Amazingly, through a Facebook group about this town, I discovered that people were collecting and selling these bottles on Ebay!  In fact, there are plenty of bottle collectors and bottle cap collectors out there! Since I have discovered this, I have purchased several different glass soda bottles on Ebay, some with my great-grandfather’s name on them, some with my grandfather’s name.  I even found a photo of the inside of the bottling works and several of decorated cars in homecoming parades advertising the company! It is just so amazing to me that I have found these treasures that are part of my family history! If only I could tell my dad and grandparents!!!

You can make lots of cute cards and other projects with this Bubble Over Bundle and the FREE Sale-A-Bration paper, Bubbles & Fizz! Wouldn’t these be fun card ideas for teenagers?  And certainly the bottles might hold something other than soda!!  The bottles can be embossed with clear embossing powder to look like shiny glass.  The bottles can be die cut out of vellum cardstock to look like glass or frosted bottles.  These products would also make great birthday, congratulations, and celebratory cards and gifts!  Lots of creative ideas!

Watch and enjoy the Stampin’ Up! video above, and be inspired to make your own soda pop bottle greeting cards and other projects!

An Elegant Handmade Birthday Card For Someone Special

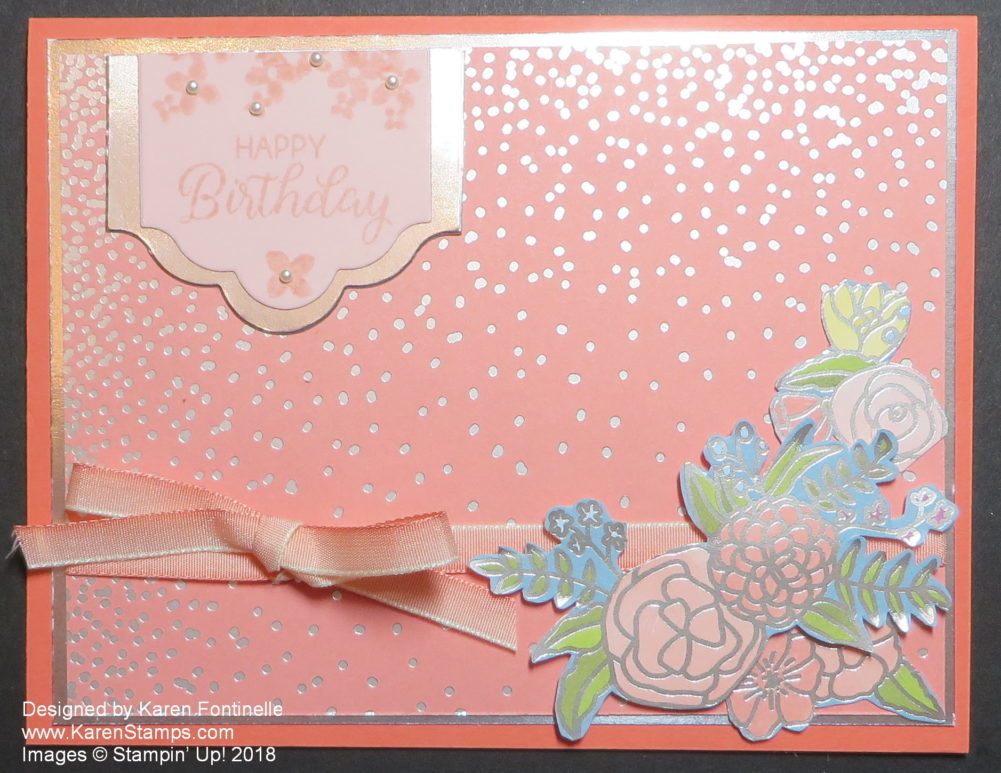
Elegant Birthday Card

You can make an elegant birthday card for someone special using the Sweet Soiree Specialty Designer Series PaperI think anything you would make with this fancy foiled paper with handpainted designs would look beautiful and elegant! Even this simple background has silver foil dots, plus the outlines of the flowers and leaves are silver foil.

To make this card, I started with a card base of Calypso Coral, one of the coordinating colors of the designer paper. I liked this dotted paper layered on Silver Foil.  I looked through the papers and decided on the flowered paper with the Marina Mist background and cut out some of the flowers to adhere to the front of the card.  If you have the Paper Snips scissors, it makes cutting out a little easier and you can just do it while you are watching TV!  After I cut out the bigger group of flowers, I also cut some of the smaller ones out of the scraps.

Before I glued down the flowers, I thought a little ribbon might be nice on the card.  The Calypso Coral 1/4″ Ombre Ribbon was perfect! I just adhered one strip across the card and then tied the bow on later.

With the ribbon on, I popped the large group of flowers up on Mini Stampin’ Dimensionals mostly, with a few of the regular size dimensionals. The smaller flowers I fit in alongside the large group and adhered with some Fast Fuse. (Only the Fast Fuse refills are available from now on.)

For the greeting, I chose the “Happy Birthday” from the Beautiful Bouquet Stamp SetNot only is this stamp set wonderful for all the flowers, but it has a great selection of greetings! I stamped it on a piece of Powder Pink Cardstock with Powder Pink ink, not quite knowing what I was going to do with it!  I ended up die-cutting with the Lots of Labels Framelits Dies but cut off the top of the diecut with the top edge of the card layer. For a little more pizzazz I added a Silver Foil diecut underneath.

I thought the greeting looked a bit plain so I stamped some small flowers on from the Beautiful Bouquet Stamp Set. It’s one of those things where perhaps I should have stopped before doing that! I nearly messed it up and I’m not sure I’m happy with it now.  I thought adding some of the teeniest pearls would help it, but I’m not sure.

As my friend and I used to say back in the day when we were painting t-shirts and wine glasses together, sometimes you have to know when to stop!  I should have stopped with just the stamped greeting on this card! But I doubt the recipient will be so critical!

If you want to make some beautiful, elegant cards and other projects, you might want to consider purchasing this Sweet Soiree Specialty Designer Series Paper.  Now there is also a stamp set and framelit dies in the Cake Soiree Bundle, if you want to get the whole works! If you want to make an elegant card for someone special, this paper will make your job easy!

Party Pandas Birthday Card With Balloons

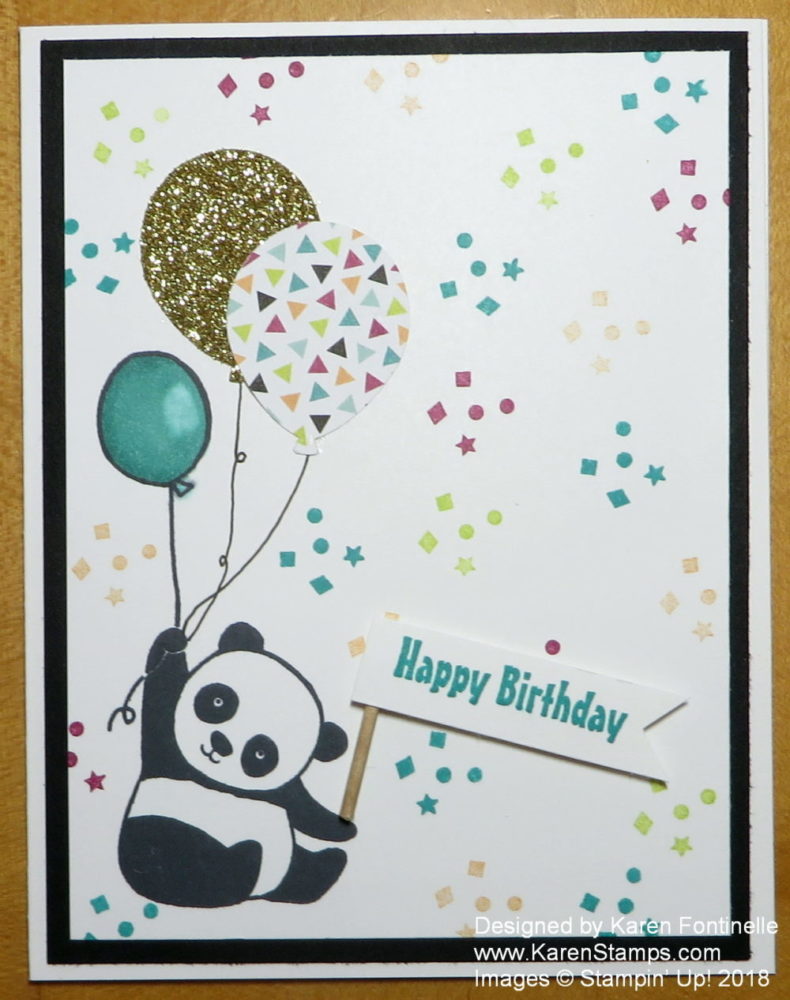
Party Pandas Birthday Card With Balloons

Celebrate a birthday with the Party Pandas! Make this fun and easy Party Pandas Birthday Card With Balloons to send to a child, an adult, a friend, a loved one, anyone! So many possibilities with this simple stamp set! And you can get it FREE!

Stampin’ Up! has their best promotion going on right now called Sale-A-Bration! All you have to do is spend $50 on any Stampin’ Up! products (which you know you are going to do anyway!) and then choose a FREE product in the Sale-A-Bration Brochure!  Lots of choices, you are sure to find something fun that you like!  I’m guessing that this Party Pandas Stamp Set is going to be one of the most popular sets during Sale-A-Bration!  Everyone seems to love pandas!

To make this card, I stamped the panda and his balloon with Memento Black Ink. I colored in the stamped balloon with my Bermuda Bay Stampin’ Blends Markers. For a little extra interest, I punched two balloons with the Balloon Bouquet Punch. One is made with Gold Glimmer Paper and one from the Picture Perfect Party Paper.  Then I just drew in the balloon strings down to the panda’s hand.  For the background I stamped the little confetti stamp in the coordinating colors of the Picture Perfect Party Paper. I decided to make the “Happy Birthday” greeting a little pennant that the panda is holding by using a cut toothpick for the stick!

That’s all there is to this easy Party Pandas Birthday Card With Balloons. So fun to make!

Remember, for every $50 you spend at Stampin’ Up!, from now through March 31, you can earn a FREE Sale-A-Bration product!  Let me know if you have any questions!  There’s a good deal for signing up to be a Stampin’ Up! Demonstrator, too!

Shop Stampin’ Up! Today!

New Stampin’ Up! Narrow Note Cards For a Birthday

Stampin' Up! Narrow Note Cards For a Birthday

Something new in the Occasions Catalog that you might overlook (I did!) are the Whisper White Narrow Note Cards & Envelopes. These Narrow Note Cards are perfect for enclosure cards in gifts, perhaps for a birthday, as I have decorated these! Use them for a birthday, Valentines, in a wedding gift – whatever the occasion!

These note cards measure  2-1/2″ x 4-1/2″ and the envelopes measure  2-3/4″ x 4-3/4″. Going by the envelope size, I doubt that these are big enough to send in the mail.  You should check with your post office. If you did want to mail one of these Narrow Note Cards, you could just place the note card or even the note card in an envelope into a larger envelope and mail it that way. It looks to me that the post office requires an envelope (doesn’t matter the size of the card inside, it’s the envelope size) that is 3 1/2″ x 5″ at a minimum. Check this information HERE.

Now Stampin’ Up! also has the Whisper White Note Cards & Envelopes that we have always used.  They are also available in Very Vanilla.  These note cards are 3 1/2″ x 5″ and the envelopes are 1/8″ larger on each measurement so they are absolutely okay to mail. Here is a photo of the two kinds of note cards.

Stampin' Up! Note Cards Comparison

You can see some cards I made with the standard Note Cards & Envelopes HERE.

As you can see, the Narrow Note Cards have envelopes that run lengthwise and have a curved flap on the end!  Very cute!  I say have both kinds on hand!  Quick and easy to just stamp or embellish slightly and you are ready to go! They are really so handy! You don’t have to cut cardstock, just pull out a notecard, possible stamp a greeting (or not!), maybe stamp a cute image or pretty flower on the outside or add some designer paper and ribbon.  Who knows?  It’s all cute and easy!

These Narrow Note Cards (#145583) are great for quick and easy embellishing to add your personal touch to a gift or even just a little note you are going to hand someone or stick in a lunch bag, purse, suitcase, or briefcase! Yes, they even would hold a gift card!  I just tried! You will find them on page 19 in the Occasions Catalog. Really the photo is off the bottom of the page so you mostly only see the printed description.  But now you know that they are there! You get 20 for only $8.00 and that includes the cute envelopes!

To fancy up my Narrow Note Cards, I added a layer of the Picture Perfect Party Designer Series Paper and a greeting. The one card has a bow hand cut from another of the patterns with all the photographed bows for a little embellishment.

Today would be a good day to place an order for a 3-month Prepaid Paper Pumpkin subscription because today is the deadline for receiving the January 2018 Kit. Then you can add on the Narrow Note Cards & Envelopes, some designer paper, maybe a new stamp set and whatever else you like and collect a FREE Sale-A-Bration item with every $50 increment! And you would already earn a Free Sale-A-Bration product just with the Prepaid Paper Pumpkin Kits. You would have to pay shipping on the free item you chose, so to get best value, order a few other things as long as you are paying the shipping already!  That’s what I would do!

Shop Stampin’ Up! Online HERE!

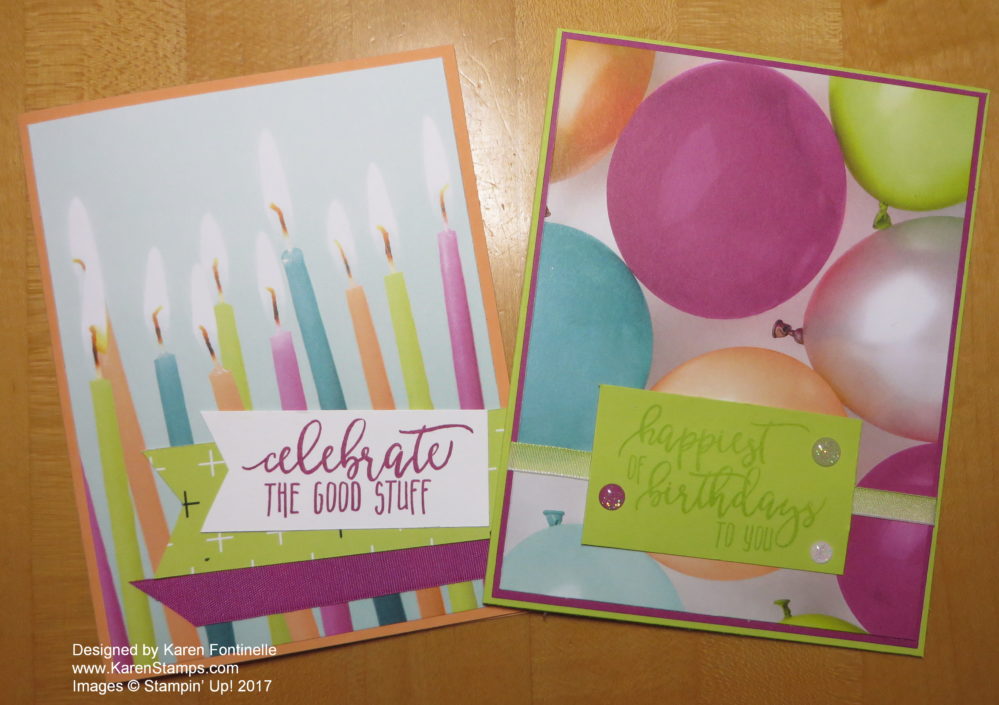
Quick and Easy Picture Perfect Party Birthday Cards

Quick and Easy Picture Perfect Party Birthday CardsWhen it comes to quick and easy cards, these Quick and Easy Picture Perfect Party Birthday Cards are about as easy as you can get!  The new Picture Perfect Party Designer Series Paper in the Occasions Catalog is just delightful! I didn’t know if I would really like the “photographic” imagery on the one side of all the sheets in the package, but I do!

Sometimes to get your creativity started when you are making a card, it’s a good idea to start with the catalog!  The Stampin’ Up! catalogs are just full of wonderful samples and you are welcome to copy! I suggest start off copying something you like and then make another card almost the same but change something up a bit.  Chances are, once you start making a card, you will come up with something on your own anyway!

The card on the left is one that I copied from the Occasions Catalog on page 4.  It’s even marked “Quick & Easy”!  Even when you are copying, you will probably find that you won’t copy exactly for whatever reason – maybe you don’t have the exact same supplies or you want to use another color or you want to use a different sentiment. Whatever it is, if you need a boost to your creative mojo, just start off copying something in the catalog! While I was trying to “copy” this card, I don’t have that Paper Ribbon used on the sample because Stampin’ Up! isn’t even selling it right now. There was a problem with the production in the factory so it will not be carried in the Online Store. That’s a shame, I thought that was something different and cute, but it was out of Stampin’ Up!’s control.

The sample card base is Peekaboo Peach layered with the Picture Perfect Party Designer Series Paper. This selection of paper comes in the 6″ x 6″ size. It’s really fun to page through and choose either one of the photographic images or the graphic pattern on the reverse side.  The greeting is stamped in Berry Burst with a greeting from the Picture Perfect Birthday Stamp Set. I substituted a piece of Berry Burst 1/2″ Finely Woven Ribbon.

The card on the right is one that I more or less copied from the first card but changed things up.  I chose the balloon paper in the Picture Picture Party pack and layered it on a piece of Berry Burst on top of the card base of Lemon Lime Twist card stock. I tied a piece of ribbon, the Lemon Lime Twist 1/4″ Ombre Ribbon around the layers before adhering to the card base.  The greeting is stamped with Lemon Lime Twist ink on a piece of cardstock the same color. For a little bling, I added some different colors and sizes of the Glitter Enamel Dots.

Copying or at least looking in the Stampin’ Up! catalogs is a great way to get some inspiration if you need it or you just enjoy looking at other samples. For some quick and easy cards, be sure to try some like these Quick and Easy Picture Perfect Party Birthday Cards.

Shop Stampin’ Up! Online with the new Occasions Catalog &

Sale-A-Bration!

Quick and Easy Birthday Card With Birthday Memories Paper

Quick and Easy Birthday Card with Birthday Memories

If you want to make a quick and easy birthday card, use the Birthday Memories Designer Series Paper and the Happy Birthday Thinlits Die!  I LOVE this die!  It is just perfect to put on so many birthday cards.

The card base is Real Red to match the Happy Birthday diecut. Actually I had already cut out this red diecut for another card, but it didn’t look right on that card so I just saved it. To make this card, I looked through the Birthday Memories Designer Paper and picked out this plainer background for this card. Real Red is one of the coordinating colors of this designer paper so it was perfect to use this diecut in red.

For something else on the card front, quick and easy, I decided to cut out one of the birthday cakes from one of the patterns in the Birthday Memories package.  I just cut it out by hand, only took a few seconds, and adhered it to the card front with the Multipurpose Liquid Glue.

You have a few options for gluing down the Happy Birthday diecut.  This time I just put tiny dots of the Multipurpose Liquid Glue all around on the back.  Very tiny. I could have also sponged on some of the glue. Or I could have used the Multipurpose Adhesive Sheets if I would have stuck one onto the back of the cardstock before I diecut it!

If you would like to see the Happy Birthday diecut on another card, there is THIS POST with one of my favorite cards ever because of the beautiful background paper!

That is all there is to this card!  Simply make the card base, adhere a plainer piece of designer paper, adhere the Happy Birthday Diecut, and cut out a birthday cake, or maybe some other image from the Birthday Memories Paper.  There you have a quick and easy birthday card with the Birthday Memories Paper!

Shop Stampin’ Up! for all you papercrafting and stamping needs!

Birthday Memories Birthday Card

Birthday Memories Birthday CardThis is a birthday card I made for my niece with the Birthday Memories Paper, and I loved it when it was finished! Sometimes you make a card or project and it’s fine, and sometimes you make a card or project and you really like it! And this is just a simple card! Anyone can make it!

The interesting part of this card is that part of the front of the card is cut off so that you get a peek at the inside. It’s kind of like a z-fold card without the fold! It’s just half a card front! The greeting is fairly large to decorate the front, partly, but it also hides the greeting that you might stamp on the inside of the card. And then I used cut out images from the Birthday Memories Designer Series Paper to decorate both the front of the card and the inside.

Here are the measurements I used:

Card base: Powder Pink:  5 1/2″ x 6 1/2″, score at 4 1/4″

Basic Black front layer:  2″ x 5 1/4″

Basic Black Inside layer:  5 1/4″ x 4″

Fresh Florals Designer Series Paper Stack:  Powder Pink pattern 1 3/4″ x 5″

Whisper White inside layer:  5″ x 3 3/4″

Greeting on front:

Basic Black:  3″ x 3 1/2″ (depends on your greeting)

Whisper White:  2 3/4″ x 3 1/4″ (depends on your greeting)

Birthday Memories Birthday Card OpenYou do have to think about the size of the greeting on the front and where to place the greeting on the inside so that the greeting inside doesn’t show.  You might need to make a light pencil mark or use a sticky note to help with placement, whatever works.

The greeting on the front of my card is from Big on Birthdays and the greeting on the inside is from Happy Birthday Gorgeous. To decorate the inside, I cut out some images from the Birthday Memories paper and adhered them to the inside.  Such cute paper!

Click HERE to see a very similar card with a z-fold using this Birthday Memories Designer Series Paper.

Birthday Memories BIrthday Card InsideThis designer paper is one of the many selections on the Buy 3 Get 1 Free Designer Series Paper Sale.  Be sure to check out the choices and stock up!  There are a couple of papers priced at $10.00, most at $11.00, and one at $13.00. When you order, put in the least expensive 3 papers first so that when you enter the 4th one, which will be free, it will be the more expensive one.  If you have any questions, just let me know.

Designer Series Paper SaleStock up on all the paper you want, but don’t just hoard it…….use it!  Make a batch of cards like this Birthday Memories Birthday Card and mail them out to your friends!

Make a Nostalgic Birthday Card With Birthday Memories

Nostalgic Birthday Card with Birthday Memories

I love this Birthday Memories Designer Series Paper and the whole Birthday Memories Suite of products in the Annual Stampin’ Up! Catalog, so I thought I would make this card for a friend’s birthday. It was a “big” birthday for her and I debated what kind of special card to make for her. I just thought she would like this “vintage” look kind of card.

The card base is the new Powder Pink Cardstock, randomly stamped with the little bouquet in the Birthday Delivery Photopolymer Stamp Set with the same color ink.  This gives a little bit of interest in the background without taking away from the focal point. I used a piece of Powder Pink 1/2″ Finely Woven Ribbon wrapped around the card.

The cute little girl is die cut from the Birthday Memories Paper with one of the Birthday Friends Framelits Dies that fits the girl!  Also, the red polka dot package is die cut! The other little package I just cut out by hand with my Paper Snips. Something new that we can use the framelits to die cut images on the designer paper!  And very handy!

The little girl is adhered to a Whisper White oval die cut with the Stitched Shapes Framelits Dies.  This is layered on a piece of Silver Glimmer Paper die cut with the Layering Ovals Framelits Dies.  

The greeting is stamped from the Birthday Delivery Stamp Set. If you want to save 10%, you can purchase the Birthday Delivery Photopolymer Bundle which includes the stamp set and framelit dies.

I also stamped the envelope with a birthday cake in Powder Pink.  Stampin’ Up! has the best envelopes!  Try the Whisper White Medium Envelopes! Once you do, you’ll never go back to ordinary envelopes for your precious cards!  I can identify them by feel if I get a Stampin’ Up! envelope in the mail!!

And here is a glimpse of the inside of the card!

I just die cut another character on the designer paper and adhered him inside the card on a piece of Whisper White!  So fun! I wrote a note to my friend saying we weren’t getting older, just “nostalgic”!  I knew she would enjoy the “vintage” characters!

Take a look at the Birthday Memories Suite in the Annual Stampin’ Up! Catalog and see if you can resist ordering it for making some fun cards and projects!

Shop Stampin’ Up! HERE Today!

Handmade Gift Box and Card For a Birthday–For Me!

Handmade Gift Box For a Birthday

I was so lucky to receive this handmade birthday gift box and card from my friend Jan recently! Such a happy thing to see after opening the mailing box! So many gifts now are given in gift bags, which are fine, so it was an extra treat to see a package to “open”! And of course my friend made it herself plus the card!  So pretty! She makes such beautiful cards and things!

The box is made with the pretty Sycamore Street Designer Series Paper from Sale-A-Bration several years ago. There are lots of instructions online of how to make a box out of paper, very simple. You can find directions to a box I made recently in THIS POST.

The birthday card she made me is made with the stamps, dies, and stickers in the Eastern Palace Suite.  This suite was released the month before the new Stampin’ Up! Catalog came out, but of course it is still available now. You can make very pretty cards and projects with this group of products, and the stickers are such high quality and fun to use.

We made it through Hurricane Harvey just fine last evening and overnight. We’ve gotten almost 5″ of rain at our house in our rain gauge. It’s just the outer bands of rain from the hurricane, not anything like the people close to the eye had.  So it might rain lightly or more heavily for a few minutes and then let up. No heavy wind, maybe some light wind gusts, like we had last night when we tried to go for a walk after dinner and misjudged the radar! There was a tornado that struck at 1:00 am several miles from here in a very nice neighborhood with lots of young families, about fifty homes damaged. The pictures on TV look pretty horrible but I’ve heard only one minor injury. They say these tornadoes drop down quickly and go back up quickly, but this one looks like it was pretty strong.  As long as these bands of rain keep moving through and don’t stop over one location they think things will be much better.  Every break in the rainfall gives the water time to drain.  Still a mess and the storm can do whatever it wants, no matter the weather predictions, so who knows!  Our power just blipped off for a second last night but we are very lucky at this moment to still have power, internet and air-conditioning!

Here is a screenshot of the radar on my phone at 9:00 am today, Saturday Aug. 26. I’m the blue dot!

Hurricane Harvey Aug 26 9 am

That’s the hurricane update for now!  Keep your fingers crossed for us!  The worst is yet to come I think for our location and the city of Houston.

Wouldn’t you love to receive a beautiful handmade gift box and card like my friend sent me? Make one for your friend and send it!  It really only takes a little bit of time to make something like this and you know it will be very much appreciated! Love it, Jan!  And the gifts inside! Guess I should say……if you are curious….she sent me a cute candle in a little bottle with a birthday cake scent and a cute boxes of matches – which we may have to put to use this week!! – and a cute little Halloween decoration because she knows I love Halloween!

Don’t forget to use your Bonus Coupons before August ends!!

Enjoy your weekend if you’re not in Hurricane Harvey’s path!

Making a Z-Fold Card with Birthday Memories Designer Paper

Birthday Memories Z-Fold Card Open

Making a Z-Fold Card for a birthday is easy and with the Birthday Memories Designer Series Paper, your card will be so cute and fun! Z-Fold cards give an added dimension to cardmaking and thereby make you look like such an expert and professional! And yet, if they only knew, it is SO EASY!

To make the Z-Fold card base, just make a regular card. Then fold the front of the card base back on itself in half! In other words, score the front of the 4  1/4″ x 5 1/2″ card front at 2 1/8″ (in the middle of the 4 1/4″ card front) and fold the right side backwards toward the card fold. This is easy to see on the photo above. You can add whatever designer pieces of paper, if you want, to decorate the panels.

As you design the front square or rectangle which is the focal point of the card, consider what size the greeting on the inside of the card will be. You will want that focal point to cover the greeting when the card is closed. Once I decided on the size I wanted that focal panel to be and cut the pieces, I closed the card with the focal piece on top and lightly penciled in the outline of it on the Whisper White layer that was going to be inside the card so that I could see where I had to stamp my greeting inside the card.

As you can see, I used the Birthday Memories Designer Series Paper, which is such a happy and whimsical collection of papers. I don’t think we have had anything quite like it in the past.  I just love it!  The Birthday Delivery Photopolymer Stamp Set coordinates with the paper, and that is what I used to stamp the greeting on the fox’s banner and on the inside of the card. The other amazing product is the Birthday Friends Framelits DiesThese dies not only cut some of the stamped images, but also some of the images in the Birthday Memories Designer Series Paper.

You do have to have it all, you know you do!!  Get the Birthday Delivery Photopolymer Bundle and get the stamp set and framelits all at a 10% savings. Also order the Birthday Memories Designer Series Paper and if you like, get some embellishments you can use like ribbons or Balloon Honeycomb Embellishments.

You can see another birthday card I made with this set HERE in this post!

Be sure to use any July Bonus Coupons you have before the end of August!

Also, check the Clearance Rack as new products were added the other day!  Only available while supplies last!

Birthday Memories Z-Fold Card

Place your Stampin’ Up! order today so you can get your hands on this fun Birthday Memories Designer Series Paper, stamp set and dies and start creating!

SHOP STAMPIN’ UP! ONLINE HERE!

Quick and Easy Birthday Card with Birthday Memories

Birthday Memories Card in Red

Want to make a quick and easy birthday card?  Then reach for the Birthday Memories red print in the designer paper package and make a card like this one!  I love the color red, and I thought this card might be a different one than a person would expect using this designer paper and stamp set. Just a quick and easy, simple birthday card to make in a couple of minutes!

Start with a card base of Real Red Cardstock.  Layer with Whisper White with just a thin border to help the Real Red patterned paper stand out against the red card base. The Birthday Memories Designer Series Paper has so many pretty papers in it, although most are colorful and filled with child-like or vintage type images. But this plainer red paper caught my eye and I thought I would make more of a monochromatic card with no much fuss so the paper can stand out on its own.

The greeting is from the same suite, from the Birthday Delivery Photopolymer Stamp Set. I stamped it in Real Red on Whisper White and cut out with the Stitched Shapes Framelits Die. Then I layered it on a scalloped oval die cut from the Layering Ovals Framelits Dies.  The paper is the Silver Glimmer Paper.  I think I just as easily could have left the greeting without the glimmer paper layer underneath and it would have looked fine.  The ribbon wrapped around twice is the Whisper White 1/8″ Sheer Ribbon.  It’s always good to have some basic white ribbon on hand because you can use it on most any project.

Be sure to check out this wonderful, happy Birthday Memories Designer Series Paper.

Birthday Memories Designer Series Paper

Birthday Memories Designer Series Paper

Order this amazing suite of products, the Birthday Memories Suite .  Save 10% by ordering the Birthday Delivery Photopolymer Bundle which includes the stamp set and framelit dies.  Add on the Birthday Memories Designer Series Paper and you are good to go!  Add any of the extra embellishments if you like.

Remember to use your Bonus Coupons that you earned in July before the end of August!  They will expire August 31.

Check out the Stampin’ Up! Clearance Rack as new items were added yesterday, although many sold out right away, but there is still a selection and you might find good things to go along with the upcoming Holiday Catalog!

Shop Stampin’ Up! Online Today!


Birthday Mini Treat Bag With Birthday Memories Die Cuts

Birthday Mini Treat Bag

Isn’t this Birthday Mini Treat Bag With  the Birthday Memories Die Cuts such a cute way to send your Happy Birthday wishes to someone?  I have always loved making these mini treat bags and putting a card inside. But now that we have the new designer paper and stamp set in the catalog that I used here, we can do many more fun things with the treat bag!

Did you see the Birthday Memories Designer Series Paper in the new Stampin’ Up! Annual Catalog?  It is so fun and cute and almost a little vintage looking!  Perfect for young children but really for anyone!  I don’t know who wouldn’t smile upon receiving a card made with pieces of this paper.  The only problem with the paper is that you will hate to cut into and use it!

What’s even better is that there are die cuts that match the designer paper! The Birthday Friends Framelits Dies  will cut out several of the images in the paper, like this foxy guy and his banner!  I also stamped on the banner with the coordinating stamp set, Birthday Delivery Photopolymer Stamp Set.  Lots of cute images in the stamp set as well.  If you want to save 10%, get the Birthday Delivery Photopolymer Bundle that has the stamp set and framelit dies together.  You WILL want both!

You’ll be able to use this Birthday Memories Designer Paper and Birthday Delivery Stamp Set for more occasions that just birthdays.  It will be cute for party favors, invitations, and many other projects!

Birthday Mini Treat Bag Inside Card

This is what the inserted card looks like.  I stamped the balloons and die cut with one of the framelit dies in the set.  I purposely made them stick up at the top off the card a little bit so when it is inside the card, you will see the edge of the balloons and know to pull out the card. You can see how you could easily make this into a birthday party invitation or some other congratulatory occasion.

And let’s not forget to mention the Mini Treat Bag Thinlits Dies!  These have been in the catalog before and I have so much fun with them!  To make the bag, there are two dies, one cuts the front of the bag and part of the back.  The other die cuts the other half of the back portion plus the fold that adheres to the front of the bag. It’s so simple, plus the die set comes with so many other fun pieces. I chose to make this mini treat bag simple by just adhering the die cuts from the Birthday Memories Paper on the front.  I could have done lots more embellishing, but I thought this was cute enough as is!  There are even other options to make besides a basic gift bag, such as I made in THIS POST.

Be sure to check out the Birthday Memories Suite in the catalog.  You can order the Bundle and Designer Paper plus any other embellishments that you want so that you can make some fun cards and projects like this Birthday Mini Treat Bag With Birthday Memories Die Cuts.

Shop Stampin’ Up! Online HERE!

Happy Birthday Greeting Card Die Cut

Happy Birthday Greeting Card Die Cut

Today is MY birthday, but I have a friend who has a birthday tomorrow (and I don’t think she looks at my blog!) so this is the card I made for her! I was glancing through some cards I had made recently, and I LOVED a card I made with the Happy Birthday Thinlits Die and a watercolor background and I LOVED a card I made with this same Whole Lot of Lovely Designer Series Paper.  So I just combined the two ideas!

The card is made with Basic Black Cardstock so you do need to put a piece of Whisper White Cardstock inside so you can stamp or write a greeting or note. I glued a strip of this designer paper to the side of the Whisper White inside the card so I could decorate the inside a little bit. There is a layer of Powder Pink underneath the Whole Lot of Lovely DSP.

The greeting, of course, is just the Happy Birthday die cut!  I love the script, the size and everything about it!  Glue it down with just tiny dots of Multipurpose Liquid Glue or the Fine Tip Glue Pen.  Or try the new Multipurpose Adhesive Sheets.

I think the new Powder Pink 1/2″ Finely Woven Ribbon is just beautiful with this designer paper pattern and the card!  So soft and such a pretty pink!  I wrapped the strip of ribbon around the layer before adhering to the card.  Then I tied the bow separately with another piece of ribbon and attached it to that strip of ribbon with a few Mini Glue Dots . Sometimes that is easier than trying to tie a perfect bow with the whole piece of ribbon around the card!

I think this Whole Lot of Lovely Designer Series Paper is actually a whole lot of lovely!!  I suggest you put a package or two on your next order!  And if you ever make birthday cards (surely you do!) I would also get the Happy Birthday Thinlits Dies!

Since today is my birthday, I’m giving YOU the gift!  I’m celebrating all weekend (why not?!) so if you place a Stampin’ Up! order of $25.00 or more (before tax and shipping, of course!), I will send YOU a little grab bag of “stuff”!  And who doesn’t need more “stuff”?! Some might be new, some might be retired, but it will be a surprise! Order today through Sunday, August 13, 2017 at midnight.

SHOP STAMPIN’ UP! ONLINE HERE!


Stamp an Easy Icing on the Cake Birthday Card

Stamp an Easy Icing on the Cake Birthday Card

After a  trip to the West Coast to visit our faraway kids, it’s time to get back to stamping and blogging!  Why not start with stamping an Easy Icing on the Cake Birthday Card? This card is all stamping, nothing else! Sometimes it is good to just stamp, as I also said in THIS POST.

I actually won this stamp set as a prize in an online event I was participating in!  How fun is that?!  I think the Icing on the Cake Stamp Set is one that could be overlooked, but is actually a fun one to use for birthdays and other occasions.

When you get back from vacation, and need a little inspiration to get back into stamping, be sure to remember to consult the Stampin’ Up! Catalog!  That’s what all those sample projects inside are for!  Use them! I opened my catalog and in just a second I came upon page 79 where I found the Icing on the Cake Stamp Set and was inspired to make a card almost exactly like the sample.  I think the sample might have used a Note Card for the card base as it looks a little bit smaller, but I made mine the regular card size 5 1/2″ x 4 1/4″. I chose Powder Pink for the card base and Whisper White for the top layer with the stamping.  I was planning to change the colors from the sample, so I looked on the chart provided by Stampin’ Up! with 2017 InColor Combinations for ideas. I suggest you print out this chart on Whisper White cardstock and keep it handy for reference! I decided to stamp with Powder Pink, Soft Sky, and So Saffron. I considered making the card with just one color ink, Powder Pink, a monochromatic card. Maybe I will try that next time! I think it would also be fun to stamp the “Happy” and “Birthday” on another scrap of paper and cut out each word in a rectangle to fit in the space and have the words popped up on Stampin’ Dimensionals.

Warning:  This stamp set will make you hungry for cake and icing! Stamping pretty rows of colored frosting just looks yummy!

If you need a birthday stamp set or a set for many congratulatory occasions, check out the Icing on the Cake Photopolymer Stamp Set. Then have fun stamping with it!

Shop Stampin’ Up! Online Today! Remember, you have about one more week to get $5 bonus coupons to use in August for every $50 you spend in July!