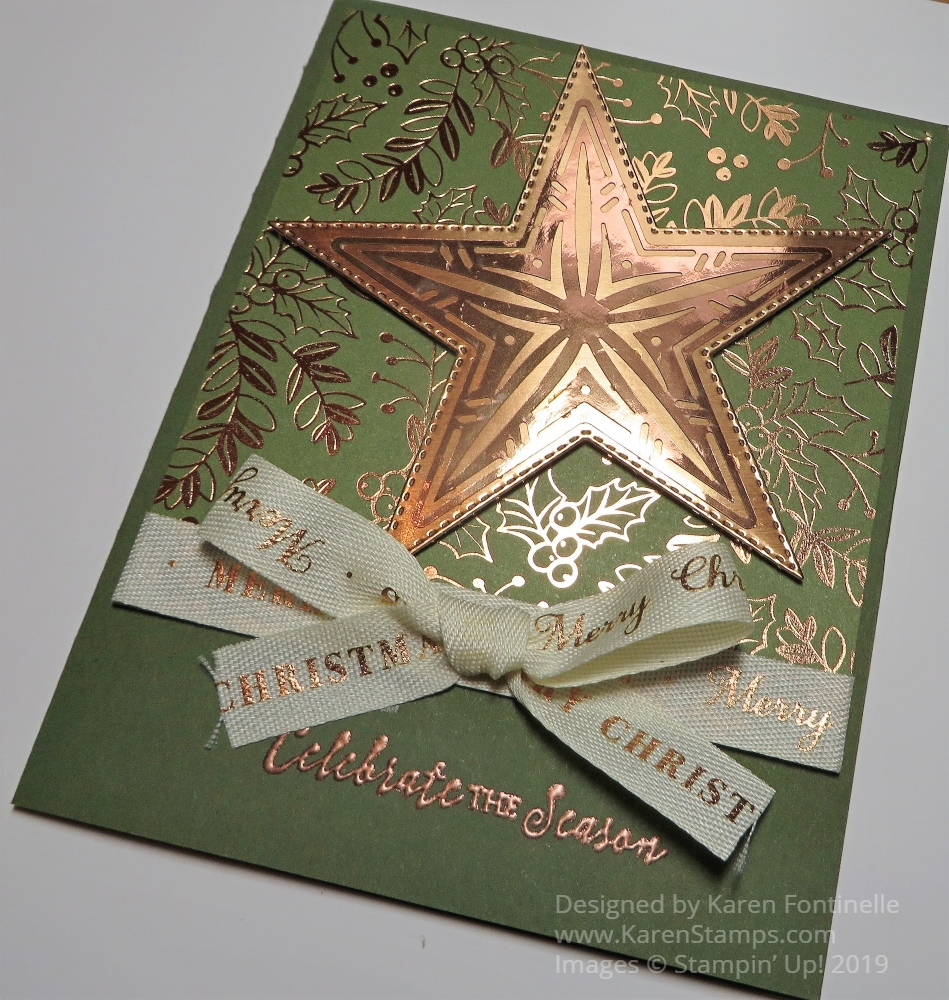
This Brightly Gleaming Stitched Star Christmas Card was very difficult to photograph without a giant glare of the Copper Foil, but I think I got it pretty well now on an angle! I’m feeling like I haven’t had enough time to play with all my Christmas stamp sets and accessories and time is getting short! Panic is setting in! And a sore throat that slowed me down this past week!
However, I did fit in some stamping time and here is one example! It seemed like a lot of samples I was seeing used the Night of Navy designer paper in the Brightly Gleaming Specialty Designer Series Paper. I thought I would change things up a bit and use the Mossy Meadow color.
The card base is Mossy Meadow and the Mossy Meadow patterned designer paper just comes down partway on the card base. Be sure to adhere some of the Very Vanilla/Copper 1/2″ Classic Weave Ribbon around the bottom of the designer paper before adhering the designer paper to the card base! And before you do any of that, if you want to emboss a greeting at the bottom of the card, do it before you have ribbon hanging in the way with the potential to ruin the card! I got lucky and could have covered it up with an embossed greeting on a different paper. But it’s better if you plan your card and space first and stamp or emboss before you get everything adhered to the cad!
The star is die cut with the largest star in the Stitched Stars Dies. I just love that we have star dies again because I think stars are SO useful in designing cards and projects. Just think about how many things you can use stars for besides Christmas! Birthdays, congratulations, babies, retirement, everything! These stars are beautiful dies and certainly not just for the holidays.
The star is cut from Copper Foil. Then that Copper Foil star is overlaid with the large star in the Brightly Gleaming Foil Elements. I used the Multipurpose Liquid Glue in teeny tiny dots on the back of the foil element to adhere to the die-cut star. I got lucky and didn’t make a mess with the glue so it worked fine. On this card, I popped up the foil star with Stampin’ Dimensionals, but you can also adhere it flat on the card.
The ribbon is really beautiful. I need to learn how to tie a bow with the words all going in the same direction if that’s possible! I passed it up on one of my first Holiday Catalog orders, but then added it later because it is something different!
For the greeting on the card front, I chose one from the Itty Bitty Christmas Stamp Set because I knew I needed something small. I stamped it with Versamark and heat embossed with Copper Stampin’ Emboss Powder and my Heat Tool. Heat embossing is magical, if you haven’t tried it yet!
For the inside of the card, I added a Very Vanilla layer of cardstock, stamped with a greeting in Mossy Meadow Ink and with a strip of the same Brightly Gleaming DSP along the inside edge of the Vanilla layer. The greeting used inside the card says “Hoping all your Christmas wishes come true.” in the So Many Stars Stamp Set. Save 10% by purchasing the So Many Stars Stamp Set and Stitched Stars Dies in a Bundle.
Thanksgiving is coming up so make those cards first if you are mailing a few cards to friends and family. But then it’s really time to get serious about Christmas cards!! You’ve probably paged through the Holiday Catalog a bunch of times, but maybe you need another few run-throughs before it gets too close to the holidays!
