Category Archives: Candy

Valentine’s Day Party Pandas Mini Treat Bag

Valentine's Day Party Pandas Mini Treat Bag

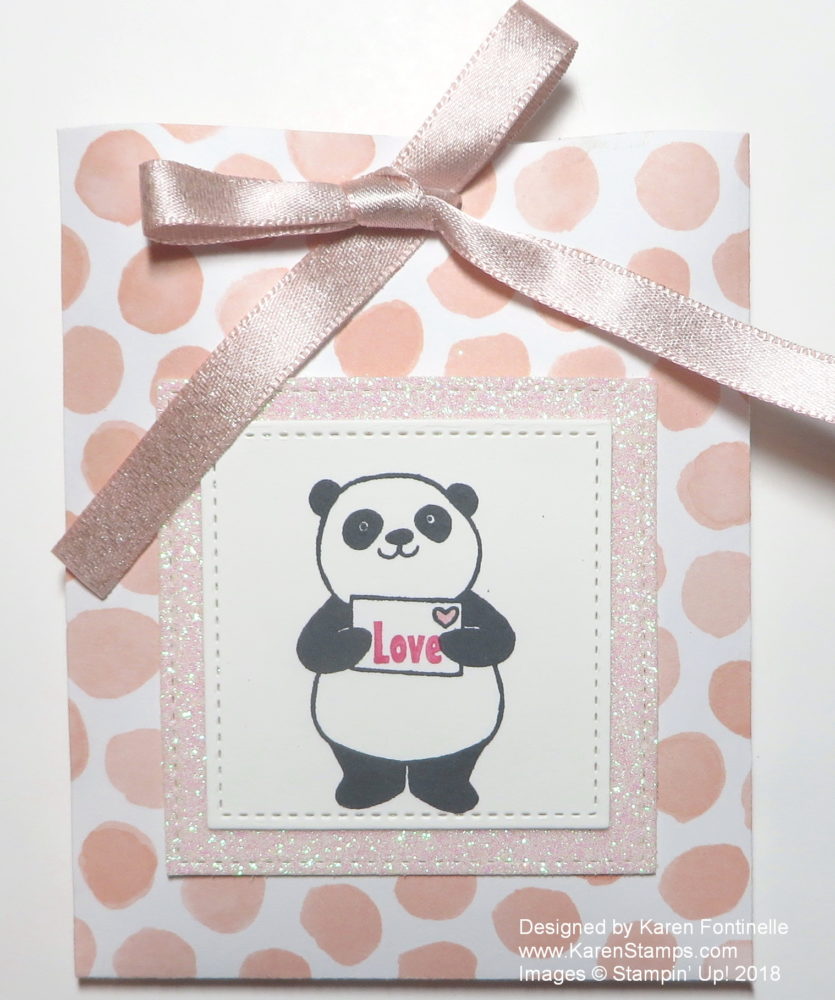
How about a cute Valentine’s Day Mini Treat Bag stamped with one of the Party Pandas? This mini treat bag is big enough to hold a few pieces of candy inside, a gift card, a small gift or just a note! You can make it for Valentine’s Day, but really it could be used for lots of occasions!  And one of the best parts is that you can get the Party Pandas Stamp Set FREE during Sale-A-Bration with a $50 purchase of Stampin’ Up! products!

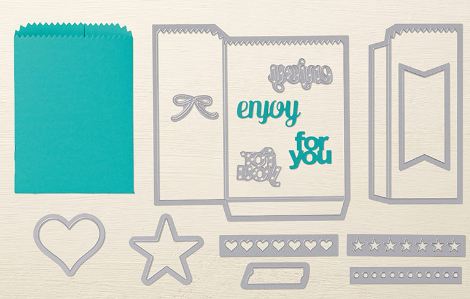
It’s so easy to make a treat bag with the Mini Treat Bag Thinlits Dies.  These dies have always been one of my favorites!  I also like the other pieces that come in the collection besides the two pieces that make up the treat bag.

Mini Treat Bag Thinlits Dies

For the Party Pandas treat bag, I made the treat bag with a paper in the Whole Lot of Lovely Designer Series Paper.  I figured the pink dots could be used for Valentine’s Day but also for other occasions.  I did trim off the top edge of the bag since I was going to tie the bag shut with the Powder Pink 3/8″ Shimmer Ribbon.

The Panda is stamped with the Party Pandas Stamp Set available during Stampin’ Up! Sale-A-Bration!  You can’t buy this stamp set, you have to earn it! You earn it with a $50 purchase, which is easy to do, and then you choose a special Sale-A-Bration product for your FREE product!  I think the pandas are probably one of the most popular Sale-A-Bration sets this year! The panda is just stamped in black ink.  (I used Memento Black.)  Just color in the little heart on the envelope with a pink marker.  I stamped just the word “Love” from the stamp in the set and inked it up with the Melon Mambo Marker.  I got lucky and stamped it in just the right place!

Next I die cut the panda with the Stitched Shapes Framelits Dies and layered on a piece of the Iridescent Myths & Magic Glimmer Paper in the Occasions Catalog. This glimmer paper was also die cut with the larger square in the Stitched Shapes Dies.  The paper almost seemed to take on a little bit of the pink from the paper and the ribbon!

Here is another Mini Treat Bag I made last summer with the Birthday Memories Designer Series Paper.  I put a card inside the bag for the birthday card.  There are so many ways you can use these treat bags!

If you need a little Valentine Treat Bag, you can make one yourself with the Mini Treat Bag Thinlits Dies out of any paper you choose. Best of all, with a $50 purchase, you can choose the Party Pandas Stamp Set for your free Sale-A-Bration item and make all kinds of cute cards and projects with the pandas.

If you like this project and want to share it with your friends, you can click one of the social media buttons right below this post! Or leave me a comment!

Shop Stampin’ Up! Online During Sale-A-Bration!

Make a Valentine Treat Box With a Mini Pizza Box

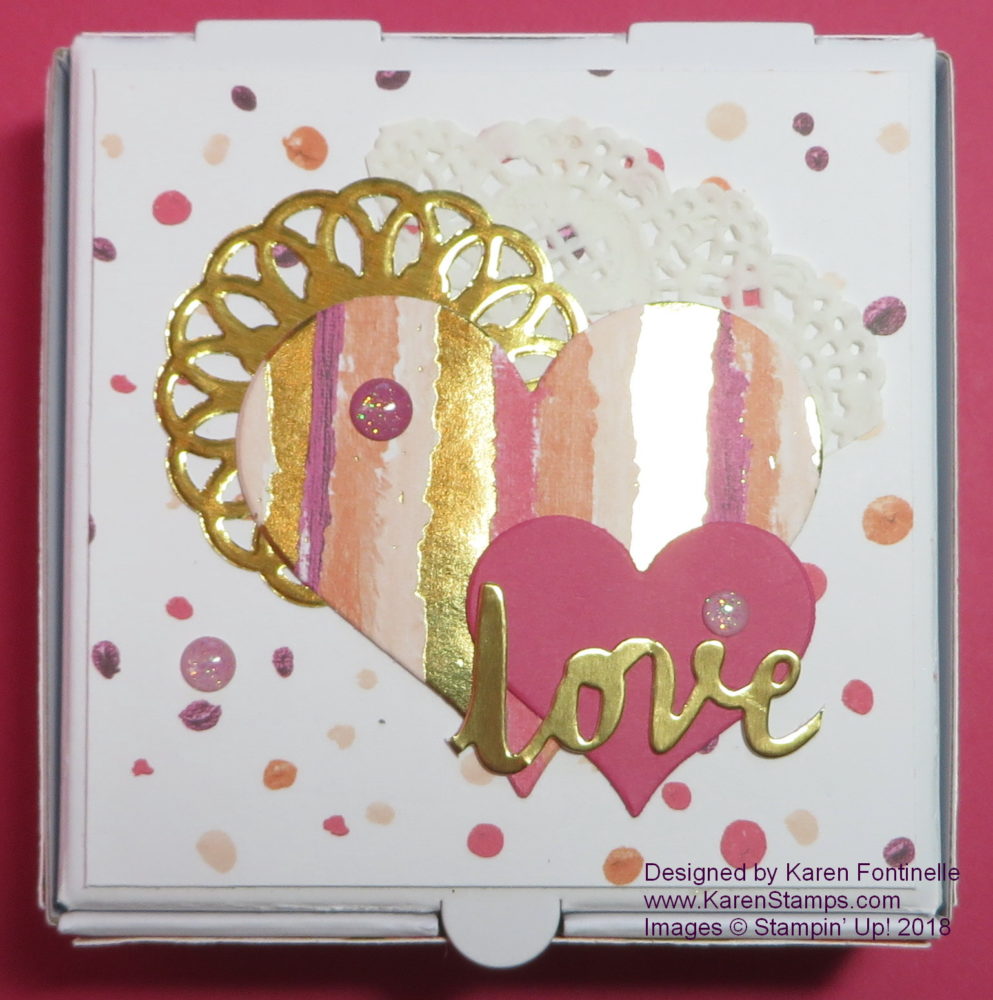
Valentine Treat Box with a Mini Pizza Box Embellished

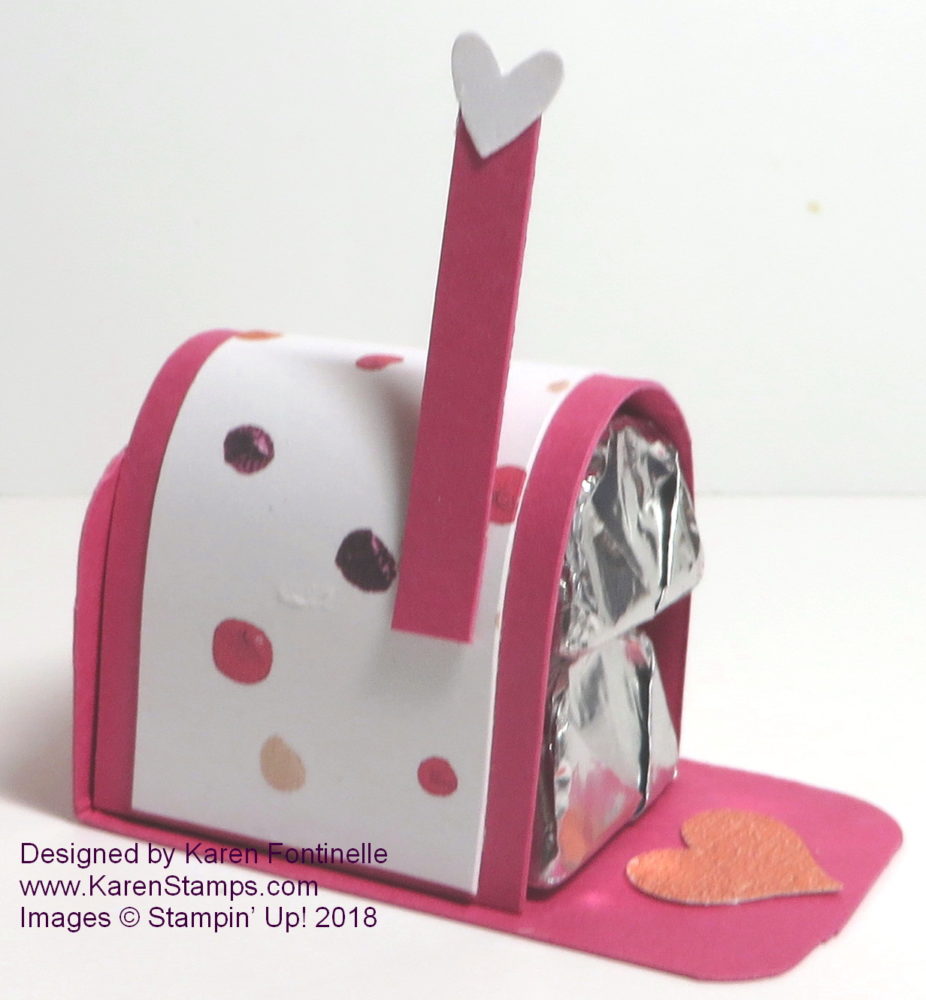
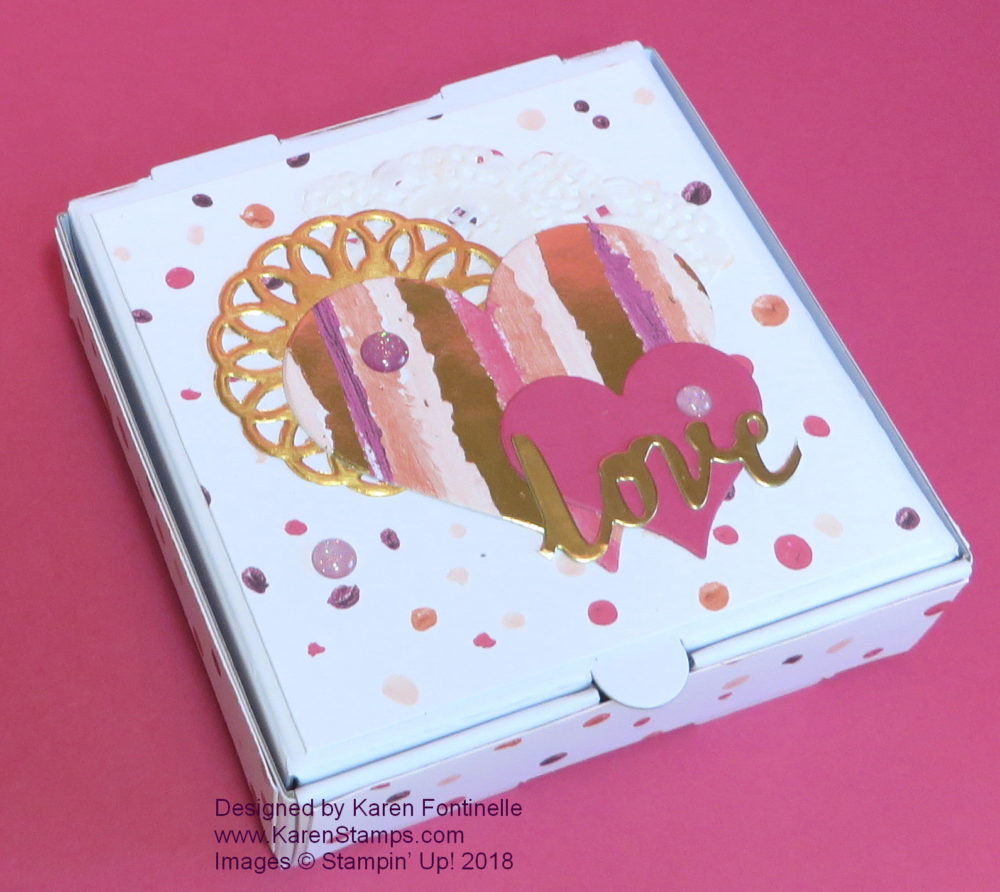
Here’s an easy project for Valentine’s Day or any occasion –  Make a Valentine treat box with a Mini Pizza Box from Stampin’ Up!  Use a small box to decorate with paper and embellish to put a special treat inside!

Did you know you can still purchase the Mini Pizza Boxes that were in the Stampin’ Up! Holiday Catalog?  They are on the Carryover List of products that are still available at least until the next Annual Catalog comes out.  Then we will see which products continue on in the new catalog or if they are retired. Anyway, you will still find the Mini Pizza Boxes in my Online Store! You will find all the Carryover Products listed in the Online Store under Holiday Favorites.

The Mini Pizza Boxes come flat in the package so storage is not a problem.  Then just fold on all the scored lines and assemble the pizza box. Decorate however you like for whatever occasion! For this box, I chose to use the Painted With Love Specialty Designer Series Paper.  Even though one side of each sheet has gold foil accents, today I chose to use the side without the gold foil. Just cut a square slightly smaller than the top of the lid and individual strips to adhere on the sides of the pizza box.  You can make them the same or contrasting.

For the top of the box, I chose some hearts since we are close to Valentine’s Day, but hearts can be for anything! I used the Sweet & Sassy Framelits Dies to cut out the two hearts. If you look closely at these dies, you will see there are two styles of hearts – one sweet, and one sassy, I suppose! One shapes curves inward near the bottom and the other shape just has a straight edge to the bottom point. I don’t know which shape is sweet and which shape is sassy, but you can choose! Sometimes I don’t notice these subleties so in case you are like me, I thought I would point it out. Of course you can mix and match the shapes of the hearts however you like!

I also added two kinds of doilies. One is a small gold doily in the Metallic Foil Doilies package.  The other is part of a white doily in the Delicate White Doilies package.  Always good to have embellishments like these on hand for when your project needs a little something And for some extra little embellishments, I stuck on a few of the Glitter Enamel Dots.

At the last minute I added the word “Love” in Gold Foil because I thought the top of the box still needed “something”.  How did I get the word “Love”?  From the Lovely Words Thinlit Dies!  The die cuts out a heart and the word “Lovely”, so I just trimmed off all but the “love” part!  Very easy!  I think it adds just the right thing on this box. The other two words are “hugs” and “friend”.

Do you have some Mini Pizza Boxes that you can make into a Valentine Treat Box with embellishments and designer paper or cardstock?  If not, put them on your Stampin’ Up! order!Valentine Treat Box with a Mini Pizza Box Top Closeup


Quick and Easy Reindeer Small Treat Bag

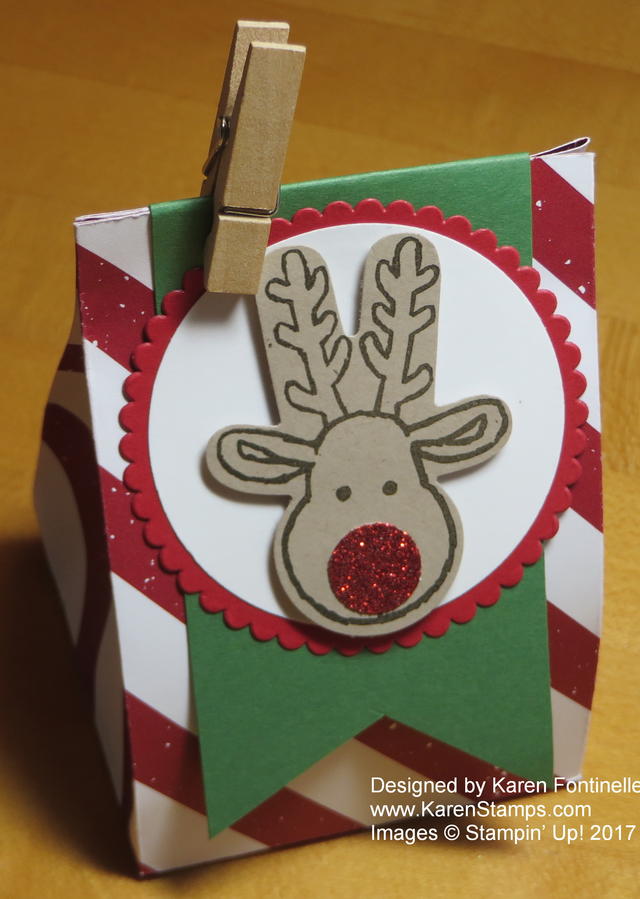
Reindeer Small Treat Bag

If you need a quick and easy little treat, this Reindeer Small Treat Bag is easy to make!    Honestly, it only took me a few minutes before I went out the door!  Nothing like planning ahead!  I got the basic idea from another demonstrator, Angie Juda.

The paper I used for the bag is from the Be Merry Designer Series Paper package. Of course you can use any pattern, any paper, and make one for any occasion.  Keep in mind if there is a pattern going in one direction, think about which way you are cutting the paper!  I had to use the reverse side of the designer paper on another treat bag I was making because I didn’t pay attention to the pattern on the side I intended to use!

Start with a 6″ x 12″ piece of paper.  Score the length of the paper at 2″.  This will become the bottom flaps of the bag. Now turn the paper so you have the 12″ width going horizontal. Score at:  1″,  3 3/4″, 6 1/2″ and 9 1/4″. Crease the score lines. Cut off that tiniest portion under the 1″ section (it’s 2″ x 1″). On all those score lines you just made, cut up from the bottom to the 2″ score line to make the bottom flaps. Apply a strong adhesive to that 1″ flap and adhere the other side of the bag.  If you just fold the paper over in half you will see that it matches up with that 1″ section with the adhesive. Fold in the bottom flaps and use adhesive.  Reach inside the bag with a bone folder or something to press down to make the adhesive stick.

Now you have the basic bag made.  You could leave it open at the top, punch holes and run ribbon through to tie it, fold it over, staple it shut, or use a small clothespin (retired) like I did. Actually I cut a strip of paper to fold over the top and made the flag ends. I did put a little bit of Multipurpose Liquid Glue on the back of the front banner and let it dry, just a small circle of glue, in hopes it would be “reuseable”.

To decorate the bag, I stamped the reindeer from the Cookie Cutter Christmas Stamp Set, gave him a Red Glimmer Paper nose, and punched him out with the Cookie Cutter Builder Punch.  Just turn it upside down for the reindeer!  Then I die cut a circle and a larger scallop circle to mount the reindeer on. Very cute and easy! Quick and easy, I should say, because I was really doing it before leaving the house for an appointment!

Check my blog for other past treat or gift bag ideas if you need some last minute ones! Here’s one with the Mini Treat Bag Thinlit Dies.  Just click on the category you want or write something in the Search box!

I need more time to stamp more holiday projects I wanted to make! But if you want something simple to make, try this Reindeer Small Treat Bag for some candy treats, small gift, or maybe a gift card!

Quick and Easy Christmas Candy Gift Treat Box

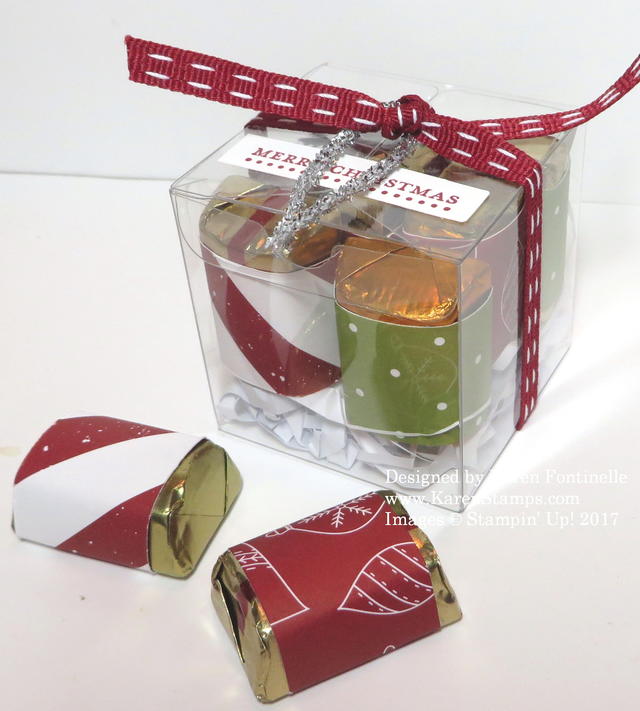
Quick and Easy Christmas Candy Gift Treat Box

If you need some extra little gift for someone or a stocking stuffer, how about this Quick and Easy Christmas Candy Gift Treat Box! This has been one of my favorite things to make ever since I saw the idea! What could be easier or more fun than wrapping chocolate candies in a 1″ x 3″ strip of designer series paper?!  Then put them in some kind of bag or container that you have decorated as cute as can be!  Remember, presentation is everything!

To showcase my covered chocolates, I put them in a Clear Tiny Treat Box.  I tried to fit them in there “decoratively” and finally decided on a bit of shredded paper at the bottom and 7 candies. To take up some space, I cut up scrap computer paper and wadded it up, pulled it apart, wadded it up, pulled it apart, until I finally felt like it was crushed up well enough.  I usually use the Crimper tool from long ago to crimp the strands of paper.  This way you don’t have to rush to the store to get some of this stuff!  Just make your own!

Since the candies were decoration in themselves, I just tied some Cherry Cobbler 1/4″ Double-Stitched Ribbon around and added a bit of Silver Tinsel.  Then I stamped the “Merry Christmas” greeting from the Teeny Tiny Wishes Stamp Set (one of my favorites!!) in Cherry Cobbler ink. I punched it out with the Classic Label Punch.  I had actually tried the Everyday Label Punch first, but decided just a very small greeting was fine. I snipped off the pointed ends of the punched greeting and just adhered it to the top of the Tiny Treat Box. Done!

Obviously, you could use this idea for any occasion or no occasion, just a gift! Use birthday paper, Valentine, Halloween, patriotic, whatever. Love these Tiny Treat Boxes!  They are great for quick and easy treats!

Don’t forget to check out the Year-End Sale at Stampin’ Up!  The retiring Holiday Catalog products are listed, although not on sale, so you can get them while supplies last.

Get out your designer series paper scraps or cardstock, buy some chocolates at the store (uh, craft supplies, of course!), and wrap to decorate! Time will be getting short and you know you will want some little gifts handy, so try this Quick and Easy Christmas Candy Gift Treat Box and make some extras!

Last Minute Thanksgiving Ideas

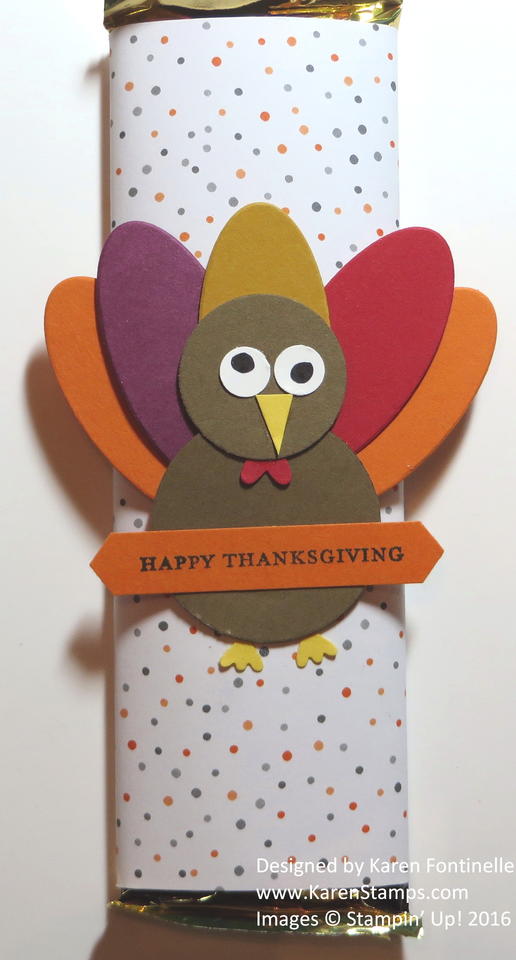
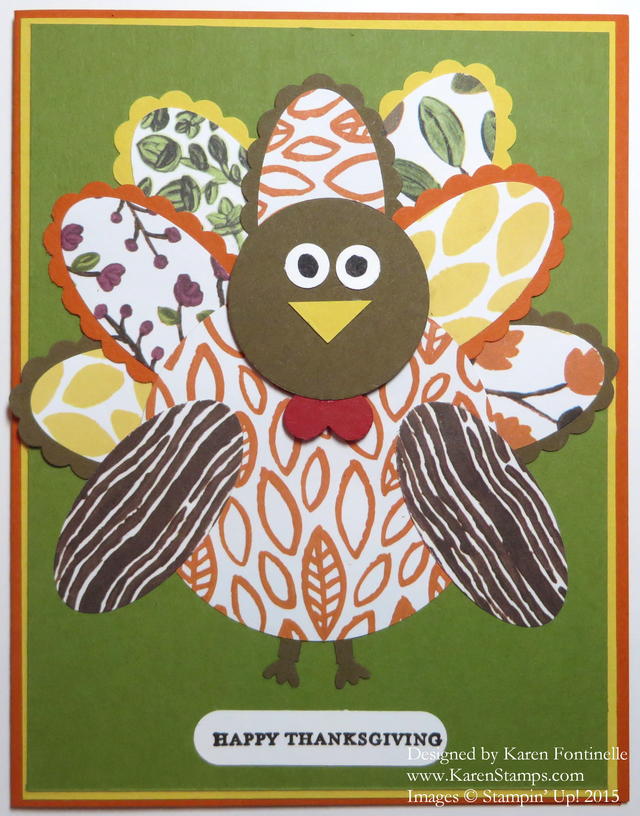
Thanksgiving Punch Art Turkey Candy Bar Wrapper

If you need a last minute idea for a Thanksgiving card or treat, try these from past years on my blog! All you need is the idea and you can use whatever paper, supplies, creativity you have!

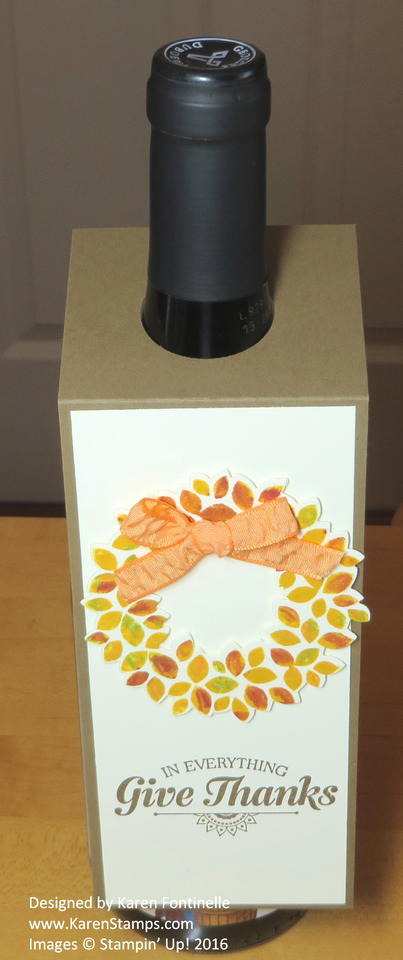
Wondrous Wreath Wine Bottle Tag for Thanksgiving

Quick and easy wine bottle topper to take to your host or decorate your own bottle or beverage.

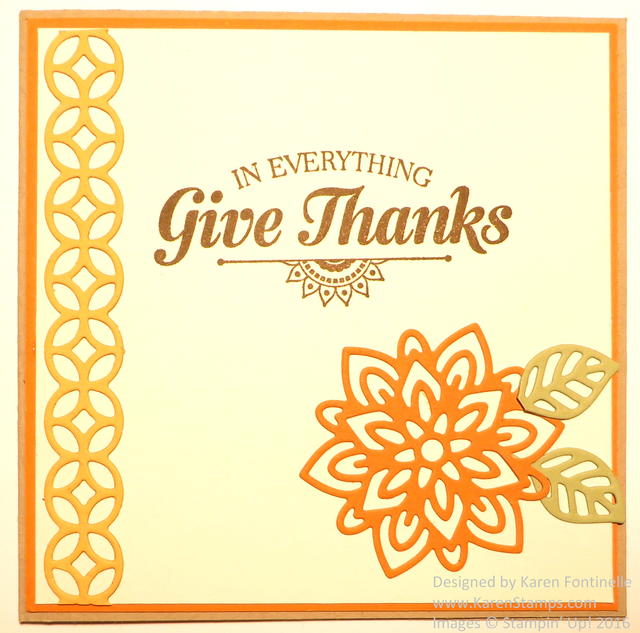
Flourish Thinlits Dies Thanksgiving Card

A lovely Thanksgiving card with the Flourish Thinlits Die!

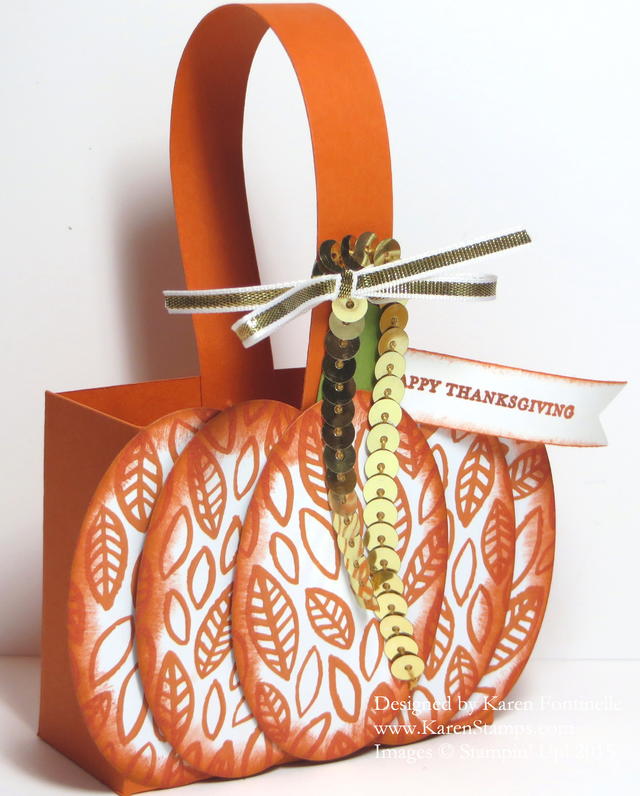
Embellished Pumpkin Box

A Thanksgiving Pumpkin Box, easy to make with oval punches or dies!

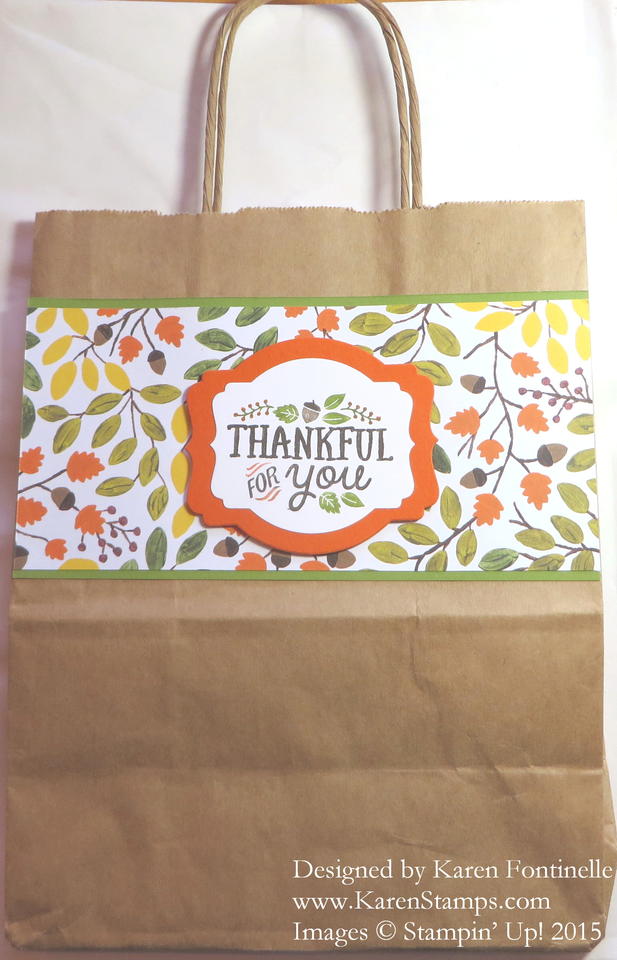
Thankful Friends Thanksgiving Gift Bag

Make a quick and easy gift bag to take your gift or treat to your hostess at Thanksgiving!

Punch Art Turkey Thanksgiving Card

What could be more fun than this Thanksgiving punch art turkey?! Use whatever paper you have!

Don’t work too hard today! And if you have a few minutes, don’t forget to check out the Stampin’ Up! Online Extravaganza going on this week!

Remember, all these ideas are  interchangeable and you probably have enough materials at home to make any of them! Who wouldn’t love that turkey candy bar at the top?!

Try these last minute ideas for whatever Thanksgiving cards, treats or bags you need.


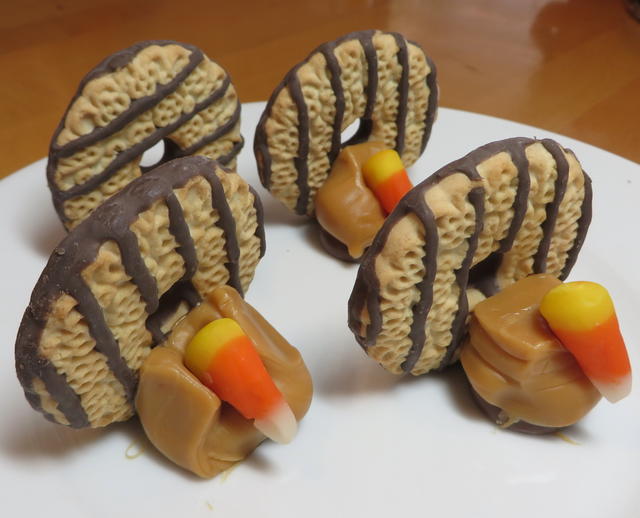
Little Thanksgiving Turkeys

Little Thanksgiving Cookie Turkeys

I think I have posted these little Thanksgiving turkeys before, but in case you need some fun little Thanksgiving favor or something, these are something I have made for years!  These would be great to put at each place at the Thanksgiving table or take along to your hostess where you are going!

You will need chocolate Kisses, candy corn, caramels, and fudge-striped cookies.

Put a few caramels on a plate and just barely heat in your microwave.  You want to just soften them, not melt them.  Do a few for a test and see how your microwave operates.  I did mine about 10 seconds or a tiny bit longer. You can probably do about 4 at a time and still make them all before the caramel hardens again.

Soften the caramel (take off the wrapper first!). Have the Kisses unwrapped also and candy corn and cookies handy.  As soon as the caramel squares come out of the microwave, press the caramel on top of a Kiss for the base. Then smoosh the fudge-striped cookie up against the back of the caramel until it sticks.  Take the candy corn and smoosh it into the caramel as you see in the photo. This is supposed to look like a turkey!

Someone taught me how to make these a million years ago!  There are other versions out there but these are super simple.  I used to make them for preschool Thanksgiving lunches and on to elementary school for the kids, as well as our own dinner.  It’s always fun to have a Thanksgiving favor for everyone at the table or to take to a party!

Don’t forget the Stampin’ Up! Online Extravaganza is underway!  The stamp sale is over, but plenty of select products are available for 10% – 40% off!  And a to-be-announced FLASH SALE of something next Monday!

Online Extravaganza HERE!

Make an Easy Triangle Box For a Treat With Year of Cheer Paper

Year of Cheer Triangle Box Side

If you need a cute little gift box for a treat or small gift, try making this easy triangle box with the Year of Cheer Designer Paper. I learned to make this triangle box a long time ago and it is SO easy!  You can vary the size, decorate it for any kind of occasion, make it as plain or simple as you want….it’s up to you! And did I say it was quick and easy?!

My sample starts with a piece of the Year of Cheer Specialty Designer Series PaperThis is beautiful paper with foil designs, one-sided, and perfect for special cards and projects. I used a  piece of paper cut 5″ x 10″.  All you have to do is score the paper at 5″, then mark on the short ends the center spot which would be 2 1/2″. Score from the 5″ score line to the center mark on the short ends on each side on each end.

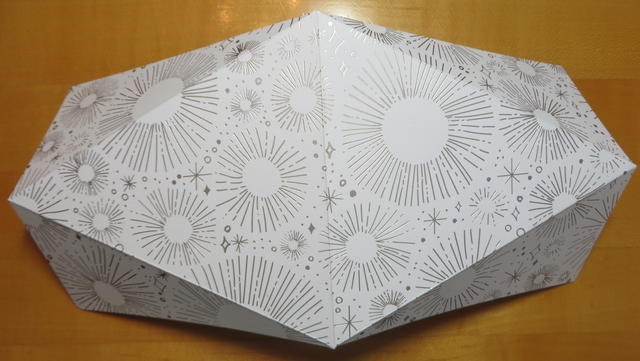
This is what the scored paper will look like:

Triangle Box Scored

Fold all the score lines and practice folding into the triangle box shape. Then on each end you will need to punch holes so that you can tie all the ends together once you put the contents inside.

Here is one of my older posts with a diagram of how to score the box. You do the same thing even if the size is a little different.

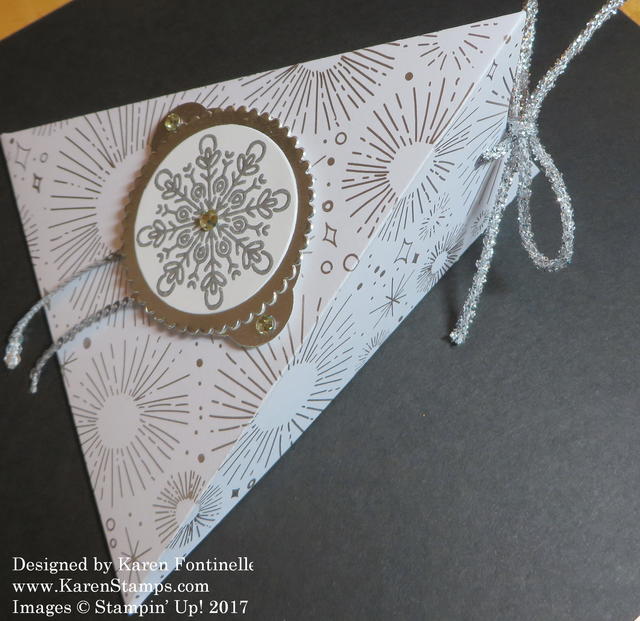
Year of Cheer Triangle Box Front

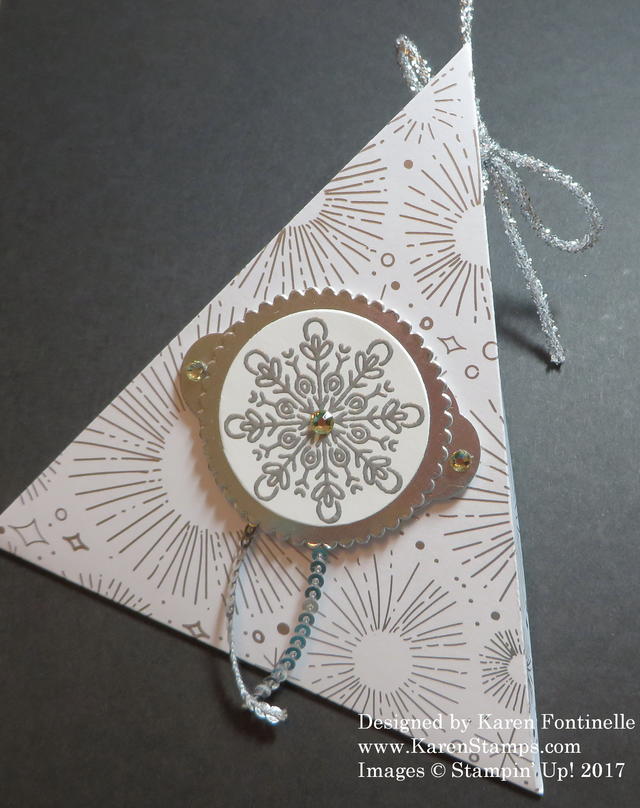
To decorate this triangle box, I embossed a snowflake image from the Cheers to the Year Stamp Set with the Heat Tool and Silver Stampin’ Emboss Powder. I punched out the snowflake with a Circle die that fit around it with a Silver Foil scalloped circle die. After adhering these two pieces together, I layered that piece on a piece of Silver Foil punched with the Pretty Label Punch.  I embellished this snowflake piece with a piece of Silver Mini Sequin Trim and Rhinestone Jewels.  The triangle box is tied with a piece of Mini Tinsel Trim.

Make an Easy Triangle Box For a Treat With Year of Cheer Paper for a small gift or a candy treat inside! It’s easy to make and the Year of Cheer Paper is elegant for any occasion!

SHOP STAMPIN’ UP! ONLINE HERE!

Last Minute Halloween Ideas

Here are some of my favorite Halloween posts from last year all in one place, if you need some last minute Halloween ideas!  If you don’t have this year’s Halloween stamps and paper, perhaps you have ones from last year or you can just use something else. Substitution is easy! It doesn’t always have to be “Halloween” paper or stamps.  Just use the ideas!

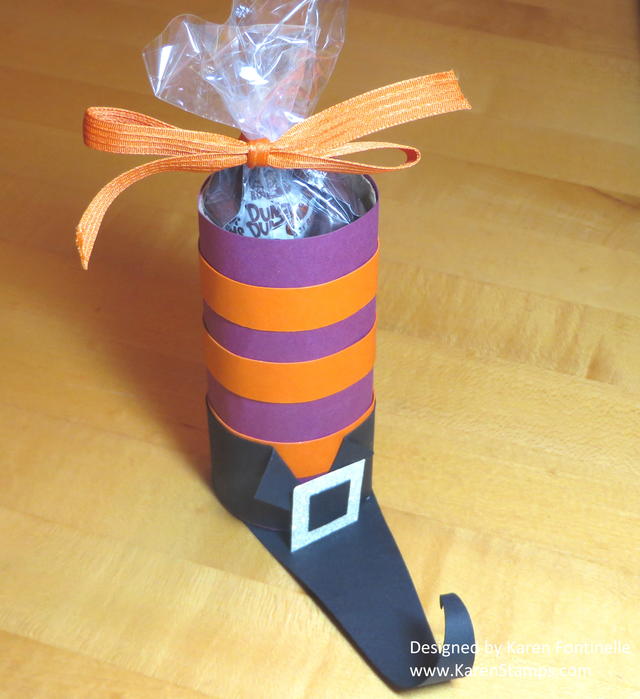
Halloween Witch's Boot Candy Treat Holder

Halloween Witch’s Boot

Easy to make with a toilet paper roll or paper towel roll! Very cute and fun to make!

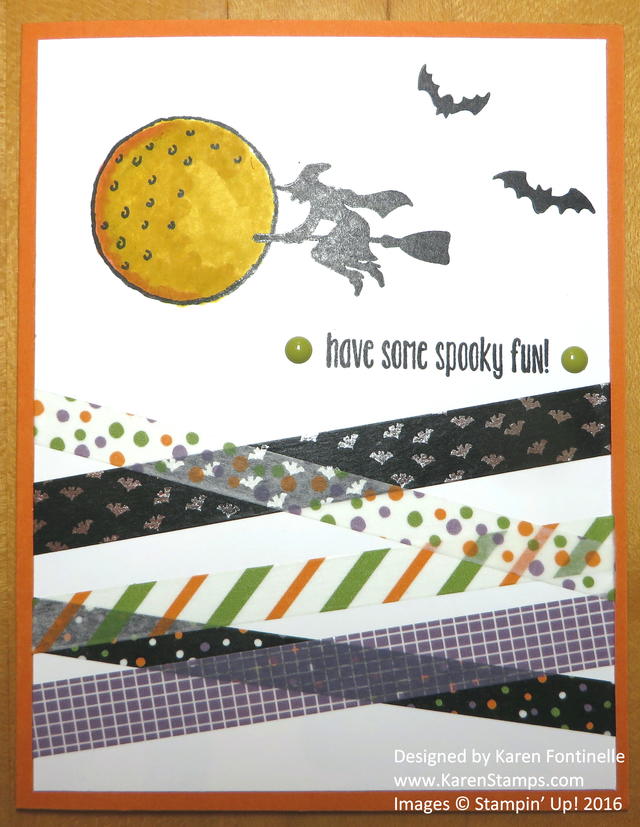
Halloween Night Washi Tape Halloween Card

Halloween Night Washi Tape Halloween Card

Use some washi tape, whatever you have, criss-crossing at the bottom of the card and do a little stamping at the top!

Halloween Chocolate Candy Treat Bag

Halloween Chocolate Candy Treat Bag

Even if you don’t have the narrow cello bag, use the idea of wrapping chocolate nugget candies with designer series paper for a Halloween treat!

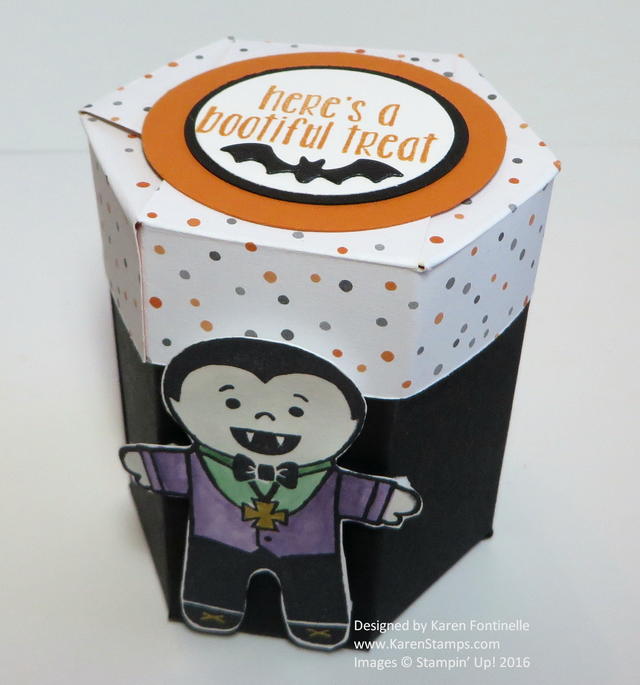
Halloween Small Hexagon Box

How to Make a Halloween Small Hexagon Box

This cute little hexagon box isn’t as hard as it looks!  Give it a try for any occasion!

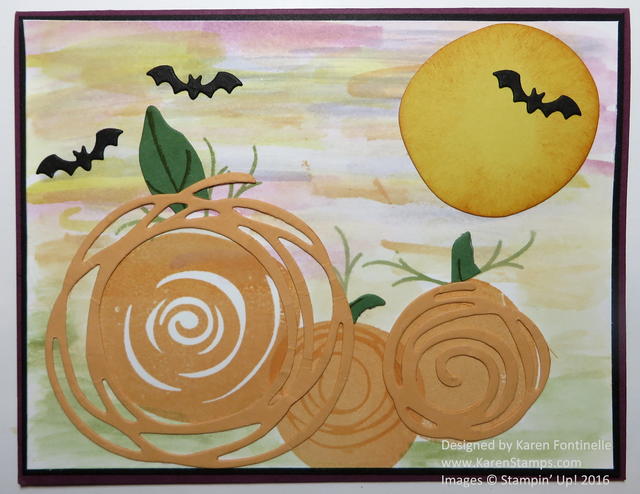
Swirly Bird Pumpkins Halloween Card

Swirly Bird Pumpkins Halloween Card

Use the Swirly Scribbles dies to make pumpkins for Halloween!

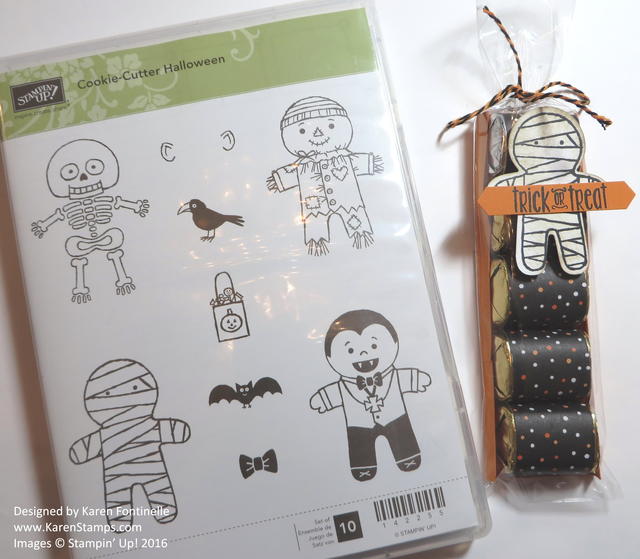
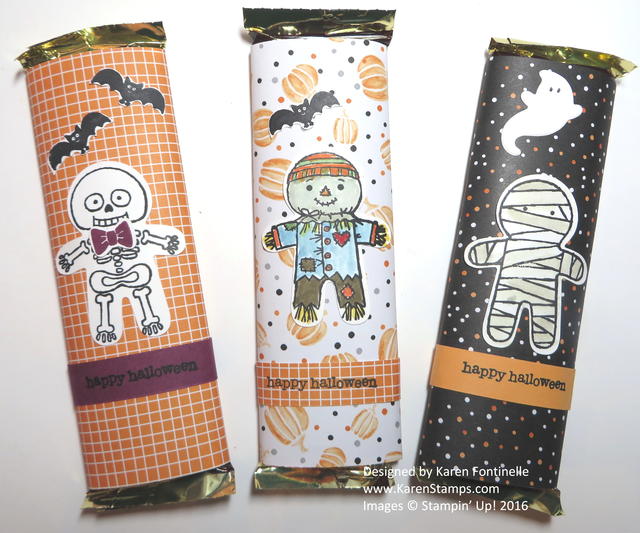
Halloween Night Candy Bars

Halloween Night Candy Bars

Decorate candy bars of any size with designer paper and Halloween images.

I hope you can use these ideas to inspire your own ideas with the materials you have! Actually most of these could be used as Christmas ideas or for a birthday party.  Just change the colors, the paper, the images.

Have fun making some last minute Halloween treats for family, friends, or your trick-or-treaters!


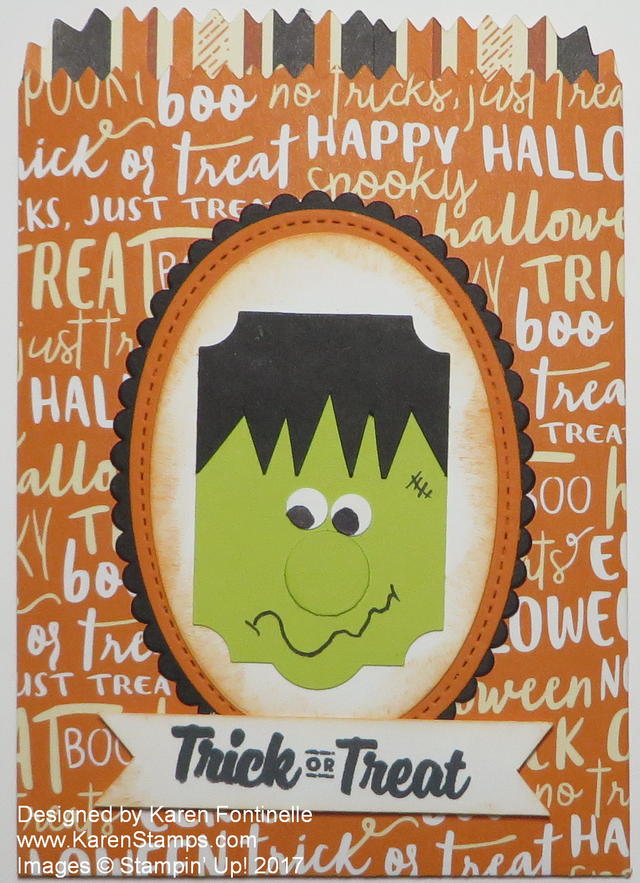
Frankenstein Mini Treat Bag For Halloween

Frankenstein Mini Treat Bag For Halloween

As I was reading something online, I saw a mention of Frankenstein, and I realized with Halloween almost here, I’d almost forgotten about Frankenstein.  We used to make lots of fun cards with one of the original steel dies we used to have, the Top Note Die.  It was perfect for a Frankenstein head!  But as I glanced through some images of Frankenstein to refresh my memory of how his face looked, I noticed people were using various punches to make Frankenstein, perhaps a little smaller though!  I saw one candy project using the Everyday Label Punch, and decided to make a Frankenstein face with that punch.

The face turned out small, naturally, using a punch, and I could have added it to many different things, like the Clear Tiny Treat Box for one thing.  Since I love the Mini Treat Bag Thinlits Dies so much, I decided to make a Mini Treat Bag out of the Spooky Night Designer Series Paper and make the Frankenstein face the focal point.

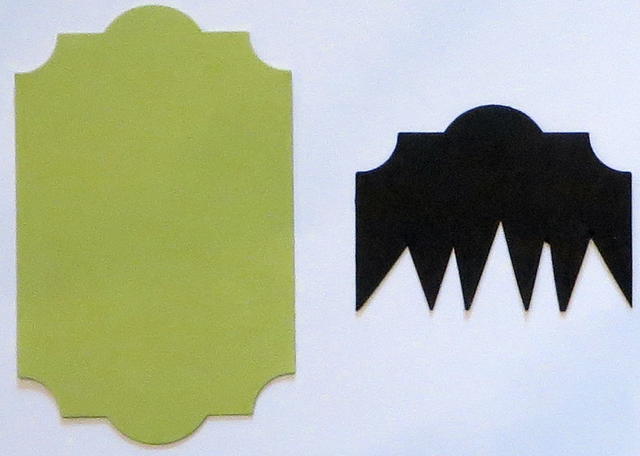
This is how you start using the Everyday Label Punch to make the Frankenstein face:

Everyday Label Punch for FrankensteinI punched one label out of Lemon Lime Twist Cardstock and one out of Basic Black. The Basic Black one I cut in a little less than half and then just snipped the bangs with my Paper Snips. Then I glued the black hair piece on top of the green face piece. I suppose you could leave the “lump” on top of his head, but I cut mine off, just following along that straight line on top.

For the Frankenstein face, I used the 1/2″ Circle Punch for his nose and sponged it with a little bit of Lemon Lime Twist Ink. For the eyes, I missed having the Owl Punch and forgot that would have been good to use for the eyes.  Use whatever punch that you have to punch out the white eyes.  You can punch smaller dots for the eyes, but the simpler thing to do is just color in the black part of the eyeballs with a black marker.  I used my 1/4″ Handheld Punch for the white eyes. They are a little small but that’s okay.  Just draw on his mouth and scar with a black marker.

To make Frankenstein stand out on the Mini Treat Bag, I just layered him on an Oval die cut, also one with the scalloped edge, and one of the Stitched Shapes Framelit Dies.  The greeting is from the Spooky Cat Stamp Set.

Check out Stampin’ Up! Online for all your papercrafting and stamping supplies!

Halloween Candy Corn Treat Boxes

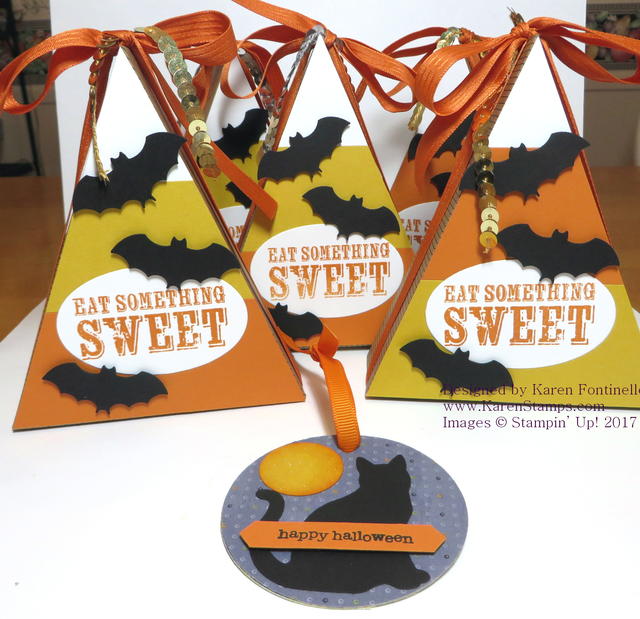
Halloween Candy Corn Treat Boxes

Someone asked me to make some kind of treat boxes for a school festival, and these Halloween Candy Corn Treat Boxes are what I came up with after looking at a whole bunch of ideas online. As it turned out, these were made with the boxes in a Paper Pumpkin Kit a couple of years ago. The kit came out in time for Thanksgiving and the boxes were designed to look like a piece of pie. Since it’s usually just three of us at Thanksgiving, I saw no need to make these boxes so of course I saved the kit. Sometimes hoarding is good!

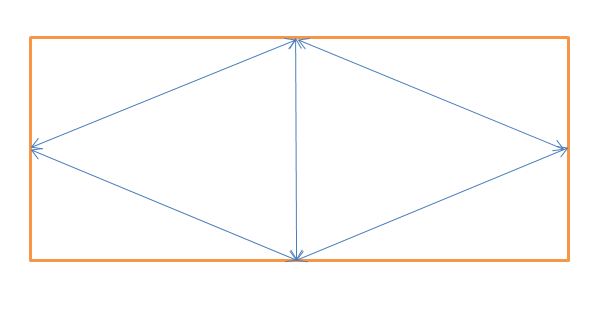
Even if you don’t have an old Paper Pumpkin Kit with pie shaped boxes, you can easily make your own triangle boxes yourself out of cardstock.  You can see one I made HERE in this post.  Just cut a strip of cardstock, score in half, then score from the halfway mark on each side to the middle point at each end.

Triangle Box Drawing

I pretty much copied the sample box I saw online. Instead of trying to cut the colored cardstock strips to an exact length and angle, which which have been a little difficult to measure ahead of time, I just adhered each “too big” strip onto the box lid and then trimmed off the excess length with scissors.  Just make the strips whatever width you like, no need to measure.  Just fit them on the box.

The bats were punched with a retired Bat Punch from Stampin’ Up!.  The greeting, as it turns out, after I searched through many old stamp sets, was from a Paper Pumpkin Kit!  Even when you make the project, you still have an exclusive little stamp set to keep! After filling the box with some candy corn in a cello bag, I closed up the box and tied the Pumpkin Pie ribbon around the sides and added a bit of Gold Sequin Trim. We used to have bigger sequin trim but now we have Mini Sequin Trim.

Just for an extra surprise in the box, I decided to make the little black cat Halloween ornament.  All that took was to die cut a circle out of lightweight cardboard and cover with designer paper.  In this case I used some retired paper. Then I used the Cat Punch, a small circle for the moon and sponged the edges, stamped the greeting from Teeny Tiny Wishes (still one of the best stamp sets!) and punched the greeting with the Classic Label Punch.

This was such a fun project to make! Try your hand at making the triangle box!  You can make so many variations for treats or small gifts for most any occasion!

SHOP STAMPIN’ UP! ONLINE HERE!

Christmas Tiny Treat Box

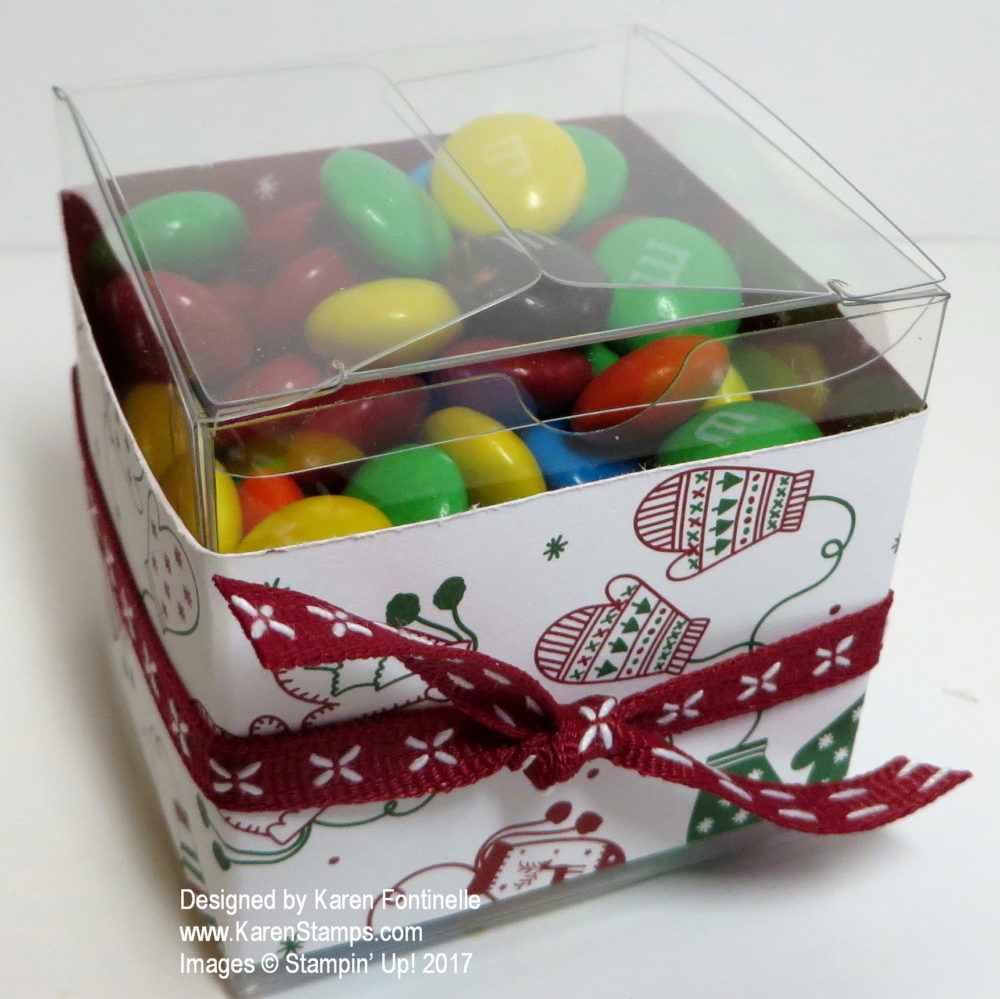
Christmas Tiny Treat Box

It’s time to stock up on the Clear Tiny Treat Boxes for making something like my Christmas Tiny Treat Box or treat boxes for any other occasion. They are very easy to decorate and fill with candy or a small gift.

These little boxes are really handy to have.  They are small and come flat so storage is no problem.  Just pull off the plastic protecting their surface and assemble.  Be sure to crease the score lines well on the boxes.  I usually fold  back and forth where I can to get a good crease.  That makes for a “sharper” box.

Decorate the Tiny Treat Boxes any way you like!  For Christmas, like the box above, you might easily wrap some Christmas designer paper around the outside around the sides. Another variation might be to wrap the paper from top to bottom, covering the lid and decorating that way. After wrapping the Be Merry Designer Series Paper around the outside of the box, I also wrapped a piece of Cherry Cobbler 1/4″ Double-Stitched Ribbon around the the middle and simply tied in a knot,  You really can’t decorate a small gift box quicker and easier than this! And if you wanted to, you could embellish way more than this!

If the gift or treat or favor is for a birthday, of course just wrap with birthday or generic paper, tie on some ribbon, maybe add a greeting or an embellishment or tag, and you have something quick and ready to go for the recipient.

Here are some Halloween Tiny Treat Boxes With Spooky Cat in THIS POST that I made in August to get ready for Halloween. Just think of the possibilities!  You get 16 boxes that are food safe, 2″ x 2″ x 2″ and only cost $7.50. Good to order some and keep on hand, even if you don’t have a specific occasion in mind at the time.  They will be useful for lots of things.

And don’t forget, the Be Merry Designer Series Paper is one of the papers in the Buy 3 Get 1 Free DSP Sale going on now all month in October.

Stock up during the special offers going on now!

Shop Stampin’ Up! today online HERE!


Halloween Witch Trick or Treat Candy Treat Box

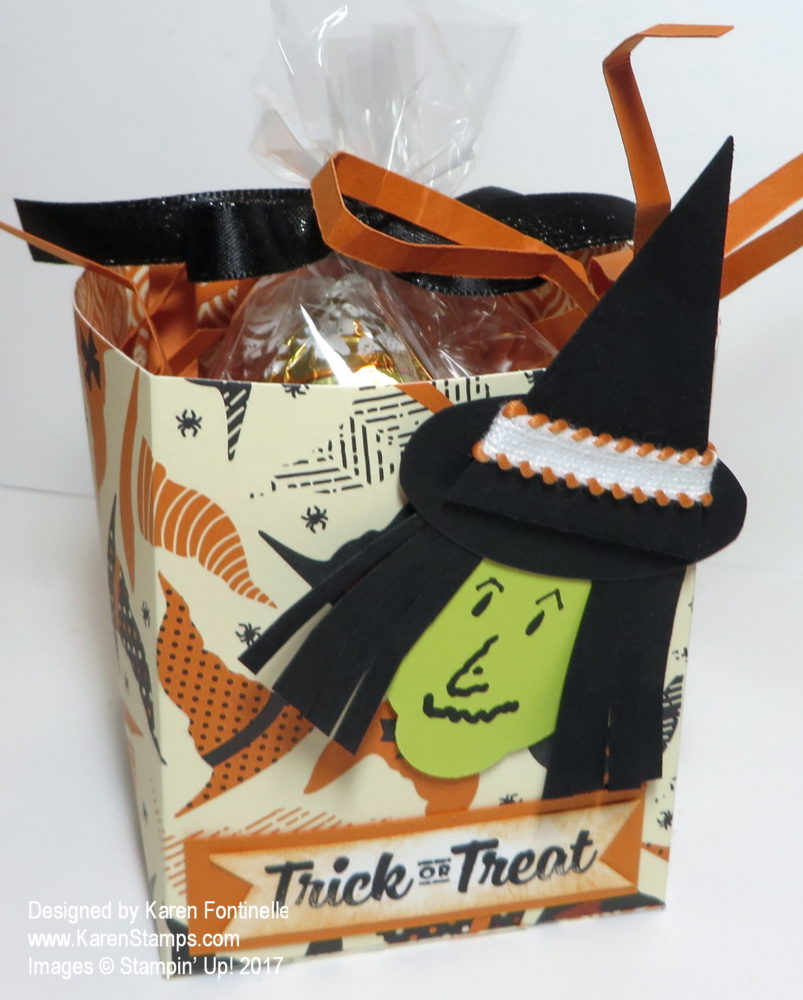
Halloween Witch Trick or Treat Candy Treat BoxHere’s a fun Halloween Witch “Trick or Treat” Candy Treat Box to make for Halloween! I think it is the witch on this project that makes it interesting (although I could have made her face better I think!).

Remember the little Fall Treat Bag I made the other day on THIS blog post?  This treat box is made the exact same way, except it is not as tall and I left it open instead of closing the top! This box is about 3 1/4″ tall. I made it with the witch’s hat pattern in the Spooky Night Designer Series Paper.  For the treat inside, I used a Cello Bag to hold some chocolate candy (of course!) and tied with the Basic Black 3/8″ Shimmer Ribbon.  You can make your own “shred” to put in a gift bag or a treat box like this one by just cutting very narrow strips of cardstock and then crumbling it up in your hands as tight as you like!  The greeting is stamped from the Spooky Cat Photopolymer Stamp Set. I even sponged it a little with Pumpkin Pie ink.

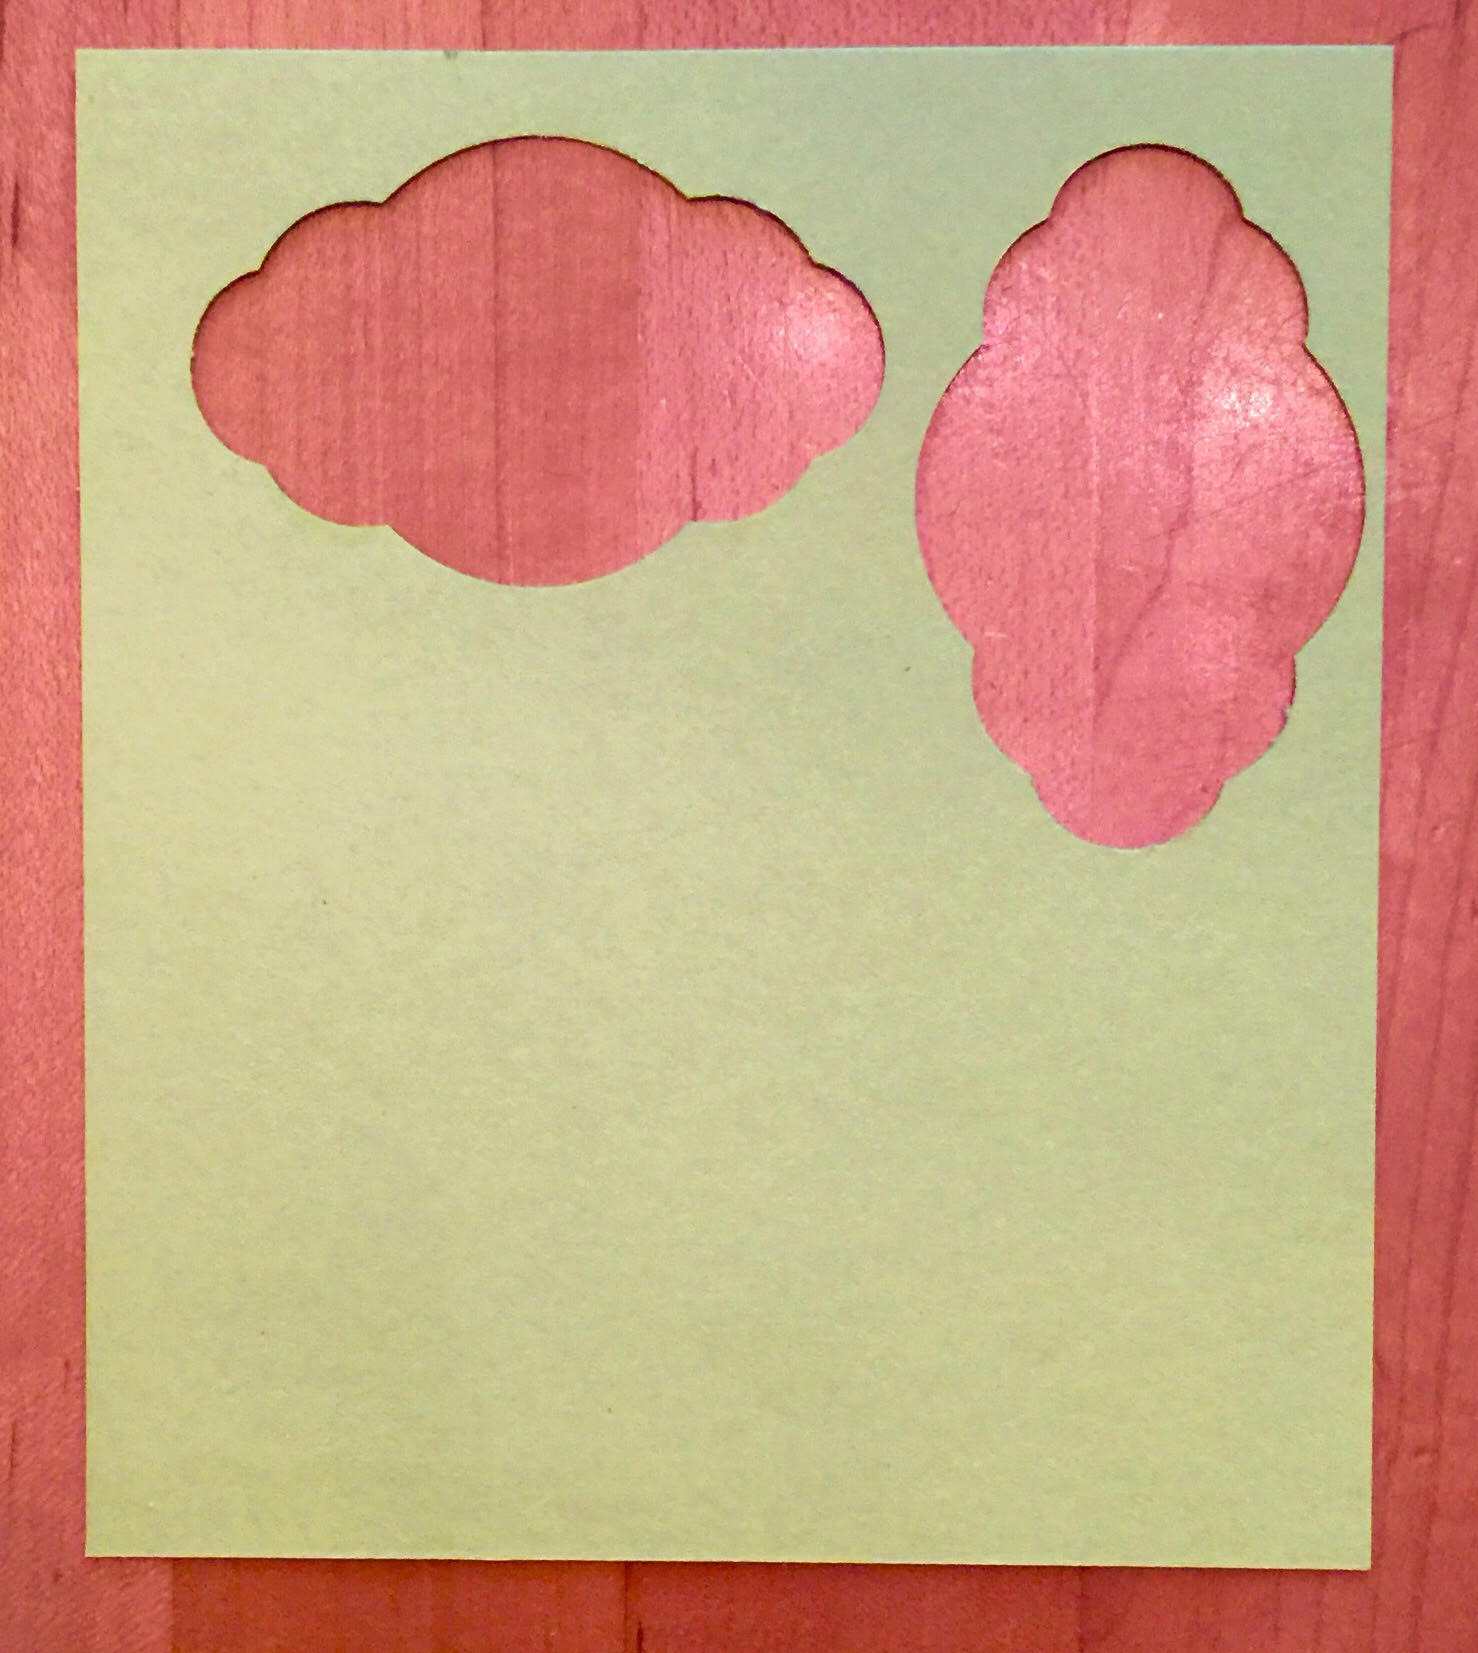
Let’s talk about the witch!  I took out a scrap of Lemon Lime Twist Cardstock to possibly punch with a Circle Punch for the witch’s face.  This particular scrap already had a piece punched out with the Pretty Label Punch.  I saw that and thought that, at least, the bottom portion, lengthwise, could look like a witch’s face with a chin! Do you see it??

Lemon Lime Twist Punch outThat’s how I came up with the witch’s face using the Pretty Label Punch!  Then I just cut a triangle and an oval for her witch’s hat and added a small strip of the Pumpkin Pie 1/4″ Stitched Ribbon on her hat band. For her black hair, I just cut a scrap of Basic Black Cardstock and snipped it to look like hair for each side.  No special directions, just play it by ear!  I could have drawn on her face better but I didn’t give it much thought!  I was excited to make her face out of the Pretty Label Punch!

Box Diagram

Remember, check out my blog post HERE to see all the directions for making this box, but above you see the diagram.  For this box, since I wanted it to be shorter than the fall treat bag, I made it shorter than the 6″ width, about 5 1/4″.  The paper is 12″ long.  Score for the bottom flaps with the paper lengthwise at 2″.  Then turn the paper sideways, like the diagram, and score at 1″, 3 3/4″, 6 1/2″ and 9 1/4″. Cut out that little section I have marked with light blue. Fold and crease all the scored lines and assemble the box.

Don’t forget to subscribe to Paper Pumpkin so you get your October and November holiday kits in the mail!  Join Paper Pumpkin HERE!

Shop Paper Pumpkin Today!

Quick and Easy Fall Treat Bag For Candy or a Gift

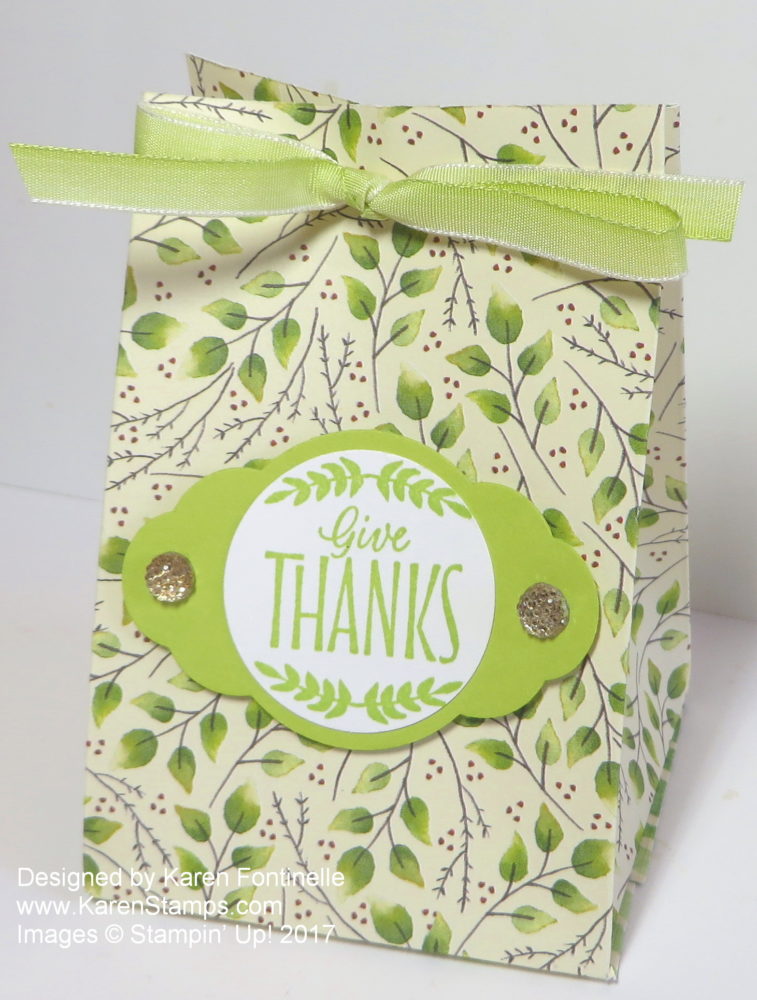
Quick and Easy Fall Treat Bag For Candy or a GiftIf you need a quick and easy fall treat bag for some candy or a gift, making this little bag out of some pretty designer paper or cardstock is about as easy as it gets!  It uses half a sheet of 12″ x 12″ paper and then is scored and cut, folded and glued.  Leave it open at the top or tie shut with a ribbon or something else and you’ve got a cute little treat bag. Make it for any occasion by changing the paper and the greeting or decoration.
Start with a 12″ x 6″ piece of designer paper or cardstock to make this bag. I used a piece of the beautiful Painted Autumn Designer Series Paper  (I love this paper!!). Place the paper lengthwise in the Stampin’  Trimmer or Simply Scored board.  Score at 2″.  This will make the bottom of the bag. Next turn the paper the other way to score four times:  at 1″, 3 3/4″, 6 1/2″ and 9 1/4″. Fold and crease all the score lines with the Bone Folder. It really helps to get a good crease.

Now starting at what will be the bottom flaps of the box, the 2″ scored section, cut those four score lines up to the original 2″ score line. So you will have one little section that is 1″ wide and the rest are 2 3/4″ wide. Cut off the little 1″ section. This diagram isn’t drawn to scale but it gives you the idea! (And I learned a new skill!)  Cut out the light blue portion and cut up on the short score lines at the bottom to the horizontal score line to make the bottom flaps.Box Diagram

Put adhesive, something strong like Fast Fuse, Multipurpose Liquid Glue or Tear & Tape on that remaining 1″ strip. If you have the paper flat on the table, you can just fold over the opposite end and adhere it to that 1″ portion. Do this instead of fumbling with it in a box shape in your hands.

Punch two holes in the top, if you like and tie with a ribbon.  I used the Lemon Lime Twist 1/4″ Ombre Ribbon.  The greeting is stamped from the Labels to Love Stamp Set, stamped on Whisper White in Lemon Lime Twist Ink. Then it is punched out with the 1 3/8″ Circle Punch. The background is a piece of Lemon Lime Twist Cardstock punched with the Pretty Label Punch. I adhered the greeting on to this label, popped it up on Stampin’ Dimensionals on to the bag, and added some Gold Faceted Gems for some bling!

This is a very quick and easy treat bag you can make for fall or Thanksgiving or any occasion for a small gift or a candy treat!  Leave it open or close it up.  It will only take you a few minutes to make and the recipient will think it is fantastic!  If you think your friends would be interested in this blog post, you can share by clicking the buttons below!

Shop Stampin’ Up! for all your papercrafting needs!


Halloween Treat Bag With Candy

Halloween Treat Bag With Candy

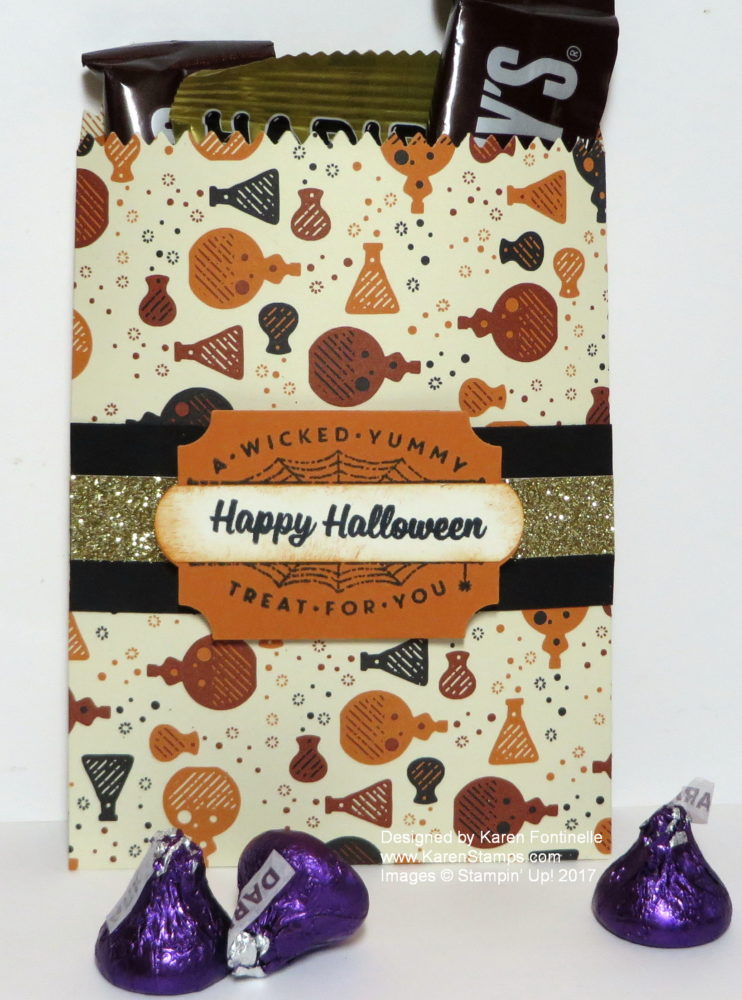
If you have the Mini Treat Bag Thinlits Dies, you can make this Halloween Treat Bag with candy quickly and easily!  I love those Mini Treat Bag Dies, as I have mentioned many times in my blog posts! They make it so easy to make these cute treat bags, which you can use for treats, as card, or for a small gift or gift card!  They are so versatile!

The paper I used is the Spooky Night Designer Series Paper in the Holiday Catalog. I chose the pattern with the little bottles of potions!  The label on the front is from the Spooky Cat Photopolymer Stamp SetThat is stamped on Pumpkin Pie Cardstock and punched with the Everyday Label Punch, which also coordinates with another stamp set,  Merry Little LabelsYou can even buy this stamp set and punch in a Bundle and save 10%.  I also stamped the Happy Halloween in the set on Very Vanilla on a scrap strip of paper and then put it in the punch to get the perfect curved ends to match the label!  I also sponged it with a bit of Pumpkin Pie ink to have it match a bit better and look a little spookier! I put this all on a strip of Basic Black Cardstock (you could also wrap it all the way around in a belly band) and to jazz it up a bit, put a strip of Gold Glimmer Paper behind it!

Won’t a little trick-or-treater love to get this mini treat bag instead of just being handed a candy bar?!

Here’s another treat bag I made with the Birthday Memories paper in the Stampin’ Up! Annual Catalog.  So many cute ideas with the Mini Treat Bag Thinlits Dies!

It’s time to start getting ready for Halloween, whether you are giving out treats to trick-or-treaters or co-workers at the office or maybe party favors at a Halloween party!  It’s fun to do when you’re not rushed at the last minute so take some time to make some easy and fun Halloween treats NOW like this easy Halloween Treat Bag!

Shop Stampin’ Up! Online Today!

Enjoy Some Stampin’ Up! Holiday Videos!

The new Stampin’ Up! Holiday Catalog is LIVE!  You can view it online and order from it! Start enjoying all its gorgeousness!  It really is time to begin thinking of the holidays and all the cards and projects we want to make.

Click HERE to View the Stampin’ Up! Holiday Catalog!

Click HERE to See the Holiday Catalog Products Online in the Store!

Summer has ended and now it is almost fall, at least that’s what Labor Day weekend tells us! Here in Houston we still have plenty of hot weather to go, although after the wrath of Hurricane Harvey last weekend, I think we are going to be treated to a little bit cooler weather for a few days. It’s hard to believe a week ago we’d had 3″ of rain with another 32″ to go by Sunday morning. And even as I write this post, people are still being evacuated from places that are still flooding and from places east of Houston where Harvey’s path took it after it hit here. By some grace of God, we are still fine in our home.

That’s why it is so good to have something to help us relax and take our minds off the troubles of the world for a little while. That’s why we say “Stamping is cheaper than therapy!” Of course a lot of stampers and other Demonstrators are still trying to save their stamps and papercrafting supplies from the flood or will have none left when this is all over with.  Stampin’ Up! has already stepped up to help some of those people.

Here are some Stampin’ Up! videos for you to enjoy and to get a better feel for some of the products in the Holiday Catalog!

When you look through the catalog, when you see that little “play” arrow near a product description, that means there is a video for that product or suite of products.

If you do not have a Demonstrator and would like a Holiday Catalog, it seems that our mail service is back up so I can send you a complimentary copy.  Email me at Karen@KarenStamps.com with your contact information and let me know if you would also like a copy of the Stampin’ Up! Annual Catalog.

Be sure to order your favorite products as soon as you can as some could go on backorder temporarily as we have seen in the past!  If something is backordered when you want to order it, I always think it is best to go ahead and add it to your order anyway rather than wait until the stock is resupplied because Stampin’ Up! will send it out to you as soon as they have it.

To check out some other Stampin’ Up! product videos, look at THIS POST.

Enjoy your Holiday Catalog and enjoy your Labor Day weekend!

SHOP STAMPIN’ UP! ONLINE HERE!