Category Archives: Candy

Enjoy Some Stampin’ Up! Holiday Videos!

The new Stampin’ Up! Holiday Catalog is LIVE!  You can view it online and order from it! Start enjoying all its gorgeousness!  It really is time to begin thinking of the holidays and all the cards and projects we want to make.

Click HERE to View the Stampin’ Up! Holiday Catalog!

Click HERE to See the Holiday Catalog Products Online in the Store!

Summer has ended and now it is almost fall, at least that’s what Labor Day weekend tells us! Here in Houston we still have plenty of hot weather to go, although after the wrath of Hurricane Harvey last weekend, I think we are going to be treated to a little bit cooler weather for a few days. It’s hard to believe a week ago we’d had 3″ of rain with another 32″ to go by Sunday morning. And even as I write this post, people are still being evacuated from places that are still flooding and from places east of Houston where Harvey’s path took it after it hit here. By some grace of God, we are still fine in our home.

That’s why it is so good to have something to help us relax and take our minds off the troubles of the world for a little while. That’s why we say “Stamping is cheaper than therapy!” Of course a lot of stampers and other Demonstrators are still trying to save their stamps and papercrafting supplies from the flood or will have none left when this is all over with.  Stampin’ Up! has already stepped up to help some of those people.

Here are some Stampin’ Up! videos for you to enjoy and to get a better feel for some of the products in the Holiday Catalog!

When you look through the catalog, when you see that little “play” arrow near a product description, that means there is a video for that product or suite of products.

If you do not have a Demonstrator and would like a Holiday Catalog, it seems that our mail service is back up so I can send you a complimentary copy.  Email me at Karen@KarenStamps.com with your contact information and let me know if you would also like a copy of the Stampin’ Up! Annual Catalog.

Be sure to order your favorite products as soon as you can as some could go on backorder temporarily as we have seen in the past!  If something is backordered when you want to order it, I always think it is best to go ahead and add it to your order anyway rather than wait until the stock is resupplied because Stampin’ Up! will send it out to you as soon as they have it.

To check out some other Stampin’ Up! product videos, look at THIS POST.

Enjoy your Holiday Catalog and enjoy your Labor Day weekend!

SHOP STAMPIN’ UP! ONLINE HERE!

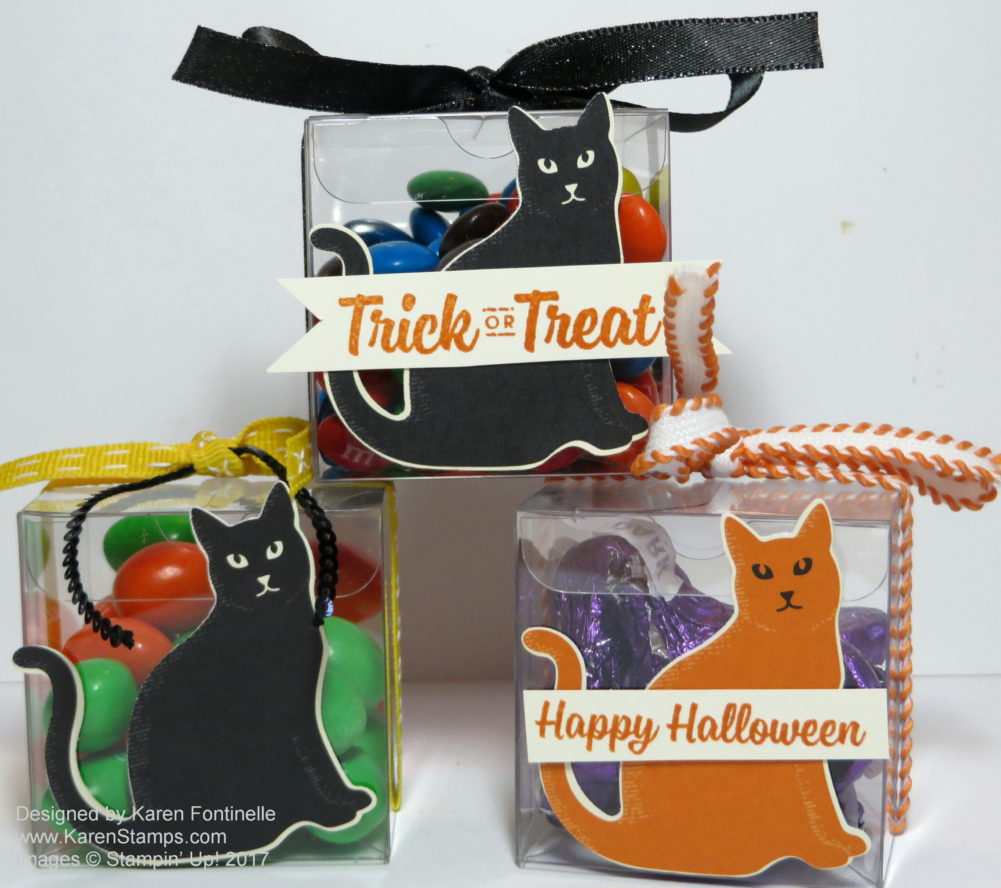
Halloween Tiny Treat Boxes with Spooky Cat

Halloween Tiny Treat Boxes with Spooky Cat

How do you like these Halloween Tiny Treat Boxes with Spooky Cats?  I bet that one of the most popular items in the upcoming Holiday Catalog will be this Cat Punch! If you are interested, I would order it right away when the catalog comes out. What is really great, is that you can punch the cat right out of the Spooky Night Designer Series Paper!  You can also stamp and punch with the Spooky Cat Stamp Set!

If you are ordering in August, I would go ahead and order the Clear Tiny Treat Boxes from the Annual Catalog.  They are currently backordered, but yours will come as soon as they are resupplied, which will be faster than if you wait until they are back in stock and then order.  You get 16 boxes that are 2″ x 2″ x 2″ and are food safe!  And the cost is only $7.50. These are great for having on hand any time you need a little treat for someone or to hold a small gift.  You can decorate them however you like.  You will see this Halloween idea in the Holiday Catalog. I chose to just punch out some cats from the Spooky Night Paper and tie with some ribbon, plus I added a stamped greeting from the Spooky Cat Stamp Set.  So fun!  So many creative possibilities!

This is such a quick and easy Halloween treat to make and will be so fun with the new Cat Punch!!

Remember to use your Bonus Coupons that you earned in July by August 31.

I can’t believe how fast August is flying by!

Bonus Redeem

SHOP STAMPIN’ UP! ONLINE HERE!

Easy Graduation Card Idea for 2017

Easy Graduation Card Idea for 2017

Now that I know my niece has received her high school graduation card, I can show it to you! I got the idea online somewhere and updated it a little bit, so it really is an easy graduation card for 2017, using the Large Numbers Framelits Dies, which thankfully are not retiring this year! There are so many good graduation cards out there it was hard to narrow down my choices. Or maybe I wish I had more graduates to send cards to this year!

The front layer of this card is Whisper White Cardstock, embossed with the Lucky Stars Embossing Folder. This folder is retiring, although it is still available. I think stars are always handy to have in your stash in whatever form because they can be used to many occasions. The numbers are die cut with the Big Shot and the numbers framelits I already mentioned.  I used Gold Foil paper as well as a layer under the Whisper White.  Some gold or silver foil or glimmer paper always adds some elegance, I think!

The graduation cap is easy to make. Either you can google some tutorials on how to cut the angles or you can just cut out somewhat of a diamond shape. Then cut a little square piece for underneath and punch or cut those two little half circles like graduation caps usually have. You can make your own tassel with embroidery floss or twine, but I used a tassel from the Eastern Palace Suite. It was easier to just stick it up underneath the cap than to deal with the ring on top of the tassel which maybe should go at the center of the top of the cap. On the top of the cap I placed a Gold Faceted Gem, coming in the new catalog.

The card is just on a Basic Black card base and you can put a piece of Whisper White on the inside so you have somewhere to stamp and write a greeting.  Maybe add a strip of the Gold Foil on the inside to carry through the design.

Which do you think a graduate will appreciate more, a graduation card you handmade for them or a store bought one? I guess as long as it has money inside, they will appreciate either, but you know what I mean!!

Shop Stampin’ Up! Online 24/7!

Current Catalog ends May 31! New Catalog begins June 1st!


Make Easy Animal Party Favor Treat Boxes and More!

Pyramid Pals

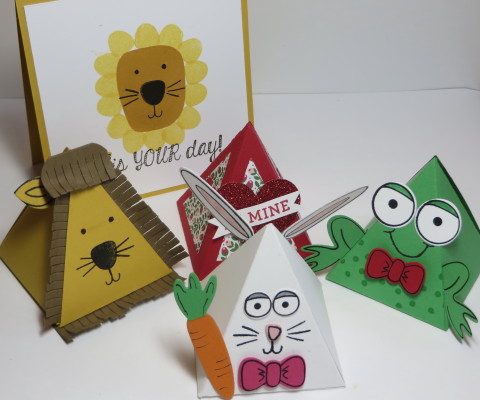
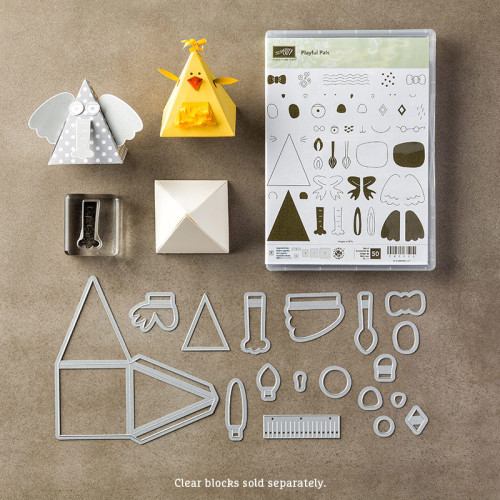
Two of the items on the Stampin’ Up! Retiring Products List are the Pyramid Pals Thinlits Dies and the Playful Pals Photopolymer Stamp Set which can help you make easy animal party favor treat boxes and more! It’s an infinite number of cards, party favors, gift boxes, party decorations and more that you can make. Fill these Pyramid Pals with candy or a treat or just make them for fun or for a decoration.  Just think of the fun you could have with your children or grandchildren if you make the box and then they help you decorate the pyramid to make an animal. Or just make a pyramid box, decorate with some designer paper or stamping or perhaps a clear window cut out, and use it as a party favor or gift box. Use the stamp set to decorate the boxes or just to make cards and other projects.

Both the Playful Pals Photopolymer Stamp Set and Pyramid Pals Thinlits Dies are still available as I write this post, so if you think this is something that would be fun and useful to own, grab it while you can.  All retiring items are available until May 31 or while supplies last.

Playful Pals Bundle

The Playful Pals Bundle may not still be available but you can order the dies and stamp set separately. It’s a fun and different product to use!

SHOP STAMPIN’ UP! FOR RETIRING AND OTHER PRODUCTS THIS WEEKEND!

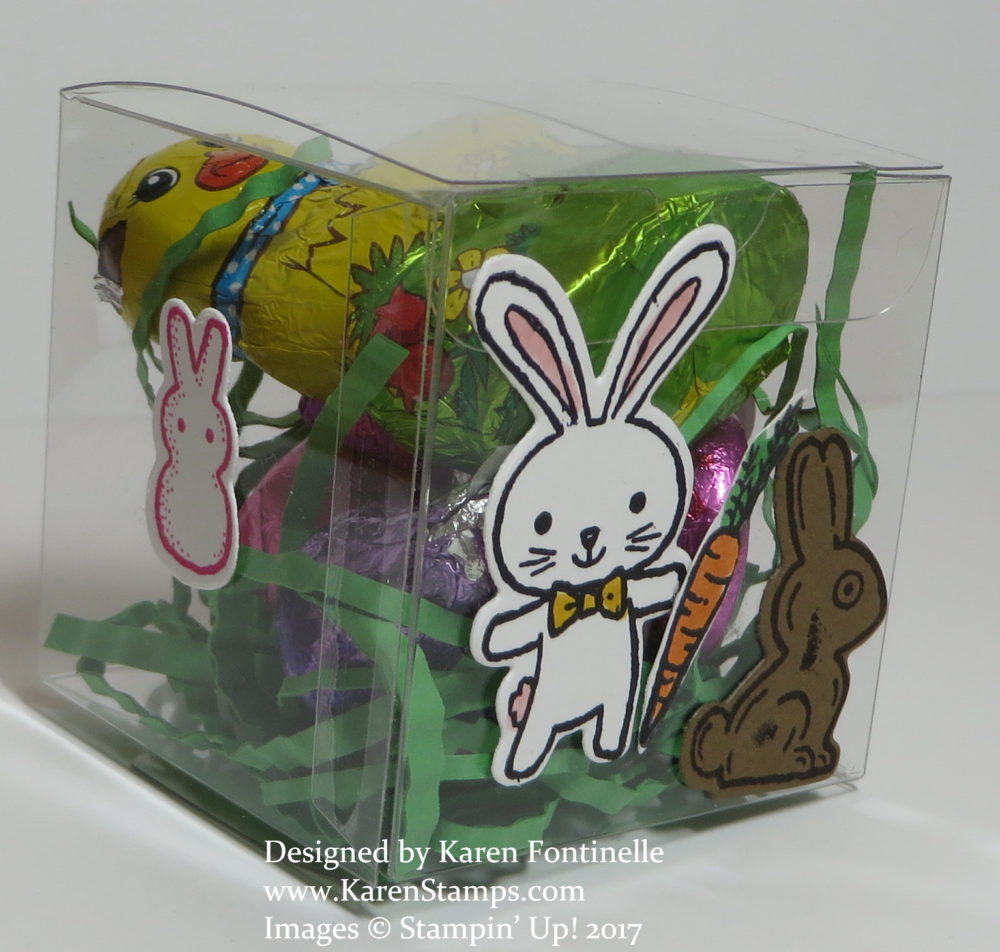
Quick and Easy Easter Tiny Treat Box

Quick and Easy Easter Tiny Treat Box

Make a quick and easy Easter Tiny Treat Box for a little gift or a table favor or even a decoration in your home!  And you can eat the candy later!  The Stampin’ Up! Tiny Treat Boxes make this project so quick and easy. If you don’t have any “Easter grass” to put inside, just cut narrow strips of cardstock and moosh them up with your hands, unless you have the old Paper Crimper, which is what I used to get the crinkly effect.

My project was made super-quick because I already had extra Easter figures cut out while doing another project. I had already stamped and die cut the Easter bunny, carrot, chocolate bunny and little bunnies with the Basket Bunch Photopolymer Bundle. The Bundle includes the stamp set and matching framelits dies and is on the Stampin’ Up! Retirement List. Now the Bundle at $46.75  in the Occasions Catalog has always been the best deal if you wanted both the stamp set and the framelits, but now that the Retirement List is here, it looks to me like the best deal is to buy the Basket Bunch Photopolymer Stamp Set on sale at $16.80 and the Basket Builder Framelits Dies on sale at $15.50.

This set can be used for other occasions, not just Easter, so don’t worry that you don’t have time to order and use it now!  There is always next year, but even now you can use bunnies for any happy occasion and certainly the basket and flowers. One day I made a baby card with the bunnies that had nothing to do with Easter.

The Retirement List was released yesterday so be sure to check it out early so as not to be disappointed if any products sell out early!

  • Retiring stamp sets will continue to be manufactured by Stampin’ Up! in Kanab, UT until May 22, then it will be while supplies last.
  • Some items on the Retirement List are discounted, but not all.
  • Bundles in any catalog are only priced as bundles with the 10% discount for the first year in the catalog, after that the items may be available separately.
  • Tools and accessories are available “while supplies last”.

Shop Stampin’ Up! for all the Retiring Products HERE!

Retiring Stamp Sets

Retiring Bundles

Retiring Everything Else

Check out the Retirement List  in PDF or EXCEL.

Mini Egg Cartons by Stampin’ Up! Back in Stock!

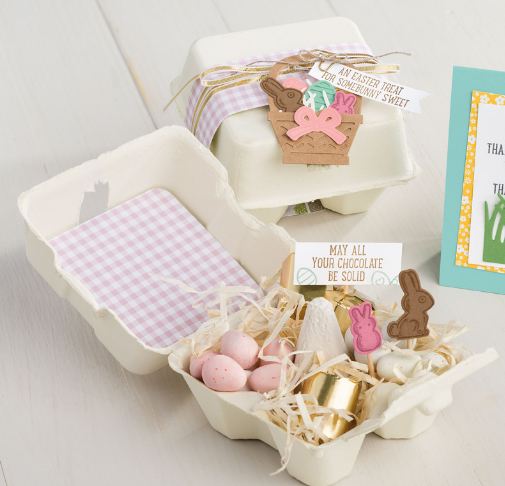
Decorated Egg Cartons Stampin' Up!

Image (c) Stampin’ Up! 2017

The Mini Egg Cartons by Stampin’ Up! are back in stock!  What a shame that they were unavailable for this length of time, but you can get them now. If you do want them for Easter and depending on where you live, you still might be able to get them in time to decorate if you order today or even over the weekend. There is even Expedited Shipping if you REALLY want them FAST!

With the popularity of the Hey Chick! Stamp Set at Sale-A-Bration, I would say these Mini Egg Cartons could be used for cute projects even after Easter, so don’t hesitate to think of other creative ideas beyond Easter.

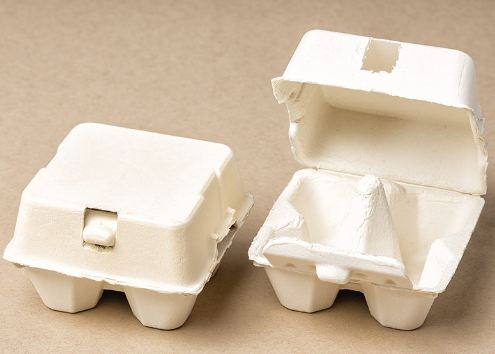
Mini Egg Cartons Plain

Image (c) Stampin’ Up! 2017

As you can see, the Mini Egg Cartons come very plain, just like real egg cartons.  You can spritz them with a color if you like, using the Stampin’ Spritzer and ink refills, or leave them plain and embellish according to the occasion.  In the photo at the top of my blog post, you can see there is a piece of designer paper inside the lid and a matching belly band around the carton plus decorations made with the Basket Bunch Photopolymer Bundle.  These can be used as a gift box or treat box. If you are looking for a different kind of presentation, this just might be it!

*****************

Remember, the Retirement List for the Stampin’ Up! Annual Catalog and the Occasions Catalog comes out on Monday, April 10th at 1:00 pm Mountain Time. If there are things you REALLY wish you would have ordered already, it’s time to get them before someone else does, whether you know it’s going to retire or not. Once the Retirement List hits, all bets are off; some things sell out in the blink of an eye and many do not.  So you never know.  We don’t know what is on the list except for the In Colors of two years ago, so be sure to consider those first of all! You don’t want to pay high prices on Ebay later!

Check out the Mini Egg Cartons and perhaps add some In Color products to your order before Monday!

Shop Stampin’ Up! Online Today!

St. Patrick’s Day Easy Candy Treat Holder

St. Patrick's Day Easy Candy Treat Holder

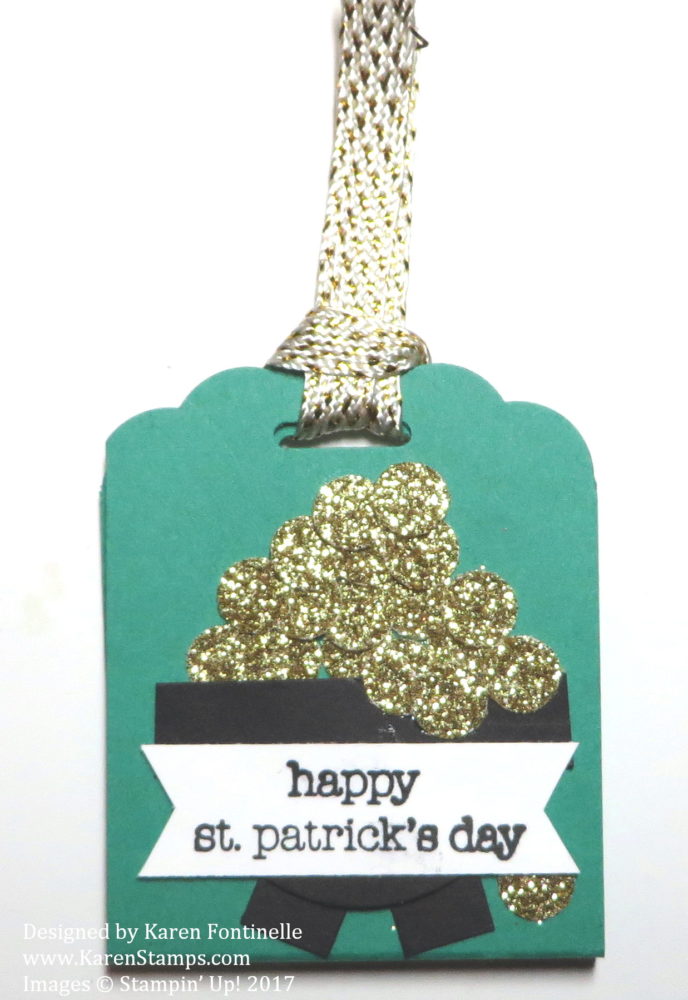
St. Patrick’s Day is coming up on Friday, March 17th, so if you are looking for a fun little treat maybe for your family, your co-workers, teachers, whomever, here is a St. Patrick’s Day Easy Candy Treat Holder. You can put a chocolate square on the inside or whatever you find that fits. Or modify the measurements to suit your treat!

This project is so easy to make and as usual, can be made and decorated for any occasion.  Cut a piece of cardstock 5 1/2″ x 2″ so that it will fit inside the Scalloped Tag Topper Punch. Score at 2 5/8″ and at 2 7/8″.  Then insert each end of the strip into the punch for the fancy top. If you don’t have this punch, you can leave it plain or snip off the corners at an angle.

For the decoration on the front, I made a pot of gold!  The pot is just a 1 3/8″ Circle Punch cut in about half. Either just cut little strips for the pot legs or use, as I did, the Classic Label Punch, cut in half or smaller. I first thought I would like the pointy ends for the legs, but I changed my mind. I also punched another strip to go across the top of the pot. If you have the retired Window Punch, that works great, too!

For the gold coins, I used the always-useful Owl Builder Punch!  If you don’t own this punch, you really need to put it on your next order. It’s so fun! I use it in so many ways. For the coins, I punched the small circles that would be eyes. They are adhered with the Liquid Multipurpose Glue.

Click here to see a similar St. Patrick’s Day design I made last year. As you can see, I used Gold Sequins.

The greeting is from another of my favorite things, the Teeny Tiny Wishes Stamp Set. There aren’t many places you will find a “Happy St. Patrick’s Day” stamp but this set has it!

The ribbon is the one with gold accents, free in the Sale-A-Bration Brochure, with a $50 purchase.  You get a Combo Pack of two ribbons, one with the silver accents and one with the gold accents. It’s called the 3/8″ Metallic Ribbon Combo Pack.  The ribbon is very soft and nice.  You will like it.

Sale-A-Bration ends the last day of March and we know that will sneak up fast!

Be prepared for all special occasions by knowing how to make this St. Patrick’s Day Easy Candy Treat Holder! 

 Shop Stampin’ Up! Online HERE!

Easy Valentine Treats to Give

Easy Valentine Treats to Give

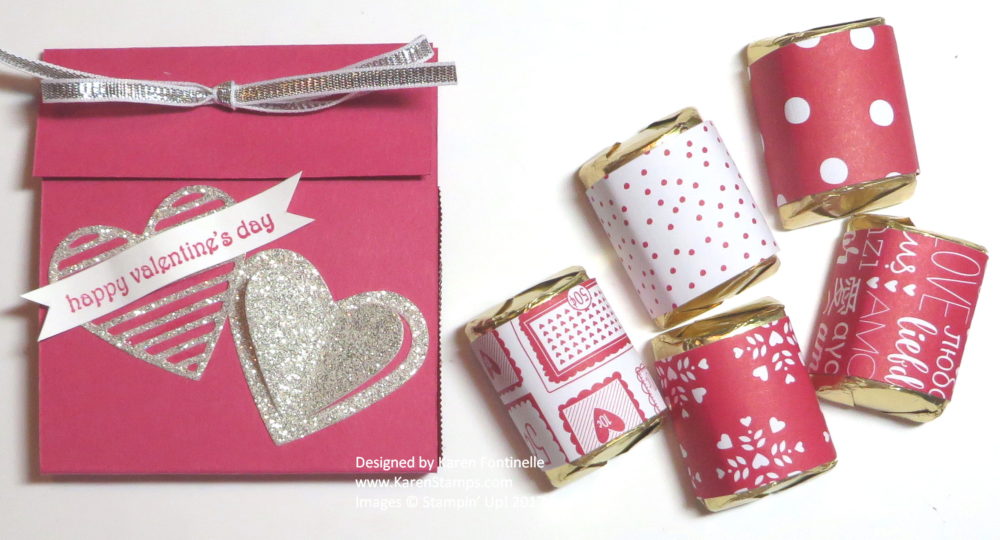
If you are looking for easy Valentine treats to make to give to people, here are a couple of ideas! Candy, of course, is always a good idea for friends or family or maybe your office co-workers or the staff at your doctor’s office or whatever places you go to regularly.

The candy treat on the left is very simple, just a strip of paper, really, wrapped around a Ghirardelli chocolate, Aren’t these some of the best chocolates for using for a special treat?! I just cut a strip of Melon Mambo cardstock 7 1/4″ x 2 3/4″ and scored it at 3″, 3 1/4″ and 6 1/4″. Fold all the score lines with a good crease with the Bone Folder.  The little 1/4″ space gives just a little room for the chocolate square. You probably want to adhere the chocolate lightly to the paper with a Glue Dot or bit of Snail Adhesive just to hold that candy inside. Then fold the paper strip around the candy on the scored lines and fold the flap over the top.

Now that you have the basic instructions, you could decorate or embellish this ANY way you like! I punched two small holes in the top and tied with a 12″ piece of ribbon.  On this one I used the Silver 1/8″ RibbonSince I already had the Silver Glimmer Paper hearts die cut from the Love Notes Framelits Dies I just used those.  You could punch hearts with any heart punch you had or die cuts or add a Whisper White layer to the front and stamp some pretty hearts. For a little greeting I just pulled out my old standby, Teeny Tiny Wishes. Still love that stamp set! Just stamp on a small scrap of paper, curve it a little with the Bone Folder and adhere to the front with a couple Glue Dots.  The possibilities are endless with this project!

And the candies to the right in the photo above are always my favorites for special occasions. Simply take a 1″ x 3″ piece of designer paper (preferably) or cardstock and adhere the ends on the back around a chocolate nugget candy. You could even tie a little ribbon around some of them.  Put them in a small cello bag or small box or whatever you have.  SO easy!  I love this idea!  On these candies I used scraps of the Sending Love Designer Series Paper Stack.  This paper won’t be just for Valentine’s Day, there are plenty of generic patterns that you can use for many projects and cards.

If you are looking for some quick and easy Valentine treats to give, try these ideas and make them as creative as you like!

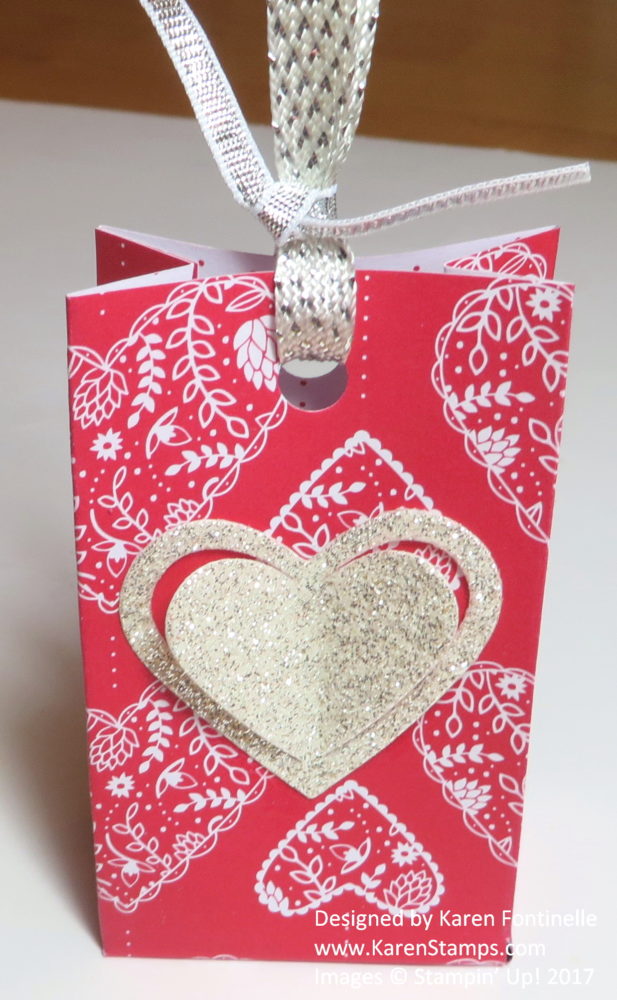
Valentine Sending Love Small Treat Bag

Valentine Sending Love Small Treat BagIf you are looking for ideas for Valentine treats, this Valentine Sending Love Small Treat Bag might be the perfect idea for you! It is the perfect size for just a few treats and easy to make! You can use cardstock or designer paper and make this treat bag for any occasion.  Decorate it however you like with die cuts or greetings or just leave plain if you use cute paper.

Start with a piece of paper 4″ x 6″. The Sending Love Designer Series Paper Stack is 6″ x 6″ so it is perfect to just cut off 2″ and you are ready to go! It’s easiest if the paper doesn’t have a pattern that must go a certain way, but if it does, just be careful to have the pattern running the correct way.

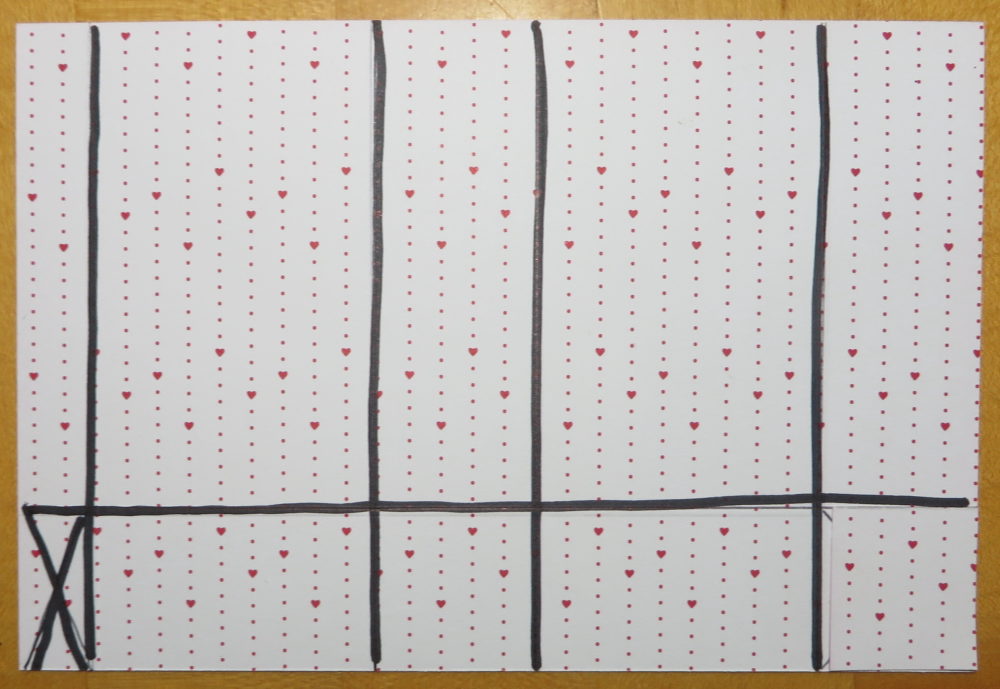
Treat Box diagram

This is the inside of what will be my treat bag but I drew on the score lines so you could see.  The “x” marks the area that you will cut off entirely.  You can see how the score line going across lengthwise indicates where the bottom of the bag will be, so watch your pattern.

Place the paper lengthwise on the Simply Scored board and score at 1″ (portrait). The bottom of the bag should be along the left side of the board.  Then turn the paper and score at 1″, 2 3/4″, 3 3/4″ and 5 1/2″. (Obviously if you have the paper turned the wrong way you wouldn’t be able to score at 5 1/2″ if the paper is only 4″ wide.) After scoring, cut up on all those bottom score lines up to that 1″ score line. Then cut off the little area marked with an X on my diagram. Fold and crease all the score lines.  I like to use a Bone Folder to get a good crease!

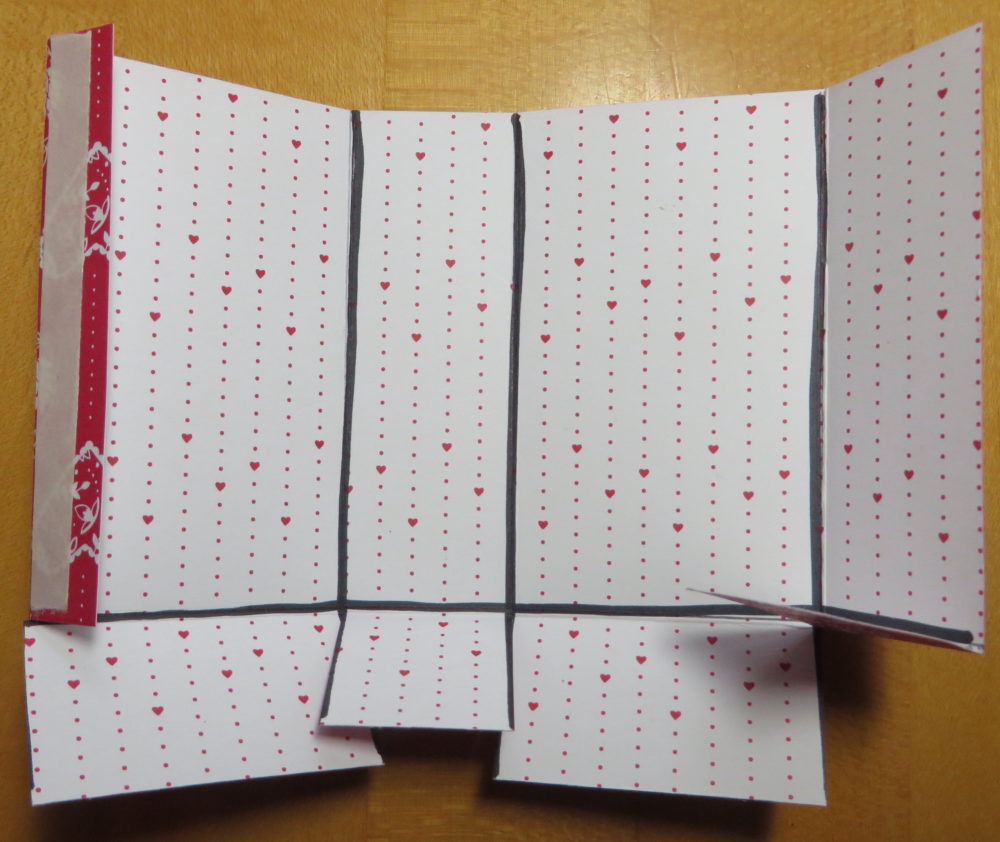
Treat Bag Folded

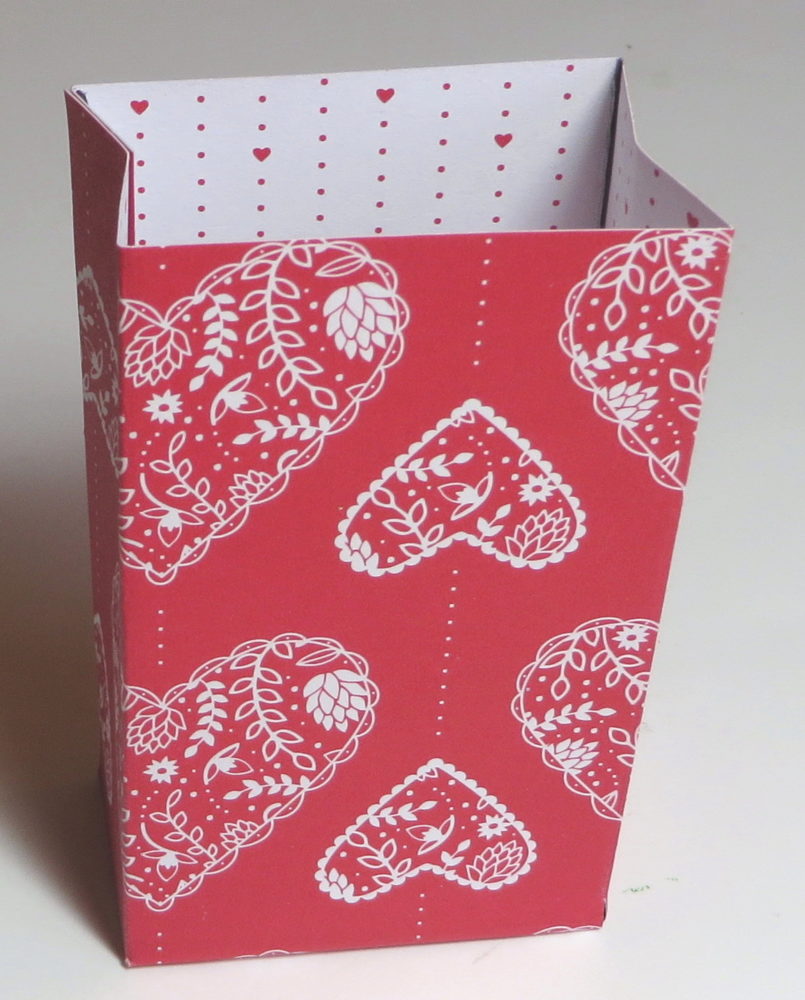
After the bag is creased, add some adhesive to the narrow flap on one side.  I like to use Tear & Tape because I’m sure it will hold the bag closed. You can see it in the photo above. If you just fold the other side of the box over it is easier to adhere flat than to have the box 3D. Just match up the top of the bag so the edges are even.Treat Bag open box

When the box is all assembled, this is what it looks like.  You could leave it like this! But if you want the top closed, be sure to put your treat inside and then punch a hole or two holes in the top and add a ribbon or bow. Just push in on the sides in order to pull the top edges together. When you have the treat bag assembled, add on whatever you like to decorate.

Just think, if you use birthday paper or the colors of your themed party, then you have something for another occasion!  Once you make some of these, you would probably be able to design your own treat bag according to whatever size you want.  Just draw a little sketch showing how wide and how tall you want the front and back and then how wide you want the sides. You could use this same idea and make a smaller or larger bag or box.

No matter what, this little Valentine Sending Love Small Treat Bag is easy to make and fun to give!

Shop Stampin’ Up! Online for all the best in stamping in papercrafting supplies!


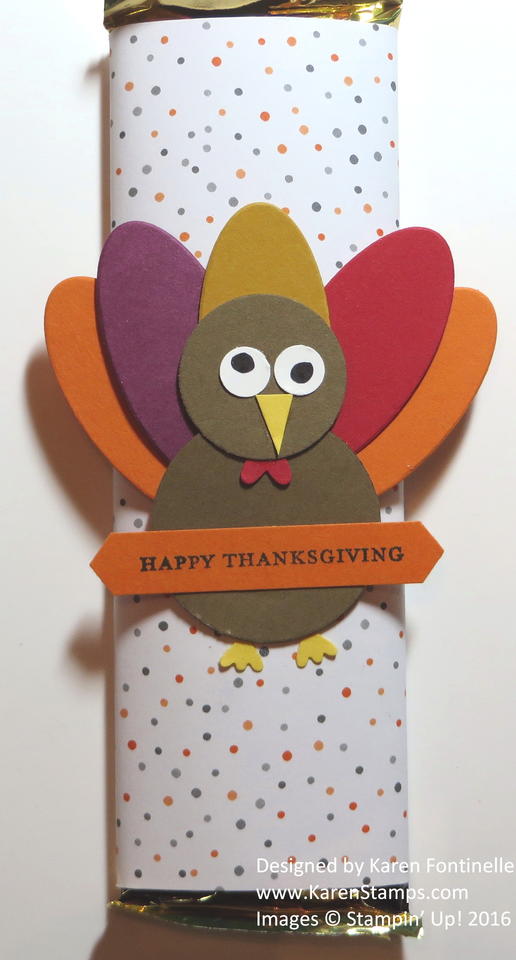
Thanksgiving Punch Art Turkey Candy Bar Wrapper

Thanksgiving Punch Art Turkey Candy Bar Wrapper

If you want a quick and easy favor for your Thanksgiving dinner, try this Thanksgiving Punch Art Turkey Candy Bar Wrapper. Just get some chocolate bars and wrap them in designer paper.  I used this generic sheet from the Halloween Night Specialty Designer Series Paper.

To make the punch art turkey to fit on the candy bar, I used the 1 3/8″ Circle Punch for the body and the 1″ Circle Punch for the turkey head. The feathers were cut out with the Layering Ovals Framelits Dies  and Big Shot, but you could also use an oval punch. The turkey feet are punched with the feet of the Owl Punch!  What would we do without the Owl Punch?! The eyes are also punched with the Owl Punch but I just colored in the pupil with a black marker. The red waddle on the turkey is the little heart from the …..Owl Punch! Just cut the beak freehand.

The Thanksgiving greeting is from the ever-useful stamp set, Teeny Tiny Wishes and punched with the Classic Label Punch.  I still love and use the Teeny Tiny Wishes Stamp Set a lot.  It has almost every greeting in it that you could possibly need.

Just a fun punch art turkey to make for a  Thanksgiving candy bar wrapper or you could make the same one on a Thanksgiving card. Play with the idea and make something fun!

Shop Stampin’ Up! Online 24/7


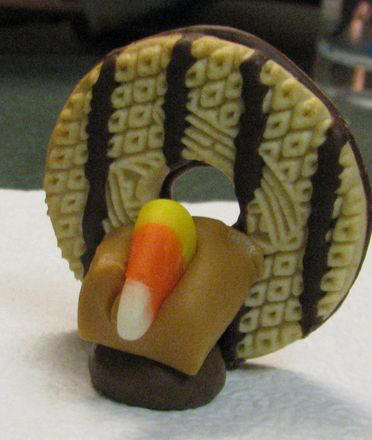
Thanksgiving Candy Turkey Cookie Favor

Thanksgiving Candy Turkey Cookie Favor

This Thanksgiving Candy Turkey Cookie Favor is not made with stamps, ink, or paper but it still is one of my favorite things at Thanksgiving! I think I found the idea in a family magazine way back when my kids were little and I made lots of them for preschool parties and elementary school or Scouts or whatever at Thanksgiving. There are similar ideas out there, usually involving Oreos, candy corn and frosting as glue. Those are cute, too, but I always thought these were the easiest to make and so cute!!

You will need Keebler Fudge Stripe Cookies, Hershey Kisses, candy corn and Kraft Caramels (or whatever similar brands you find at your store).

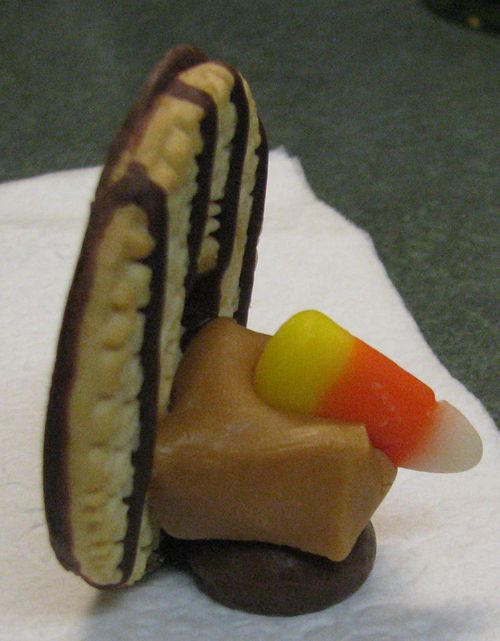
Unwrap several Hershey Kisses and have them sitting on a plate or napkin so they are ready, with a cookie and candy corn handy also. Put a caramel on a plate nad microwave it just a few seconds until it is slightly soft, but not melted or too soft. When the caramel comes out of the microwave, plop it on top of the Hershey’s Kiss. Immediately “smoosh” the cookie against the backside of the caramel until it sticks. Take the candy corn on edge and stick it into the caramel! There you have a turkey!

These turkeys are so fun to make for Thanksgiving! To make multiples, just have your ingredients ready to go. You can soften several caramels at a time on a paper plate in the microwave, maybe about six. You want to be able to work quickly when the caramels come out of the microwave so you can stick everything together. Have extras on hand because there will be some broken cookies! And you will need to kind of test your microwave and caramel softening factor to get the timing right. So just have extra ingredients on hand. And of course you can eat any malfunctions or leftover ingredients!

You can place these at each setting at your Thanksgiving table. If you want to add a placecard with someone’s name, can probably do that one way or another. My, how I used to like making placecards for family dinners when I was little!!

Pick up these ingredients at the store and try your hand at these Thanksgiving Candy Turkey Cookie Favors! Something different for Thanksgiving!

Thanksgiving Candy Turkey Cookie Favor Side

Don’t forget the Stampin’ Up! Online Extravaganza starting Monday, November 21!  Lots of products and special bundles on sale up to 40% off all week plus a Flash Sale on Monday ONLY, plus another Flash Sale on the last day, November 28. Get your wish list ready this weekend so you don’t waste time on Monday! You may be cleaning and cooking, but you deserve a break and some shopping!

Download the Online Extravaganza List HERE.

Shop Stampin’ Up! HERE!

(On Monday when you click the store link you will undoubtedly see a banner about the Online Extravaganza but it’s not there today yet.)


Ghirardelli Chocolate Candy Treat Holders

Ghirardelli Chocolate Candy Treat HoldersWhile we are on the subject of chocolate (from yesterday!), here are two more versions of Ghirardelli Chocolate Candy Treat Holders. Honestly, once you get started on these, you hate to stop! So many possibilities!

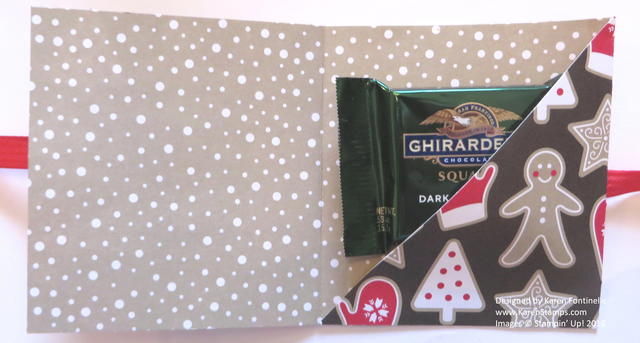
The first candy treat holder on the left is a folded over piece of Candy Cane Lane Designer Series Paper, cut 9 3/4″ x 3 1/2″. It is scored at 3 1/4″ from each end so that the paper is scored in thirds.  That gives a flap to fold on the inside to hold the candy (you could also do this for tea bags) that is trimmed at a diagonal so you can see the candy. Use an adhesive to hold the bottom of the triangle shut to hold the candy like Fast Fuse. Then just decorate the front of the candy holder however you like. I used the new Stitched Shapes Framelit Dies to cut out the greeting from the Oh What Fun Photopolymer Stamp SetThis stamp set is one that is on sale during the month of November.  You will be able to get lots of use out of this stamp set making your holiday cards and projects.

Ghirardelli Chocolate Folded Candy Treat Holder Inside

The smaller chocolate candy treat holder is cut 5 1/2″ x 2″ with each end punched with the Scalloped Tag Topper Punch. Then it is scored at 2 5/8″ and 2 7/8″. Fold, put the candy inside, perhaps with a Glue Dot to hold it inside, and tie with a ribbon at the top. I used the Gold 1/8″ RibbonI chose a piece of the Candy Cane Lane Designer Series Paper for the small piece on the front of the candy holder. The little greeting is from the Oh What Fun Stamp Setdie cut with the new Stitched Shapes Framelit Dies.  You DO want these dies in your collection!

Go stock up on some candies you can use in your holiday crafting, then have fun making all kinds of cute things like these Ghirardelli Chocolate Candy Treat Holders.

Shop Stampin’ Up! Online 24/7 for all your crafting needs!

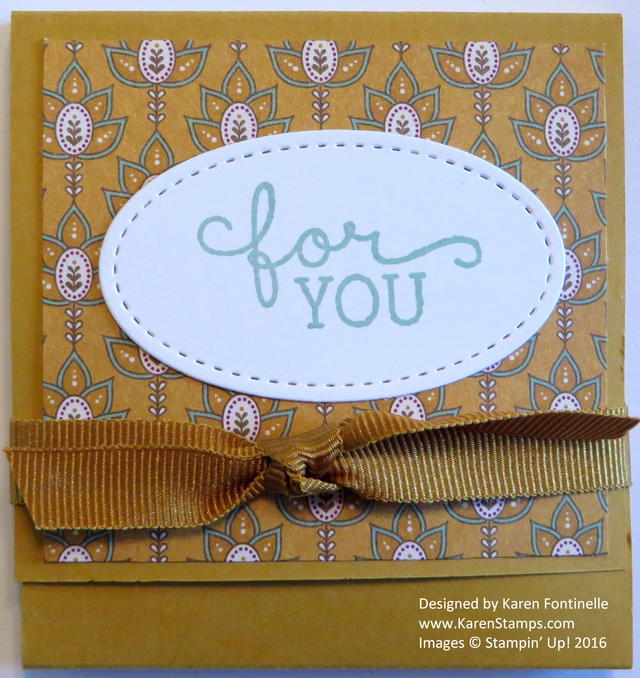
Easy Ghirardelli Candy Holder

Easy Ghirardelli Candy Holder

Here is an easy Ghirardelli Candy Holder for you to make, perhaps as a little table favor for your Thanksgiving guests or really for any occasion.  All you need are the basics on how to make this and you can decorate and embellish for any occasion. The other day I came across one of these I had made a long time ago for Valentine’s Day and I thought it was time for an update!

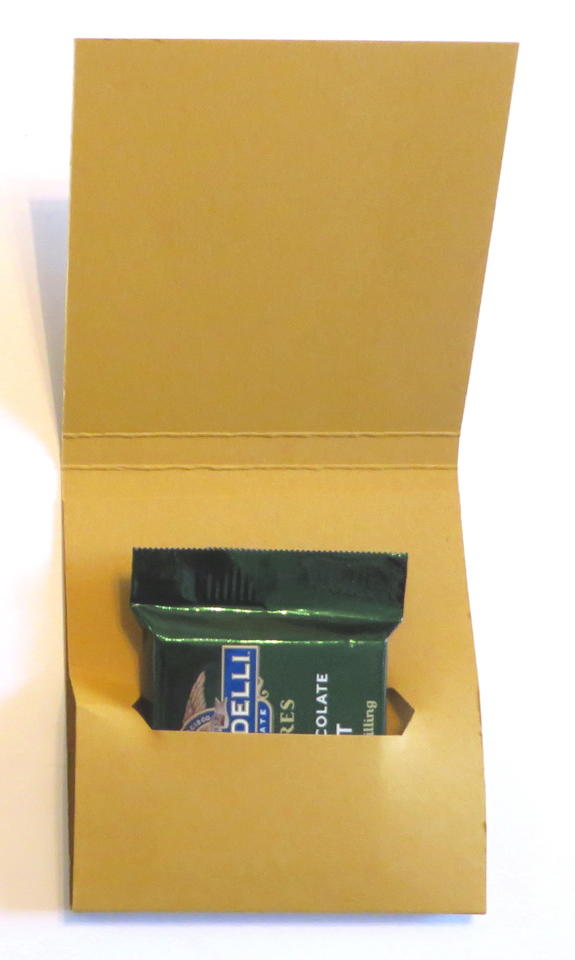
I cut my Delightful Dijon Cardstock 3″ x 9 5/8″. Actually, once you have the idea, you can modify the measurements to whatever you like. Then I scored this strip at 2 3/4″, 3″, 6 1/4″ and 6 1/2″. We used to use the Word Window Punch (retired) for the candy slot so today I tried the Classic Label PunchBefore you punch, fold on all the score lines and see how the packet will go together. I made the area that was a bit shorter to be the top flap. Therefore the longer area went inside and was punched to make the candy slot. From the bottom of the strip then I inserted it into the punch all the way, being careful on the sides to make sure it was centered. In this case, the punch was as wide as the paper, but you still need to make sure where the punch is in relation to the paper. After punching, I adhered the punched flap just about 1/4″ below the inside score line and used Fast Fuse Adhesive to hold it. If you are using SNAIL Adhesive, I would probably put the SNAIL on both areas that I was adhering.  I think that makes it hold better and stronger if you need that.

Candy Holder Inside

Now once you have the basic candy holder made, you can decorate it however you like! If you don’t find the exact greeting you want, just look through your stamps and surely you will find something generic you can use.  I opted for this “For You” greeting from the Birthday Blooms Stamp Set.  I’ve used that greeting over and over because I love the font and it suits almost any occasion.

I stamped the greeting on Whisper White and die cut with the Big Shot and the wonderful new Stitched Shapes Framelit Dies. Yes, you are going to love these new dies when you order them!  These dies put just a little bit of a stitched look around the shape. Many times it is just a little something that you need to make your card or project “pop” and these dies will do that! I could have put an oval layer behind the greeting, but for one thing, there wasn’t much space and for another, it looked good the way it was! I stamped it in Mint Macaron ink because that is one of the coordinating colors of the designer paper. Cut some designer paper for the front flap, leaving either a 1/4″ or 1/8″ border around the outside.  Since my outside flap was 2 3/4″ x 3″, I cut the designer paper, a pattern from Petals & Paisleys, to 2 1/2″ x 2 3/4″. I think this paper is beautiful for all your fall and Thanksgiving projects!

To finish my candy holder project, I used a piece of Delightful Dijon ribbon in the Ribbon 3/8″ Trio Packjust tied around to hold the flap down, in the Stampin’ Up! Holiday Catalog.  You can view the catalog online or if you would like your own hard copy, please email me at Karen@KarenStamps. com.  I’ll be happy to mail one to you. It’s not too late to enjoy the Holiday Catalog and enjoy you will!

So go hit the “craft supply” section in the candy department and pick up some candies you know you can use during the holiday season, starting now! These square chocolates are good for a lot of projects!

Shop Stampin’ Up! for color coordinated paper and ink!


How to Make a Halloween Triangle Treat Box

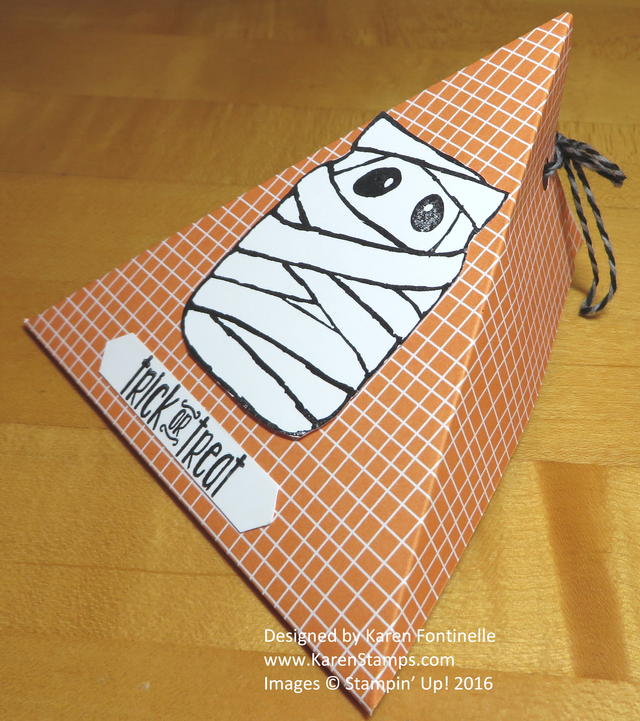
Halloween Triangle Treat Box

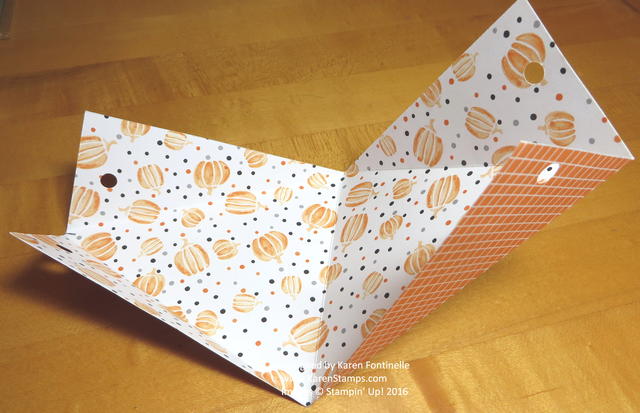
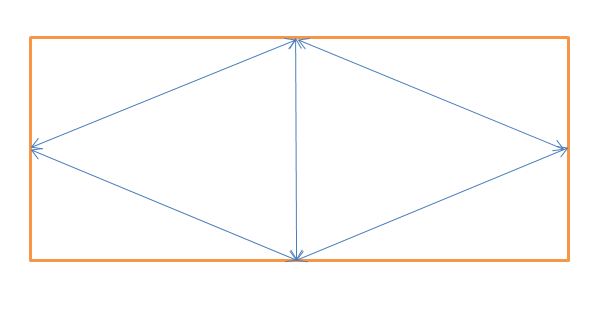
Here is how to make a Halloween Triangle Treat Box, one of my favorite treat boxes to make! I have been making these triangle boxes for years and find them so easy to make! Just take a rectangular piece of paper, score it in half, then score from the middle of each end to the outside edge of that center score line. Fold, punch holes in the ends for ribbon, and decorate.

Check out the photo below to see how it is scored and folded.How to Make the Halloween Triangle Treat Box

For this particular box, take a piece of cardstock or designer paper cut 8 1/2″ x 4 1/2″.  Score at 5 1/2″.  On the ends of the paper, mark the center measurement lightly with a pencil.  Score from this mark to the side of the center score line. See my imperfect drawing below for the general idea:Triangle Box Drawing

Just fold on all the score lines and use a hole punch to make holes in the ends for ribbon to tie or I suppose you could just adhere it shut after you put the candy or gift inside, maybe with Tear & Tape Adhesive. To tie mine together, I used the Halloween Night Baker’s Twine. The designer paper is the Halloween Night Specialty Designer Series Paper. To decorate the box, I stamped the mummy image from Jar of Haunts Stamp Set. The greeting is from Spooky FunThe greeting is punched out with the Classic Label Punch.

That’s it!  Try making bigger and smaller sizes of this box, although I think this size is pretty good. Couldn’t be easier!  You can use it for any occasion!

If you need a last minute treat box, try this Halloween Triangle Treat Box or save the idea for the next occasion when you need a box for a candy treat or small gift!

Shop Stampin’ Up! Online or contact me to put in your order for you!               I’m happy to!

Halloween Witch’s Boot Candy Treat Holder

Halloween Witch's Boot Candy Treat Holder

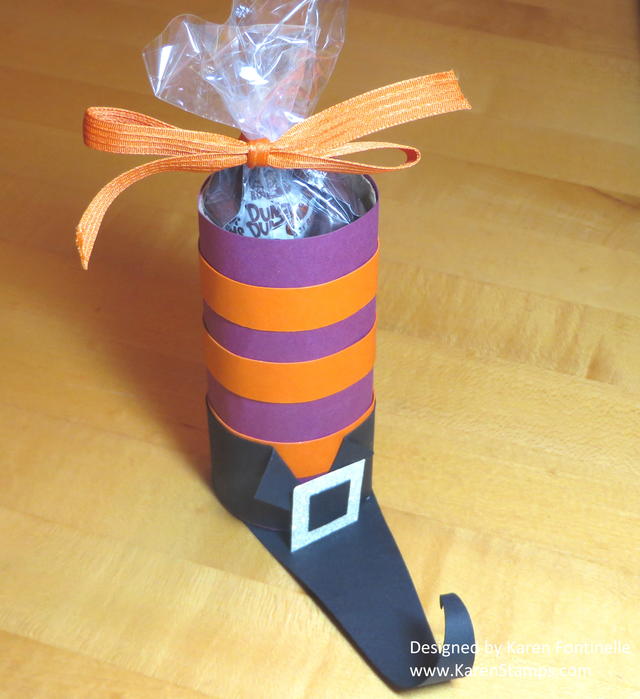
Here’s a Halloween treat holder I made a couple of years ago and it was so popular I thought I would post the photo again. It’s the Halloween Witch’s Boot Candy Treat Holder! I saw the idea online and had no directions, but I just figured it out on my own. I thought it was such a cute idea and we all have those empty toilet paper rolls or paper towel rolls around the house frequently. (Personally I think I’d rather use a paper towel roll!)

I wrapped Rich Razzleberry card stock around the roll, adhered with Multipurpose Liquid Glue.  Before I tried wrapping the roll I pulled the cardstock over the edge of my kitchen table a few times, which has a rounded edge, just to break up the fibers a little bit and make it easier to roll. You could use a bone folder or just anything rounded to get the paper to “relax”. For the sock stripes, you can use Pumpkin Pie 1/2″ strips of card stock. For the top of the boot, I just wrapped around a piece of Basic Black and folded back the corners. The buckle is a piece of Dazzling Diamonds Glimmer Paper (you could use any color Glimmer Paper) with a small square piece of Basic Black right in the center which makes it look like a buckle without having to actually MAKE a buckle! The “shoe” part is easy to make. Measure the roll diameter and then make the black paper slightly wider. Cut it at a diagonal as you see, Put glue on the bottom of the roll and stick it on the black card stock. When the glue is dry, you can trim off the excess in the back. Roll up the toe a little bit. There you have it! Put a little treat inside the boot.

This could be a little Halloween gift for someone, or a table decoration or party favor. Have fun making your Halloween Witch’s Boot Candy Treat Holder!

Shop Stampin’ Up! for the best in stamps, ink, paper, and accessories!