Category Archives: Halloween

Halloween Treat Bag With Candy

Halloween Treat Bag With Candy

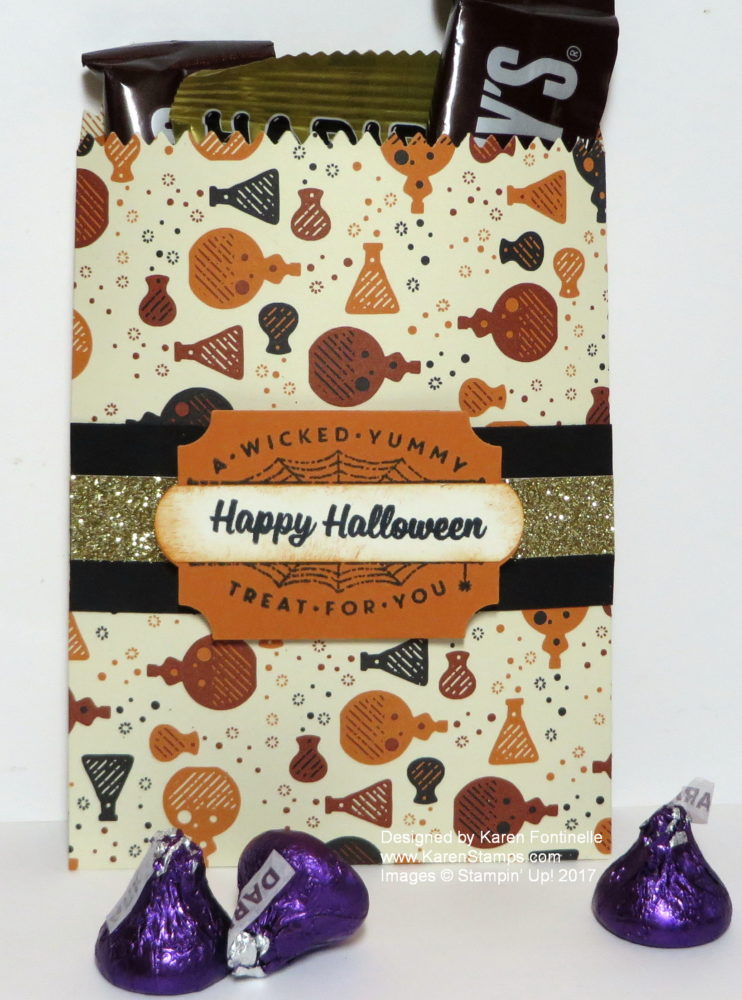
If you have the Mini Treat Bag Thinlits Dies, you can make this Halloween Treat Bag with candy quickly and easily!  I love those Mini Treat Bag Dies, as I have mentioned many times in my blog posts! They make it so easy to make these cute treat bags, which you can use for treats, as card, or for a small gift or gift card!  They are so versatile!

The paper I used is the Spooky Night Designer Series Paper in the Holiday Catalog. I chose the pattern with the little bottles of potions!  The label on the front is from the Spooky Cat Photopolymer Stamp SetThat is stamped on Pumpkin Pie Cardstock and punched with the Everyday Label Punch, which also coordinates with another stamp set,  Merry Little LabelsYou can even buy this stamp set and punch in a Bundle and save 10%.  I also stamped the Happy Halloween in the set on Very Vanilla on a scrap strip of paper and then put it in the punch to get the perfect curved ends to match the label!  I also sponged it with a bit of Pumpkin Pie ink to have it match a bit better and look a little spookier! I put this all on a strip of Basic Black Cardstock (you could also wrap it all the way around in a belly band) and to jazz it up a bit, put a strip of Gold Glimmer Paper behind it!

Won’t a little trick-or-treater love to get this mini treat bag instead of just being handed a candy bar?!

Here’s another treat bag I made with the Birthday Memories paper in the Stampin’ Up! Annual Catalog.  So many cute ideas with the Mini Treat Bag Thinlits Dies!

It’s time to start getting ready for Halloween, whether you are giving out treats to trick-or-treaters or co-workers at the office or maybe party favors at a Halloween party!  It’s fun to do when you’re not rushed at the last minute so take some time to make some easy and fun Halloween treats NOW like this easy Halloween Treat Bag!

Shop Stampin’ Up! Online Today!

Spooky Cat Halloween Moon Card

Spooky Cat Halloween Moon Card

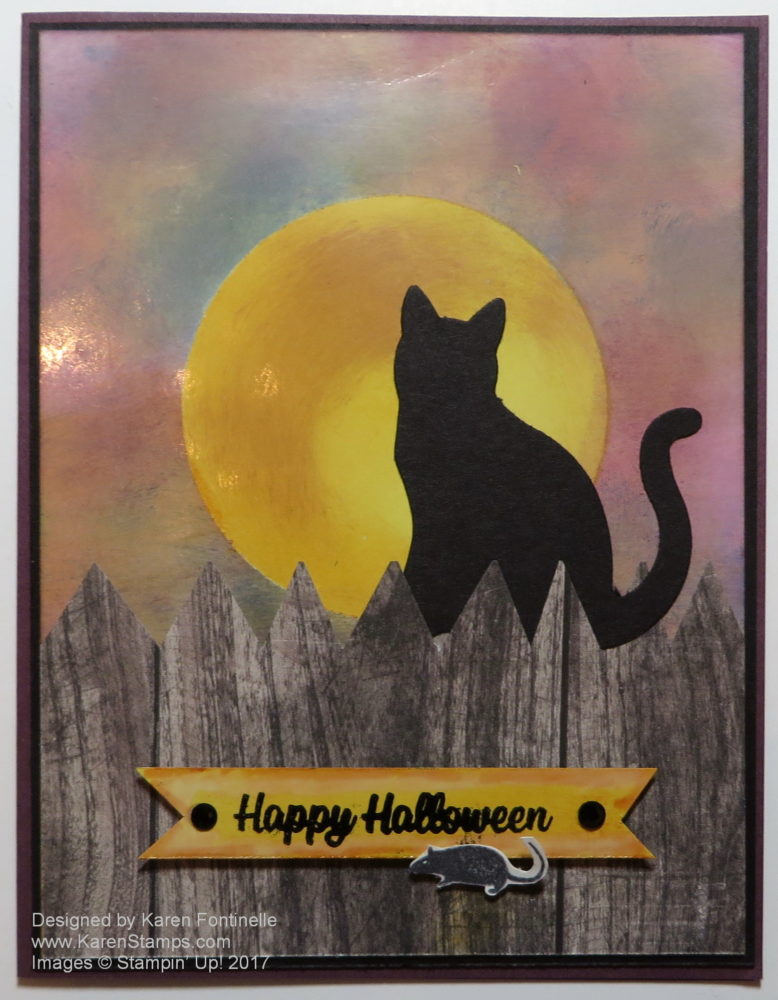
How about making a spooky cat on Halloween night looking up at the moon sitting on a fence? Halloween cards are so much fun! All the varieties of Halloween stamps in the new Stampin’ Up! Holiday Catalog give you so many design options for different scenes and Halloween themes for cards, party invitations, decorations, and more! And this card uses a fun (but a little messy!) technique for the spooky sky!

The card base is Fresh Fig Cardstock, one of the new In Colors this year. I also have a narrow layer of Basic Black, but you could try another color.  Then the card front layer is the fun part.  It is Glossy White Cardstock, something we used to have and now it has been brought back.  I always loved Glossy Cardstock since I first began stamping.  I still remember the lollipop cover I made with it!

The moon and background on this card is just made by sponging various colors of ink onto the Glossy White Cardstock. First I die cut a circle from a sticky note so that I could use both the circle and the negative piece that was left to make this card.  You could also use a punch. First I stuck down the negative piece on the layer where I wanted the moon to be and sponged on some yellow like Crushed Curry, then some Pumpkin Pie orange, and then a little of the Fresh Fig purple.  I love the Stamping Sponges we sell and usually cut them into smaller pieces for sponging. I just sponged inside the cut out circle making sure the paper didn’t move which is the reason to use a sticky note so the adhesive will hold it in place.

Here is another card I made for the Eclipse with the sponging technique.

When I was happy with the moon, I removed the negative piece of sticky note and then adhered the cut out circle over the moon to cover it while I sponged on the sky colors.  You can use whatever you like!  I used a bunch of colors, probably some Night of Navy, some Daffodil Delight, some Rich Razzleberry, Pumpkin Pie, whatever you like to make a spooky sky!

For the fence, I took a piece of the Wood Textures Designer Series Paper Stack and just cut the triangles at the top to look like the top of a fence.  You can draw a line on the back to keep them straight but mostly I just eyeballed it!

The cat is super simple, at least if you have the Cat Punch!  This is a new punch in the Holiday Catalog and if you like cats or Halloween it should be on your list right away!  You will also be able to use the cat on lots of other projects, like Christmas cards!  My punched cat is just stuck behind the pickets of the fence, easy peasy!

The greeting is stamped on a sponged scrap piece of the Glossy White.  I managed to smear it  a little as I was adhering it to the card, but since “there are no mistakes in stamping” I fixed it! Can you tell?!  I looked in the Spooky Cat Stamp Set, where the greeting came from, and found  a rat stamp!  I stamped the rat in Basic Gray and cut him out with my Paper Snips.  Yes, a little tedious since he is so small but I did it and adhered him with a tiny piece of a dimensional so he would cover my smear! I also added a couple of the new Black Rhinestone Jewels in the Holiday Catalog. They are all ready to go, already colored black for you to use at Halloween and beyond!

If you want both the Cat Punch and the Spooky Cat Stamp Set, the be sure to purchase the Spooky Cat Photopolymer Bundle and save 10%!

Yes, it is time to start thinking about Halloween and start making those cards and craft projects! Maybe that will make fall get here sooner!

Shop the Stampin’ Up! Holiday Catalog & More HERE!

Enjoy Some Stampin’ Up! Holiday Videos!

The new Stampin’ Up! Holiday Catalog is LIVE!  You can view it online and order from it! Start enjoying all its gorgeousness!  It really is time to begin thinking of the holidays and all the cards and projects we want to make.

Click HERE to View the Stampin’ Up! Holiday Catalog!

Click HERE to See the Holiday Catalog Products Online in the Store!

Summer has ended and now it is almost fall, at least that’s what Labor Day weekend tells us! Here in Houston we still have plenty of hot weather to go, although after the wrath of Hurricane Harvey last weekend, I think we are going to be treated to a little bit cooler weather for a few days. It’s hard to believe a week ago we’d had 3″ of rain with another 32″ to go by Sunday morning. And even as I write this post, people are still being evacuated from places that are still flooding and from places east of Houston where Harvey’s path took it after it hit here. By some grace of God, we are still fine in our home.

That’s why it is so good to have something to help us relax and take our minds off the troubles of the world for a little while. That’s why we say “Stamping is cheaper than therapy!” Of course a lot of stampers and other Demonstrators are still trying to save their stamps and papercrafting supplies from the flood or will have none left when this is all over with.  Stampin’ Up! has already stepped up to help some of those people.

Here are some Stampin’ Up! videos for you to enjoy and to get a better feel for some of the products in the Holiday Catalog!

When you look through the catalog, when you see that little “play” arrow near a product description, that means there is a video for that product or suite of products.

If you do not have a Demonstrator and would like a Holiday Catalog, it seems that our mail service is back up so I can send you a complimentary copy.  Email me at Karen@KarenStamps.com with your contact information and let me know if you would also like a copy of the Stampin’ Up! Annual Catalog.

Be sure to order your favorite products as soon as you can as some could go on backorder temporarily as we have seen in the past!  If something is backordered when you want to order it, I always think it is best to go ahead and add it to your order anyway rather than wait until the stock is resupplied because Stampin’ Up! will send it out to you as soon as they have it.

To check out some other Stampin’ Up! product videos, look at THIS POST.

Enjoy your Holiday Catalog and enjoy your Labor Day weekend!

SHOP STAMPIN’ UP! ONLINE HERE!

The Stampin’ Up! Holiday Catalog is Live Today! Sept. 1st!

The new Stampin’ Up! Holiday 2017 Catalog is LIVE today! Finally the day is here!  Can you believe it? Time for stampers and papercrafters to get going to get ready for the holidays!

Click on Photo to View Catalog!

Click HERE to View the Stampin’ Up! Holiday Catalog!

Click HERE to See the Holiday Catalog Products Online in the Store!

If you are interested in Stampin’ Up! products and want a Holiday Catalog, email me your contact information at Karen@KarenStamps.com.  As of this moment, I don’t know when our regular mail service will be restored after Hurricane Harvey so it might take me until next week to find an open post office and know that it will get out of Houston! The airports opened yesterday so maybe mail will start coming in and out as far as planes are concerned, and by truck as more and more roads completely open up!

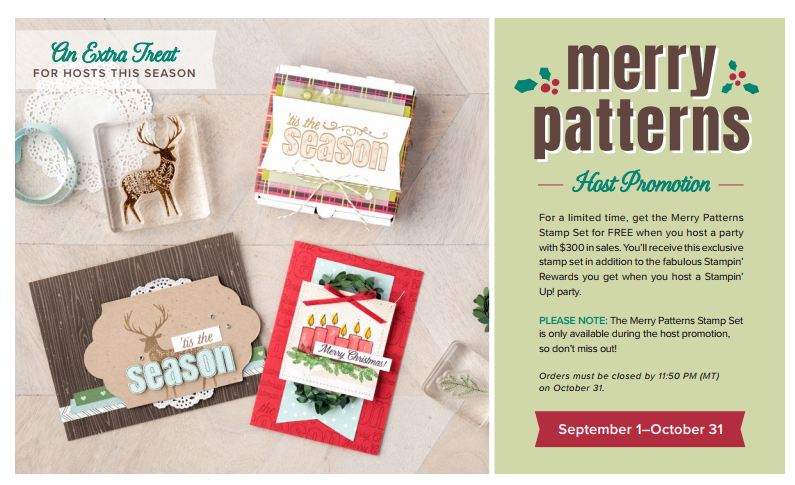
And during September and October, Stampin’ Up! has this special Host Promotion! If  you have your own large order or gather some orders from friends, if your workshop or order total reaches $300 or more, you will receive this FREE exclusive stamp set, Merry Patterns!  This is in addition to your normal Hostess Rewards benefits!

SU Merry Patterns Host and SampleMore information on my blog post yesterday HERE.

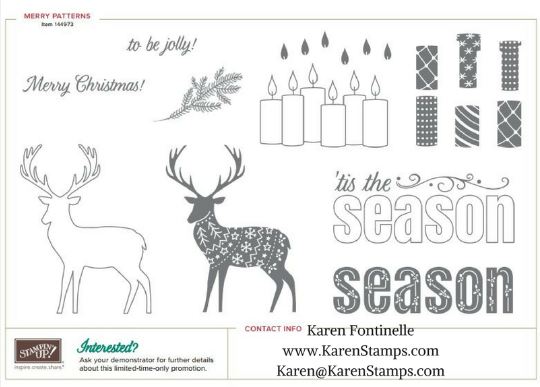
SU Merry Patterns Stamp SetGo ahead!  Start enjoying the new Stampin’ Up! Holiday Catalog!  Ordering begins today, September 1st. Get your favorites right away before they are backordered!
Shop Stampin’ Up! HERE!

New Stampin’ Up! Holiday Catalog 2017 Starts Friday, September 1st!

SU Merry Patterns Host and Sample
Merry Patterns Host Stamp SetFinally the day is coming!  The new Stampin’ Up! Holiday Catalog begins tomorrow, Friday September 1, 2017! If you have already received a Holiday Catalog, you have probably been pouring over it since you opened your mailbox! If you do not have a catalog, you will be able to view the catalog online or visit the Online Store HERE at this link.  If you click that link tomorrow, you will see all the Holiday Catalog products in the store, but they are not there yet today!

One exciting thing that will start tomorrow is this special promotion from Stampin’ Up!  If you host a party or gather some orders together with friends or make your own big order (not just from the Holiday Catalog) that total $300 or more, you will receive this free, exclusive stamp set called Merry Patterns.  This stamp set is only available through this promotion and the promotion lasts through October 31.

Catalogs and Hurricane Harvey:

I have a few extra Holiday Catalogs here, all untouched by Hurricane Harvey! Even if it was a wet copy I’m sure you would enjoy it!  If you need a Demonstrator and a Holiday Catalog, please just send me an email with your contact information at Karen@Karenstamps.com. I will get one out to you as soon as we have mail again! If you also want the main annual Stampin’ Up! Catalog if you don’t have one, I’d be happy to send you a complimentary copy of that, too.

We haven’t heard yet when the post offices will open and when we will have mail delivery. It’s not even just about the local post offices, its about the main office and the transportation bringing mail in and taking it out, all of which is disrupted. Just haven’t heard much about it yet.

We were fine at our house, no flooding, no power loss, but of course such a huge area of Texas is affected. I’d advise getting your car filled with gas wherever in the country you live as gasoline prices will go up since several refineries in Texas got hit by Hurricane Harvey. They say last year from January to August we got around 50 inches of rain —- during Hurricane Harvey over a few days most areas got 50 or more inches! We think we got about 35 inches at our house since Friday when it first started raining and it didn’t stop until Tuesday evening. Almost constant during that time, whether drizzle or heavy bands of rain for hours. But we are fine which is an incredible blessing to be home!

Here are a few Stampin’ Up! videos to get a taste of some of the new products in the Holiday Catalog!

Of course you can shop at Stampin’ Up! today if you want to, but if you wait until tomorrow, September 1st, you can order any of the products from the Stampin’ Up! Holiday Catalog. I will have a link to it on my blog tomorrow!

You can click this link today or tomorrow to shop. If you click it tomorrow, you will see the new Holiday Catalog products in my Stampin’ Up! Online Store!

SHOP STAMPIN’ UP! ONLINE!

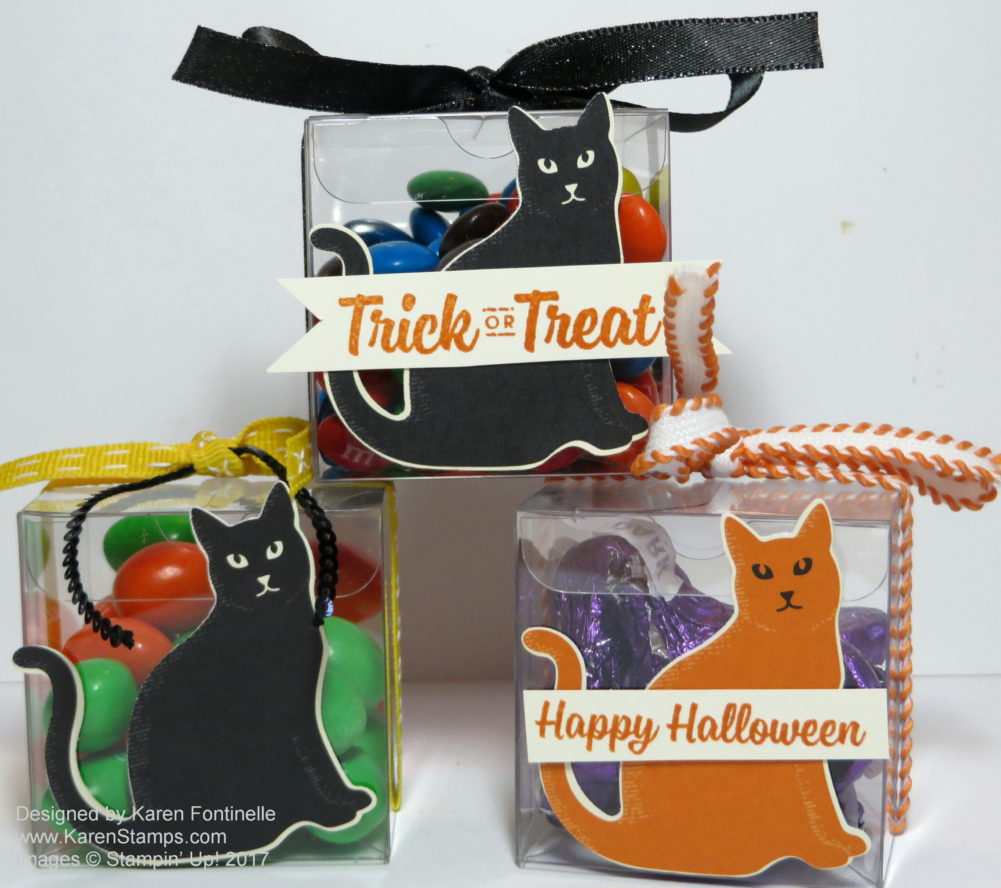
Halloween Tiny Treat Boxes with Spooky Cat

Halloween Tiny Treat Boxes with Spooky Cat

How do you like these Halloween Tiny Treat Boxes with Spooky Cats?  I bet that one of the most popular items in the upcoming Holiday Catalog will be this Cat Punch! If you are interested, I would order it right away when the catalog comes out. What is really great, is that you can punch the cat right out of the Spooky Night Designer Series Paper!  You can also stamp and punch with the Spooky Cat Stamp Set!

If you are ordering in August, I would go ahead and order the Clear Tiny Treat Boxes from the Annual Catalog.  They are currently backordered, but yours will come as soon as they are resupplied, which will be faster than if you wait until they are back in stock and then order.  You get 16 boxes that are 2″ x 2″ x 2″ and are food safe!  And the cost is only $7.50. These are great for having on hand any time you need a little treat for someone or to hold a small gift.  You can decorate them however you like.  You will see this Halloween idea in the Holiday Catalog. I chose to just punch out some cats from the Spooky Night Paper and tie with some ribbon, plus I added a stamped greeting from the Spooky Cat Stamp Set.  So fun!  So many creative possibilities!

This is such a quick and easy Halloween treat to make and will be so fun with the new Cat Punch!!

Remember to use your Bonus Coupons that you earned in July by August 31.

I can’t believe how fast August is flying by!

Bonus Redeem

SHOP STAMPIN’ UP! ONLINE HERE!

Happy Halloween Pick a Pumpkin Card

Happy Halloween Pick a Pumpkin Card

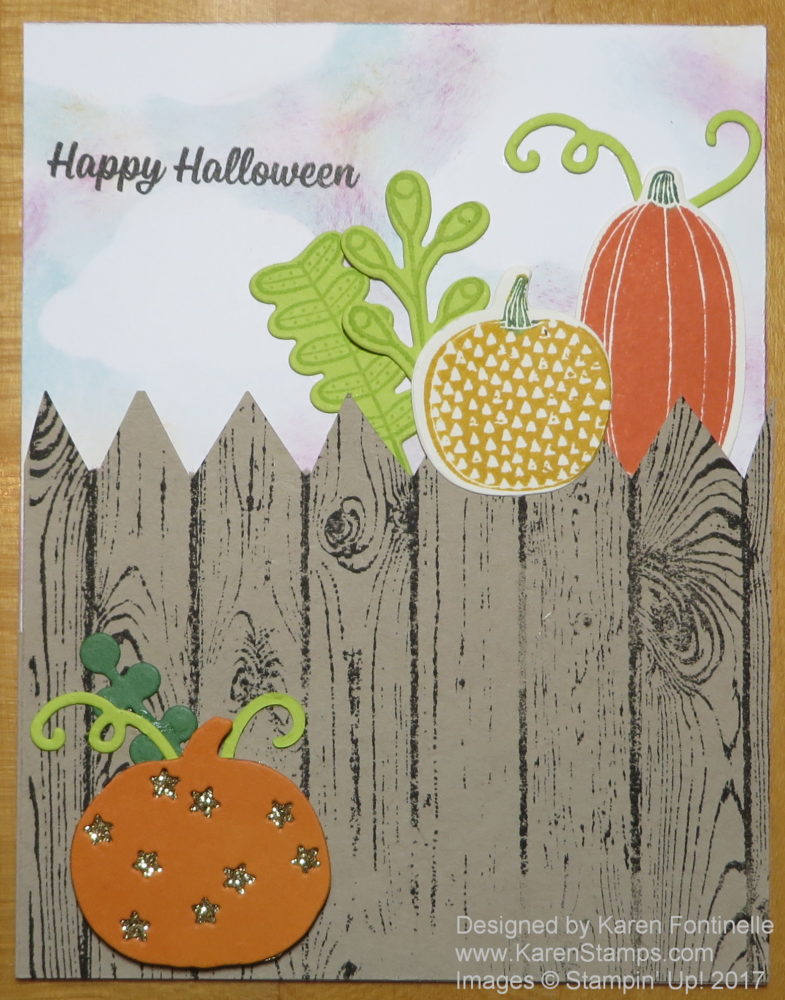
This is my first Halloween card of the season and of the upcoming Stampin’ Up! Holiday Catalog, made with the Pick a Pumpkin Bundle.  I wondered if some of you were “on the fence” about subscribing to Paper Pumpkin, the papercrafting kit that comes to you in the mail once a month!  And then I thought about making a card with pumpkins on the fence!  You never know where inspiration will come from!  LOL!

New Paper Pumpkin subscribers can join and get the September Paper Pumpkin Kit for 50% off! Just use Promo Code:  HALFOFF0917. The only clue for September is that it is an “exceptionally beautiful kit”. That’s all I know, but if you like fall, there’s no reason not to try Paper Pumpkin at least for September because it is well worth the special offer price!  It is well worth the regular price, too, but might as well take advantage of a bargain I say!

Click HERE to Join Paper Pumpkin!  No risk, no obligation! Do it for yourself!

Now back to my Halloween card!  If you changed the greeting, this card could be any occasion. The card base is actually Crumb Cake, even though the front layers completely cover it up. I have a piece of Whisper White at the top on which I sponged some colors like Soft Sky, Pumpkin Pie, Rich Razzleberry to make an interesting sky. The greeting is stamped in Early Espresso ink and is from the new stamp set Spooky Cat.

The fence portion is the Hardwood background stamp stamped on Crumb Cake Cardstock with Early Espresso ink. To make the pickets at the top, I drew a pencil line across the top a little ways down so I knew how far down to cut.  Then I used my Paper Snips to just cut by hand. Very easy!  If you don’t own the Stampin’ Up! Paper Snips, you really need a pair, more than you know!  They can do things regular scissors can’t!  I love mine! I’ve mentioned this before, but in the large background stamps I do prefer the wood-mount.  I just think it gives them a little more strength to have them already mounted on the wood and they are ready to go. It also saves you from buying the largest acrylic block if you don’t have the whole set.

The pumpkins, stems and vines are stamped with the Pick a Pumpkin Stamp Set and die cut with the Patterned Pumpkins Thinlits Dies.  Now as I mentioned, if you buy them together in the Bundle (144670), you will save 10%. I also discovered that the pumpkin dies also fit some of the pumpkins in the Spooky Night Designer Series Paper if you would like to die cut some of those from the paper!

The pumpkin on the ground on this card with the die cut little stars is backed with a piece of Gold Glimmer Paper that I hand cut for a sparkly layer behind the stars!  Cute!

The Holiday Catalog will be out September 1, 2017! I believe customers are starting to receive the ones I ordered in the mail.  Some will take longer than others to arrive, just depends where you live and how long the postal employee sits in the back room and reads it first!  I do have some extras if you are new and are interested in Stampin’ Up! products. Just email me with your contact information. If you already have a Demonstrator you are working with, she will be able to provide you with a catalog.

Don’t forget!  Try Paper Pumpkin with the special 50% offer for September!  Don’t just sit on the fence and miss out!  To find out more about this offer, click HERE.

JOIN PAPER PUMPKIN!  USE PROMO CODE:  HALFOFF0917

Last Minute Halloween Ideas

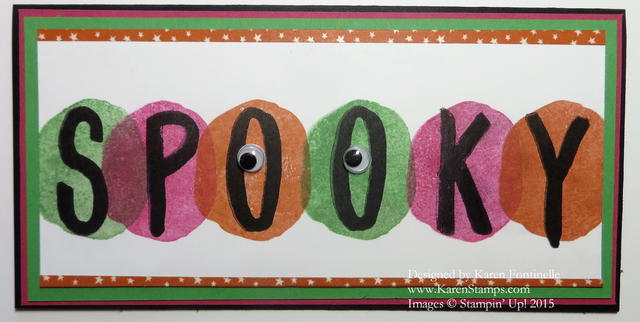
Layered Letters Alphabet Spooky Halloween Card

I thought I would look back and give you some last minute Halloween ideas with stamp sets and supplies you might have from last year if you don’t have the most recent ones. We gotta work with what we have, right?! Of course all you really have to do is change paper or colors or stamp sets to take an idea of things you don’t have and make something similar.

Above you see my Layered Letters Alphabet Spooky Halloween Card from last year using the Layered Letters Alphabet.  Love that! I used some Halloween colors and added some googly eyes. Click the link for the card for all the details on the blog post.

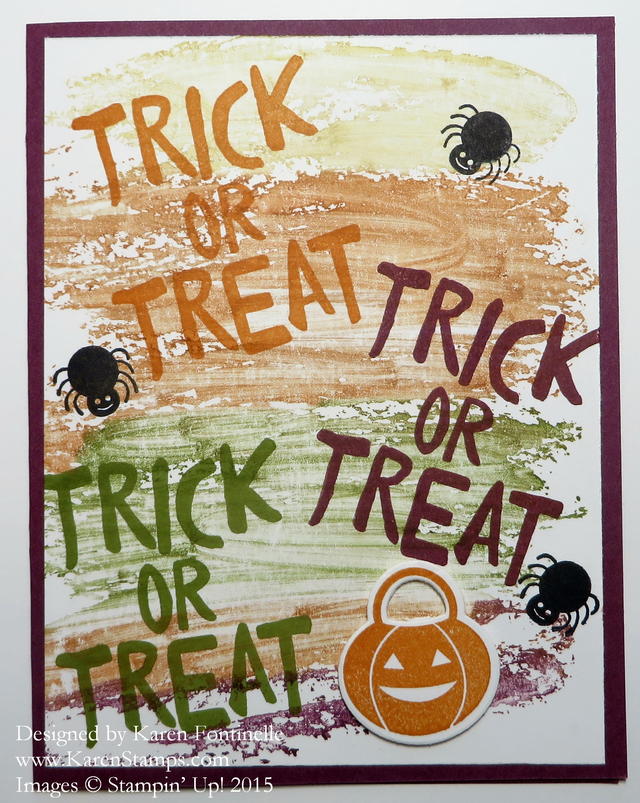
Trick or Treat Watercolor Wash Halloween Card

On my Trick-or-Treat Watercolor Wash Halloween Card I simply used the Watercolor Wash Background Stamp colored with various markers for the background.  You could also just pick up some ink refill with the Aqua Painter or a paint brush to make a similar background! Then just stamp over it with some greetings and embellish as you desire. Click the link for the card for all the details.

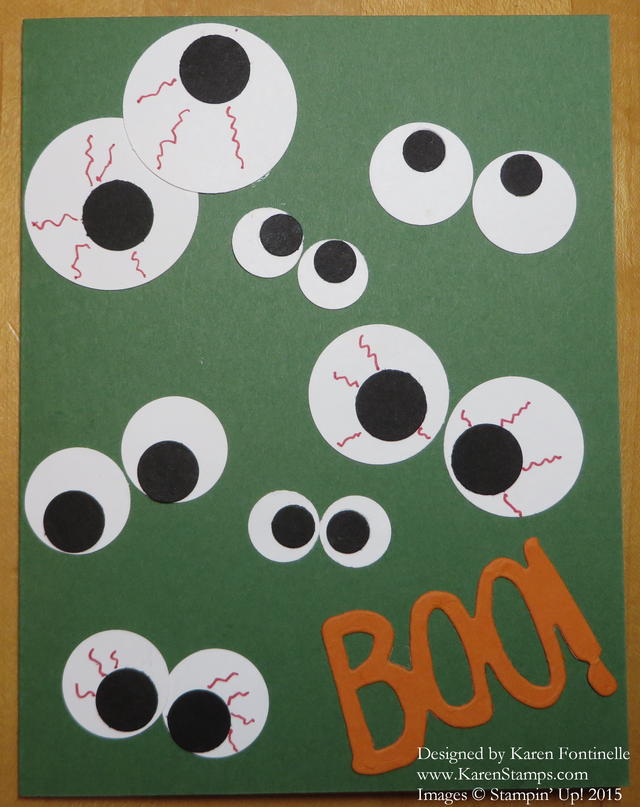
Easy Halloween Eyeball Card

Now here’s an easy Halloween card anyone can make or put on a treat bag or box for Halloween! It’s my Easy Halloween Eyeball Card! Click on that link for all the specifics!

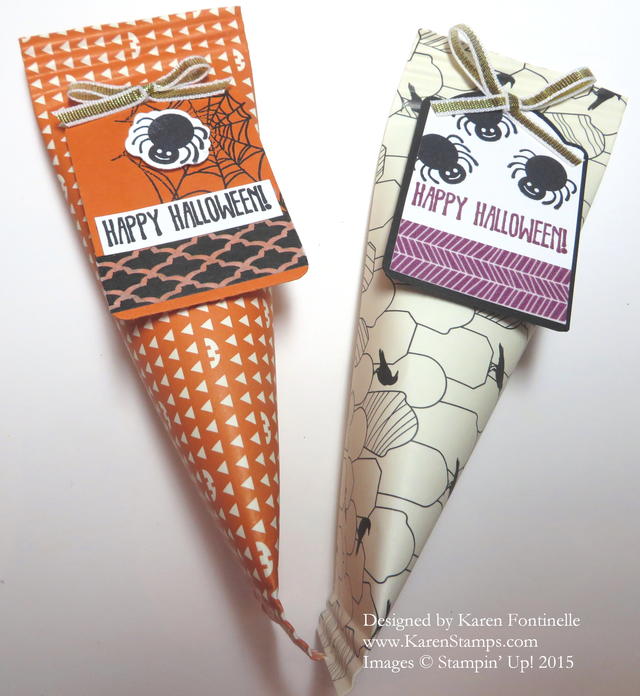
Halloween Happy Haunting Sour Cream Containers

My goodness, don’t forget about the Sour Cream containers like these Halloween Happy Haunting Sour Cream Containers! These have been popular since I first became a Stampin’ Up! Demonstrator and still are! So easy to make.  Click the link for the directions.

If you still need more ideas, just click on the Categories drop down box on the right side of my blog and choose Halloween. You’ll be able to go back in time and see lots of projects!

Get the best in papercrafting supplies at Stampin’ Up! Online!

How to Make a Halloween Triangle Treat Box

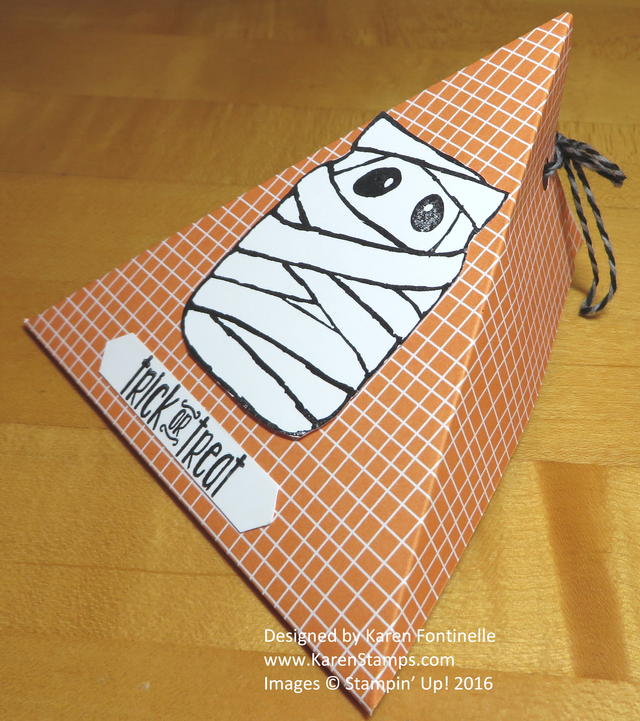
Halloween Triangle Treat Box

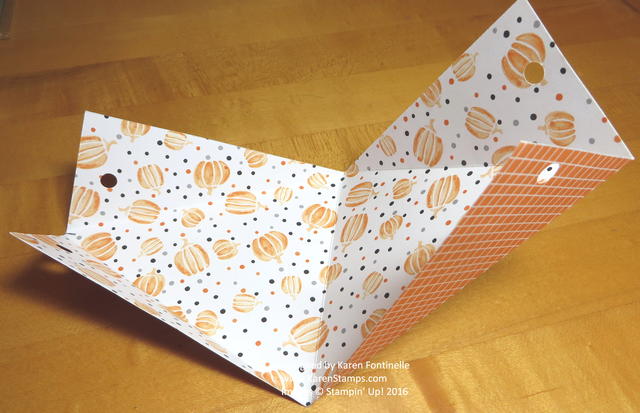
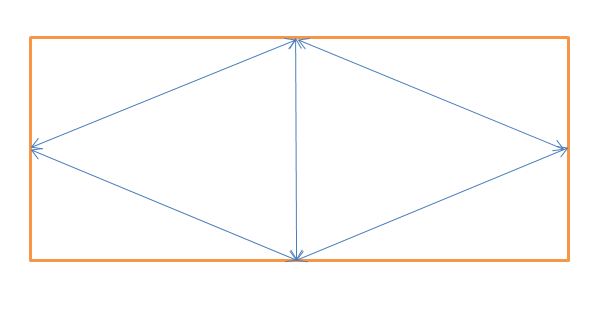
Here is how to make a Halloween Triangle Treat Box, one of my favorite treat boxes to make! I have been making these triangle boxes for years and find them so easy to make! Just take a rectangular piece of paper, score it in half, then score from the middle of each end to the outside edge of that center score line. Fold, punch holes in the ends for ribbon, and decorate.

Check out the photo below to see how it is scored and folded.How to Make the Halloween Triangle Treat Box

For this particular box, take a piece of cardstock or designer paper cut 8 1/2″ x 4 1/2″.  Score at 5 1/2″.  On the ends of the paper, mark the center measurement lightly with a pencil.  Score from this mark to the side of the center score line. See my imperfect drawing below for the general idea:Triangle Box Drawing

Just fold on all the score lines and use a hole punch to make holes in the ends for ribbon to tie or I suppose you could just adhere it shut after you put the candy or gift inside, maybe with Tear & Tape Adhesive. To tie mine together, I used the Halloween Night Baker’s Twine. The designer paper is the Halloween Night Specialty Designer Series Paper. To decorate the box, I stamped the mummy image from Jar of Haunts Stamp Set. The greeting is from Spooky FunThe greeting is punched out with the Classic Label Punch.

That’s it!  Try making bigger and smaller sizes of this box, although I think this size is pretty good. Couldn’t be easier!  You can use it for any occasion!

If you need a last minute treat box, try this Halloween Triangle Treat Box or save the idea for the next occasion when you need a box for a candy treat or small gift!

Shop Stampin’ Up! Online or contact me to put in your order for you!               I’m happy to!

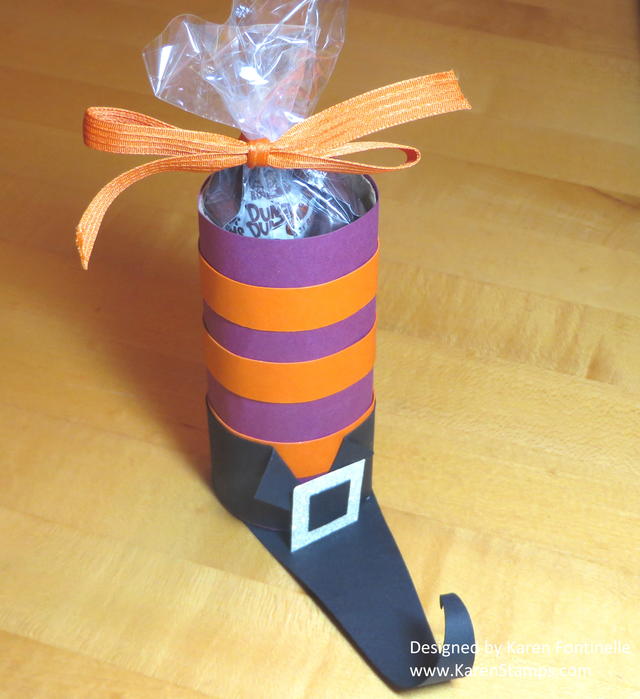
Halloween Witch’s Boot Candy Treat Holder

Halloween Witch's Boot Candy Treat Holder

Here’s a Halloween treat holder I made a couple of years ago and it was so popular I thought I would post the photo again. It’s the Halloween Witch’s Boot Candy Treat Holder! I saw the idea online and had no directions, but I just figured it out on my own. I thought it was such a cute idea and we all have those empty toilet paper rolls or paper towel rolls around the house frequently. (Personally I think I’d rather use a paper towel roll!)

I wrapped Rich Razzleberry card stock around the roll, adhered with Multipurpose Liquid Glue.  Before I tried wrapping the roll I pulled the cardstock over the edge of my kitchen table a few times, which has a rounded edge, just to break up the fibers a little bit and make it easier to roll. You could use a bone folder or just anything rounded to get the paper to “relax”. For the sock stripes, you can use Pumpkin Pie 1/2″ strips of card stock. For the top of the boot, I just wrapped around a piece of Basic Black and folded back the corners. The buckle is a piece of Dazzling Diamonds Glimmer Paper (you could use any color Glimmer Paper) with a small square piece of Basic Black right in the center which makes it look like a buckle without having to actually MAKE a buckle! The “shoe” part is easy to make. Measure the roll diameter and then make the black paper slightly wider. Cut it at a diagonal as you see, Put glue on the bottom of the roll and stick it on the black card stock. When the glue is dry, you can trim off the excess in the back. Roll up the toe a little bit. There you have it! Put a little treat inside the boot.

This could be a little Halloween gift for someone, or a table decoration or party favor. Have fun making your Halloween Witch’s Boot Candy Treat Holder!

Shop Stampin’ Up! for the best in stamps, ink, paper, and accessories!

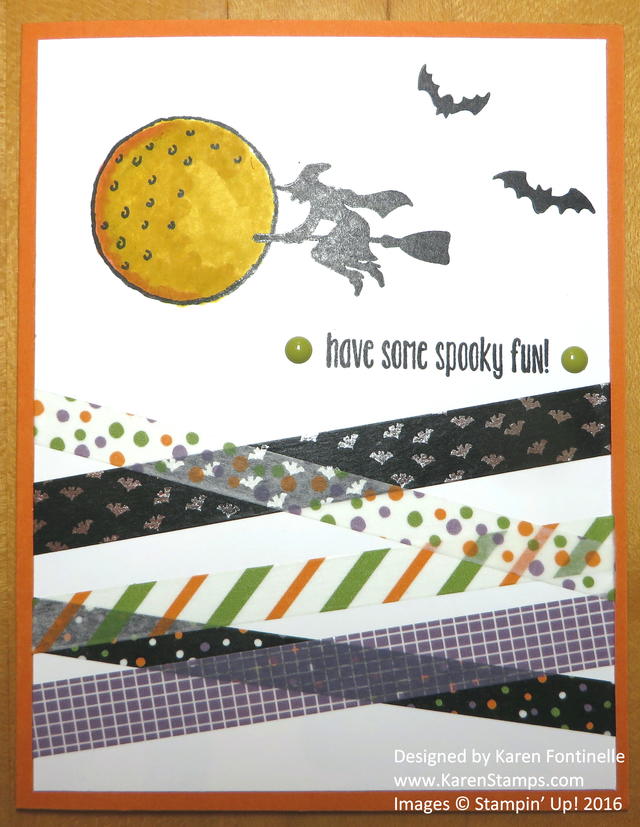
Halloween Night Washi Tape Halloween Card

Halloween Night Washi Tape Halloween Card

I wanted more cards to send out for Halloween (although maybe they will get there late or last minute!) so I went on a Halloween cardmaking blitz the other day and out came this Halloween Night Washi Tape Halloween Card. I wanted to use some of my Halloween Night Specialty Washi Tape before the holiday was over so this is how I used it on this card! Washi tape is so fun for some reason! And if you don’t get it placed right, you can peel it off and try again. Just tear off the ends, no need for scissors.

The card base is Pumpkin Pie with a Whisper White cardstock layer. I applied the washi tape without even knowing how else I was going to decorate the card! I decided to use the Spooky Fun Stamp Set and stamped the moon, the witch, the bats and the greeting.  I placed both the bats on one acrylic block so I could stamp them both at the same time. I think I got one bat upside down! But maybe they fly that direction sometimes!

If you ever want to see bats fly at dusk, go to Austin, Texas to the Congress Avenue Bridge. It’s a tourist attraction! There are “seasons” for getting the best viewing of the bats. I think we also have a big bat colony here in Houston under a certain bridge, the Waugh Bridge, but I haven’t visited that yet!

I colored in the moon a little bit with two Stampin’ Write markers and then added a couple Halloween Night Enamel Dots. All of the enamel dots Stampin’ Up! carries are really fun to use! They add just a bit of color and embellishment to your card and are FLAT so they mail easily!

Don’t put away that Halloween Night Washi Tape after Halloween because you can still use all of it except for the black with the silver bats for any time – and  if no one notices the bat pattern, I guess you could use that as well! Maybe it would be good to use on cards for gardeners or outdoors people!

You still have time to make and mail or hand out Halloween cards and treats to your family and friends, so go stamp something and mail it!  I have some cute Halloween stamps so that is an incentive to get these cards in the mail! Send someone some Happy Mail for Halloween!

Don’t forget the Designer Series Paper Sale – Buy 3/Get 1 Free!  The sale ends October 31 and you’re going to be busy with ghosts and monsters that day so order ahead of time!

Click HERE to choose your designer paper!


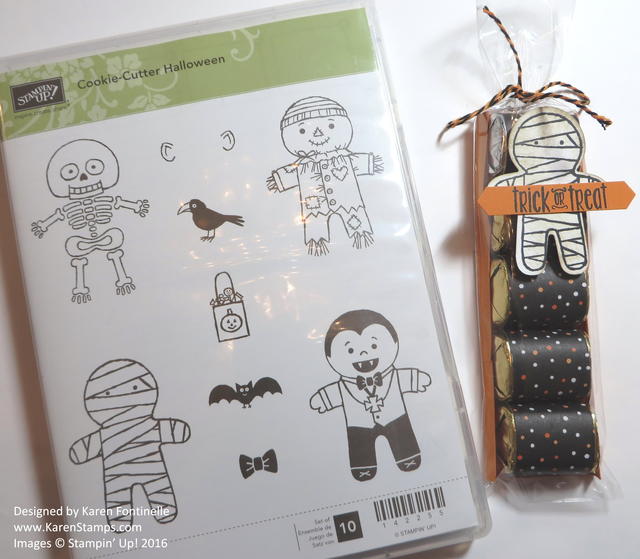
Halloween Chocolate Candy Treat Bag

Halloween Chocolate Candy Treat Bag

These Halloween Chocolate Candy Treat Bags are fun and easy to make, if you need a simple treat to make.  Actually you can make these candy treats for ANY occasion – just cover a chocolate nugget candy with designer paper! These narrow cello bags from Stampin’ Up! are fun to use, but if you don’t have them, just put the candies in any little bag, tie with a ribbon, and make a tag and you have a  cute little gift!

The Cookie Cutter Halloween Stamp Set gives you so many choices with the characters you can stamp. Don’t forget, you can still use the scarecrow through the fall and for Thanksgiving so don’t put away this stamp set after October 31! And if you are thinking ahead to Christmas (surely you are!), get the Cookie Cutter Christmas Stamp SetYou will want the Cookie Cutter Builder Punch to go with it, so you might as well get the Bundle and save 10%.

To make the cute candies, I used the Halloween Night Specialty Designer Series Paper to cover the chocolate nuggets.  You just need a 1″ x 3″ strip of paper.  I adhered them on the back of the candy with a Mini Glue Dot. The adhesive is only on the paper, not touching the candy.  I have made tons of these candies through the years for gifts or treats. For Christmas, of course, use Christmas colors or Christmas paper. For birthdays, use some other design. Whatever! And remember, some of the patterns in the Halloween Night paper can be used beyond Halloween, so keep it out and handy after Halloween!

These narrow cello bags are the 2″ x 8″ Cellophane Bags. They are only $3 for 50 bags! Remember, if you want to stamp on cello bags, use Stazon Ink. Check out all the different sizes and kinds of cello bags Stampin’ Up! offers because they are so handy to have on hand!

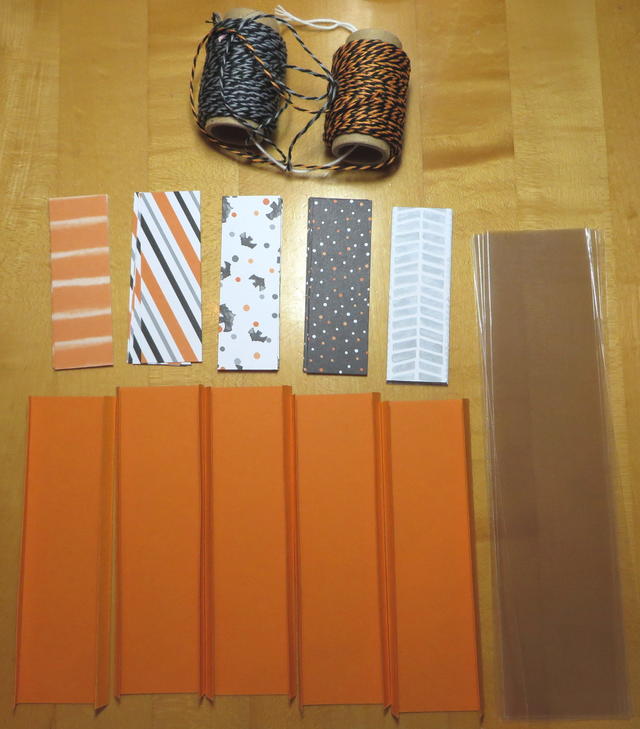
To make a little tray to hold the candies in the bag, cut a piece of cardstock 2″ x 5″.  Score 1/4″ along each long side to make the tray.  This will fit inside the bag. Cut a piece of ribbon or twine about 12″ long to tie the bag. Embellish as desired! Make a bunch and put them together assembly line style.

Halloween Treat Bag Pieces

Think ahead to Thanksgiving or Christmas or New Years and think about making some chocolate candy treat bags like this one!

Shop Stampin’ Up! Online HERE!

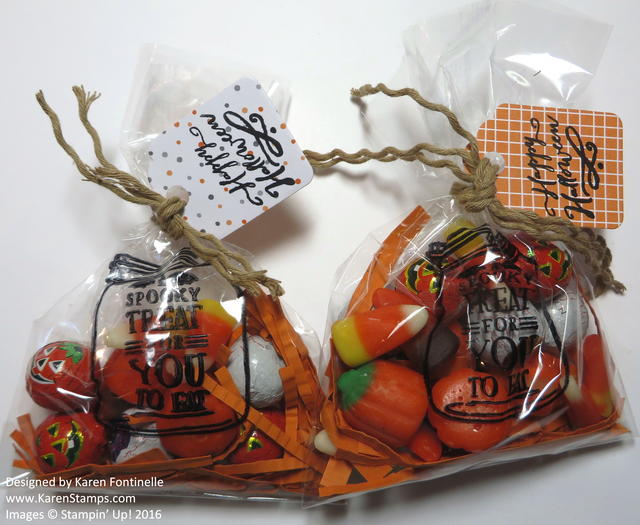
Cello Halloween Jar of Haunts Candy Treat Bags

Cello Halloween Jar of Haunts Candy Treat Bags

Need more last minute Halloween ideas like these Cello Halloween Jar of Haunts Candy Treat Bags?  This is what I came up with late last night!

Do you ever have late night stamping sessions when you should be calming down and getting ready for bed?  Isn’t that when you feel the most creative?! And then when you do go to bed, you can’t fall asleep because your mind is still swirling with creativity!

Although this size of cello bags is retired, there are other kinds and sizes of cello bags you can use. You do need Stazon Ink to stamp with because it dries on cello bags and plastic items like these treat bags. As with other times, what I thought I was going to stamp and make changed into some other idea as I was working on the project! It happens! As I started putting in my “filler” paper and candy, I got the idea to stamp the empty jar from the Jar of Haunts Stamp Set. Originally I was going to stamp the eyeballs randomly on the bag or an image from the Spooky Fun Stamp Set. But then I saw the jar and thought that would look like the candy in the bag was inside the jar. And then I thought the greeting would be cute stamped inside the jar! That’s how this came about!

The filler paper is just scraps of cardstock, run through the old Crimper we used to have, and then cut into thin strips with the Fringe Scissors. You can cut the strips with whatever scissors or paper cutter you have, it’s just that the Fringe Scissors do several strips at one time. Then, moosh the strips of paper all up with your hands and much as you can, and you have “filler”. I think there’s another name for it but I can’t think of it. Just a little something to take up space and add some color in a gift or treat bag.

The ribbon tying the bag is the Kraft Rope Trim unraveled into three pieces or rope!  I saw that idea online, so always be thinking outside the box with every product! I like the frazzled look of it rather than smooth for this Halloween treat bag!  The tag is made with the Tags & Labels Framelits Dies and Big Shot.  The greeting is in the Jar of Haunts Stamp Set.

Such fun tricks and treats you can make for Halloween!

Shop Stampin’ Up! Online 24/7!

Jar of Haunts Monsters Halloween Card

Jar of Haunts Monsters Halloween Card

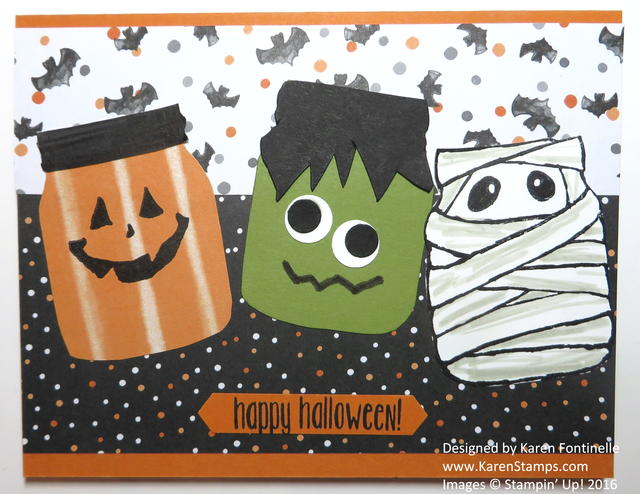
What’s more fun than some cute Halloween monsters?! Maybe Halloween monsters in a jar?! You can play with the Jar of Haunts Photopolymer Stamp Set and come up with all kinds of creations!

The card base is Pumpkin Pie Cardstock with two pieces of designer paper from Halloween Night on the front.  You can stamp the jars on designer paper and cut them out or on cardstock. On two of the jars I traced just the jar lid and cut out to add on. On the Frankenstein jar, I just cut the lid freehand at the bottom.  The eyes are punched with the ever-useful Owl Builder Punch.

The greeting is in the stamp set and punched out with the new Classic Label Punch.

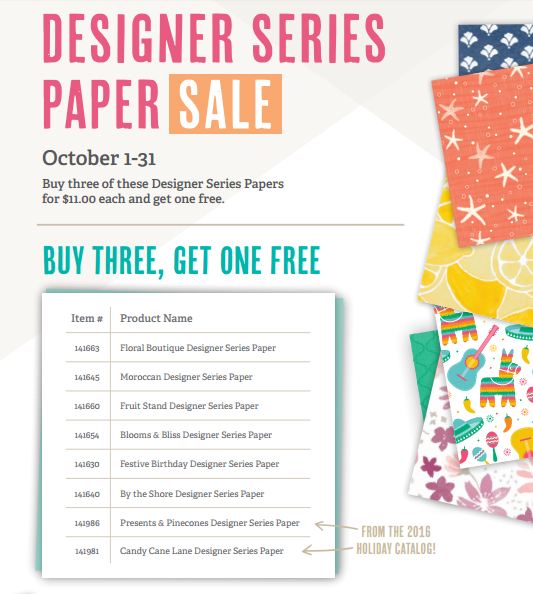
Don’t forget about the Designer Series Paper Sale going on during October! This Halloween Night paper is NOT included because it is a “Specialty” paper. Check the list below.  Buy 3, Get 1 Free!

Designer Series Paper Sale List of Papers


How to Make Ghosts Out of Hearts for Halloween

how-to-make-ghosts-out-of-hearts-for-halloween

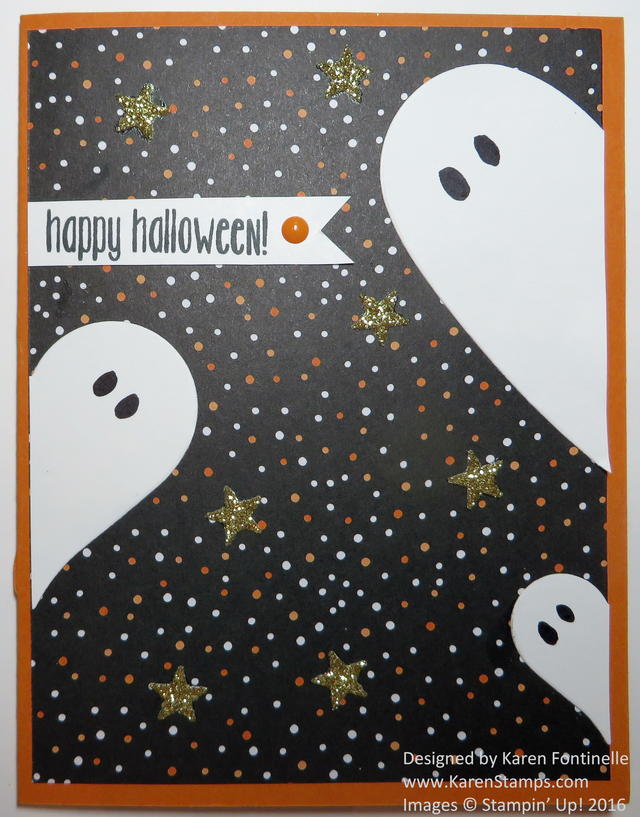
I made this Halloween card to show you how to make ghosts out of hearts because it reminds me of when I signed up to be a Stampin’ Up! Demonstrator.

I was first introduced to Stampin’ Up! when I went to my friend’s house, probably over fifteen years ago, to go to a wedding shower for a mutual friend. She only had time to tell me she had signed up to be a Demonstrator and showed me some projects she had made at a stamp camp. I didn’t really know much at all about rubber stamping but I was surprised how cute her little projects were! Later on that summer we were back in town for the wedding and I got to spend several days with my friend, and all I wanted to do was stamp with her and look at all her samples! I was mesmerized! Sometime later she suggested I sign up so we could go to the Stampin’ Up! Convention together. It took me awhile to be convinced, even though I did think it would be great to go to the next convention with her. I think it was yet another visit that I went with her to a group meeting of Demonstrators in her upline and sideline that I saw so many cute ideas on display of cards and other projects. One that I really fell in love with was a card something like the one I made above. The person made a ghost by cutting a punched heart in half, and I thought it was one of the most clever ideas I’d ever seen!

It has now been fourteen years since I bought my Starter Kit (don’t think we had any choice of products back then!) and I have loved every minute of it! Customers couldn’t even order online themselves back then, only through a Demonstrator and I don’t think any (or certainly not many) people had blogs or social media. Our Demonstrator websites were new sometime after I joined.  Lots of changes in catalogs, products, ink pads, types of stamps over the years!

If you would like to be a part of this great company, Stampin’ Up!, now is a great time to join! Someday you might be saying “I joined Stampin’ Up! 14 years ago!” I love that Stampin’ Up! values all Demonstrators, whether you want to work hard and turn this into a big business or whether you want to just get the discount and benefits for yourself, or something in between.

For an introduction, click HERE to find out about joining Stampin’ Up! All you need to do is purchase a “Starter Kit”, which means you choose $125 worth of current products (your choice) and only pay $99.  You also get about $50 in catalogs and business supplies to get your business started. Feel free to contact me with any questions or concerns you have. When you feel ready to join, just read the Demonstrator Agreement, enter your information, choose your Starter Kit and submit.  Within minutes you will be a Stampin’ Up! Demonstrator and have your Demo ID# and can start looking around on the Demo side of the website.

JOIN STAMPIN’ UP! HERE!

As for the Halloween card, I used Pumpkin Pie Cardstock for the card base and layered with a piece of paper from the Halloween Night Specialty Designer Series PaperFor the ghosts I just die cut some hearts of different sizes with the Sweet & Sassy Framelits Dies out of Whisper White Cardstock. Then I cut each heart in half with a scissors and adhered them to the card front. Use a black marker or Sharpie to draw in some eyes on each ghost. The greeting is from the Spooky Fun Photopolymer Stamp Set and I added just one Halloween Night Enamel Dot. I love these enamel dots because they are cute and flat enough for mailing! For a little extra pizzazz I die cut a strip of stars from Gold Glimmer Paper with the stars die in the Mini Treat Bag Thinlits Dies. Adhere a few of the stars with a tiny drop of Multipurpose Liquid Glue.

Maybe this card will inspire you to join the Stampin’ Up! family for lots more creative ideas! Look over the information on the Stampin’ Up! website and then email me at Karen@KarenStamps.com  if you would like more information or answers about your particular situation.