Category Archives: Halloween

Halloween Lovers: Join Paper Pumpkin Now!

Paper Pumpkin Sept 2018 Ad New

If you love Halloween, then you absolutely want to be subscribed to Paper Pumpkin in time for the September Kit in the mail!  Join or reactive your subscription by Monday, Sept. 10th in order to get this kit.

Paper Pumpkin has just what you need—a frightfully delightful kit in a scary-cute, special edition box. You’ll get the handmade Halloween look without the fuss.

Click this link to go to my personal Paper Pumpkin page:  bit.ly/paperpumpkinjoin

We promise: Paper Pumpkin’s September kit will not give you nightmares, but you WILL be haunted by the spooky box, wrapped in a whimsical spider web. And the contents? Not scary . . . just adorable, and everything you need for a successful Halloween crafting experience.

Hints:  There will be a quantity of 24 treats to make inside!  If you need more for those cute trick-or-treaters, just order extra kits.  You can change the number of kits each month. Get an extra kit or two and make them with a friend or neighbor.  I know my trick-or-treaters loved the “test tube” treats I passed out from a previous Paper Pumpkin Kit so I even ordered a refill and had more for the next year!

If you have canceled your previous subscription, just sign up again!  If you have skipped a month, make sure your subscription is activated so that you don’t miss this Halloween Kit.  Even if you are not into Halloween, you will find alternate ideas online for using your kit, but it is mostly Halloween so if you prefer, just skip this month and resume the next month.

JOIN PAPER PUMPKIN HERE!

Get your spooky Paper Pumpkin Kit mid-September!  Sign up by Sept. 10th!

Please tell your friends who might be interested!  And SHARE on Facebook and other social media!

Toil & Trouble Halloween Witch Card

Toil & Trouble Halloween Witch Card

Unless you have been inside a craft store, you probably won’t believe it is less than twelve weeks until Halloween!  We are in the midst of summer and back to school, but as a mom of three, I remember that there is just a small pause after school starts while kids get acquainted, before birthday parties start, before sports and activities kick into full gear, before big school projects get assigned. THEN it all hits and before you know it, it is Halloween and we know it is a slippery slope to all the rest of the holidays until the end of the year! So the Stampin’ Up! Holiday Catalog comes out at a good time, early enough for us to take some stock into what we want to make for the holidays and get our supplies purchased and ready to go!

Since Halloween is right around the corner (ha!), here is a card I made to get us in the mood!  I love all things cute an lovely for fall and Halloween and I think this new Toil & Trouble Designer Series  Paper in the upcoming Holiday Catalog fills that bill! You’ll find cute witches and cauldrons, like the ones on this card, plus little spiders, bats, lovely pumpkins, and even some generic paper patterns that you can use for backgrounds or trim on Halloween cards or even on other cards.

I started with this cauldron paper, which lends itself to being cut into strips which can then be used in various ways.

Toil & Trouble Designer Series Paper Cauldrons

Toil & Trouble DSP Strips

For the card base, I used Basic Black Cardstock with a layer of Crushed Curry, then a layer of the designer paper with one of those “generic” backgrounds, the stars.  I chose a piece of Whisper White to die cut and layer on a scalloped piece of Crushed Curry.  I was just going to glue on the witch, cauldron, and greeting, but I decided it needed a little more spookiness!  I used my Sponge Daubers to sponge on some spooky colors of ink for the background. I just hand cut the images from the designer paper, but you can purchase the Cauldron Framelits Dies if you prefer. My greeting is from the Trick or Treat Stamp Set, also coming in the catalog.

Witch Card Closeup

Since the inside of the card is Basic Black I adhered a piece of Whisper White inside for a greeting.  To embellish it a bit, I added a strip of the designer paper on the side and even the little cat which is on the designer paper.  I like the way it turned out for my first Halloween card of the season!

Hopefully, your Holiday Catalogs are starting to arrive in the mail if you are one of my customers.  If you are looking for Stampin’ Up! products, just send me your contact information and I can mail a complimentary catalog to you!  We wouldn’t want you to miss out on these great holiday products!!

I hope this Toil & Trouble Halloween Witch Card gets you in the Halloween and fall mood.  I know I am in the mood, especially for cooler fall weather and time for crafting!

Shop Stampin’ Up! Online!

Subscribe to Paper Pumpkin For a Spooky Papercrafting Kit!

Paper Pumpkin Spooky Banner 2018

It’s hard to believe in the middle of the heat wave that is summer that we can think ahead to Halloween, but here’s an easy way to get into fall crafting with the September Paper Pumpkin Kit with a spooky Halloween project inside the exclusive Halloween-designed box.  You will love finding this special box in your mailbox mid-September and getting excited about Halloween!  I personally love Halloween and have boxes of decorations, not the gory, scary stuff but the cute and fun Halloween things!  I will be looking forward to this kit for sure!

You may think there is no rush, but it wouldn’t hurt to subscribe TODAY and then you don’t have to think about it anymore!  You can go to paperpumpkin.com, fill out the information, and then choose me as your Demonstrator OR you can just go to my personalized link for Paper Pumpkin HERE and you’re right there on my Paper Pumpkin site!  If you have any questions, just ask!  Here is a Stampin’ Up! video to help you and see the process.

Even if you have subscribed to Paper Pumpkin in the past, you are always welcome to come back!  If you subscribed in the very beginning of the program several years ago now, I think you will find now that the kits are much improved and everyone loves them!  The good thing is that there is no risk or obligation to continue for any length of time.  Try Paper Pumpkin and if it doesn’t suit you, just cancel. If you like Paper Pumpkin but know you will be super busy one month, just go into your account and skip that month.  It’s all up to you!  Just subscribe or amend your account by the 10th of any month.  You can add kits any month if you want to give one for a gift or have a friend coming over you would like to craft with!

Once you are a Paper Pumpkin subscriber, you also have access to any available past kits in the Stampin’ Up! Online Store. Sometimes it is the full kit and sometimes it is a refill to the kit. If, for example, you subscribed to a certain kit and wanted to make more, you could order just the refill since you would already have the stamps and ink spot. Therefore, the refill would be of less cost.

If you like Halloween, be sure to subscribe to Paper Pumpkin and see what this spooky kit has in store for us!

JOIN PAPER PUMPKIN TODAY!

Last Minute Halloween Ideas

Here are some of my favorite Halloween posts from last year all in one place, if you need some last minute Halloween ideas!  If you don’t have this year’s Halloween stamps and paper, perhaps you have ones from last year or you can just use something else. Substitution is easy! It doesn’t always have to be “Halloween” paper or stamps.  Just use the ideas!

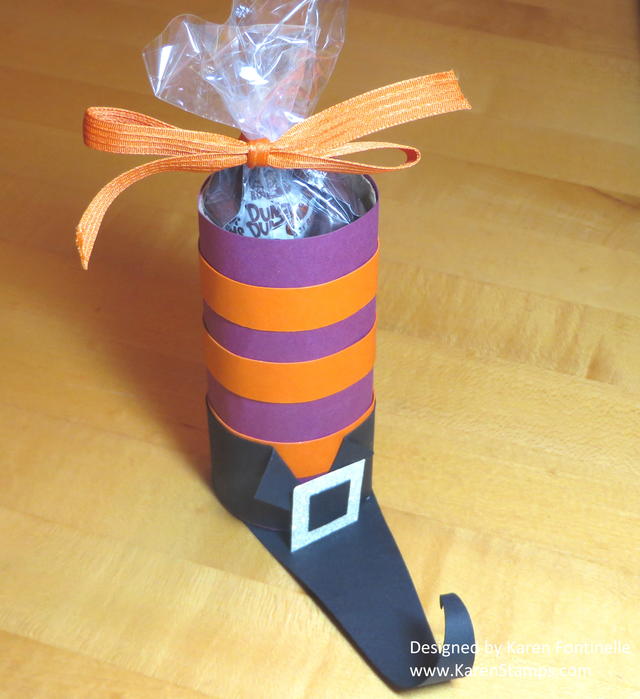
Halloween Witch's Boot Candy Treat Holder

Halloween Witch’s Boot

Easy to make with a toilet paper roll or paper towel roll! Very cute and fun to make!

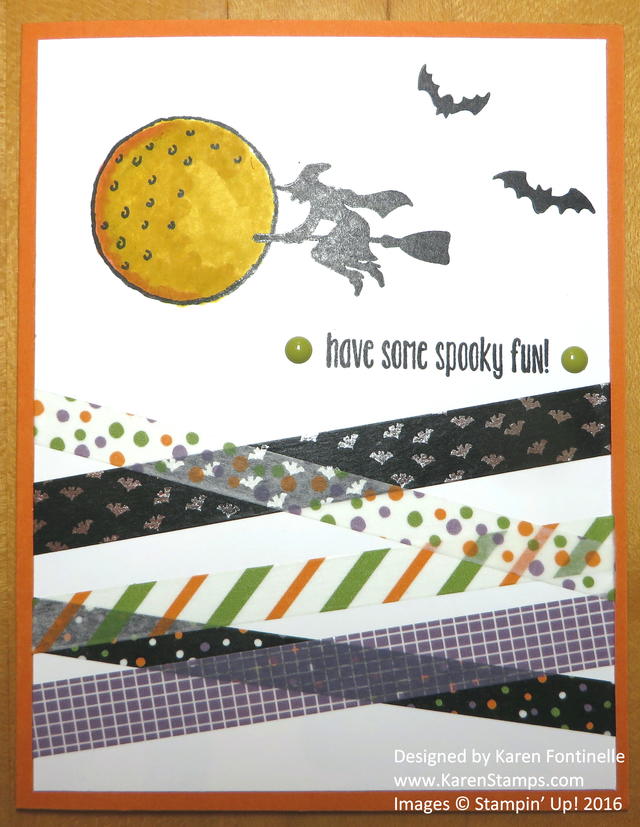
Halloween Night Washi Tape Halloween Card

Halloween Night Washi Tape Halloween Card

Use some washi tape, whatever you have, criss-crossing at the bottom of the card and do a little stamping at the top!

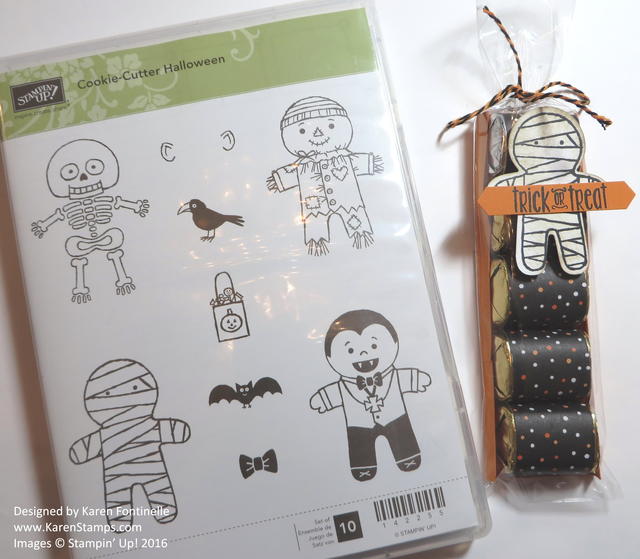
Halloween Chocolate Candy Treat Bag

Halloween Chocolate Candy Treat Bag

Even if you don’t have the narrow cello bag, use the idea of wrapping chocolate nugget candies with designer series paper for a Halloween treat!

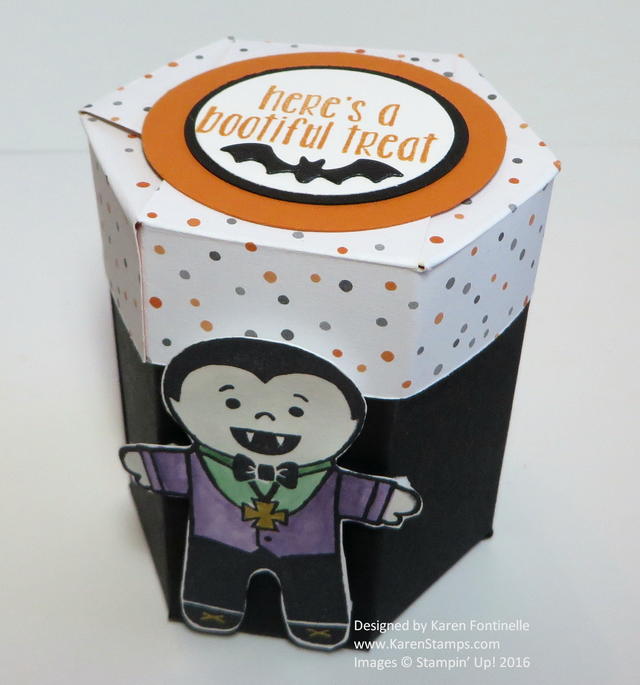
Halloween Small Hexagon Box

How to Make a Halloween Small Hexagon Box

This cute little hexagon box isn’t as hard as it looks!  Give it a try for any occasion!

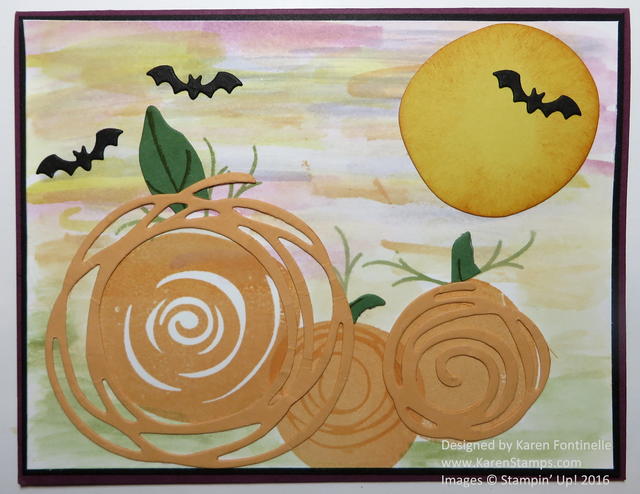
Swirly Bird Pumpkins Halloween Card

Swirly Bird Pumpkins Halloween Card

Use the Swirly Scribbles dies to make pumpkins for Halloween!

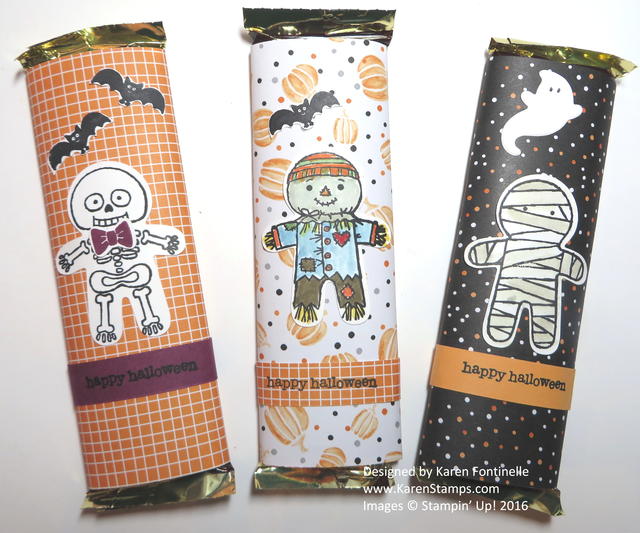
Halloween Night Candy Bars

Halloween Night Candy Bars

Decorate candy bars of any size with designer paper and Halloween images.

I hope you can use these ideas to inspire your own ideas with the materials you have! Actually most of these could be used as Christmas ideas or for a birthday party.  Just change the colors, the paper, the images.

Have fun making some last minute Halloween treats for family, friends, or your trick-or-treaters!


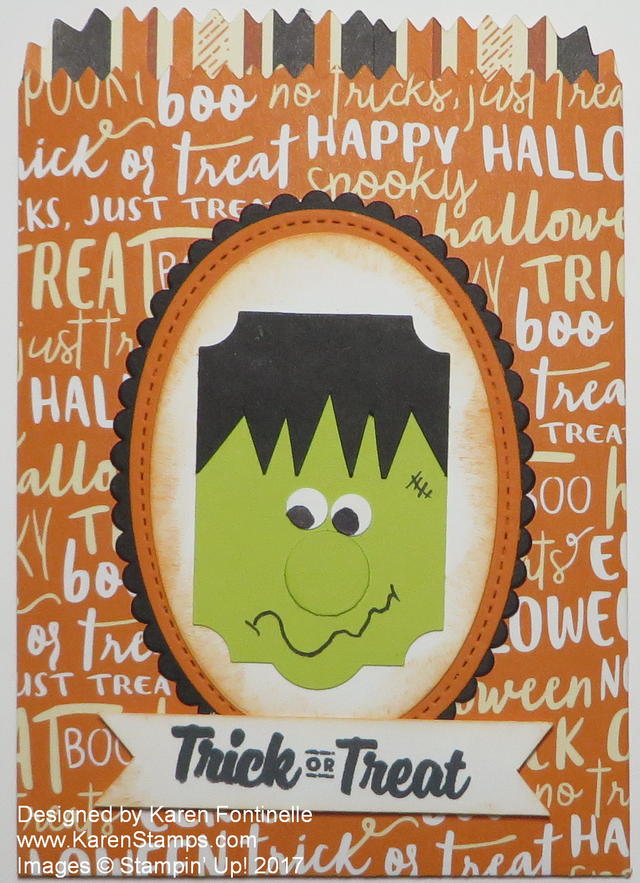
Frankenstein Mini Treat Bag For Halloween

Frankenstein Mini Treat Bag For Halloween

As I was reading something online, I saw a mention of Frankenstein, and I realized with Halloween almost here, I’d almost forgotten about Frankenstein.  We used to make lots of fun cards with one of the original steel dies we used to have, the Top Note Die.  It was perfect for a Frankenstein head!  But as I glanced through some images of Frankenstein to refresh my memory of how his face looked, I noticed people were using various punches to make Frankenstein, perhaps a little smaller though!  I saw one candy project using the Everyday Label Punch, and decided to make a Frankenstein face with that punch.

The face turned out small, naturally, using a punch, and I could have added it to many different things, like the Clear Tiny Treat Box for one thing.  Since I love the Mini Treat Bag Thinlits Dies so much, I decided to make a Mini Treat Bag out of the Spooky Night Designer Series Paper and make the Frankenstein face the focal point.

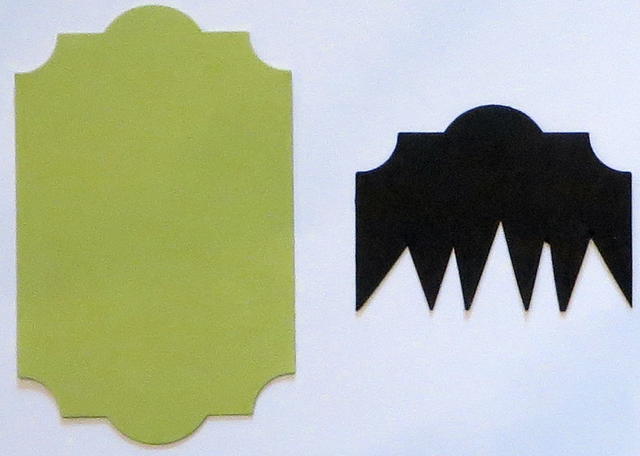
This is how you start using the Everyday Label Punch to make the Frankenstein face:

Everyday Label Punch for FrankensteinI punched one label out of Lemon Lime Twist Cardstock and one out of Basic Black. The Basic Black one I cut in a little less than half and then just snipped the bangs with my Paper Snips. Then I glued the black hair piece on top of the green face piece. I suppose you could leave the “lump” on top of his head, but I cut mine off, just following along that straight line on top.

For the Frankenstein face, I used the 1/2″ Circle Punch for his nose and sponged it with a little bit of Lemon Lime Twist Ink. For the eyes, I missed having the Owl Punch and forgot that would have been good to use for the eyes.  Use whatever punch that you have to punch out the white eyes.  You can punch smaller dots for the eyes, but the simpler thing to do is just color in the black part of the eyeballs with a black marker.  I used my 1/4″ Handheld Punch for the white eyes. They are a little small but that’s okay.  Just draw on his mouth and scar with a black marker.

To make Frankenstein stand out on the Mini Treat Bag, I just layered him on an Oval die cut, also one with the scalloped edge, and one of the Stitched Shapes Framelit Dies.  The greeting is from the Spooky Cat Stamp Set.

Check out Stampin’ Up! Online for all your papercrafting and stamping supplies!

Halloween Candy Corn Treat Boxes

Halloween Candy Corn Treat Boxes

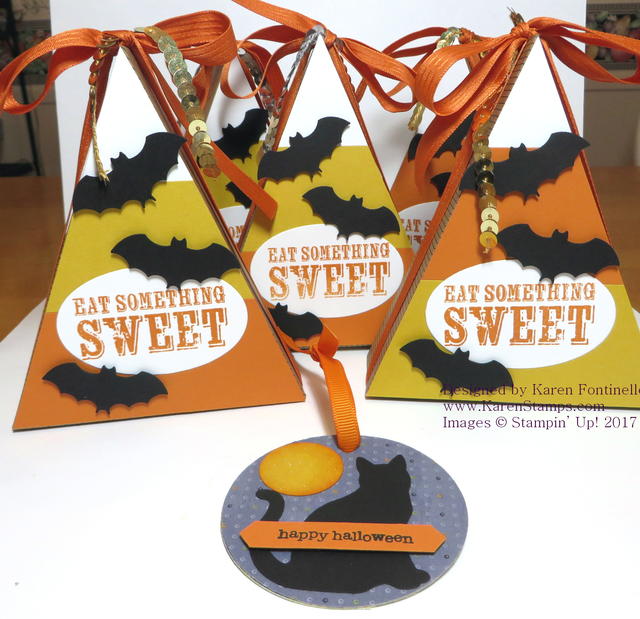
Someone asked me to make some kind of treat boxes for a school festival, and these Halloween Candy Corn Treat Boxes are what I came up with after looking at a whole bunch of ideas online. As it turned out, these were made with the boxes in a Paper Pumpkin Kit a couple of years ago. The kit came out in time for Thanksgiving and the boxes were designed to look like a piece of pie. Since it’s usually just three of us at Thanksgiving, I saw no need to make these boxes so of course I saved the kit. Sometimes hoarding is good!

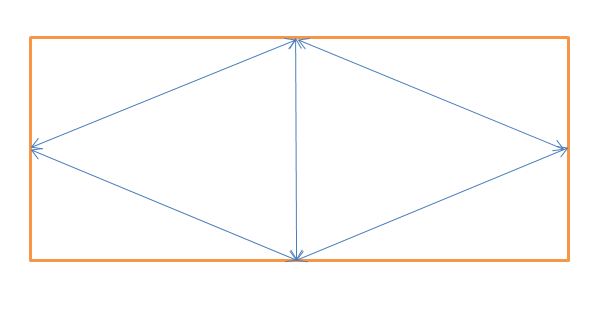
Even if you don’t have an old Paper Pumpkin Kit with pie shaped boxes, you can easily make your own triangle boxes yourself out of cardstock.  You can see one I made HERE in this post.  Just cut a strip of cardstock, score in half, then score from the halfway mark on each side to the middle point at each end.

Triangle Box Drawing

I pretty much copied the sample box I saw online. Instead of trying to cut the colored cardstock strips to an exact length and angle, which which have been a little difficult to measure ahead of time, I just adhered each “too big” strip onto the box lid and then trimmed off the excess length with scissors.  Just make the strips whatever width you like, no need to measure.  Just fit them on the box.

The bats were punched with a retired Bat Punch from Stampin’ Up!.  The greeting, as it turns out, after I searched through many old stamp sets, was from a Paper Pumpkin Kit!  Even when you make the project, you still have an exclusive little stamp set to keep! After filling the box with some candy corn in a cello bag, I closed up the box and tied the Pumpkin Pie ribbon around the sides and added a bit of Gold Sequin Trim. We used to have bigger sequin trim but now we have Mini Sequin Trim.

Just for an extra surprise in the box, I decided to make the little black cat Halloween ornament.  All that took was to die cut a circle out of lightweight cardboard and cover with designer paper.  In this case I used some retired paper. Then I used the Cat Punch, a small circle for the moon and sponged the edges, stamped the greeting from Teeny Tiny Wishes (still one of the best stamp sets!) and punched the greeting with the Classic Label Punch.

This was such a fun project to make! Try your hand at making the triangle box!  You can make so many variations for treats or small gifts for most any occasion!

SHOP STAMPIN’ UP! ONLINE HERE!

Easy Halloween Ghost Card

Halloween Ghost Card

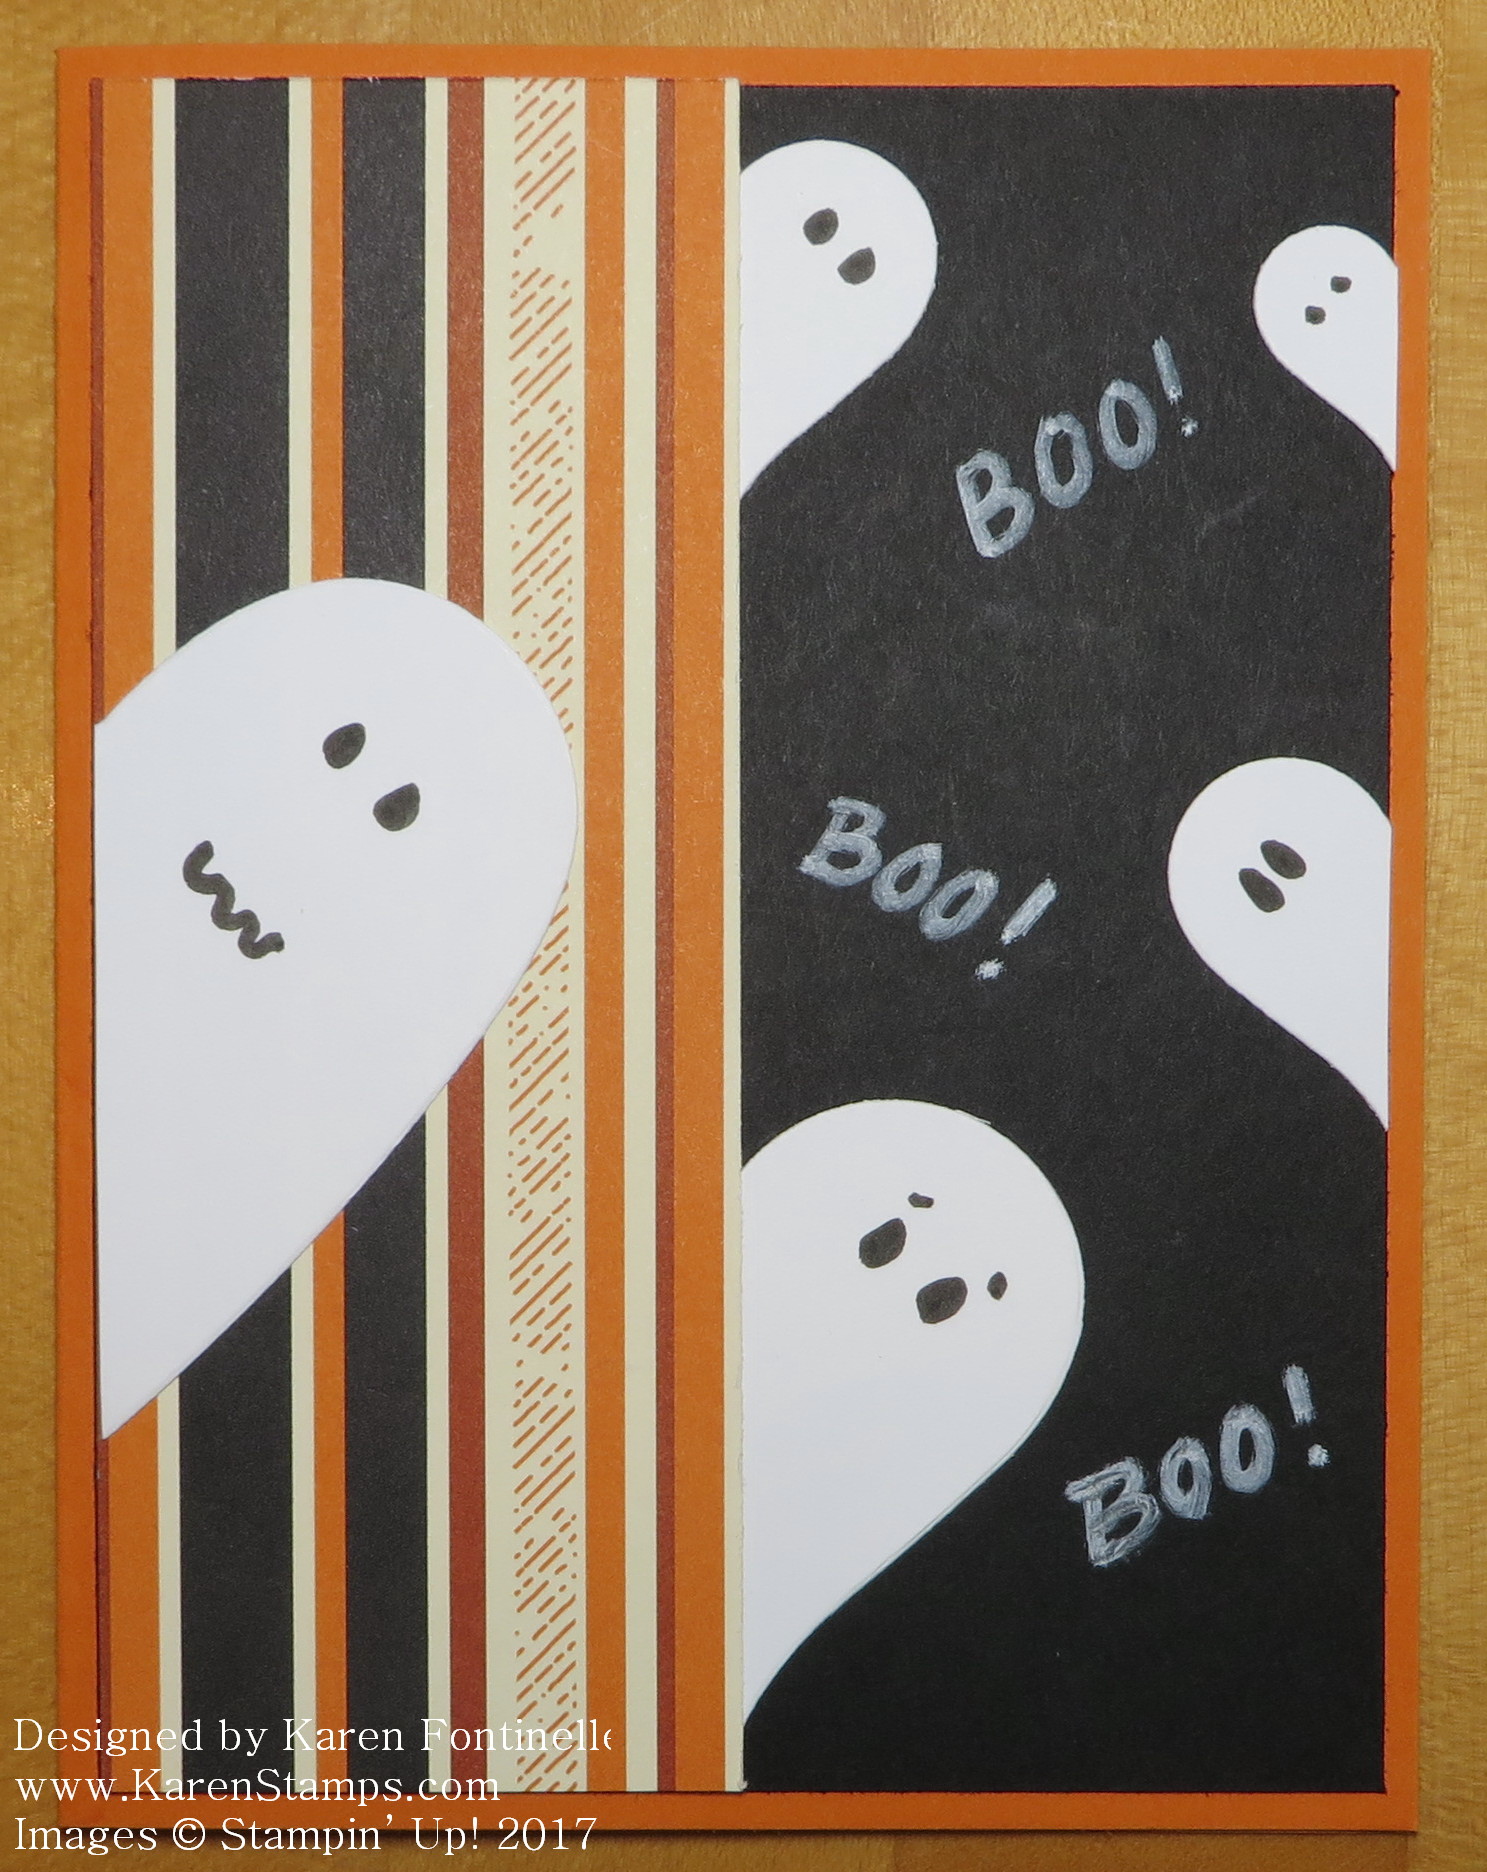
If you want to make a quick and easy Halloween card, this Halloween Ghost Card is it! This creative idea is actually one of the things that made me sign up to be a Stampin’ Up! Demonstrator fifteen years ago this month! Sometimes it’s the little things! I was already buying Stampin’ Up! products as a customer from my friend who introduced me to the company, when she suggested I sign up to be a Demonstrator, partly so we could go to the Convention together! When I visited her in October that year, she took me along to a team meeting of other Demonstrators and I got to see even more samples of cards and projects.  I was overwhelmed with all the creative ideas, but when I saw you could make a ghost out of half of a heart shape, I was sold! Who thinks of these things?!  And that thrill has never diminished for me as I see what other ideas stampers come up with!

This card base is Pumpkin Pie Cardstock with a Basic Black layer. The designer paper is Spooky Night.  The “Boo!” words are handwritten with the White Stampin’ Up! Chalk Marker.

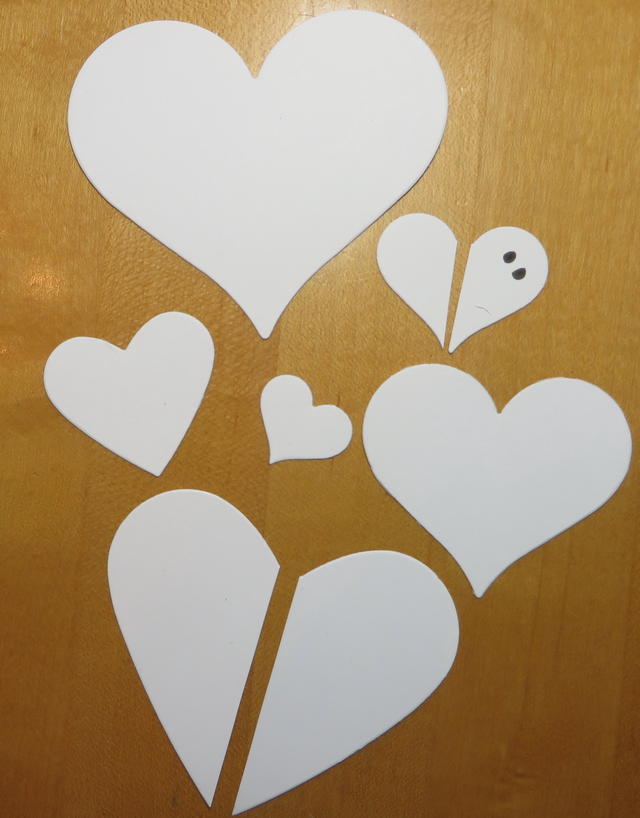
This is all you have to do to make this Halloween card. Die cut various size hearts with the Sweet & Sassy Framelits Dies. Or perhaps you have retired heart punches…..or just cut out some hearts with Paper Snips. After you get the heart shape, just cut it in half! Add some eyes or face or whatever you like to make a ghost!  Then put you ghost peeking out from the side of the card or project!

Heart Diecuts

Here is another card explaining the process with another sample!

I always love making Halloween cards and projects, but this was one idea, making ghosts out of hearts,  was one that really stuck with me!  Try it on any Halloween project you want to make!

SHOP STAMPIN’ UP! ONLINE TODAY!

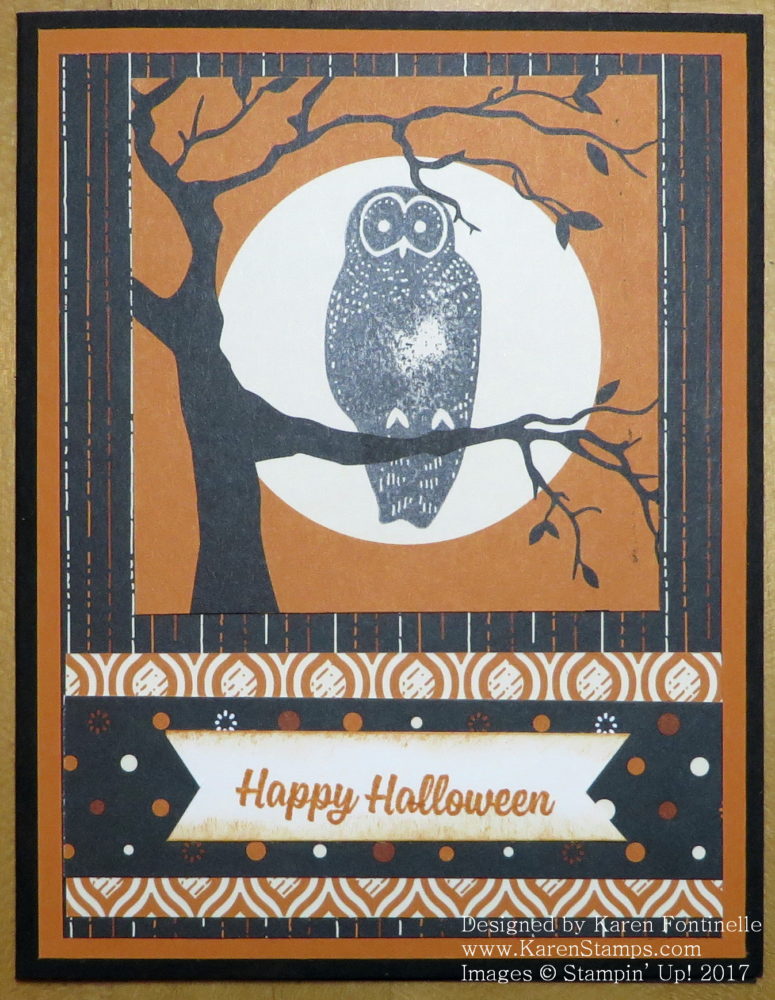
Easy Spooky Night Owl Halloween Card

Easy Spooky Night Owl Halloween CardIt’s certainly time for a Easy Spooky Night Owl Halloween Card.  I’ve used this Spooky Night Designer Series Paper a lot but hadn’t stamped the owl in the tree yet!  The paper comes printed with a partial tree and branch with the moon in the background, leaving space to stamp the owl from the Spooky Cat Photopolymer Stamp Set. I’m not into owls, but here is my token owl card since it came in the stamp set!

Except for stamping the owl and the greeting, this card is mostly about layering the various patterns of the Spooky Night Designer Series Paper.  The card base is Basic Black Cardstock with a layer of Pumpkin Pie Cardstock.  Then we have striped layer on top of the Pumpkin Pie with the owl and tree stamped piece on top of that,

At the bottom of the card are a couple layers of the Spooky Night Paper with the little banner stamped with “Happy Halloween” from the Spooky Cat Stamp Set.  The owl is also in this stamp set.

This card can be jazzed up more if you like, with some ribbon or Black Rhinestones. I was happy with it the way it was!

Click HERE to see a Halloween Treat Bag I made with the Spooky Night DSP.

Be sure you sign up for my Stamping With Karen Mailing List!  Get the latest news and offers from Stampin’ Up!, plus cards and projects from me with the supply list and instructions. And right now I’m sending out my special 12 Weeks of Christmas holiday emails once a week on Wednesdays with a new holiday project and instructions each week!  And it’s all FREE!  Sign up in the red box below!


Subscribe to My Mailing List! 

Exclusive Projects

Stampin’ Up! News & Updates

FREE Welcome Gift!

We respect your email privacy

I hope you enjoy my Easy Spooky Night Owl Halloween Card!  Just gather your stamps, ink,  and paper and make a Halloween card for someone special!  Have fun with this holiday!

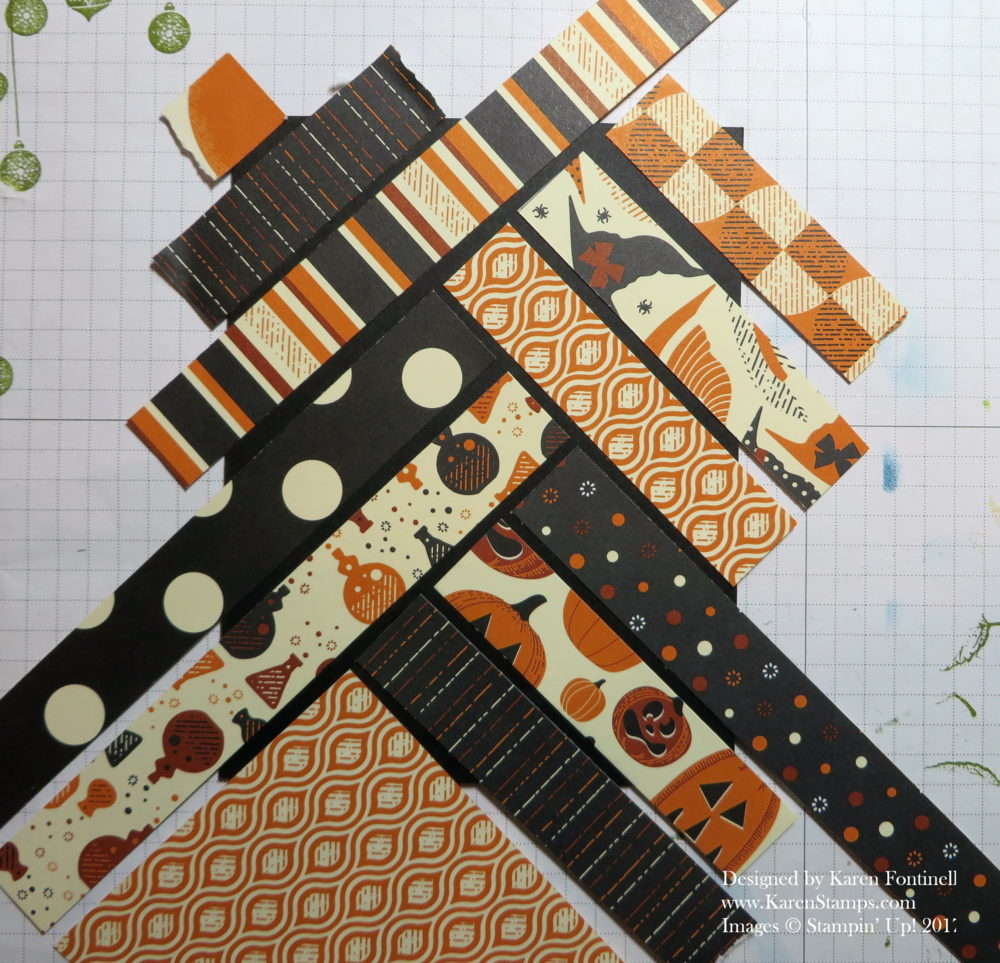
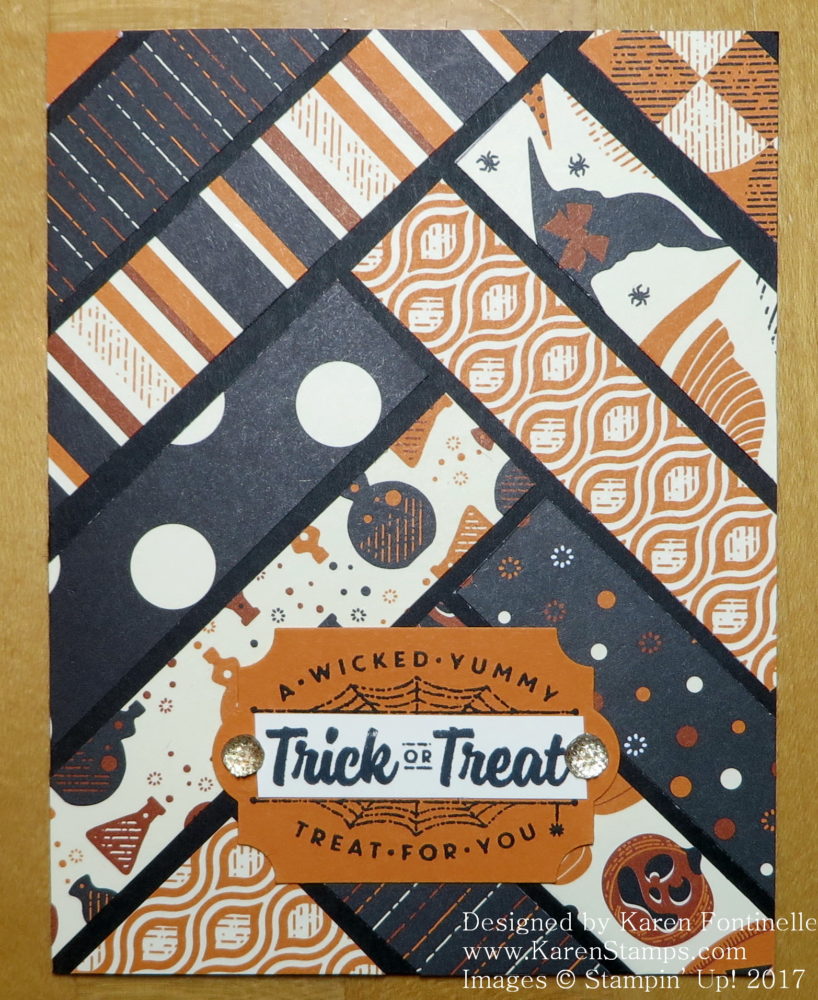
Spooky Night Scrap Card For Halloween

Spooky Night Scrap Card Assembly

This is the beginning of a Spooky Night Scrap Card For Halloween! Can you imagine this will become a card? It’s actually a fun way to use up scraps of designer paper that you may have to make a Halloween card. Of course you can use any designer paper and any cardstock to make a card for any occasion using the same technique!

I started with a card base of Basic Black and adhered these strips right on the card front.  If you preferred, you could adhere the strips on another piece of cardstock to layer on top of the card base. It’s better to do it that way if you want to wrap ribbon around the card front.

This card just began with laying one 3/4″ strip of the Spooky NIght Designer Series Paper diagonally across the card front.  Then everything else plays off of that piece.  You can make the pieces touch if you prefer.  I left a small space in between the strips.

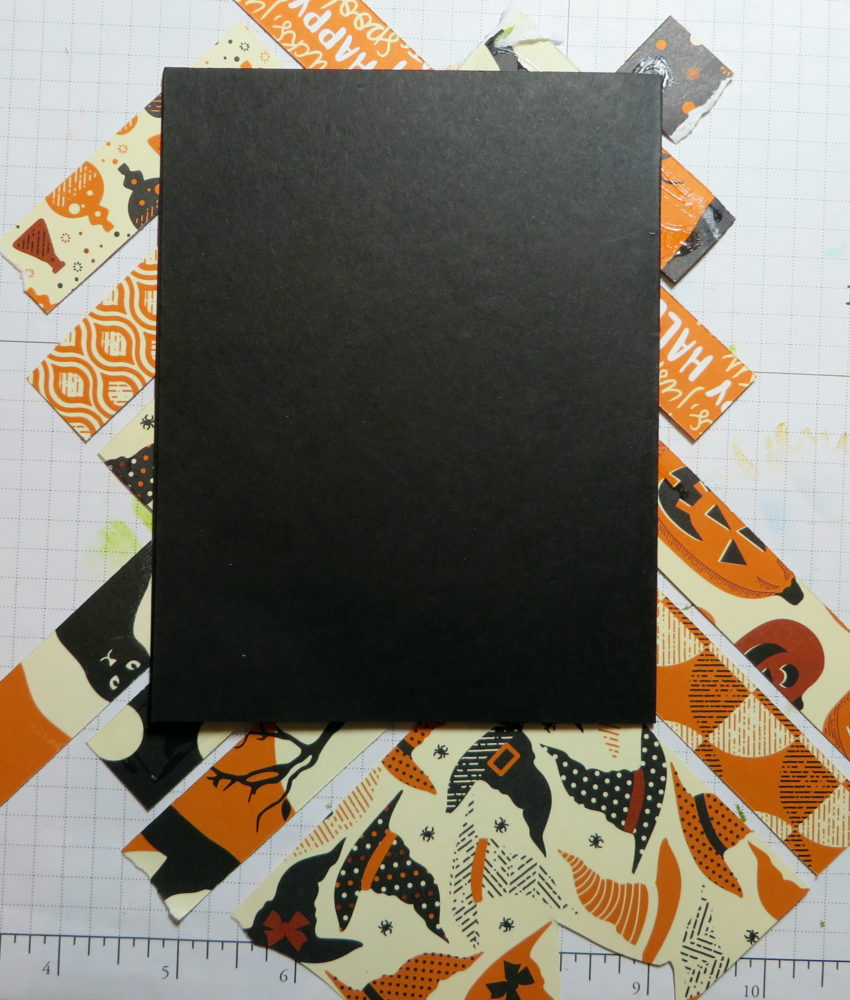
After all the pieces were glued down with Multipurpose Liquid Glue (to give me some wiggle room to place them properly), I flipped the card over.  It’s easier to let the strips extend off the card than to try to cut them to an exact length and angle.

Spooky Night Scrap Card Assembly BackTake a scissors and trim the excess strips off from the back.  That’s the easiest.  You might have to clean your scissors later from getting a bit of glue on them but that’s okay.

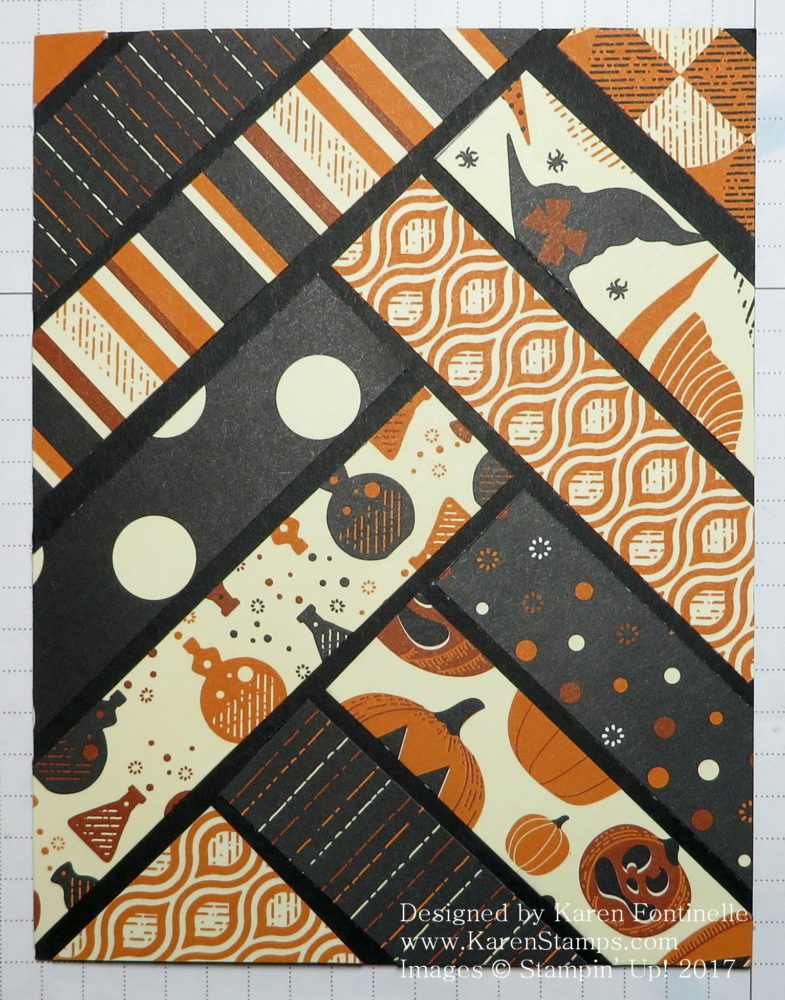
Spooky Night Scrap Card Assembly Front

After trimming the excess paper strips, the card front will look like this!  Then just finish embellishing the card or whatever you would like to do with it.  I stamped a greeting in the Spooky Cat Stamp Set.

Spooky Night Scrap Card For Halloween

Don’t forget the Designer Paper Sale going on through October!  Good time to stock up on the select papers!  Buy 3 Get 1 Free!

Try your hand with this technique of using scraps adhered to the card front and make something like my Spooky Night Scrap Card For Halloween.

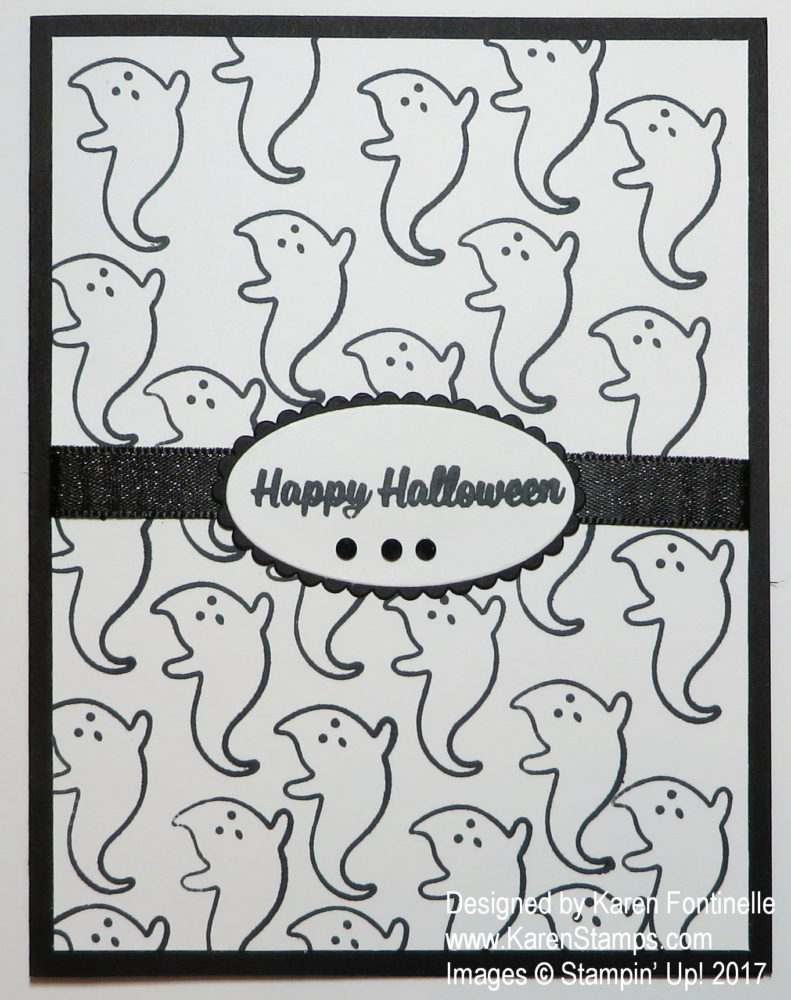
A Halloween Ghost Black & White Card

A Halloween Ghost Black & White CardThe other day when I was stamping with the ghost in the Sweet Home Stamp Set, I got the idea to make a card like this Halloween Ghost Black & White Card. That little ghost is just a fun one to stamp!

This card couldn’t be simpler to make!  It’s all just black and white!  Of course you could change it up any way you wanted to, by adding other colors, for example! Maybe stamping fewer ghosts randomly on the card front. Whatever suits your Halloween fancy!

The card base is Basic Black Cardstock. The stamped layer is Whisper White!  You probably guessed that already!  I stamped that little ghost just randomly on the paper trying to fill up almost all the space. Since it was a photopolymer stamp I used my Stampin’ Pierce Mat just in case the stamp needed a little cushioning. In order not to get ink on my mat, I covered the mat with a scrap piece of computer paper so I could stamp ghosts off the edge of the cardstock in places.

The greeting is from the Spooky Cat Stamp Set. First I tried punching the greeting with the Classic Label Punch and layering it on Basic Black, but I didn’t quite like that small size. Next I stamped the greeting again and die cut it with an oval in the Layering Ovals Framelits Dies and then layered that on one of the scalloped dies in the set in Basic Black.

The ribbon is the Basic Black 3/8″ Shimmery Ribbon.  I think you can see a bit of the shimmer in the photo.  Very pretty ribbon and perfect for Halloween! And finally I added a few of the Black Rhinestone Jewels on the greeting. I tried them randomly scattered but didn’t like that so I just put them in a row!

This Halloween card reminded me of a baby card I made HERE in this post.

If you need some quick and easy ideas for Halloween cards, try this Halloween Ghost Black & White Card!

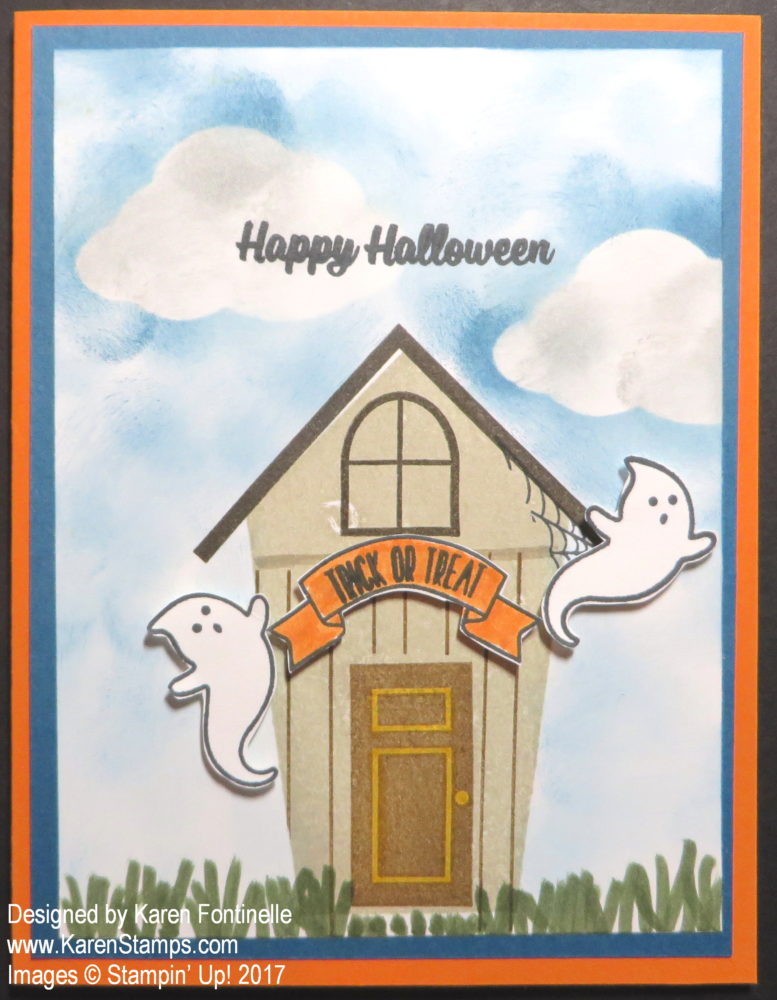
Sweet Home Haunted Halloween House Card

Sweet Home Haunted Halloween House CardHow fun to make this Sweet Home Haunted Halloween House Card with the Sweet Home Stamp Set that came out last year. I’d almost forgotten about it.  Be sure to look at ALL your stamp sets from time to time and not totally get caught up in the current seasonal catalog!  There are great sets and products in the regular Stampin’ Up! catalog, too!
The card base is Pumpkin Pie Cardstock and I was going to use Basic Black for a layer but then decided to use Dapper Denim Cardstock to match the ink I was using for the sky. The black you see is just the paper I laid the card on for the photo, but it does look good with it so you could have the card base be black if you wanted!

The Sweet Home Stamp Set has images for little houses that can be designed for any season.  There are matching dies, the Home Sweet Home Thinlits Dies , that can be used to cut out the various pieces and even make the homes 3D. For today I just wanted a stamped haunted Halloween house. After stamping the house and the various parts on to it, I stamped and cut out two ghosts and the banner.  I used a Stampin’ Write Marker to draw in some grass at the bottom of the card, because, well, you should have grass and because there was a slight stamped line out of place that I needed to cover up!

The sky is sponged in with a Sponge Dauber and Dapper Denim Ink around a punched out cloud from the Tree Builder Punch.  Then I went back over the clouds likely with some Smoky Slate Ink.

The ghosts and banner are popped up with the Mini Stampin’ DimensionalsBoy, were those handy on those small pieces!  Be sure to get some on your next order!

The “Happy Halloween” greeting at the top is from the Spooky Cat Photopolymer Stamp Set. There are other ways you could embellish this card even more but I was sticking with relatively simple today!

Here is another card I made with the Sweet Home Stamp Set, so you can see how versatile it can be!  It’s a fun stamp set to have for lots of holidays or any occasion, and if you like a physical little house, be sure to get the Home Sweet Home Thinlits Dies.

Have fun making a Halloween card for a friend or loved one like this Sweet Home Haunted Halloween House Card.

Halloween Card Made with Scraps

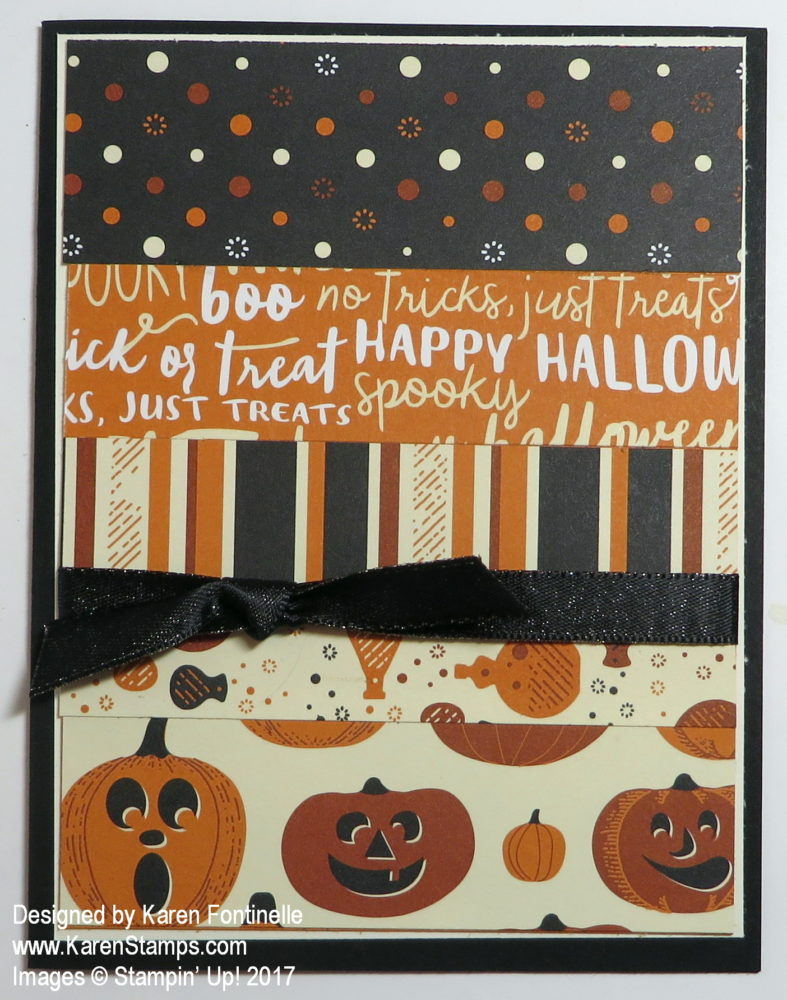
Halloween Card Made with ScrapsThis is an easy and fun way to make a Halloween card using scraps of Halloween designer paper!  You can do this type of card for any occasion using any paper, even just plain cardstock in different colors. This card could even be embellished more but I chose to leave it simple.
The card base is Basic Black with a slight Very Vanilla layer. The paper strips are actually glued on to a piece of Pumpkin Pie cardstock. It’s easier to glue strips on to a piece of cardstock, trim the ends, and then layer that on the card than to try to get everything straight directly on the card. This is a great way to use up some scraps you have leftover from other projects. The strips can be the same size or they can be different widths. Just play around until you make them fit on the card. If you are layering on a piece of cardstock, you don’t have to worry about the length of the strips.  Just glue them down and then trim the ends from the back of that cardstock before adhering to the card front.

On this card I just tied on a piece of Basic Black 3/8″ Shimmery Ribbon.  I could have punched out a cat or cut out a pumpkin or added a greeting, but since the Halloween words were part of the paper, I just let that be the greeting.

The Spooky Night Designer Series Paper is a fun package to use for Halloween, and not all the sheets are exclusively for Halloween.  They can be used for other fall cards and projects.

Be sure to check out the Spooky Night Suite of products in the Holiday Catalog!

Halloween Witch Trick or Treat Candy Treat Box

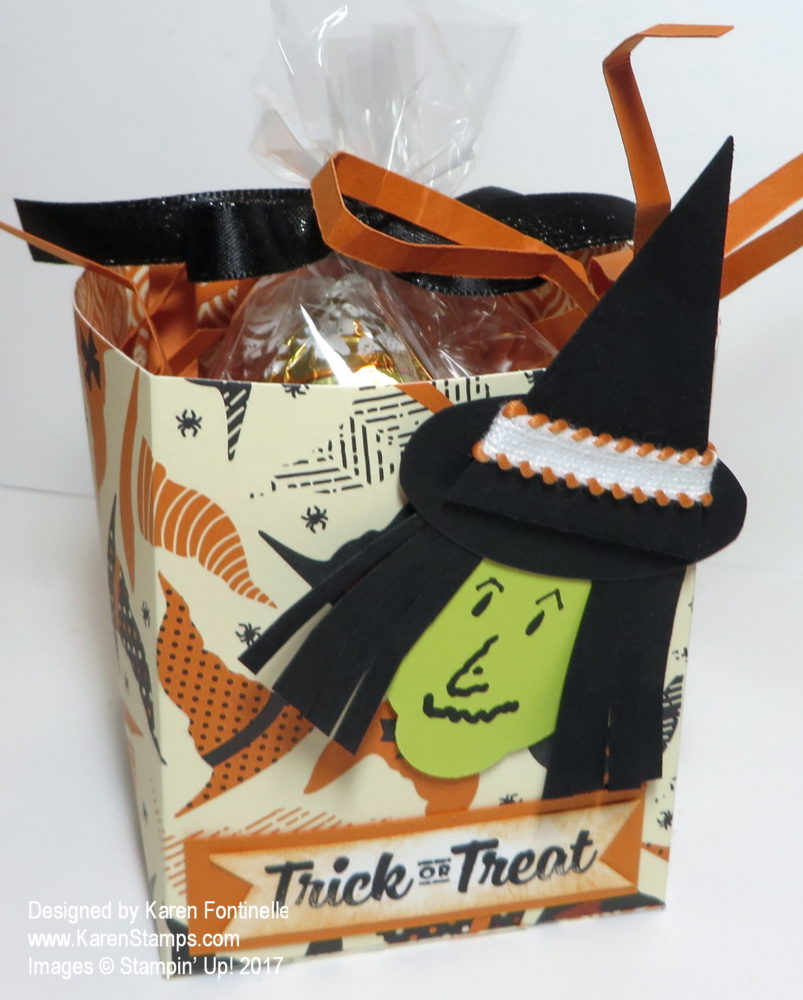
Halloween Witch Trick or Treat Candy Treat BoxHere’s a fun Halloween Witch “Trick or Treat” Candy Treat Box to make for Halloween! I think it is the witch on this project that makes it interesting (although I could have made her face better I think!).

Remember the little Fall Treat Bag I made the other day on THIS blog post?  This treat box is made the exact same way, except it is not as tall and I left it open instead of closing the top! This box is about 3 1/4″ tall. I made it with the witch’s hat pattern in the Spooky Night Designer Series Paper.  For the treat inside, I used a Cello Bag to hold some chocolate candy (of course!) and tied with the Basic Black 3/8″ Shimmer Ribbon.  You can make your own “shred” to put in a gift bag or a treat box like this one by just cutting very narrow strips of cardstock and then crumbling it up in your hands as tight as you like!  The greeting is stamped from the Spooky Cat Photopolymer Stamp Set. I even sponged it a little with Pumpkin Pie ink.

Let’s talk about the witch!  I took out a scrap of Lemon Lime Twist Cardstock to possibly punch with a Circle Punch for the witch’s face.  This particular scrap already had a piece punched out with the Pretty Label Punch.  I saw that and thought that, at least, the bottom portion, lengthwise, could look like a witch’s face with a chin! Do you see it??

Lemon Lime Twist Punch outThat’s how I came up with the witch’s face using the Pretty Label Punch!  Then I just cut a triangle and an oval for her witch’s hat and added a small strip of the Pumpkin Pie 1/4″ Stitched Ribbon on her hat band. For her black hair, I just cut a scrap of Basic Black Cardstock and snipped it to look like hair for each side.  No special directions, just play it by ear!  I could have drawn on her face better but I didn’t give it much thought!  I was excited to make her face out of the Pretty Label Punch!
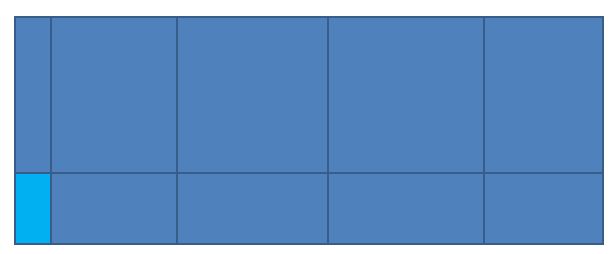
Box Diagram

Remember, check out my blog post HERE to see all the directions for making this box, but above you see the diagram.  For this box, since I wanted it to be shorter than the fall treat bag, I made it shorter than the 6″ width, about 5 1/4″.  The paper is 12″ long.  Score for the bottom flaps with the paper lengthwise at 2″.  Then turn the paper sideways, like the diagram, and score at 1″, 3 3/4″, 6 1/2″ and 9 1/4″. Cut out that little section I have marked with light blue. Fold and crease all the scored lines and assemble the box.

Don’t forget to subscribe to Paper Pumpkin so you get your October and November holiday kits in the mail!  Join Paper Pumpkin HERE!

Shop Paper Pumpkin Today!

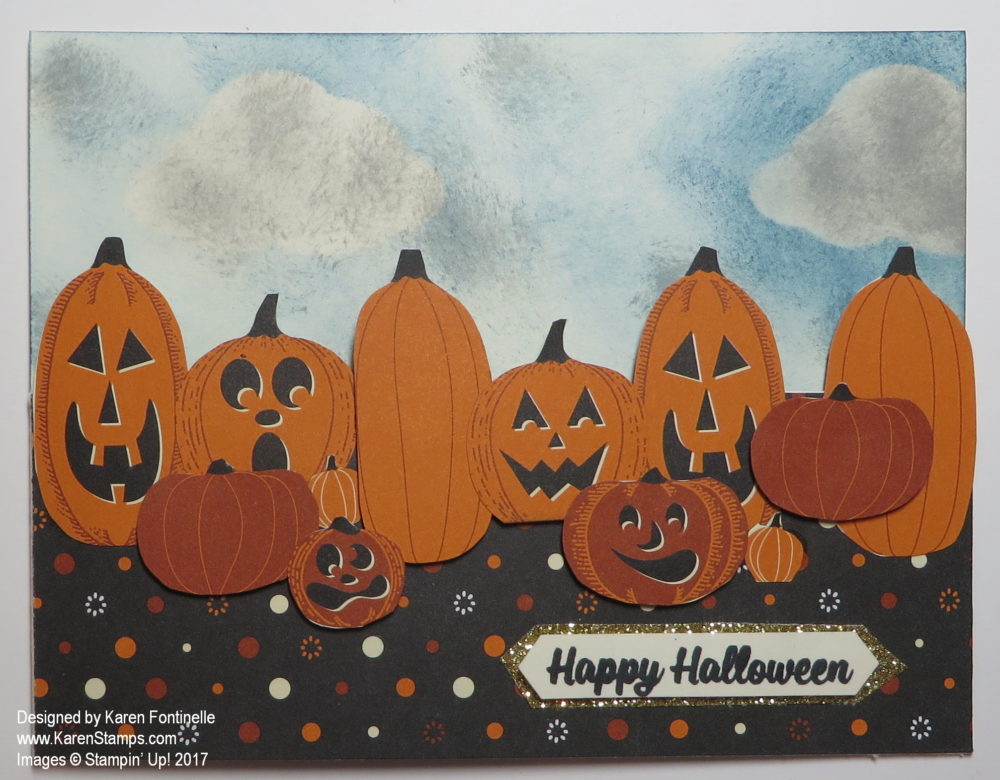
Pumpkins Halloween Card

Pumpkins Halloween CardThat’s a lot of pumpkins on this Halloween card!  They are actually from the Spooky Night Designer Series Paper in the Stampin’ Up! Holiday Catalog.  I got the idea for this card from one on Pinterest from several years ago, so I used the basic format and changed my design a little bit.
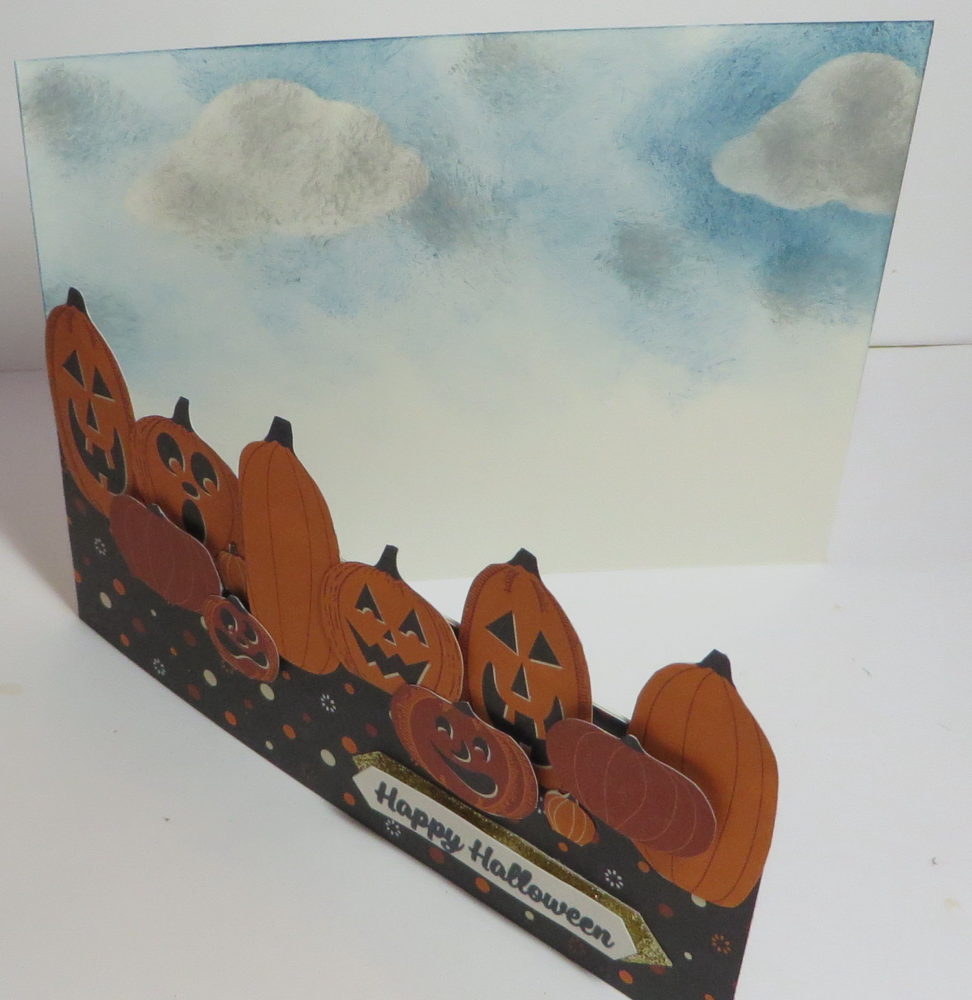
Pumpkins Halloween Card

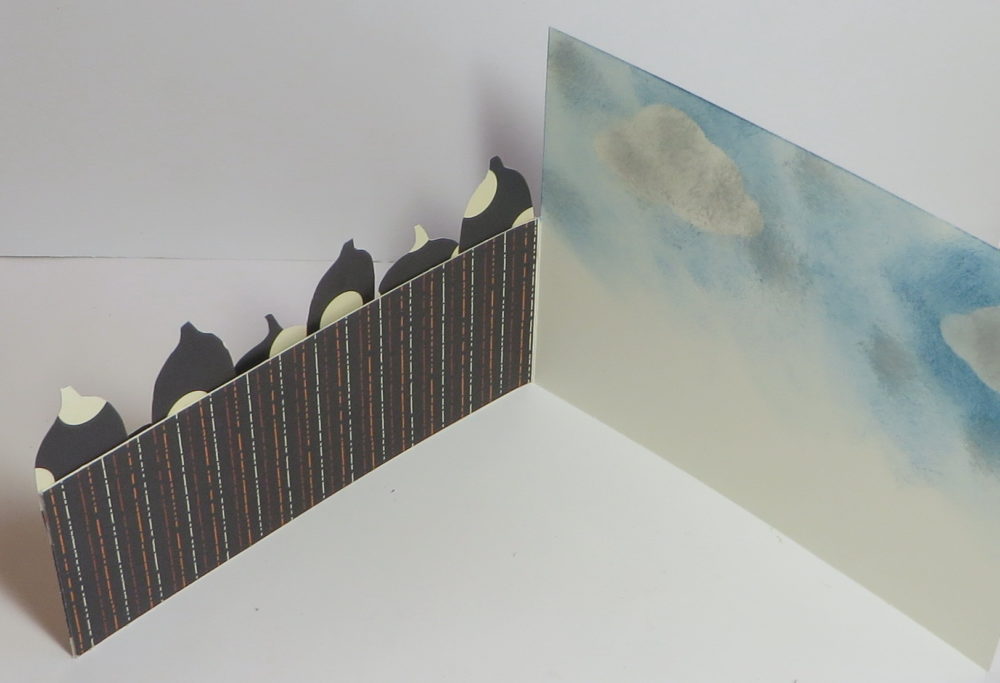
As you can see, the card base is a little different.  The fold is on the side for one thing.  I cut the Very Vanilla Cardstock in half lengthwise on the 8 1/2″ x 11″ paper instead of horizontally.  Cut the cardstock in half at 4 1/4″ x 11″, score at 5 1/2″ and fold. Now cut off the top half of the front of the card. You can make this measurement whatever size you want, but I just cut mine in half. Make sure you know which side is the front of your card and which way it opens, then cut on the fold line down to wherever you want and then across the front. My bottom piece (and same as the piece I cut out) is 5 1/2″ x 2 1/8″.  You can save the cut out piece for some other use.

When I had the basic card formed, I adhered a more neutral piece of the Spooky Night Paper to that front portion.  You could also layer with other colors.  I added a different pattern to the inside front of the car. See the photo below.

Pumpkins on a Halloween Card InsideFor the pumpkins, there is a sheet of paper in the Spooky Night Paper that is all pumpkins! Some of the Patterned Pumpkins Thinlits Dies fit some, but not all, of these printed pumpkins. You can use your Big Shot and dies to cut out the pumpkins that fit.  Since I was watching TV, I decided it was just as easy for me to hand cut the pumpkins with Paper Snips scissors. If you like cutting with a scissors, it’s very relaxing to cut mindlessly while watching TV! If you hate cutting, then use the Big Shot! I cut enough pumpkins to fit totally across the front of the card and some for in front of that row along the edge.  I wanted LOTS of pumpkins!
Some of the pumpkins I glued with Mulitpurpose Liquid Glue and some I popped up on Stampin’ Dimensionals. Just be careful with the glue that you know the exact pumpkin placement so that you don’t get glue on the back part that shows.  You don’t want the pumpkin glued to the inside of the card!  I didn’t worry about the backside of that paper showing when the card was opened, and fortunately it was an okay pattern to show.

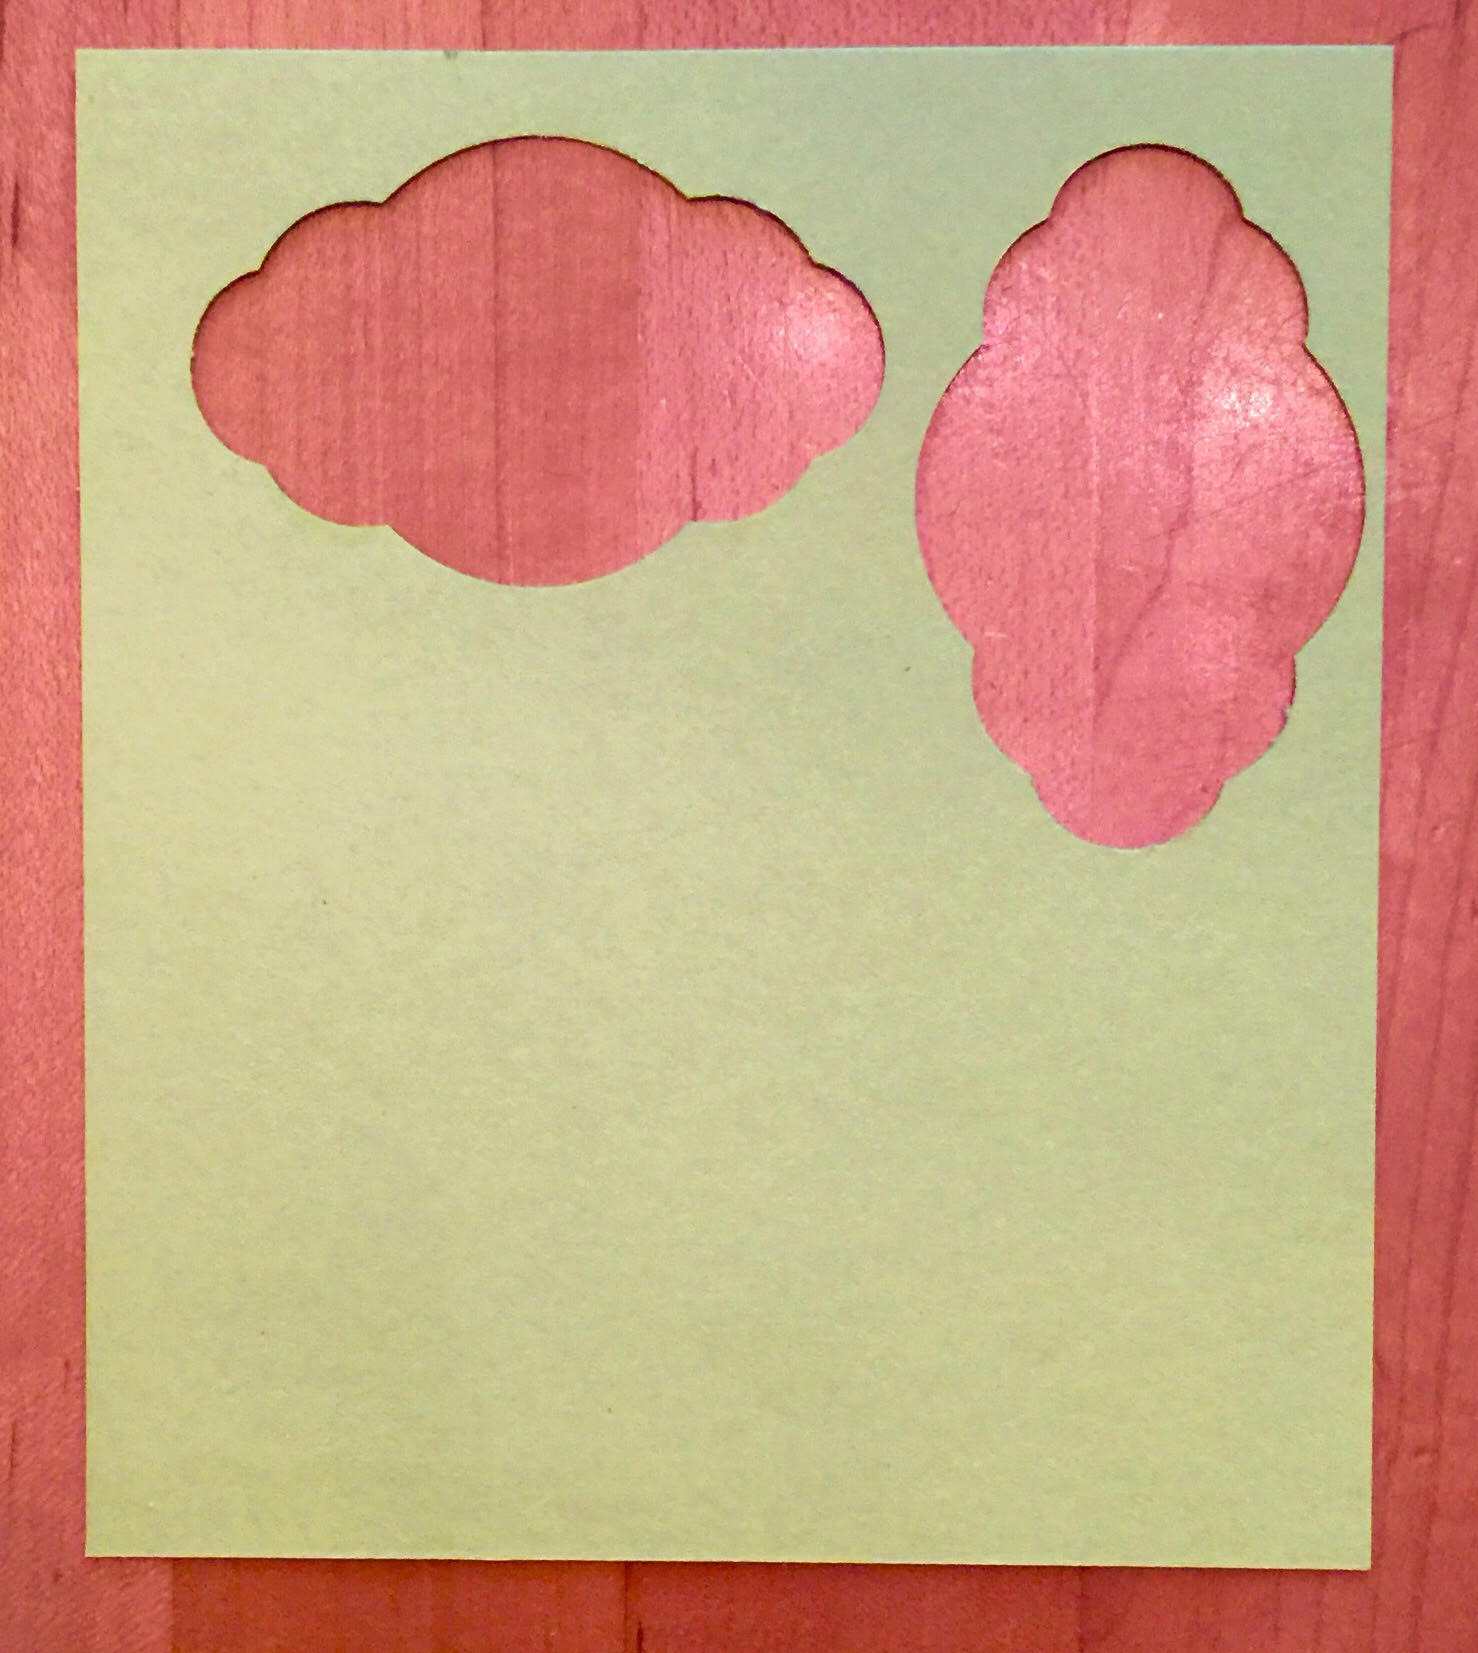
For the background, I sponged with ink and Stamping Sponges.  I always cut my sponges into pieces.  Some people like to make a portion of a sponge for each color and label them. I already had a cloud template cut out from the Tree Builder Punch.  I just save it and then sponge around the edges to make a cloud…..make a cloud by sponging blue around what will show up to be the white cloud! So it’s really a “mask” to keep from getting ink in a space.  I sponged on some sky with Dapper Denim ink and some gray floating clouds with Smoky Slate ink.  That makes it look a little spooky!

The greeting is from the Spooky Cat Photopolymer Stamp Set, punched out with the Classic Label Punchand layered on a piece of Gold Glimmer Paper, a scrap I had laying around!

This was really an easy card to make!  And I love the end result, if I do say so myself!  Try something like it and see what you come up with! You can copy exactly or you might have a different idea! Get yourself some pumpkins and make a Halloween card today!

SHOP STAMPIN’ UP FOR ALL YOUR HALLOWEEN PAPERCRAFTING NEEDS!


Halloween Card with Spooky Cat

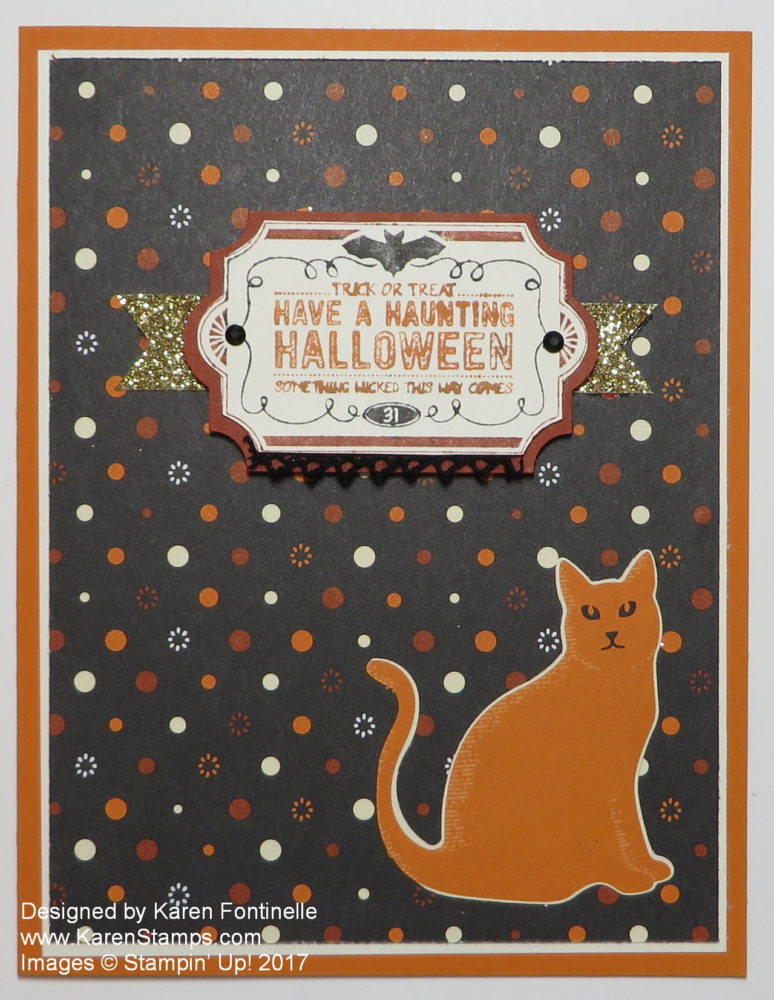
Halloween Card with Spooky Cat

Here’s a pretty easy Halloween card to make with a spooky cat!  If you are a cat lover, Stampin’ Up! has made it easy for you this fall season to enjoy cats!  We have the new Spooky Night Designer Series Paper with a whole page of cats!  And Stampin’ Up! makes it even more fun with the new Cat Punch!  How crazy is that?!  You can use the Cat Punch on both the designer paper and on stamped images!  This cat is punched out of the designer paper and adhered on to the card.

Some of the coordinating colors with this Spooky Night Paper are Pumpkin Pie and Cajun Craze. For this card, I made the card base Pumpkin Pie and a polka dot panel of the designer paper.  To make the paper stand out a bit, I put a narrow layer of Very Vanilla behind it.

One of the fun stamp sets this season is the Labels To Love Stamp Set. It has enough greetings to cover several occasions and has a cute one for Halloween. I used the Stampin’ Write Markers in Basic Black, Pumpkin Pie, and Cajun Craze to color directly on the stamp to get a multi-colored look.  The fun thing about the labels in this stamp set is that there is a punch to match – the Everyday Label Punch by Stampin’ Up!  Since I wanted to layer the stamped Very Vanilla piece on to Cajun Craze I had to trim down the Very Vanilla label.  It was pretty easy with my Paper Snips and just following the lines on the label itself to make it a little bit smaller. Then I just punched a plain label of Cajun Craze.

To jazz things up a little bit, I did three things.  Before I layered the labels I adhered a bit of the Vintage Crochet Trim in Basic Black in the Holiday Catalog to the bottom of the vanilla label. Next I made a little Gold Glimmer banner to go underneath the label and adhered the label with Stampin’ Dimensionals. And for just a finishing touch, I stuck on two Black Rhinestone Jewels. They are already black so you don’t have to color the regular rhinestones yourself!

It’s time to make Halloween cards, so check out the Holiday Catalog and all the great products so you can order what you want for cardmaking or Halloween partying!

SHOP STAMPIN’ UP! FOR ALL YOUR HALLOWEEN NEEDS!