Merry & Bright Lights Christmas Card

Merry & Bright Lights Christmas Card

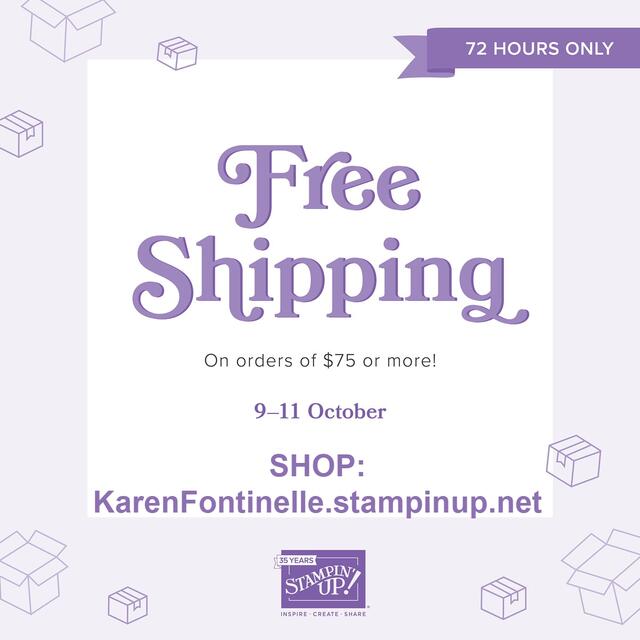
Special Note! Today, October 11th, is the LAST DAY for FREE SHIPPING (with a $75 minimum order!). Don’t miss it!

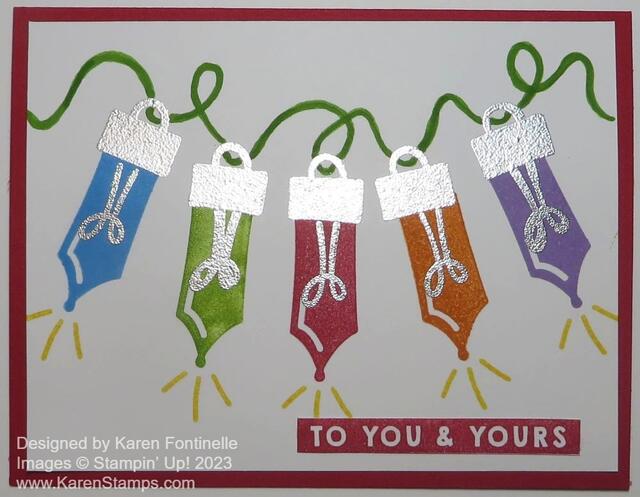
For this Merry & Bright Lights Christmas Card I wanted just to stamp the little light bulbs and see what I could do without die-cutting or cutting out. It turned out to be a fun card to make! I used the Merry & Bright Stamp Set in the Stampin’ Up! Holiday Mini Catalog on page 9. You can purchase the whole Merry, Bold & Bright Suite if you want all the fun things! I especially love the Merry Bold & Bright Designer Series Paper! I didn’t use it on this card, but I’ve used it on others.

The card base is Real Red but you can choose any color to match the color you use on the card. The stamping of the lights is done on Basic White. I used Azure Afternoon, Granny Apple Green, Real Red, Pumpkin Pie, and Highland Heather ink to stamp the small bulbs. I love that this stamp set gives you two styles of Christmas bulbs to choose from!

After stamping the bulbs, I used Versamark ink to stamp the metal portion of the bulb and then used Silver embossing powder to heat emboss it. I also embossed the little filament inside the light bulbs with silver to make them stand out.

For the wire holding all the bulbs on the strand, I used a Granny Apple Green Stampin’ Write Marker and drew a curvy line connecting all the bulbs and looking like they are ready to be strung on the Christmas tree or outdoors on the house. I just free-handed the line but first I drew it with the tip end of the marker, then went over it with the brush tip. If you are unsure about freehanding this wire, draw it with pencil first and then go over it with the marker. You don’t have to be fancy, just make a line going through all the lights.

There also is a stamp to denote the brightness of the light bulbs, so I stamped that in Daffodil Delight at the tip of each bulb.

I used the greeting inside the stamp set and then cut it out along the colored edges and adhered it near the bottom corner of the card.

On the inside of the card, on Basic White cardstock, I stamped a greeting in different colors using the word stamps in the stamp set. Fortunately, they came out pretty straight and even! Then I stamped a Pumpkin Pie light bulb with a Smoky Slate light base. The filament inside the bulb is stamped with the same color as the bulb, Pumpkin Pie, but it shows up because it is a narrow image. Then I drew another green wire as I described above.

Certainly this Merry & Bright Stamp Set is a fun one to use!

SHOP STAMPIN’ UP! ONLINE HERE!

Three Days of FREE SHIPPING at Stampin’ Up!

Free Shipping Boxes w_Info

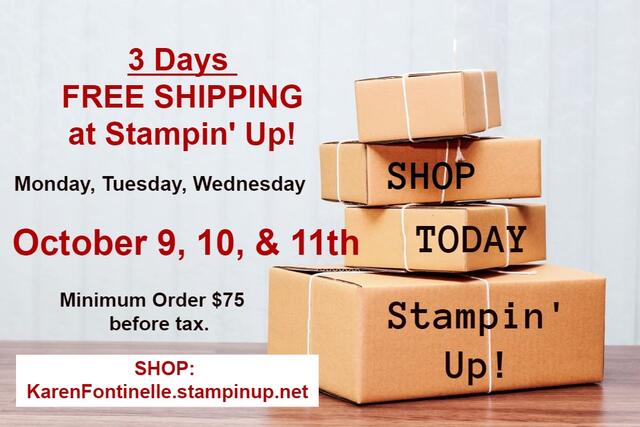
To continue celebrating World Card Making Day, after their fun virtual stamping event on Saturday, Stampin’ Up! is offering FREE SHIPPING for not just one day, but for 3 DAYS!!

Your order must be at least $75 before tax. If you need to add a little extra, check out the Clearance Rack or maybe treat yourself to a Prepaid subscription to Paper Pumpkin!

Have fun shopping HERE!

Shining Christmas Trees Card

Shining Christmas Trees Card

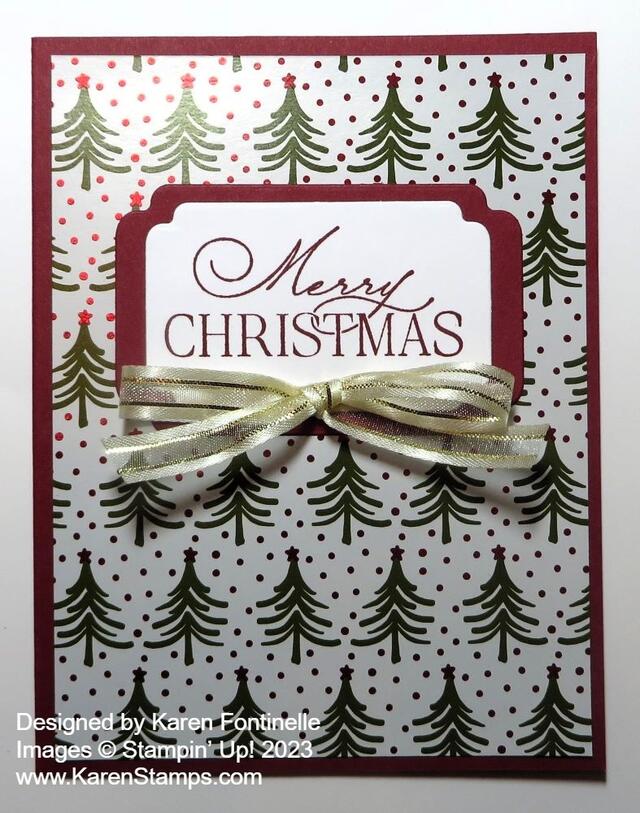
I almost forgot that I had this paper and forgot where it came from! However, it was fun to use it to make this Shining Christmas Trees Card! This is a super easy card to make yet looks elegant enough to send out for your Christmas cards. It is good for making multiples. You don’t want something too complicated to make if you are mailing out 50 Christmas cards or whatever the number is!

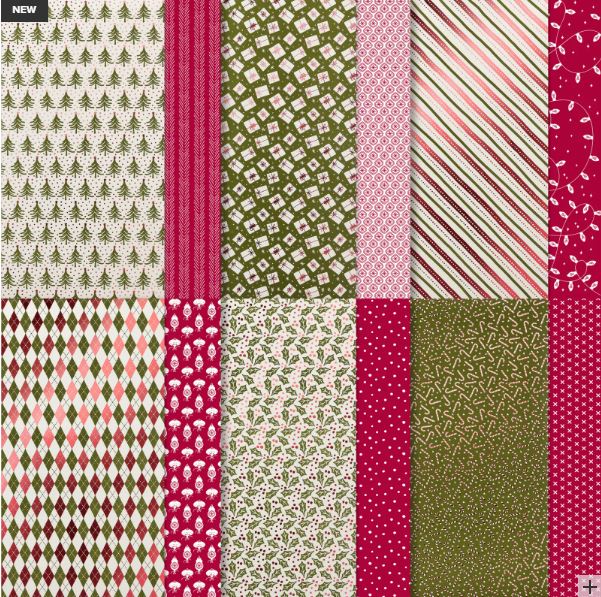
I used the Shining Christmas Specialty Designer Series Paper to make this card. You will find it in the Stampin’ Up! Online Exclusives, not in the Holiday Mini Catalog. The whole paper is slick with shiny accents on each one, like the stars and the red dots in between these Christmas trees! Really pretty!

One of the coordinating colors for this paper is Cherry Cobbler. Really the only other colors are Mossy Meadow and White! So that is easy! I used Cherry Cobbler for the card base and then added the Christmas tree patterned paper.

The greeting is stamped from the Brightest Glow Stamp Set (one carried over online from last year. It is stamped in Cherry Cobbler ink. I love the look of this greeting and have used it a lot. It was then diecut using a label shape in the Something Fancy Dies. This is one of those basic, very useful die sets. Then I cut the next larger shape out of Cherry Cobbler for a layer underneath the greeting. For a little embellishment, I adhered a bow tied with the very pretty Gold & Vanilla 3/8″ Satin Edged Ribbon.

If you didn’t have or didn’t care for Cherry Cobbler, I think you could use Real Red and no one would notice or chastise you! On the inside, add a white layer so you can stamp a message or write a note. Maybe adhere a strip of the same designer paper at the bottom or down the side of the inside layer for a little surprise decoration when the person opens the card!

I’m sure you could add some sparkly gems to this card, maybe just Iridescent Rhinestones because they would add sparkle without taking away anything from the card. But surprisingly, I just stopped after I added the ribbon!

Shining Christmas Paper
© Stampin’ Up! 2023

COMING MONDAY, OCTOBER 9-11!!

FREE SHIPPING on orders of $75 or more!

WCMD Free Shipping 2023

Happy World Card Making Day 2023!

WCMD 2023 Sq Ad

Join everyone online this afternoon at the virtual

Stampin’ Up! World Card Making Day Event!

It is for EVERYONE and it is FREE!

Follow along, stamp along, or just watch for fun and relaxation as Stampin’ Up! provides just under three hours of stamping and creating three unique cards.

TIME: 2:00 – 5:00 PM (MT)

3:00 – 6:00 PM (CT)

CLICK HERE TO JOIN THE EVENT!

AND….After the World Card Making Day Event, Stampin’ Up! is having three days of FREE SHIPPING with a $75 order. Free Shipping will be Monday, Tuesday, & Wednesday, October 9-11, 2023! After the event, make out your Shopping List and pick up a few things without paying shipping. Your order must be $75 in merchandise before tax.

WCMD Free Shipping 2023

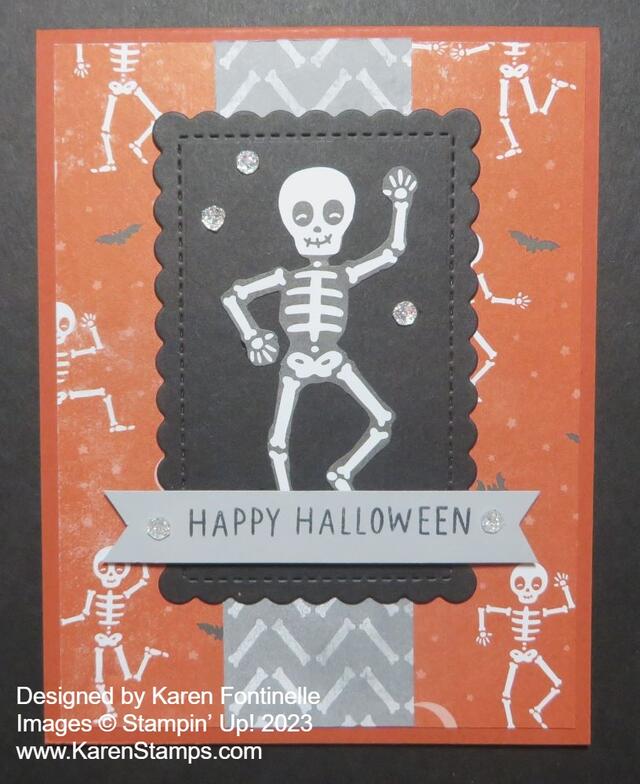
Them Bones Skeleton Happy Halloween Card

Them Bones Skeleton Happy Halloween Card

Here’s a fun Halloween card, the Them Bones Skeleton Happy Halloween Card, that I came up with playing around with the Them Bones Designer Series Paper. This paper has cute skeletons to use one way or another on Halloween projects. There is even the paper I used that has a design made of bones!

The card base is made with Cajun Craze cardstock. I cut it at 4 1/4″ x 11″ and scored at 5 1/2″ with the fold at the top. Then I added a layer of the Them Bones Paper with a bunch of little skeletons dancing around!

I cut a 1 3/4″ x 5 1/4″ strip of designer paper with the bones pattern to use somewhere on the card, likely on the side. But I tried it down the center of the card, and I liked that. By chance, there was already a black cardstock scalloped rectangle just the right size, cut with the Scalloped Contours Dies, in my package of cardstock so I just used it!

Since I don’t own the Bag of Bones Dies in the Them Bones Suite, I simply cut out the skeleton from another piece of the Them Bones Designer Paper with my Paper Snips. If you hate fussy cutting, then you need the dies and there are lots of fun dies to use in this set!

The greeting is stamped on Smoky Slate cardstock with Memento Black ink. The greeting is from the Paper Pumpkin Kit from September 2022 that happened to be lying on my table. I liked the one line that I could stamp on a narrow strip with flagged ends to pop up over the bottom of the skeleton’s legs. There is also a “Happy Halloween” greeting in the Pick of the Patch Stamp Set.

I added some Adhesive-Backed Glitter Sequins in white around the skeleton and on the ends of the greeting banner. You’ll find these in the Beary Christmas Suite but you can use them in lots of places, not just Christmas.

This card design could also be used on the front of a treat bag for Halloween or even as part of a scrapbook page. There are so many options with this Them Bones Designer Series Paper in the Holiday Mini Catalog! I think it was backordered recently but it is back in stock as I write this so grab it soon if you would like it!

SHOP STAMPIN’ UP! ONLINE HERE!

New Rustic Christmas Countdown Kit!

Rustic Christmas Countdown Kit

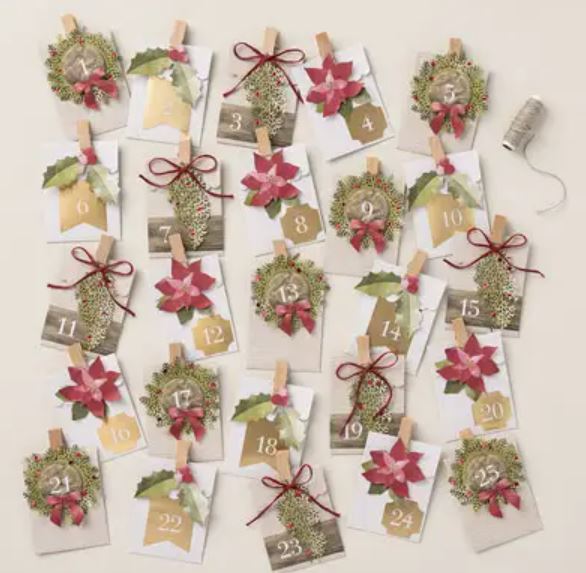
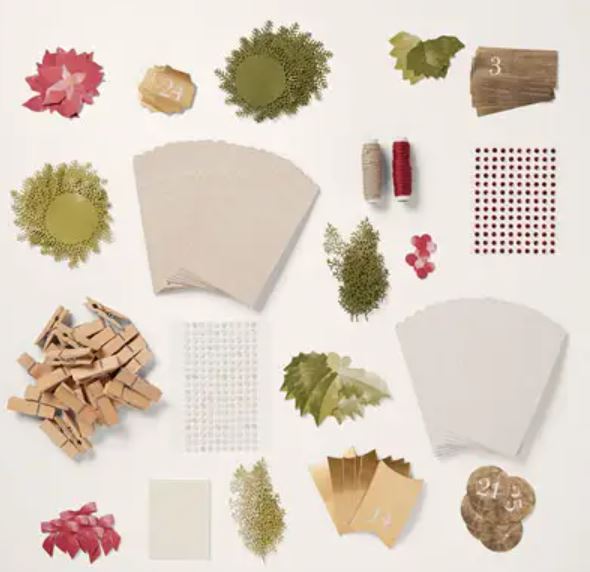
There’s a new holiday kit in the Stampin’ Up! Kits Collection! Bring the spirit of Christmas into your home with the Rustic Christmas Countdown Kit.

This kit has everything you need to create 25 individual envelopes that you can fill with small treats, kind messages, and more. With seasonal greenery, fun accent pieces, and gold detailing, you’ll be able to make and display your own unique hanging advent calendar anywhere you’d like. What a simple and easy way to count down the days ’til Christmas!

This kit includes:

-Enough supplies to create 25 individual envelopes
-Printed die cuts, printed labels, adhesive, embellishments, clothespins, and twine
-Folded envelope size: 4″ x 3″ (10.2 x 7.6 cm)
-Coordinating colors: Cherry Cobbler, Crumb Cake, Mossy Meadow, Old Olive

You can use this kit for an Advent Calendar or maybe you will think of an alternate way to use this kit for your family. Maybe you will want to make it and give it as a gift to another family. Lots of possibilities! It looks like a beautiful kit and something different! Check it out!

Watch Sara Douglass show you how the Rustic Christmas Countdown Kit goes together!

SHOP THE KITS COLLECTION HERE!

The 12 Weeks of Christmas Is Almost Here!

12 Weeks of Christmas 2023 Banner

The time has snuck up on me this year, but the 12 Weeks of Christmas begins TOMORROW, October 4! Who would have thought?! I’ve been doing this every year for quite a few years now and usually, I give you several weeks warning! But now it is here!

Every Wednesday for twelve weeks I will send out a special email, only to my mailing list subscribers, with one holiday project each week! We start with cards, then gift ideas, and finally bags, tags, and gift wrap. I have fun sending these emails and I think my customers enjoy receiving them and getting extra ideas that they can use for their holiday crafting.

How do you get them? You have to be on my Mailing List! Just sign up in the red box on the right if you are on my website. If you are on your phone, you may have to scroll all the way down to find it. Or just click HERE to go to the page to sign up. It’s free, of course, and you can unsubscribe at any time if it’s not for you. If you are already getting my Tuesday emails, then you don’t have to do anything! You are IN!

These projects will not be anywhere else…not on my blog, or Facebook page, or Instagram. They are my gift to my mailing list subscribers as a thank you for following me and stamping along with me! We’d love to have you join us if you would like! The first email goes out tomorrow afternoon! I better get busy!

JOIN the STAMPING WITH KAREN MAILING LIST HERE!

It’s Time To Become a Stampin’ Up! Demonstrator!

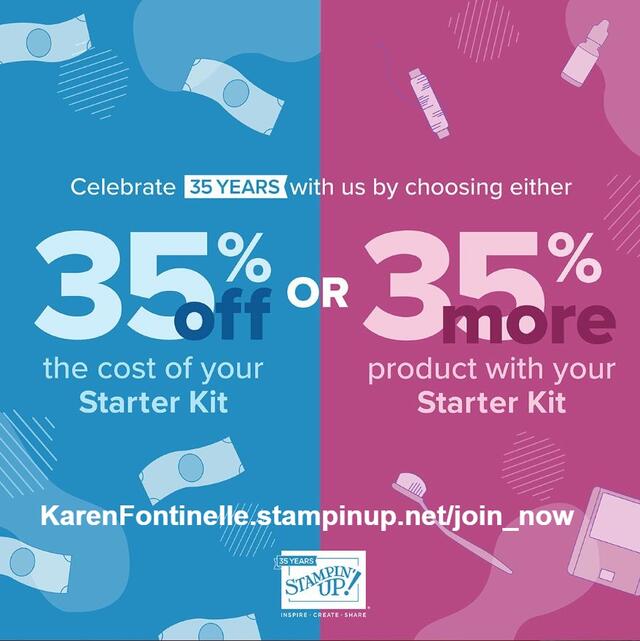
The new special for October is an excellent deal for the Starter Kit if you want to become a Stampin’ Up! Demonstrator and start your own business! To celebrate Stampin’ Up!’s 35th year, you have two choices: get 35% off the cost of the Starter Kit or add another 35% more in product to your kit! It’s always a good time to purchase the Starter Kit and officially become a Demonstrator, but when there is a special deal, it’s really a great time! More details below.

Promotion Period:  October 3–31

Ordering Deadlines

  • Phone: October 31, 2023; 6:59 PM (MT)
  • Online: October 31, 2023; 11:59 PM (MT)

New demonstrators can choose one of the following options for their Starter Kit:

Option 1: Get 35% OFF the normal cost of a Stampin’ Up! Starter Kit. Those who select this option will receive $125 USD worth of product for only $64.35 USD!

Option 2: Get 35% MORE product with their Starter Kit. Those who select this option will receive $168.75 USD worth of product by spending $99 USD!

No matter which option you choose for your Starter Kit, both provide you with free business supplies (catalogs, order forms, brochures), a free Paper Pumpkin Kit, and free shipping on your Starter Kit—not to mention all the fun that comes with being part of Stampin’ Up!

BONUS: FREE OnStage@Home Registration

It gets better! Those who sign up for a Starter Kit during this offer will also be automatically registered for FREE* to our virtual OnStage event on November 11 — a $77 USD value!

  • Those who sign up for this offer have the opportunity to watch the event independently, gather together with other demonstrators, or with their Team Leader.
  • Demonstrators who join during this promotion will be automatically added to the OnStage attendees; they do not need to register separately.
  • Demonstrators who join during this promotion will also receive an email with all the information about this event.

*Please note that free registration will not include the gift box.

This year is Stampin’ Up!’s 35th anniversary, which means 35 years of stamping and memories. Throughout the year, Stampin’ Up! has been celebrating with 35 for 35 events, and they want to wrap up this year-long celebration at OnStage@Home 2023. At this virtual, one-day event, Stampin’ Up! will celebrate their 35th Stampin’ Up! anniversary. Attendees will watch lots of presentations, and view new products in action from the January–April 2024 Mini Catalog and Sale-A-Bration Brochure. Attendees will be able to order brand new products for the Craft Along Experience where they’ll follow along and create crafts from the comfort of their own homes!

Besides the fun of being a part of Stampin’ Up! and meeting new people through stamping, you get early peeks at new products and catalogs with the opportunity to preorder those products to get samples ready to show your customers. Your Demonstrator discount will begin immediately once you get your Demonstrator number in an email after you order your Starter Kit. You get to choose what products you want in your Starter Kit, so even if you already have Stampin’ Up! products, you get to make your own choices of products so you won’t receive duplicates. You’ll get catalogs to share with friends. And worth almost as much as the Starter Kit is the FREE admission to the virtual OnStage 2023 event that you can watch from home and enjoy stamping demonstrations and see new products! It’s all good!

Check out my link HERE tomorrow about joining when the new Starter Kit deal will be online! I can help you no matter where you live, but if you prefer to have a Demonstrator local to you, just click the “Find a Demonstrator” link in the top bar on the Stampin’ Up! Home Page. Look over the information and then let me know if you have any questions or need more information. You can also call Stampin’ Up! at 1-800-STAMP-UP.

I hope you consider this very special deal during the month of October. With the Holiday Mini Catalog in full swing and the upcoming Spring Mini and Sale-A-Bration in January 2024 you will be set up for a great start to your business.

Layering Leaves October Fall Card

Layering Leaves October Fall Card

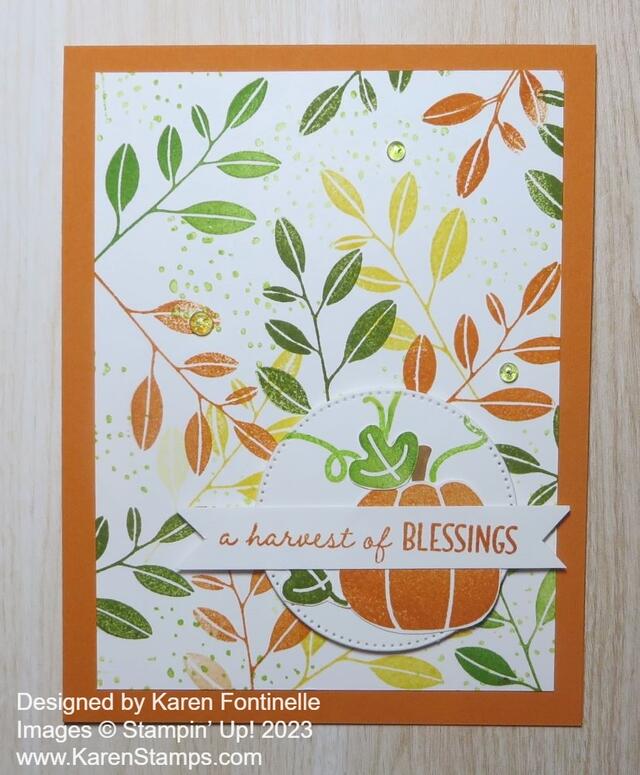
Happy October!! Now that it is officially October, it feels much more like the fall season, even if it still doesn’t feel like fall here in Houston! This Layering Leaves October Fall Card commemorates the beginning of October which really makes us think of fall, colored leaves, and all the upcoming holidays and seasons! Once the fall and Halloween decorations go up in my house and my regular home decor is put away, it won’t get pulled out again until January! Halloween decorations are starting to go up in the neighborhood. While I absolutely love all my Halloween decorations, I’m not quite ready for full-blown Halloween decorating quite yet. Maybe in another week or two for sure!

This card base is Pumpkin Pie and is cut at 11″ x 4 1/4″, scored at 5 1/2″ and the fold is at the top. I could have put the fold on the left and the card would be in a landscape position rather than our usual cards at 5 1/2″ x 8 1/2″.

I made my own designer paper, so to speak, by stamping the leaves from the Layering Leaves Stamp Set. I used these inks: Pumpkin Pie, Daffodil Delight, Granny Apple Green, and a little bit of Old Olive. I love to do this random stamping all over the paper! To fill in the empty spaces I used a stamp in the set with just little dots. Those kinds of stamps just add a little something lots of times! Those dots are stamped with Lemon Lime Twist.

Next, I used the Pick of the Patch Stamp Set to stamp and cut out a pumpkin, some leaves, and a stem. I also stamped some vines on the die-cut circle on which I adhered the pumpkin and leaves. It is from the Stylish Shapes Dies. This circle is popped up on Stampin’ Dimensionals.

The greeting is also from the Pick of the Patch Stamp Set and is stamped in Pumpkin Pie. I always have a bunch of narrow strips of Basic White so it makes it easy when you want to stamp a narrow greeting. I just stamped the greeting on the scrap strip and then flagged the ends to make it look like a banner.

For a finishing touch, I added a few Lemon Lime Twist gems from the Tinsel Gems Four-Pack. Sometimes it is hard to stop at adding only three gems! I would have liked more by the pumpkin and/or the greeting…..but sometimes you have to know when to stop!

Get out your fall colors and do some fall stamping!

SHOP STAMPIN’ UP! ONLINE HERE!

Trucking Along Bundle Back in Stock!

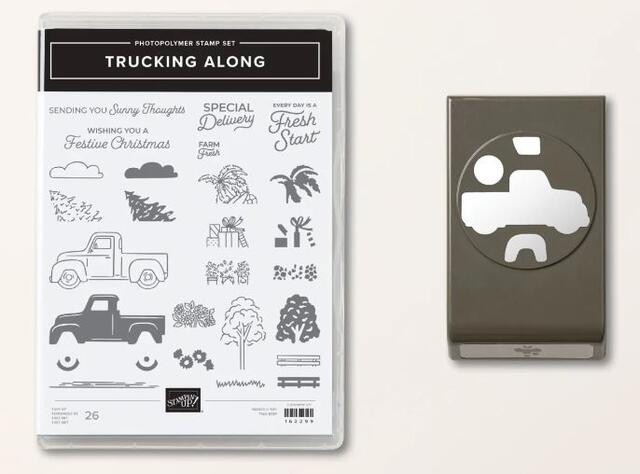
Trucking Along Bundle

This Trucking Along Bundle has proven so popular that it has sold out quickly from the beginning and every time Stampin’ Up! got more in stock. There has been a long wait but finally, it is back, even earlier than expected!

As I write this, you can purchase the Bundle with the stamp set and Trucking Along Builder Punch and save 10%.

You can use this Trucking Along Bundle for all seasons! Just load up the truck bed with different colors and different objects! Put fall leaves, Christmas trees, or spring flowers in the truck! Whatever you like. You will have fun with some of your other stamp sets finding little things you can add in the truck I’m sure!

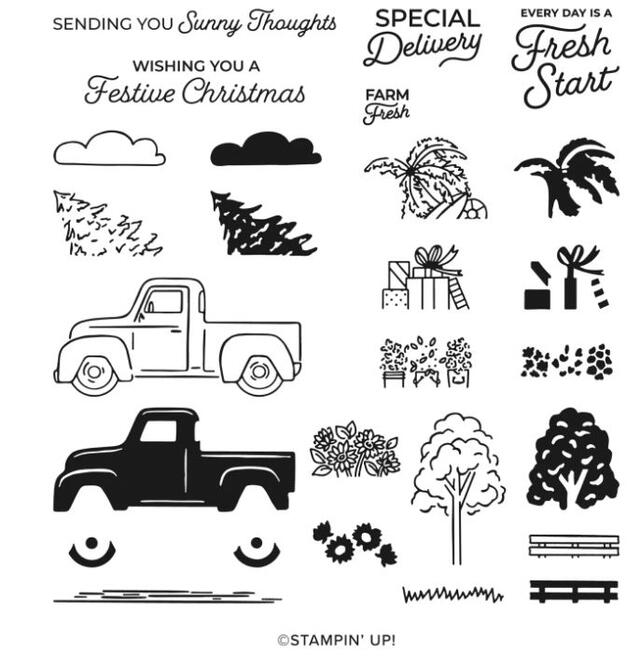
Or you can purchase just the Trucking Along Stamp Set alone.

Trucking Along Stamp Set

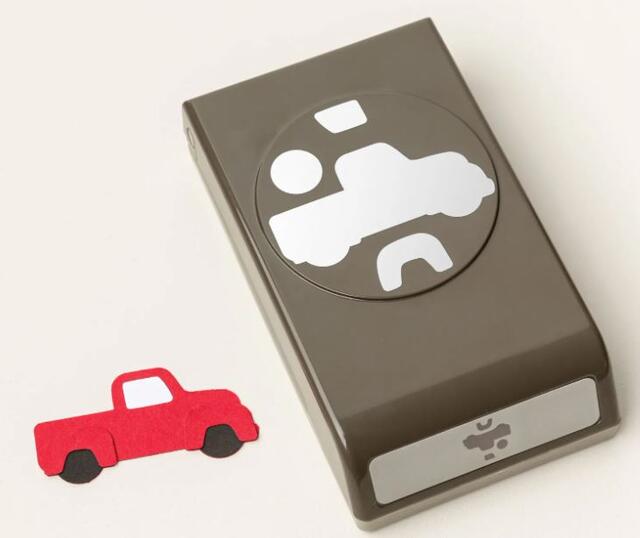
Or maybe the most popular of all, the Trucking Along Builder Punch.

Trucking Along Builder Punch

SHOP STAMPIN’ UP! ONLINE HERE!

Delightful Floral Book Fold Card

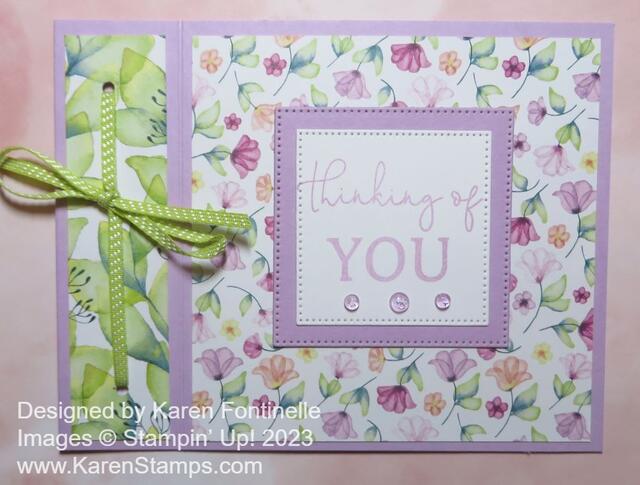
This Delightful Floral Book Fold Card is called a book fold card because of the left side fold being glued down instead of the card opening the whole way! Just something different and super simple to make!

For this card, I used a couple of patterns of designer papers in the Delightful Floral 12″ x 12″ Designer Series Paper. You won’t find this paper in either of our catalogs. It is one of the recently released designer papers in the Online Exclusives category in the Online Store. There are many great products in there so don’t forget to check them now and then!

Here is how to make this basic card. Cut the Fresh Freesia cardstock lengthwise in half at 11″ x 4 1/4″. Score at 4 1/4″ x 5 1/2″. Fold and crease the score lines. You could put the fold line at the top of the card, but in this case, I have the fold on the left. I applied glue to that narrow section so that the card would open at the next score line.

The designer paper I used on that small section is cut at 1″ x 4″. I chose a leafy patterned paper. For the larger front of the card, I used a piece of floral designer paper cut at 4″ x 4″. This pattern has very small flowers, but other papers have larger flowers and you could use any of those instead. On this card, I punched two holes in the side of the card (the part that is adhered so that the card doesn’t open all the way) and tied a ribbon through. This is the Lemon Lime Twist ribbon in the Ribbon Duo Combo Pack. It’s a perfect match and perfect size. If you are going to tie ribbon through this book fold portion, then you wouldn’t necessarily need to adhere to inside front and back together.

The greeting is stamped in Fresh Freesia ink with words in the Sentimental Park Stamp Set. The greeting is diecut with a square stitched die in the Stylish Shapes Dies. Then the next larger square die is used to cut out a piece of Fresh Freesia for a layer. You could use other die shapes but I thought the square shape worked well with the square area of the card front.

For a little embellishment, I added three Fresh Freesia gems from the Tinsel Gems Three-Pack to the greeting. They add a little sparkle and interest to the card. There are many other gem choices in the Stampin’ Up! embellishments you could choose from! The card is pretty enough without it, but I think it’s fun to use that extra little pop!

Here is another easy card I made with this designer paper.

This Delightful Floral paper is really some lovely paper with its watercolored florals and botanicals. This paper coordinates with the Translucent Florals Bundle in the Holiday Mini Catalog. You will want to check out this paper soon!

Shop Stampin’ Up! HERE!

Join Our Stamping With Karen Mailing List!

Mailing List Mailbox

Have you signed up for my Stamping With Karen Mailing List yet? If you like visiting my blog or if this is your first time here, please join us by signing up in the Mailing List Sign Up Box! You will receive an email newsletter on the first Tuesday of each month with the latest Stampin’ Up! news and any special offers, plus at least one tutorial for a card or another project or tip.  Each following Tuesday I send an email, again with some kind of stamping idea or a review of some projects I have recently had on my blog, plus any news or reminders. Stampin’ Up! generally updates us on Tuesday mornings so that is why Tuesday is a good time to get in touch with you!

If you like getting new ideas for stamping, then this is for you! These projects are exclusive to my newsletter. As a special gift for signing up, you will receive a PDF called “A  Dozen Creative Gift Wrap Ideas”.

And one of the best parts of being on my mailing list is something that will be coming up VERY soon! We know the holiday season will sneak up on us quickly!  Something very popular with my subscribers is my “12 Weeks of Christmas” newsletter. Each week leading up to Christmas, I send out a special email with an exclusive project in it.  We start with cards, move on to gift ideas, and end up with tags and bags! Only my subscribers receive these newsletters each week leading up to the holidays so make sure YOU are signed up! And tell your friends!

No obligation, of course!  As with any email, just unsubscribe it if it is not for you.

You can also follow me on my Stamping With Karen Facebook page HERE and follow me on Instagram @stampingwithkaren.

Keep on top of all things Stampin’ Up! and learn ways to use those great products in your papercrafting!  Sign up in the Mailing List sign-up box in the upper right corner of my blog or in the pop-up box! If you are on your phone, the red signup box may be at the bottom of this post.

Here is a link to sign up also. See you on Tuesday! And for the 12 Weeks of Christmas!

Merry & Bright Christmas Bulbs Card

Merry & Bright Christmas Bulbs Card

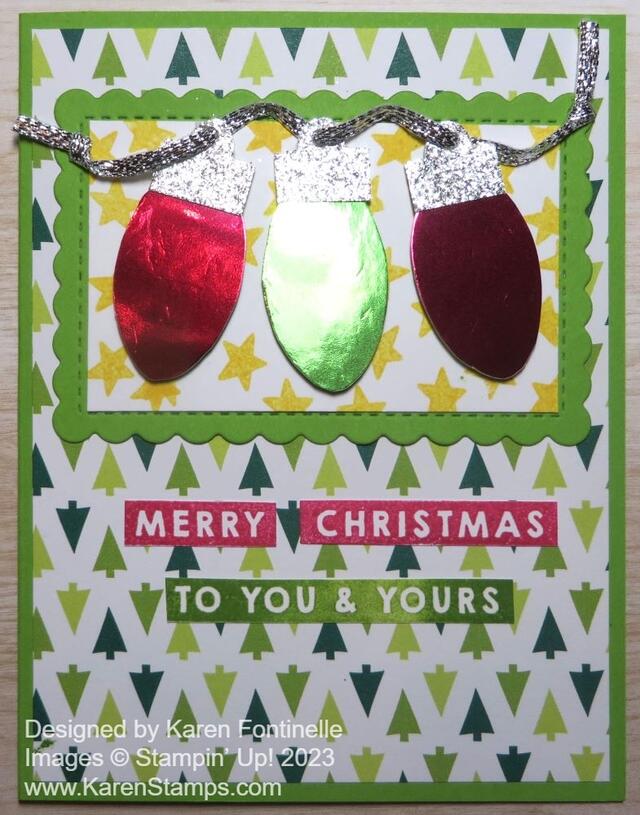
Here’s a fun Christmas card to make if you like those old-fashioned Christmas light bulbs! This Merry & Bright Christmas Bulbs Card takes me back to my childhood! If you are old enough to remember, many years ago Christmas trees were decorated with these big bulbs, not the tiny ones we have been using for a lot of recent years. I remember my dad putting up outdoor lights with all these colored bulbs. The Christmas tree also was decorated with these large-sized bulbs. After many years of using the small Christmas lights, I think some of the big bulbs have come back in style!

This card has a card base of Granny Apple Green. You could choose any of three colors of green that would coordinate with this Christmas tree pattern in the designer paper. The designer paper is the Merry Bold & Bright Designer Series Paper in the Holiday Mini Catalog. I love this paper! Not only does it have bright and bold colors, but some of the patterns you can use year round! They aren’t all for the holidays. Many of the patterns would be great for birthday cards or scrapbook pages, wherever you want a bright and happy look to your project!

The Christmas bulbs can be stamped and diecut using the Merry & Bright Bundle, the stamp set, and dies. Or maybe you just want to diecut the bulbs out of paper, such as the Melon Mambo and Granny Apple Green Foil Sheets, which is what I used on this card. That’s why there is such a glare in the photo! I used two Melon Mambo bulbs and a Granny Apple Green one in the center. For the bulb holder, I used the Online Exclusive Silver & Gold Adhesive-Backed Glimmer Paper in silver. I intended to peel off the backing and not have to worry about adhesive, but when I put them on the card, I used Stampin’ Dimensionals to pop them up so I didn’t need the adhesive backing. But when you want it, it is great to have! To make the lights look like they are on a string, I used a piece of the Silver Trim in the Combo Pack with gold trim. I just wound it through each hole, left it a little loose, and tied the ends in a little knot but kept it looking loose and free. I like the way that turned out.

The greeting is stamped from the Merry & Bright Stamp Set. I used Melon Mambo and Granny Apple Green ink and just cut the words out by hand.

To showcase the Christmas lights, I diecut a piece of Granny Apple Green using the Scalloped Contours Dies. I opted to cut another plain rectangle to fit just inside the stitching of the diecut piece to help the bulbs show off better. But the plain white seemed a little stark, so I stamped a bunch of the little stars in the same stamp set using Daffodil Delight in. First I stamped only a few but that wasn’t enough so I stamped as many as I could fit in and I liked that look. I think the stars make the bulbs look like they are shining brightly! The scalloped piece is adhered flat on the card and the bulbs are popped up, as I mentioned.

This is actually an easy card to make, now that you have the idea to copy! And you can change it up with different paper, maybe just stamped bulbs or bulbs diecut from cardstock in different colors. Turn the card in the sideways landscape position and you can add more Christmas bulbs! It’s a fun set and Bundle to play with! If you don’t want to purchase the dies, you can do some fussy cutting.

SHOP STAMPIN’ UP! ONLINE HERE!

Traditions of St. Nick Little Stockings Card

Traditions of St. Nick Little Stockings Card

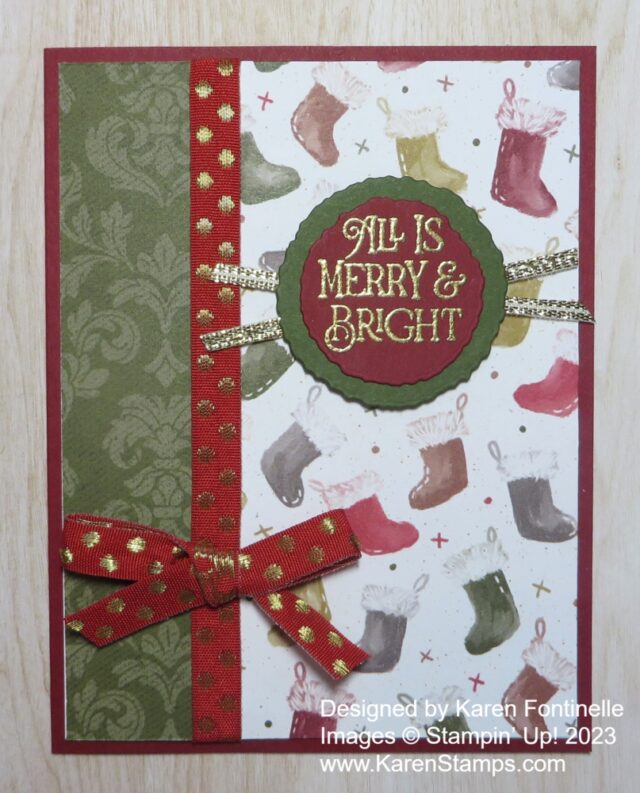
I wanted to make a card with this cute stocking patterned paper in the Traditions of St. Nick Designer Series Paper. I came up with this very easy, basic card, Traditions of St. Nick Little Stockings Card using the “other side” of the stocking paper!

This card turned out a lot like the card that I made a month ago with a different designer paper, the Joy of Christmas Designer Series Paper. That card I made looks more like a wrapped package with two rows of ribbon on it.

The card on this blog post has a card base of Cherry Cobbler. I could have used Real Red and maybe would have preferred that, but I hadn’t used Cherry Cobbler cardstock in a while. Originally, I cut the stocking pattern to be the full layer on the card, which would have been fine, but when I saw the pretty green damask design on the other side, I wanted to show some of that off to the side. I simply cut off 1 1/4″ of the stocking pattern and turned it over on the other side. When I plan ahead, I leave a little extra space for overlap of the two papers. In this case, since I wanted to wrap the ribbon around the designer paper, I adhered both pieces of designer paper onto a 4″ x 5 1/4″ piece of Basic White. Then I could add the strip of ribbon, adhered on each end on the back of the Basic White.

The ribbon I used is the very pretty Real Red & Gold 3/8″ Dotted Ribbon. I tied a bow separately and adhered it to the card front using Mini Glue Dots.

The greeting is stamped on Cherry Cobbler using the Brightest Glow Stamp Set. It is a carry-over from last year’s holiday catalog. It has great holiday sentiments in it so I pulled it out to use this season! I decided to emboss it with Gold Embossing Powder using Versamark ink to stamp. You will find three colors of embossing powder in the Metallic Embossing Powders trio. I thought the gold embossing would go well with the gold in the ribbon. I die cut the greeting and the Mossy Meadow layer with two of the Deckled Circles Dies. Another choice would be to emboss the greeting in white. Depending on the lighting, white would show up better, but I do like the look of the gold. To further emphasize the gold, I added two strips of the Gold Trim, which is part of the Gold & Silver 1/8″ Trim Combo Pack, underneath the greeting, sticking out on each side. I like that little touch.

You will find this designer series paper, Traditions of St. Nick, in the Online Exclusives category of the Online Store. The Online Exclusives are new products Stampin’ Up! wanted to get out to use without waiting for the next catalog! So they are only available while supplies last. Be sure to get any of the Online Exclusives that you like lest they be sold out or backordered if Stampin’ Up! is able to add more.

As you think about holiday card designs you might like to make, something like this card would be easy to duplicate. If you wanted to make it easier you could just stamp the greeting in colored ink rather than embossing. Check out all the choices in the Stampin’ Up! Holiday Catalog and the Online Exclusives. Don’t forget the Clearance Rack, too!

SHOP STAMPIN’ UP! ONLINE HERE!

Hello First Day of Fall Card

Hello First Day of Fall Card

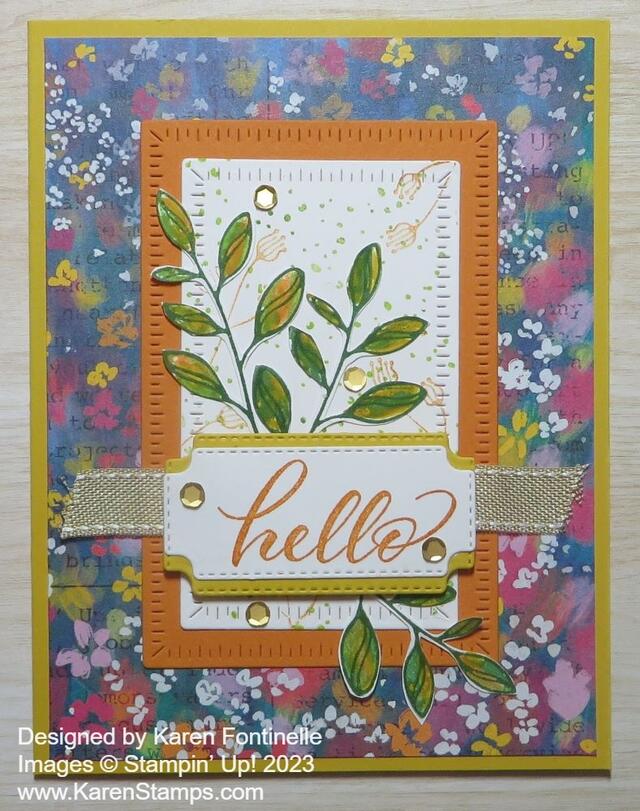
Today, September 23, is the first day of fall! Thank goodness!! We had such a hot, hot, hot summer here in Houston and most of Texas I think that we are SO ready for a break in this heat! I’m hoping this Hello First Day of Fall Card will help usher in more comfortable weather! It will be a while before the heat goes away, though.

In thinking about fall, I naturally thought about the Layering Leaves Stamp Set. In kind of looking for ideas online, I saw someone had made a card using the Masterfully Made Designer Series Paper. That made me look through my package to see if an idea popped into my head using one of the paper patterns. This one that I used seemed to have some fall colors in the flowers so I chose it! It’s a different look for a fall leaves card, I admit, but this whole package of paper is a little daring so it’s okay to do something a little different with it!

In the Layering Leaves Stamp Set, there are two stamps you can use for two-step stamping. I stamped the outline stamp of the leafy stem with Garden Green. Then I colored on the stamp that was just the fill-in leaves using two or three different colors of Stampin’ Write Markers. I wanted each leaf to have several colors on it as if it were turning colors for fall. I used Crushed Curry, Garden Green, Pumpkin Pie, and Granny Apple Green. Just play and see what you come up with! Everyone will be different. On a few leaves, I added a little marker color to fill in some empty spaces. Then I cut out each stem with my Paper Snips. The Bough Punch has been out of stock for a while but you can order it now, earlier than expected!

The card base is Crushed Curry. I used the Radiating Stitches Dies to diecut a piece of Pumpkin Pie for a layer for the focal point of the card, and the next smaller piece of Basic White. To fill in the white background a little bit, I stamped lightly with the dotted stamp using Granny Apple Green and Lemon Lime Twist. Not one to leave well enough alone, I also stamped the little flower image in Pumpkin Pie.

The greeting is in the Layering Leaves Stamp Set. I thought “Hello” was appropriate for saying “Hello” to the first day of fall! I love the font of the greetings in this stamp set. I stamped it in Pumpkin Pie ink and die cut it with a label die in the Cheerful Daisies Dies. I also cut a piece of Crushed Curry with the same die and cut it in half horizontally to make a layer under the greeting. I just adhered one half of the Crushed Curry to peek out from the top of the greeting and the other half for the bottom. Just line the two pieces up evenly and they look like a full layer underneath the greeting!

Before adhering the greeting, see where you want the leaves placed and glue those down. I decided to add a piece of ribbon underneath the popped-up greeting. It is the Burlap Ribbon in the Combo Pack with Real Red Ribbon. I also added some gold Pastel Adhesive-Backed Sequins around on the card.

You can make a similar card to this one with the Layering Leaves Stamp Set. You can change the background designer paper and change the colors of paper and ink that I used. The best part of the Layering Leaves set, I believe, is the beautiful fonts and words you can use a lot.

Fall and fall decorating is just around the corner now! It is fall and it is almost October! Make a few cards to send to celebrate fall!

SHOP STAMPIN’ UP! HERE!