Hello First Day of Fall Card

Hello First Day of Fall Card

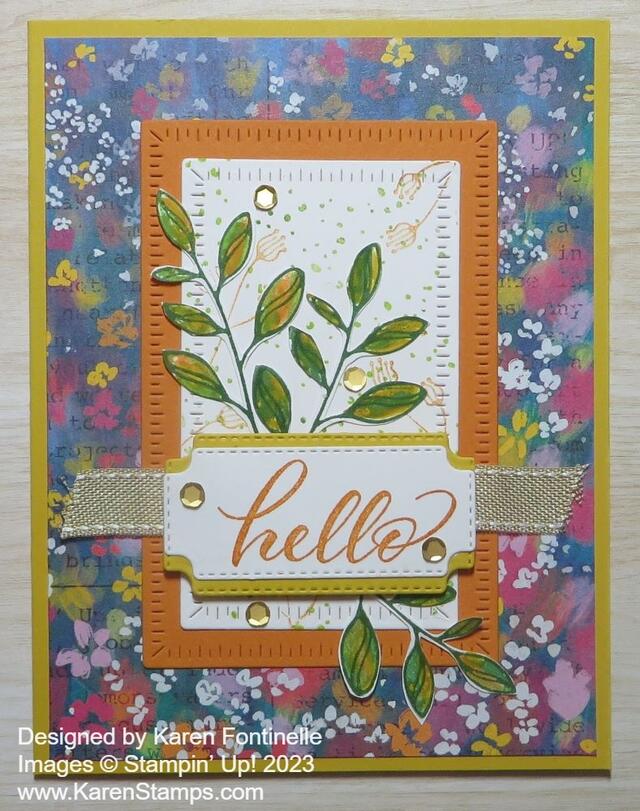
Today, September 23, is the first day of fall! Thank goodness!! We had such a hot, hot, hot summer here in Houston and most of Texas I think that we are SO ready for a break in this heat! I’m hoping this Hello First Day of Fall Card will help usher in more comfortable weather! It will be a while before the heat goes away, though.

In thinking about fall, I naturally thought about the Layering Leaves Stamp Set. In kind of looking for ideas online, I saw someone had made a card using the Masterfully Made Designer Series Paper. That made me look through my package to see if an idea popped into my head using one of the paper patterns. This one that I used seemed to have some fall colors in the flowers so I chose it! It’s a different look for a fall leaves card, I admit, but this whole package of paper is a little daring so it’s okay to do something a little different with it!

In the Layering Leaves Stamp Set, there are two stamps you can use for two-step stamping. I stamped the outline stamp of the leafy stem with Garden Green. Then I colored on the stamp that was just the fill-in leaves using two or three different colors of Stampin’ Write Markers. I wanted each leaf to have several colors on it as if it were turning colors for fall. I used Crushed Curry, Garden Green, Pumpkin Pie, and Granny Apple Green. Just play and see what you come up with! Everyone will be different. On a few leaves, I added a little marker color to fill in some empty spaces. Then I cut out each stem with my Paper Snips. The Bough Punch has been out of stock for a while but you can order it now, earlier than expected!

The card base is Crushed Curry. I used the Radiating Stitches Dies to diecut a piece of Pumpkin Pie for a layer for the focal point of the card, and the next smaller piece of Basic White. To fill in the white background a little bit, I stamped lightly with the dotted stamp using Granny Apple Green and Lemon Lime Twist. Not one to leave well enough alone, I also stamped the little flower image in Pumpkin Pie.

The greeting is in the Layering Leaves Stamp Set. I thought “Hello” was appropriate for saying “Hello” to the first day of fall! I love the font of the greetings in this stamp set. I stamped it in Pumpkin Pie ink and die cut it with a label die in the Cheerful Daisies Dies. I also cut a piece of Crushed Curry with the same die and cut it in half horizontally to make a layer under the greeting. I just adhered one half of the Crushed Curry to peek out from the top of the greeting and the other half for the bottom. Just line the two pieces up evenly and they look like a full layer underneath the greeting!

Before adhering the greeting, see where you want the leaves placed and glue those down. I decided to add a piece of ribbon underneath the popped-up greeting. It is the Burlap Ribbon in the Combo Pack with Real Red Ribbon. I also added some gold Pastel Adhesive-Backed Sequins around on the card.

You can make a similar card to this one with the Layering Leaves Stamp Set. You can change the background designer paper and change the colors of paper and ink that I used. The best part of the Layering Leaves set, I believe, is the beautiful fonts and words you can use a lot.

Fall and fall decorating is just around the corner now! It is fall and it is almost October! Make a few cards to send to celebrate fall!

SHOP STAMPIN’ UP! HERE!

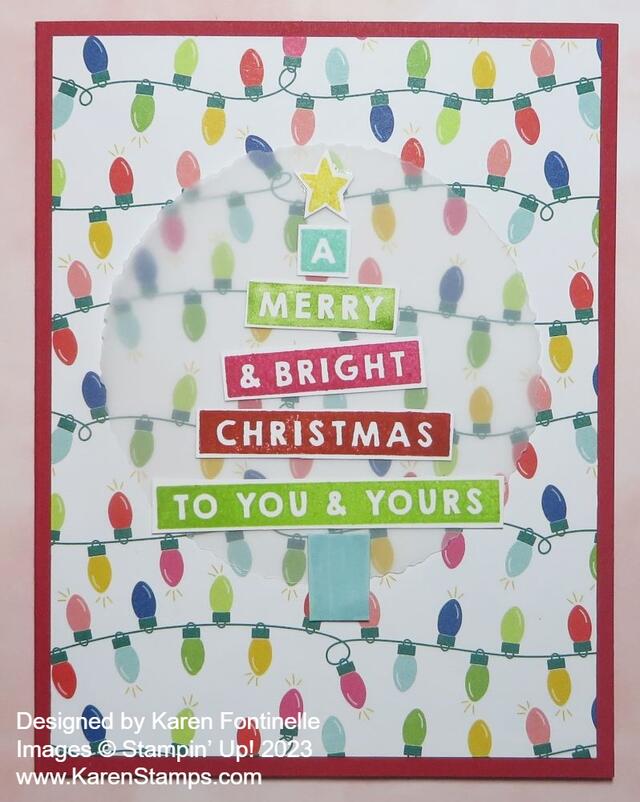
A Merry & Bright Christmas Card

A Merry & Bright Christmas Card

I had purchased this designer paper knowing I could make plenty of Christmas cards with just the paper and not the stamp set. But at some point, I could no longer resist the stamp set! Being able to stamp the words and make a little tree or being able to stamp several different styles of Christmas light bulbs was just too fun to pass up!

The card base is Real Red card stock, but you could choose from a lot of different colors because of all the colors of the Christmas light bulbs in the paper! This Merry Bold & Bright Designer Series Paper is wonderful! It has bright colors, Christmas patterns, and generic bold colorful patterns that can be used at other times of the year.

On top of the designer paper is a circle of vellum to soften the little light bulbs a bit so the tree with the greeting would show up. I used one of the Deckled Circles Dies to cut a circle out of Vellum Cardstock. I stamped all the words in the Merry & Bright Stamp Set in various colors – Pool Party, Granny Apple Green, Melon Mambo, Poppy Parade, Lemon Lime Twist. The little star at the top of the tree is stamped in Daffodil Delight Ink. The little trunk of the tree is a scrap of Pool Party cardstock.

The good thing about this card is that I could use Multipurpose Liquid Glue on the back of all the words on the back of the vellum that I glued flat on the card, and of course, none of the glue showed through the vellum. Sometimes it is difficult to hide adhesive under vellum. I placed some of the words (cut out by hand) a little crooked so it wouldn’t matter if they weren’t perfectly straight. But you could place them as straight as possible too!

I thought about using some bling on the card, but I resisted and stopped where I was! I think this paper and stamp set is going to be fun to work with. It would be nice to have the dies as well, the Merry & Bright Dies. Get the Merry & Bright Stamp Set and the Dies together in a Bundle and save 10%. It’s a fun change of pace to use these bright, non-traditional colors for the holidays!

SHOP STAMPIN’ UP! ONLINE HERE!

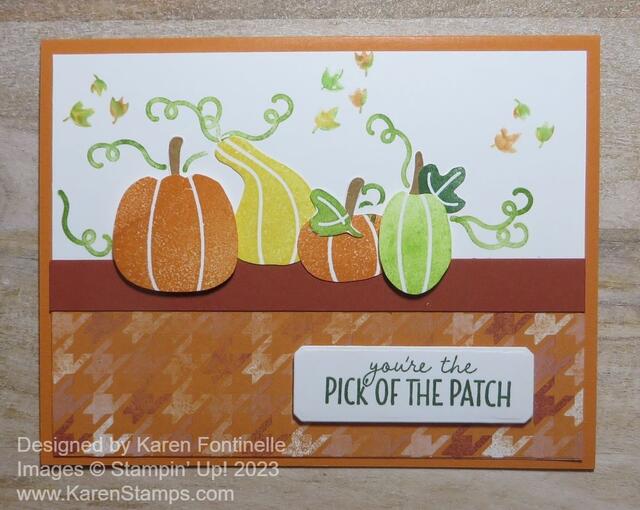
You’re the Pick of the Patch Fall Card

You're the Pick of the Patch Fall Card

This You’re the Pick of the Patch Fall Card may have gotten lost in the shuffle and never got posted but if you’ve already seen it somewhere, it’s a replay! Making fall cards makes me hopeful that it might feel like fall here in Texas someday! Usually, it is December until the leaves turn to fall colors but hopefully, we get much cooler temperatures before that! The colors on this card make me feel a little cooler!

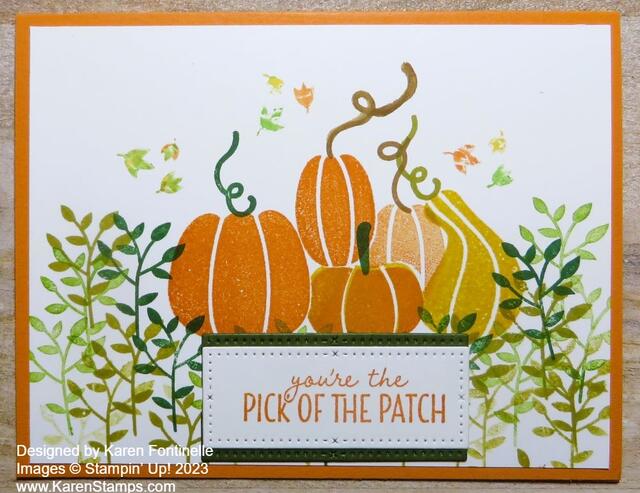
This card is made with the Pick of the Patch Stamp Set and the Them Bones Designer Series Paper. The card base is Pumpkin Pie cardstock with a layer of Basic White. You wouldn’t have to use a whole piece of Basic White if you are going to put a piece of designer paper at the bottom but you want them to overlap a little bit probably. Then cover the seam with ribbon or a strip of paper as I did here. It’s a little easier to use a whole layer of Basic White and then just cut a strip of the designer paper to whatever size you want instead of figuring out the math for the two pieces to be the right size for the card layer. In this case, I used a 5 1/4″ x 4″ piece of Basic White and then a layer of patterned paper that is 5 1/4″ x 1 3/4″. The strip of Cajun Craze is 5 1/4″ x 1/2″. You could also use a strip of ribbon or another patterned paper.

The pumpkins and gourds are stamped with the Pick of the Patch Stamp Set in various colors. You can use any colors that you like and even “stamp off” if you want a lighter shade. I used Pumpkin Pie, Daffodil Delight, and Granny Apple Green. There is a Pick of the Patch Builder Punch that you might like for pumpkins. I don’t have it so I just cut out my images by hand with my Paper Snips.

Here’s a tip for using the Builder Punch. Take any piece of cardstock that fits in the punch (not too large, not too small. Punch the paper. Then use that punched-out paper as a template so you can stamp all the images that match the punch that will be lined up perfectly. Lay the template on the paper you want to stamp on, then stamp each image inside the template. Remove the template, then punch. Everything should be lined up for the punch! Or you can always just punch individual pieces with the punch.

Before adhering the Basic White cardstock layer, lay out all the pieces of the card and see where the pumpkins and gourds will go. Then stamp the vines so that they will line up with the stamped pumpkins and gourds. To fill in some empty space, stamp the little leaves around the background. To make them look like fall leaves, use Stampin’ Write Markers (not Blends). Apply the marker directly on the leaf stamp, starting with the lightest color and adding another color or two to the same stamp. Breathe (huff) on the stamp to remoisten, then stamp and you will get the multicolored stamped image!

Assemble your card, popping up some of the pumpkins if you like and adding some stamped leaves in the set. The greeting is in the Pick of the Patch Stamp Set. What a cute greeting to send to someone special! I die-cut it with the narrowest die in the Countryside Corners Dies.

The Pick of the Patch Bundle is a great set of products to have for this time of year. The stamp set even includes a jack-o-lantern face if you want to make your pumpkins for Halloween!

SHOP FOR FALL AT STAMPIN’ UP!

New Items Added to the Stampin’ Up! Clearance Rack!

Clearance Rack

RUN! DON’T WALK!

Hurry to the Stampin’ Up! Clearance Rack for some great deals!

What a fun surprise to wake up and find out Stampin’ Up! added to the Clearance Rack! Get up to 60% off select products while supplies last! The earlier you check and shop, the better selection you will have!

There are stamp sets, punches, designer papers, Christmas, Halloween, Fall, packaging, ribbons, embossing folders, Memories & More products, and embellishments! Some $12.00 designer papers are on clearance for only $4.80!

SHOP EARLY! As word gets out, the best products will disappear fast! Maybe some already have!

SHOP THE CLEARANCE RACK HERE!

ENJOY!

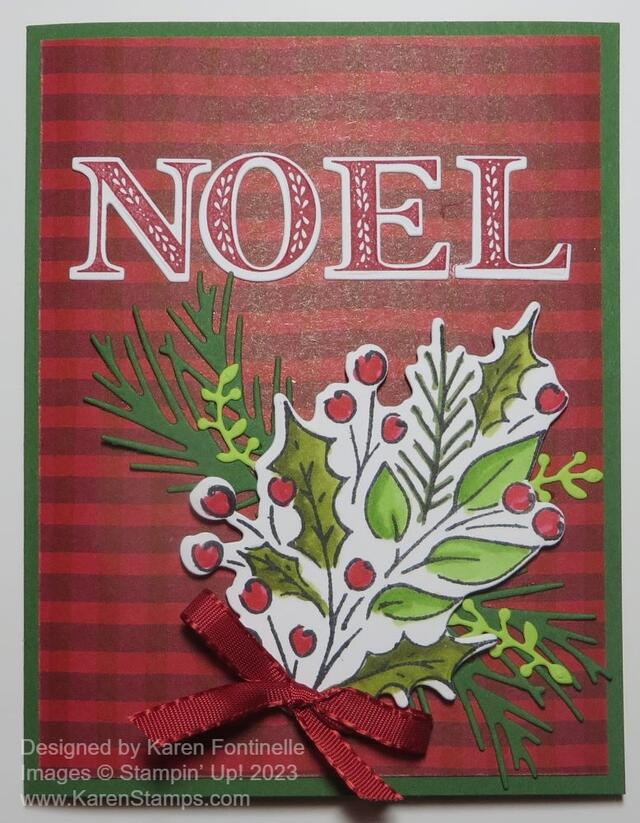
Joy of Noel Foliage Christmas Card

Joy of Noel Foliage Christmas Card

The way this Joy of Noel Foliage Christmas Card turned out was a surprise to me! I really wasn’t sure what kind of card I was going to make but it wasn’t this one! I was reminded of this red and black plaid paper in the Joy of Christmas Designer Series Paper and after that I knew I had to use it!

First I stamped the image of the holly leaves and berries in Memento Ink and then had some fun with my Stampin’ Blends coloring them in. I hadn’t done any coloring in a little while. I used the Old Olive Combo, Granny Apple Green Combo, Mossy Meadow Combo, and the Real Red Combo for the berries. I used the die in the Joy of Noel Dies to cut out this piece.

The card base is Garden Green. One of the main things that interested me in this Joy of Noel Bundle was the stamp for “NOEL” and the die that would cut out the letters individually. I stamped the letters in Real Red and then diecut them. With the white border around the letters, I thought they showed up fine against the red plaid so I didn’t have to layer them on anything.

I also diecut some other foliage pieces to slip underneath my holly leaves piece. The holly leaves are popped up on Dimensionals and everything else is glued down flat on the card. I resisted the urge to add some kind of jewels or sparkle but I did add a red bow to the base of the holly leaves bouquet. I used the Real Red Ribbon in the Combo Pack with the Burlap ribbon. You can use whatever ribbon you have. This one was good because it was narrower than some other Real Red ribbon I had.

Be sure to check out the entire Joy of Christmas Suite and choose all or some of it!

SHOP STAMPIN’ UP! HERE!

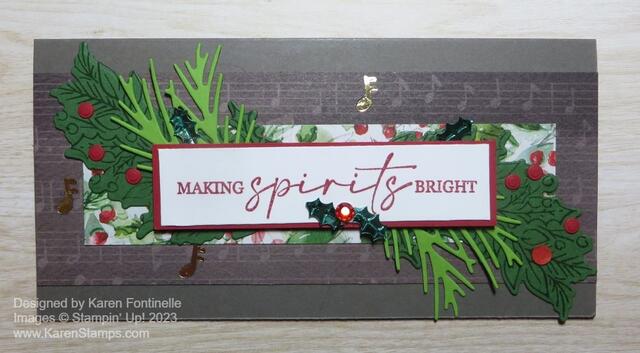
Joy of Noel Slimline Christmas Card

Joy of Noel Slimline Christmas Card

This Joy of Noel Slimline Christmas Card was my first card after recently getting the Joy of Noel Bundle. There are two different Bundles in the Joy of Christmas Suite Collection. Of course, I wanted everything in the Suite, but I chose this bundle because I liked the NOEL stamp.

To get started, I chose to copy a sample in the Holiday Mini on page 28. Of course, mine turned out a little different, but it was fun to make. You can always start by copying an idea in a catalog and then as your idea develops, you can make it your own, as they say.

This is a slimline card. I started with a 6″ x 6″ piece of Pebble Path cardstock and folded it in half to make a 3″ x 6″ card. I cut a piece of the Joy of Christmas Designer Series Paper, the music pattern to go all the way across the middle of the card. It is 2 1/4″ x 6″. Then a smaller piece of the holly leaves and berries patterned paper is 1 1/4″ x 5″.

I stamped two of the foliage pieces in Garden Green ink on Garden Green cardstock and used a die in the Joy of Noel Dies to cut them out. I also cut other foliage pieces out of Granny Apple Green cardstock to add some additional foliage and color.

The greeting is stamped from the Joy of Noel Stamp Set in Real Red ink on Basic White with a layer of Real Red. I just cut a rectangular piece without a die. I popped up the greeting just in the center at first with a Stampin’ Dimensional until I got the foliage pieces placed where I wanted them. I used Multipurpose Liquid Glue so I had some “wiggle” time to put them in the right places. There is even a die for little red berries so I cut some of those out and glued them to the holly leaves. When I had all the pieces adhered where I wanted them, I slipped another Dimensional underneath each end of the greeting.

For some embellishment, not that I needed it, I wanted to play with the new Loose Holly Gems and Sequins. These are currently unavailable but should be back in stock next week, the week of September 18th. They have no adhesive so you need to use a tiny dot of glue to adhere them. There are even little gold music notes in there so I added a few since I was using the music paper.

It’s time to be thinking about Christmas cards so check out the Holiday Mini for some great ideas!

SHOP STAMPIN’ UP! ONLINE HERE!

Delightful Floral Thank You Card

Delightful Floral Thank You Card

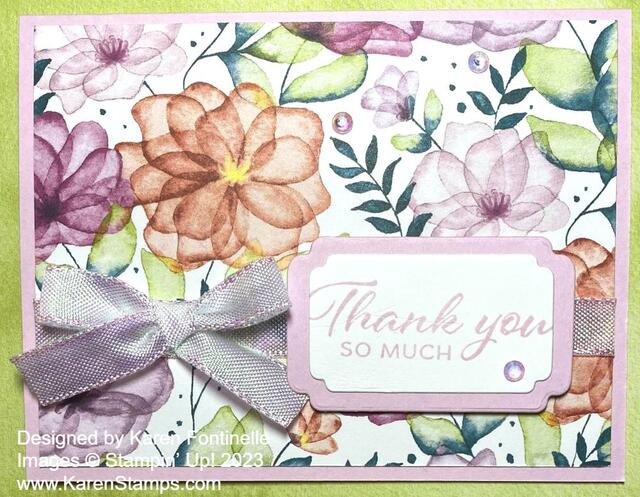
This Delightful Floral Thank You Card is made with the brand-new designer paper of the same name, Delightful Floral Designer Series Paper. This paper was just released by Stampin’ Up! last week in the Online Exclusives category. You may have noticed a stamp set and dies in the Holiday Mini Catalog called the Translucent Florals Bundle. This paper looks to me like it coordinates very well with the stamps and dies, but I only have the paper.

This card is made with a card base of Bubble Bath cardstock. I intended to use two different designs of the designer paper on this card but once I laid this floral pattern on the card front, I thought it looked beautiful as is! It is way prettier in person than in this photograph.

Before adhering the paper to the card front I wrapped a piece of the Iridescent White Ribbon around the front and adhered the ends to the back of the paper. I tied a separate bow and adhered that with several Glue Dots on the back center of the bow.

For the greeting, I chose one in the Layering Leaves Stamp Set. These fonts and sentiments are so pretty and useful. There are a lot of sentiments out there, and I may even like them, but a majority of them are not things that I am going to say on a card, so I really appreciate basic greetings like the ones in this stamp set. This greeting is stamped in Bubble Bath ink (although I also tried Berry Burst). The greeting and layer underneath of Bubble Bath cardstock were both cut with dies in the Something Fancy Dies. I popped it up with Stampin’ Dimensionals to fit over the ribbon. And for my favorite finishing touch, I added three Iridescent Rhinestone Jewels for a little sparkle, along with the sparkle of the ribbon!

Every page of this Delightful Floral Designer Paper has beautiful watercolor flowers and botanicals that you can use for all kinds of occasions. It has beautiful jewel-toned colors: Berry Burst, Blackberry Bliss, Bubble Bath, Calypso Coral, Fresh Freesia, Lemon Lolly, Parakeet Party, Pool Party, and Pretty Peacock. This paper would make beautiful scrapbook pages as well. Remember, you will find it in the Online Exclusives in the Stampin’ Up! Online Store or just write the name in the search box and it will come up!

You won’t be disappointed to have this paper on hand for your cardmaking and scrapbooking!

SHOP STAMPIN’ UP! ONLINE HERE!

October Paper Pumpkin: Home For the Holidays!

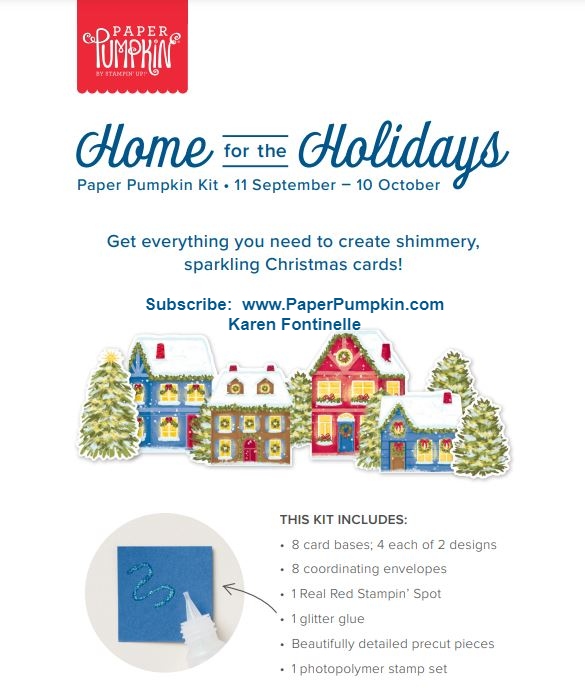
It’s a new month for Paper Pumpkin and the October Paper Pumpkin Kit is called Home For the Holidays!

Create dazzling traditional Christmas cards with the Home for the Holidays Paper Pumpkin Kit! This kit includes eight beautiful cards—four each of two designs. Whether you want to send a few to your loved ones or fill your home with some extra special Christmas cheer, this kit has everything you need to make some sparkly, festive cards. Keep reading to learn more!

One extra fun feature of the Home for the Holidays Paper Pumpkin Kit is the bottle of glitter glue! You can use this glue to add shimmery, shiny details to the Christmas scenes on your cards. You can add some glitter to the trees, houses, snow, and more. That sounds like fun!

ABOUT THE KIT

Kit Name: Home for the Holidays

This kit includes:

  • All the supplies you’ll need to create 8 sparkly and dazzling Christmas cards—4 each of 2 designs—and eight coordinating envelopes.
  • A coordinating photopolymer stamp set with endearing holiday sentiments and festive designs.
  • A Real Red Stampin’ Spot
  • A bottle of Glitter Glue
  • Beautiful Christmasy-themed precut pieces

Finished folded card size: 4-1/4″ x 5-1/2″ (10.8 x 14 cm)

Coordinating Stampin’ Up! colors: Balmy Blue, Blueberry Bushel, Cherry Cobbler, Crumb Cake, Crushed Curry, Daffodil Delight, Lemon Lolly, Mossy Meadow, Night of Navy, Old Olive, Pecan Pie, Real Red

SUBSCRIBE to Paper Pumpkin by October 10th by clicking HERE!

Pick of the Patch Pumpkin Card

Pick of the Patch Pumpkin Card

Pick of the Patch is one of the new stamp sets I just got from the Stampin’ Up! Holiday Mini Catalog and this Pick of the Patch Pumpkin Card is my first play with it! I had no particular plan in mind and I’m not saying this is the best I could do with the set, but I got a card made! While I only ordered the stamp set, there is a Pick of the Patch Builder Punch you can also order for punching two different pumpkins, a leaf, and a stem. If you get both the punch and the stamp set together in the Pick of the Patch Bundle, you can save 10%.

I didn’t need the punch for this card because I only did stamping with the pumpkins and gourds. This will be a stamp set where you might need to use the masking technique. If you are unfamiliar with masking, it means covering up one stamped image so you can stamp another one to look like it is behind the first one or if they overlap on the sides. It is handy to do this with something like a sticky note. Stamp the images, such as a pumpkin, on the sticky note so that when you cut out the pumpkin you will have some of that adhesive to hold the mask in place. Now Stampin’ Up! sells Masking Paper that has adhesive on the paper that you use for a mask. So you stamp your image on the masking paper (take a peek and make sure that the side of the paper you are stamping on is the sticky side!), cut it out, them use it as a mask when you need it. Just keep it in your stamp case because you can use the masking image over and over.

The card base is Pumpkin Pie cardstock with a layer of Basic White. I stamped an assortment of pumpkins and a gourd, in Pumpkin Pie ink and Crushed Curry for the gourd and added some stems and vines. Then I stamped the leafy plants all around the pumpkins in two different colors of green. There is a stamp with three little leaves on it so I pulled out some Stampin’ Write markers (NOT Blends!) in Pumpkin Pie, Granny Apple Green, and Crushed Curry. I colored directly on the stamp with two or three of the marker colors and then stamped to give them a little fall multi-color.

For a greeting, I chose one in the Pick of the Patch Stamp set and stamped it with Pumpkin Pie ink. Then I used a rectangle die in the Timeless Arrangements Die to cut out the greeting. I cut out another rectangle of the same size in Mossy Meadow cardstock. Since it is the same size, I can’t use it as a layer, but I went about it another way. I cut the green rectangle in half horizontally and just adhered the two pieces to the top and bottom underneath the greeting to help it stand out a little better.

That’s all to this card. As I said, I may have just been trying out the pumpkins but it did turn out to be a card in the end! I look forward to using this set a lot more during the fall, for Halloween, and for Thanksgiving, anything fall! And while I’m stamping and cutting out pumpkins, I can pretend like it’s not still 100 degrees outside!

Shop Stampin’ Up! Online HERE!

Old-Fashioned Santa Christmas Card

Old-Fashioned Santa Christmas Card

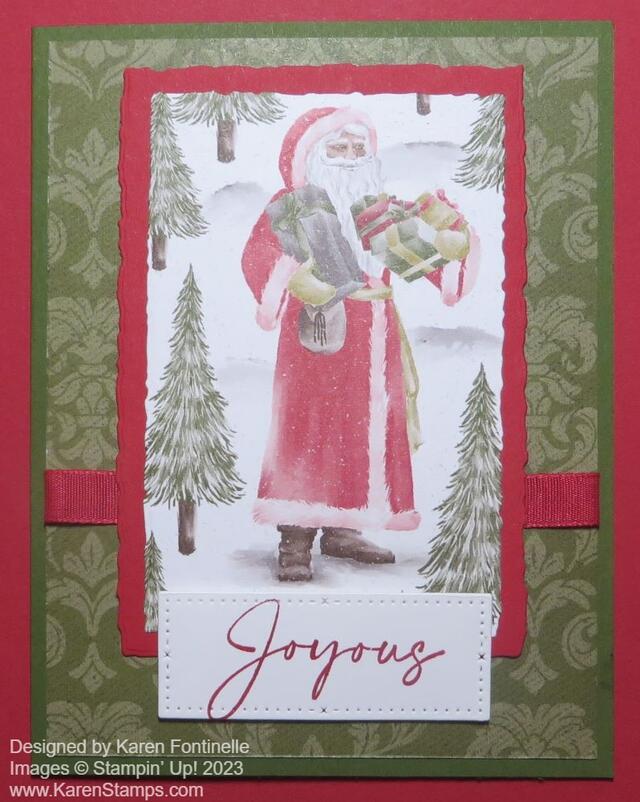
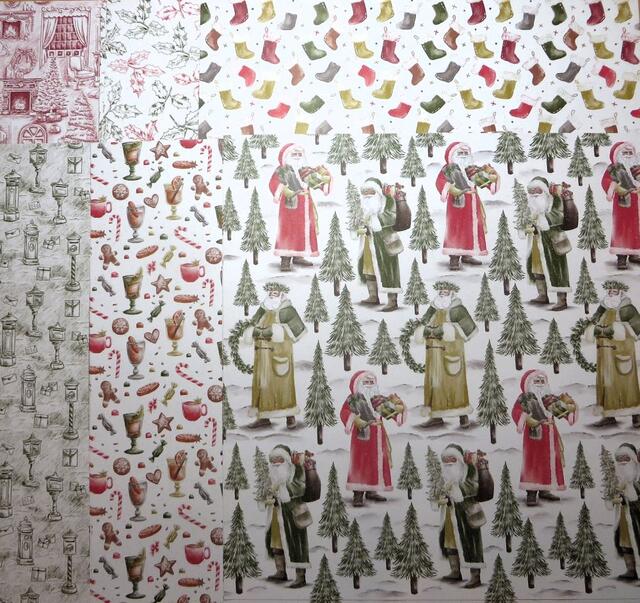
This week Stampin’ Up! released not only the September-December 2023 Mini Catalog but also five new designer series papers in the Online Exclusives! One of them I especially loved with these classic Santas as one of the paper patterns. As soon as my Holiday Mini order came with this Traditions of St. Nick Designer Series Paper I had to make a card with it and this Old-Fashioned Santa Christmas Card is what I came up with!

The card base is Mossy Meadow cardstock with a layer of the damask pattern of paper in the same Traditions of St. Nick paper. This damask pattern gives a really elegant look without taking away from the Santa. Before adhering the designer paper layer, I wrapped a piece of Real Red Ribbon around it.

The Santa is diecut using the Deckled Rectangles Dies. If you take the die that is the right size and place it on the designer paper, you can figure out where you have to cut out that area of the image from the designer paper. It’s a killer to cut into the paper the first time but it must be done! It seemed impossible to me to omit just the bottom of a couple of tree trunks in the area but you have to make the Santa fit plus some nice trees without bumping into part of another Santa. You could also just fussy cut a Santa if you don’t want a rectangle. Circles probably wouldn’t work. Then I cut another larger deckled rectangle in Real Red for a layer. You could pop up the Santa on Stampin’ Dimensionals but I just adhered it flat on the card.

The greeting is from the Joy of Noel Stamp Set that I just got. I stamped it in Real Red ink and diecut it with a stitched rectangle in the Timeless Arrangements Dies. The word just barely fit but it did! It is popped up with Dimensionals. There are other Christmas greetings that you could use as well.

I really like this paper and this card and plan to make more Santa cards! Remember, this Traditions of St. Nick Designer Series Paper is NOT in the Holiday Mini Catalog. You have to search under “Online Exclusives” which are new releases that Stampin’ Up! is going to bring out now and then so we don’t have to wait to see them in a catalog! That keeps life exciting! The only thing is Online Exclusives are not guaranteed to be around for any particular length of time. So if you see something you like a lot, don’t wait.

I hope you are enjoying the new mini catalog and getting ideas for your fall and holiday cards and projects!

Traditions of St. Nick Designer Series Paper

SHOP STAMPIN’ UP! ONLINE HERE!

Textured Floral Hello Card

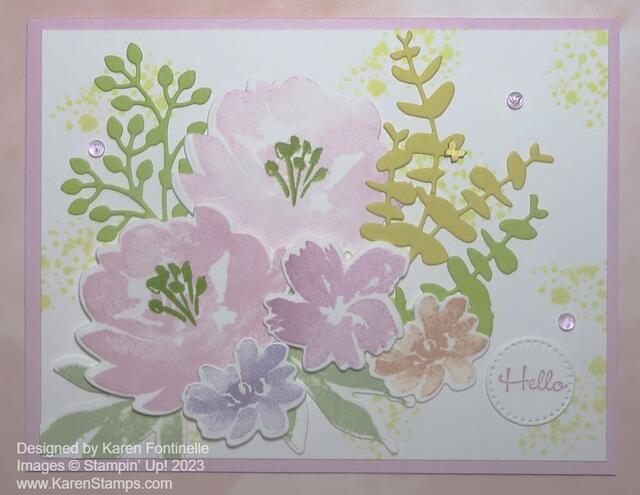
I’ve had this little pile of scraps on my table for quite a while so I finally decided I was going to just make a card right away with these stamped and diecut pieces. From that, I came up with this Textured Floral Hello Card just made of scraps!

The card base is Bubble Bath, one of our new colors. I thought that was the color these large flowers were probably stamped with. I added a layer of Basic White since the flowers were so light in color. As I tried out various flower arrangements I decided to add some texture in the background with the dotted stamp in the Textured Floral Stamp Set. I stamped these randomly in Lemon Lime Twist.

I also had three smaller flowers stamped in other colors – Highland Heather, Fresh Freesia, and Calypso Coral. I just played around with the placement of the flowers, the leaves, and the foliage stems until I was happy with it. At this stage, it’s often a good idea to take a picture with your phone so when you pick up the pieces to glue them down, you will be able to put them back in the design that you liked!

Here’s kind of a similar card I made by stamping and diecutting with the Textured Floral Stamp Set.

Since I took up a lot of room with all the flowers and stems, I didn’t have much, if any, room for a greeting. I almost left it off because that is fine, too. But in the Go To Greetings Stamp Set, I found this very small “Hello” and I thought that was perfect! I stamped it in Fresh Freesia and diecut it with the smallest circle in the Stylish Shapes Dies. I also die cut the next larger circle in Fresh Freesia, but it wasn’t as close in size as I would have liked to this small circle and it took up too much room on my card. I thought the Hello by itself looked fine.

For embellishments, I added a little Brushed Brass Butterfly on one of the leaves. I also added three Tinsel Gems Three Pack in Fresh Freesia. And that finished off my card made out of stamped and diecut scraps!

SHOP STAMPIN’ UP! ONLINE HERE!

Halloween Ghosts Boo Card

Halloween Ghosts Boo Card

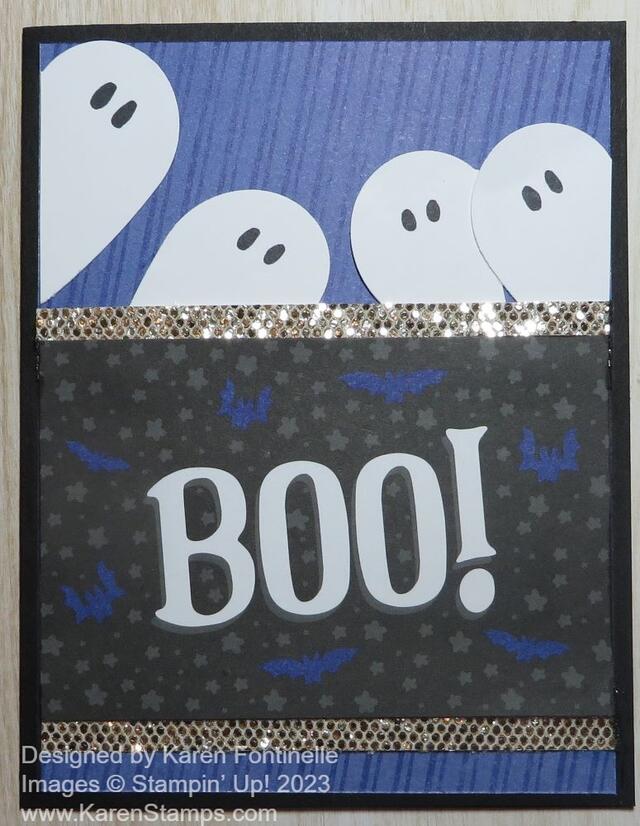
I was so thrilled with this Halloween Ghosts Boo Card after I made it! It’s all because of a creative idea I learned right before I signed up to be a Demonstrator. It was such an incredible idea I could hardly stand it! And I’ve been copying that idea ever since!

This Them Bones Designer Series Paper for Halloween has two sheets of this paper that have multiple panels on it that you can cut apart. One of them has the word “Boo” on the panel and that is what I used on this card. The background paper is also in the package, with a slight diagonal stripe. Behind the Boo panel, at the top and bottom, I added narrow pieces of the More Dazzle Specialty Paper. They are about 1/2″ wide. The card base is Basic Black.

This is how I made the ghosts, the focal part of the card. I punched out two hearts. That’s it! And then you cut the heart in half right up the middle. Then place the ghosts at an angle (or in this case, tucked under the Boo panel). Draw on some eyes, maybe a mouth if you want. So simple and isn’t it so creative?! I used a retired heart punch to make the ghosts. You probably have one or some heart dies, and if you don’t have one of those you can just cut out hearts like you did when you were a kid.

That’s how easy it is to make this card. If you don’t have the Boo panel to use, just adhere any paper you like and add a greeting from another stamp set or spell out Boo with an alphabet set you may have.

In case you haven’t heard, the Stampin’ Up! Holiday Mini Catalog went live yesterday so you can start your holiday stamping shopping spree!

SHOP STAMPIN’ UP! HERE!

Holiday Products at Stampin’ Up! Today!

Holiday Mini Catalog 2023 Cover

Finally, the day has arrived when everyone can order to their heart’s content from the new Stampin’ Up! September-December 2023 Mini Catalog, otherwise known as the Holiday Mini! It’s the second-best catalog next to the Stampin’ Up! Annual Catalog if you ask me!

Here are some products that are currently unavailable and dates when they will be back in stock. But you can always check back earlier and see!

The Stars At Night Hybrid Embossing Folder: Week of October 2

Adhesive Backed Star Trinkets: Week of October 25

Shining Brightly Designer Series Paper: Week of September 11

Copper & Natural Ribbon Combo Pack: Week of October 23

Bag of Bones Dies: Week of September 11

All About Autumn Designer Series Paper: September 11

***If a Suite or Bundle is unavailable, it means one or more of the products in the Suite are unavailable but you can still order the products separately that are available. And probably a good idea to do that!

SHOP HERE!

And there’s MORE!!

In the Online Exclusives, Stampin’ Up! is offering a special release of five beautiful new Designer Series Paper options! These papers include fabulous holiday prints, gorgeous seasonal styles, and some spectacular timeless designs. These papers are available while supplies last! Check out the interesting and fun new designs to add to your collection! They’re not just for Christmas! Watch the video below.

SHOP HERE!

AND a new Kit in the Kits Collection available today!

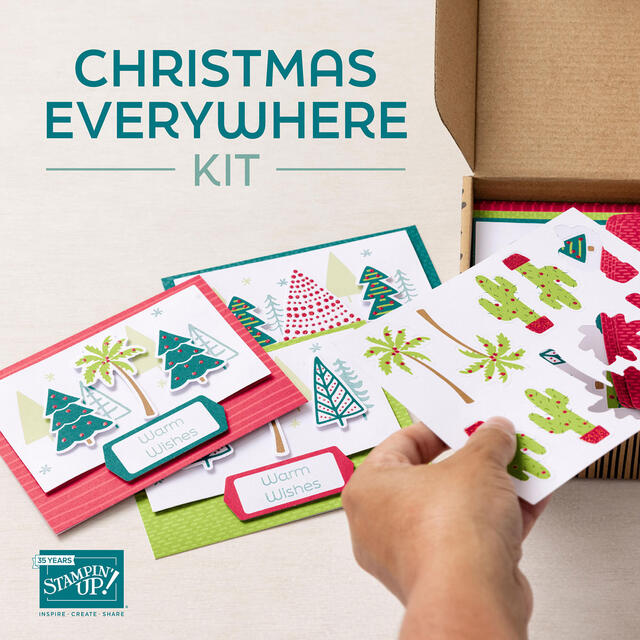
Christmas Everywhere Kit Collection

“Celebrate Christmas with everyone, everywhere with the Christmas Everywhere Kit by Stampin’ Up! It comes with everything you need to create 9 Christmas cards in 3 festive designs featuring trees from around the world. Get an early start on your Christmas crafting and send some holiday cheer to friends and loved ones wherever they are!”

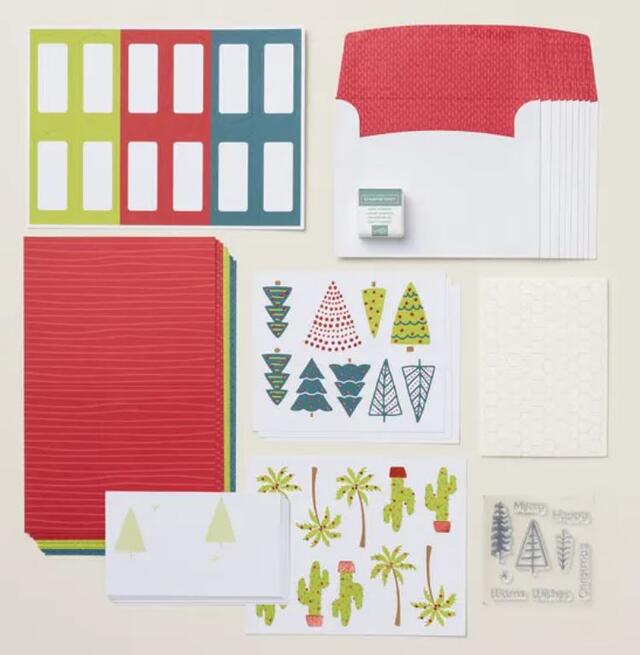
This kit includes:

-Enough supplies to create 9 cards—3 each of 3 designs
-9 coordinating envelopes
-Christmas Everywhere photopolymer stamp set
-One Lost Lagoon Ink Spot
-Printed card bases, printed die-cut labels and images with red glitter, adhesive, and a clear block
-Finished card size: 5-1/2″ x 4-1/4″ (14 x 10.8 cm)
-Coordinating colors: Granny Apple Green, Lost Lagoon, Pecan Pie, Pretty Peacock, Real Red

Christmas Everywhere Kit Collection Supplies

SHOP KITS COLLECTION HERE!

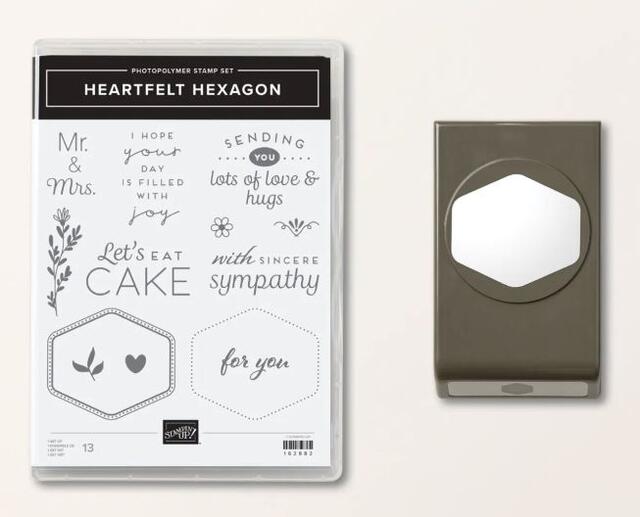
One more surprise Bundle released today for World Card Making Day October 7! You can register for the FREE Stampin’ Up! event! It’s the Heartfelt Hexagon Bundle!

Heartfelt Hexagon Bundle

HAPPY SHOPPING!

Beary Cute Polar Bear Christmas Card

Beary Cute Polar Bear Christmas Card

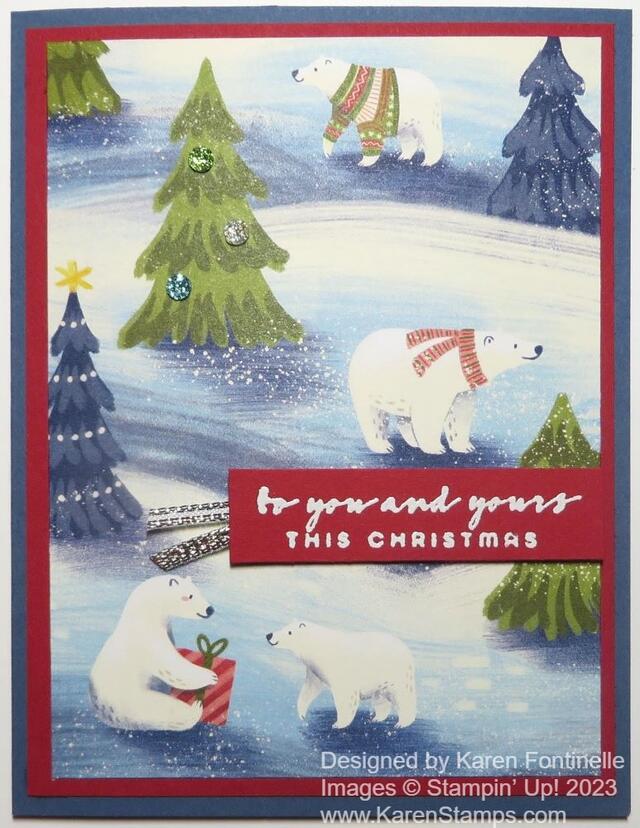
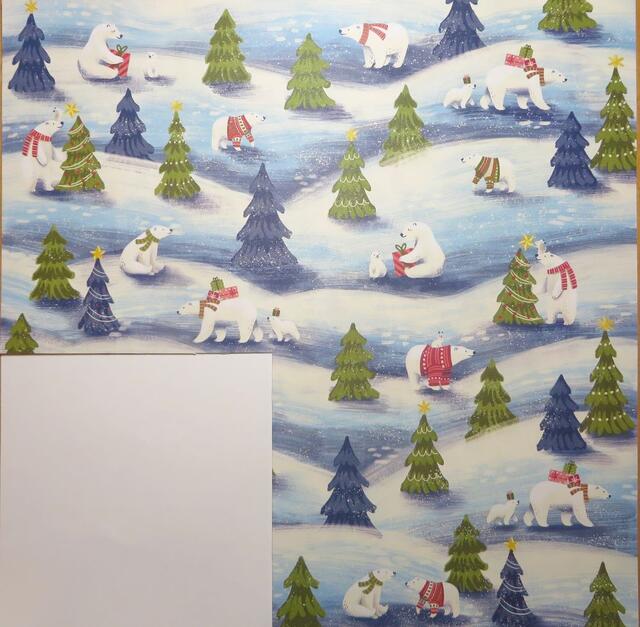
This Beary Cute Polar Bear Christmas Card is made with one of the new designer papers coming TOMORROW in the new September – December 2023 Mini Catalog. The more I use it the more taken I am with it! You can do so many fun things with these cute polar bears of all sizes! I knew the paper was cute when I saw it in the catalog, but it could possibly be my favorite paper in the Mini.

I can guarantee that you will hate to cut into this paper with all the bears and the other forest creatures. But cut into it you must! You can use the Beary Cute Punch to punch out certain of the bears but to really have fun with the paper you can “fussy-cut” the images or diecut some.

To make this card, I simply cut out an area of the Beary Cute Designer Series Paper and adhered it to the card. Now it may not seem simple to do. You just have to figure out an area that can be cut out, either with a die or using the Paper Trimmer, that won’t cut off anything that you really want or won’t include something you don’t want from a neighboring image. You may have to cut it smaller than a normal layer on a card but that will work out. I used a ruler to help me see what part of the paper would work. Just kind of measure the piece you want. You may even initially cut it larger than you want so then you can carefully trim down the piece to have the images you want that will fit on your card or project.

Beary Cute DSP

I liked having the Real Red layer underneath the designer paper for this card to bring out the red on the bears. The card base is Misty Moonlight but Night of Navy looks good, too. You might notice that Very Vanilla is one of the coordinating colors for the designer paper, not Basic White. Most people wouldn’t notice if you sent a card with this paper with Basic White, but officially I guess the color to use for a neutral is Very Vanilla.

For the greeting, I embossed this one with white embossing powder on a scrap of Real Red cardstock. The greeting is in the Brightest Glow Stamp Set. It is carried over so you will find it online if you search but it is not in the Annual Catalog. To add a little accent to the greeting I simply stuck a folded piece of Gold Trim underneath the edge. And you won’t be able to resist using the Glitter Sequins on page 23 in the Holiday Mini! I stuck a few on the Christmas tree on the paper for a little sparkle!

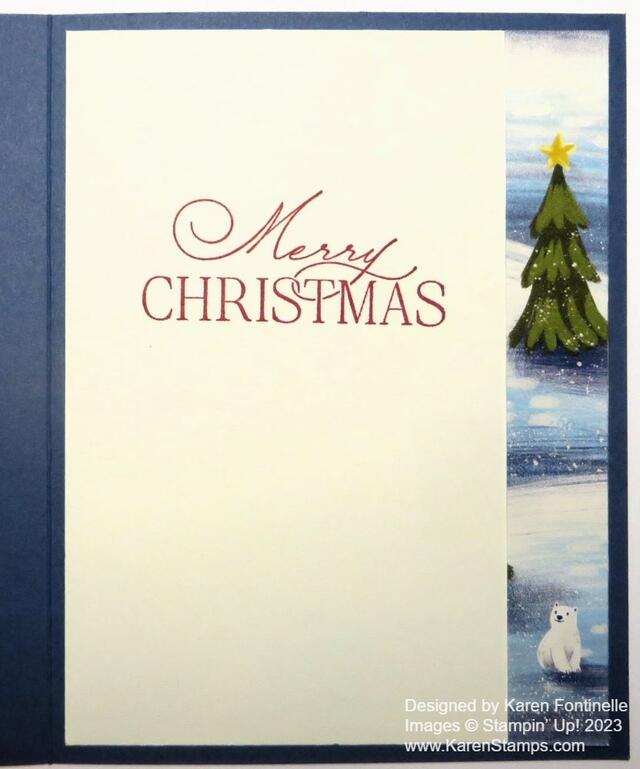
The area I cut out of the designer paper is a little larger than I used for just the front of the card. After I finished the front of the card I decided I would like a strip of the designer paper on the inside layer of the card. When I looked back at the paper, it looked like a perfect strip of paper just to the side of what I had already cut out for the front of the card. It has a small tree and a small bear! You can see the photo below.

Beary Cute Polar Bear Christmas Card Inside

Get ready with your Shopping List for tomorrow when the Holiday Mini goes live! Remember, the website could be busy but hopefully you won’t have any problems!

SHOP HERE!

Them Bones Easy Halloween Card

Them Bones Easy Halloween Card

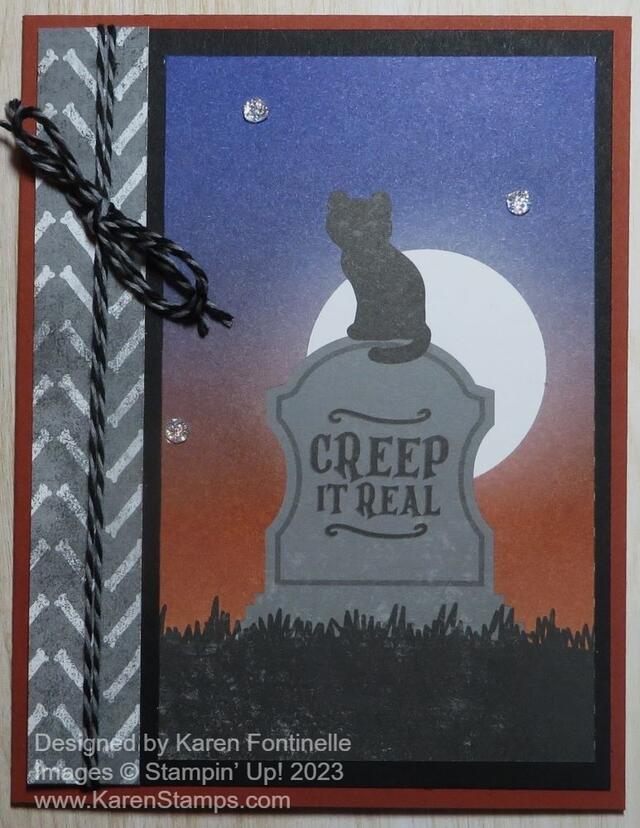
If it is September, then we who love Halloween start thinking ahead! If you want to send out a Halloween card or two you probably want some easy ideas, like this Them Bones Easy Halloween Card.

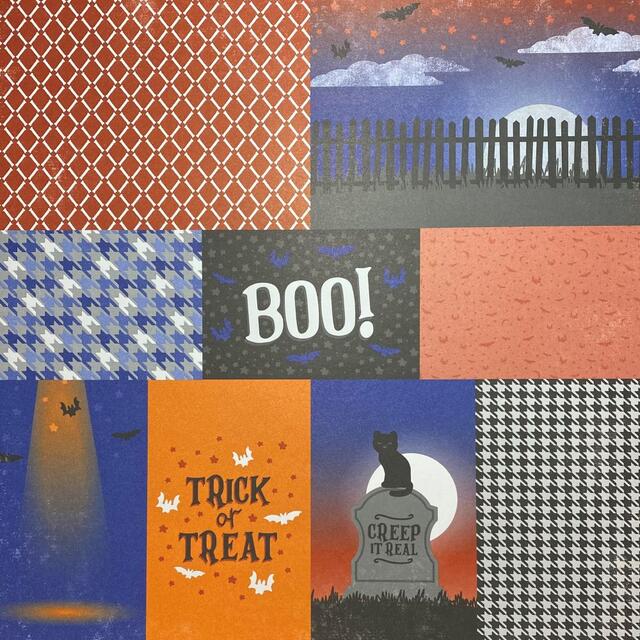
Two of the sheets in the pack of Them Bones Designer Series Paper (162215) have different Halloween scenes printed on smaller panels. You can cut these apart and use them for cards or other projects. My card today is one of those panels. You can see the paper below. You can see that this card came from the panel on the bottom row.

When you cut these panels apart, as you can probably tell by looking at the paper, they aren’t all a standard size. You will have to work with the panel a little if you put it on a card to maybe add a layer underneath or add a little something to the side. This panel that I cut off the big sheet of paper measures 3″ x 4 7/8″ so I had to work with that a little.

The card base is Cajun Craze with a layer of Basic Black. Then I cut a strip of paper from another pattern in the Them Bones Designer Paper. One side has all these bones in a herringbone pattern and the other side is orange with small skeletons and bats. I cut a strip 5 1/4″ x 3/4″ to fill up that space since the main image is narrow.

I wanted some ribbon or twine to tie around the bones paper and I ended up pulling out some retired Halloween Night Baker’s Twine, maybe from quite a few years ago! It was perfect! It was black and gray. If you have this twine, the other roll is orange and black. Plain black twine would be fine, too. If you need some twine, you can purchase the Baker’s Twine Essentials Pack with five colors – black, white, Gray Granite, Crumb Cake, and Very Vanilla. That will cover you for most anything! I just chose to use something I already had that went well with the card.

For a little embellishing, I added three Adhesive-Backed Glitter Sequins (162029) on page 23 in the Holiday Mini Catalog. You want to get these for sure! Even though they are on a Christmas page, you can see you can even use them for Halloween! I thought they looked like little stars in the sky or even something spooky!

If you like Halloween, you will enjoy the Them Bones Suite Collection in the Holiday Mini! Be sure to notice the Glow-in-the-Dark Bats & Ghosts and the Glow-In-the-Dark 6″ x 6″ Specialty Paper if you want to make some diecuts of skeletons of anything!

The September-December 2023 Mini Catalog, or Holiday Mini, goes live on Wednesday, September 6th! Be sure to get some of the things you really, really want as soon as you can because no telling what will be super popular early on when the catalog comes out!

SHOP STAMPIN’ UP! ONLINE HERE!