Countryside Inn Blue Floral Card

Countryside Inn Blue Floral Card

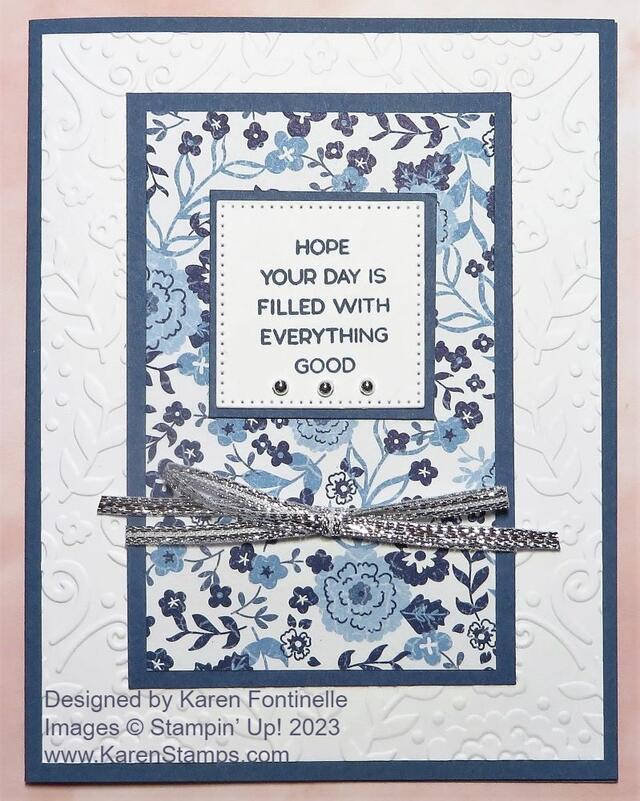
Here’s a card that is simple enough yet has that elegant look to it, I believe. This Countryside Inn Blue Floral Card could be used for almost any occasion, even with the greeting that is stamped on it, but could have a different greeting such as for sympathy or even a wedding.

You can use any of four blue colors for this card that coordinate with the Countryside Inn Designer Series Paper. The colors are Balmy Blue, Boho Blue, Misty Moonlight, and Night of Navy. You could choose any of them for this card. The card base I used is Misty Moonlight cardstock.

The layer on the card is Basic White and embossed with the Countryside Blossoms Embossing Folder. This is such a pretty embossing folder, and even though most of the embossing is covered up on my card with the center panel, you still see enough of it to enhance the card. It just adds some richness and texture to the card.

The Countryside Inn Designer Series Paper is on the center panel, of course, layered on top of another piece of Misty Moonlight cardstock. You can cut these layers any size you like. Mine is approximately 3″ x 4 1/4″ for the Misty Moonlight layer and then 2 3/4″ x 4″ for the designer paper layer. Before adhering that piece to the embossed layer and the card, I wrapped around some Silver Trim ribbon and added a bow around that center panel. After that it was glued to the front of the card or you could pop it up with Stampin’ Dimensionals.

The greeting is stamped on Basic White cardstock which is diecut with the stitched square in the Stylish Shapes Dies and then layered on just a cutout rectangle of Misty Moonlight to fit.

For some bling, I added three Festive Pearls in silver to the greeting on the card. I think those are just the right touch!

Remember, this Countryside Inn Designer Series Paper is on sale for just a couple of days at Stampin’ Up! Besides the florals, this designer series paper almost has surprises in its paper designs. Check it out for 15% off by June 30th!

SHOP STAMPIN’ UP! ONLINE HERE!

Join My Stamping With Karen Mailing List!

Red Mailbox for Mailing List Sign Up

Have you signed up for my Stamping With Karen Mailing List yet? If you like visiting my blog or if this is your first time here, please join us by signing up in the Mailing List Sign Up Box! You will receive an email newsletter on the first Tuesday of each month with the latest Stampin’ Up! news and any special offers, plus at least one tutorial for a card or another project or tip.  Each following Tuesday I send an email, again with some kind of stamping idea or review some projects I have recently had on my blog, plus any news or reminders. Stampin’ Up! generally updates us on Tuesday mornings so that is why Tuesday is a good time to get in touch with you!

If you like getting new ideas for stamping, then this is for you! These projects are exclusive to my newsletter. As a special gift for signing up, you will receive a PDF called “A  Dozen Creative Gift Wrap Ideas”. Who doesn’t need some quick and easy way to wrap a gift at the last minute?! This might save you a trip to the store for gift wrap! You can change the stamps, ink, paper, and embellishments to current products but the basic idea is the same.

Once you sign up, you will receive a confirmation email very shortly and after that, you will get another email with a link to your FREE GIFT!

And one of the best parts of being on my mailing list is something that will be coming up soon! This may be hard to believe, but we are inching ever closer to Christmas, even as we are suffocating in the summer heat!  Something very popular with my subscribers is my “12 Weeks of Christmas” newsletter. Each week leading up to Christmas, I send out a special email with an exclusive project in it.  We start with cards, move on to gift ideas, and end up with tags and bags! This makes it handy for my subscribers to get ideas or just be inspired to create something of their own. Make some cards, make a few simple gifts, and then be ready with some wrap ideas and cute tags! It’s all fun! Only my subscribers receive these newsletters each week leading up to the holidays so make sure YOU are signed up! And tell your friends! Before we know it, the Stampin’ Up! Holiday Mini Catalog will be coming out because we crafters need to get an early start on the holidays starting with fall.

No obligation, of course!  As with any email, just unsubscribe it if it is not for you.

You can also follow me on my Stamping With Karen Facebook page HERE and follow me on Instagram @stampingwithkaren.

Keep on top of all things Stampin’ Up! and learn ways to use those great products in your papercrafting!  Sign up in the Mailing List sign up box in the upper right corner of my blog or in the pop-up box if you are lucky enough to get one! If you are on your phone, the red signup box may be at the bottom of this post.

Here is a link to sign up also.

Charming Sentiments Brights Scrap Card

Charming Sentiments Brights Scrap Card

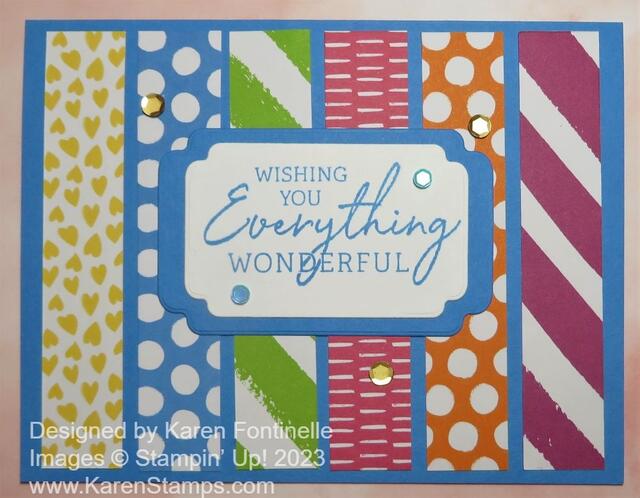
Could there be anything easier to make than this Charming Sentiments Brights Scrap Card? And it’s bright and cheerful to boot! This was an accidental card, meaning I had no intention of making it, but I saw these almost perfect-sized scraps in my package of the Brights 6″ x 6″ Designer Series Paper and the idea came to me to make this scrap card!

I just chose one of the designer paper colors, Azure Afternoon, for the card base. Next, I simply chose some scrap strips and played around for a second with their placement. Remember, you have two sides to choose from! I glued them down right onto the Azure Afternoon, just eyeballing their placement. You “could” measure and do the math and all that, but that’s no fun! Just lay them out and tweak them about how spaced apart they should be!

As an alternative, you could cut a layer of Basic White or any other color and either glue the strips spaced apart as they are now or push them together with no spaces.

For the greeting, I chose this one from the Charming Sentiments Stamp Set and stamped it in Azure Afternoon ink. It is die cut as well as an Azure Afternoon layer with two dies in the Something Fancy Dies. For some sparkle, I used a few Pastel Adhesive-Backed Sequins.

It’s really a very simple card but still makes you look talented! Another thing you could do would be to stamp randomly on Basic White or colored cardstock, then cut that paper apart into strips whatever size you like. So many different ideas you could pull from this one card!

Don’t forget the Stampin’ Up! Designer Series Paper sale going on for just another week! It ends on June 30. This Brights 6″ x 6″ paper is NOT on sale but plenty of other great ones are so take a look!

SHOP STAMPIN’ UP! ONLINE HERE!

Irresistible Blooms Lemon Lime Twist Monochromatic Card

Make a bright and happy card with one of the bright new colors in our Color Refresh at Stampin’ Up!, the Irresistible Blooms Lemon Lime Twist Monochromatic Card. It’s easy when you use one color of ink and paper!

This card uses the Irresistible Blooms Stamp Set and the Irresistible Blooms Dies. You can buy both together and save 10% by purchasing the Irresistible Blooms Bundle. The flowers and leaves are all stamped with Lemon Lime Twist Ink on Basic White and then die cut. There are two different sizes of dies for the flowers and two sets of leaves. If you don’t have the dies, it is easy enough to cut them out by hand.

The greeting is in the Irresistible Blooms Stamp Set and is die-cut with a stitched circle in the Stylish Shapes Dies.

The card base is Basic White. The card layer uses two different patterns of the Brights 6″ x 6″ Designer Series Paper. They are cut at 5 1/4″ x 4″ as you would for any layer on a card but then cut diagonally in half to make two different designs. Be sure to check before you cut the paper if you want the patterns to go a certain way.

After the designer paper is in place and you have stamped and diecut all the flowers and leaves, lay them out on the card to get an idea of where you want everything to be placed. You can pop up some of the flowers or leaves on Stampin’ Dimensionals and adhere the rest flat on the card. You just want the adhesive to not extend completely to the edges of the flowers so that you can tuck the leaves in underneath where you want them. The greeting is popped up on Stampin’ Dimensionals.

For a finishing touch, I added some Irridescent Rhinestone Jewels to the card front. On the inside, I added a flower and some leaves in the corner or I could have just stamped them to match the front of the card.

You could make this same card but make the flowers and leaves different colors, but I think monochromatic cards look very nice and are easy! Try your hand at a card like this one with this pretty stamp set and bright and happy designer paper!

SHOP STAMPIN’ UP! ONLINE HERE!

FREE SHIPPING TODAY at Stampin’ Up!

Today is FREE SHIPPING at Stampin’ Up! with a $75 minimum order, before tax, of course!

All Day!!

SHOP HERE TODAY!

Time to stock up and save on your favorite Stampin’ Up! products!

Take advantage of the Designer Series Paper Sale as well!

Prepaid 3-, 6-, or 12-month Paper Pumpkin subscriptions are eligible for FREE shipping!

The sale ends June 21 at 11:59 PM (MT).

Zoo Crew Book Fold Card

Zoo Crew Book Fold Card

This Zoo Crew Book Fold Card is something just a little bit different to make! There is a card design called a Book Fold. Instead of the entire front of the card opening, there is an additional scored line to the left on the card front and that 1 1 /4″ section is glued or tied down so that only part of the card front opens. Just something a little different and interesting!

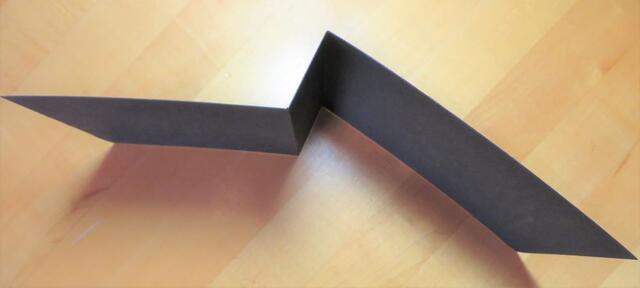
Cut a piece of cardstock for the card base that is 11″ x 4 1/4″. Basically, cut a piece of cardstock in half lengthwise. With that piece of cardstock horizontal in your Paper Trimmer or Scoring Tool, score at 4 1/4″ and 5 1/2″. It should look something like this:

Book Fold Card Paper Scoring

In this card design, you are creating a “hinge” where the card opens rather than at the normal fold line. That section of the hinge will be glued down so that it won’t open on the fold line but on that additional score line.

You will also need a 1″ x 4″ piece of designer paper (or stamped piece) to adhere to the front of that narrow hinge area and a 4″ x 4″ piece of designer paper (or stamped piece of plain cardstock) for the front section of the card. On the inside of the card, you can add a piece of Basic White if the card is dark for your stamped or written message. You can cut it at 4″ x 4″ or longer to fit underneath the hinge area before it is adhered.

You can adhere that hinge area with glue or Stampin’ Seal OR you can punch two holes and tie it shut with ribbon or twine.

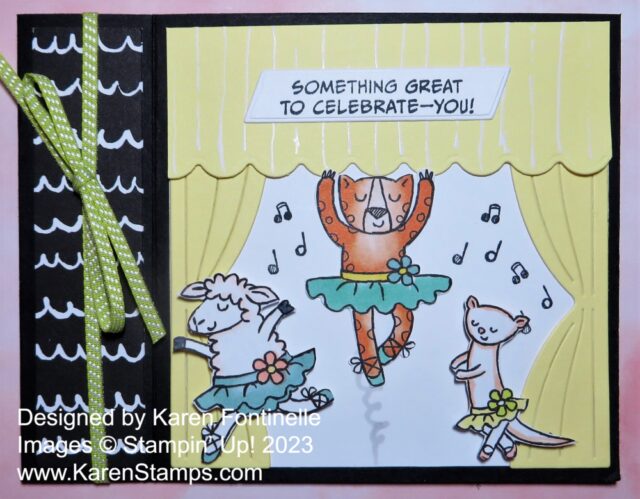
For this card, I used Basic Black cardstock for the card base and one of my favorites, the Zoo Crew Designer Series Paper to decorate the card. The 1″ x 4″ piece on the hinge side is the black & white side of one of the designer papers. Before adhering to that section, I wrapped a piece of ribbon around it first and then tied on a bow.

For the card front, I added a 4″ x 4″ background piece of Whisper White, stamped with a few music notes in the Zany Zoo Stamp Set. For the overhead valance and curtains on the side of the stage for the dancers, I used Lemon Lolly cardstock, die cut using the Zany Zoo Dies. You can purchase the stamp set and dies in a Bundle and save 10%! And save 15% on the Zoo Crew Designer Series Paper during June! For a little something on the top valance, I used a retired white gel pen to draw in some “folds” or “pleats” (just straight lines!).

The dancers are cut from the Zoo Crew Designer Series Paper and are partially colored but I added a bit more color to some of them with my Stampin’ Blends. I love to color with those but leaving the characters plain would be fine too! I drew a little spiral under the center dancer to show that she had leaped up in the air! The other two dancers are popped up on Stampin’ Dimensionals.

Just a fun card to make with a little different design! Try your hand on one of these Book Fold cards next time you are crafting!

TOMORROW is FREE SHIPPING at Stampin’ Up! with a minimum $75 order, one day only, June 21! Make your list today and enter your order tomorrow! Combine the DSP Sale and the FREE SHIPPING for an even better deal!

Time Is Getting Short On The Stampin’ Up! Designer Series Paper Sale!

DSP Sale Sq Ad June 2023 Info

Time is getting short to take advantage of the Stampin’ Up! Designer Series Paper Sale on select papers during the month of June! Amazingly, we are already past the middle of June!! You have this week and most of next to order the Designer Paper you want!

CLICK HERE TO READ THE FLYER LISTING ALL THE PAPERS!

  • There is no limit to how many packages of Designer Series Paper may be purchased during this promotion.
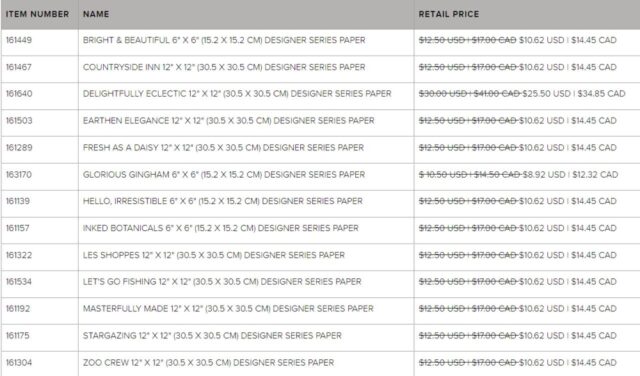
  • Only select Designer Series Papers are available at a 15% discount during this promotion. Please reference the table below to see the papers included in the sale.
  • Orders must be placed—and closed—during the promotion period for the 15% discount to apply.
  • Designer Series Paper ordered as part of a Starter Kit or with Stampin’ Rewards qualifies for the 15% discount.
  • Designer Series Papers are from the new 2023–2024 Annual Catalog (p. 129–132) and Online Exclusives.
  • Click on the chart below or HERE.
Designer Paper Sale June 2023 Listing

Notice that the big, 48-sheet pack of designer paper, Delightfully Eclectic 12″ x 12″ Designer Series Paper, is on the list!! It seems expensive, but you get a lifetime of paper at 15% off, so it’s a great deal! Interesting and different patterns, like pretzels, (one of my favorite foods), an alphabet, swans, ledger paper, flowers, stripes, everything!

The Sale ENDS FRIDAY JUNE 30th!

SHOP THE STAMPIN’ UP! DESIGNER SERIES PAPER SALE!

A Dad Card For Father’s Day

Dad Card For Father's Day

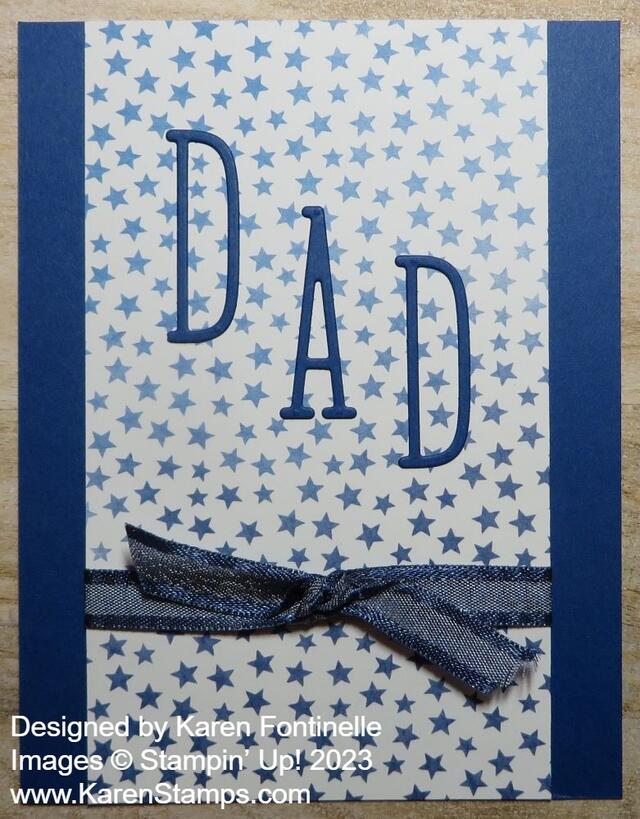
Sunday is Father’s Day so make sure you have a card ready for the special man/men in your life! Here is a super simple Dad Card For Father’s Day.

The card base is Blueberry Bushel, one of the returning colors in the Stampin’ Up! Color Refresh in May. I liked this layer of Bright & Beautiful Designer Series Paper with the little stars for this card. The stars have the ombre effect as you go down the card. I cut the paper the full length of the card but narrower. It’s 5 1/2″ x 3 1/4″. Before adhering it to the card base, I added a piece of the Night of Navy 3/8″ Bordered Ribbon around the bottom of the card and tied a knot onto the ribbon separately. After attaching the ribbon, I adhered the this piece to the card base.

I used the Alphabet A La Mode Dies to cut out the word “DAD”. I used Blueberry Bushel cardstock for the letters. Now, if you don’t have this alphabet die set, see if you have some other alphabet set that you could stamp. If you do, stamp on Basic White cardstock, either for the whole word or each letter. You could cut rectangles for each letter so that the stamping would show up on the card.

If you wanted to, you could add some punched or die cut additional stars on the card.

That’s all there is to this card, so if you need a last-minute Father’s Day card, perhaps this card will give you some ideas or you can simply copy it!

Bright & Beautiful Diagonal Birthday Card

Bright & Beautiful Diagonal Birthday Card

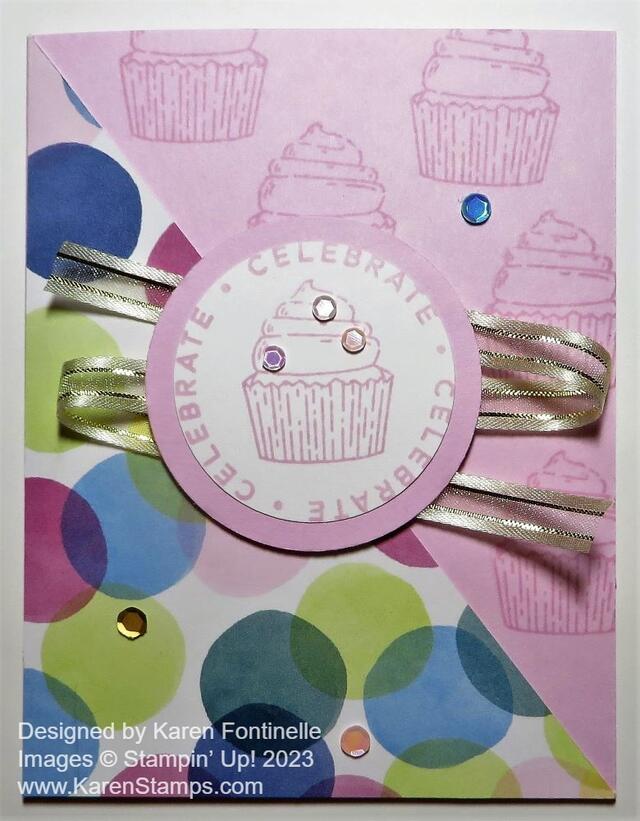
Make this Bright & Beautiful Diagonal Birthday Card for anyone’s birthday! The paper makes it festive and bright and of course, who doesn’t love a cupcake?

This Bright & Beautiful 6″ x 6″ Designer Series Paper is a great package to own. You can purchase it at a 15% discount right now through June 30th! It has bright and beautiful colors and designs, just like the name says! So many coordinating colors with this paper, also. Some papers are like ombre-dipped shades, then there are stars, dots, diagonal stripes, circles, confetti, and more. Use it for cards or scrapbooking. For sure, the papers go well for making birthday cards.

The card base is Bubble Bath cardstock. If you want to have some stamped images on the side without designer paper, be sure to do that before you add the designer paper. I just stamped the cupcake from the Circle Sayings Stamp Set in Bubble Bath ink on the Bubble Bath cardstock. That gives a watermarked look, the same as if you used Versamark ink instead. It just adds a little interest rather than the blank cardstock on that side.

To cut the designer paper on the diagonal, first decide what size you want it to be. If you want it to fit corner to corner, completely against the fold of the card and all the way to the bottom of the card, then cut a piece of designer paper 4 1/4″ x 5 1/2″, the exact size of the card. Then cut it diagonally from corner to corner with your Paper Trimmer. Put the top left corner of the designer paper even with the Paper Trimmer cutting track while also putting the lower right corner of the paper also even with the cutting track. That puts your paper on the diagonal. To avoid tearing the corners when you start cutting, place the cutting blade up into the paper, then back down to the corner, and then go up to the top, or vice versa. That takes some of the pressure off that pointy corner of the paper with the cutting blade jamming into it.

If you want the card to have the usual margin, cut the paper at 4″ x 5 1/4″, then adhere it 1/8″ off the fold and from the bottom as you would normally do. Either way is fine, or even smaller, depending on your design.

For the center greeting, I stamped the words and the cupcake from the Circle Sayings Stamp Set on Basic White with Bubble Bath ink. I punched it out, which was very close, with the 2″ Circle Punch. I wanted to use the 2 3/8″ Circle Punch for a layer of Bubble Bath so I had to use the 2″ Circle Punch. It worked fine!

I added Stampin’ Seal to the back of the greeting circle so that I could wind the Gold & Vanilla 3/8″ Satin Edged Ribbon back and forth behind it, and then I added Stampin’ Dimensionals to hold down the ribbon and to pop up the greeting in the center of the card. I liked the touch of gold on a festive birthday card!

And what birthday card would be complete without some bling? I used the Pastel Adhesive-Backed Sequins here and there on the cupcake and card to some sparkle. I have used these sequins a lot, maybe because the colors go with a lot and because they already have adhesive on them, unlike sequins we used to have that we had to glue down ourselves.

You can use this same card design with the other images in the Circle Sayings Stamp Set or even use some other greetings and dies. Here is another card I made recently using the same paper and stamp set, but with a few differences.

Check out the Stampin’ Up! Designer Series Paper Sale!

Here’s the New July Paper Pumpkin 2023

Paper Pumpkin July 2023 Sq Ad1myinfo

Say hello to summer and get crafting under the sun with this month’s Paper Pumpkin kit! With beach designs, fun accordion-fold cards, along with sentiments to support, encourage, say hello, and more, wave at those you love through uplifting cards and send family and friends oceans of kind words all summer long!

Paper Pumpkin is a monthly subscription, so you will find the gift of a Paper Pumpkin Kit to yourself in your mailbox each month! Usually, it is a kit to make cards, but it can be something else. All the supplies for the project are included in the box, even wrapped in tissue paper just like a gift! No risk, no obligation to continue for any length of time. Skip a month now and then if you need to. Stampin’ Up! guarantees each kit.

JOIN PAPER PUMPKIN TODAY!

ABOUT THE KIT
Name: Fun in the Sun

Coordinating Stampin’ Up! colors: Azure Afternoon, Basic Gray, Crumb Cake, Daffodil Delight, Flirty Flamingo, Granny Apple Green, Melon Mambo, Pool Party

This kit includes:

  • All the supplies you need to create 9 cards with fun accordion folds: 3 each of 3 designs; and coordinating envelopes.
  • An all-occasion stamp set to send friends and family words of encouragement, support, and kindness.
  • Iridescent Sequin Embellishments
  • 1 Classic Stampin’ Spot: Daffodil Delight.
  • Summertime Ephemera pieces, labels, and paper pieces.
  • Adhesive Dots and Tear & Tape Adhesive.
  • Completed card size: 5-1/2″ x 4-1/4″

This looks like a fun Paper Pumpkin Kit to me! If you have skipped any months recently, make sure your account is active so that you will receive this kit mid-July.

SUBSCRIBE BY JULY 10th!! CLICK HERE FOR MY PERSONAL LINK!

Zoo Crew Father’s Day Card

Zoo Crew Designer Series Paper
Father's Day Card

If you are looking for a whimsical card for Father’s Day, this Zoo Crew Father’s Day Card might do! If you don’t have “official” masculine stamp sets, look through your stash because you will find something you can use! Maybe just change the colors to make a card look more masculine if that’s what you want.

I thought it would be fun to try to make a Father’s Day card using the Zoo Crew Designer Series Paper with all its cute, whimsical characters. Depending on who you are giving the card to, the page with the celebratory animals, like for a birthday, might work the best. But if you have a hiker, camper, or outdoorsman, the page with those images would be perfect.

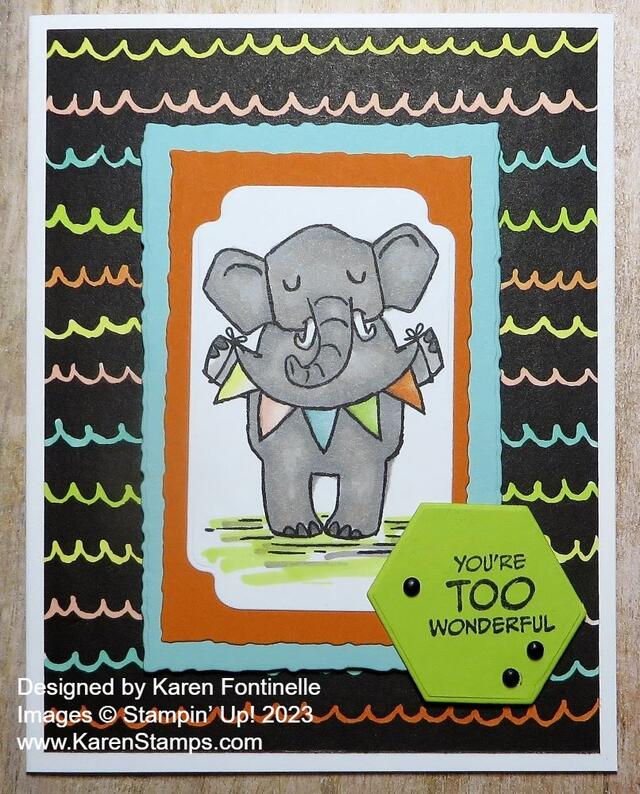
This elephant holding a colorful banner seemed like it would work for a Father’s Day card. I diecut the elephant with a die in the Something Fancy Dies. Then I layered it on two Deckled Rectangle die cuts, one in Pumpkin Pie cardstock and one in Pool Party cardstock.

Once I decided on this scalloped wavy line pattern for the card background, I decided to color each line with a color in the elephant’s banner. I used Stampin’ Blends in Lemon Lolly, Petal Pink, Pool Party, Lemon Lime Twist, and Pumpkin Pie. I really like the look of the colored lines. The elephant is colored with the Gray Granite Stampin’ Blends.

After layering the elephant and the two rectangle layers together, I popped it up on Stampin’ Dimensionals. For the greeting, I used one in the Zany Zoo Stamp Set and then die cut with the hexagon shape die in the Something Fancy Dies. I stamped it a little off-center by accident, but since “there are no mistakes in stamping” I just added a few black Classic Matte Dots.

If you need a Father’s Day card for Sunday, you don’t need everything to be masculine and specific for Father’s Day. See what you have and just choose something you can use. It’s the thought that counts!

SHOP STAMPIN’ UP! ONLINE HERE!

Melon Mambo Daisies Birthday Card

Melon Mambo Daisies Birthday Card

Sometimes it’s fun to stamp your own images on a card instead of using die cuts or designer paper! It’s like getting back to basics and it feels so good to have that stamp in your hand and stamp over and over!

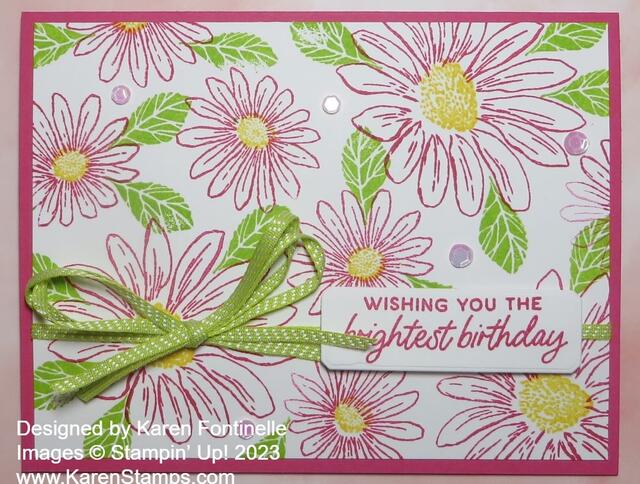
This card is very simple. I chose a Melon Mambo cardstock card base with a Basic White layer. Of course, stamp the white layer before adhering!

I used the Cheerful Daisies Stamp Set to stamp three of the largest daisies and then filled in the rest of the space with the smaller outline daisy stamp. For the flower centers, I used Daffodil Delight ink. There is a smaller flower center stamp and a larger one. Of course, flowers need leaves, so I inked up the leaf stamp with Granny Apple Green ink and filled in wherever I could.

The ribbon tied around the card is the Lemon Lime in the Ribbon Duo Combo Pack. To make the bow a little more substantial, I used two strands of ribbon and tied a bow.

The greeting is in the Cheerful Daisies Stamp Set and is stamped in Melon Mambo ink. It is diecut with the small banner die in the Countryside Corners Dies. For a final touch, I added several pink Pastel Adhesive-Backed Sequins.

This is just a fun, simple card to make and good to have on hand for birthdays or other occasions!

SHOP STAMPIN’ UP! ONLINE HERE!

Countryside Inn Z-Fold Card

Countryside Inn Z-Fold Card

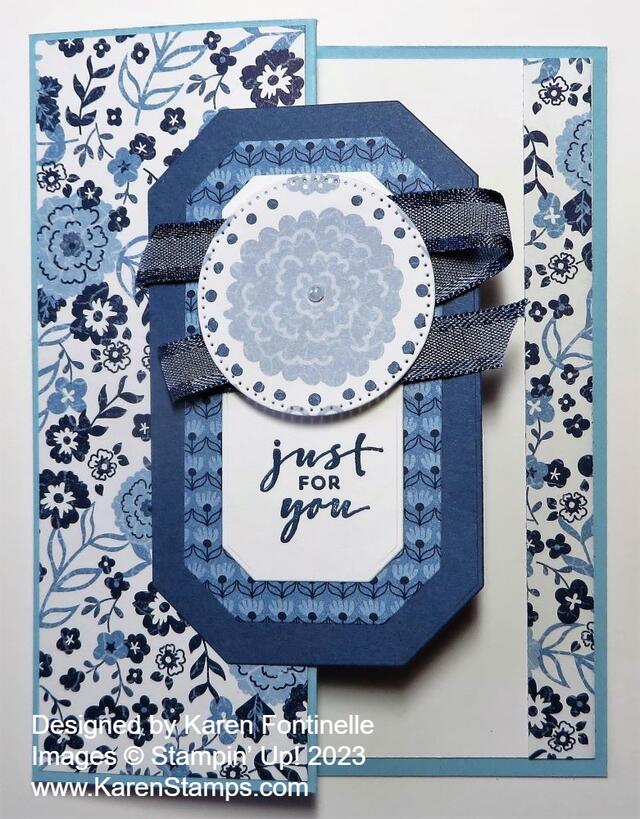
This Countryside Inn Z-Fold Card uses both the paper and the dies in the Countryside Inn Suite Collection, and the Z-Fold design just kicks it up a notch! I like to make Z-Fold cards because they are so easy and look like you really make something extra special!

The Countryside Inn Designer Series Paper has four colors of blue and white. For this card base, I chose Balmy Blue cardstock. To make the z-fold, make the card base as usual so that the front measures 5 1/2″ x 4 1/4″. On the front of the card, you will score down the center at 2 1/8″. Then fold the right edge of the card front back on itself. If you look down from the top, you will see the card base is in the shape of a Z. So basically, fold the front half of the card, back on itself.

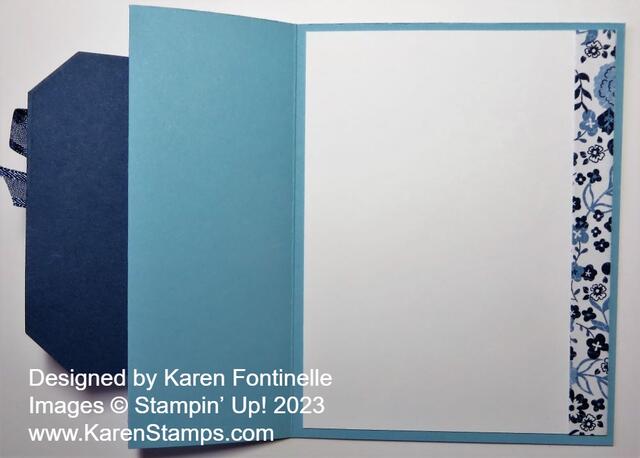
To add designer paper (or a stamped design) to that folded back left side of the card front, cut the paper at 2″ x 5 3/8″. That gives that narrow margin. If you want the usual margin, cut the designer paper at 1 7/8″ x 5 1/4″. The inside is Basic White with a strip of the same designer paper along the edge.

To decorate the card, I used the Countryside Corners Dies. I cut the larger piece out of Misty Moonlight cardstock, but you could use Night of Navy or Boho Blue. The next layer is cut out of a different pattern of the same designer paper. For the center, I diecut a piece of Basic White.

For the center piece, the trick was to find a greeting that would fit a vertical piece like I had. However, I could have also stamped a greeting that would just go horizontally across the white center. The greeting is in the Charming Sentiments Stamp Set and is stamped in Misty Moonlight ink.

To decorate the top, I used a die in the Stylish Shapes Dies to cut out the big flower in another pattern of the Countryside Inn DSP. To jazz it up a little, I added the Night of Navy 3/8″ Bordered Ribbon back and forth behind it and popped it up on Stampin’ Dimensionals. I also added a tiny little pearl.

To adhere this center piece to the card, remember to only put adhesive on the left half that will be glued to the Z-Fold. Try to center it as much as possible. Then if you want to stamp a greeting on the inside of the card, try to hide it behind this piece.

Here is what the inside of the card looks like.

Countryside Inn Z-Fold Card Inside

The Countryside Inn Designer Paper and all the papers on pages 130-132 in the new Annual Catalog are discounted by 15% during the month of June! Don’t let that sale slip by! You can search online under “Specials” on the top greenish bar.

SHOP STAMPIN’ UP! ONLINE HERE!

Countryside Corners Multicolor Card

Countryside Corners Multicolor Card

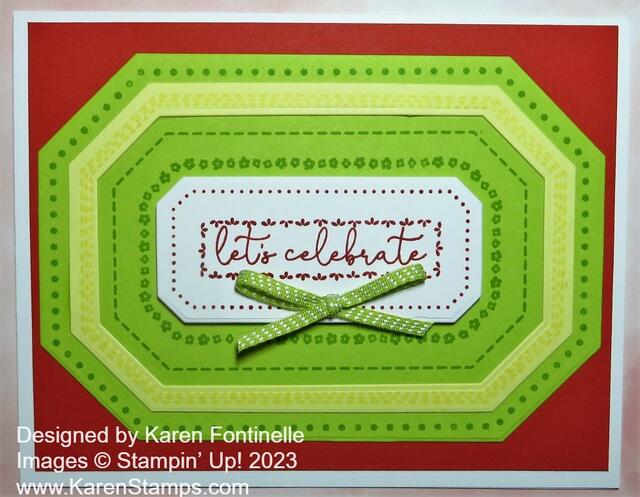
When you think outside the blue box, you might come up with a Countryside Corners Multicolor Card like this one! If you are familiar with the new Countryside Inn Suite Collection, the Countryside Corners Bundle, or the Countryside Inn Designer Series Paper, you know the main colors are blue and white. There are four different colors of blue in this paper! As much as we like blue, sometimes it takes a shift in thinking to realize, “Oh, I could use some other colors besides blue to make cards with this set!”

With summer on the way, I thought I would look at some Stampin’ Up! color suggestions, and I chose to use Poppy Parade, Lemon Lolly, and Lemon Lime Twist, plus Basic White. Nice bright colors instead of blue….not that there is anything wrong with blue!

The card base is Basic White with a layer of Poppy Parade. Even though I have had the Countryside Corners Stamp Set all this time, I hadn’t used it yet! Actually, it is not a stamp set, it is one stamp! You might think that each design would be a separate ring in the stamp design, but it isn’t, which is a little perplexing at first. You can ink the stamp all in one color or you can use Stampin’ Write Markers to color each ring or border with a different color.

What you can do for these layers is stamp the whole stamp on different pieces of cardstock and then you can die cut each color in whatever way you like. For this card, I stamped the whole stamp with Lemon Lime Twist ink on Lemon Lime Twist cardstock. I also stamped with Lemon Lolly ink on a piece of Lemon Lolly cardstock. I used two dies to cut out just that single design of the Lemon Lolly cardstock, which is then adhered onto the Lemon Lime Twist large, whole stamped piece. I tried out a couple of things for the center but decided on stamping Poppy Parade ink on Basic White and die-cutting that centerpiece. Then I chose a greeting from the Sentimental Park Stamp Set and stamped it in the center in Poppy Parade ink. That center piece is popped up on Stampin’ Dimensionals.

For a finishing touch, I added a Lemon Lime Twist ribbon, found in the Ribbon Duo Combo Pack. I tied a small bow and attached it with a Mini Glue Dot. I think maybe some bling in the form of gems, rhinestones, or sequins might be fun on this card, but I was undecided! Sometimes you have to know when to stop when you are creating something!

If you have this Countryside Corners Bundle (stamp set and dies), try out some different color combinations and see what you can create!

SHOP STAMPIN’ UP! ONLINE HERE!