Favorite Stamp Sets and Cards

Stamp Sets and Cards on Sale

Stampin’ Up! Stamp Sale TOMORROW, September 15!

One Day Only!

Yesterday we got word to make out our lists to get ready for the 24-Hour Stamp Sale at Stampin’ Up! tomorrow, Thursday, September 15, 2022! What do stampers love more than a sale on any of the products we use?! Each stamp set is 15% off.

I was under the impression this very long list of stamps was a “select” collection of sets on sale, but as I went through my catalog last night I realized that it was EVERY stamp set in the Stampin’ Up! Annual Catalog except for the Host stamp sets in the back of the catalog. Maybe there is some other exception, but this is what I understand now.

The Holiday Mini Catalog is NOT included in the sale.

SEE THE LIST OF STAMP SETS ON SALE HERE!

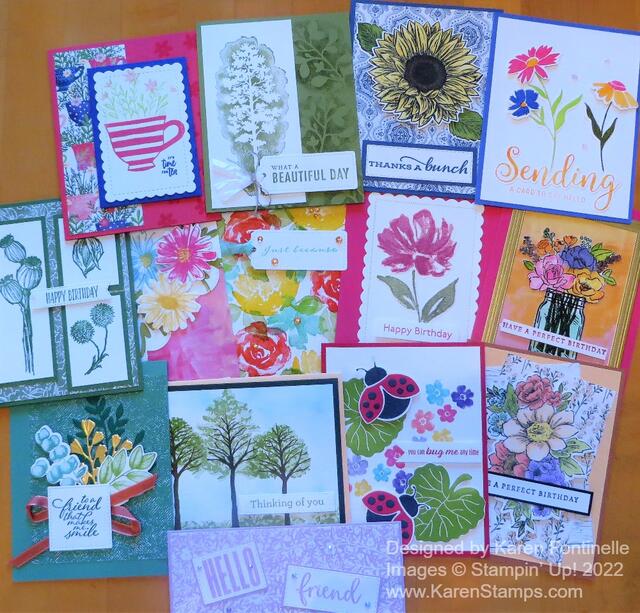
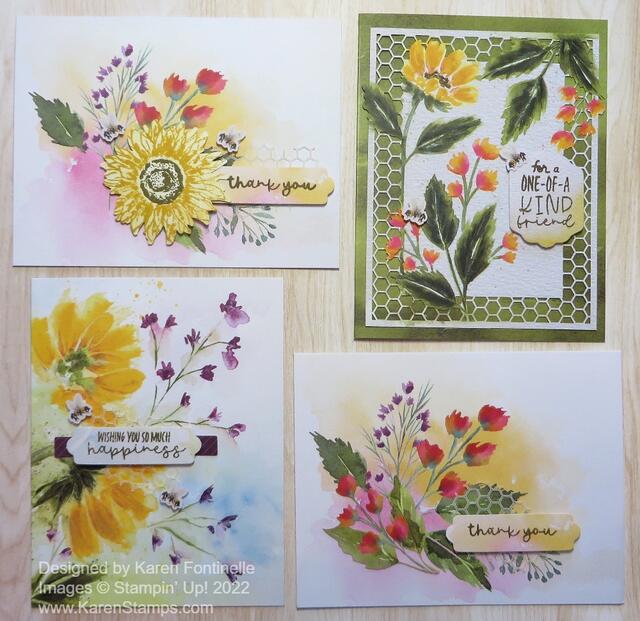
In the photo above are some cards I made with current stamp sets that I still had in my stash. Some of these may be your favorites too or ones that you just haven’t purchased yet! Tomorrow is the time!

Here are the stamp sets I used on the cards above, starting at the top, in case you want to know:

Cup of Tea, Amazing Silhouettes, Celebrate Sunflowers, Sending Smiles, (maybe this one is retired), Color & Contour, True Beauty, Art Gallery, Jar of Flowers, Forever Fern, Beauty of Friendship, Hello Ladybug, Blessings of Home, Biggest Wish.

Hope I got those all right except for one! So many more to choose from, too!

Enjoy the day browsing through the Stampin’ Up! Annual Catalog and make a list for tomorrow! Don’t forget you can stack other bargains with the Stamp Sale, like the Perfect Partners Dies, the Weekly Deals, any Bundles you may want for World Card Making Day plus the FREE pearls (add to your order and they should come up free), the Clearance Rack, the new Gifting Christmas Kit Collection, and whatever else you want!

Happy Shopping!

Stamp Sale on Thursday!

24 Hour Stamp Sale 2022
Click to see the List!

Find yourself staring at multiple stamp sets and can’t decide which one to get? On Thursday, September 15, 2022, you can get those sets you’ve wanted at a 15% discount. This is a deal you do not want to miss out on! The 24-Hour Stamp Sale will only last for one day, so make sure you are ready to shop ‘til you drop! It’s time to expand your collection! 

For 24 hours on September 15th almost all the stamp sets from the 2022–2023 Annual Catalog will be available for purchase at a 15% discount!

Holiday Catalog stamp sets NOT included!

SEE THE STAMP SALE LIST HERE!

On Thursday, you can look on the Online Store in the Stamp Sale category to find all the sets on sale!

Sales Period: 15 September 2022 12:00am to 11:59 p.m. (MT)

DETAILS:
This stamp sale only happens once a year!
The sale will run for 24 hours.
The 15% discount will apply to select stamps from the 2022–2023 Annual Catalog.
Check out the list of stamps included in the sale and be ready to act quickly!
Stamp sets are available while supplies last!

SHOP HERE ON THURSDAY!

Don’t forget the September Weekly Deals! There will be new ones by Thursday! Get a double sale!

Design A Daydream Just For You Card

Design a Daydream Just For You Card

The other day I was looking through my designer paper and realized I hadn’t really used this Design A Daydream Designer Series Paper very much and it is actually quite a pretty and interesting package of papers! I thought for the next card I was going to make, I would just make something simple and easy with this paper and this Design a Daydream Just For You Card is what turned out!

This package of designer paper is in the back of the Stampin’ Up! Annual Catalog on page 179 at the very top of the page so it is kind of easy to miss. There is also a correction on the description. There are 48 sheets of paper, not 12, 4 each of 12 designs! Now that is a lot of paper and a lot of designs to choose from! However, this is a Host Reward set, which means you cannot purchase it, but you can choose it for your Stampin’ Rewards with an order of $150 or more. There are also three stamp sets on that page at prices lower than their actual value, so you might want to check that whole page!

This card starts with a card base of Mint Macaron, one of the coordinating colors of the Design A Daydream Paper. I chose a floral pattern for the card layer, but I also added a 1″ strip on the left side, a striped pattern, just for some other little pattern. The ribbon does kind of cover it up a little bit, though! Before adhering the designer paper layer to the front of the card, wrap the ribbon around the side of the card. I used the Petal Pink 3/8″ Soft Polyester Ribbon. This ribbon is so soft, has a rich feel, and is beautiful to use. I intended to tie a bow and adhere it, but the bow was going to be a little bulky so I settled for just a knot and I actually really like it. The card is designed to be soft and simple and I think just tying a knot around the ribbon keeps with that design.

The greeting is stamped from the Charming Sentiments Stamp Set using Petal Pink ink on Basic White, Then it is diecut with a small stitched circle in the Stylish Shapes Dies and layered on a small scalloped edge circle in the Layering Circles Dies. I popped that up with Stampin’ Dimensionals® and added three Champagne Rhinestones on the card for a little bling and sparkle!

This card was just that quick and easy and you can make a card like this for almost any occasion. Use a pattern or two of designer paper, add a greeting, and maybe some embellishment or bling! The recipient will think you spent hours designing and making it!

SHOP STAMPIN’ UP! HERE!

Paper Pumpkin Holiday Kit!!

Paper Pumpkin Kit October 2022 Banner1

‘Tis the season to make your own Christmas cards with the Ho Ho Ho Paper Pumpkin Kit! This kit contains whimsical designs of Santa and his reindeer in a classic Christmas color palette which is sure to match various styles of holiday décor and look great on mantles everywhere.


Each kit contains enough supplies to create 9 festive cards—3 each of 3 designs—and 9 coordinating envelopes. These cards are sure to bring a warm holiday spirit.


And word from the North Pole is that this kit coordinates with next month’s Paper Pumpkin tag kit and the special add-on product! With so much coordination between products, you’ll have a breeze at creating a cohesive look for all your holiday gifting needs. Make this season the most wonderful time of the year for your loved ones—and for yourself!

My Spooky Treats Paper Pumpkin Kit isn’t even here yet but already I can’t wait to get these next two coordinating kits! If you want extras, just change the quantity in your account! The Holidays are definitely coming! This is an easy and fun way to get ready!

JOIN PAPER PUMPKIN NOW!

If you don’t care for a monthly subscription, purchase a Prepaid Subscription on your regular Stampin’ Up! order for the number of months that you choose!

Best Witches and Frogs Halloween Card

Best Witches and Frogs Halloween Card

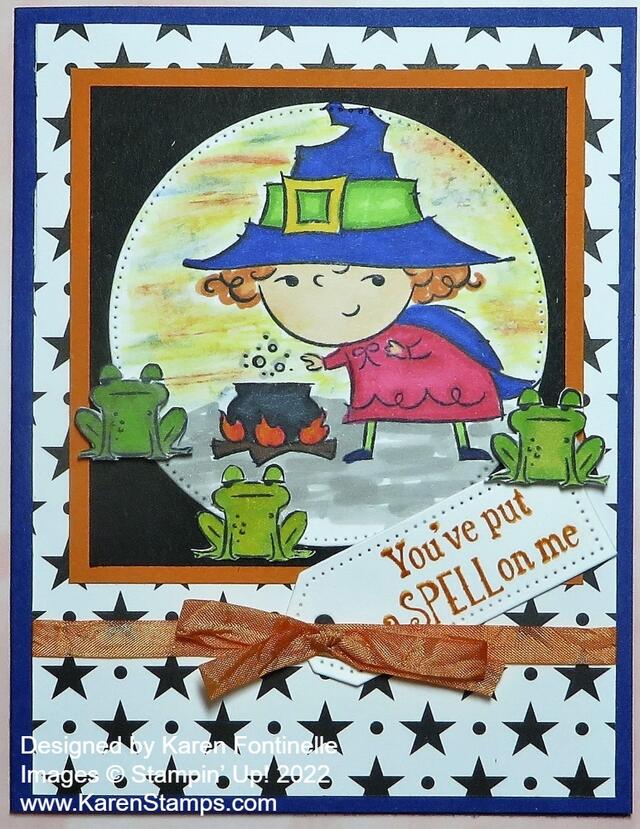
I was in the mood for some coloring and I even thought I would try for different colors on this Halloween witch. In the end, I don’t think I strayed too far from typical Halloween colors except for her Melon Mambo dress! This Best Witches and Frogs Halloween Card is one you make just to have fun coloring and playing!

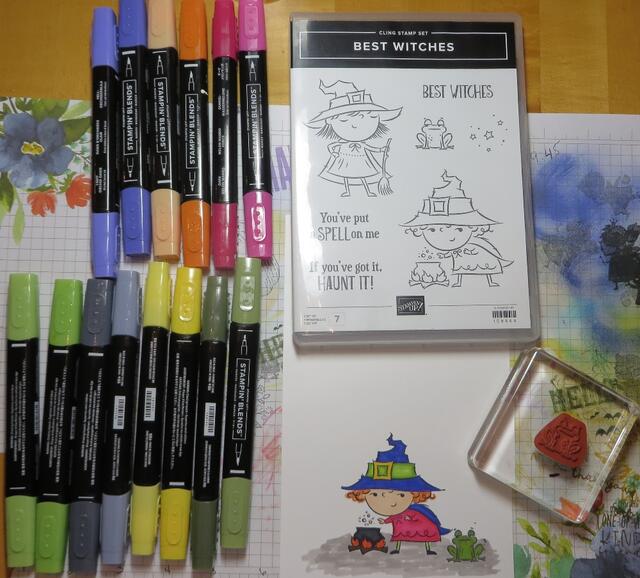
I started off using the Best Witches Stamp Set and stamping the stamp with the witch and her cauldron on Basic White cardstock with Memento ink. I colored her with a bunch of different Stampin’ Blends. You can see some of the colors I used in the photo below. I also used some of the Natural Tones markers for her face and hands and the logs for the fire. I also stamped a frog but decided to cut him out separately, and then I decided on stamping and cutting out some more frogs!

Coloring Best Witches

After I had the witch stamped and colored in with her cauldron, I diecut the image with the largest circle in the Stylish Shapes Dies. I wanted to layer it on a scalloped circle in the Layering Circles Dies, but it wasn’t large enough so I just cut out two square layers, Basic Black and Pumpkin Pie. The black one is 3 1/4″ x 3 1/4″ and the Pumpkin Pie is 3 1/2″ x 3 1/2″. I used the Black & White Designs Designer Series Paper with the black stars as the layer on the Starry Sky cardstock card base. Before adhering the designer paper, I wrapped around some ribbon. I colored the White 1/4″ Crinkled Seam Binding Ribbon with the Dark Pumpkin Pie Stampin’ Blend. Just do it on top of a piece of scrap paper and run the side of the brush tip of the marker along the ribbon, holding it down at one end with your finger. Give it a little bit of time to dry completely or even rub a tissue along it to remove any ink that hadn’t dried yet. I tied the bow separately and adhered it with a Mini Glue Dot.

Back to the stamped and die-cut witch piece. I colored underneath with a bit of light gray marker. For the sky, I thought I would try Soft Pastels in various colors. I started off picking up some chalk color with a Blender Pen but then I just scribbled on various colors for the Halloween night sky and softened them with the Blender Pen. You have to be a bit careful to not make the paper pill up from having too much moisture or rubbing too much. But you can get away with a lot for a Halloween sky! After adhering this piece to the front of the card above the ribbon, I adhered the little frogs, two with Stampin’ Dimensionals and one flat on the card with the Multipurose Liquid Glue.

The greeting is in the Best Witches Stamp Set and is stamped in Pumpkin Pie ink and die cut with one of the Tailor Made Tags. I decided to tuck it under the bow so I added another Mini Glue Dot to hold the ribbon in place over the tag hole and put a frog partly on the end of the tag. That’s all there is to this fun Best Witches and Frogs Halloween Card!

SHOP STAMPIN’ UP! ONLINE HERE!

Glitter Washi Tape Birthday Card

Glitter Washi Tape Birthday Card

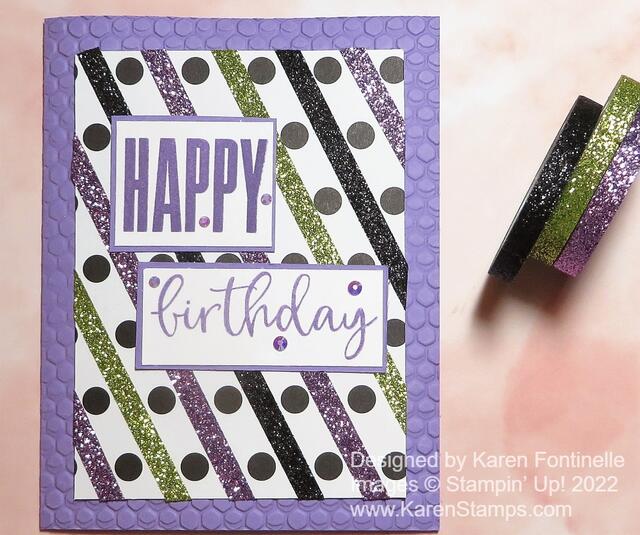
I saw this idea of using our Glitter Washi Tape this way on the @Stampinupofficial Instagram account the other day and I loved the idea! Because of the colors, I assumed they were suggesting this was a way to make a Halloween card. While that would be very cute, I thought I could make a Glitter Washi Tape Birthday Card with three of the four washi tape colors! And I did! But I’m also dying to make a Halloween card using this technique, too!

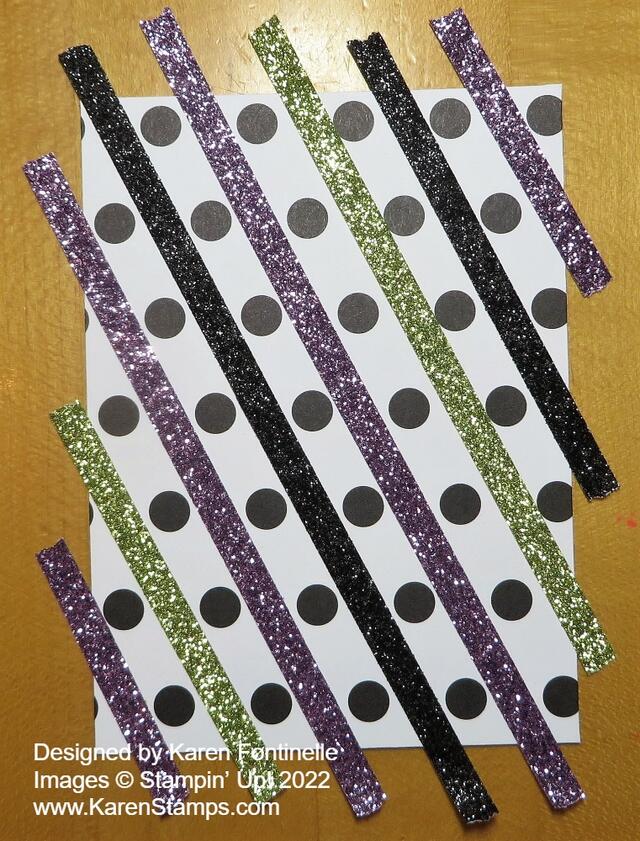
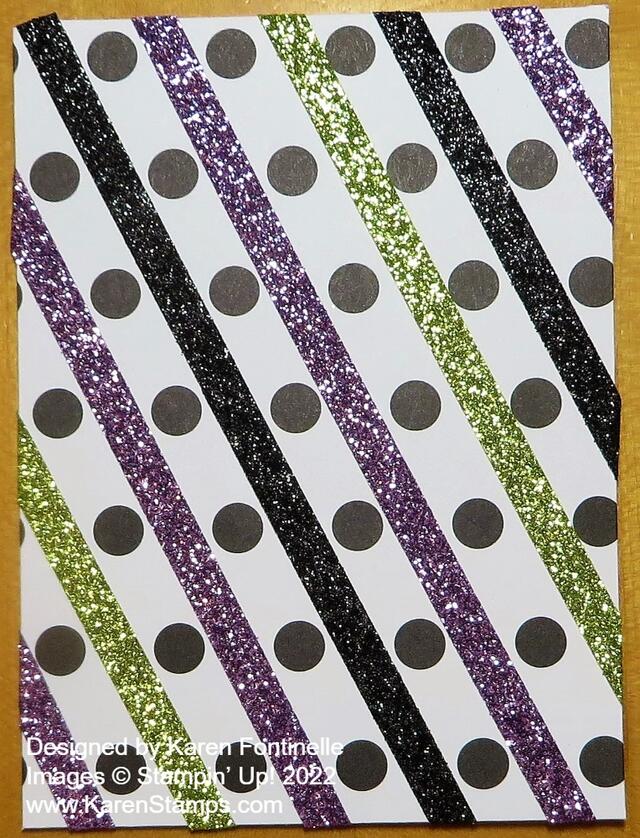
The main idea is to use the Black & White Designs Designer Series Paper and add strips of the Glitter Washi Tape in the Holiday Mini Catalog on page 57. You have to look up in the upper left corner of the page to find it! I did make THIS CARD for Halloween using some Glitter Washi Tape but not in this way. I think this is such a clever idea to use this washi tape with this designer series paper!

The colors of the Glitter Washi Tape are Old Olive, Black, Highland Heather, and Pumpkin Pie. I left out the Pumpkin Pie so it wouldn’t look like Halloween. The card base is Highland Heather and I embossed the front with the Hive 3D Embossing Folder. I would normally use a separate layer to emboss, but since this card base was already cut and folded in the cardstock package I just went with it this way. I had to run the folder through my Stampin’ Cut & Emboss Machine sideways which isn’t the best but it worked. Since I had a slightly smaller layer for the card front I thought a little texture around the edges of the card was in order.

The card front is a polka dot pattern in the Black & White Designs Designer Series Paper in the Holiday Catalog. I ran the washi tape diagonally in between the polka dots. There are also striped designs and others so you can choose other ways to apply the washi tape. Just let the strips of washi tape extend over the edges of the cardstock and then fold them all under instead of cutting or tearing them off at the ends. You could do that though. I used Stampin’ Seal+ adhesive to adhere the striped card front to the card base.

Glitter Washi Tape Card Front
Glitter Washi Tape Card Front2

I used the Biggest Wish Stamp Set for the greeting and focal point of the card. I stamped the words separately in Highland Heather ink and cut them very closely to the words with the Paper Trimmer. I also added a narrow layer of Highland Heather behind the stamped words. This stamp set is a fun one to own and perfect for a card like this.

Just in case the Glitter Washi Tape wasn’t enough “bling” on this card, I added a few 2021-2023 In Color Jewels even though they are retired now. (Such a shame!) I thought the Fresh Freesia jewels could be a close enough match to work on the card and applied a few to the greeting.

You might want to add this 4-pack of Glitter Washi Tape to your next order. It’s not just for Halloween and you can use the tape in so many ways in cardmaking and scrapbooking. You could just use little touches of it or actually make stripes or designs with it on cards. Just one of the fun embellishments we have for our papercrafting!

SHOP STAMPIN’ UP! ONLINE HERE!

New Kit For Christmas Gifting!

Christmas Gifting Kit Collection

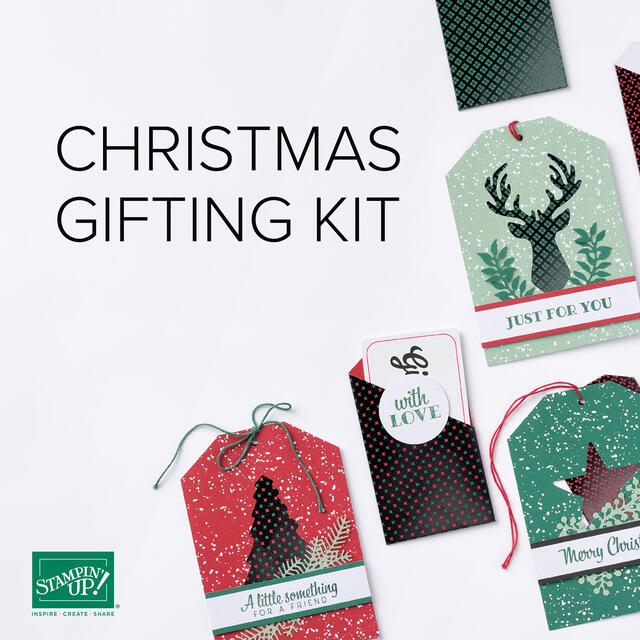
You’ll love the ease of gift gifting this year with the Christmas Gifting Kit! Create gorgeous gift tags to attach to presents or make the gift card holders to wrap your loving gift cards in!

Available starting today, the Christmas Gifting Kit is a simple way to enhance the gift gifting experience for you and your loved ones! Give your friends and family gift cards to the places they love, while still adding a handmade touch.

Christmas Gifting Kit Contents Photo

DETAILS


Kit Includes:

  • Kit includes 9 tags and 9 gift card holders—3 each of 3 designs
  • Includes the exclusive Christmas Gifting Stamp Set and a Shaded Spruce Classic Stampin’ Spot
  • Sized to fit standard gift cards
  • Coordinating colors: Basic Black, black foil, Mint Macaron, Real Red, Shaded Spruce

Celebrate the season with a card kit that has everything you need to wish those you love a merry Christmas and a joyous New Year. Don’t let the holidays overwhelm you–get your all-inclusive kit and make quick multiples everyone will love!

Watch Sara show the Christmas Gifting Kit in this video! Watch for the pretty foil! That caught my interest!

By the time you start wrapping Christmas gifts, you will be very happy to have these tags already made and ready to go instead of having to use those stick-on tags you buy at the grocery store!

There’s also the Cozy & Bright Kit for making Christmas cards with all the supplies included in your kit!

Check out the entire Kit Collection in the Stampin’ Up! Online Store!

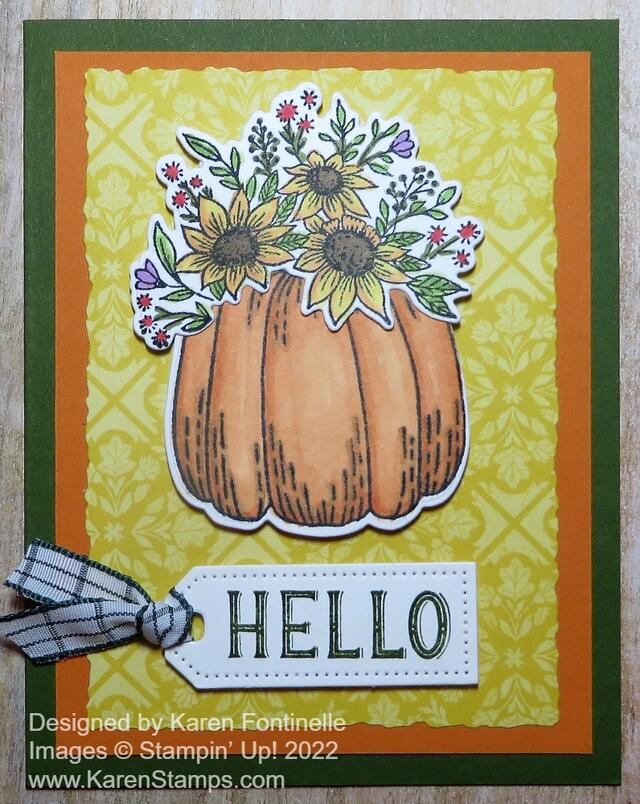
Hello Harvest Pumpkin Fall Card

Hello Harvest Pumpkin Fall Card

I feel as if I should be saying, “Hello Fall!” with this Hello Harvest Pumpkin Fall Card, but it’s not fall yet, just the day after Labor Day! Put away your white shoes and slacks! That used to be the rule in the olden days at least! And the day after Labor Day was always the first day of school when I was a kid. We usually bought new “fall” clothes for the start of school even though it was still pretty warm and not really fall yet so you couldn’t exactly wear the new clothes right away!

This card is made with the Hello Harvest Bundle in the July-December Holiday Mini Catalog. Almost anything “fall” I think is just beautiful! That’s why this Bundle and the coordinating Rustic Harvest Designer Paper is one of my favorites in the Holiday Catalog!

The card base is Mossy Meadow cardstock. It has a layer of Pumpkin Pie with a piece of the designer paper die cut as the layer on top of that. I had recently purchased the Deckled Rectangles Dies and then forgot I had them! So I used them on this card to cut out the Rustic Harvest Designer Paper. In the olden days of stamping, we just tore the paper edges if we wanted the deckled edge look, and we wanted that a LOT! But now, thanks to the Deckled Rectangles Dies, we don’t have to tear edges anymore!

The pumpkin and flower garland were stamped on Basic White with Memento Ink and then colored in with Stampin’ Blends Markers. I love to color with those markers! I didn’t keep track of every color I used so just play and use what you like! I did color the pumpkin with Pumpkin Pie (of course!). The flowers and leaves are quite a few different colors. The sunflowers are mostly So Saffron with a little Pumpkin Pie and Daffodil Delight thrown in and a brown #300 in the flower center. Remember those natural tones markers aren’t only for skin color and animals! You can use them for anything! The leaves are mostly Granny Apple Green with some Mossy Meadow. One of the little flowers is colored with Fresh Freesia and the bright “red” flowers are Light Sweet Sorbet. That’s pretty much what I used but you can blend other colors together or change it up.

To put the card together I die cut the pumpkin and flowers and popped those two pieces up on Stampin’ Dimensionals. The greeting is in the Hello Harvest Stamp Set. It is stamped in Mossy Meadow and die cut with one of the Tailor Made Tags. I added a piece of the Evening Evergreen 3/8″ Windowpane Check Ribbon. I think it adds a little extra pizzazz to the card.

It’s time to start making cards you can send around Thanksgiving time or for Halloween! You’ll find all kinds of card ideas using the Rustic Harvest Suite of products!

SHOP STAMPIN’ UP! ONLINE HERE!

Check out the new Weekly Deals for September 1 – 7!

Get Ready For World Card Making Day!

WCMD Event

Stampin’ Up! will be holding a FREE virtual event to celebrate World Card Making Day on Saturday, October 1st! During this free virtual event, we will come together as a crafting community to do what we all love—make cards! 

This is a worldwide online event, open to EVERYONE!! All you have to do is gather your supplies, get online at the appointed time and join the Stampin’ Up! presentation! Watch from the comfort of your own home or gather some friends together! This virtual card-making event will take place on Saturday, October 1, from 2:00 PM – 5:00 PM Mountain Time (MT). The event will be in English with language interpretation voiceover and subtitles in English, French, German, and Dutch.

World Card Making Day is all about making beautiful, heartfelt cards. During the event, we’ll walk you through several projects, and you’ll create the cards right along with us. You’ll end up with new project ideas and some stunning new cards!

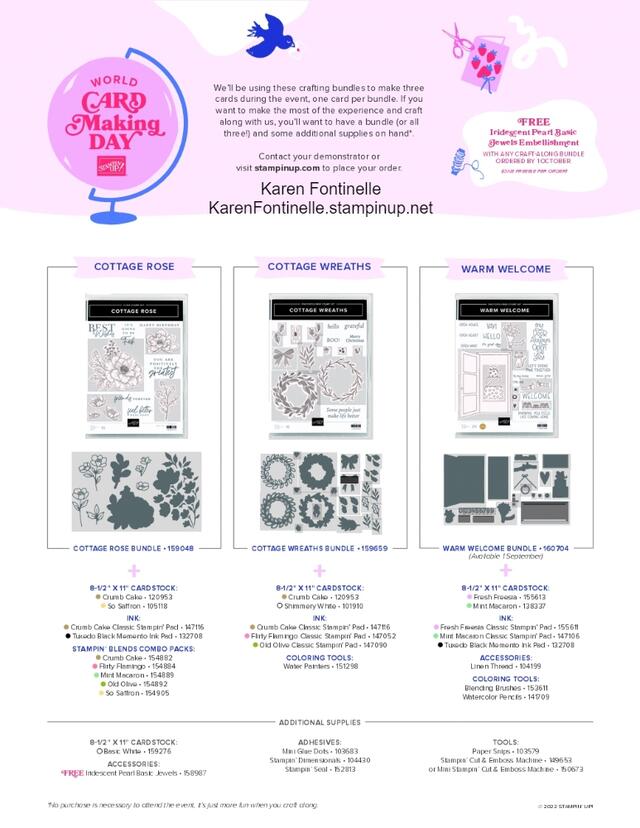
To make the most of this experience, you can order the Cottage Rose Bundle from the 2022–2023 Annual Catalog, the Cottage Wreaths Bundle from the July–December 2022 Mini Catalog, or the Warm Welcome Bundle, which you can get early from the January–June 2023 Mini Catalog! If you want, you could even order all three bundles! The Warm Welcome Bundle will be available for purchase starting 1 September*.

When you order one of these three bundles: Cottage Rose Bundle, Cottage Wreaths Bundle or Warm Welcome Bundle you’ll get a FREE gift of Iridescent Pearl Basic Jewels! (Note that even if you order all three bundles, you’ll only receive one Iridescent Pearls gift.) You can still attend this event without ordering the bundles, but it will be a lot more fun to craft together if you have one or more bundles! Order early to get your products in time for our World Card Making Day Creative Event.

WCMD Flyer info
Click to read for lists of supplies!

We will provide a list of products you’ll need before the event. We will also provide a Project Measurements PDF before the event. Following the event, we will post an Instructions PDF so that you can recreate the projects we made on World Card Making Day.

You can stamp along with the presentation or you can simply watch and enjoy! Registration is not required, but if you would like to be kept informed of the upcoming event, CLICK HERE and register! It’s FREE, remember!! It will be recorded so you can watch it later if you can’t watch it live or if you want to watch it again. It will be fun for sure!

Perfectly Penciled Colored Flowers Card

Perfectly Penciled Colored Flowers Card

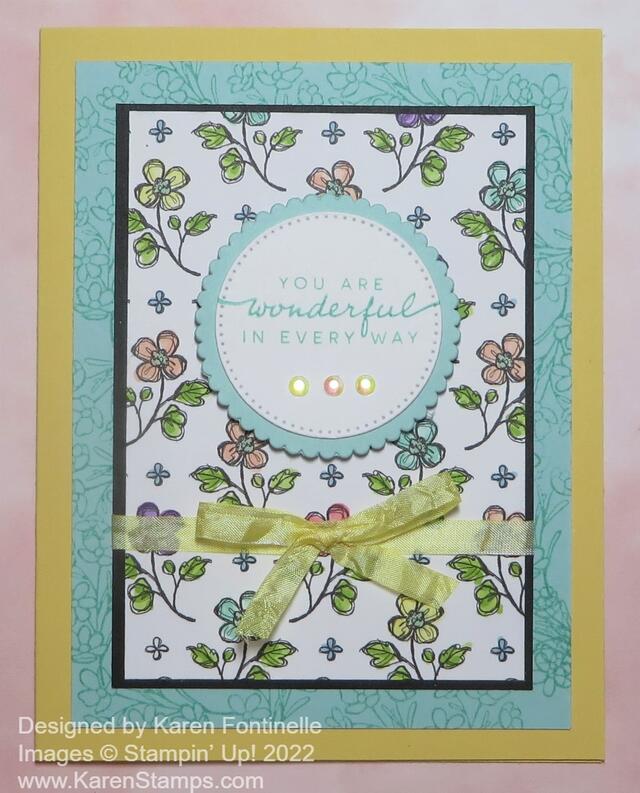
The other day, on this post, I made a card with the Perfectly Penciled Designer Series Paper but left the design black and white. Here is another card using the same designer paper, but with a smaller floral pattern. This time I colored in the flowers to make the Perfectly Penciled Colored Flowers Card. I find coloring in these images to be easy and fun. With the coloring techniques we have, you really don’t have to be too perfect. You don’t have to exactly stay inside the lines or color every single spot. Just get some color down in the area and it will look fine.

This card has a base of So Saffron and a layer of Pool Party cardstock. For the Pool Party, however, I stamped around the edge with one of the small flower stamps in the Happiness Abounds Stamp Set. The designer paper piece is cut at 3″ x 4 1/4″ and colored with Stampin’ Blends. Just use whatever colors you like. I was using light colors such as Petal Pink, So Saffron, Pool Party, Highland Heather, and Granny Apple Green for the leaves.

The greeting is also in the Happiness Abounds Stamp Set. It is stamped in Pool Party ink and then die cut with a stitched circle in the Stylish Shapes Dies. I almost put the greeting as is on the Basic White on the card, but then decided to add a Pool Party layer die cut with one of the scalloped circles in the Layering Circles Dies. I think it adds a lot.

I colored the White 1/4″ Crinkled Seam Binding Ribbon with a Dark So Saffron Stampin’ Blend Marker to add some embellishment to the card. I adhered the designer paper to a piece of Basic Black and then adhered a strip of ribbon around and added a bow. For a final touch, I added three Iridescent Rhinestone Jewels to the bottom of the greeting. This card is a simple one yet has several areas of interest so it’s not too plain.

SHOP STAMPIN’ UP! ONLINE!

SHOP SEPTEMBER WEEKLY DEALS!

Two New Stampin’ Up! September Deals!

Perfect Partners Banner
Images © Stampin’ Up! 2022

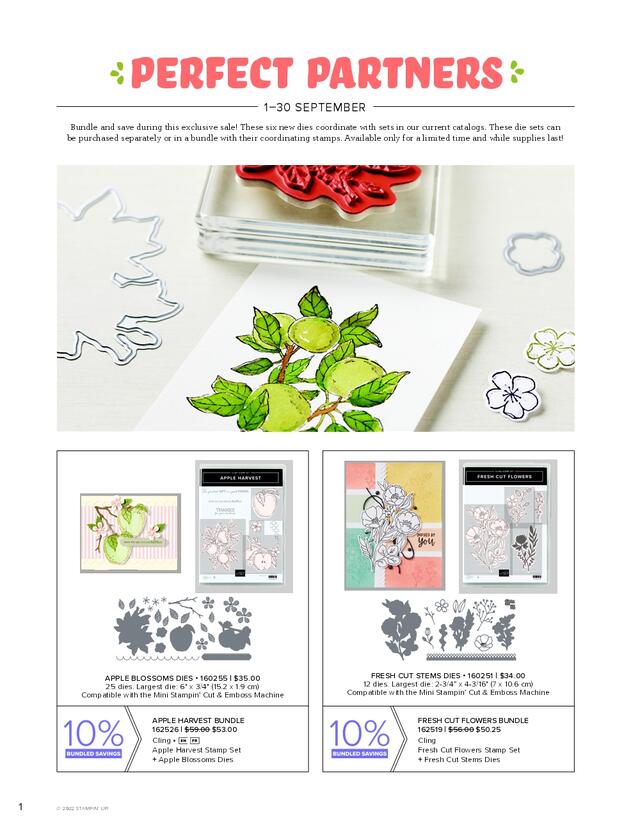
“Some things are great on their own but become epic when they are paired with something else: cereal and milk, toast and butter, Fred Astaire and Ginger Rogers. We may be biased, but our favorite combo is our stamp sets and dies—and that’s what the Perfect Partners promotion is all about!” says Stampin’ Up!

“We created six new dies that coordinate with stamp sets in the 2022–2023 Annual Catalog and the July–December 2022 Mini Catalog. These coordinating dies will only be available during this promotion and will not be offered in any catalog.” 

These stamp sets and dies are available separately or as a bundle. By buying the bundle, you will save 10% off the retail price. 

Put these wonderful stamp sets and dies together for more papercrafting fun! Order now!

Offer good September 1-30, 2022.

https://youtu.be/P2eyeyKoCNs

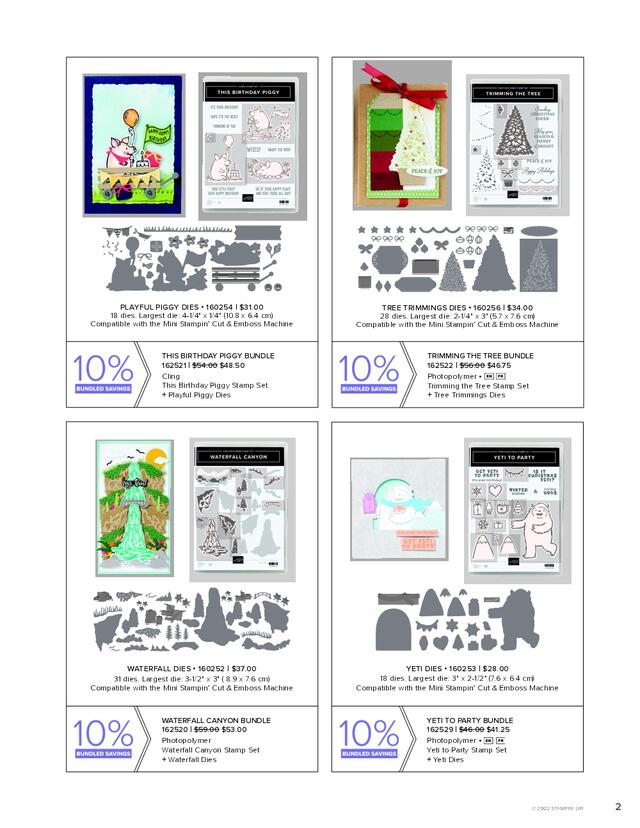
Check out all the sets and Bundles on this flyer below!

Perfect Partners Flyer
Perfect Partners Flyer pt2

Click on the photos above of the Stampin’ Up! flyer or click the link below.

Click HERE to view and print the Perfect Partners Flyer PDF.

AND

Every week in the month of September Stampin’ Up! is offering a selection of discounted products. Discounts and product selection will vary from week to week.

  • New products added each week on 1, 8, 15, and 22 September.
  • Promotion ends 28 September.
  • Product options and discounts vary based on inventory availability.
  • All order types qualify for this promotion (customer, demonstrator, workshop, and online).
  • Discounted items can be added to a Starter Kit.
  • Get the most up-to-date product information on the online store beginning 1 September.

Let’s see what the Weekly Deals are TODAY, Sept. 1st!

Last Day of Sale-A-Bration 2022!

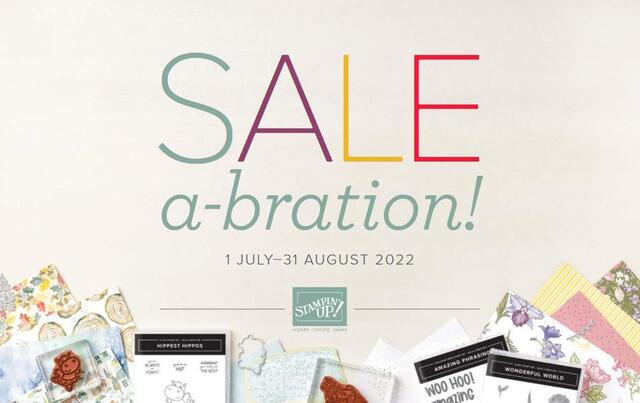
Sale-A-Bration Cover July-Dec 2022

Today is the LAST DAY of Sale-A-Bration 2022!

This is your last chance to earn a free product with a $50 purchase! No limit!

With each $50 purchase, you can choose from these products to earn FREE!

Sale-A-Bration $50 Level Products

With a $100 Purchase, choose two $50 Level products or one of these $100 Level products!

Sale-A-Bration $100 Level Products

If you want to watch some videos to help you decide on your choice(s), click HERE to go to my blog post!

SHOP STAMPIN’ UP! ONLINE HERE!

Perfectly Penciled Black and White Card For a Friend

If you asked me what my idea or thought process was for this card I wouldn’t know! This Perfectly Penciled Black and White Card For a Friend just came about from the designer paper itself! I looked through the package of paper and decided to do something with just the designs, not the floral images on “the other side” of the paper. I wasn’t sure at all how it would turn out! Sometimes you have to just work with an idea!

I thought maybe I could use strips of three of the different designs of the designer paper. This Perfectly Penciled Designer Series Paper has pretty floral designs on one side of the paper and graphic designs on the other side. You can certainly use it just black & white as I did on this card or you could color in the images as I have done on other cards like THIS ONE. And THIS CARD uses the paper’s floral and graphic design sides in just black & white! As you can see, this paper is fun to play with!

For this card, I chose three patterns of paper, cut them into strips, and planned to run the strips vertically on the card. But once I got them together I liked them going horizontally better! I adhered them to a piece of Basic White thinking I might tie some ribbon around that layer before adhering to the Basic Black card base. If you do that and you have some edges that aren’t perfect, just trim them down a tiny bit so the underneath layer isn’t showing. These strips are just a “smidge” over 1 1/4″ wide. A “smidge” means maybe about another 1/16″ more! They don’t have to be super-exact because we don’t want to ruin our fun cardmaking with a lot of math!

I decided to cut out a square 3″ x 3″ of one of the pretty floral images and then layered it on a piece of Basic Black. I wasn’t sure what ribbon to use at first, but decided to just use a strip of this White 3/4″ Frayed Ribbon that didn’t go around to the back of the card. I really like it! For a greeting, I stamped the “friend” in the Happiness Abounds Stamp Set and cut it with one of the circle dies in the Stylish Shapes Dies.

Remember, Sale-A-Bration ends on this Wednesday, August 31 so if you need any Stampin’ Up! supplies, be sure to shop by then to get your FREE product with every $50 purchase!

SHOP STAMPIN’ UP! ONLINE!

Paper Pumpkin August 2022 Sweet Sunflowers Cards

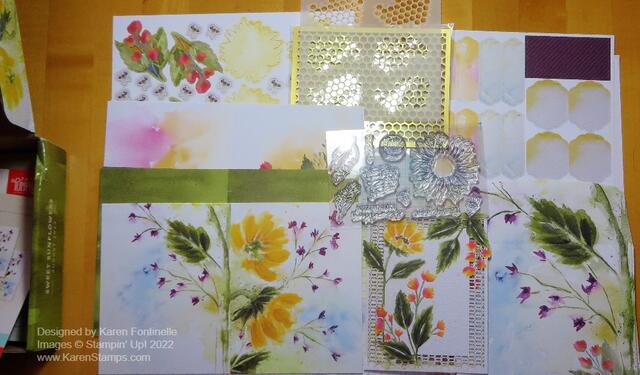
Paper Pumpkin August 2022 Sweet Sunflowers Contents

Is this the most gorgeous Paper Pumpkin Kit we ever had or is this the most gorgeous Paper Pumpkin Kit we have ever had??! This Sweet Sunflowers Paper Pumpkin Kit for August 2022 is so pretty! You have never seen prettier envelopes (lower right corner) than this kit has! Some crafters are cutting up the envelopes to make into cards they think the designs are so pretty! Some crafters are cutting the cards in half and using the beautifully designed back of the cards to make more cards! In any Paper Pumpkin Kit, you get all the supplies, including adhesive, to make the project, whether cards or treats or whatever it is. It’s one of the best kinds of mail you can get in your mailbox every month!

This Sweet Sunflowers Kit probably has the most alternatives you can make with the contents than any other Paper Pumpkin Kit ever invented! As I said, people are cutting things apart to make more things! But first, I always like to make the cards as designed, which is what I did for this blog post! Then I will think about other ideas, if I want to make different designs and then make more cards!

Paper Pumpkin August 2022 Sweet Sunflowers Cards

These are the cards I made, as designed for the kit. The artists really did a fantastic job designing these cards and kit contents!

Most months, if you are a Paper Pumpkin subscriber, you can purchase a kit you missed or want more of, or the refill just for extra materials to make more cards or projects. But I heard this kit sold out. We’ll have to see if that is true.

Every Paper Pumpkin Kit also has a video you can watch to see how it goes together, plus pictorial instructions!

You may not be able to get this kit, but don’t miss the next holiday ones! Next to this pretty kit, always enjoy the holiday kits for Halloween and Christmas! This is the next kit coming up! I can’t wait! And when they decorate the box, you know you are getting something special!

Paper-Pumpkin-Sept-2022-Banner

JOIN PAPER PUMPKIN TODAY! DON’T MISS OUT AGAIN!

Scary Cute Slimline Halloween Trick or Treaters Card

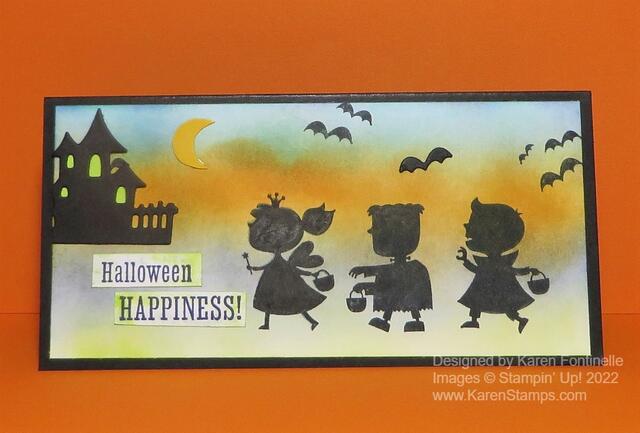
Halloween will be here before we know it so get your new stamp sets and accessories in the Stampin’ Up! Holiday Catalog and start creating! On this Scary Cute Slimline Halloween Trick or Treaters Card, I couldn’t resist making a colorful spooky background with the trick-or-treaters heading up to the house for their treats!

This is a slimline card made with a Basic Black cardstock card base. The card base is a 6″ square that is scored in half at 3″ so when it is folded, the card will be 3″ x 6″. The layer on the front of the card is Basic White cardstock 2 3/4″ x 5 3/4″.

To make the Basic White cardstock look spooky for Halloween Night, I used the Blending Brushes to add all kinds of ink colors! I used some of the new In Colors. Well, maybe all of them except Sweet Sorbet. I also used some Pumpkin Pie and Crushed Curry. I only have three Blending Brushes but if you are careful to work from light to dark ink in similar colors and really rub off the excess ink after each color on scrap paper or Grid Paper, you can use each brush for several ink colors. When you are finished, just rinse them out at the kitchen sink! Be sure to rub off a little bit of ink before applying the Blending Brush to the project to avoid getting a dark blob of ink.

Next, I stamped the three separate trick-or-treaters in black Memento Ink as if they were walking around on Halloween Night going trick-or-treating with their little baskets. You need to have a juicy ink pad to get a good, dark impression of the image. The Stamparatus would work well for this so you could stamp it over and over if necessary. You can also fill in the areas that didn’t stamp heavily enough with a black marker if the blacks match pretty well.

The Scary Cute Stamp Set has some fun stamps and greetings in it. I stamped some of the bats up in the sky. I stamped the Crushed Curry cardstock with the moon stamp but I cut it out according to the shape and used the plain cardstock side because I liked the cardstock color better than the inked side.

The haunted house is a diecut and I already had that cut out. I decided to use it but away from the trick-or-treaters so it wouldn’t look like the wrong size. I adhered tiny pieces of Parakeet Party card stock behind the windows and after adhering it to the card layer, I trimmed off the excess side so the house would fit better.

For the greeting, I stamped the “Halloween Happiness” on Basic White but decided to cut the words apart so they would fit in the corner. They were stamped with the Starry Sky In Color Ink and then I added a little Parakeet Party ink around the edges with a Blending Brush just to make the words look a little spooky and fit the card just right.

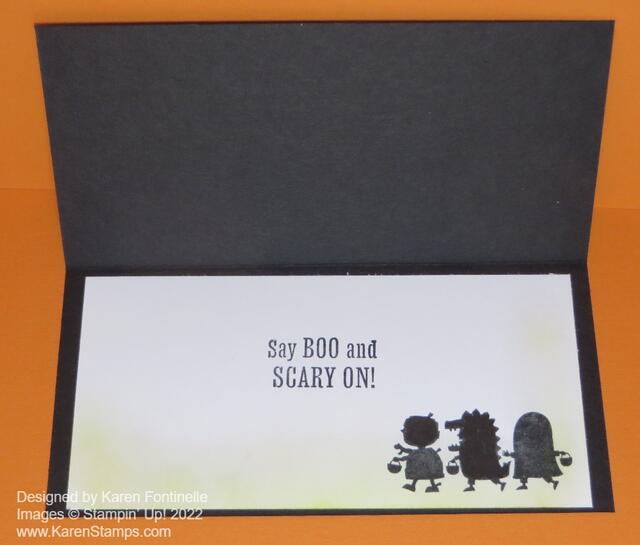
On the inside of the card, I adhered a Basic White layer just like on the front of the card. I stamped the other stamp with the three smaller trick-or-treaters and a greeting from the stamp set. Then I used the Blending Brush and just a light layer of Parakeet Party ink. You could use any color you like.

Scary-Cute-Slimline-Halloween-Trick-or-Treaters-Card-Inside

This Scary Cute Stamp Set will be fun to use making Halloween treats and other projects as well! Here is a Scary Cute card I made the other day using the spooky frame die with the tree branches. Just get the Scary Cute Bundle of stamp set and dies and you will be all set for making a card like my Scary Cute Slimline Halloween Trick or Treaters Card or many others!

SHOP STAMPIN’ UP! ONLINE HERE!