How to Decorate a Gift Box

Decorated Gift Box

The other day while searching for some tins I ordered many years ago for candy, I found these Stampin’ Up! White Gift Boxes (142000) in my retired stash. I had to change my design idea from candy in a tin to candy in a box for a few gifts. Whether or not you have these official White Gift Boxes in your stash, you can use this idea of any plain box. It would even cover up company printing on the box and the size of the box doesn’t matter. You can use this same principle.

Each side of this box is 3″ x 3″. I cut out five pieces of cardstock at 2 3/4″ x 2 3/4″, then five pieces of designer series paper at 2 5/8″ x 2 5/8″ (or you could do 2 1/2″ x 2 1/2″). Just adhere the designer paper to the cardstock and then on to the box. I like to use Multipurpose Liquid Glue because it gives you “wiggle room” to get the paper on straight on the box. On this box, I used the A Little Bit Festive Specialty Designer Series Paper and Misty Moonlight Cardstock.

The snowman on the top of the box is punched out of the Snowy Scenes Designer Series Paper with a Circle Punch and then layered on a punched circle of Daffodil Delight to match his scarf. You could use whatever you like.

For a final touch (before adding candy inside!), I wrapped around some ribbon that I had handy, which happened to be some retired Pretty Peacock ribbon, but I thought it matched okay. Use Mini Glue Dots to hold the ribbon in place at least in the back and maybe the sides, then tie a bow on the front.

Even if you had a small Amazon or other shipping box, you could use this same idea to cut out pieces of cardstock and/or designer paper to cover the sides of the box and personalize it! Just have fun with it! Time to wrap those gifts!!

A Little Bit Festive Christmas Stockings Card

A Little Bit Festive Christmas Stockings Card

This A Little Bit Festive Christmas Stockings Card is another fun and easy Christmas card to make! All you need is the A Little Bit Festive Specialty Designer Series Paper plus one greeting. As I’ve said in other blog posts, the A Little Bit Festive paper is special because it consists of 3 double-sided sheets of designer series paper and 3 sheets of Christmas die cuts! What more can you ask for?! Everything is matched and ready for you to use right there in one package!

This card base is Garden Green although you could choose Real Red instead. It would also be pretty. The layer on the front is Basic White cardstock that measures 5 1/4″ x 3″. Underneath the top and bottom of the Basic White layer are strips of the designer paper with the green triangle trees. You could make a whole layer of it which ouls mostly get covered up by the white piece, so I just used two strips adhered underneath the white layer. You can cut them at 5 1/4″ x 1″ and that should give you enough for the margin to show top and bottom. It just adds an interesting border.

I chose the row of Christmas stockings die cut which includes the branch of greenery that they are hanging from. I added some little star diecuts to fill up some space. The greeting is in the Joyful Sayings Ephemera. I adhered everything flat to the card front but you could pop up some or all of it with Stampin’ Dimensionals. I also added some red dots for berries on the bough of greenery in the Cherry Cobbler & Pearl Adhesive-Backed Berries. I think those little red dots add a lot to the card above the stockings.

That’s all there is for that card! Using the ephemera packs in the Holiday Mini Catalog and the diecut in the A Little Bit Festive Specialty Designer Series Paper have been so fun to use and so quick and easy! Make sure you have used yours! And if you don’t need more cards, make tags for packages!

SHOP STAMPIN’ UP! ONLINE HERE!

x

Christmas Ornaments Kit Stampin’ Up! Kits Collection

Christmas Ornaments Kit Stampin' Up! Kits Collection

Finally, I got my Christmas Ornaments Kit in the Stampin’ Up! Kits Collection made! I’ve kept the box out ever since it arrived weeks and weeks ago, and yet it didn’t get made until the pressure was on here at the last Christmas minute! The kit makes nine ornaments, three each of three designs, which I posted in the photo above. Unfortunately, the kit is “currently not available” in the Online Store, but maybe you already have the kit and haven’t made it. This is your reminder to get out that kit and sit down and enjoy making the ornaments! Or if you are too busy, get it out right after Christmas when you have more free time and make the kit. Then you’ll have them ready for next year!

The kit is called Christmas Ornaments, but you could use these for fancy gift tags on packages! If you were hand-delivering a card or mailing a card inside a package, maybe you could use this ornament as a card front! Then the recipient can take it off the card and use it themselves as an ornament or decoration.

Someone suggested jazzing up these ornaments a little bit! I plan to do that this afternoon in my “spare time”! Just as with the Paper Pumpkin Kits, people always think of other creative ways to use the kit and make “alternate” projects with the contents. So even though you are given directions and a video, you can still make your project differently, however you want to make it! Some of the suggestions I saw were adding a bit of gold or maybe some Wink of Stella glimmer. Paint on a bit of white for a snowy look on the pinecones. Add a greeting or another Christmas image on the ornaments. Six red bows are included in the kit but you can add your own bows to the other three ornaments if you wish. Just play around with the kit and do what pops into your head to make it your own!

The only difficult part of this kit is tying on the gold thread onto the gold hoop. The hoops are very nice, by the way. Strong and good quality. Use the included glue dots to put glue dots where the gold thread is going to go. You will see a little bump on each hoop, some barely noticeable, so you might want to wrap the thread around those areas if you can. Be sure to watch Sara’s video assembling the kit to see how she does it. You can watch it again and again or pause it to follow along with each step. Or just go wild and crazy and do it however you like, as I’ve said!

Watch the video below about the kit. As I said, if you have the kit but haven’t made it yet, now is the time!

Here is the kit in the Online Store that you can check out and keep an eye on in case they get more in stock.

While you are there, check out the other Kits in the Kits Collection! You can purchase a kit for yourself or get an extra one to make with a friend or loved one (I hear lots of grandmas do this for their grandchildren!). Maybe you just want to purchase a kit as a gift for a friend! Lots of variety to choose from! Enjoy!!

A Little Bit Festive Cocoa & Gingerbread Card

A Little Bit Festive Cocoa & Gingerbread Card

When you don’t have your own original idea, you can copy a card from the Stampin’ Up! catalog as I did with this A Little Bit Festive Cocoa & Gingerbread Card. You will find the sample that I copied on page 18 in the Holiday Mini Catalog. I changed mine just a tiny bit, but it was fun to make!

This Christmas card uses the A Little Bit Festive Specialty Designer Series Paper. This paper comes with three regular double-sided sheets of designer paper and three sheets of Christmas die cuts that you can use for cards or holiday projects. It’s really fun to work with, just playing with all the pieces!

This card has a card base of Real Red and a layer of the red and white striped designer paper in this package. After playing with the die cut pieces to get the design set, I cut a piece of Basic White cardstock at 3 1/4″ x 3 1/2″ layered on a piece of Real Red cardstock at 3 1/2″ x 3 3/4″. I arranged the die cut pieces like on the sample in the catalog. The cup of hot chocolate is adhered flat to the card, the gingerbread tree and gingerbread man are popped up on Stampin’ Dimensionals, and the gingerbread present is glued flat on the card. I chose “Happy Holidays” for the greeting in the Joyful Sayings Ephemera Pack.

For a little embellishment, this was the perfect card on which to use the Real Red & White Adhesive-Backed Peppermints. Unfortunately, these cute embellishments have been very difficult to keep in stock and are backordered even now. Hopefully, you already snagged some earlier. These do look cute with two next to the cocoa cup and one looking like it is floating in the whipped cream topping!

My card looks almost exactly like the sample card in the catalog, but if you look closely, you will see mine is the full size card and the sample looks to be square. My red and white stripes are running horizontally rather than vertically. And as I said, I used a different greeting and the peppermint embellishments. This is what usually happens when you plan to copy a card Almost always you will find your own little twist you want to put on the card and that helps get your creativity flowing!

New Paper Pumpkin Kit For January 2025!

Paper Pumpkin Kit January2025 title

The December Paper Pumpkin is being sent out and now it’s time to sign up for Paper Pumpkin so you get the next kit in January! I couldn’t believe I was writing 2025 in the post title! But this will be the fun Paper Pumpkin Kit you can receive in your mailbox mid-January 2025 which will be perfect for you-know-what…..Valentine’s Day! Or of course any time you want to send hearts to someone throughout the year!

Paper Pumpkin is a monthly, all-inclusive crafting kit that you subscribe to. Each kit includes a photopolymer stamp set, Classic Stampin’ Spot, and step-by-step instructions to complete exclusive paper craft projects, including cards, tags, and gift packaging.

JANUARY: Hearts for You
Subscribe December 11–January 10
Create heartfelt cards for Valentine’s Day, Galentine’s Day, and beyond!
• Makes 9 cards: 3 each of 3 designs with 9 envelopes
• Heart-shaped precut pieces and stickers
• Twine and heart gem embellishments
• Coordinating colors: Flirty Flamingo, Petal Pink, Real Red (Classic Stampin’ Spot)

Since this will be useful for Valentine’s Day, you can order more than one kit in your account if you’d like to make more than 9 cards!

JOIN PAPER PUMPKIN HERE!

No risk, no obligation! Skip a month or cancel if you need to.

It’s Day 2 Of FREE SHIPPING at Stampin’ Up!

Free Shipping Boxes on Cart Info

From December 9–11, you can shop and save on all qualifying orders of $75 or more. What a great way to stock up on all your favorite products from the catalog, Last Chance Products List, Online Exclusives, kits, and more!

Free shipping is for three days only so don’t delay!

Due to the high volume of orders and the Christmas season, the distribution center may fall behind their typical shipping timeframes. They will do all they can to return to the regular service levels as quickly as possible. 

Please know that any orders placed during this promotion are not guaranteed to arrive before or by December 25. 

SHOP TODAY!

(Give yourself a Christmas gift! Order what you want! 🙂 )

A Little Bit Festive Christmas Tree Card

A Little Bit Festive Christmas Tree Card

If you don’t have the A Little Bit Festive Specialty Designer Series Paper with which to make this easy and pretty A Little Bit Festive Christmas Tree Card, you ought to put it on your Stampin’ Up! order today, the first day of FREE SHIPPING! Today, December 9 is the first of three days to get FREE SHIPPING with a minimum order of $75. It’s a good time to stock up on any basics you need and all the things you “want” out of the Holiday Mini Catalog and from the Last Chance Products List where you might be able to get a few things at a discount!

I actually forgot I owned this A Little Bit Festive Specialty Designer Series Paper! It must have gotten lost in the shuffle even though I’d used it a little bit when I first got it. The interesting thing about this paper is that it is three sheets of double-sided designer series paper and three sheets of holiday diecuts! That makes it really fun to use! One side of the designer paper is Christmas designs and the other side has generic patterns you can use any time. And not just any diecuts, really cute ones and some that are frames for card fronts or photos. It would be great for scrapbooking, cardmaking, and other Christmas projects.

For this card (photographed on a Garden Green background), I started with a Real Red card base and a layer of Pretty in Pink cardstock to match some of the ornaments on the tree. The whole front panel of the card is in the A Little Bit of Festive package! It is so simple and pretty! I couldn’t find or think of a greeting that would fit on this card without interfering with the beautiful decorated tree until I found this very small rectangular diecut greeting in the Joyful Sayings Ephemera Pack. I placed it down at the bottom of the tree. Besides the colored ornaments on the tree, there are also gold foil accents on the tree, tiny dots plus the fancy star at the top. To this, I added five gems on the Christmas tree for a little more sparkle. These are the Pretty in Pink gems in the 2024-2026 In Color Shimmer Gems.

Don’t forget FREE SHIPPING December 9-11 this week at Stampin’ Up! with a $75 minimum order! Please be aware that depending on when your order is shipped (and there may be delays with a higher number of orders during these three days) your order may or may not reach you before Christmas. Some of you normally get your order in a couple of days and others take a week so take into account how long your order normally takes plus possible delays in getting the order shipped in the first place. Stampin’ Up! will be ready and working hard to get these orders out as fast as possible!

Also, don’t forget the new category of Last Chance Products which contains retiring Holiday Mini Catalog Products and also holds the Online Exclusive products, all of which are available while supplies last. This will also replace the Clearance Rack. This way things are in one place. Some retiring products are discounted and discounts may change during the time they are on the Last Chance list. Right now you can save 20% on the A Little Bit Festive Specialty Designer Series Paper that I featured with this card!

If you had already started an order before today, start over in your Cart. The free shipping offer is good on orders started today. For all the details, check out my blog post from the other day HERE.

SHOP TODAY!

FREE SHIPPING Dec. 9-11 at Stampin’ Up!

Free Shipping Boxes Banner Borders Info Dec 2024

FREE SHIPPING 3 Days Only Next Week!

Don’t buy anything over the weekend! (Unless you’re in a hurry!)

Surprise! It’s time for FREE SHIPPING

From December 9–11, you can shop and save on all qualifying orders of $75 or more. What a great way to stock up on all your favorite products from the catalog, Last Chance Products List, Online Exclusives, kits, and more!

Free shipping is for three days only so don’t delay!

Due to the high volume of orders and the Christmas season, the distribution center may fall behind their typical shipping timeframes. They will do all they can to return to the regular service levels as quickly as possible. 

Please know that any orders placed during this promotion are not guaranteed to arrive before or by December 25. 

If you need an order by Christmas, order as early as possible or consider expedited shipping.

DETAILS

  • Free shipping is for three days only. Orders must be opened and closed during December 9–11.
     
  • Free shipping automatically applies to your cart after the qualifying amount has been met, which is $75 USD (before tax).
     
  • Coupon codes and product credits are non-commissionable and will lower your order’s retail amount. Orders must meet the qualifying amount to be eligible for free shipping.
     
  • The additional cost for expedited shipping is not covered by this promotion.
     
  • Prepaid 3-, 6-, or 12-month Paper Pumpkin subscriptions can contribute to the qualifying amount for free shipping (Month-to-month subscriptions do not qualify). Subscriptions billed and shipped this month will be charged for the normal amount ($24.50 USD shipping included) + tax .

Let me know if you have any questions! Don’t forget the Last Chance List!

SHOP STAMPIN’ UP! ONLINE HERE!

Reindeer Days Circle Window Card

Reindeer Days Circle Window Card

I called this card the Reindeer Days Circle Window Card because the center focal point is actually an opening to the designer paper image underneath. It’s almost like a shaker card without covering the hole and filling it with shaker bits. But you could easily make it a shaker card if you wanted to!

The card base is Real Red cardstock. The designer paper is the white dotted paper in the Reindeer Days Designer Series Paper. I used one of the Deckled Circles Dies to cut a hole in the paper. To make a frame, I used the next larger size Deckled Circle die to cut out a piece of Basic White cardstock plus the same smaller circle inside that one. You want that diecut piece to fit around the diecut circle on the designer paper. These dies are not available right now, so if you don’t have those, just use some other circle dies you have, perhaps the circles in the Stylish Shapes Dies.

I looked over the patterned paper in the Reindeer Days DSP, the one with the reindeer and the reindeer snowmen, and chose an area that I wanted to appear in my diecut window on the front of the card. I cut it out and positioned it so it would fit exactly right in that window and adhered it to the card base. Then I popped up the whole front part of the card with the window with Stampin’ Dimensionals.

The greeting fits perfectly at the base of the card. It is in the Joyful Sayings Ephemera Pack. It’s so easy to find the right greeting in the ephemera pack and just glue it on! Plus, the Reindeer Days DSP and the Ephemera Packs are discounted now on the Last Chance list. I also added some Iridescent Foil Gems to the scene with the snowman and reindeer for a little sparkle!

Be sure to check out the Last Chance Products list as the Holiday Mini will be retiring January 6th. However, the retiring products will stay on the Last Chance list while supplies last so you might still be able to buy them longer than when they were completely gone on the retirement date.

SHOP STAMPIN’ UP! HERE

Reindeer Days Forest Christmas Card

Reindeer Days Forest Christmas Card

Talk about a simple card! I love this Reindeer Days Forest Christmas Card and there almost couldn’t be an easier card to make! I love the look of the reindeer just out in the forest, in the snow, surrounded by beautiful evergreen trees. There are babies and adult reindeer just out relaxing in the forest!

This paper is one of the patterns in the Reindeer Days Designer Series Paper. This fun holiday paper is on the “Last Chance Products” category in the Online Store which means it is retiring from the Holiday Mini Catalog come January 6. You can still order it and it is discounted to $10.00 instead of $12.50, while supplies last. If you haven’t gotten it yet or you want another package for your stash, hurry and order so you will receive it before Christmas.

I didn’t just cut a piece out of the paper. I found the exact scene I wanted to have on my card and planned how to cut it out. Now this will wreck your perfect 4″ strips you probably would normally cut from the paper for cardmaking, but I wanted a scene, not just any old part of the paper. Once I had it cut out, I adhered it to the card base of Pecan Pie cardstock. Early Espresso would also be a good choice. I also considered adding an extra layer of Granny Apple Green or Garden Green…or both! But I liked the paper just layered on the Pecan Pie card base.

For the greeting, I chose the “Wishing You & Yours” sentiment in the Peaceful Season Stamp Set. It was a good size for this card because I didn’t want to cover up my forest scene any more than I had to. It is stamped in Pecan Pie ink on Basic White and cut out with one of the label dies in Countryside Corners. For a layer I diecut a piece of Pecan Pie cardstock with the same size Countryside Corners die. I cut it in half horizontally and adhered it to the top and bottom of the greeting. I also cut a second piece, cut it in half vertically, and adhered it to each side of the greeting. It looks like a full layer underneath and no one will notice! I added two Swirl Dots to the sides of the greeting. I thought the brown color went well with this card.

On the inside of the card, I stamped the second half of the greeting “A Season of Wonder and Happiness” also in Pecan Pie ink on Basic White.

Several of the patterns in the Reindeer Days Designer Series Paper lend themselves to choosing a scene for your card rather than just cutting the paper into pieces randomly. Try it!

SHOP STAMPIN’ UP! ONLINE!

Remember to check the Last Chance list for some discounts on retiring products and Online Exclusives!

So Much New At Stampin’ Up! Today!

DSP Special Release Recolored

Stampin’ Up! has taken these designer series papers we have had previously and changed the colors to fresher, updated ones! You will find these papers in the Online Exclusives category and are available while supplies last!

Refreshed Beauty (#166259) is the previous Blackberry Beauty DSP. This paper is 12″ x 12″.

Serene Love (#166261) is the previous True Love DSP. This paper is 12″ x 12″.

Shades & Hues (#166260) is the previous Color Theory DSP. This paper is 6″ x 6″.

Watch this video to see the papers a little closer:

NEW LAST CHANCE LIST

Last Chance Products Ad1

This is a new way to present the retiring products from catalogs, which beginning today are products in the September – December 2024 Mini Catalog (or Holiday Mini Catalog as we know it!). But from now on, this list will contain any retiring products from any catalogs and from Online Exclusives and Kits in the Kits Collection. (This does not include Paper Pumpkin kits.). Some products will be discounted and product discounts may change over time. This will take the place of the Clearance Rack.

The good thing is that everything is in one place and instead of, for example, a stamp set retiring from the Holiday Mini Catalog, will not go away at the end of the catalog, but instead will be in the Last Chance list for however long, until it sells out and is then discontinued. So you will have access to all those products “while supplies last” once they are on the Last Chance list. You can sort for “Discount Applied” in the Online Store for the Last Chance List if you want to see the sale items without scrolling through everything.

What this means is that the “retirement list” for the Holiday Mini is out today but it is in the Last Chance category and those products will remain there until they sell out, whether one day or whether two months. Go check it out!

NEW KITS IN THE KITS COLLECTION!

There are new Kits in the Kits Collection today!

You will want the Perpetual Beauty Calendar Kit here at the beginning of the New Year to have your list of birthdays and anniversaries and other occasions all in one list for each month!

Perpetual Calendar Kit

The Cherry Blossom Treat Boxes Kit will make beautiful favors for parties, showers, weddings, or birthdays, even just small gift boxes. The boxes are already printed, you just need to assemble and stamp the greeting on the tag.

Cherry Blossom Treat Box Kit Assembled

That’s a lot for one day! There might even be more that I missed but it’s time to get this post out!

Check out the LAST CHANCE LIST right away!

Take a Bow Bells Christmas Card

Take a Bow Bells Christmas Card

It is December, if you can believe it, and December means Christmas cards like this Take a Bow Bells Christmas Card. This is a basic card design so it would be pretty easy to duplicate if you wanted to make multiples. The only thing that would prevent that would be the ephemera piece I placed on the front of the card. You could omit any image there and only have a greeting, or you could stamp an image instead.

The card base is Real Red, one of the colors in the Take a Bow 6″ x 6″ Designer Series Paper. This paper is so great for the holidays, but there’s no reason why you couldn’t use many of the patterns for any time of year. Its 6″ x 6″ size means it’s a little easier to use that the large 12″ x 12″ sheets of paper. This paper is part of the Take a Bow Bundle if you would like the dies with which to make bows for your holiday packages or any gifts throughout the year.

For this card, I used a piece of the red, white, and green diagonally striped paper cut at 4″ x 5 1/4″ for the first layer on the card. I added a strip of the white polka dot paper to the side. It is cut at 5 1/4″ x 1 1/2″. Usually we line it up with the left edge of the designer paper, but sometimes I move it over to the right so that a little bit of the designer paper shows on the left side, too.

Before adhering the designer papers to the card, I wrapped around a piece of white ribbon in the Petal Pink & White 1/4″ Diagonal Trim Combo Pack. I tied a separate bow and adhered it with a Mini Glue Dot on the back. I usually also like to place a glue dot underneath the ribbon underneath the bow to hold everything in place.

The greeting is stamped in Real Red ink on Basic White cardstock using one of the greetings in the Peaceful Season Stamp Set. I found a die in the Unbounded Love Dies that I thought worked perfectly to fit the greeting plus add something special to the card. It is popped up with Stampin’ Dimensionals. The ephemera piece of bells and ribbon is found in the Joyful Images Ephemera Pack in the Holiday Mini Catalog. It was just laying there on my table begging to be used on a card. It is also popped up with Stampin’ Dimensionals.

If you start looking for Christmas card ideas that aren’t fussy, you can try out something like this card! It looks festive, it’s easy to make, and if you like, you can jazz it up even more for something fancier.

SHOP STAMPIN’ UP! ONLINE HERE!

It’s Thanksgiving Day 2024!

Happy Thanksgiving

I hope you and your family or friends are having a wonderful Thanksgiving together! I am thankful that you are one of my customers, blog readers, or that you just happened upon my website! I hope you enjoy the ideas you find here! There’s more to come through the holidays!

Enjoy that turkey dinner and especially the pie and dessert!

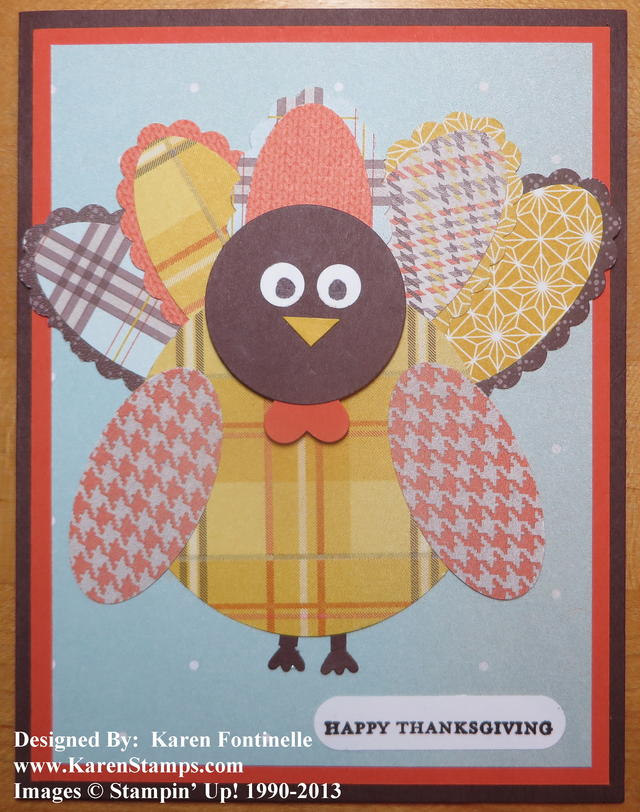
Punch Art Turkey Thanksgiving Card

Easy Snowy Scenes Christmas Card

Easy Snowy Scenes Christmas Card

Using the Snowy Scenes & Sticker Sheet Scrapbooking Workshop Kit is an easy way to make a Christmas card. This Snowy Scenes Christmas Card was a fun and easy card to make!

The card base is Real Red cardstock. The diagonally striped paper as a layer on the card is in the Snowy Scenes 12″ x 12″ Designer Series Paper. This paper has such cute images of snowglobes, penguins, snowmen, villages, and more! Have you noticed how much “pink” is out there this season in Christmas decorations? Some of these papers use that pastel peach and mint color scheme that seems to be in style these days. Even if you are a traditionalist with red and green, you will find plenty of those colors mixed in with some of the pastel colors.

The round piece you see on the card front with the penguin and evergreen trees is diecut from one of the snowglobes on the designer paper. I used the Stylish Shapes Dies to cut the stitched circle shape. It fit just about perfectly in that snowglobe image. The big tree on the card front is a sticker from the Snowy Scenes Sticker Sheet in the special online version of the Snowy Scenes DSP. All you have to do is peel it off the main sheet and adhere it where you want because it already has adhesive on the back. I added a gold foil star to the top from the Joyful Images Ephemera in the Holiday Mini Catalog. The snowflake over the penguin is also a sticker from that sheet! It’s really fun to just use a sticker!

The greeting is stamped in Real Red ink on Basic White. It’s in the Reindeer Fun Stamp Set. I cut apart the two words after stamping so they would fit better on the card in the space I had. For a little bling, I added some white sequins from the Sequins Trio package.

That’s how easy this card is! Just because the cute penguin is in a snowglobe doesn’t mean you have to have a snowglobe on your card! Use things in different ways!

Have fun making some Christmas cards over the Thanksgiving holiday if you have time!

SHOP STAMPIN’ UP!

Meandering Meadows Happy Birthday Card

Meandering Meadows Happy Birthday Card

This is the Meandering Meadows Happy Birthday Card which I made for my son, in kind of a hurry since it became really a “belated” birthday card! At least I mailed it on his birthday, I think! I actually did make this card for him because he loves to go hiking in the mountains where he lives. I thought this beautiful scene on this designer paper looked like a trail he might find when he goes hiking. Maybe it looks more like a trail I would like since it looks flat and there are no drop-offs on the side!

This card has a Basic White cardstock card base with a little wider than usual margin before we get to the card layers. Your layer colors will be determined by which of the papers you choose from the Meandering Meadows 6″ x 6″ Designer Series Paper. I don’t have the card in front of me as I write this, but I believe for this pattern I chose Shaded Spruce and Lemon Lime Twist cardstock for the layers. I almost always play around with a couple different colors as I work on a card to see which ones look best together on the card.

The greeting is stamped with two different stamps in the Choose Happy Stamp Set. You can make up many different greetings with this set. It also has a lot of cute little images that might be fun to use in your cardmaking and other projects. It is diecut with one of the small banner dies in the Stylish Shapes Dies. I cut off the left side of the banner, lined it up with the edge of the designer paper, and adhered a bow made with a double layer of the Garden Green Natural Tones Linen Thread. You get three colors in this pack of this linen thread!

And if you want to decorate the inside, this is what I added to the inside of this card:

Meandering Meadows Happy Birthday Card Inside

That’s how easy this card is because you just have to let the Meandering Meadows Designer Series Paper show off its beauty! Add a greeting and maybe an embellishment and you have a beautiful card.

SHOP STAMPIN’ UP! ONLINE HERE!