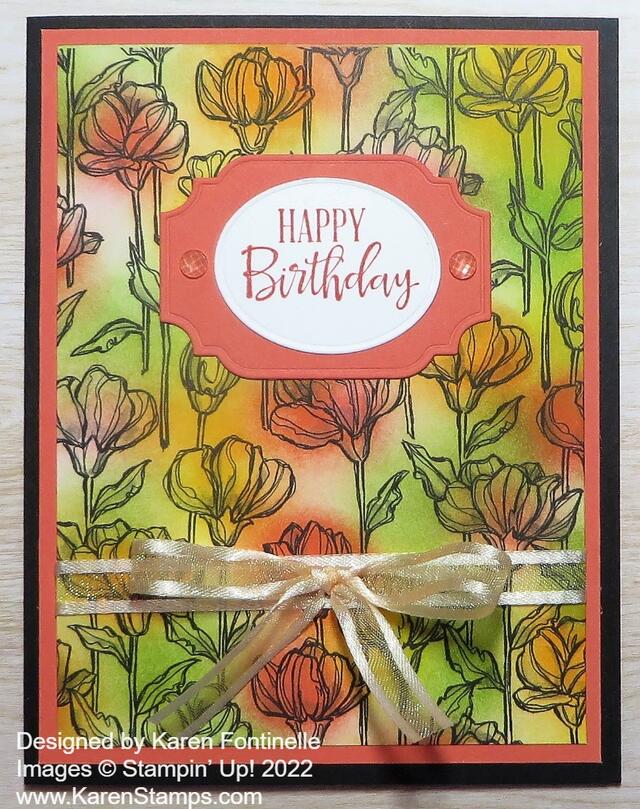
Even though I love this designer paper just in its black and white design, one of my first thoughts was one of the ways to add color would be to use Blending Brushes or some kind of sponge. It could be soft and intermittent or more precise, as far as this coloring could go.
This new black and white paper is the Perfectly Penciled Designer Series Paper. While black and white can be very stunning on their own, it also begs for the rather new trend of coloring in! Coloring takes us back to our childhood! I think of some times when my mother would sit down and color in our coloring books with my brother and me with crayons and we thought her coloring was perfection!
Stampin’ Up! has so many different ways you can color in stamped or printed images. With this designer paper, you don’t have to worry about which ink to use or if anything will smear. We have two different kinds of markers, Watercolor Pencils, ink and Blender Pens, ink and Water Painters, Pastels, and more. It’s all fun!
For this card, I colored this floral pattern of the Perfectly Penciled Designer Paper using ink pads and Blending Brushes. Blending Brushes come in a set of three. That’s all I have, at least at the moment. I have found that I can rub them on scrap paper really well after using a color and then go on to use another color. After using them, you can just wash out the ink, but if you wanted to use them over and over, you probably wouldn’t want to work with a wet blending brush. Some people like to have more so they can use a clean brush for every color.
For most of the flowers, I just rubbed the Blending Brush on the ink pad and lightly colored on the paper already cut into a layer for the card. After picking up some ink on the brush, be sure (usually) to lightly rub the brush on scrap paper so you don’t get too dark of a color on your image. After I had lightly colored some of the images, I decided to add a darker layer of color to some of the flowers. Obviously, with this method, you cannot color precisely on any image, which makes it easy because you don’t have to worry about going out of the lines! It’s all out of the lines! The colors I used for the flowers were Daffodil Delight, Calypso Coral, Mango Melody, and Granny Apple Green for the leaves. You can use any combination of colors you want. I also added a layer of Calypso Coral cardstock under the Perfectly Penciled paper. Before adhering, I added a piece of Pale Papaya Ribbon around the lower part of the paper. Even though I didn’t use Pale Papaya as a color, the ribbon looks perfect on the card. It blends in with the other colors and doesn’t compete with all the other pattern and colors happening on the card. I tied a separate bow and adhered it with a Glue Dot.
For the greeting, I stamped “Happy Birthday” in the Peaceful Moments Stamp Set in Calypso Coral ink. It is die-cut with the oval in the All That Dies set and then layered on a Calypso Coral piece also in the die set. For embellishment, I added an Elegant Faceted Gem to each side of the die-cut.
Since the card base is Basic Black, you will need to add an inside layer so you can stamp a greeting or write a personal message on the inside of the card. You could also make the card without the black card base and just use the Calypso Coral or whatever color you like.
If you want to see a card that is just left black and white, check out THIS POST of a card I made with the Perfectly Penciled Designer Series Paper.
Just play with this paper and see what you come up with as I did with this Perfectly Penciled Colored With Blending Brushes Card.

