Tag Archives: Bee My Valentine Stamp Set

Bee Mine Gift Bag

Bee Mine Gift Bag

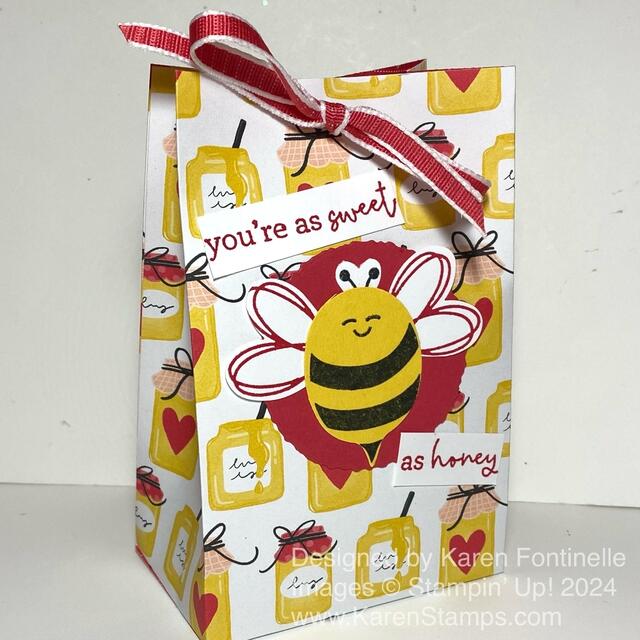
Another pretty thing that is retiring from Stampin’ Up! on Tuesday, April 30 is this cute Bee Mine Designer Series Paper. You only have today and tomorrow to pick up anything that is retiring that will likely be gone for good! Before time is up, I thought I would make one more thing with the honey jar pattern in the Bee Mine paper. This paper doesn’t have to be for Valentine’s Day. You could make this Bee Mine Gift Bag for any time of year for someone! It’s easy to make and would be nice for a “sweet” gift, maybe a special jar of honey and some cookies or tea!

You can vary the height of this bag if you want it taller or shorter. My gift bag starts with a piece of the Bee Mine Designer Paper cut at 6″ x 11″. You want to think about the direction of the pattern, if you use a paper like this one with a pattern. You wouldn’t want the honey jars to be upside down! Score at 2″ across the bottom of the paper, which is where the bottom flaps of the bag will be. Then score at 2″, 5 1/4″. 7 1/4″ and 10 1/2″. Cut up on bottom flap score lines up to that 2″ score line. Cut off the little corner piece that is 1/2″ x 2″. Crease and fold all the score lines and see how the bag is going to go together.

Fold the 1/2″ piece on one side to the inside and apply adhesive. Fold the other side over to adhere both sides to form the bag. Then fold in the bottom flaps and adhere. Stick a Bone Folder or ruler or something down inside the bag to press the bottom flaps together so the adhesive will hold.

You can leave the bag open at the top or pinch it closed, as I did. Then use a hole punch to punch holes for ribbon if you want to tie it closed. You could also use some kind of clip to just clip the top of the bag shut after you put the gift or goodies inside. I used the pretty Sweet Sorbet 1/4″ Bordered Ribbon. I hate to see that color and that ribbon retire!

To decorate the bag a bit, I stamped and punched out parts of the bee with the Bee Builder Punch. To help the bee stand out on the bag, I diecut a Deckled Circle in Sweet Sorbet. The greeting is in the Bee My Valentine Stamp Set. This stamp set and the Bee Punch are NOT retiring, but will not be available as a Bundle in the new catalog. So if you want to save 10% on the stamp set and punch, you need to purchase them before they retire.

Since the greeting was pretty long, I cut it apart and put one part of the greeting above the bee and the remainder at the bottom. I think it turned out cuter like that than one long strip across the bottom of the bag.

If you want to see another gift bag project, click HERE.

This is an easy and cute little project! Make the gift bag and hang on to it until you need it for a gift or treat! You will be happy to have something handy!

SHOP STAMPIN’ UP! HERE!

Bee Mine Bees Valentine Card

Bee Mine Bees Valentine Card Jan

HAPPY VALENTINE’S DAY!!

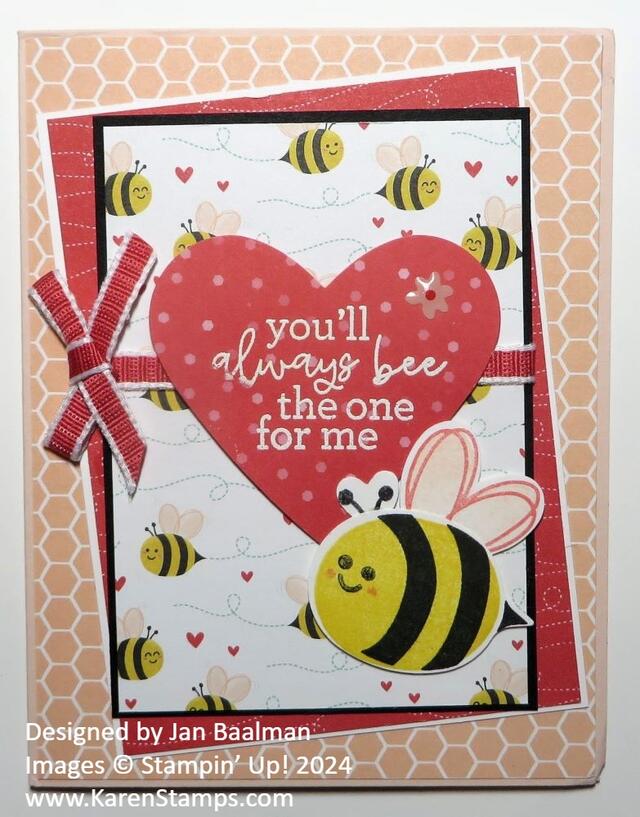
If you are looking for one last card idea for Valentine’s Day, here is a card I got from my very dear friend! She always makes beautiful cards! I called this the Bee Mine Bees Valentine Card! It is made with the Bee Mine Designer Series Paper. I didn’t think I was into bees, but as soon as I started working with this paper it was just so cute! I loved cutting out the medium-sized bees on one of the papers and using them for embellishments! And the paper is not just for Valentine’s Day. The patterns will mix and match and not all of them have hearts. But hearts are for any time so don’t be afraid to use the cute bees with hearts!

This card uses several of the products in the Bee Mine Suite Collection in the Spring Mini Catalog. If you want to use just one item number for ordering all the products in the Suite, you will get the Bundle price on the stamp set and punch. Otherwise, just order the products individually that you want and/or the Bee Mine Bundle. Remember to think in terms of spending increments of $50 so you can earn FREE Sale-A-Bration products until February 29th!

This card uses the Petal Pink honeycomb pattern for the card front and then two other papers layered on diagonals. The Sweet Sorbet paper with the squiggly bee flight lines is layered on Basic White and the paper with the little bees is layered on Basic Black. The large heart on the front has a greeting embossed in white from the Bee My Valentine Stamp Set. That’s such a cute saying I think! There is one of the cute little flower embellishments in the Suite, the Adhesive-Backed Hearts & Flowers, on the heart. Wrapped around the bee paper and under the popped-up heart is the Sweet Sorbet 1/4″ Bordered Ribbon. And of course, we have a cute Valentine bee, stamped and then cut out with the Bee Builder Punch which cuts out the bee body and the wings which could also be hearts plus a little bitty heart, which could also be little bitty wings. It’s really a more versatile punch than it looks like!

Are you doing something special for Valentine’s Day today?

Bee My Valentine Hearts Valentine Card

Country Bouquet Hearts Valentine Card

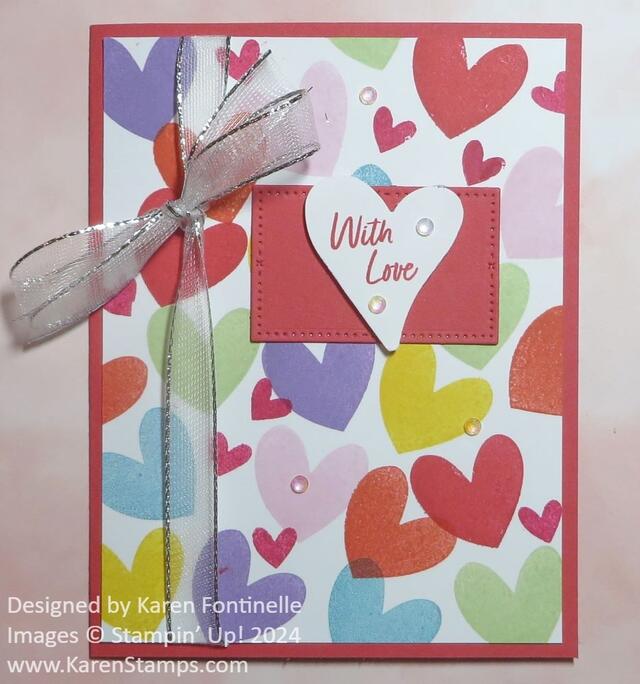
Are you making Valentines? Here is a fun one, the Country Bouquet Hearts Valentine Card, with lots of stamped hearts! Sometimes I like to just stamp randomly all over the card. It just feels good and the simplicity is nice!

For this card, I used the solid heart in the Bee My Valentine Stamp Set in the Spring Mini Catalog. I started by stamping three Sweet Sorbet hearts. Then I just chose several other colors and mostly stamped three hearts of each color. You can use whatever color theme you like! I think I used Fresh Freesia, Balmy Blue, Highland Heather, Daffodil Delight, Soft Sea Foam, and Calypso Coral. I crammed them in there! Be sure to turn the stamp or paper so they are all going in slightly different directions. Not to be one to know when to stop, I also added some really small hearts stamped in Melon Mambo ink.

Before adhering the hearts card front, I wrapped around a piece of Silver & White 1/2″ Sheer Ribbon down the side. After adhering the front layer to the Sweet Sorbet card base, I tied a bow around that piece of ribbon. I liked this ribbon because you could still see through it to see the colored hearts.

For the greeting, I chose “With Love” in the Country Bouquet Stamp Set. I wanted to stamp it on the heart punched out of the Country Bouquet Punch but it was too long so I had to stamp each word by carefully inking up only one word at a time. It was risky but I did it! I could have done it a more careful way but I took a chance! I popped up the stamped heart over a diecut rectangle in the Timeless Arrangements Dies. Then I scattered around some Iridescent Rhinestone Jewels.

Have fun making some Valentines!