Tag Archives: Bright & Beautiful 6" x 6" Designer Series Paper

Bright & Beautiful Father’s Day Card

Bright & Beautiful Father's Day Card

Father’s Day is Sunday, June 16th! Do you have a card ready? This Bright & Beautiful Father’s Day Card is an easy one for you. But that’s not a Father’s Day card, you might say, because it doesn’t say “Happy Father’s Day” on the front. If you don’t have that exact greeting, there are many others you can use for the important father in your life! Just look through your stash! Even just a “Celebrate” or “Love” will do just fine. I pulled out this Circle Sayings Stamp Set, forgetting that it retired recently, but that’s okay because it illustrates how you can use another kind of greeting for a Father’s Day card.

I looked through some of my designer papers, and decided this Bright & Beautiful 6″ x 6″ Designer Series Paper would make a good card for a father. There were several different papers I considered using but I settled on this one with little blue stars and a solid blue background.

The card base is Blueberry Bushel cardstock, one of the several blues that goes with these papers. I cut the solid blue designer paper at 5 1/4″ x 4″ for a layer, and then I just added two rectangles of the stars paper to two corners. Those two rectangles are cut at 2″ x 2 5/8″. Yes, that took some math! Half the width of 4″ and half the length of 5 1/4″.

If you made a card design like this, you could stamp a greeting and cut out with a rectangle shape or with a die. I used several circle punches but you could use circle dies. Whatever works for the greeting you want to use and the size. For my greeting, I have a background circle of Blueberry Bushel and then the center circle is popped up on Stampin’ Dimensionals. I had also added some Blueberry Bushel Stampin’ Write Marker around the edge just to give it a tiny bit of color to help it stand out.

I thought I was finished, but I decided to add a bow. I took the Lemon Lolly Baker’s Twine in the Baker’s Twine Three Color Pack and colored it with the Dark Blueberry Bushel Stampin’ Blend marker and adhered it with a Mini Glue Dot.

If you like this card, you could use it for another occasion besides Father’s Day! It’s a good design, easy to make, and you can add any greeting and use any designer paper to make it! Be sure to check out the Father’s Day card I made the other day HERE or put Father’s Day in the Search Box over on the right and see what comes up from previous years!

Spotlight On Nature Dear Friend Card

Spotlight On Nature Dear Friend Card

Today the Stampin’ Up! Bundle Sale begins! Save 10% on any Bundle with a stamp set and set of dies. One set of dies I would recommend is the Spotlight On Nature Dies. While they go with the Spotlight On Nature Stamp Set, they will go with almost anything. This Spotlight On Nature Dear Friend Card uses both the flowers and greeting in the stamp set plus the circular dies in the background. I used a sample in the Annual Catalog as a starting point for this card but ended up with a little different look. When you put the Spotlight On Nature Stamp Set and the Spotlight On Nature Dies together, you get the Spotlight On Nature Bundle! Normally you would save 10% by buying the two products together in a Bundle and now, during this sale all month, you will save an additional 10%.

This card has a card base of Petunia Pop. The layer on the front of the card uses this dotted pattern of paper in the Bright & Beautiful 6″ x 6″ Designer Series Paper. It was one of the couple of papers in the previous catalog that made the cut into the new Annual Catalog. That doesn’t usually happen!

I diecut two circles from the Spotlight on Nature Dies. The outer one is Petunia Pop cardstock. The smaller inner one is the plain background of one of the papers in the Bright & Beautiful paper. Funny that this paper was sold before the new In Colors, but Bubble Bath and others go well with this paper.

The flowers are stamped twice from the stamp set, colored with Stampin’ Blends, and then cut out by hand. I made two sets so I could have a fuller bouquet, like the sample in the catalog and even cut off one of the flowers and stems so I could put that flower where I wanted it to make the bouquet fuller. I used Bubble Bath and Petunia Pop Blends to color the flowers. The leaves on the flower stamps were colored lightly with Lemon Lime Twist and maybe Soft Sea Foam.

For more foliage in my bouquet, I stamped and colored the stem of leaves, colored those with other green colors and cut out by hand, then glued down all leaves and flowers. You can play around with these pieces to get what you like first, then glue them down.

The greeting is stamped in Petunia Pop ink and die cut with a banner in the Stylish Shapes Dies. I popped it up on Stampin’ Dimensionals. The bow is a piece of white Baker’s Twine doubled up and adhered with a Mini Glue Dot. You could also add some gems or jewels if you wanted.

DETAILS:

  • Get an additional 10% discount on stamp and die bundles only (that’s a total of 20% discount on stamp and die bundles!). ***This excludes suite collections, stamp and punch bundles, bundles not yet released to customers, and any other bundles.
  • Save 10% on Stampin’ Cut & Emboss Machine and Mini Stampin’ Cut & Emboss Machine (white and Boho Blue). 
  • The 10% discount applies automatically to stamp and die bundles in all orders including Starter Kit orders.
  • See and shop all qualifying bundles in the online store.

*Please note Close to My Heart products are not included in this promotion.

Shop the Bundle Sale TODAY! The early bird gets first choice!

A Dad Card For Father’s Day

Dad Card For Father's Day

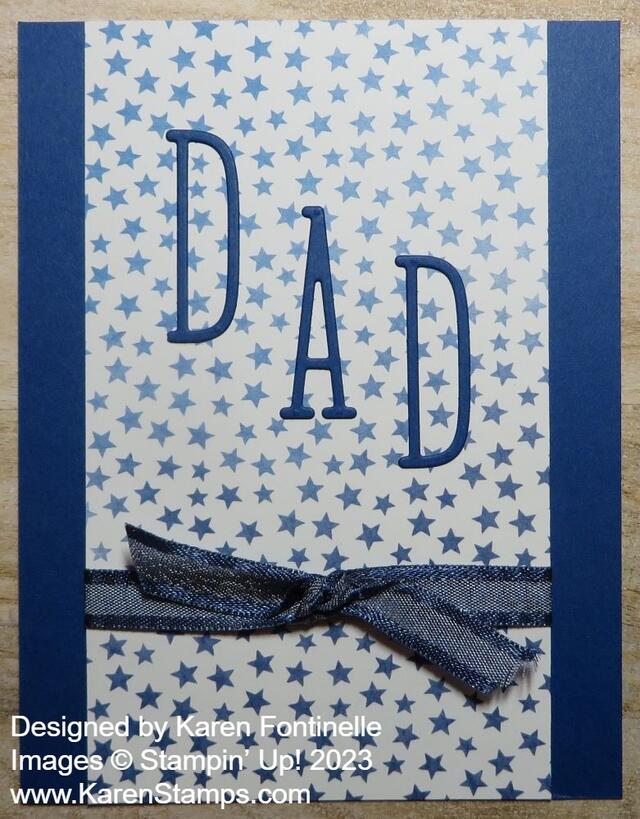
Sunday is Father’s Day so make sure you have a card ready for the special man/men in your life! Here is a super simple Dad Card For Father’s Day.

The card base is Blueberry Bushel, one of the returning colors in the Stampin’ Up! Color Refresh in May. I liked this layer of Bright & Beautiful Designer Series Paper with the little stars for this card. The stars have the ombre effect as you go down the card. I cut the paper the full length of the card but narrower. It’s 5 1/2″ x 3 1/4″. Before adhering it to the card base, I added a piece of the Night of Navy 3/8″ Bordered Ribbon around the bottom of the card and tied a knot onto the ribbon separately. After attaching the ribbon, I adhered the this piece to the card base.

I used the Alphabet A La Mode Dies to cut out the word “DAD”. I used Blueberry Bushel cardstock for the letters. Now, if you don’t have this alphabet die set, see if you have some other alphabet set that you could stamp. If you do, stamp on Basic White cardstock, either for the whole word or each letter. You could cut rectangles for each letter so that the stamping would show up on the card.

If you wanted to, you could add some punched or die cut additional stars on the card.

That’s all there is to this card, so if you need a last-minute Father’s Day card, perhaps this card will give you some ideas or you can simply copy it!

Bright & Beautiful Diagonal Birthday Card

Bright & Beautiful Diagonal Birthday Card

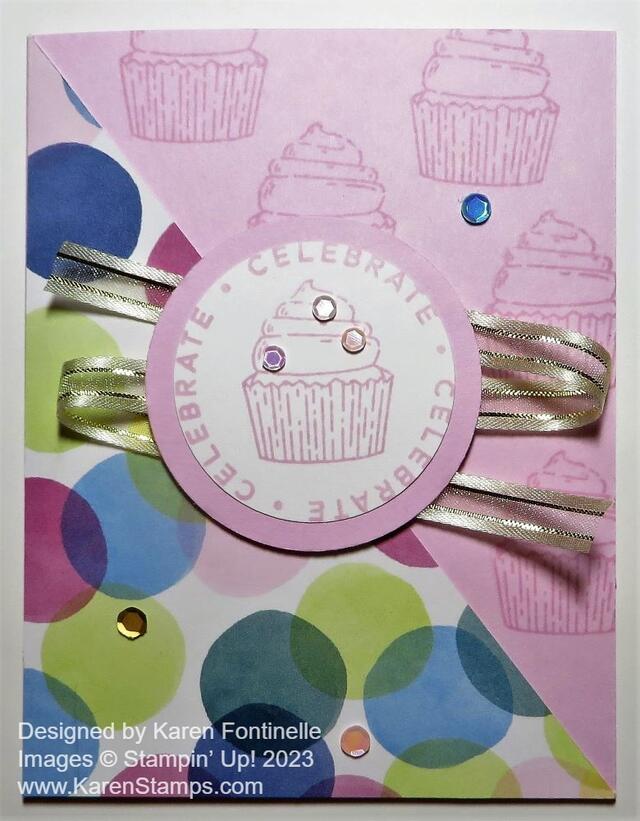
Make this Bright & Beautiful Diagonal Birthday Card for anyone’s birthday! The paper makes it festive and bright and of course, who doesn’t love a cupcake?

This Bright & Beautiful 6″ x 6″ Designer Series Paper is a great package to own. You can purchase it at a 15% discount right now through June 30th! It has bright and beautiful colors and designs, just like the name says! So many coordinating colors with this paper, also. Some papers are like ombre-dipped shades, then there are stars, dots, diagonal stripes, circles, confetti, and more. Use it for cards or scrapbooking. For sure, the papers go well for making birthday cards.

The card base is Bubble Bath cardstock. If you want to have some stamped images on the side without designer paper, be sure to do that before you add the designer paper. I just stamped the cupcake from the Circle Sayings Stamp Set in Bubble Bath ink on the Bubble Bath cardstock. That gives a watermarked look, the same as if you used Versamark ink instead. It just adds a little interest rather than the blank cardstock on that side.

To cut the designer paper on the diagonal, first decide what size you want it to be. If you want it to fit corner to corner, completely against the fold of the card and all the way to the bottom of the card, then cut a piece of designer paper 4 1/4″ x 5 1/2″, the exact size of the card. Then cut it diagonally from corner to corner with your Paper Trimmer. Put the top left corner of the designer paper even with the Paper Trimmer cutting track while also putting the lower right corner of the paper also even with the cutting track. That puts your paper on the diagonal. To avoid tearing the corners when you start cutting, place the cutting blade up into the paper, then back down to the corner, and then go up to the top, or vice versa. That takes some of the pressure off that pointy corner of the paper with the cutting blade jamming into it.

If you want the card to have the usual margin, cut the paper at 4″ x 5 1/4″, then adhere it 1/8″ off the fold and from the bottom as you would normally do. Either way is fine, or even smaller, depending on your design.

For the center greeting, I stamped the words and the cupcake from the Circle Sayings Stamp Set on Basic White with Bubble Bath ink. I punched it out, which was very close, with the 2″ Circle Punch. I wanted to use the 2 3/8″ Circle Punch for a layer of Bubble Bath so I had to use the 2″ Circle Punch. It worked fine!

I added Stampin’ Seal to the back of the greeting circle so that I could wind the Gold & Vanilla 3/8″ Satin Edged Ribbon back and forth behind it, and then I added Stampin’ Dimensionals to hold down the ribbon and to pop up the greeting in the center of the card. I liked the touch of gold on a festive birthday card!

And what birthday card would be complete without some bling? I used the Pastel Adhesive-Backed Sequins here and there on the cupcake and card to some sparkle. I have used these sequins a lot, maybe because the colors go with a lot and because they already have adhesive on them, unlike sequins we used to have that we had to glue down ourselves.

You can use this same card design with the other images in the Circle Sayings Stamp Set or even use some other greetings and dies. Here is another card I made recently using the same paper and stamp set, but with a few differences.

Check out the Stampin’ Up! Designer Series Paper Sale!