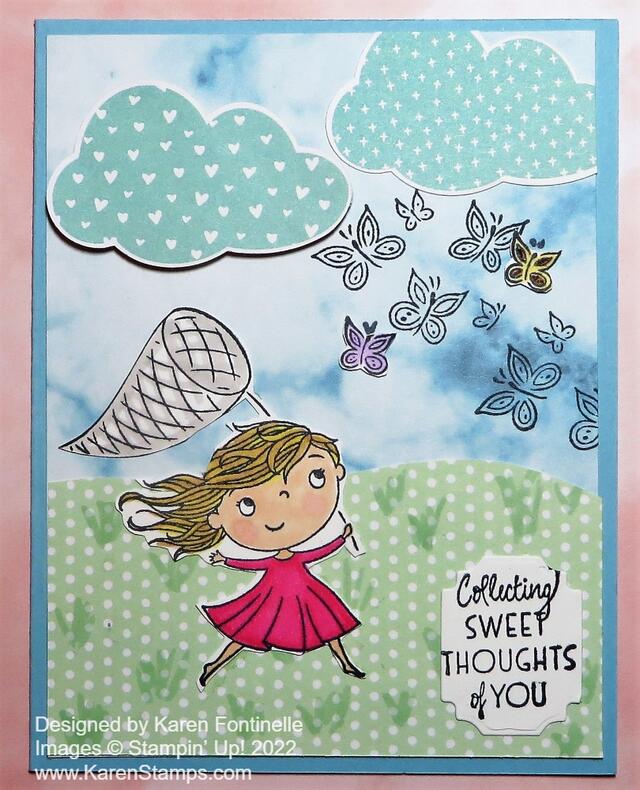
While I didn’t think this Sale-A-Bration stamp set was very exciting, I am very happy with this Catching Butterflies Greeting Card I came up with! The stamp set may look simple, but there are many different ways you can work with it! And best of all, it is FREE with a $50 Stampin’ Up! order during Sale-A-Bration! However, Sale-A-Bration is coming to an end soon, on February 28. That’s not far off anymore!
This Catching Butterflies Stamp Set is in the Sale-A-Bration Brochure on page 6. I really like the sentiments in the set. The little girl is cute and you could even cut the butterfly net stick out of her hand and not use it! Or have her be holding something else, like a group of balloons. The little butterflies are cute almost any time to stamp.
This card has a card base of Balmy Blue. For the background layer on the card, I used a piece of the Simply Marbleous 6″ x 6″ Designer Series Paper, another item you can earn free during Sale-A-Bration, found on page 10 of the SAB Brochure. I didn’t use the “swirly” side, I used the “other” side of one of the blue papers. I thought it looked like sky and also found a green patterned paper in the Sunshine & Rainbows 6″ x 6″ Designer Series Paper to look like the grass the little girl is running in.
For the grass piece, I cut a curvy edge on the top of it to look more natural. Then I used my Light Mint Macaron Stampin’ Blend Marker to draw in bits of grass, just little short lines, quick and fast!
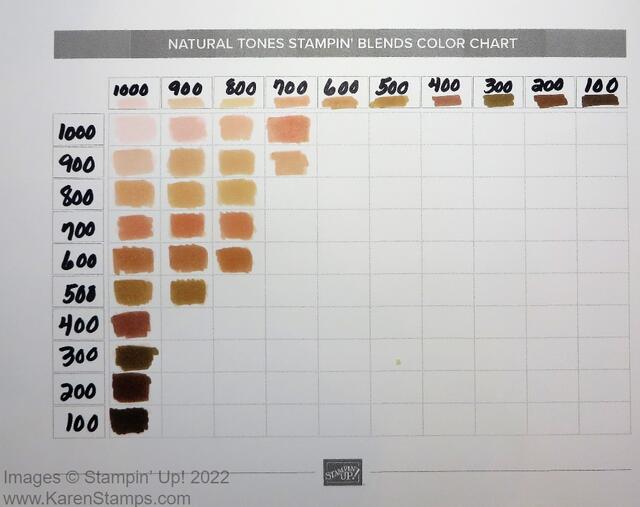
The little girl is stamped with Memento Ink and colored in with Stampin’ Blends. I used Light Melon Mambo for her dress and some of the new Natural Tones Stampin’ Blends markers (read this post for more information) to color her skin and put a little blush on her cheeks! If you fill in that chart of marker combinations to get different shades, you can choose what you would like to use. And remember, these Natural Tones Markers aren’t just for skin tones! I used one for her hair color with some added Light Daffodil Delight. You aren’t limited to one color or Light and Dark Combo of Stampin’ Blends markers, you can use different colors together to get different shades or different blending.
Natural Tones Stampin’ Blends Color Chart
Print it out on Basic White Cardstock so you get true colors rather than computer paper. Then add each marker number across the top and down the side. Color the two marker shades that coordinate in each box to see what the two colors together look like. Here’s how I started mine. Your colors may differ because of computer screens, etc.

For the butterfly net, I just lightly colored over the strings with the Light Gray Granite Stampin’ Blend Marker. After the girl was all colored in, I just cut her out with Paper Snips. Notice I did not go all the way into every white area, and when you looked at my card, you probably didn’t even notice! Neither will your recipient so don’t worry about precise cutting!
I used the Sunshine & Rainbows Designer Paper again to punch out the clouds with the Cloud Punch. If you don’t have the paper, just punch out some white or light blue clouds. If you don’t have the punch, just cut out some cloud shapes from the paper or plain cardstock.
The butterflies are all in a group on one stamp so I stamped those in Memento Ink and didn’t color them in, although I could have. There is also a single stamp of a small butterfly so I did stamp two of those on Basic White Cardstock and colored and cut them out. They are stuck on with Mini Glue Dots.
The sentiment is stamped from the Catching Butterflies Stamp Set, as I’ve said, and cut out with one of the Ornate Frames Dies. I needed something small enough to fit in the space as compactly as possible since the card is already rather “busy”.
This is one of those cards that you can make very simply or have all kinds of pieces to “play” with to make the card! Do however much or little you like! If you earn this stamp set during Sale-A-Bration, have fun playing with it! You will make some happy, cheerful cards with it for many occasions!

