Tag Archives: Christmas card

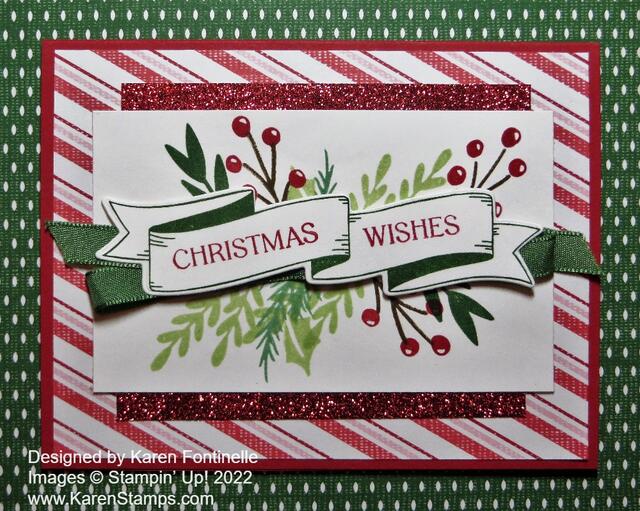
Christmas Wishes Banner Card

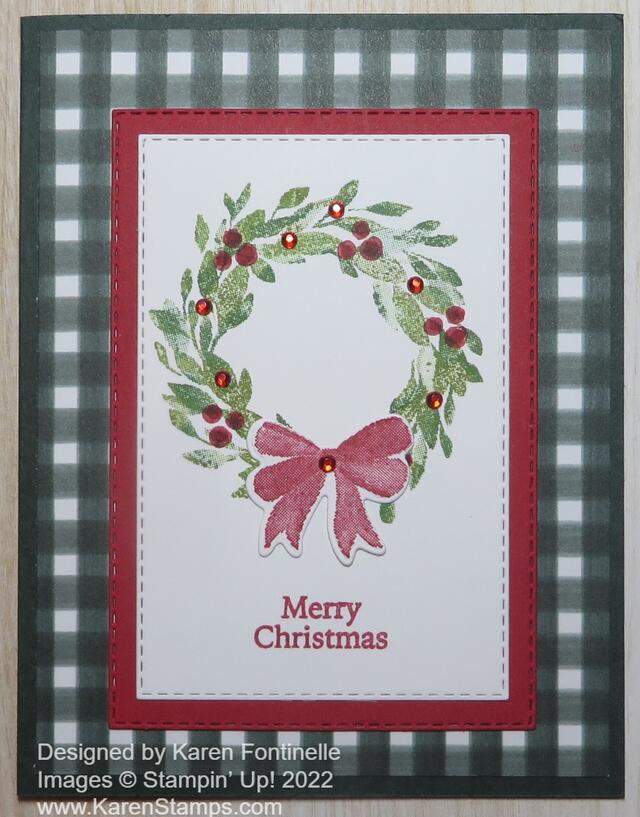
I wanted to make another Christmas card sample so I copied a design in the Holiday Mini Catalog on page 11. I found just the Real Red card base and the striped paper already cut so I just started with that even though the sample design uses a green stripe paper. I was happy with my Christmas Wishes Banner Card when I finished. That red glimmer paper really adds some pizzazz!

The green paper in the background is just another of the Sweetest Christmas Designer Series Paper designs that I put under my card for the photograph, but I kind of like it if I wanted to make a card with that as the layer if I made the center part smaller!

As I said the card base is Real Red with a striped layer of the Sweetest Christmas DSP. The center piece is Basic White cardstock, stamped with leaves, with a die-cut banner overlaid, and some glimmer paper on the top and bottom.

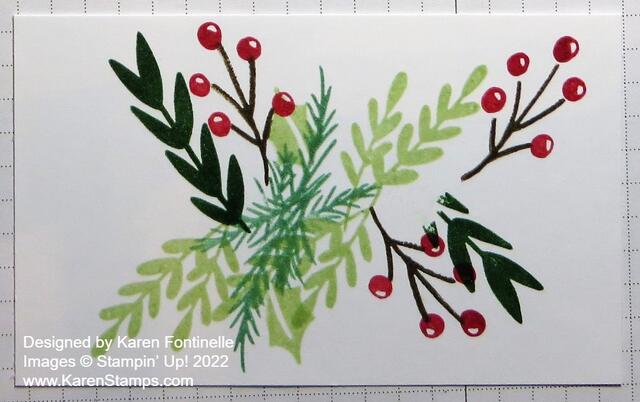
Here are the details! The Basic White piece is 4 1/2″ x 2 3/4″. I stamped various leaves and stems in the Christmas Banners Stamp Set. I used Garden Green, Soft Sea Foam, and Mint Macaron in for the greenery and Soft Suede and Real Red for the stems of berries. I love how those turned out! The berries and stem are two different stamps so you don’t have to color directly on the stamp to get two colors. As I stamped the greenery and berries, I just imagined the banner going across the middle so I didn’t have to worry about how it looked underneath. You can see in the photo below how I stamped all of that.

Christmas Banner Card Stamping

The banner is stamped in Garden Green ink with the greeting words stamped in Real Red. The banner was diecut with the Christmas Banner Dies. You could just place the banner over the center of that stamping, but I noticed the catalog sample looked like it had ribbon underneath it. I used the green ribbon in the Real Red & Garden Green 3/8″ Ribbon Combo Pack. It just goes across and back and then back to the other side so that you can see a loop at each end of the banner. I added some Stampin’ Seal on the back of the banner so I could adhere the ribbon going back and forth and back, then popped up the whole banner with Stampin’ Dimensionals.

Before adhering the piece to the front of the card, I added two scrap pieces of red glimmer paper from the Real Red & White 6″ x 6″ Glimmer Paper to the top and bottom of the center piece. I cut the glimmer paper at 4″ x 5/8″ and adhered to the white cardstock, then adhered the whole thing to the card front.

The sample in the catalog has a little bow tied with one of the Flat Jingle Bell Trinkets. You could also add some jewels if you wanted to, such as the Red Rhinestone Basic Jewels.

Even if you copied this sample, there are ways you could change things up a little if you wanted. It at least helps you to get going to copy something!

Shop Stampin’ Up! Online HERE!

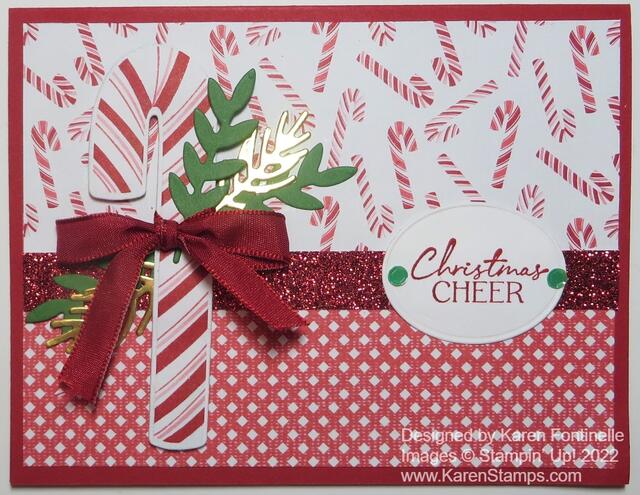
Christmas Candy Cane Card

Christmas Candy Cane Card

As long as I still had the paper, stamps, and dies out from yesterday’s card I decided to make another card design with all those materials. As I looked through the Sweetest Christmas Designer Series Paper, I liked this small candy cane print with this little red and white print on the backside of a candy cane stripe and that’s how this Christmas Candy Cane Card was born!

The card base is Real Red. I cut the two pieces of the designer paper to overlap a little bit. I intended to use Real Red Ribbon across the seam but I glued the paper down to the card base before I put the ribbon across. So the next best thing, maybe even better, was to use a strip of the Real Red Glimmer Paper! It really makes it festive!

To decorate the card, I die-cut one of the candy canes on the Sweetest Christmas Designer Paper from the Candy Cane Dies. You can cut it out with Paper Snips if you don’t have the dies. However, you can purchase the Sweet Candy Canes Bundle with the stamp set & dies and save 10% over buying them separately. I popped up the candy cane with Stampin’ Dimensionals and tied on a bow with the Real Red Ribbon in the Real Red and Garden Green Ribbon Combo Pack. Then I used some diecuts of leaves, Gold Foil and Garden Green, using the Christmas Banner Dies. You can decorate the candy cane as much or as little as you like.

The greeting is in the Sweet Candy Canes Stamp Set. I used the oval die in the All That Dies to cut it out. I think it fits perfectly along the glimmer band. For a finishing touch, I added two of the Adhesive-Backed Seasonal Sequins in green. They come in four different colors.

This would be a relatively easy card to make multiples of because it’s mostly designer paper. The candy cane is easy enough to cut out by hand or die-cut and the extra greenery, whether gold foil or green doesn’t need to be stamped, just diecut. Only the greeting is stamped. Even if you don’t make lots of multiples, you could make 5-10 of this same card, and little by little as you make new Christmas cards you will end up with enough to mail out to lots of friends and family!

You can get by making this card with just the package of the Sweetest Christmas Designer Series Paper, the Real Red & White Glimmer Paper, some ribbon, and a Christmas greeting (which we all have in our stash!) plus some die-cut leaves (and if you have any die cuts, you probably have some leaves or sprigs or a punch!). This Christmas Candy Cane Card is really a basic card design with two different patterns of designer paper top and bottom, a focal point, and a greeting. Here you can see some cards from a few years ago with the two patterns of designer paper and a greeting. Easy peasy!

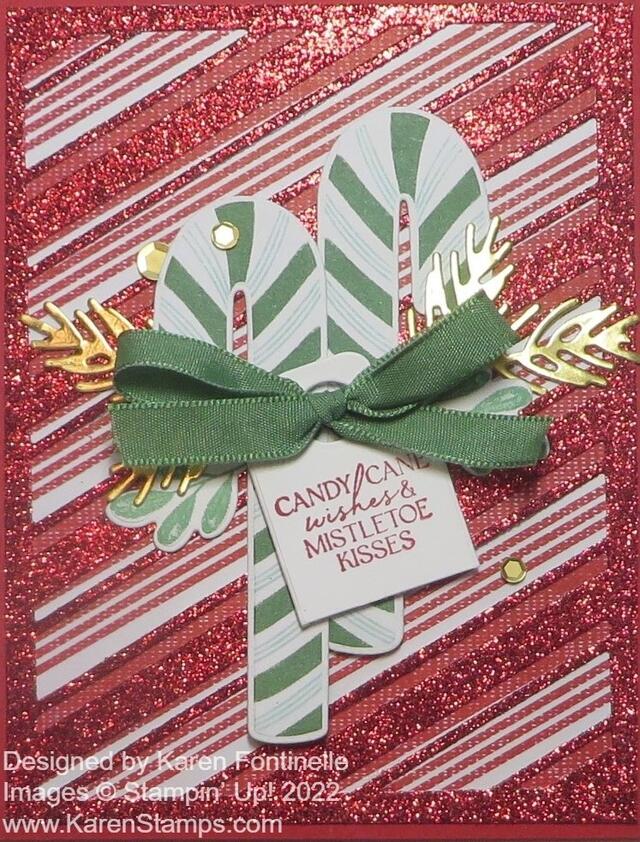
Sweet Candy Canes Christmas Card

Sweet Candy Canes Christmas Card

My first order from the new Holiday Mini Catalog arrived yesterday, and after a busy day, I got to open it late last night. The first thing I wanted to make was this pretty Sweet Candy Canes Christmas Card that is pictured in the catalog on page 10 in the Sweetest Christmas Suite Collection. I didn’t want to try to figure out my own design at that moment since it was late, but I look forward to playing more with the paper, stamps, dies, and embellishments as soon as possible! I already had ideas dancing in my head just opening the designer paper package! I didn’t take time to look up the sample recipe for how Stampin’ Up! made this card, I just stared at the catalog page multiple times to figure out at least something close to this sample card! The sparkle is so pretty!

I started with a card base of Real Red and used the large striped die in the Candy Cane Dies to die cut the new Real Red and White 6″ x 6″ Glimmer Paper. I only used it once, but there are a lot of narrow slivers of glimmer paper that will come out of your die-cut piece. I believe that if you turn the glimmer paper over to the other side, you will be able to see the die-cut lines better and see if you got all of them out of your piece.

You can use just the die first to see how it lines up with the diagonally striped designer paper in the Sweetest Christmas Designer Series Paper to make the background look like candy cane stripes, just to get the idea. I’m not sure yet the best way to size a piece of designer paper to line up with that die, so for now I would say either cut a larger piece of designer paper than you need, adhere the glimmer paper, then trim off the excess or just adhere the die-cut glimmer paper on the large 12″ x 12″ paper and then trim. Someone will figure out a less wasteful way to get the diecut placed correctly on the designer paper!

The Candy Canes Dies work with the candy cane printed paper in the Sweetest Christmas DSP. You might want to just cut with your scissors into the candy cane you want to diecut. At that point, it really is almost easier to just cut out the candy cane with your scissors! But the dies do match and that’s what I did for this card. Just make sure you get the candy canes that face different directions if that is what you want. You can also use the stamps, inking up the whole candy cane in one color or use Stampin’ Write Markers to color multiple colors on the different stripes. I think that will be fun too to make your own custom candy canes! I adhered my candy canes flat on the card but you could pop them up on Stampin’ Dimensionals.

Next, I stamped the tag with a greeting from the Sweet Candy Canes Stamp Set. There is a die for making this tag and you can use it a couple different ways. I simply cut off the bottom half of the tag and the bow went over the hole when I adhered it to the card. The ribbon is in the new Real Red & Garden Green 3/8″ Ribbon Combo Pack in the Suite.

The small green leaves on the card sticking out from behind the tag and candy canes are stamped from the Sweet Candy Canes Stamp Set and die cut. The Gold Foil leaves are die cut with the dies in the second Bundle in the Suite on page 11 of the catalog. These are the Christmas Banner Dies. There are several leaf options you can choose from.

For a finishing touch, use a few of the Adhesive-Backed Seasonal Sequins in the Suite. These are metallic and somewhat shiny but not sparkly and come in two sizes and several colors. Since you have a lot of glimmer going on already on this card, you don’t need too much more sparkle!

I think this is going to be a useful and fun Suite to work with making Christmas cards and other projects. There are lots of sample ideas in the catalog to get us started! Soon there will be hundreds and thousands of ideas online I’m sure for using this Suite of products! Maybe you make all your cards the same, but if you like a variety, when you design and make one card you make go ahead and make several more (like 4 more) then you will have five cards that are done and ready to go. When you make the same card over and over it is faster because you are not figuring out the design each time and you can make the additional cards assembly-line style!

If you want ALL of the products on pages 8-11, just use the Sweetest Christmas Suite Collection number #159579. If you want to leave out certain items, then order each product you want separately or order extras of certain ones you want more of! You can try out this Sweet Candy Canes Christmas Card to get you started with a very lovely card to send and then come up with more of your own creative ideas or use the other samples in the Holiday Catalog for inspiration!

SHOP THE HOLIDAY CATALOG HERE!

Paper Pumpkin Gifts Galore Kit Snowman in Window

Paper_Pumpkin_Gifts_Galore_Kit_Snowman_in_Window

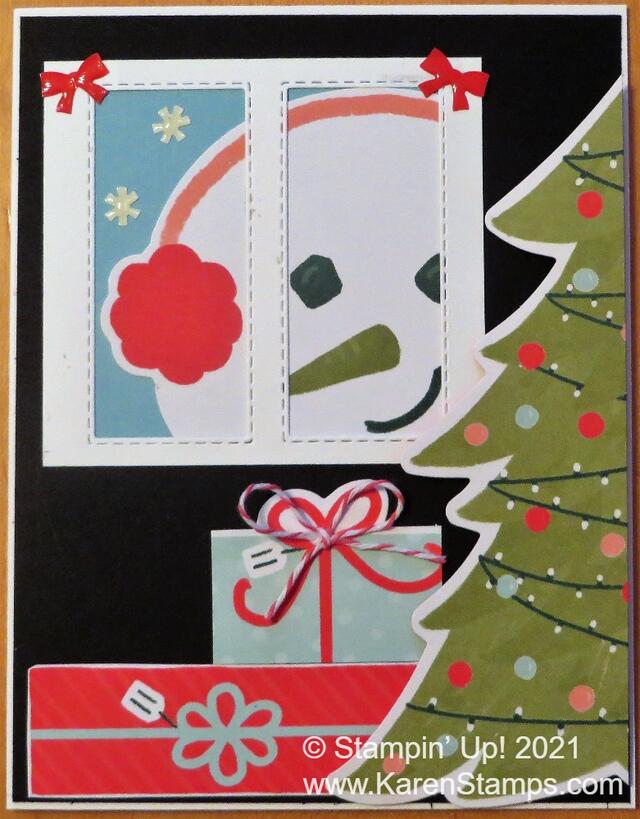
I admit to almost completely copying this Paper Pumpkin Gifts Galore Kit Snowman In Window card from someone on Pinterest, Bonnie Friday. I don’t know if she was the original person or not, but this was a card I saw “somewhere” online and then could not find it ANYWHERE later when I wanted it – until I found hers on Pinterest finally. The first time I saw this card, I believe the creator said she wondered if it looked a little “creepy” with the large snowman head peering in the window at the Christmas tree! Then there were more comments agreeing or disagreeing or laughing about that idea! That really caught my eye and made me giggle because I knew the perfect person to send a “creepy” Christmas card to just for fun!

This card is made from the contents of the November 2021 Paper Pumpkin Kit, Gifts Galore. This kit, in my opinion, is one of the best Paper Pumpkin kits! It contained very large die-cut images of this snowman, a Christmas tree, and packages. The design plan was to use two of the same images, front and back, on a small open box that would hold some kind of treats. Here is my post of the first treat holders I made as designed.

As always, stampers come up with alternative ideas for the materials in their kit. If they don’t need treat holders, they would rather make cards with the supplies or scrapbook pages or some other projects. And you can do that with your Paper Pumpkin Kit!

This card starts with a Basic White card base and a layer of Basic Black. The Christmas tree is cut a tiny bit more than in half. If you look at this sample, you can figure out where to cut it. I popped it up on Dimensionals and Foam Strips.

The snowman head is trimmed as shown so that it fits behind this “window”. This is a little tricky to figure out (maybe it won’t be for you, though!). I used a piece of Basic White and die cut two stitched rectangles out of it. You just have to make the sides wide enough so you can glue the snowman image behind it. I put a piece of Balmy Blue behind the snowman to look like the sky. Just fiddle with it and you’ll get it. The packages are cut from the piece in the kit. Most are pretty large. In fact, the top package I cut down from a larger package. Then I added a bit of the twine in the kit for a bow just for an embellishment even though there is a printed bow. In my retired stash, I had some stick-on bows and snowflakes so I added those just for fun! You could also add rhinestones or jewels to the tree. Do what you like!

I hope you get a kick out of the creepy snowman card made with the November 2021 Paper Pumpkin Kit Gifts Galore! If you still need cards or little projects, maybe you still have some pieces left in your Gifts Galore kit you can use!

JOIN PAPER PUMPKIN!

Gingerbread & Peppermint Ornament Trio Card

Gingerbread & Peppermint Ornament Trio Card

The Gingerbread & Peppermint Designer Paper has so many fun designs besides the gingerbread images! As it turned out, I had already used this pattern of the paper on another card earlier on, but since I love red, it was a natural draw for me to use it on this Gingerbread & Peppermint Ornament Trio Card.

The card base is Real Red, one of the coordinating colors of the Gingerbread & Peppermint 6″ x 6″ Designer Series Paper. After I got the idea to use the three ornaments, die-cut from the paper with the Gingerbread Dies, I thought they needed a white background to help them stand out from the red and white paper. I happened to find this die-cut from the Scalloped Contours Dies so I just used that. Since I was using that, I tipped the side ornaments in so they would fit better on that small background piece of Basic White.

The middle red ornament is glued straight on the card front, with the side ornaments popped up with Stampin’ Dimensionals®. I also tied small white bows with the Whisper White 1/4″ Crinkled Seam Binding Ribbon to put on each ornament. And then I had to add some Rhinestone Basic Jewels to each ornament in the center!

For the greeting, I used a sentiment in the Frosted Gingerbread Stamp Set. I wanted something small and simple since the rest of the card is pretty busy. I stamped the greeting on Basic White cardstock with Real Red Ink and then die cut it with a small Stitched Rectangle Die. I didn’t even layer it on anything, I just wanted it to be simple.

This Frosted Gingerbread Bundle (stamp set and dies) will be on the Last Chance List tomorrow along with the designer paper, so check out the promotion tomorrow, December 1st in the Online Store!

SHOP STAMPIN’ UP! ONLINE!

Festive Foliage Merry Christmas Card

Festive Foliage Merry Christmas Card

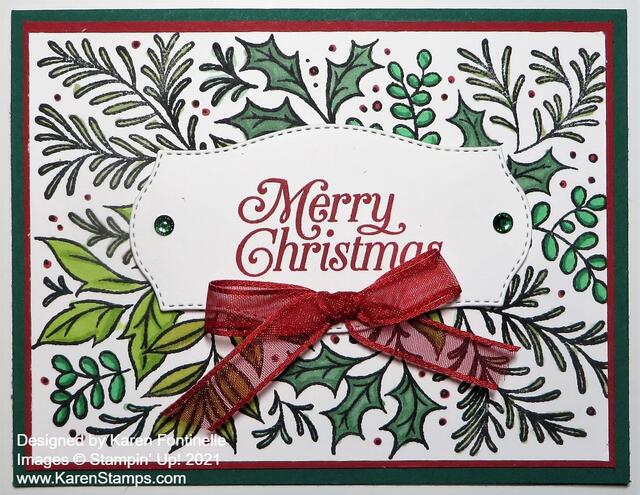
You may think that this card, the Festive Foliage Merry Christmas Card, has lots of stamping on it, but it is really only ONE stamp! The stamp is Festive Foliage! I have to admit, it is one stamp that I really overlooked in the Stampin’ Up! Annual Catalog. You’ll find it on page 90 in the lower-left corner of the page. Very easy to miss! But when a few of my customers started ordering it, I wondered what the big deal was and started looking at some samples. Of course, then I had to have it, too! All that foliage will make some very pretty Christmas cards!

The card base is Shaded Spruce cardstock with a layer of Real Red. You wouldn’t have to add the red layer, but I love red and I think it brightens up the stamping and all the green. The foliage is stamped in Memento Ink on Basic White cardstock.

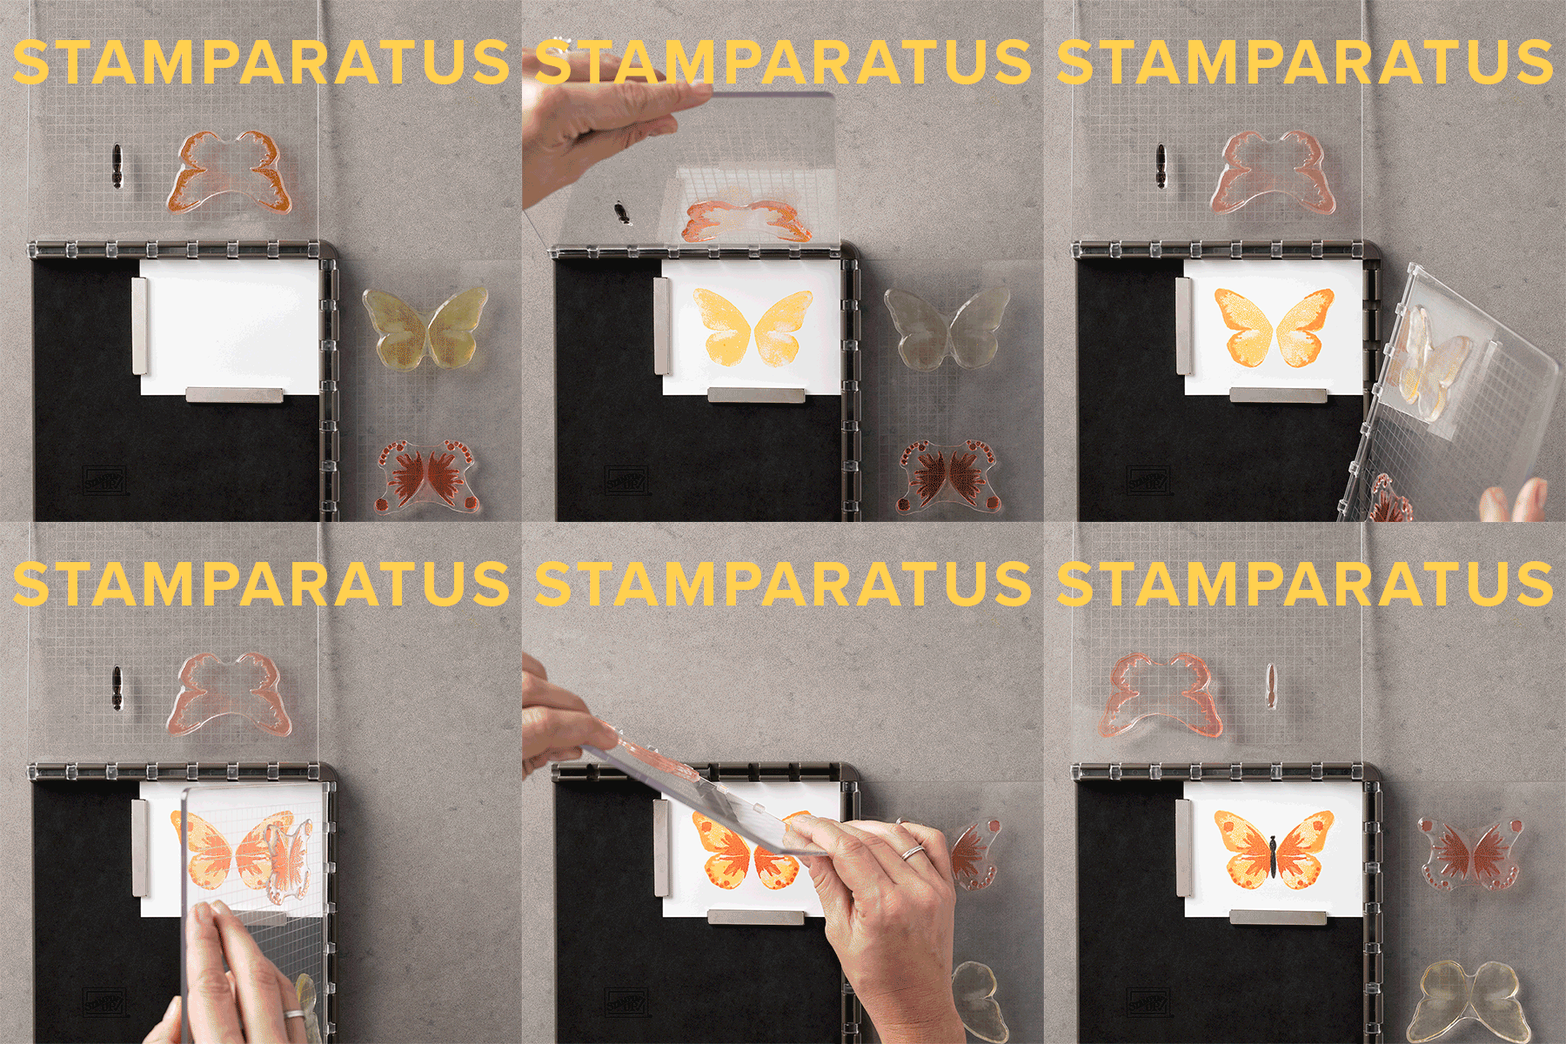
It’s really handy if you have a Stamparatus (146276) with a large stamp like this one. As long as you don’t move the stamp or the paper, you can reink the stamp and stamp again if you need to. Sometimes one little area doesn’t get inked well enough or doesn’t get pressed enough to transfer the ink from the stamp to the paper. But with the Stamparatus, you can just stamp again!

Stamparatus GIF

For coloring the foliage I used Stampin’ Blends…almost all the greens I could find! And then I dotted and colored in all the little berries with Real Red.

The greeting is in the Perfectly Plaid Stamp Set. This is one we have had for a couple of years. It is stamped with Real Red ink and then die cut with one of the Tasteful Labels Dies. It is popped up on Stampin’ Dimensionals. There was plenty of space and plenty of foliage still showing on this card to use such a large label. Then for some bling, I added two green Holiday Rhinestones and tied a bow with the Real Red 3/8″ Sheer Ribbon. It is adhered with a Glue Dot. I liked this sheer ribbon because it adds something to the card but because it is sheer, it doesn’t block the stamping underneath!

If you like coloring, you will love the Festive Foliage Stamp….and if you don’t love coloring, just stamp it in one color like green and don’t color in anything!

If you don’t own the Stamparatus, to get a good image with a background stamp like this one, I recommend laying the stamp face up, ink it up, and then lay your cardstock over the top. Put a piece of computer paper over the top or pull up your Grid paper over it, and give it a good rub with your fingers to get all the ink to transfer to the cardstock. This way you can see what you are doing and have a little more control over the pressure on the cardstock and stamp.

I can’t wait to make more cards with my new Festive Foliage Stamp because I really like how this Festive Foliage Merry Christmas Card turned out! Go check it out in the Online Store and see if you noticed it before in the catalog or missed it!

SHOP STAMPIN’ UP!

Little Delights Christmas Bulb Christmas Card

Little Delights Christmas Bulb Card

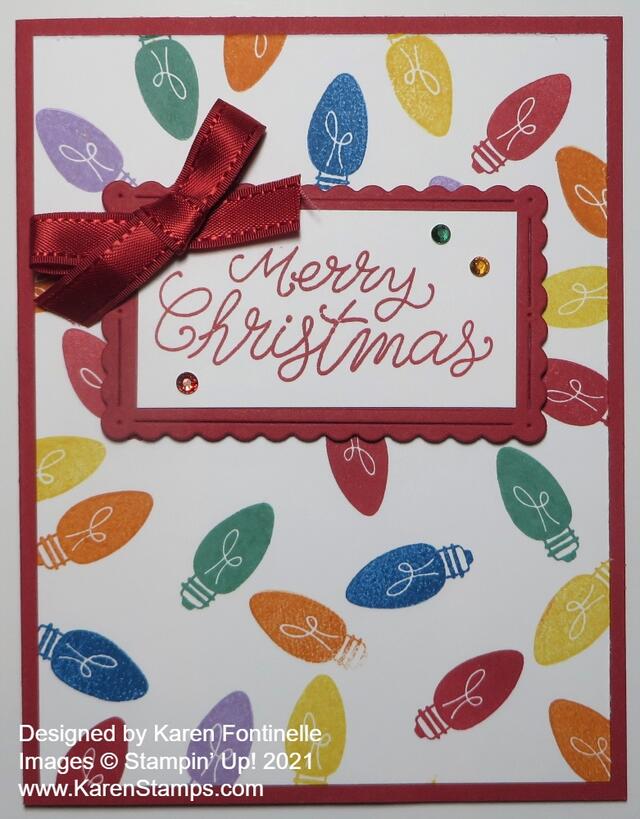
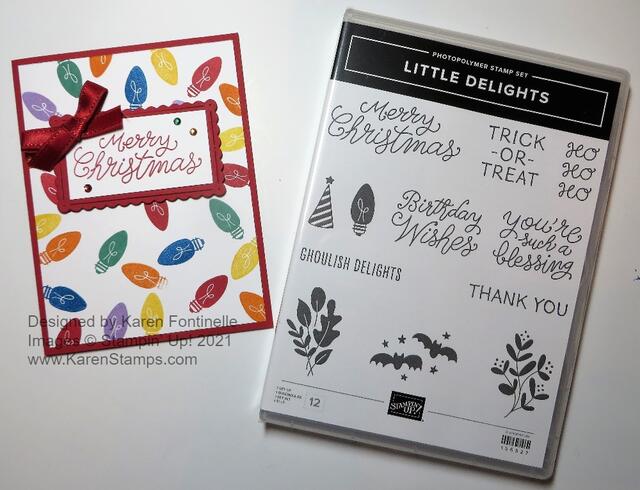
The longer I have the Little Delights Stamp Set, the more possibilities I see with it, like this Little Delights Christmas Bulb Christmas Card. All I needed was the little Christmas bulb stamp and the greeting! The only problem is that you can’t stop stamping the cute little bulbs!

The card base is Real Red with a layer of Basic White Cardstock. I just randomly stamped the Christmas bulbs in different colors. I used Real Red, Daffodil Delight, Just Jade, Pacific Point, Pumpkin Pie, and Highland Heather ink colors. After figuring out the greeting and the space it would take up, I added more bulbs so every color would have a good representation!

The die-cut greeting layer is Real Red cut from the Scalloped Contours Dies. I stamped the greeting from the Little Delights Stamp Set on Basic White and cut it to fit on the Real Red layer with my Paper Trimmer.

For some embellishment, I tied a little red bow from the Real Red 3/8″ Double-Stitched Satin Ribbon and adhered it to the corner of the greeting. I just love the font of that “Merry Christmas” sentiment! I also adhered some little Holiday Rhinestone Basic Jewels on the greeting as well!

If you wanted to jazz up the card even more, you could add Wink of Stella for a little glimmer of the Christmas bulbs! Or you could stamp fewer bulbs and connect them with a drawn line to look like a string of lights. Just play and see what you come up with!

The Little Delights Stamp Set is a cute one with several holiday images and greetings for cards and projects! These images and words are great for all kinds of stamping projects throughout the year!

Little Delights Christmas Bulb Christmas Card

Shop Stampin’ Up! Online HERE!

Whimsy & Wonder Ornament Christmas Card

Whimsy & Wonder Ornament Christmas Card

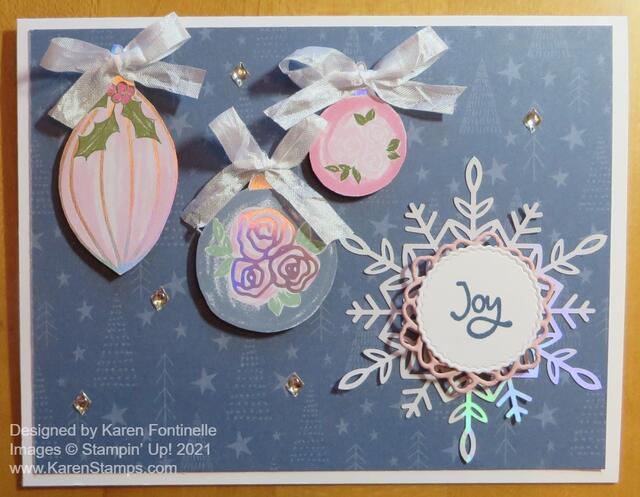
This is another card that completely changed from the idea I had in my head and it all came about because I turned the “pretty” side over! I realized I hadn’t used the very pretty ornament print paper in the Whimsy & Wonder Specialty Designer Series Paper so I was going to make a card using that paper. But when I turned the paper over to cut out just a section that I needed for the card, this dark blue print side just jumped out at me and this Whimsy & Wonder Ornament Christmas Card was born! I pictured using a snowflake and one blue ornament plus a greeting somehow, but I couldn’t resist all the other ornaments either!

Just because I’m a Stampin’ Up! Demonstrator, don’t think that card ideas come to me magically. The placement of everything on this card just was not working out, so I finally had to give up, step back, and walk away for a few minutes. I googled this paper and although I wasn’t copying anything, I saw something that sparked the idea to put the snowflake and greeting in the lower right corner instead of the upper left. That seemed to make all the difference and I was able to complete the card design!

The card base is Basic White although you could use Misty Moonlight as the base with a thin margin of Basic White under the Misty Moonlight Designer Paper to help it stand out. I cut out several ornaments from the other side of the paper with my Paper Snips while I watched TV. If you wanted to make it easier, you could just cut out the outline of the ornament and not the ornament hanger portion because if you add a bow later, you can cover up that you cut that part off!

The snowflake is in the Wonderful Snowflakes package. These are quite pretty, plain white on one side and iridescent foil on the other side. I adhered the snowflake with the tinest drops of glue, but you do have some space in the center of the snowflake. Then if you are pasting anything over the snowflake, maybe that will help hold it down also.

The greeting is in the Whimsical Trees Stamp Set. I thought maybe the simple word would go well with the snowflake. I stamped it in Moonlight Mist Ink and die cut it with the small circle in the Tasteful Labels Dies. I played with different dies and cardstock colors on which to layer it and finally settled on this Blushing Bride pink. I used a small die in the Encircled in Beauty Dies. The snowflake is adhered flat to the card and the greeting is popped up on Stampin’ Dimensionals.

The ornaments are all cut out from the opposite side of this paper. I just adhered them with Stampin’ Dimensionals and adhered a little bow on each one with a Mini Glue Dot. The ribbon is the White 1/4″ Crinkled Seam Binding Ribbon. I think a silver trim would also work well. Then for some bling I added some Silver Epoxy Essentials. I think they match well with the paper and look!

After a slow start on this card, I’m really happy with how it turned out. Be sure you check the “other side” of our beautiful designer papers because you just might find something special. And remember, a lot of the “other sides” can be used throughout the year, not just during the season the paper was designed for. This Whimsy & Wonder Ornament Christmas Card even uses both sides of the same paper by cutting out the pretty ornaments! Try it!

Whimsy & Wonder Traditional Christmas Card

Whimsy & Wonder Traditional Christmas Card

The Whimsy & Wonder Suite in the Stampin’ Up! Holiday Catalog uses soft pastel colors in it, but for this Whimsy & Wonder Traditional Christmas Card, I decided to just use the traditional Christmas colors of red and green!

The card base is Garden Green with a layer of Real Red Cardstock. Real Red has been my favorite color forever! If you buy a red somewhere else, like the big box craft store, you will find that their red does not compare to the perfect red of the Stampin’ Up! Real Red! I know because I bought a big package of red cardstock and envelopes when I first started stamping. When I saw how it compared to the Stampin’ Up! Real Red, I threw out the store-bought red paper!

The stamped layer is Shimmery White, my other favorite paper! It has just the slightest glimmer to it and works well with any medium, even some watercoloring. I stamped the tree from the Whimiscal Trees Stamp Set in Garden Green Ink. Old Olive would also look good. Then I overstamped it with the dots to look like little red ornaments or lights on the Christmas tree. I couldn’t resist stamping the holly and berries up in each corner of the card. I just stamped them in Garden Green and then went back in with a Blender Pen and added green ink to the leaves and red ink to the berries. Just very lightly and carefully because I didn’t want the initial stamping to smear.

The greeting is stamped from the Banner Year Stamp Set. It is stamped on Shimmery White and layered on a strip of Real Red, punched at each end with the Lovely Labels Pick a Punch. The greeting itself is popped up on Dimensionals but the Real Red punched piece is adhered directly on the card front. For some embellishment, I added the smallest Gilded Gems to each end of the red piece.

Since the tree doesn’t come with a trunk, I didn’t really like it just floating in the air, so I added a bow with the Real Red 3/8″ Sheer Ribbon. I might have preferred a really narrow ribbon but since this one is sheer, I thought it looked light enough to put in between the tree and the greeting. And since my tree needed a star at the top, I looked through my retired punches and found the right size little punch with a star and punched some Gold Foil.

The lesson here is that even though this stamp set, Whimsical Trees is “whimsical” doesn’t mean you can’t make it “traditional” with color and embellishment! Here is another card I made with the same stamped tree and the new Whimsy & Wonder Specialty Designer Series Paper in the less traditional colors. I love this card as is, but if you are looking for the red and green of Christmas, you can certainly use this tree and change up the colors. If you are looking for a more traditional Christmas card or at least a few for certain people, then try this Whimsy & Wonder Traditional Christmas Card with red and green!

Painted Christmas Paper Christmas Cheer Card

Painted Christmas Paper Christmas Cheer Card

This Painted Christmas Paper Christmas Cheer Card uses two different designer papers, at least a tiny bit of one! You can mix and match when you are making cards and projects. Most designer papers seem to have one side that is the “star of the show” and the other side is a more generic, plainer pattern. In this case, I don’t think the paper designs were quite as clear cut, but I would say this green side with evergreen boughs is the less popular side. The other side has pinecones. I was drawn to this side that coordinates with Garden Green and opted to put a red and black plaid reindeer on the card front.

The card base is Garden Green and I added a layer of Basic White underneath the designer paper just to help it stand out a little bit. I think it makes the whole card a little brighter. The designer paper is Painted Christmas in the Holiday Catalog on page 17. That paper design just caught my eye when I saw it in the package! Lots of pretty papers in that set!

The greeting is in the Perfectly Plaid Stamp Set. I stamped it in Real Red Ink and then die cut with one of the Stitched Rectangle Dies. For a little embellishment, I added a bit of Real Red 3/8″ Double-Stitched Satin Ribbon. The greeting is popped up on Stampin’ Dimensionals®.

For some fun, I cut out one of the red and black plaid deer on the Peaceful Prints Designer Series Paper. You will find this pretty holiday paper in the Sale-A-Bration Brochure on page 8. You’ll be happy to know you can earn it FREE with a $50 Stampin’ Up! purchase. This paper even coordinates with the Peaceful Deer Bundle in the Holiday Catalog.

This is a pretty easy card to make for the holidays. If you have the Deer Builder Punch you might be able to punch out some of the deer on the Peaceful Prints Paper if it is going in the right direction. But otherwise, just cut out by hand with the Paper Snips scissors. I like to leave a tiny bit of white margin around the edge. It keeps it from being too narrow and helps it show up a little bit.

Since the card base is a little dark, put a layer of Basic White inside the card. I stamped a “Merry Christmas” greeting in Real Red Ink from the Perfectly Plaid Stamp Set and stamped one of the trees down in the corner. This way you can write a little note and sign your name inside the card without it being on dark paper.

Be sure to check out the new products for fall, Halloween, and then the holidays in the new July-December 2021 Mini Catalog (Holiday Catalog)! Get what you want the most as soon as you can so you don’t run into any backorders! And remember, that if you spend $50 or more, for every $50 that you spend, you earn a FREE product in the Sale-A-Bration Brochure! A few are free with a $100 order or you can choose two at the $50 level. Let me know if you are interested in Stampin’ Up! products and would like copies of all the current catalogs!

SHOP STAMPIN’ UP! ONLINE HERE!

Gingerbread & Peppermint Peppermint Kisses Christmas Card

Gingerbread & Peppermint Peppermint Kisses Christmas Card

I really wanted to use this paper with the peppermint candies on it! This Gingerbread & Peppermint Peppermint Kisses Christmas Card is a very simple, easy-to-make card, and yet it turned out just fine! I’m not sure when I would use that sentiment, but it’s a cute one, especially with this paper!

The card base is Real Red and I have a layer of Basic White underneath the designer paper to help it stand out a bit. However, you wouldn’t have to use the white layer. You can just adhere the designer paper to the card base. I used the Gingerbread & Peppermint 6″ x 6″ Designer Series Paper. It has lots of fun patterns to use!

For the center of the card, I liked the next larger rectangle in the Scalloped Contours Dies but I didn’t want to cover up too much of the designer paper. So I used this rectangular die. It actually cuts slits on the sides which can either just be decorative or you could run ribbon through them or do something else creative. I chose decorative this time!

I just stamped the greeting in the middle in Real Red Ink. It is in the Frosted Gingerbread Stamp Set. There are also peppermint candy stamps so I stamped some candies on a piece of scrap Basic White and die cut them with the Gingerbread Dies. You can buy both the stamp set and dies together in the Frosted Gingerbread Bundle and save 10%. For a finishing touch, I thought I would apply Wink of Stella on the candies for some sparkle but it smeared the ink on one. I just left it so you can see even Demonstrators and long-time stampers make mistakes! It just looks like someone stuck the candy in their mouth and then decided they didn’t want it and stuck it on the card instead! LOL!

Enjoy playing around with the new Holiday Catalog stamps and other products. Remember, there is also a holiday section in the Annual Catalog, too, with some great products! When you happen upon a design and card you like that you can make in multiples easily, you will be ready to mass-produce your Christmas cards! Or you might like to make all different kinds of cards because there are so many beautiful sets and accessories! That way you don’t have to choose! You can use this same card design as I used on this Gingerbread & Peppermint Peppermint Kisses Christmas Card with other papers and stamps! Just have fun!

SHOP STAMPIN’ UP! ONLINE HERE!

Gingerbread & Peppermint Christmas Card

Gingerbread & Peppermint Christmas Card

I wanted to play some more with the festive Gingerbread & Peppermint Paper in the Holiday Catalog and this Gingerbread & Peppermint Christmas Card is what turned out! I also wanted to try out that little decorative strip I put between the two patterns of paper. This is a pretty basic card design using designer papers and a greeting, maybe just fancied up a little bit with some diecuts.

The card base is Real Red Cardstock. I used the Gingerbread & Peppermint 6″ x 6″ Designer Series Paper. These two patterns are actually on the same sheet, just opposite sides! If the diagonal striped piece looks dirty, it’s just the splattering on the paper. I don’t know why! I die cut that middle strip with the Gingerbread Dies. They are part of the Frosted Gingerbread Bundle, if you want both the stamp set and dies and want to save 10% buying them together! I just used teeny dots of Multipurpose Liquid Glue on that strip.

The greeting is stamped in Real Red Ink on Basic White. The stamp is in the Frosted Gingerbread Stamp Set. It is die-cut with a die in the Ornate Frames Dies as is the Real Red layer. To help it all stand out a little better, I layered the greeting on a larger Basic White Layering Circles Die. And for a little bling, I added three Red Rhinestone Jewels to the greeting.

It will soon be Christmas card time so check out the new Stampin’ Up! July-December 2021 Mini Catalog for all the new stamps, dies, embellishments, and ideas and start thinking about what you would like to make! Maybe you want to make several different designs of cards so you can have fun making different ones! That’s what I like to do! That way you can use different stamp sets and supplies and see what all you can come up with….and not get tired of making a whole bunch of the same card. Whatever you like!

SHOP STAMPIN’ UP! ONLINE HERE!

Heartwarming Hugs Christmas Tree Card

Heartwarming Hugs Christmas Tree Card

If you are anxious to get started on Christmas in July but you can’t order the new things yet in the Holiday Catalog, see if you still have some Heartwarming Hugs Designer Series Paper from last year’s catalog and make a card like this Heartwarming Hugs Christmas Tree Card! The paper is coming back in this current Holiday Catalog, going live August 3!

I still had some of this Heartwarming Hugs Designer Series Paper and I really like it. Lots of different plaids and stripes in traditional red, green and white! It’s just cute paper without having any special designs. Great for backgrounds on cards or other projects. Cute for making boxes and gift bags with both the inside and outside matching and looking like the holidays! Check your stash and see if you still have some.

The Pine Tree Punch is still current in the new Annual Catalog so get that out too! You can punch out lots of Christmas trees to your heart’s content!

To make this card, I started with a base of Real Red Cardstock (my favorite color!). I chose this red background paper with white dots to see what I could do with it or if it would work with the punched trees. I started with a vertical card, but when that wasn’t quite coming together, I turned it sideways and that worked, of course!

I went back to one of the first techniques I ever learned in stamping – tearing the cardstock! Hold the paper in front of you and pull down with your right hand as evenly or unevenly as you want. You want that torn edge look with kind of the underneath layer of the cardstock showing. That’s the best I can describe it. You don’t necessarily want a very straight, even, perfect edge. I used Basic White to make a snowy base for the trees.

I punched out several trees with the Pine Tree Punch and just placed them along the “snow”, popping up a few with Stampin’ Dimensionals® and some just adhered flat on the card.

The greeting is from the Perfectly Plaid Stamp Set. This is another product carried over into the new Stampin’ Up! Annual Catalog that you may already have. I think it’s been around a couple of years now, which is nice. I stamped it in Real Red Ink and then cut it out with one of the Ornate Frames Dies. It seems to fit perfectly on the card! I love the little stitching around the edge and the shape of the die is already cute.

That’s all there is to this card! I could have added some sparkle to the trees or on the background. Sometimes all I can think of is adding bling to a card, and sometimes I don’t think of it at all – until after I have taken the photo for my blog! Either way, keep it simple or jazz it up, this Heartwarming Hugs Christmas Tree Card is a fun and easy card to make.

SHOP STAMPIN’ UP! ONLINE!

Gingerbread & Peppermint Christmas Ornament Card

Gingerbread & Peppermint Christmas Ornament Card

Here is my first Christmas card of the season, the Gingerbread & Peppermint Christmas Ornament Card! It doesn’t seem like it should be time to be thinking about Christmas cards, but the Holiday Catalog will be coming out in August so the fall and holiday craft season is beginning! You can see it already in the craft stores! There is no summer!

One of the sets of products I think a lot of people are going to love in the Holiday Catalog is the Gingerbread & Peppermint Suite. There are a lot of products in this grouping! You can choose stamps, dies, designer paper, ribbon, pillow box dies, Memories & More cards and envelopes, and more! This card doesn’t use all those things!

The card base is Real Red Cardstock with a layer of the Gingerbread & Peppermint 6″ x 6″ Designer Series Paper. This green design with white lines and red dots is actually the reverse side of the ornaments! I wanted a Real Red background for the ornaments I would die-cut, but I also made a layer underneath of Old Olive to help the Real Red stamp out a little more.

I used the Gingerbread Dies to cut out the ornaments, although you could do it with Paper Snips pretty easily. I popped them up with Stampin’ Dimensionals® and tied a little bow with Linen Thread on top of each ornament. You could use whatever twine or narrow ribbon you have. I might have used silver if I had some handy!

The greeting is one in the Frosted Gingerbread Stamp Set. I stamped the entire greeting a couple of times and tried different dies and ideas, but it was just a little too large for the space I had on my card. I thought about only stamping it on the inside of the card and not having any greeting on the front of the card. In the end, I used my Stampin’ Write Real Red Marker to color just the “Merry Christmas” portion of the stamp and used a small die in the Ornate Frames Dies. It just fit!

Then for a little bling, I tried out the new Subtle Shimmer Sequins on page 37 of the Holiday Catalog (when you get one!). They don’t have holes in the center so the glue doesn’t squish out when you adhere them! They come in two sizes and four colors: Matte Silver, Matte White, Metallic Silver, and Pearl White. I just used three Metallic Silver ones. I think it’s perfect!

Once you make a Christmas card design you like, make several more cards exactly the same….five, ten, whatever number depending on how many you think you will send out. That way you can have fun making cards of several different designs. That’s what I like to do. When you have the design figured out, the supplies out, you might as well make a batch of cards! Do it assembly-line style – cut everything, stamp everything, assemble everything, etc.

The July-December Mini Catalog (delayed a month due to shipping issues) will begin August 3 so get ready! It will also be Sale-A-Bration (yes, a second one this year!!) so as you purchase holiday items, you will earn free product with every $50 purchase! Something to look forward to during this hot summer!

SHOP STAMPIN’ UP! ONLINE HERE!