Tag Archives: coloring

Layers of Beauty Celebrate Card

Layers of Beauty Celebrate Card

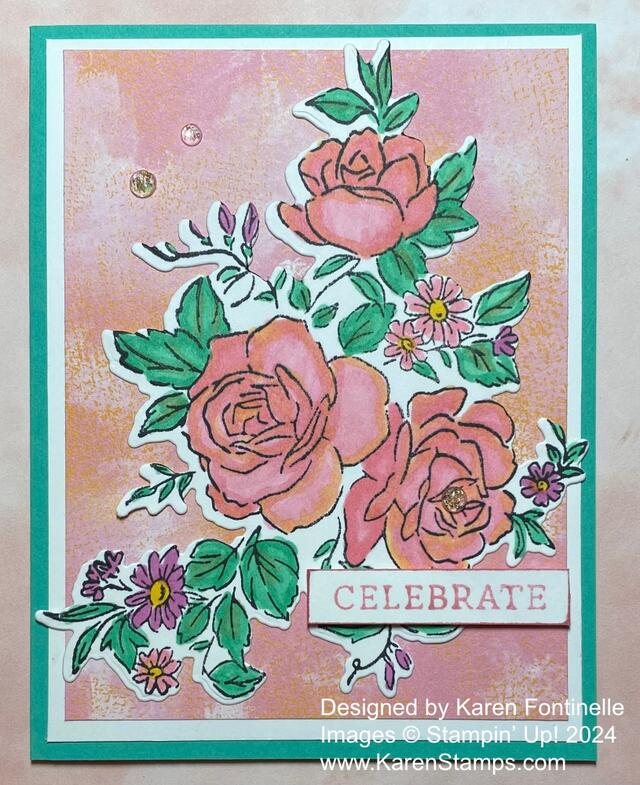
Although I started out planning to make a different card with some extra diecut flowers I had lying on the table, I changed my mind and decided I wanted to color with the new Stampin’ Blends in the In Colors. And something pretty to color would be the floral stamp in this Layers of Beauty Celebrate Card. This would make a pretty Mother’s Day card (Sunday!) or a card for almost any occasion. It’s great to use the one big die to cut out the flowers!

This card starts with a card base of Summer Splash Cardstock. (I sure wish they wouldn’t have picked two colors so close together in tone that I can’t tell them apart!) I added a layer of Basic White to set off the designer paper I picked for the top layer. This is in the Unbounded Beauty Designer Series Paper and is the paper that is a wash of Pretty in Pink, white, and Peach Pie. It makes a fairly solid background but with just a subtle “wash” of colors.

The big grouping of flowers is in the Layers of Beauty Stamp Set. As I mentioned, the Layers of Beauty Dies are great to have to cut out this large floral piece. If you purchase the Bundle, you will save 10%…PLUS this Bundle includes the Decorative Masks! You will find the Bundle on page 57 of the new Annual Catalog. The Bundle price is listed in the bottom pink border around the samples at the top of the page. (This new catalog is a bit of a scavenger hunt!). The Layers of Beauty Bundle (163519) is priced at $56.50 instead of the full price for all three products at $63.00.

The flowers are stamped with Memento Ink and then colored in with some new In Color Stampin’ Blends. I used Pretty in Pink Light on the roses plus a few daisies and added a few scribbles of Peach Pie as well to the roses. Then I even added a little more of the Dark Pretty in Pink on the roses. The purple daisies are Petunia Pop and the leaves are Shy Shamrock, both Dark and Light. I colored in the whole piece, then diecut and figured out which way the flowers would fit on the card. I just glued it flat but you could pop it up on Stampin’ Dimensionals.

The greeting is in the Simply Said Stamp Set. The stamp says “Let’s Celebrate” but I inked up only the Celebrate word with Pretty in Pink. After I had it cut to the length I wanted the greeting to be, I inked up the edges just a little bit by placing each edge on the ink pad to pick up a little ink. This helps it to stand out a little bit on the card. I popped this up with two Stampin’ Dimensionals.

For some optional bling, I added three Iridescent Foil Gems on the card. Change the greeting to whichever one you like for your recipient or occasion. With a little coloring, this is an easy card for anyone to make!

SHOP STAMPIN’ UP! ONLINE HERE!

Layers of Beauty Anniversary Card

Layers of Beauty Anniversary Card

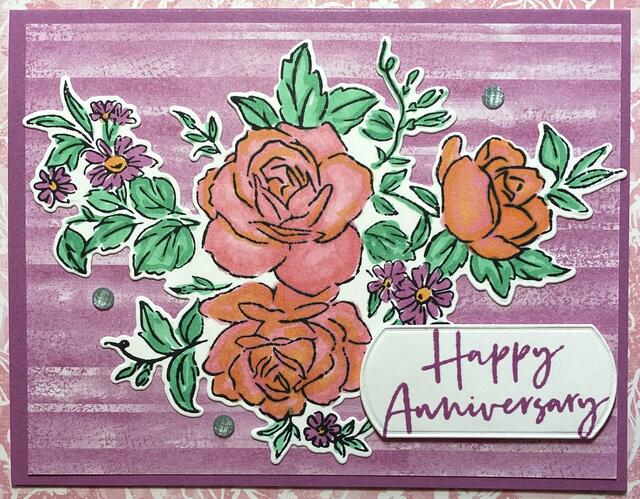
I thought I would try out this lovely new stamp set to make this Layers of Beauty Anniversary Card. We may have lots of floral stamp sets and dies but there’s always a new one that is so pretty we must have that one, too! This Layers of Beauty Stamp Set and Die is something new coming in the Stampin’ Up! Annual Catalog 2024-2025. There are also Layers of Beauty Decorative Masks in this Bundle that can be used to color this large floral piece.

My other goal with this card was to use some of the new In Colors 2024-2026. The card base is Petunia Pop cardstock. The layer of striped paper is in the Unbounded Beauty Designer Series Paper. I thought it looked good as a background to the floral piece without being too distracting.

The large floral piece fits on the largest acrylic block we have! That’s how big it is! It is stamped with Memento Ink on Basic White cardstock. I stamped it on a piece of 4″ x 5 1/4″ Basic White. Be careful how you place it before you put the stamp down on the paper so you get all the areas of the stamp.

To color in the floral piece, I used my brand new Stampin’ Blends Markers of the In Colors 2024-2026. For the roses, I colored in with Pretty in Pink, both Dark and Light. The daisy-like flowers are colored with Petunia Pop with little Peach Pie centers. The leaves are all colored with Light Shy Shamrock and then highlighted a little bit with Dark Shy Shamrock. Then I went back over the roses with a little bit of the Peach Pie Stampin’ Blend Marker just for fun.

After coloring the floral piece, I used the die to cut it out. It’s not too hard to figure out which way it fits on your stamped image, but take some time to make sure all the edges are lined up properly so you get a good diecut. This was glued down flat on the card but I almost popped it up with Stampin’ Dimensionals.

The greeting is stamped from the Layers of Beauty Stamp Set with Petunia Pop ink. I used one of the dies in the Unbounded Love Dies to cut it out. However, that die was a little big to fit on the card without taking up too much space. I took the die cut piece back to my Stampin’ Cut & Emboss Machine to trim off each end of the label by placing the die right on the diecut piece but sliding it down a tiny bit to make it shorter. I did this on the opposite end also. You can feel that the sides are lined up in the lines on the sides of the die. I only ran the die through just over each end, not across the whole piece. I popped up the greeting with Stampin’ Dimensionals.

Lastly, I added three 2024-2026 In Color Shimmer Gems in the Shy Shamrock color. It was hard to stop at three, but I did it!

Right now you can shop the Last Chance Sale at Stampin’ Up! to get select products at a discount or to stock up on your favorite papers, stamps, dies, and embellishments before they retire (or before the prices go up in the new catalog!). This sale lasts until April 30, 2024. And then the new Annual Catalog begins on May 1st!

SHOP STAMPIN’ UP! ONLINE HERE!

Coloring on Perfectly Penciled Designer Paper

Coloring on Perfectly Penciled Designer Paper

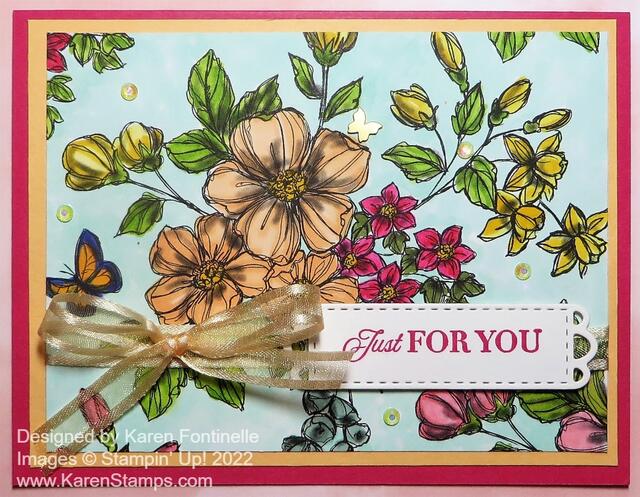
I’m not crazy but yes, I did color in this whole card front on this Coloring on Perfectly Penciled Designer Paper card! If you like coloring, you’ll understand that coloring is fun, and if you don’t like coloring, then you can stick to the beautiful black and white images on this paper!

The Perfectly Penciled Designer Series Paper has hand-drawn black and white floral images on one side of the paper that you can use beautifully as is or add color in any of many different ways. On the other side are generic graphic patterns that you can use as backgrounds on cards. It’s really great paper to use!

I simply cut the Perfectly Penciled Paper to have the floral design I wanted in the center of my card. You may have to think a little bit unless your paper has already been cut into, to get the design that you want to work with. Maybe it doesn’t matter how the images show up on your card design. Just so you are happy with it. I colored in the floral pattern and then I designed the rest of the card.

I started with the large flowers in the center and decided to color those with the Light and Dark Pale Papaya Stampin’ Blends. The leaves are mostly Granny Apple Green, some with a touch of Daffodil Delight, and a few smaller leaves colored with Old Olive Blends. The star-shaped flowers are colored with Melon Mambo, which at first I thought was too bright, but once I got the whole thing done, I liked that pop of bright color. Other flowers and buds are Daffodil Delight Blends and some Flirty Flamingo pinkish buds down in the lower-right corner. There is one little butterfly on the card which I colored with a purple and orange, but I’m not happy with it! Luckily it is off to the side and partially obstructed by the bow! I could have left the colored images as is, but I sometimes love coloring in the background, too! For this card, I used the Light Pool Party Stampin’ Blend. If you just kind of scribble around lightly, it’s not that difficult to color in the whole background. If you bear down with the point of the marker, trying to color in perfectly every nook and cranny, it will probably be an unpleasant experience…unless that is really what you want to do!

To make the actual card, I decided to layer and piece of Pale Papaya under the designer paper and then adhere that to a card base of Melon Mambo. The greeting is in the Celebrating You Stamp Set, a great set to have for sentiments for lots of occasions. It is stamped in Melon Mambo ink and then die cut with a die in the Meadow Dies. It looked like too much to layer it on Melon Mambo so I left it as is. The ribbon across the lower portion of the card is the pretty Pale Papaya Open Weave Ribbon. The bow is tied separately and adhered to the card with Mini Glue Dots. For a finishing touch, I couldn’t resist adding some Iridescent Rhinestone Basic Jewels plus one little Brushed Brass Butterfly!

This card could be for almost any occasion if you just change the greeting. Actually, this greeting is perfect for almost any occasion! It could be for a birthday, thinking of you, congratulations, wedding, anniversary, or even sympathy. Here is another card I made recently by coloring the black and white design using Blending Brushes and ink and not trying to color inside the lines at all!

You’ll find the Perfectly Penciled Designer Series Paper in the brand-new Stampin’ Up! Annual Catalog!

True Love Colored Daisies Card

One of the products I hate to see retire in the January-June 2021 Mini Catalog is this black and white paper which is so fun to play with! You can leave it as is for a black and white card or you can color in the designs as I did on this True Love Colored Daisies Card. Just do whatever strikes your fancy!

This is the True Love Designer Series Paper on page 11 in the Love You Always Suite. There are large flowers in the designs which are fun to color in with Blends or color in the space around the flowers. This time I came across this paper with these tiny daisies and decided to do something with this.

I thought it would be fun to make the paper colorful, but of course, I didn’t want to color each flower! I got out my Sponge Daubers and some ink pads and just picked up some ink, rubbed the Dauber over several areas of the paper, and then added another color. I used Flirty Flamingo, Daffodil Delight, Gorgeous Grape, and Granny Apple Green. I felt like I should add a touch of green in there for the leaves, not that I could color in the leaves themselves. Gorgeous Grape was too dark unless I rubbed some off on scrap paper before. I ruined my first attempt with dark blobs of purple on my card!

When I was finished coloring the flowers with my Sponge Daubers, I chose a greeting stamped and die-cut with the Messages Die. I almost adhered the greeting to the card without any ribbon as an embellishment. It was pretty enough, the white greeting with black ink on the busy background. But I did add some Whisper White 1/4″ Crinkled Seam Binding Ribbon just for a little something and also adhered a bow I tied with Glue Dots.

Here is another card I made with the larger flowers in the True Love Designer Series Paper, colored with Stampin’ Blends, and then cut out and added to a card. It’s one of my favorites because I love red and I loved the red with the black and white.

Before this paper is gone, be sure to check it out, especially if you like to color! Some of the pages are generic designs like dots or stripes so you can use those as backgrounds on cards or other ways.

The January-June Mini Catalog will end on June 30. Some products are discounted. Last Chance products are only available while supplies last!

SHOP STAMPIN’ UP! ONLINE HERE!