Tag Archives: Easter treat box

Sour Cream Container Easter Treat

Sour Cream Container Easter Treats

In this post I’ll show you how to make Sour Cream Container Easter Treats very easily. I loved the treats shown in the Stampin’ Up! Spring Mini on page 26 so I just used those for my examples. Mine turned out slightly different because of choice of paper and ribbon. We have all been making these sour cream containers for years and years for treats for every occasion so they are very versatile! You can make them larger too if you want. I don’t even know why they are called “sour cream containers” but I think maybe sour cream used to be packaged in small portions like these, maybe in restaurants? I don’t know!

Mine are slightly different sizes but you can barely tell. You really can vary the sizes. One starts with a piece of designer paper 4 1/4″ x 5 1/2″ and one is 4″ x 5 1/4″. You can make them with 6″ x 6″. It just depends on how big you want them and what they will hold. Mine hold 4 little chocolate eggs. You could also use cardstock but designer paper is more flexible to roll up into this odd shape.

I used the Storybook Moments Specialty Designer Series Paper which has cute diecuts included along with the adorable designer paper. On both I used the generic side of the paper so that the little tag and ribbon would stand out. Be sure to use a strong adhesive such as Tear & Tape Adhesive to hold them shut and kind of loosen up the paper fibers before you put them together but gently rolling into a tube shape or run the paper over some curved object, like the edge of the table if it is rounded.

Lay the paper out, long sides top and bottom. Put the adhesive along the edges of the long sides, top & bottom, and on one short end. There is no adhesive on the other short end.

Sour Cream Container Easter Treat Assembly

To make it easier to not have adhesive all over the place while you are trying to assemble the container, pull down a short section of the tape cover and press to crease so you can grab that later. Take off the paper on the short section and adhere it to the opposite side forming a tube. Then reach inside and peel off one of the papers and adhere one end together. Use a bone folder to something to press on these seams to make sure the adhesive is holding firmly. Be sure to add the treat inside the container at this point before you adhere the final side! Remove the third adhesive paper from inside and adhere the other end making sure it is perpendicular to the top. It’s surprising how easily it goes together this way even though it’s a little odd.

Sour Cream Container Easter Treat Adhesive

For the little tags on each container, I just cut a piece of Basic White at 2″ x 1 1/2″ and added diecuts that are in the Storybook Moments DSP. Use whatever ribbon you have to adhere a loop on the back of that tag and pop it up with Stampin’ Dimensionals. Sometimes I put Stampin’ Seal Adhesive on the back first to hold the ribbon and then put Dimensionals to help hold the ribbon in place and to pop up on the card or project. One ribbon is a retired Pool Party ribbon and the other is a retired Bubble Bath ribbon that came in a Combo Pack.

Once you try these sour cream containers you will find they are easy to make. Be sure to loosen up the paper a little as I said to make it easier to roll up. Click here to see some that I made for Halloween. This post also has photos that might help you see how to fold them together. These would be so cute to make with any of the sides of the Storybook Moments paper to put in Easter baskets or make for little favors for Easter gatherings! This paper is in stock now so be sure to grab some quickly if you want it!

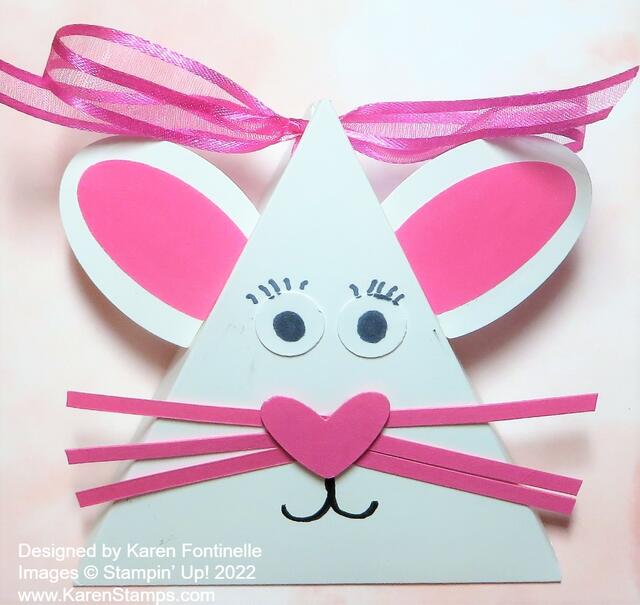
Triangle Box Easter Bunny Treat

Triangle Box Easter Bunny Treat

These triangle boxes are so fun and easy to make. I have made lots of them over the years for different holidays or occasions but I may not have ever made one for Easter like this Triangle Box Easter Bunny Treat. All you need is a piece of paper and then score it according to directions. You can vary the size of the paper depending on what size treat box you want. Put some candy or a small gift inside for a fun treat!

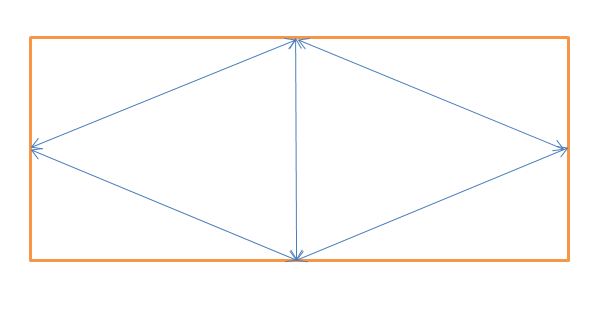
My Basic White cardstock is cut at 4″ x 8″. Use the diagram below to see how to score, but it is simple! At each end of the cardstock, put a light pencil mark at the halfway point which in this case would be 2″. Score the paper in half at 4″. Then in that awkward manner, with your Paper Trimmer, score from that 2″ middle point at one end down to the middle score line which will be on a diagonal. Do that on both sides of one end, then turn the paper and score at the other end in the same way.

Triangle Box Drawing

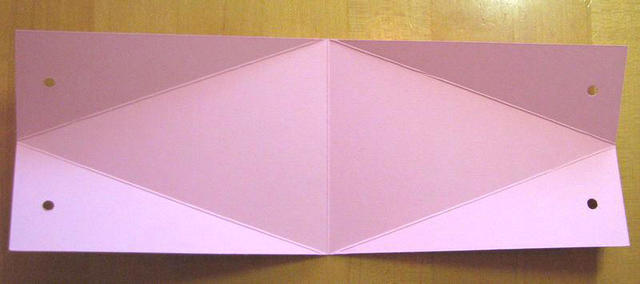
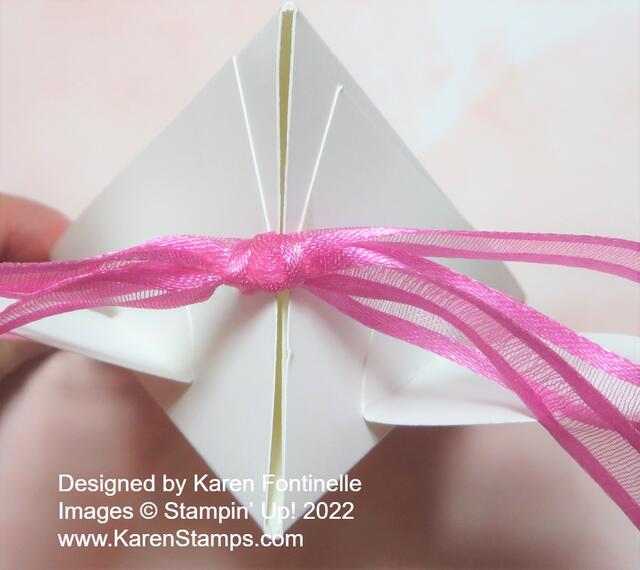
Now fold and crease all the score lines. You will see how it will fold together to make the triangle box. Determine which side will be the front or top of your box that you will want to decorate and how the flaps will go so that the top view of the box will have the fold of the flaps showing and not the open side. Once you see how it folds together how you like, you can use any hole punch to punch holes in the sides near the top. You want the two holes on each side to align. This is how your paper should look creased and with holes punched.

Triangle Box diagram

To decorate my Easter Bunny treat box, I used punches that are retired now but you can use whatever you have. There is the Double Oval Punch or maybe you have retired punches and dies that you can use….or simply cut out by hand! For the ears, I punched a large oval for the white ear and then I found the 2021-23 In Color Shimmer Vellum that I have and have barely used! It’s on the Last-Chance List and even on sale! To attach the ears to the box, I simply scored a bottom portion of the ears and folded then adhered each to the box. You can use Multipurpose Liquid Glue but you will have to hold it in place for a few moments.

For the eyes, I punched 1/2″ circles with my old punch and colored in the black portion. I had originally drawn them right on the box but later I smeared the ink somehow so I covered that mess up with the punched eyes! “There are no mistakes in stamping!” I think it looks better this way! The nose is a little larger than I planned on but I used one of the hearts in the Sweet Hearts Dies. I had to have something a little large since I attached these whiskers. If you have been papercrafting for any length of time you probably have a heart die or punch somewhere in your stash or you can just cut one by hand. The mouth is just drawn on with the Black Stampin’ Blend marker.

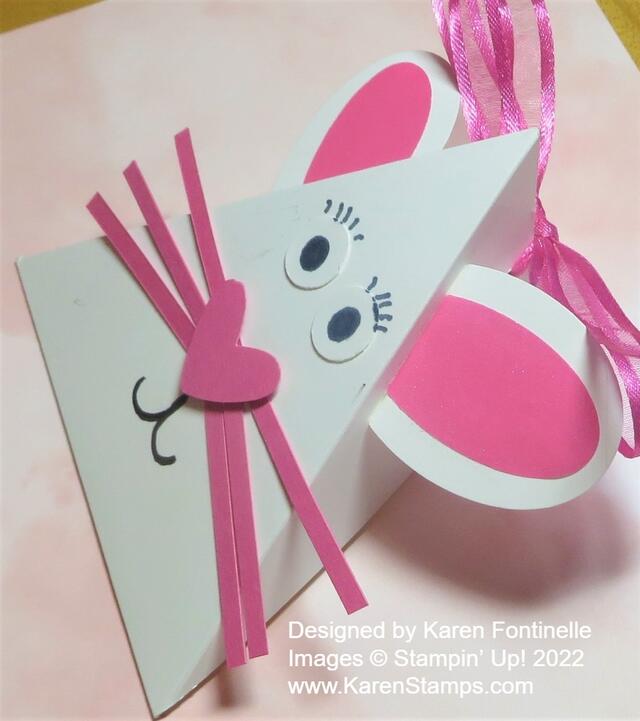
Triangle Box Easter Bunny Treat Side

After putting your treat or gift inside the box, you can tie it closed with either an inconspicuous piece of ribbon or do as I did and use a larger bow that matches my bunny colors that looks somewhat like a bow tied on the bunny’s head! My pink colors are the In Color Polished Pink in the paper and ribbon. The ribbon is the 3/8″ Open Weave Ribbon. Such pretty ribbon in all the In Colors! Luckily these In Color ribbons are carrying over into the new Annual Catalog!

Triangle Box Easter Bunny Treat Top

That’s it for making a triangle box! Here is another example in THIS POST. Just decide on the size of paper you want to use, score in half, score on the diagonal to each end from that scoreline, punch holes if you want to be able to tie it shut, and decorate as I did in this Triangle Box Easter Bunny Treat.