Tag Archives: fall

Button Pumpkin Board

Button Pumpkin Board

If you ever wondered what to do with any retired Stampin’ Up! buttons and others you may have, here is a fun Button Pumpkin Board you can easily make! All of us crafty people certainly have a stash of buttons somewhere, and if you don’t, you know you can buy some online or at the craft store. Years ago Stampin’ Up! sold buttons for embellishments and I had lots of them. Maybe they went along with the period of time when Stampin’ Up! sold fabric, which I also still have!

My friend’s friend sent her a picture of this idea, so my friend bought a board like this one and got out her buttons. If you want a cute decorating tip, she put her buttons by color into glass jars and then set them on a metal tiered tray! She used mostly brownish buttons for her pumpkin.

Of course when I see a cute idea like that, I have to make it too! If you saw my Facebook post the other day about the pickles, this is what I ordered from Walmart….this board! And when my order was delivered the next day, I got a heavy package on my porch. When I opened it, it was a giant gallon jar of the biggest dill pickles I have ever seen!

Walmart pickles

Luckily, I got a refund through the Chat online for the board, my friend took the pickles to the food pantry at her church, and I picked up the board at an actual store in the afternoon! I’ll never forget this funny story!!

I just dug around in the closet, where fortunately my daughter a few years ago had organized a lot of my craft stuff so I just found the boxes that she had labeled “Buttons”. As I said, I had a lot of Stampin’ Up! buttons plus a bunch of other buttons, some from the Quilt Show I used to go to every year downtown from projects I never made, and just random other buttons. A long time ago my mother-in-law had bought a tin of buttons at a garage sale she gave me for crafting. I sorted through all the buttons and set aside the containers or loose buttons I thought I might use.

You can lightly sketch a pumpkin shape on the board if you like or not draw anything. If you are sure your pumpkin outline drawing skills are not up to par you can google “pumpkin coloring pages” and print out one. Cut it out and trace around it. Easy peasy. Then just start glueing on buttons inside that shape!

My friend told me to use E3000 glue, which I did, but I hated the “fumes” and smell. She thought hot glue would not stick to the wooden board but I don’t know. The next day when I added more buttons, I used hot glue although not many were glued directly onto the board. But it seemed to work, so far!

Think in terms of layering the buttons. There’s no rhyme or reason, no way to do it wrong. If you don’t have many buttons, make a smaller version. Use any color(s) you want. After I mostly had my pumpkin “finished” I decided to stop and come back to it later. I needed to get away from it and see if I liked it as is or work on it some more.

The next day I got out more buttons and added more orange buttons and made the stem with green buttons. You can see I used all sizes of buttons. If you aren’t sure about this, lay out the larger buttons and then start filling in with medium and smaller buttons. Then glue buttons on top, overlapping, to cover up any spaces or maybe put small buttons in the center of large buttons. Just play around with it!

I would have put raffia on my pumpkin but I didn’t have any so I used some old Stampin’ Up! ribbon and frayed the ends. When I was making the stem, I didn’t have enough green buttons so I colored some plain white ones with a Stampin’ Blend marker. It dried almost instantly so easy to use. You could probably use a Stampin’ Write marker, too.

Overall, this was a fun and easy project, and I’m happy with how it turned out. I hung it up on the wall behind my baker’s rack when I was putting out my Halloween decorations yesterday. I think I’ll be able to leave it out over Thanksgiving because it’s not a Halloween jack-o-lantern. Another idea if you have some picture frames, you could cover the background with cardstock, designer paper, or fabric and use that for a background for the button pumpkin. For me, it was easier to order something new than to plow through a pile of old picture frames to see what I had. You could make very small pumpkins with maybe just one color of small buttons. So many possibilities! If you make one, leave a comment or email me and let me know how it turned out!

Simply Zinnia Fall Card

Simply Zinnia Fall Card

They say it is now fall since the autumnal equinox happened yesterday morning so I made this Simply Zinnia Fall Card to commemorate the new season. Here in Houston, Texas though, the best the weathermen can say about fall is “it will be less hot”. I want to hear that the temperatures are cooling off and it will not feel like summer again until June 2025. No such luck, I don’t think!

I got lucky in making this card because I found the zinnia piece stamped and diecut but not colored in! The zinnias are in the Simply Zinnia Stamp Set. It was in my pile of scraps and since I was being very indecisive about what kind of card to make, I made a final decision to use these zinnias. I colored them with Stampin’ Blends alcohol markers using these colors, both Light and Dark: Daffodil Delight, Pumpkin Pie, Berry Burst, and Granny Apple Green for the leaves. I was pleased with the look of the flowers after I colored them, and coloring with alcohol markers is one of my favorite things to do!

To make the card, I chose a card base of Garden Green cardstock. The background is two different papers in the Meandering Meadows 6″ x 6″ Designer Series Paper. I happened to have that paper out thinking that I was going to use it to make a card, but decided on the zinnias instead. However, I looked through it again, wondering if there was a background pattern in Meandering Meadows that I could use. I found a strip of this green pattern plus this other lighter-colored paper. I thought they looked great with the flowers. The green pattern is 1 1/2″ x 5 1/4″ and the light-colored paper is 4″ x 5 1/4″. Those were adhered to the Garden Green card base.

The zinnias are popped up on Stampin’ Dimensionals. They were diecut with the Simply Zinnia Dies. You can buy both the stamp set and the dies in the Simply Zinnia Bundle and save 10%.

The greeting is stamped from the Simply Said Stamp Set. Lots of great choices in that stamp set! It is stamped in Pumpkin Pie ink and die cut with the smallest curved rectangle in the Nested Essentials Dies. I added some Shiny Sequins in Pumpkin Pie and Lemon Lime Twist for some sparkle. I always love a little sparkle on a card!

Here’s another card I made with the Simply Zinnias Bundle that I really liked the way it turned out!

Shop Stampin’ Up! Online HERE!

Hello First Day of Fall Card

Hello First Day of Fall Card

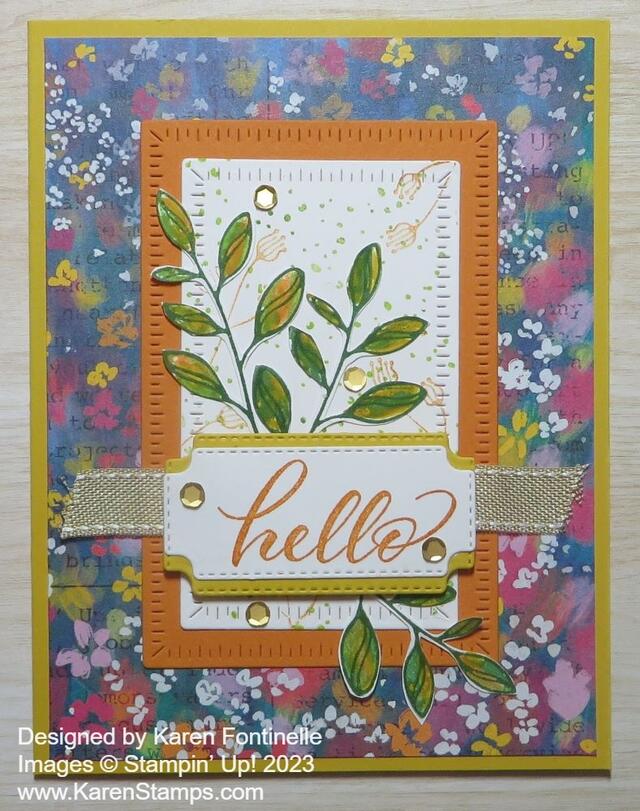
Today, September 23, is the first day of fall! Thank goodness!! We had such a hot, hot, hot summer here in Houston and most of Texas I think that we are SO ready for a break in this heat! I’m hoping this Hello First Day of Fall Card will help usher in more comfortable weather! It will be a while before the heat goes away, though.

In thinking about fall, I naturally thought about the Layering Leaves Stamp Set. In kind of looking for ideas online, I saw someone had made a card using the Masterfully Made Designer Series Paper. That made me look through my package to see if an idea popped into my head using one of the paper patterns. This one that I used seemed to have some fall colors in the flowers so I chose it! It’s a different look for a fall leaves card, I admit, but this whole package of paper is a little daring so it’s okay to do something a little different with it!

In the Layering Leaves Stamp Set, there are two stamps you can use for two-step stamping. I stamped the outline stamp of the leafy stem with Garden Green. Then I colored on the stamp that was just the fill-in leaves using two or three different colors of Stampin’ Write Markers. I wanted each leaf to have several colors on it as if it were turning colors for fall. I used Crushed Curry, Garden Green, Pumpkin Pie, and Granny Apple Green. Just play and see what you come up with! Everyone will be different. On a few leaves, I added a little marker color to fill in some empty spaces. Then I cut out each stem with my Paper Snips. The Bough Punch has been out of stock for a while but you can order it now, earlier than expected!

The card base is Crushed Curry. I used the Radiating Stitches Dies to diecut a piece of Pumpkin Pie for a layer for the focal point of the card, and the next smaller piece of Basic White. To fill in the white background a little bit, I stamped lightly with the dotted stamp using Granny Apple Green and Lemon Lime Twist. Not one to leave well enough alone, I also stamped the little flower image in Pumpkin Pie.

The greeting is in the Layering Leaves Stamp Set. I thought “Hello” was appropriate for saying “Hello” to the first day of fall! I love the font of the greetings in this stamp set. I stamped it in Pumpkin Pie ink and die cut it with a label die in the Cheerful Daisies Dies. I also cut a piece of Crushed Curry with the same die and cut it in half horizontally to make a layer under the greeting. I just adhered one half of the Crushed Curry to peek out from the top of the greeting and the other half for the bottom. Just line the two pieces up evenly and they look like a full layer underneath the greeting!

Before adhering the greeting, see where you want the leaves placed and glue those down. I decided to add a piece of ribbon underneath the popped-up greeting. It is the Burlap Ribbon in the Combo Pack with Real Red Ribbon. I also added some gold Pastel Adhesive-Backed Sequins around on the card.

You can make a similar card to this one with the Layering Leaves Stamp Set. You can change the background designer paper and change the colors of paper and ink that I used. The best part of the Layering Leaves set, I believe, is the beautiful fonts and words you can use a lot.

Fall and fall decorating is just around the corner now! It is fall and it is almost October! Make a few cards to send to celebrate fall!

SHOP STAMPIN’ UP! HERE!

You’re the Pick of the Patch Fall Card

You're the Pick of the Patch Fall Card

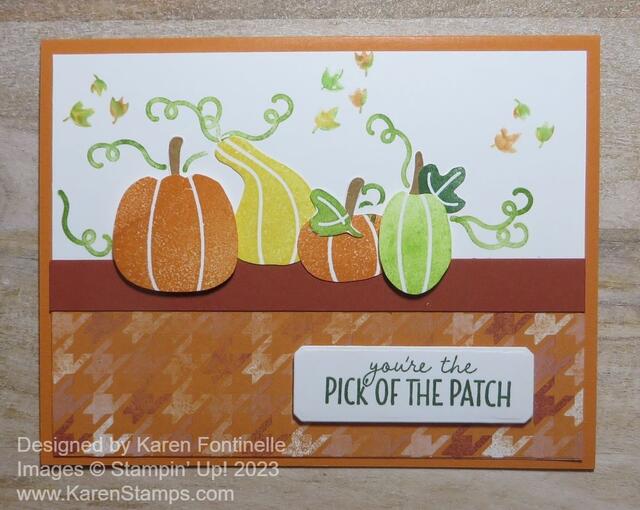
This You’re the Pick of the Patch Fall Card may have gotten lost in the shuffle and never got posted but if you’ve already seen it somewhere, it’s a replay! Making fall cards makes me hopeful that it might feel like fall here in Texas someday! Usually, it is December until the leaves turn to fall colors but hopefully, we get much cooler temperatures before that! The colors on this card make me feel a little cooler!

This card is made with the Pick of the Patch Stamp Set and the Them Bones Designer Series Paper. The card base is Pumpkin Pie cardstock with a layer of Basic White. You wouldn’t have to use a whole piece of Basic White if you are going to put a piece of designer paper at the bottom but you want them to overlap a little bit probably. Then cover the seam with ribbon or a strip of paper as I did here. It’s a little easier to use a whole layer of Basic White and then just cut a strip of the designer paper to whatever size you want instead of figuring out the math for the two pieces to be the right size for the card layer. In this case, I used a 5 1/4″ x 4″ piece of Basic White and then a layer of patterned paper that is 5 1/4″ x 1 3/4″. The strip of Cajun Craze is 5 1/4″ x 1/2″. You could also use a strip of ribbon or another patterned paper.

The pumpkins and gourds are stamped with the Pick of the Patch Stamp Set in various colors. You can use any colors that you like and even “stamp off” if you want a lighter shade. I used Pumpkin Pie, Daffodil Delight, and Granny Apple Green. There is a Pick of the Patch Builder Punch that you might like for pumpkins. I don’t have it so I just cut out my images by hand with my Paper Snips.

Here’s a tip for using the Builder Punch. Take any piece of cardstock that fits in the punch (not too large, not too small. Punch the paper. Then use that punched-out paper as a template so you can stamp all the images that match the punch that will be lined up perfectly. Lay the template on the paper you want to stamp on, then stamp each image inside the template. Remove the template, then punch. Everything should be lined up for the punch! Or you can always just punch individual pieces with the punch.

Before adhering the Basic White cardstock layer, lay out all the pieces of the card and see where the pumpkins and gourds will go. Then stamp the vines so that they will line up with the stamped pumpkins and gourds. To fill in some empty space, stamp the little leaves around the background. To make them look like fall leaves, use Stampin’ Write Markers (not Blends). Apply the marker directly on the leaf stamp, starting with the lightest color and adding another color or two to the same stamp. Breathe (huff) on the stamp to remoisten, then stamp and you will get the multicolored stamped image!

Assemble your card, popping up some of the pumpkins if you like and adding some stamped leaves in the set. The greeting is in the Pick of the Patch Stamp Set. What a cute greeting to send to someone special! I die-cut it with the narrowest die in the Countryside Corners Dies.

The Pick of the Patch Bundle is a great set of products to have for this time of year. The stamp set even includes a jack-o-lantern face if you want to make your pumpkins for Halloween!

SHOP FOR FALL AT STAMPIN’ UP!