Tag Archives: Flourish Dies

Sympathy Card With Gold Foil Cross

Sympathy Card With Gold Foil Cross

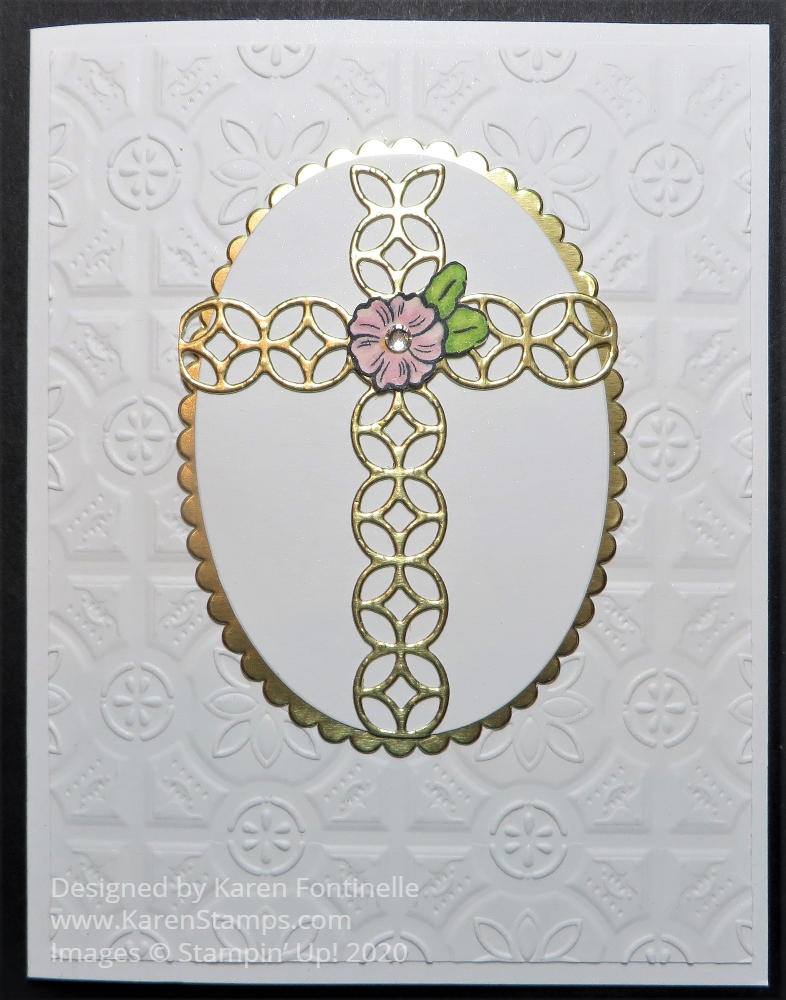
Three weeks ago today I had a need for a special sympathy card so I created this Sympathy Card With Gold Foil Cross. A dear friend with whom I’d grown up since 4th grade lost her husband to the coronavirus. While I saw lots of pretty ideas for sympathy cards online and almost chose one of those, I ended up somewhat copying a card I’d made myself several years ago.

Around Easter I had posted some past cards I had made and I noticed my friend commented on a card like this one. She’s also has a strong religious faith so I thought a card with a cross would be appropriate.

I first thought of making an all-white card but in the end, I used Gold Foil for the cross and the scalloped layer. The card base is Whisper White with a layer that is embossed with the Tin Tile 3D Embossing Folder.

The cross is made with two die-cut pieces from the Flourish Dies. It is the long piece that is not a leaf or flower! I cut two but then cut each down according to the size I wanted. Just use Paper Snips to cut carefully either with a straight line or perhaps following the curve, depending on where that end is going to end up.

I had to put a lot of thought into layering the cross, whether to emboss that background piece, what shape, what color, etc. Finally, I settled on using the Layering Ovals Dies because I needed something large. I chose to use one of the scalloped ovals for the gold foil layer under the white oval. To glue the cross together and to adhere it to the oval, I used the teeniest drops of Multipurpose Liquid Glue. It IS possible to get teeny drops out of the bottle but if that doesn’t work for you, put a small puddle of glue on some scrap paper or wax paper or your Silicone Craft Sheet and dip something like a toothpick or corner of a scrap of cardstock in it to pick up the glue.

Last, but not least, I had a difficult time deciding on a flower. Whether to stamp a flower and punch it out with either a current punch or retired punch and what flower stamp to use, etc. etc. Finally, I settled on this flower, stamped in Memento Ink and colored with Stampin’ Blends. The stamp is in the Ornate Style Stamp Set. I even added a little Rhinestone Jewel to the center of the flower.

This is the card I copied from. It doesn’t hurt to look back at your older creations and see if something in your own collection inspires you! I just changed up the colors to what feel I wanted this sympathy card to have and it was easy to duplicate. Of course the personal note inside a card like this is the most important part, but I know for us cardmakers, making a card for a situation like this takes some thought about the design, colors, greeting, etc. in hopes we will get the tone just right and bring comfort to the recipient. I’m afraid we could all need to have some sympathy cards on hand or ideas in our heads for one with the virus ravaging our country in this way.

Always look through your stash of cardmaking supplies, even older ones, and you will likely find something, even the perfect something, with which you can make a card like this sympathy card. It’s a shame we have to send them to people we know, but we do and we’ve been given a special opportunity with our supplies and our talent to hopefully ease someone’s sorrow with our cardmaking and papercrafting.

Path of Petals Thank You Card

Path of Petals Thank You Card

We often say, “Stamping is therapy” and it certainly is, like with this Path of Petals Thank You Card and many other cards! Sometimes you just need to stop and sit down and stamp.

It’s been such a busy week and everywhere I went traffic, traffic, traffic! I think everybody is in town with all the schools back in session so no one is on vacation anymore. Everybody is home and going to work and on the roads! Not to mention construction everywhere which causes backups and slowdowns! I think I need to allow an hour to get anywhere I go just to keep the drive less stressful! I don’t know when it’s been quite like this in all the years I have lived here.

So what is the best thing to do to alleviate a little stress?? Stamp, of course! This card uses the Pressed Petals Specialty Designer Series Paper and stamping with the Path of Petals Stamp Set. Although I have used the Pressed Petals DSP on lots of cards, I had difficulty stamping the flowers and leaves with this stamp set so this is the first time I actually used the flowers and stems! Here is a card I made with a piece of the Pressed Petals Designer Paper. I love these dark-colored flowers so much!

The card base is Mossy Meadow, one of the coordinating colors of the Pressed Petals Designer Paper. I started with the design with the leaves and ferns (I guess!), although originally I had the top and bottom designs reversed. This is actually the same paper, the leaves on one side and the cloth-looking design on the other.

The die-cut piece going across the front of the card is from the Flourish Dies using Merry Merlot Cardstock. I like to have something, usually ribbon, where I have two different patterns of paper coming together. It just finishes off that edge nicely. But this time I thought of using some kind of border die or something and finally, I found this one. It is a little bit fancy but doesn’t overwhelm the card. The secret is that the piece is not long enough to reach all the way across the card. But since part of the die-cut was going underneath the stamped piece, I was able to cut it, leaving a space underneath the stamping making the ends reach to each side of the card, and no one will be the wiser!

Maybe you won’t have trouble stamping the flowers, but just in case, this is what I found out. I think it was easier to stamp the flower stems and leaves first. I stamped these in Pear Pizzazz Ink. Next, I stamped the flowers in Merry Merlot Ink. I think you will have to move the stamp around until you feel like the flower blossoms are fitting with the stems. Past stamps we have had had a notch on each of the stamps that were to be stamped in the same direction so you could tell how to line them up. These stamps do not, so you just have to line them up as best you can. I could not get the other leafy stamp to line up correctly, so I just stopped with what I had as you see on the card.

For a little pizzazz on the stamping, I used the Clear Wink of Stella Glitter Brush to brush on a little Merry Merlot ink from the ink pad onto each flower, trying to keep it fairly light, which also added a bit of glimmer. Then I did the same with the leaves with the Pear Pizzazz ink. As much trouble as these stamps were to line up, I really liked the stamped image after adding a little bit of color and the glimmer from the Wink of Stella brush!

The greeting is from the same stamp set. It is stamped on Very Vanilla Cardstock in Merry Merlot Ink and then punched out with the Classic Label Punch. However, I snipped off the pointy ends of the punched piece to just make it plain. I could have layered it on a piece of Merry Merlot but I liked it just adhered to the card by itself.

So there you have it! A little stress relief from the demands of the week and a simple card design that you could vary in many different ways!