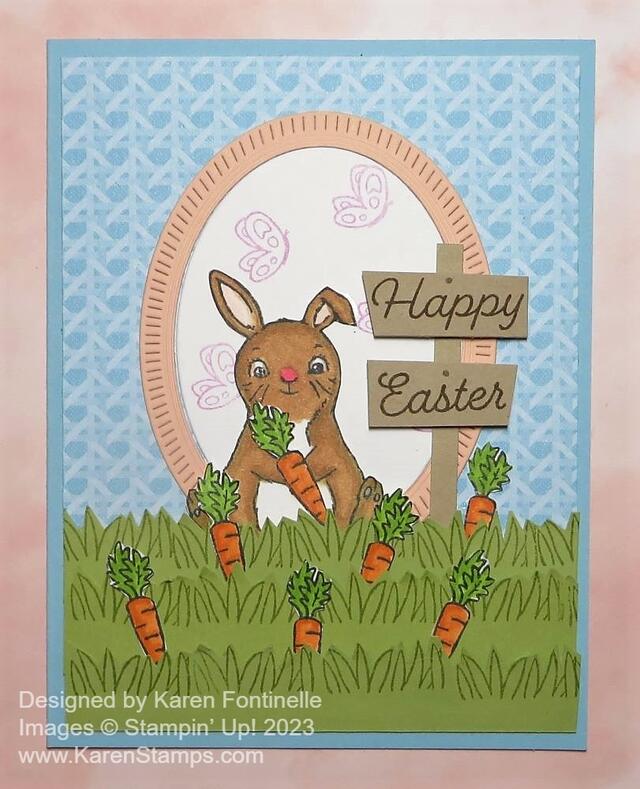
Easter will be here before we know it so it’s time to get going on all things Easter and Spring! This Easter Bunny in the Carrot Patch Card is mostly a copy of a sample in the Spring Mini Catalog on page 52. Sometimes when I’m not quite sure where I want to start with a new stamp set, I look at the samples in the Stampin’ Up! catalog and see if I want to copy something or get some inspiration for my own ideas. My card is mostly the same with a few changes.
Now I will warn you, as cute as this card is, it took some work! It’s like buying the whole Suite of Christmas products to make a spectacular card and then realizing you can’t make 50 of those! Not that I had the intention of making multiples of this card design necessarily, I’m just saying there was a lot of detail work. Which is okay lots of times when you really want to just enjoy a good stamping project!
For my card, I changed the colors a little bit. I used Balmy Blue for the card base. Then I found this pattern that looks like wicker in the Regency Park Designer Series Paper, on “the other side” as I like to say, of the floral pattern. I thought a wicker design would go well with an Easter bunny since wicker Easter baskets are what we use!
The Petal Pink frame is diecut with the oval frame in the Framed Florets Dies. (These should be back in stock around March 27.) I had also cut a Basic White oval frame in case I wanted to use white instead but I chose the pink frame and used the white as the insert in the frame. I stamped several butterflies for the background in Fresh Freesia ink.
The Easter Bunny Stamp Set is really a cute one to have for Easter or spring or of course babies! Bunnies are always a cute theme for baby cards and baby projects! The bunny is stamped in Memento ink and colored in with Stampin’ Blends. Don’t forget about the Natural Tones Blends to use for animals. I used #500 for most of the bunny but then added a darker brown (I forget which one!) for the shading. The ears of course have some Petal Pink in them and the nose is a bright Polished Pink! Maybe a little too bright but that’s okay! The designer paper, the frame, the insert, and the bunny are all just glued down flat on the card.
For the grass, I cut strips of Pear Pizzazz Cardstock and stamped them with the grass stamp in the Easter Bunny Stamp Set. There are no dies to cut out the strips of grass but I just zigzagged my scissors to cut imperfectly up and down around the tops of the blades of grass. When I glued these down I only put glue along the bottom edge so the top edge would be open. I needed to stick the carrots down into the grass. I first stamped five carrots and colored them with Pumpkin Pie and Granny Apple Green Blends. I cut these out by hand and glued them down into the grass. But I didn’t like the way I placed them so I made two more carrots and added those. Now I like them! The bunny even gets to hold one in his paws!
For the greeting, I stamped “Happy Easter” in Soft Suede ink on a little strip of Crumb Cake Cardstock. Since it is rather large, I cut it apart sort of like the greeting on the card in the catalog. But when I looked closely at the catalog sample, I saw that there was a post behind those words! It really is a little wooden sign in the grass! So I cut a very narrow piece of Crumb Cake, glued that down, and then popped up the words on Stampin’ Dimensionals. I even added a dot of Soft Suede marker on the top of each word to look like those boards were nailed onto the post!
As I said, this project did have a lot of steps in it, and if you hate to cut out anything, you might not enjoy this project! But the bunny and the carrots are so cute, I don’t know how you could resist!
Unfortunately, the Easter Bunny Punch is backordered until May which is sad! However, if you stamp the one bunny that fits the punch, it will be easy enough to cut out by hand.
Start thinking about bunnies, eggs, baskets, and flowers, and let’s get ready for Easter!


