Tag Archives: Holiday card

Snowy Scenes Snowy Trees Holiday Card

Snowy Scenes Snowy Trees Holiday Card

This Snowy Scenes Snowy Trees Holiday Card is made with several different elements and it all turned out to be a quick and easy card! I got my order from the online September Scrapbooking Brochure that Stampin’ Up! recently put out with new products that coordinate with the Stampin’ Up! Holiday Mini Catalog.

This is a digital-only scrapbooking brochure, full of scrapbooking essentials and exciting new products. With Workshop Kits and some new product releases like Two-Tone Cardstock and another white cardstock choice, this will add variety and inspiration to your holiday crafts this year! Even if you are not doing scrapbooking or memory-keeping, you can use these products to make cards and other projects, as I did with this holiday card above!

The card base is Pool Party cardstock which coordinates with the Snowy Scenes Designer Series Paper. You can order this cute paper by itself in the Holiday Mini or you can order it with a sticker sheet in this online brochure. That’s what I did. The sticker sheet only comes with the designer paper package, not separately. You can also purchase a whole Suite of products in the Holiday Mini.

On the Pool Party card base, I added a snowflake layer of the Snowy Scenes DSP. The snow globe is cut out with Paper Snips from another sheet of the designer paper. I popped up the snow globe with a lot of Stampin’ Dimensionals. Then I looked at the Sticker Sheet and saw some snowflakes, so I punched out two of those and added them as embellishments to the snowglobe, putting a Dimensional under the part that hung off the snowglobe since the snowglobe was popped up. The stickers really are stickers with adhesive on the back! For a greeting, I chose this banner shape in the Joyful Sayings Ephemera Pack in the Holiday Mini Catalog. I thought the color, shape, and size was perfect to add to this snowglobe!

For a finishing touch, I added several white sequins from the Adhesive-Backed Sequins Trio. You’ll find these in the Annual Catalog! There are other embellishments you could use or a touch of ribbon or a little Wink of Stella on the trees or snowflakes.

You will find a lot of other wonderful products in this September Scrapbooking Brochure so be sure to check it out! And don’t forget the Clearance Rack, but hurry!

Christmas Ornaments Holiday Card

Christmas Ornaments Holiday Card

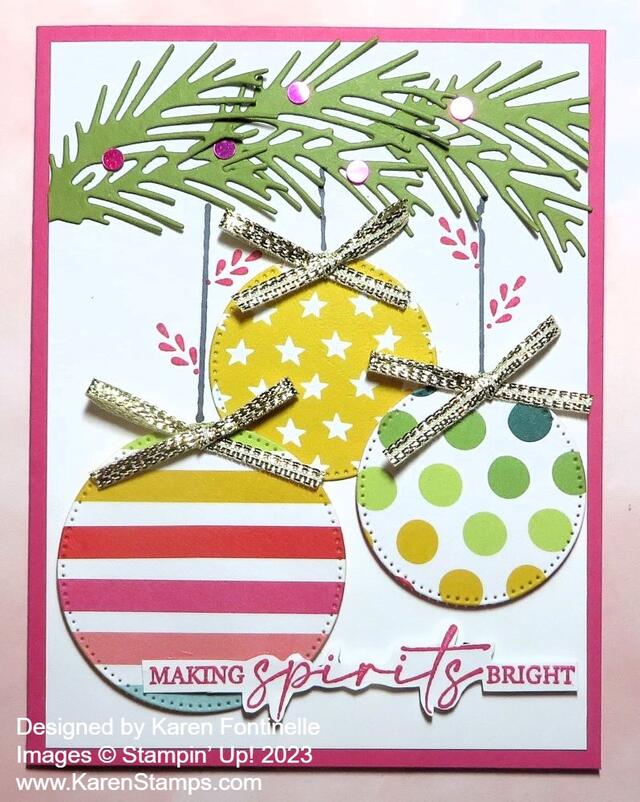
After making a card with an ornament made just out of a circle die and designer paper, I thought why not make another card the same way except make three ornaments? That was the inspiration for the Christmas Ornaments Holiday Card. You never know where your inspiration will come from. Sometimes it just comes from looking at a card already on your table!

This card starts with a base of Melon Mambo. It’s one of the coordinating colors of the Merry Bold & Bright Designer Series Paper. I love the bright colors and patterns of this paper besides the Christmas lights patterns. We can use these generic patterns long after Christmas.

To make the ornaments I used two different sizes of stitched circle dies in the Stylish Shapes Dies. You could use three different sizes if you wanted to. Or make a bunch of really small ornaments! I used three different patterns of the designer paper to look like bright and merry ornaments hanging from the evergreen bough. It could be from a tree or from a garland!

For the greenery, I had another idea at first, but I changed my mind and decided on the die cuts of Old Olive cardstock from the die in the Joy of Noel Dies. I cut out three of the branches going across the top of the card. You can let the ends extend over the edge of the card at first while placing them, then trim off the overlap before gluing down the card layer. I used Basic White for the layer thinking everything would show up better on plain white.

I just drew a straight line down from the evergreen bough to the ornament. I used a strip of cardstock as a straight guide. The large striped ornament is popped up on Stampin’ Dimensionals as is the small polka dot ornament. The ornament with the stars is glued down flat. I just tied gold bows and adhered those with Mini Glue Dots.

The greeting is in the Joy of Noel Stamp Set. I stamped it in Melon Mambo, but I wasn’t happy with its size for the small space I had to place it. So I cut around the greeting with my Paper Snips and thought it fit perfectly! I used Mini Dimensionals to adhere the side that was not over the ornament, which I had to do because the ornament was popped up. Therefore, the part of the greeting over the ornament only got glue on the back portion, not a dimensional.

For some finishing touches, I added some Melon Mambo Iridescent Adhesive-Backed Discs to the foliage to look a little like berries. And whatever image that tiny little leafy-looking stamp is in the Joy of Noel Stamp Set I stamped along the strings of the ornaments. I’m not sure why except I had envisioned stamping some small Christmas words in the background of the card layer, but I didn’t see anything quite like what I was looking for. But whatever they are, I really like that touch of Melon Mambo with the ornaments!

Here is the card I made a short time ago with the Shining Christmas Designer Series Paper. That’s why I say I took inspiration from another card I had made recently!

Remember, the Last Chance List for the Holiday Mini Catalog is out if you want to know which products are retiring from the Holiday Mini at the end of the season. A few products are discounted.

SHOP STAMPIN’ UP! ONLINE HERE!