Tag Archives: Playing in the Rain Stamp Set

Playing In the Rain 4th of July Card

Playing In the Rain 4th of July Card

It’s almost time for the 4th of July so here is a Playing In the Rain 4th of July Card to celebrate! The little guys in the Playing In the Rain Stamp Set are having fun watching the fireworks, not playing in the rain this day! It’s always fun to make up a little scene with stamp sets and dies that work that way!

Although I can’t believe it is July already (unless I walk out my back door into the heat!), I do enjoy the 4th of July, especially seeing the fireworks! I thought it would be fun to make a card with the characters in this stamp set. The gray rabbit on the left is the “correct” one. The brown rabbit on the right is stamped in reverse! I stamped him on my Silicone Craft Sheet. Then I laid down my Basic White piece of paper over the top of the stamped image, rubbed the back of the cardstock, and lifted it up. Then I had a bunny facing the other way! The image was almost as good quality as stamping it directly on paper. The gray fox in the center is stamped normally on Basic White like the gray rabbit.

I colored in the animals with my favorite, the Stampin’ Blends alcohol markers, then cut them out with the Playing In the Rain Dies. The one I stamped in reverse I just cut out by hand. I also cut away the umbrella and puddle because, as I said, it’s not a rainy day this time! The die set has other fun dies like the bridge, the tree stump, and the grass. I cut those out and played with the placement until I had everything just right. The two bunnies are popped up on Stampin’ Dimensionals.

Although I don’t have any official “fireworks” stamps, I made some with dies in the Merriest Trees Dies. I used some red glimmer paper I had in my stash from a previous catalog, some white glimmer paper, and gold foil. A couple of them I doubled up. You may have other stamps or dies that you could use to make fireworks if you look! Also, the card base is Real Red with a Pool Party layer for the background. Just a fun card to make to celebrate the 4th of July coming up on Thursday!

Happy July!

SHOP STAMPIN’ UP! ONLINE HERE!

(July 3rd Bonus Days begin! Spend $50, get a $5 coupon code to use on any order in August!)

Playing In The Rain Rainy Day Card

Playing In the Rain Rainy Day Card

Yesterday afternoon we finally got the tropical rain in Houston that they had been predicting since Monday from the storm in the Gulf of Mexico heading into Mexico. ‘Tis the season of unpredictable tropical weather of all kinds. That’s how this Playing in the Rain Rainy Day Card came about!

I started getting out some stamp sets and cardstock to make the card idea in my head when I saw the Playing In The Rain Stamp Set on the shelf. It was carried over into the new Annual Catalog! If I had remembered I had the matching dies, I might have made this card a little differently, but I like it as is. Since it was pouring down rain at the moment this seemed like the perfect stamp set to use.

I chose Smoky Slate for the card base to go along with gray clouds on a rainy day. For a layer, I chose Azure Afternoon because I have barely used that color and because it seemed like the right blue for this card. I just stamped a little rainy day scene on the card with Memento Ink on Basic White and colored in with Stampin’ Blends Markers. I made a mask of the bunny dancing in the rain puddle to cover him so I could then stamp the raindrops closer to him. If I had thought about it ahead of time, I would have stamped the whole background scene and then stamped the bunny separately and diecut him so I could pop him up on the card against the background. But either way is okay!

For coloring the clouds, I lightly colored them with Light Smoky Slate, leaving a little bit of white space on most, then added little bits of Dark Smoky Slate around some of the edges of the clouds. I thought that made it look a little stormy but not really bad. For the background, I just kind of scribbled with Pool Party and then went over some areas with Balmy Blue to give the sky some color. On the ground around the flowers, I colored in with Light Soft Sea Foam. The flowers are colored with Daffodil Delight, Melon Mambo, and a few with purple. The leaves are Granny Apple Green. The colors don’t matter. You can choose whichever ones you like.

The greeting is in the Playing In The Rain Stamp Set and is stamped with Azure Afternoon ink on Basic White. I needed to cut it out with a small die so it would fit fine on the card front. I found this one in the Unbounded Love Dies and it was the perfect size for my greeting. I popped it up with Stampin’ Dimensionals. All in all, this turned out to be a fun card to make on a rainy afternoon!

Here is another card I made back in January 2023 using the Playing in the Rain Stamp Set and the Rain Or Shine Specialty Designer Series Paper (retired). It’s a fun stamp set to use for sure!

SHOP STAMPIN’ UP! ONLINE HERE!

Playing in the Rain Z-Fold Card

Playing in the Rain Z-Fold Card

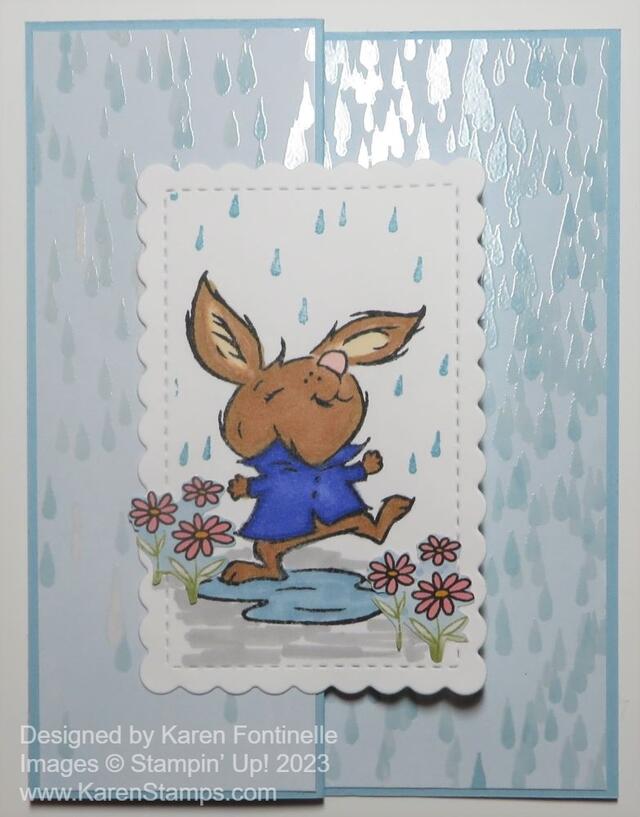
Everything in the Rain Or Shine Suite in the Spring Mini Catalog is so cute that you can’t make just one card! I’ve used this stamp set, dies, and designer paper to make quite a few cards but it’s always fun to make another one, like this Playing in the Rain Z-Fold Card.

I decided to make a Z-Fold card with the cute bunny in the Playing in the Rain Stamp Set. I think Z-Fold cards look like an extra-special design but it’s really ridiculously simple! To make a Z-fold card, make a card base as you normally would. Then score the card front in half, at 2 1/8″, and fold the right front half of the card back on itself. When you look at the card standing up, from the top, it looks like a zigzag or a Z.

This card base is Balmy Blue cardstock. I used layers of the Rain Or Shine Specialty Designer Series Paper, the raindrop pattern for the front panel of the card, and also on the inside. The narrow front panel is 5 3/8″ x 2″. The inside is 5 3/8″ x 4 1/8″.

I diecut two of the scalloped rectangles, the same size, from the Scalloped Contours Dies, in Basic White cardstock. One rectangle is stamped with the bunny using Memento ink and colored in with Stampin’ Blends. For his fur, I used #500 and #600 of the Natural Tones with Pale Papaya in his ears. His jacket is Orchid Oasis. The puddle is colored in with Balmy Blue and I added a little Light Smoky Slate just scribbled in to ground the bunny and the puddle. The raindrops are stamped in Balmy Blue ink. I covered the scalloped edges with a piece of scrap paper so I wouldn’t get raindrops on those edges and I just tried not to get raindrops on the bunny. For a little embellishment, I cut out some flowers from the designer paper and adhered them near the bunny.

When you adhere the front panel onto the Z-fold card, be sure you only put glue on half of the panel so it only adheres to that folded panel, not the inside of the card!

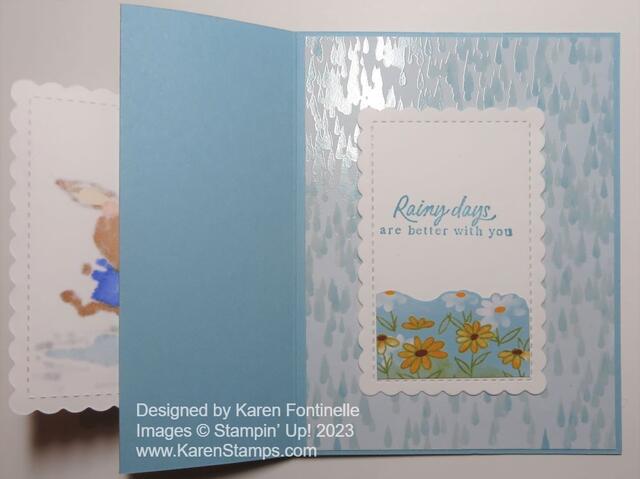
With a Z-Fold card you have to be careful about what you put on the inside. You would like it to not show from the front. So if you write a message all the way across the inside, it will show from the front of the card. I cut another scalloped rectangle die that was the same size as the one on the front (or you could do something smaller) and I stamped the greeting on that plus added some designer paper flowers to the bottom. To adhere it to the inside, I lined it up with the front of the greeting against the back of the front rectangle which is already adhered to the front of the card. Keep that in place while you apply adhesive (I like the Liquid Glue so you have that “wiggle room” in case you need to move it a tiny bit to get it placed perfectly.) and then fold over the back of the card to adhere to the greeting which will then be on the inside of the card and placed perfectly behind the front panel so that you don’t see what is in the inside until you open the card.

Playing in the Rain Z-Fold Card Inside

Writing this out is a lot more complicated than actually making the card! If you don’t put a panel on the inside of the card but you just stamp a greeting, just lightly mark with a pencil where the front panel hits the inside, and then you will know the area where you can safely stamp or write your greeting or message.

Here is another good example of what a z-fold card that I made looks like.

Try your hand at a Z-fold card like my Playing in the Rain Z-Fold Card and it will look extra special for your recipient. With different designer paper and a bunny on the front, this would make a really cute Easter card!

SHOP STAMPIN’ UP! ONLINE HERE!