It’s so funny that the Tea Boutique Suite of products did not appeal to me when the newest Stampin’ Up! Annual Catalog came out. Once I saw some samples made with the stamp set and designer paper, I couldn’t resist! I love a lot of the patterns in the Tea Boutique 6″ x 6″ Designer Series Paper and they go with all the new In Colors so it is a lot of fun to make cards with this Suite. I actually forgot this designer series paper was the 6″ x 6″ size! I kept looking and looking through my 12″ x 12″ designer paper trying to find it until I remembered it was in a different spot with the other 6″ x 6″ paper!
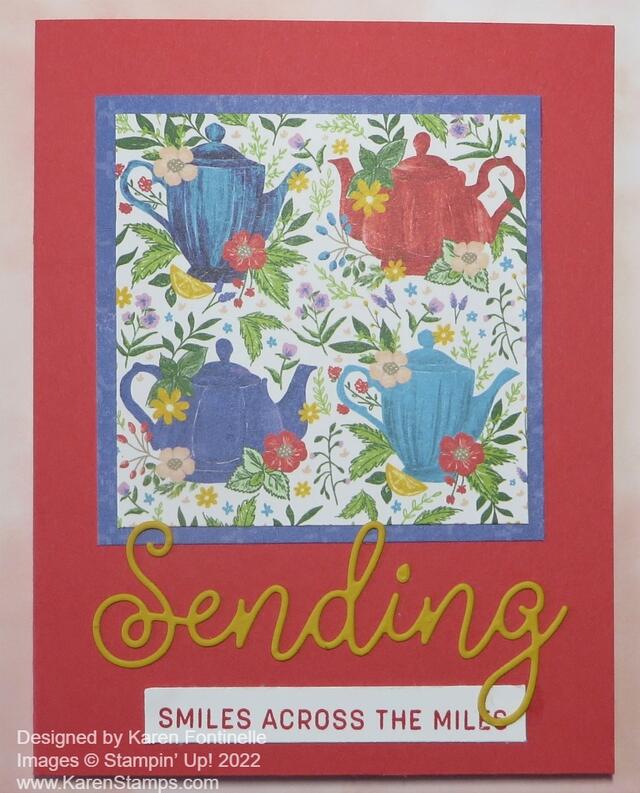
This is really a simple card. The card base is Sweet Sorbet, but I could have used any other new In Colors. I cut a 3″ x 3″ piece of the Tea Boutique DSP and layered it on another piece of the designer paper. This pattern worked out well because of the four teapots that display so well. It fits perfectly on this card.
For the greeting, I used the Sending Dies to cut out the word “Sending” from Crushed Curry Cardstock. Then I stamped one of the many sentiments in the Sending Smiles Stamp Set in Sweet Sorbet ink on a thin strip of Basic White Cardstock. I could have planned a little better to not cover up part of the sentiment with the tail of the die-cut word! Or I could have chosen a different, shorter sentiment.
And when will I ever remember to use Adhesive Sheets before die-cutting something very thin and delicate like the word “Sending”! These are sheets that you adhere the piece of cardstock to that you are going to cut out. Then, after you cut out the cardstock, you simply peel off the backing and you don’t have to apply any bit of glue or adhesive. It’s as if you made your own sticker with the Adhesive Sheets. Put them on your next order and then try them out! But if you forget to use them, use teeny tiny dots of Multipurpose Liquid Glue on the back of tiny, thin pieces and that will work if you are careful and have a steady hand!
On the inside of the card, I added a layer of Basic White cardstock for additional stamping or a written personal message. On one of my scraps of the same designer paper, I cut out one of the teapots and adhered that in the lower right corner on the Basic White cardstock for an extra little touch inside the card.
The Tea Boutique Suite contains the Cup of Tea Stamp Set and the Teacup Dies, which you can buy together in the Cup of Tea Bundle and save 10% if you do not want the entire Suite. Also in the Suite is the Tea Boutique 6″ x 6″ Designer Series Paper which I have told you has lots of really cute patterns in it, especially if you are a tea lover! Even the generic designs that don’t have tea cups or teapots are cute and very usable. You might miss the Tea Boutique Cards & Envelopes in the Suite which are super cute and give you a head start with a card base that you can decorate with stamps, dies, and paper. The envelopes are also printed with flowers and In Colors. You will enjoy decorating these cards and then sending them off in the printed colorful envelopes!
If you are a tea lover, a teacup collector, or a teapot collector like my sister-in-law (and me to a certain extent!) you will enjoy any and all parts of this Tea Boutique Suite!
SHOP STAMPIN’ UP! ONLINE! Earn FREE Sale-A-Bration Products!


