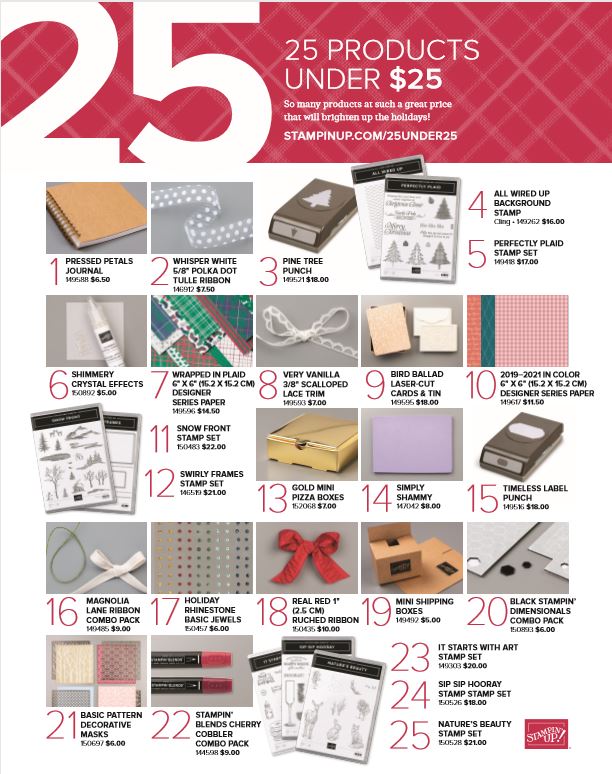
We may want almost everything in the Stampin’ Up! Holiday Catalog but most of us cannot afford to buy everything, not even Demonstrators! But here is a flyer with 25 Holiday Catalog products that are priced under $25. This may help you out if you are trying to watch your budget.
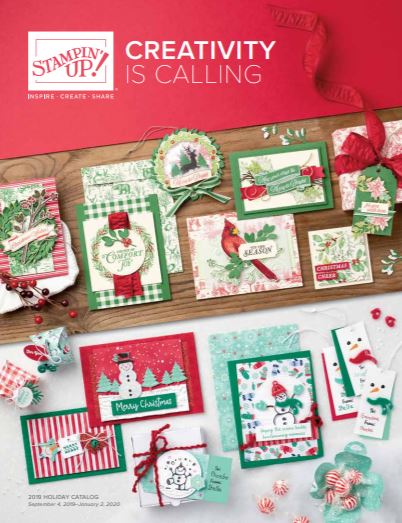
I know we probably say this every year, that THIS Holiday Catalog is the best we’ve ever had, but maybe it is because this year and every year it is TRUE! It is all subjective, of course, but I think it is because almost everyone just loves the holidays beginning in the fall and going through New Year’s. We are always excited to get the new Holiday Catalog when it comes out and ready to start all our craft projects and cards as soon as possible!
If you are interested in making holiday cards and projects with Stampin’ Up! products and are looking for a Demonstrator to assist you, I would be happy to send you a catalog or answer any questions you may have. Just send me your contact information and I can mail a complimentary Holiday Catalog to you. Also, remember you can look at the Holiday Catalog AND Annual Stampin’ Up! Catalog online HERE.
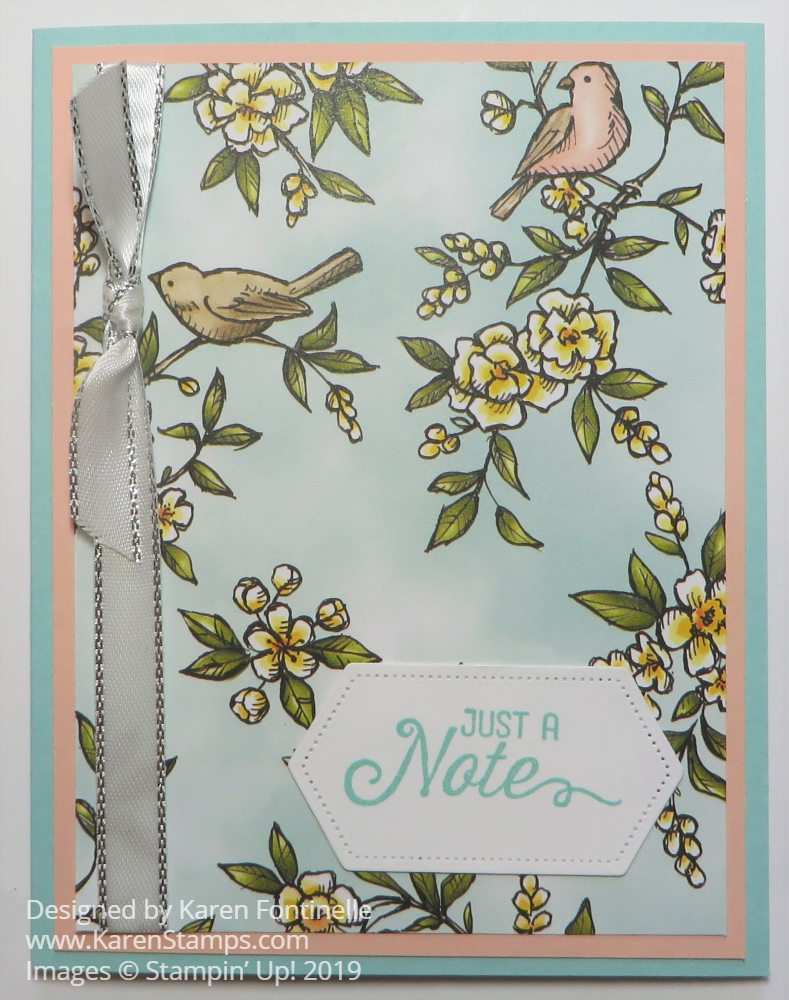
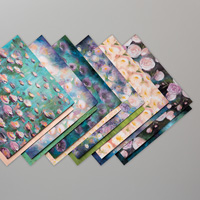
Yesterday I was making a few cards much like this one for various occasions and I realized I had not photographed any of them, but I DID mail them! So I just made one more, this Bird Ballad Just A Note Card slightly different from the others and took a photo for my blog post!
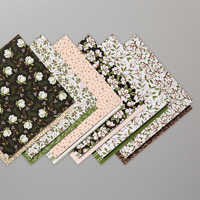
You just can’t get away from the beauty of this Bird Ballad Designer Series Paper! I think it’s the watercolored look of the paper that catches my eye. In fact, it was designed with watercoloring so that we could use our Stampin’ Blends alcohol markers to duplicate the look with our stamping with the Free As A Bird Stamp Set. I think several of these designs are the prettiest we have ever had.
This card is so easy to make, even for beginners. The card base is Pool Party Cardstock with a layer of Petal Pink Cardstock. Then the designer paper is layered on as the top layer but first, the Silver 3/8″ Metallic-Edge Ribbon was adhered on the back of the designer paper. Then I just tied a knot onto the ribbon, but you could tie a bow and adhere it with some Mini Glue Dots.
The greeting is stamped with Pool Party Ink on Whisper White Cardstock, then die cut with the Stitched Nested Label Dies. You can purchase these fun label dies along with the Free As a Bird Stamp Set in the Free As a Bird Bundle and save 10%. The greeting is from the Flourishing Phrases Stamp Set (one of my favorites!).
This pretty Bird Ballad Designer Series Paper is one of the select papers on the Buy 3, Get 1 Free Designer Paper Sale by Stampin’ Up! There are only 10 days left to take advantage of the sale! When you order, put in the 3 designer papers that you want, and when you add the 4th paper, you will see that it is FREE! This offer ends September 30.
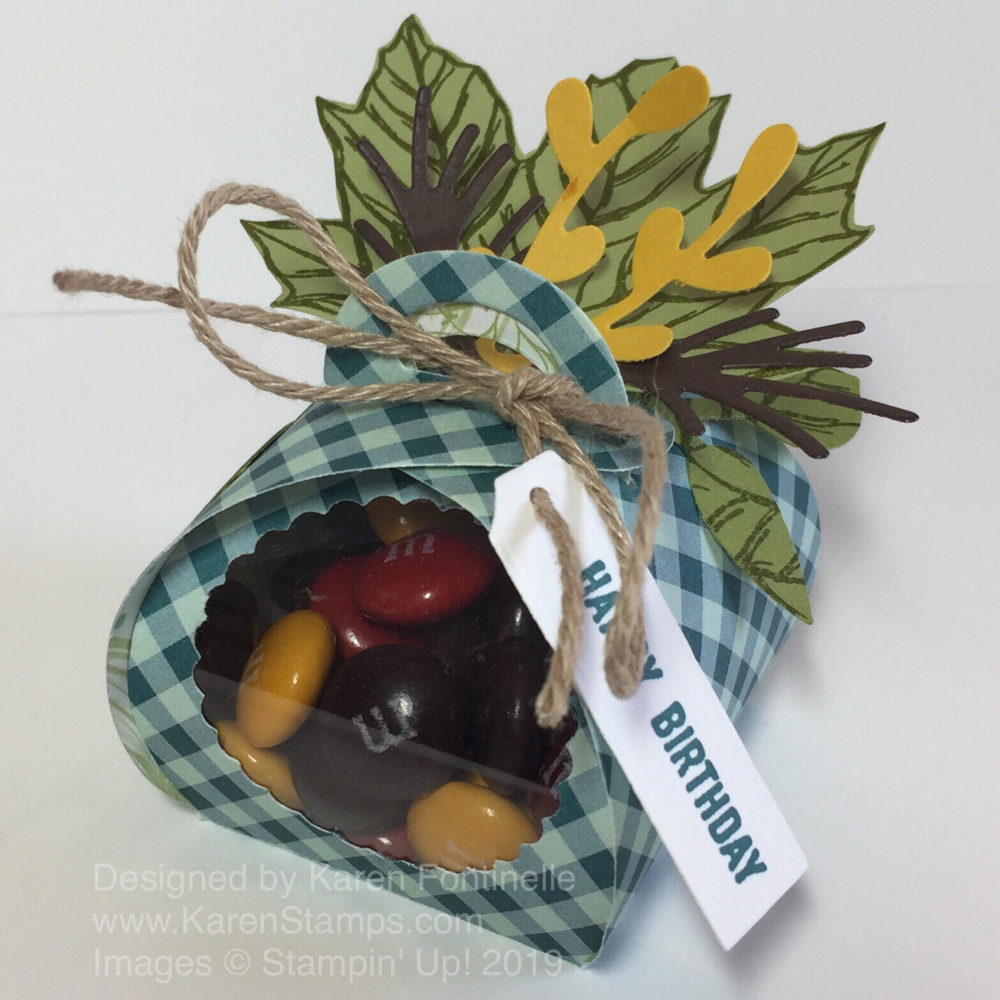
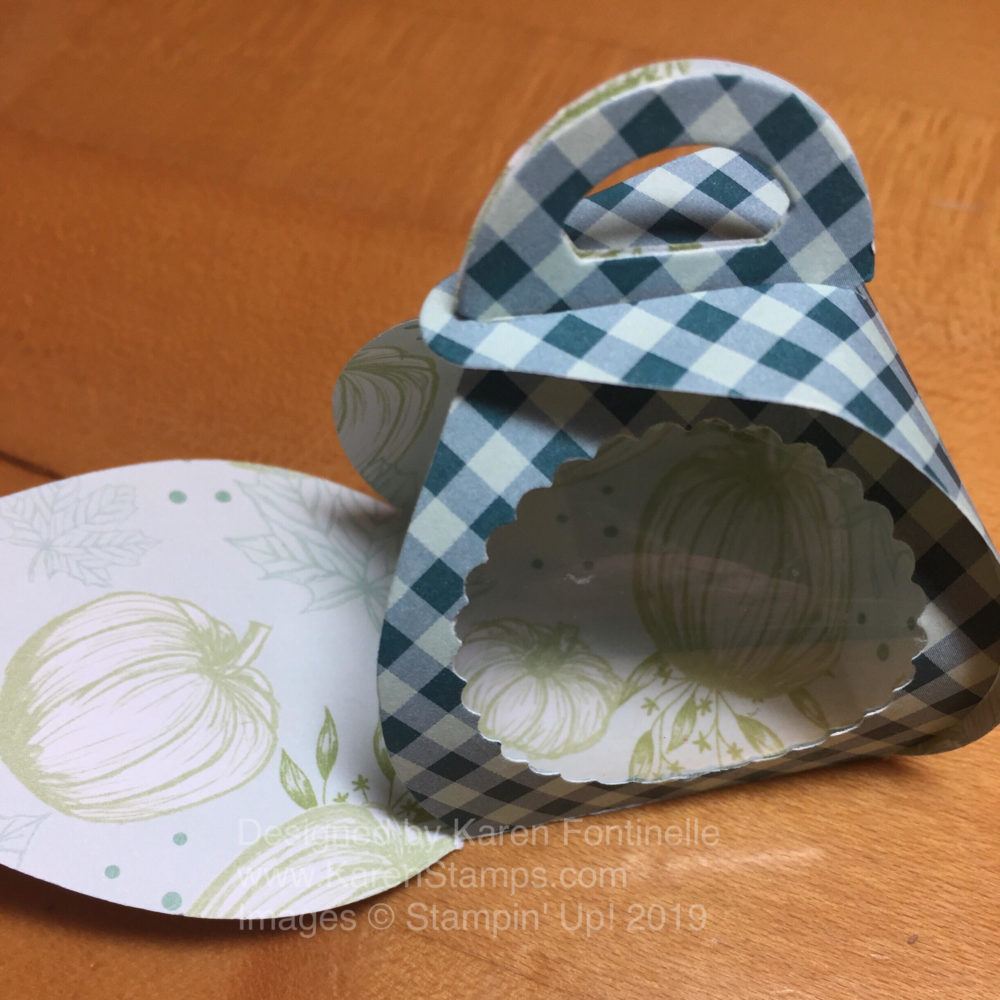
Yesterday was my husband’s birthday so instead of a card, I decided to make this Mini Curvy Keepsake Box For A Fall Birthday. I was looking online for ideas, thinking of something birthday-ish or fall-ish and I saw this idea of making a window in the box so you can see the candy or treat inside! I thought that looked pretty cute so that is the main idea I went with!
Instead of cardstock, I used a piece of the Come To Gather Designer Series Paper. I wanted something that would look good on the outside as well as the inside. The inside doesn’t really matter, but if you are making a fall box, you probably don’t want to use a Christmas paper with a generic pattern for the outside and some Christmasy pattern on the inside of your fall box! Depending on the pattern, pay attention to the direction of your paper. Think about which way the design will go on the outside of the box and maybe even the inside of the box.
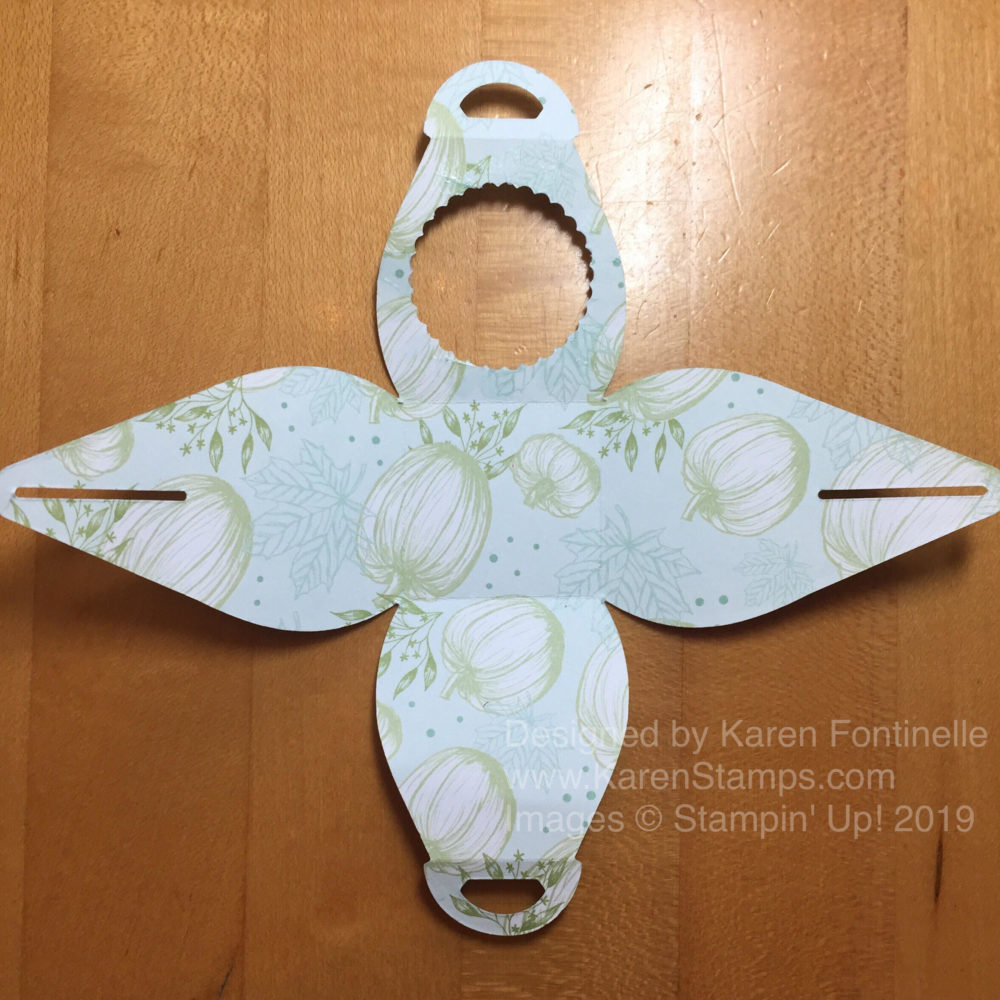
What you need for this Mini Curvy Keepsakes Box Die is a piece of 6″ x 6″ paper. Then lay the die down with the points diagonally on the paper. If you put any point straight up on the paper, it will not fit.
After die-cutting the box piece and creasing the score lines and folding, I decided on which panel I was going to put the little window. Ultimately I decided on the 1 3/8″ Scallop Circle Punch for the punched hole. Since the area was so small and narrow, I actually die cut a piece of window sheet for one panel and then trimmed that down by hand to fit the area. I just used Snail Adhesive in tiny bits around the hole to hold the window sheet in place.
I just recently made my first box with my daughter on vacation and I couldn’t figure out how to hook the top together! Luckily a video provided the answer! As you are trying to fit the side pieces with the long slits over the “handles”, PRESS DOWN! That lowers the handles, provides the curve to the box and allows the slit pieces to fit over the handles and hold everything in place! Very easy but I didn’t know to do that until I watched a video!
In order to put the candy in the box, I assembled the box except for one side. Then I could put the candy in and fill it up.
Then all was left was to decorate the box! I stamped some leaves with the Gather Together Stamp Set, die-cut some brown stems with a little die in the Mini Curvy Keepsake Box Dies, and punched some stems with the Sprig Punch out of Crushed Curry for some color. I also punched some Old Olive leaves with the Leaf Punch. Then I over-stamped those leaves with the large leaf stamp in the Gather Together Stamp Set.
My birthday greeting is stamped with Pretty Peacock Ink and a stamp from the Itty Bitty Greetings Stamp Set. Then I just die cut the greeting with a die from theOrnate Frames Dies and tied the box handles together with a piece ofCrumb Cake Nature’s Twine. I just poked the twine through the hole on my greeting tag and pulled the tag up to the box.
I didn’t initially order these dies to make these Mini Curvy Keepsake Boxes but I’m glad I did as there is a LOT you can do with them! Check them out in the Stampin’ Up! Holiday Catalog!
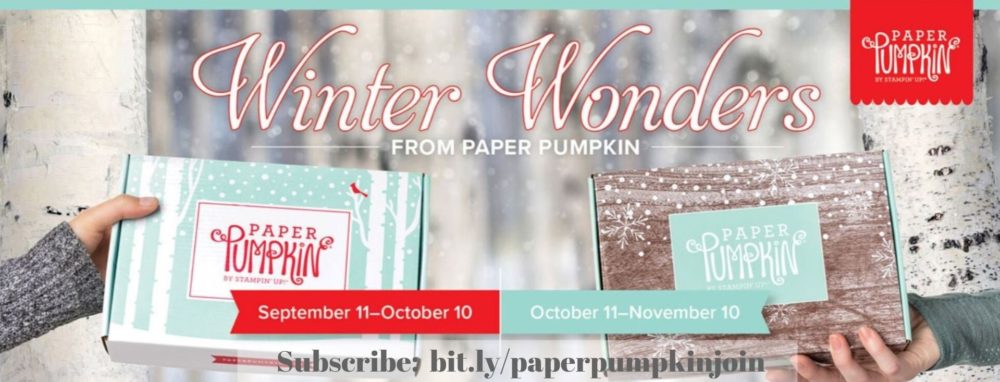
If you enjoy holiday craft projects, especially ones that come in a special edition box in perfect packaging, delivered straight to your mailbox for you to open up and begin crafting immediately, then you probably will love to get these October and November Paper Pumpkin Winter Wonders 2019 Holiday Kits.
The October and November Paper Pumpkin Kits are coordinating, back-to-back kits to help you with your holiday giving. Everyone loves the holiday kits and they are useful as well as fun!
October Kit
Kit details: Makes 10 cards and envelopes Card size: 4 1/4″ x 5-1/2″ (10.8 x 14 cm) Envelope size: 4-1/2″ x 5-3/4″ (11.4 x 14.6 cm) Coordinating colors: Early Espresso, Pool Party, Poppy Parade, and Shaded Spruce
November Kit
Kit details: Makes 24 holiday-themed gift tags of 4 various sizes and designs. Coordinating colors: Early Espresso, Pool Party, Poppy Parade, and Shaded Spruce
The October and November kits coordinate; however, each kit is all-inclusive and can stand alone.
How great would that be to know you will have a pre-planned kit to make 10 Christmas cards to send, even if you are a regular cardmaker and have some other card designs you want to make for Christmas. I like to make many different designs of cards that I send out for Christmas!
This also means that by the end of October, you surely will have at least ten cards made for the holidays so that is ten less that you will have to rush to make at the last minute!
Then in November, you will get the second kit with designs and supplies to make tags for gifts. If you don’t need tags, use them to make more cards if you like! But usually, we always need more tags! I know I have run out to the store at the last minute in past years for MORE tags for presents!
To get one or both of these kits (with no obligation to continue your subscription, but you probably will want to!), just sign up HERE at my Paper Pumpkin website! Just remember the deadline is October 10th to get the October kit, and if you don’t subscribe then, the deadline for the November kit will be November 10th. Save yourself the effort of remembering and just subscribe NOW!
Another option is to purchase a subscription on your Stampin’ Up! order in the Online Store! This may help you reach $150 or more on your order and thus get Stampin’ Rewards! You will get an email from Stampin’ Up! telling you how to set up your Paper Pumpkin account and a code to use to register your prepaid kits. It’s easy. Decide which method works best for you. Even if you have a subscription to Paper Pumpkin, you can add a subscription to your Stampin’ Up! order, use those prepaid kits in your account, and then it will revert back to your monthly subscription. Choose whichever option is better for you!
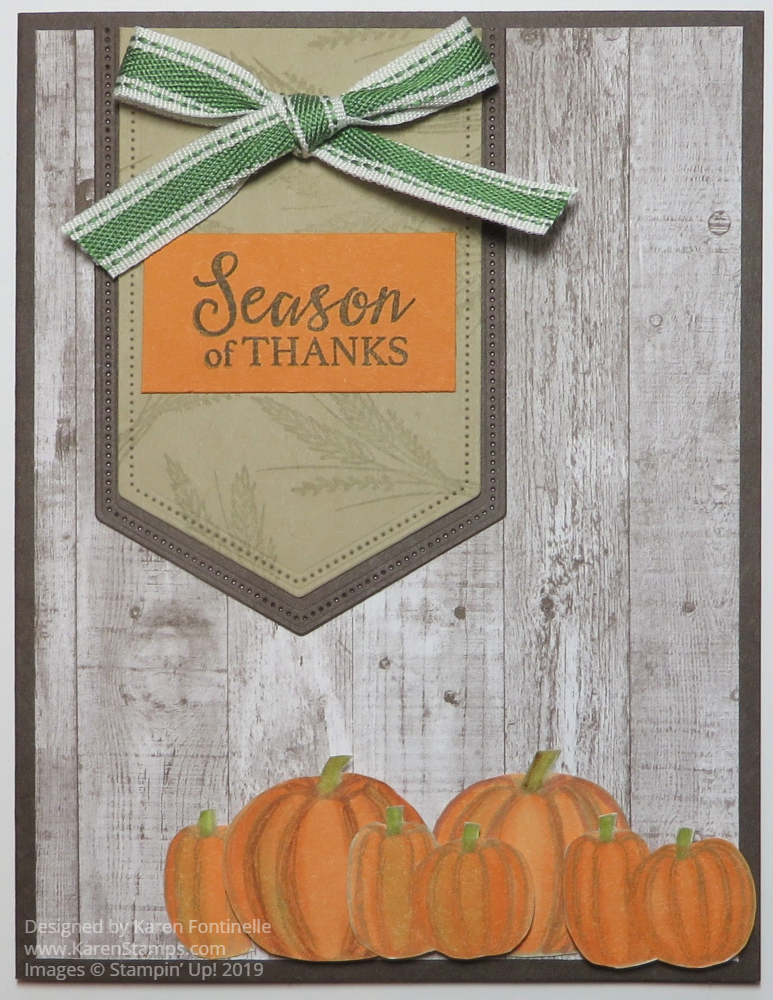
Sometimes I just get out some paper and stamps and have no idea where the stamping will lead and what will turn out, but today this Gather Together Pumpkin Card is what came out of some stamping, coloring, and paper cutting!
Who doesn’t love pumpkins, especially as fall is approaching?! Nothing says fall, and eventually Halloween, like pumpkins! These pumpkin stamps are in the Gather Together Stamp Set in the Holiday Catalog. I decided to stamp the pumpkins with Sahara Sand Ink so there wouldn’t be the bold, black lines of Memento Ink that I would normally use. I did go ahead and used Stampin’ Blends to color in the pumpkins and it seemed to work okay. I started with the Pumpkin Pie Light and Dark colors but added a bit of Light Cajun Craze for some contrast. The stems I first colored with a bit of Soft Suede Blends, but I also tried to add just a bit of Old Olive green and a bit of the Light on the pumpkins. Some pumpkins are popped up with Stampin’ Dimensionals.®
There is a set of dies that go with this stamp set, Gathered Leaves Dies. I haven’t purchased these yet, but they would be great for making the embossed leaves. I wish I would have ordered them! Since I don’t have the dies, I just hand cut the pumpkins with my Paper Snips. You can, however, save 10% if you purchase the Gather Together Stamp Set and the Gathered Leaves Dies in a Bundle, the Gather Together Bundle.
The card base is Early Espresso Card Stock with a layer of the wood grain pattern in the Come To Gather Designer Series Paper. For the banner with the greeting, I die cut a piece of Sahara Sand Cardstock with the Stitched Nested Labels Dies and just cut off the top to line up with the top of the card. The Sahara Sand is layered on a die-cut of Early Espresso. The greeting is just cut to fit on the banner. By the way, the banner was first stamped with the wheat-looking stamp for a little something in the background.
Once I got the banner made with the greeting and then added the Garden Green 3/8″ Double-Stitched Ribbon tied in a bow, that’s when I was satisfied with what I was creating! Sometimes it just takes playing around and then having that “moment” when you know you have something you like. You will find this pretty ribbon in the Toile Tidings Suite, but there is no reason why you can’t use it for fall and Halloween.
There is so much to like about the Come To Gather Suite. You can make cards for fall, Thanksgiving, and even maybe Halloween! Such pretty colors in the designer paper and even some wooden elements, the Tags & Feathers Elements, that you can use for stamping or embellishing. Think of many creative projects you can use with these products as well, some pretty home decor and other things. Fall is such a great time of year! I will be glad when it feels like fall in Houston, Texas!
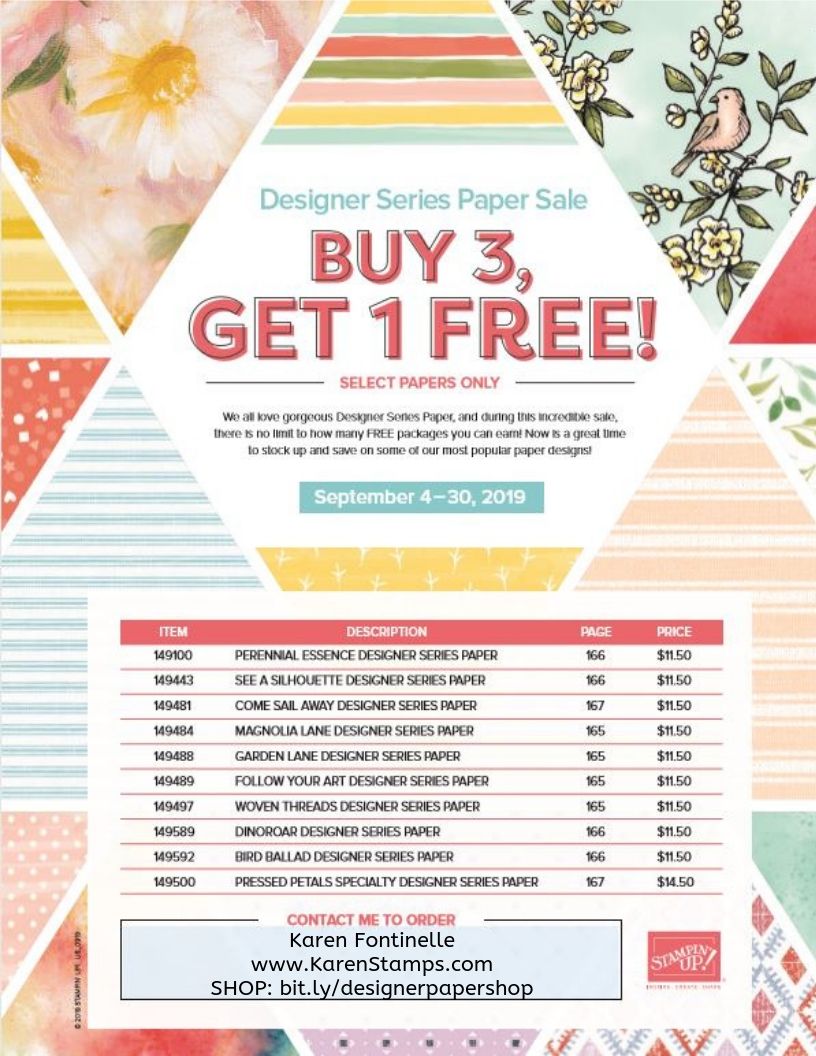
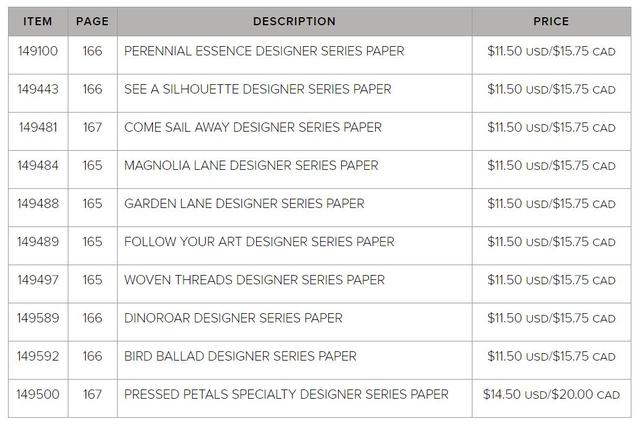
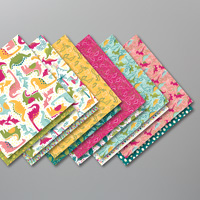
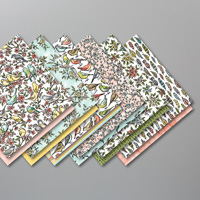
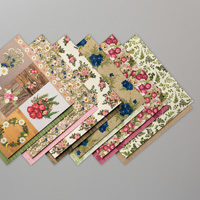
We all love gorgeous Designer Series Paper, so by popular demand, Stampin’ Up! has brought back the Designer Series Paper Sale! But the month is half over already, so be sure to check which designer papers you NEED for your stash!
Only these select papers are on the sale! Put in the three packages of designer paper you want, then add the 4th package you want FREE.
Only Designer Series Papers listed in the table above qualify for this promotion. You may mix and match papers from any of the listed papers.
There is no limit to how many times you can buy three packages of Designer Series Paper, and get one free (the 4th) during this sale.
In the online store, if a customer orders four packages of the same qualifying Designer Series Paper, they will need to enter three together and then order the fourth free item separately.
Designer Series Paper ordered as part of a Starter Kit does not qualify for this sale.
Designer Series Paper ordered with Stampin’ Rewards does not qualify for this sale.
How to order: Put three papers (all the same or different) in your order, then choose the 4th package from the selection for your FREE one. You can even make the most expensive one the free one! My favorites are Magnolia Lane and Bird Ballad! Be sure to get those…or MORE of those!
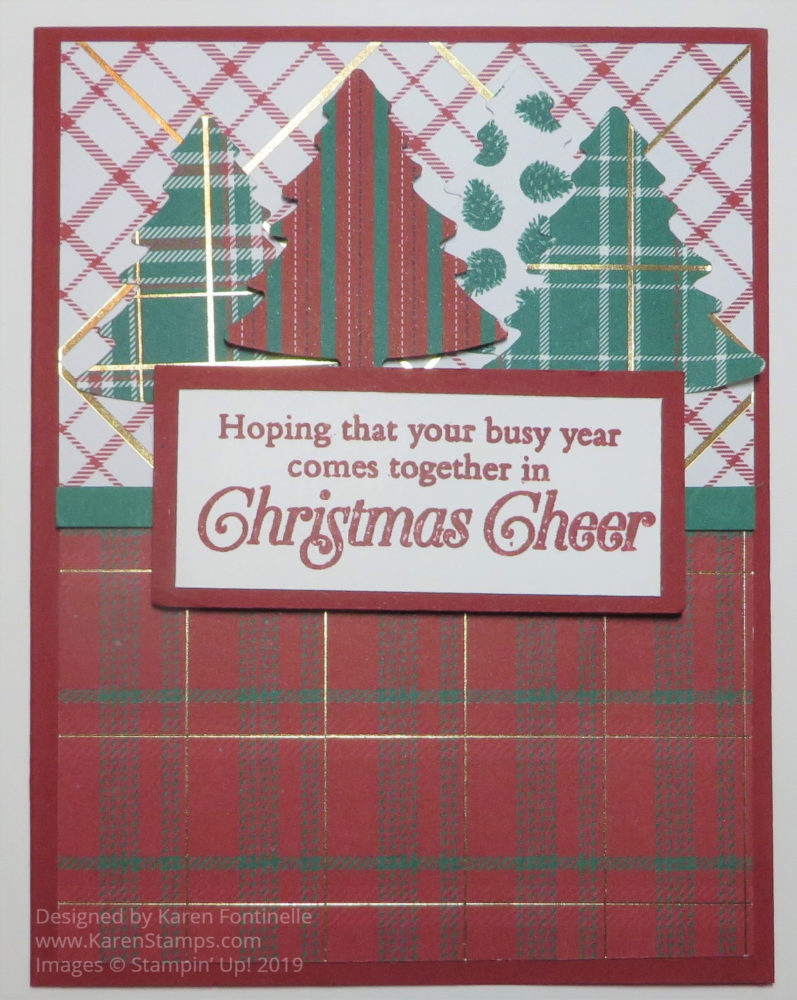
Here is an easy Christmas card I made during a short stamping session with my daughter while visiting her in California, the Wrapped In Plaid Christmas Trees Card. I brought some projects along in the hopes that a couple of her friends could join us, but it ended up being just us! Of course, when you are on vacation, there is never enough time so we didn’t get to make everything we wanted to.
While she was working on another card using this plaid paper and the tree punch, I somewhat copied this card from a sample in the Holiday Catalog on page 12. The card base is Cherry Cobbler. The greeting is stamped from the Perfectly Plaid Stamp Set in Cherry Cobbler Ink and then layered on a piece of Cherry Cobbler Cardstock.
For the background of the card, I chose two designs from the Perfectly Plaid 6″ x 6″ Specialty Designer Series Paper. They overlap just a bit and I put a thin strip of Shaded Spruce Cardstock across the line where the two papers overlap.
The four Christmas trees are punched out easily with the Pine Tree Punch, new in the Holiday Catalog. I just chose patterns from the designer paper that I thought would stand out from the background. I could have also added a few embellishments, like the Holiday Rhinestone Basic Jewels on page 58.
If you use this dark cardstock for your card base, you probably want to put a piece of Whisper White Cardstock inside the card, perhaps stamping first, or writing a personal note later. Stamp a greeting or stamp just a small image somewhere on the inside of the card.
Really, with the Pine Tree Punch and the Perfectly Plaid Paper, this is a pretty easy card to make. You could change it up by only putting the designer paper on the bottom half of the card, allowing the punched trees to stand out more against a solid color background. Just play with the elements and see what you come up with! Use a ribbon around the seam between the two patterns of plaid paper.
Have fun thinking up creative ideas using the new products in the Holiday Catalog!
Stampin’ Up! has been busy updating our Demonstrator websites, where you do your ordering, and making them more secure, for one thing.
But in some cases, you may have received some kind of security alert instead of going to the website. To ensure you have the best experience, the next time you visit my site, please make sure not to include “www.” at the front of the URL. Or you can simply click the following link and save it as a favorite so you don’t have to think about it: karenfontinelle.stampinup.net
If you forget and do include “www.” at the front, it’s possible you will see an error telling you the site may not be secure. That’s not true; in fact, it’s more secure than it was before the update! That “www.” is the problem.
Hope you check it out soon! (Just don’t type “www.”)
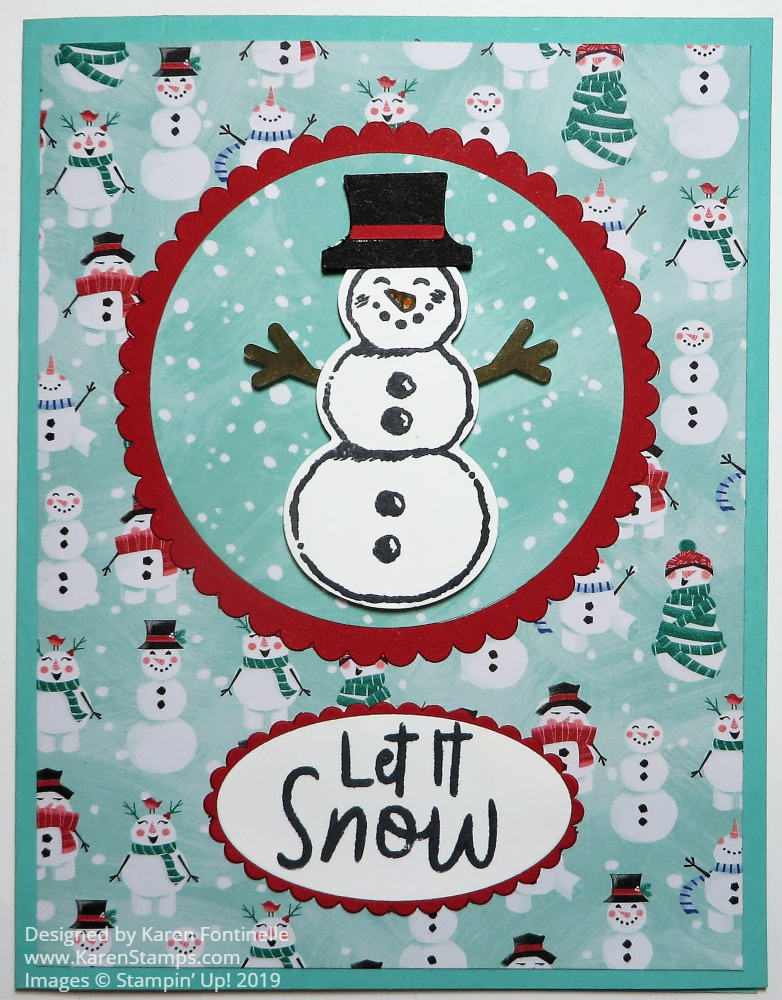
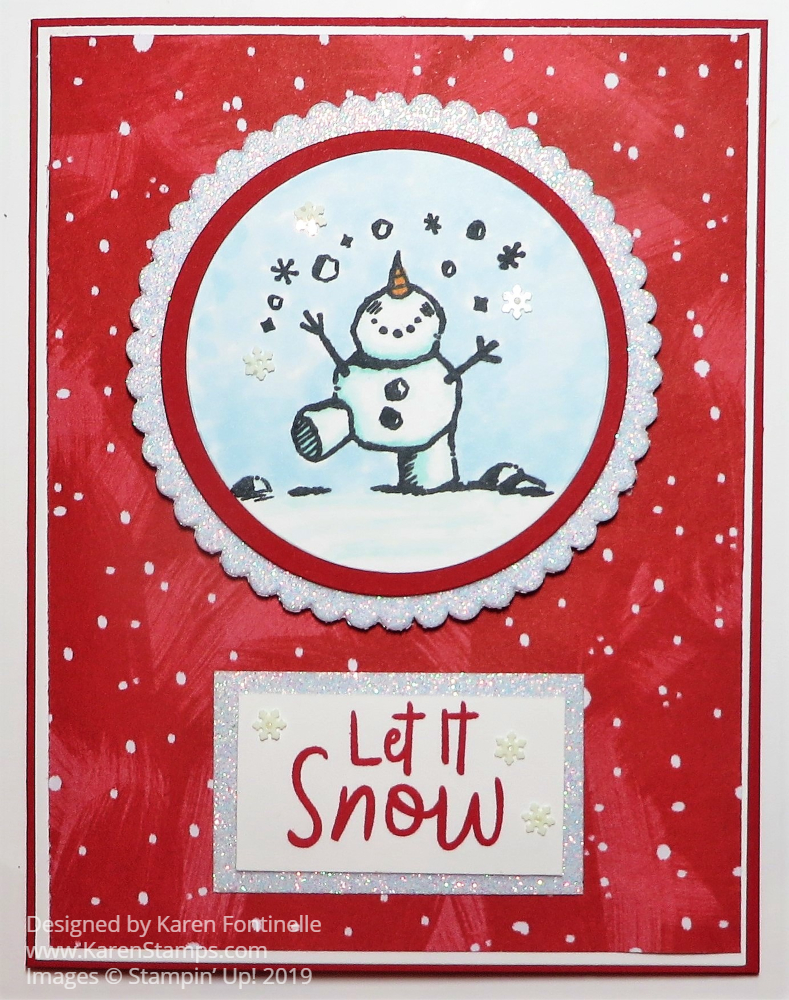
This Let It Snow Die-Cut Snowman Christmas Card will be a fun card to send at Christmas time! It uses fun designer paper plus a cute snowman stamp set. There are so many possibilities with the Let It Snow Suite for making cards and projects for winter and Christmas! You will find it all, of course, in the Stampin’ Up! Holiday Catalog!
This card starts with a Coastal Cabana card base. The designer paper is the Let It Snow Specialty Designer Series Paper. This package of paper has glittery snowmen on some of the patterns. The paper used on this card doesn’t have the glitter, but it is a design of an assortment of mini snowmen! It makes a great background for a snowman card without taking away attention from the main snowman.
The main snowman is stamped with the Snowman Season Stamp Set and then punched with the Snowman Builder Punch. With this punch, you can make the snowman body, the arms, the hat, and the carrot nose! You can even purchase the Snowman Season Stamp Set and the Snowman Builder Punch together in the Snowman Season Bundle and save 10%! After building this snowman with the punch, I popped him up with Stampin’ Dimensionals. He is then layered on a flip side of designer paper and layered on a large scalloped circle die cut.
The greeting is stamped from the Snowman Season Stamp Set and layered on a scalloped oval die cut. You can see another card HERE that also uses the punched snowman.
That’s all there is to this card! Stamp a holiday greeting inside or write a personal note and the card is ready to go!
Also, don’t forget about the Designer Series Paper Sale going on now at Stampin’ Up!. Select papers – Buy 3, Get the 4th package FREE!
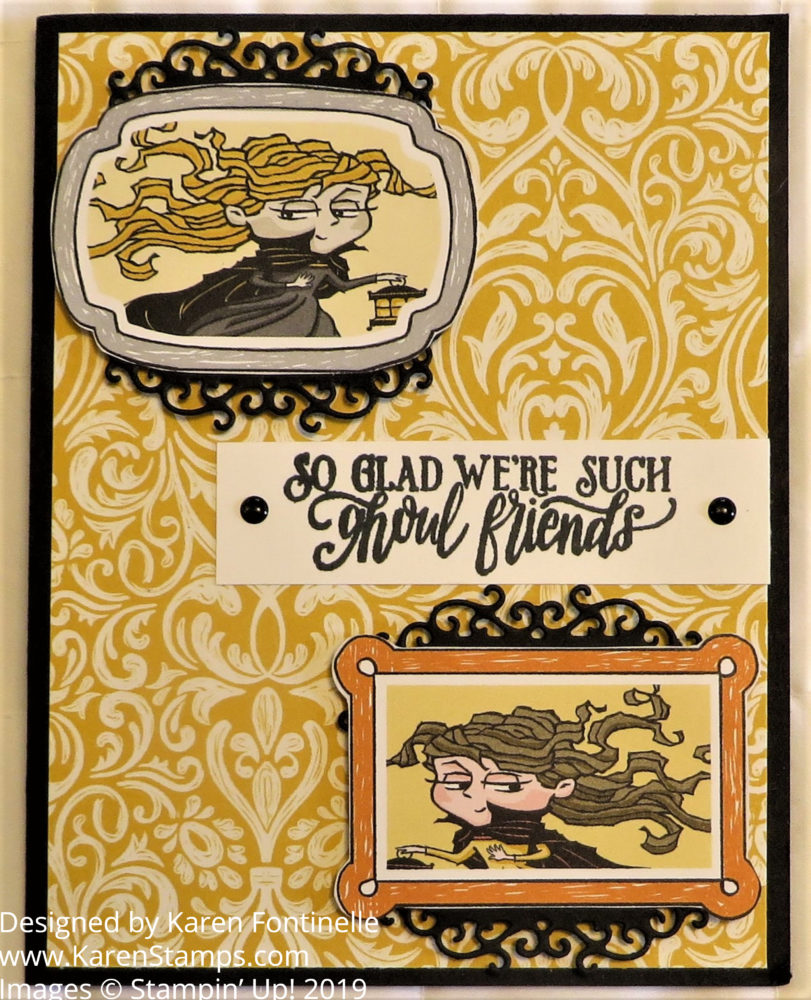
It’s the Monster Bash Spooktacular Bash Halloween Card for ghouls and goblins! Halloween is so much fun for making cards, treats, and other projects! I especially love the fun, whimsical Halloween things and this card has them! What a cute sentiment to send someone with these two ghouls on this card!
This card starts with a card base of Basic Black Cardstock with a layer of a generic design on the backside of a Halloween paper for the card layer. This paper is the Monster Bash Designer Series Paper which is full of fun Halloween characters and themes. You can cut out many of the images and use them on your projects rather than just using the full paper. For this card, I chose two of the “ghouls” and then layered them on the Ornate Frames Dies.
Although these Ornate Frames Dies are in the Holiday Catalog, in the Halloween suite, these are great frames to use on many types of cards, not just Halloween! I hope Stampin’ Up! will keep them around past the Holiday Catalog! You can layer them under many things.
The sentiment is stamped with the Spooktacular Bash Stamp Set. Talk about a cute Halloween stamp set with these fun monsters and cute greetings to use on your Halloween cards and projects! You can actually purchase the Spooktacular Bash Stamp Set and the Ornate Frames Dies in a Bundle together and save 10%!
And for a little extra pizzazz, get the Monster Bash Enamel Shapesand use them on your projects! These are adhesive-backed enamel tombstones, skulls, crows, and dots. On this card, I used two of the dots on the greeting piece. Just imagine the fun things you can do with the other shapes!
Here is how I usedthe designer paper for just a decorative strip on the side of a different card and then the Ornate Frames and monster from the DSP. If you like Halloween, you will have all kinds of fun with this Monster Bash Suite in the Stampin’ Up! Holiday Catalog!
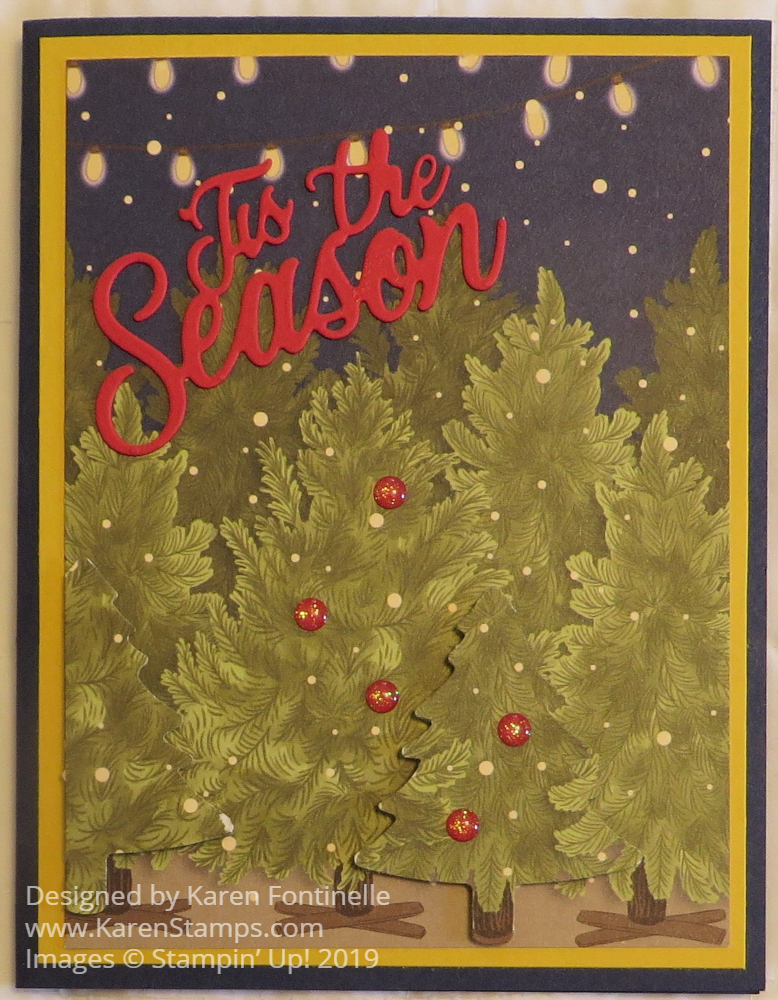
I named this card Night Before Christmas At the Christmas Tree Lot because that is what it looks like to me! Well, I guess it’s not just what it looks like to me, I think that’s what it is! I first thought it looked like all the trees were die-cut, so that’s how I got the idea for this card, but then I realized it’s just how good the paper is designed that they look that way! However, I did sacrifice some other paper to punch out a couple of trees to give it a 3D effect!
This card is made with the Night Before Christmas 6″ x 6″ Designer Series Paper. I just fell in love with this whole package of paper when I first saw it in the Holiday Catalog for its vintage look! The card base is Night of Navy, one of the coordinating colors with a layer of Crushed Curry. I thought it brought out the strings of lights over the Christmas trees. For the 3D trees, I was going to cut some out by hand but I decided to use the Pine Tree Punch, just to punch out some greenery from the larger trees in the paper. I popped those up on Stampin’ Dimensionals®.
I couldn’t find a good place for a stamped greeting, so I thought of using the die cut one from the Jolly Season Dies, part of the Holly Jolly Christmas Bundle. I used Real Red Cardstock and just adhered it with tiny drops of Multipurpose Liquid Glue. Of course, I had to have a little more bling, so I adhered some Toile Tidings Glitter Enamel Dots to the fronts of two of the trees like little red ornaments!
If you like this paper, you will also probably like the card I made in THIS POST using a different pattern of paper and the Santa in the Holly Jolly Christmas Stamp Set. All of these holiday products you will find in the Night Before Christmas Suite in the Holiday Catalog!
Grab some popcorn and a soda or some chocolate and enjoy!
Honestly, it will take you a while to really absorb all the products in the Holiday Catalog! Everyone seems to miss seeing something…..EVEN Shelli Gardner in a video hadn’t noticed the Coffin Treat Boxes! (If you like Halloween you should get those, even if you like more whimsical Halloween themes, but these are cute and easy to put together. Then you can decorate however you like!)
You will find this darling snowman stamp set and really fun designer paper in the Holiday Catalog plus the teeny tiny snowflakes in theSnowflake Sequins package. They are really for theSnow Globe Shaker Domes, but I couldn’t resist using a few with my Happy Snowman Christmas Card! I used the teeny tiniest dot of Multipurpose Liquid Glue and used the Take Your Pick Tool to place the sequins. They are really tiny!
The card base is Real Red (which I am super happy to be using with these cards and the Let It Snow Paper) and has a layer of this red pattern of Let It Snow Designer Series Paper. I hate to tell you that on the other side are glimmery snowmen that I hated to cut through and put glue on!!! Oh my!! But it had to be done if I wanted to use this red paper with white snowflakes. Of course, you could use this pattern at any time because the white dots don’t have to be snowflakes! Just to help this red stand out, I put a layer of Whisper White underneath it. Now if you don’t tell anybody, you can die cut the circle that the snowman is stamped on out of the Whisper White before you assemble the card. No one will ever see it or know!
After I die cut that circle out of the Whisper White layer, I stamped a snowman from the Snowman Season Stamp Set on it in Memento Ink. Then I could add just a tiny bit of icy shadows on the snowman and snow with my Stampin’ Blends and lightly color in the winter sky. This circle is layered on a Real Red larger circle, die-cut with the Layering Circle Dies and that is layered on a scalloped circle from the same set out of Sparkle Glimmer Paper.
The greeting is in the snowman set and stamped in Real Red Ink. I also layered this on a piece of the Sparkle Glimmer Paper. Just for fun, I added three tiny snowflake sequins to the greeting, too.
That’s it. Pretty easy card to make once you have the idea and the Sparkle Glimmer Paper adds a little pizzazz! The inside of the card has another one of the greetings stamped in red, plus “Merry Christmas” as well as some snowflakes stamped at the top, all on a layer of Whisper White since the red card base would be a little difficult on which to stamp a sentiment or write a note. It’s easy to decorate a layer inside your card with some stamping or a piece or strip of designer paper! And don’t forget the outside of the envelope!
Just as this snowman is excited, I’m sure you are excited to start shopping with the Holiday Catalog! You can combine your Holiday Catalog order with the Designer Series Paper Sale! And don’t forget about the Clearance Rack if you want to pick up some bargains!
Only these select papers are on the sale! Put in the three packages of designer paper you want, then add the 4th package you want FREE.
Only Designer Series Papers listed in the table above qualify for this promotion. You may mix and match papers from any of the listed papers.
There is no limit to how many times you can buy three packages of Designer Series Paper, and get one free (the 4th) during this sale.
In the online store, if a customer orders four packages of the same qualifying Designer Series Paper, they will need to enter three together and then order the fourth free item separately.
Designer Series Paper ordered as part of a Starter Kit does not qualify for this sale.
Designer Series Paper ordered with Stampin’ Rewards does not qualify for this sale.
Not to mention, the Stampin’ Up! Holiday Catalog also starts tomorrow so you can order everything together! Remember, only those papers listed are in the sale!
How to order: Put three papers (all the same or different) in your order, then choose the 4th package from the selection for your FREE one. You can even make the most expensive one the free one! My favorites are Magnolia Lane and Bird Ballad! Be sure to get those…or MORE of those!
We often say, “Stamping is therapy” and it certainly is, like with this Path of Petals Thank You Card and many other cards! Sometimes you just need to stop and sit down and stamp.
It’s been such a busy week and everywhere I went traffic, traffic, traffic! I think everybody is in town with all the schools back in session so no one is on vacation anymore. Everybody is home and going to work and on the roads! Not to mention construction everywhere which causes backups and slowdowns! I think I need to allow an hour to get anywhere I go just to keep the drive less stressful! I don’t know when it’s been quite like this in all the years I have lived here.
So what is the best thing to do to alleviate a little stress?? Stamp, of course! This card uses the Pressed Petals Specialty Designer Series Paper and stamping with the Path of Petals Stamp Set. Although I have used the Pressed Petals DSP on lots of cards, I had difficulty stamping the flowers and leaves with this stamp set so this is the first time I actually used the flowers and stems! Here is a card I made with a piece of the Pressed Petals Designer Paper. I love these dark-colored flowers so much!
The card base is Mossy Meadow, one of the coordinating colors of the Pressed Petals Designer Paper. I started with the design with the leaves and ferns (I guess!), although originally I had the top and bottom designs reversed. This is actually the same paper, the leaves on one side and the cloth-looking design on the other.
The die-cut piece going across the front of the card is from the Flourish Dies using Merry Merlot Cardstock. I like to have something, usually ribbon, where I have two different patterns of paper coming together. It just finishes off that edge nicely. But this time I thought of using some kind of border die or something and finally, I found this one. It is a little bit fancy but doesn’t overwhelm the card. The secret is that the piece is not long enough to reach all the way across the card. But since part of the die-cut was going underneath the stamped piece, I was able to cut it, leaving a space underneath the stamping making the ends reach to each side of the card, and no one will be the wiser!
Maybe you won’t have trouble stamping the flowers, but just in case, this is what I found out. I think it was easier to stamp the flower stems and leaves first. I stamped these in Pear Pizzazz Ink. Next, I stamped the flowers in Merry Merlot Ink. I think you will have to move the stamp around until you feel like the flower blossoms are fitting with the stems. Past stamps we have had had a notch on each of the stamps that were to be stamped in the same direction so you could tell how to line them up. These stamps do not, so you just have to line them up as best you can. I could not get the other leafy stamp to line up correctly, so I just stopped with what I had as you see on the card.
For a little pizzazz on the stamping, I used the Clear Wink of Stella Glitter Brush to brush on a little Merry Merlot ink from the ink pad onto each flower, trying to keep it fairly light, which also added a bit of glimmer. Then I did the same with the leaves with the Pear Pizzazz ink. As much trouble as these stamps were to line up, I really liked the stamped image after adding a little bit of color and the glimmer from the Wink of Stella brush!
The greeting is from the same stamp set. It is stamped on Very Vanilla Cardstock in Merry Merlot Ink and then punched out with the Classic Label Punch. However, I snipped off the pointy ends of the punched piece to just make it plain. I could have layered it on a piece of Merry Merlot but I liked it just adhered to the card by itself.
So there you have it! A little stress relief from the demands of the week and a simple card design that you could vary in many different ways!