Tag Archives: Stitched So Sweetly Dies

Flowering Fields Z-Fold Tulips Easter Card

Flowering Fields Z-Fold Tulips Easter Card

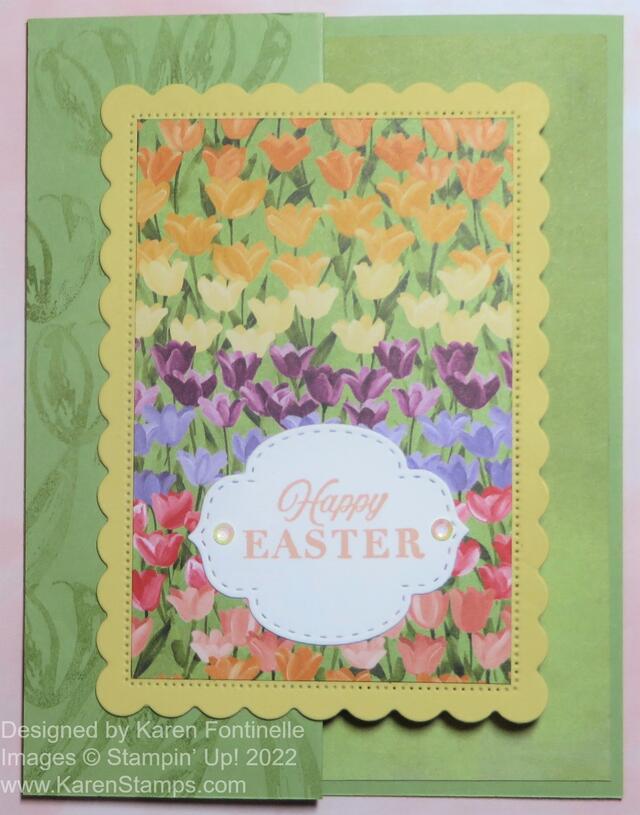
As I looked through my package of the Flowering Fields Designer Series Paper looking to see if a certain pattern was in there, I saw this print of tulips and decided I had to make an Easter card with it right away! As I scored the card in half, I decided to make it a Z-fold card and that’s how this Flowering Fields Z-Fold Tulips Easter Card came about! You never know when you start out what you will actually end up with!

This card was so easy really. I often add pieces of designer paper at least on the folded back front portion but this time I just stamped the smallest tulip in the Flowering Tulips Stamp Set. I used the same Pear Pizzazz ink as the Pear Pizzazz cardstock but I stamped off once on scrap paper because I wanted that light, watermark look down that side panel. I didn’t use the second step of stamping another tulip petal on top of the first because not much was going to show anyway and I just wanted that light look. I did stamp a few leaves to fill in some space.

I die cut a scalloped rectangle from the Scalloped Contours dies (retiring soon!) in So Saffron for the background layer to the tulip paper. For the designer paper, I just measured with a ruler inside the scalloped rectangle and cut out that size rectangle of DSP to fit inside the area. Mine was just a “smidge” under 4″ (about a 1/16th inch less) and about 2 5/8″ wide. If you want to tie a ribbon around that piece, do it before you adhere it to the scalloped rectangle of course.

The greeting is stamped on a die-cut piece from the Stitched So Sweetly Dies (also retiring soon!). I just glued it flat on the card as I am likely to mail this card. I couldn’t resist adding two Iridescent Rhinestone Basic Jewels to the sides of the greeting.

For the inside of the card, to add some interest, I adhered “the other side” of one of the designer papers without a particular pattern except for the shading of colors. This particular piece barely makes a difference in the look from the cardstock, but it’s there and makes a prettier finished look I think.

For the inside, I die-cut a Basic White scalloped rectangle, one size smaller than the card front to adhere inside the card on which to stamp another greeting or write a message and sign the card. You could use one the same size as the front but you would have to line it up perfectly so it wouldn’t stick out from underneath the front card design.

Here is another Z-Fold card I made recently for Easter using the Flowering Tulips Stamp Set instead of the designer paper.

I’ve made lots of Z-Fold cards and I always say they are so easy to make (just fold back the card front!) yet they make such a nice presentation! The recipient will think you are so clever and creative to make such a fancy card! The only difficult part is not to put glue all over the back of the front piece, just on the half that will be adhered to that Z-fold.

Be sure to check the Last-Chance Products list in the Stampin’ Up! Online Store to see what will be retired on May 2 and what is still available. Not everything is discounted, but some things are so grab what you “need”!

Reminder Today is the last day to sign up for Paper Pumpkin to get the April “Change Is Beautiful” Kit!

Easy Pansy Petals Designer Paper Card

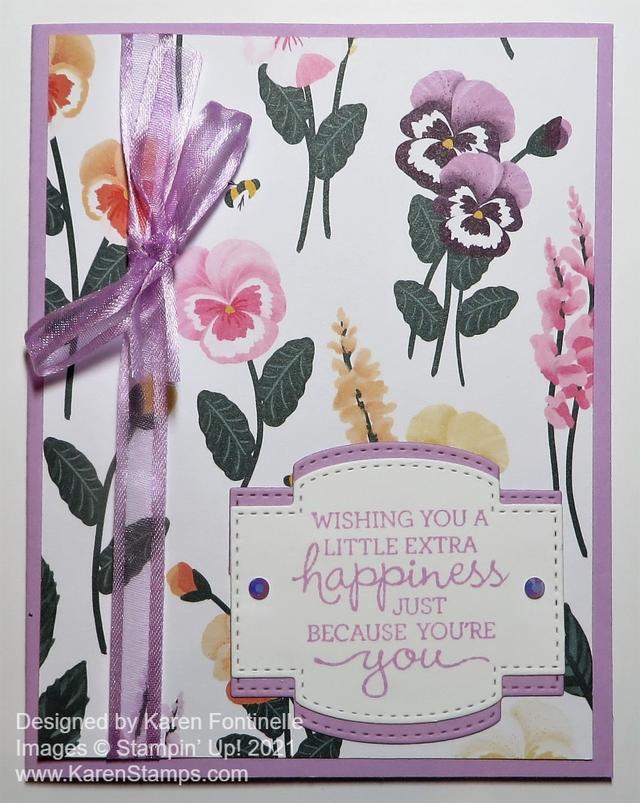
Here’s an ideas for an Easy Pansy Petals Designer Paper Card, using the beautiful new paper coming in the next Stampin’ Up! Annual Catalog! You will love all the sheets of paper in the package, florals on one side and ginghams, stripes, and other designs on the other side! You can make a simple card because the paper is so pretty.

This card starts with a card base of Fresh Freesia Cardstock, one of the new In Colors in the catalog. It is lighter in person than in this photograph. This pansy print paper is in the Pansy Petals Designer Series Paper. Some of the sheets have pansies and leaves that can be die-cut right from the paper. No stamping required!

Before adhering the designer paper to the card base, I tied some of the Fresh Freesia 3/8″ Open Weave Ribbon around the paper and then tied on a bow. I like this Open Weave Ribbon in all the new In Colors so much!! It is very pretty and elegant!

The greeting is in the Pansy Patch Stamp Set. I stamped it in Fresh Freesia Ink on Basic White Cardstock and die-cut it with one of the Stitched So Sweetly Dies. In order to make a layer for the greeting without taking up more room on the card, hiding pansies, I die cut another one of these same shapes out of Fresh Freesia and then cut it in half horizontally so that I could have it layered under the greeting but showing a tiny bit at the top and bottom.

For a little bling, I added two of the Fresh Freesia In Color Jewels. These are so pretty! You will want a package or two of these to go with the new In Colors.

Here is the first card I made with this paper, using another one of the new In Colors, Evening Evergreen plus one of the little Bumblebee Trinkets!

All in all, this is an easy card. Just add the pretty Pansy Petals Designer Series Paper to the card base, add some ribbon, and a greeting! The new catalog and these new products go live on May 4th!

SHOP STAMPIN’ UP! ONLINE HERE!

Berry Delightful Strawberry Card

Berry Delightful Strawberry Card

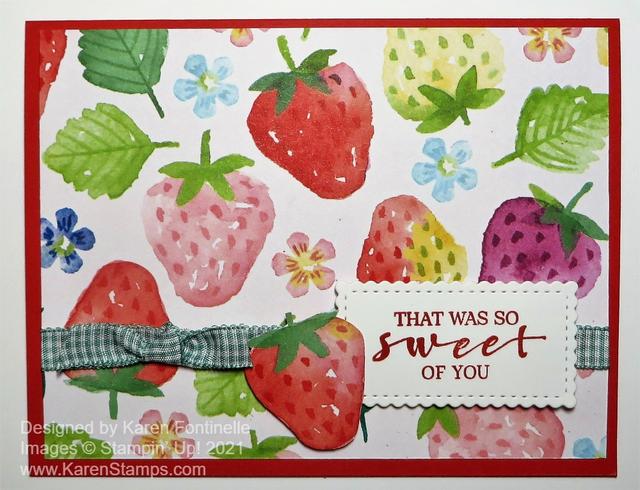
When I saw this particular strawberry paper in the package, I just fell in love and had to make this Berry Delightful Strawberry Card. It just seems to have a lovely watercolored look to it.

This is the last week to earn free products during Sale-A-Bration at Stampin’ Up! Monday, Feb. 28th is the LAST DAY! With every $50 purchase, you can earn a free product in the Sale-A-Bration Brochure. With a $100 you may choose two of the $50 choices or you may choose one of two $100 level choices, with this Berry Blessings Bundle being one of them! Earn the Berry Blessings Stamp Set and the Berry Delightful Designer Series Paper together in one Bundle!

This card is made with a Poppy Parade Cardstock base, with just a layer of the Berry Delightful Designer Series Paper. If you want something to brighten up these winter days, this paper is it! I also love the other side of this paper, as seen in this card I made for Valentine’s Day.

I used the Just Jade Gingham ribbon in the Flowers For Every Season Ribbon Combo Pack around the designer paper before adhering to the card base. The greeting is stamped in Poppy Parade ink from the Berry Blessings Stamp Set and die cut with a scalloped rectangle in the Stitched So Sweetly Dies. I popped it up with Stampin’ Dimensionals.

Since the strawberries on this paper are so pretty I cut one out with Paper Snips and popped it up on the corner of the greeting. Then I tied a little knot with the gingham ribbon. Very easy card and the paper makes it!

Sale-A-Bration is quickly coming to an end so check your Stampin’ Up! shopping list and see what else you need! Don’t forget to stock up on cardstock, adhesives, ribbons, whatever you need to help earn your free products!

SHOP STAMPIN’ UP! ONLINE HERE!

‘Tis The Season Candy Cane Christmas Card

'Tis The Season Candy Cane Christmas Card

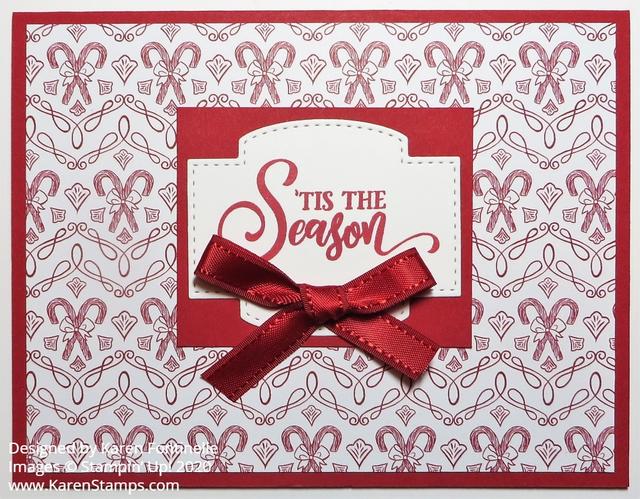
It’s time to get busy on Christmas cards and this ‘Tis The Season Candy Cane Christmas Card is an easy one! Mainly I wanted to just play with the ‘Tis the Season Designer Paper as I did the other day and see what else I could come up with.

In this case, I assumed I would use only this pattern of paper on half the card, but I cut the full size for the layer and I wanted to use it just like that! So simple! The card base is Real Red. I thought Cherry Cobbler looked a little dark, but it is a coordinating color with these papers.

I stamped the greeting in Real Red Ink from the Tag Buffet Stamp Set. I wasn’t sure how I wanted to cut it out, so I just browsed through my sets of dies and settled on this one in the Stitched So Sweetly Dies. I wanted a layer but instead of a die-cut I took the easy way out and just measured a plain rectangle to layer behind it. Sometimes you just don’t have the right size die!

For a final touch, I added a Real Red 3/8″ Double-Stitched Satin Ribbon, tied in a bow. I adhered it with a couple of Glue Dots. That’s all there was to it!

On the inside of the card, I added a layer of Whisper White stamped with a greeting from the Itty Bitty Christmas Stamp Set. All of the “Itty Bitty” stamp sets are great ones to have because you can always find a greeting stamp in one of them!

If you need any supplies for making Christmas cards, there is still time, but I suggest ordering as soon as possible, certainly by December 8th as recommended by Stampin’ Up!

SHOP STAMPIN’ UP!

Paper Pumpkin Halloween Card & Tag

Paper Pumpkin Halloween Card & Tag

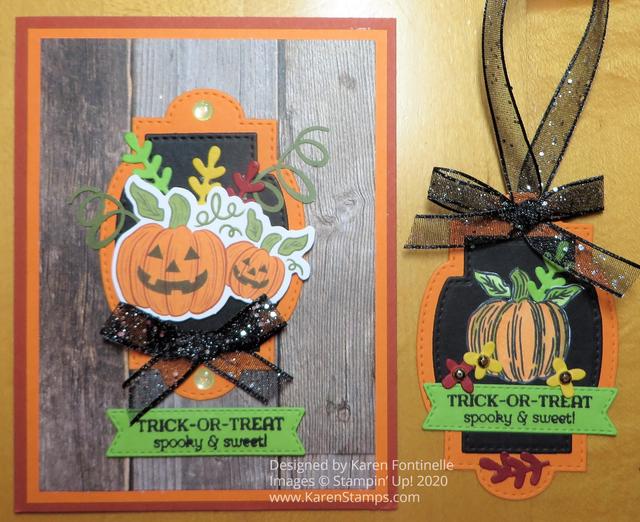
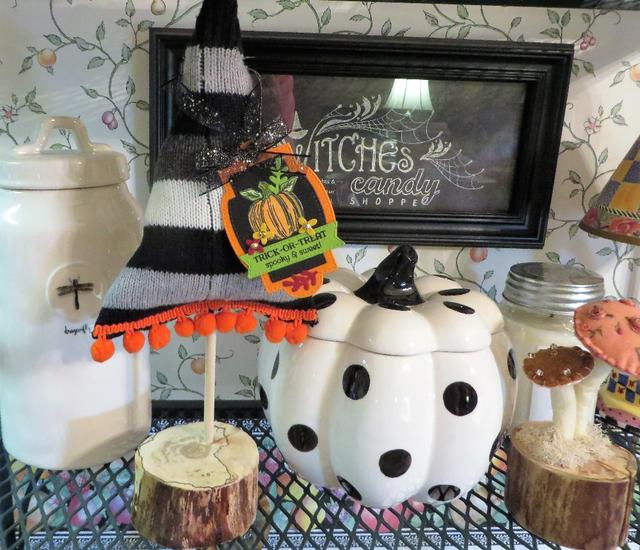
I still have pieces from my September Paper Pumpkin Kit so I used stamps and pieces to make this Paper Pumpkin Halloween Card & Tag. I actually started with the tag because I have this Halloween sweater tree I bought from someone on Instagram and I thought it would be fun to hang a tag on it for Halloween.

And after I made the tag, I thought I should copy myself and make a Halloween card as long as I had extra pieces I had die cut and everything still out on the table!

I used a lot of varied things! To start with, I used the Stitched So Sweetly Dies for the Pumpkin Pie and Basic Black pieces to make the tag and then the focal point on the card. The pumpkin on the tag is stamped with the stamp set in the Paper Pumpkin Kit and then colored with Stampin’ Blends. The greeting is from the Paper Pumpkin stamp set also and stamped on Granny Apple Green, then die cut with a die in the Tasteful Labels Dies. For some tiny little stems of leaves in various colors, I used the dies in the Forever Flourishing Dies. And I found some tiny little flowers in the Budding Blooms Dies. Sometimes you should just look through all your dies and see what you can use! It doesn’t always have to be in a coordinating set. I added a Gilded Gem on top of each flower on the tag. The ribbon on the tag is the beautiful Black 3/8″ Glittered Organdy Ribbon.

The Halloween card is very similar. The card base is Cajun Craze with a layer of Pumpkin Pie. To get the wood background, I used a pattern in the In Good Taste Designer Series Paper. This large pack of designer paper is on sale in the Stampin’ Up! Designer Series Paper Sale until October 31 so don’t miss it! Instead of the stamped pumpkin, I used one of the pumpkin diecuts in the September Paper Pumpkin Kit, as well as a couple swirly vines plus some colored stems I already die-cut like on the tag. For a couple of embellishments I used two of the Gold Glitter Enamel Dots and tied a bow with the Black Glittered Ribbon.

Here is a photo of what I did with the tag! I bought this sweater tree from @thelittlegreenbean on Instagram, also the two little embroidered mushrooms on the right. After Halloween, I could make a fall or Thanksgiving tag to hang on the tree. (If you recognize the Witches Candy Shoppe sign in the background, that was some designer paper from several years ago that was perfect for framing for home decor!

Halloween Tree With Tag

Hope you have fun stamping during the last week before Halloween and the last week of the Stampin’ Up! Designer Series Paper Sale!

Arrange a Wreath Floral Wreath Give Thanks Card

Arrange a Wreath Floral Wreath Give Thanks Card

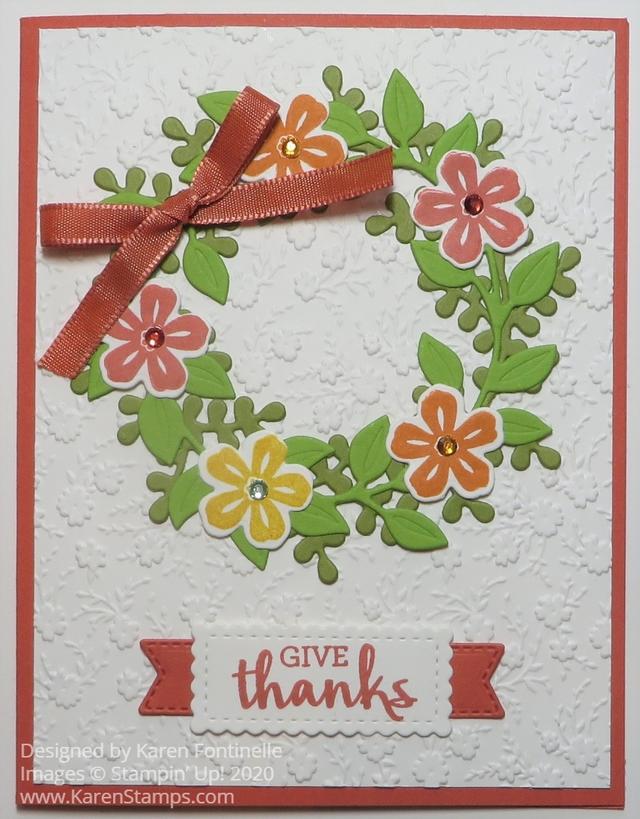
After seeing a lot of cute samples of wreath cards and receiving a birthday card from my friend using the wreath die cut, I decided I had to have this set! Finally, I got around to trying it out, and here is my fallish Arrange a Wreath Floral Wreath Give Thanks Card.

I didn’t even realize how much is included in both the Arrange a Wreath Stamp Set and Wreath Builder Dies. Of course, you can get the Arrange a Wreath Bundle and save 10% off the price of both. There are two different dies for wreaths, giving you two different looks or just two different wreaths to use separately. You get all kinds of different little items for decorating the wreaths to cover several occasions or just any occasion. The stamp set has five different greetings to use. So you are covered for just about anything with this Bundle!

For my card I chose Terracotta Tile for the card base. I seldom use these In Colors from last year but I thought Terracotta Tile might be a nice color for a fall card.

The Whisper White embossed layer I found on the table that I had made a while back just testing my new Stampin’ Cut & Emboss Machine with embossing folders! I thought it would work just fine as a background behind my wreath. The background is made with the Ornate Floral 3D Embossing Folder. It just adds a little bit of subtle prettiness I think!

I die cut both wreaths using two different greens – Granny Apple Green and Old Olive. I played around with which one looked better on top and finally settled on this combination. Then I stamped some flowers from the stamp set and cut them out with the dies. I chose Terracotta Tile, Pumpkin Pie, and Crushed Curry ink for the flowers. There is a die to cut a ribbon for the wreath but I decided to use a real ribbon, the Terracotta ribbon in the Ornate Garden Ribbon Combo Pack. For a little bit more embellishment I used some Holiday Rhinestones for each flower center.

The greeting is in the Arrange a Wreath Stamp Set and I stamped it in Terra Cotta Ink on Whisper White. It was die cut with a small Stitched So Sweetly Die and layered on a die-cut piece of Terracotta Cardstock in the Tasteful Labels Dies.

That’s all there is to this card! Take a peek again at the card my friend sent to me for my birthday. It’s really pretty easy and simple, but lots to play with in this stamp set and dies as I said! You will get a lot of use out of this Bundle because you can use a card with a wreath for lots of occasions.

SHOP STAMPIN’ UP! ONLINE!

Ghoulish Goodies Spooktacular Halloween Card

Ghoulish Goodies Spooktacular Halloween Card

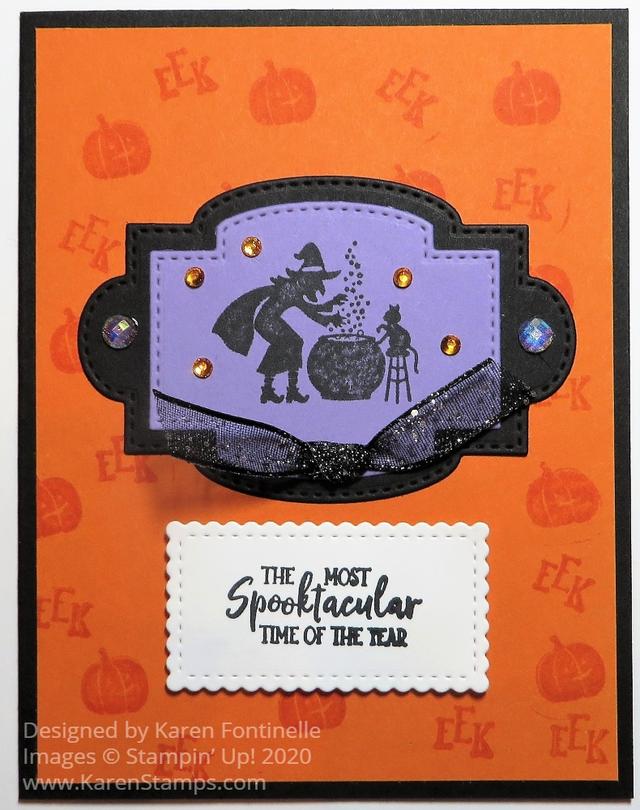
It’s October and that means it’s time to be making Halloween cards like this Ghoulish Goodies Spooktacular Halloween Card. This is one of those cards that just came about as I worked on it. Sometimes you have to know when to stop and sometimes you have to know when to keep going until you get the card you want!

The card base is Basic Black with a Pumpkin Pie Cardstock layer. I stamped the tiny little pumpkin in the Ghoulish Goodies Stamp Set randomly on the Pumpkin Pie layer with Versamark Ink. Later I also stamped the “EEK” in the stamp set to fill in some more of the spaces.

I stamped the image of the witch, the cauldron and the black cat on Highland Heather Cardstock and die cut it with a die in the Stitched So Sweetly Dies. Then I layered this piece on another die cut piece from the same die set. The greeting is also in the stamp set and the die in the same die set.

The card was coming together but still needed some jazzing up! I chose the Blue Adhesive-Backed Gems to put on each end of the black layer. Even though these say “blue” they are sparkly and iridescent so they kind of look purple and I thought went okay on this card. I also added some of the yellowish Holiday Rhinestone Basic Jewels around the witch and the black cat.

And for a final touch, I just tied a knot in a small piece of the Black Glittered Organdy Ribbon. Sometimes you just have to keep working on a card and this was one of those!

Here’s another project I made using the Ghoulish Goodies Stamp Set for a Halloween treat. It’s a fun stamp set to have for making Halloween cards but also Halloween goodies and treats.

Be sure to check out the Stampin’ Up! Designer Series Paper Sale going on during the month of October on select designer papers! Stock up or get the ones you missed before!

Gather Together Fall Pumpkin Card

Gather Together Fall Pumpkin Card

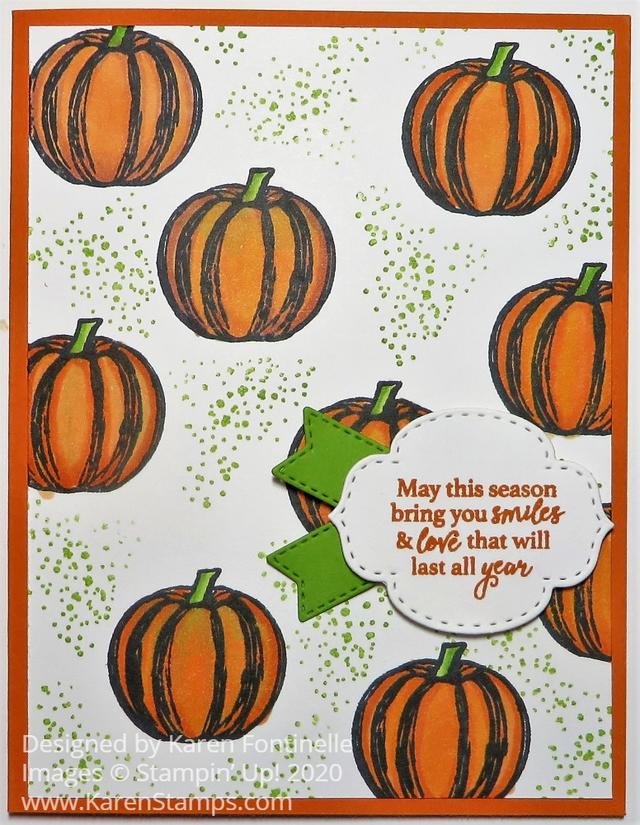
Sometimes you just need to stamp and do some coloring! I needed some relaxation and stamping images randomly on a card and then coloring them with markers was just the perfect thing! I think we all need a hobby of some kind to turn to for a little stress relief and enjoyment! Stamping certainly is mine!

These pumpkins are images in the Gather Together Stamp Set which was in the Stampin’ Up! Holiday Catalog last year. You can click on that link to view the PDF of the catalog from last year and get more ideas for samples for that stamp set and dies, but of course most things in that catalog have retired. It was a favorite and I was happy to see it return this year!

There is also a set of dies that go with the Gather Together set, the Gathered Leaves Dies. You can purchase the stamps and dies in the Gather Together Bundle and save 10%! The leaves are also very pretty in this stamp set.

To make this card, stamped the pumpkins randomly on a piece of Whisper White Cardstock. I used Memento Ink since I was going to color in with our alcohol markers, Stampin’ Blends. Mainly I used the Light and Dark Pumpkin Pie with a touch of Light Daffodil or Light Granny Apple Green. I also had out Cajun Craze and used that on a few for a slightly darker shade. The stems are all Light and Dark Granny Apple Green.

After I had the pumpkins stamped and colored it, I was tempted to stamp in the empty spaces with that dotted image in the stamp set. I wasn’t sure I should and perhaps ruin my card after all that coloring. But I was daring and I did it! I chose Granny Apple Green Ink and stamped off on my Grid Paper first to make it a little lighter. Since it is a photopolymer stamp and I could see through it, I could see if the stamp was going to fit in a space so I wasn’t stamping on the pumpkins. I think it added a little something to the card!

I have to admit I was a little sloppy in my coloring on a couple of the pumpkins. I used the Color Lifter but in my opinion it doesn’t always work as well as I would like. Maybe it depends on the color. And it wasn’t that bad, but I was able to cover it with my greeting! Remember, there almost always is a way to fix a mistake…..in fact, there are no mistakes in stamping!

I stamped the greeting in the stamp set in Pumpkin Pie ink and die-cut it with the Stitched So Sweetly Dies. There isn’t something that layers perfectly underneath it, so I chose the flagged banner die in the Tasteful Labels Die Set. It barely stuck out on the sides of the greeting, so I cut it in half and was going to make each end longer sticking out from the sides. It was a little tricky to fit on the card the way I wanted it, so I got the idea to put the two pieces off on the left side almost like two tail ends of ribbon. That’s something different and it made the greeting stand out a little. The greeting is popped up on Stampin’ Dimensionals.

That’s really all these is to the card. The stamped layer was adhered to a card base of Pumpkin Pie. I tried an extra layer either in Granny Apple Green or Basic Black but I like it fine just on the Pumpkin Pie card base.

Here’s another card with stamped pumpkins from the Gather Together Stamp Set that I cut out and arranged in a group on a card.

Sometimes it is good to get back to some basic stamping and whatever coloring technique you like for a simpler card. Pick this stamp set or another one you like and stamp the image randomly for the background of the card. If you don’t want to color in, just stamp in a color. See what you can make using my Gather Together Fall Pumpkin Card as inspiration!

SHOP STAMPIN’ UP! ONLINE HERE!

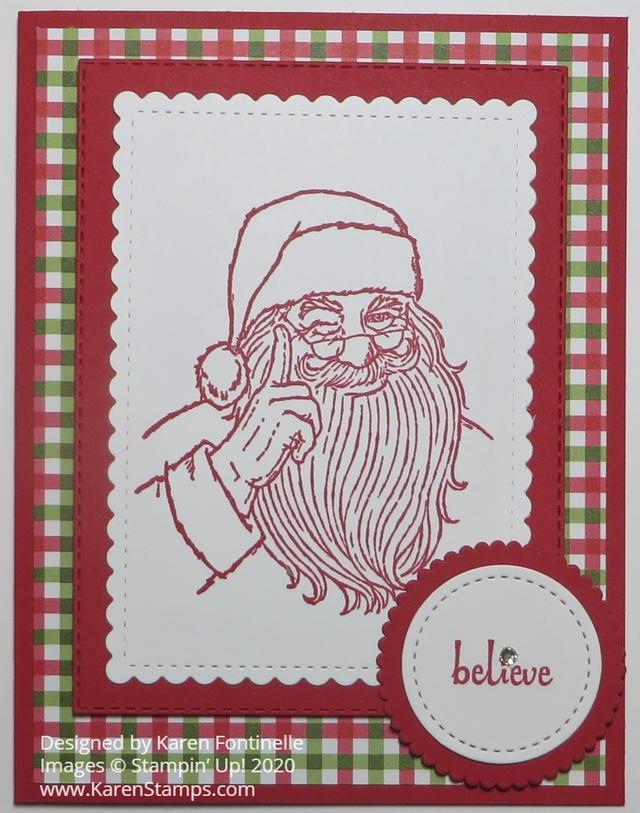
Don’t Stop Believin’ Santa Christmas Card

Don't Stop Believin' Santa Christmas Card

I got this Don’t Stop Believin’ Santa Christmas Card idea from myself, from Pinterest! I happened to see my Christmas Pinterest board and spotted a card I made last year with the Holly Jolly Christmas Stamp Set and thought I could do the same thing with a current stamp this year!

I planned to call this a monochromatic card, but since there is green in the plaid paper, maybe it’s technically not monochromatic! The card does have a “red” theme, though.

The card base is Real Red Cardstock with a layer of red & green plaid in the Heartwarming Hugs Designer Series Paper. The Santa is stamped from the Don’t Stop Believin’ Stamp Set. Isn’t that the best name?! It’s really a cute stamp set, worth a look! I stamped the Santa in Real Red on Whisper White and die-cut with one of the Stitched So Sweetly rectangle dies. The next smaller one was a little too small.

I wanted a layer underneath the Santa in Real Red but the Rectangle Stitched Dies don’t fit the Stitched So Sweetly rectangles exactly. I wasn’t quite sure what I was doing, but I shortened the Stitched Rectangle so it would fit the Santa better. You can find the best technique for doing this, but I took a guess and it worked. I die-cut the rectangle part way, then moved the die up so it would be shorter, keeping the die fit into the part that was already cut. You can feel it, if it is still in its die-cut design.

Next, I stamped the word “believe” in Real Red ink from the Itty Bitty Christmas Stamp Set. That word is die-cut with a small Stitched Shapes circle die. Then this was layered on a scalloped circle die in the Layering Circles Dies in Real Red.

There is a tiny star above the “i” and I thought it would be cute to put a small Rhinestone above it, almost like the twinkle in Santa’s eye. Actually, I’m not sure I like the rhinestone there, maybe some rhinestones scattered around the Santa would have been better. What do you think?

I popped up the Santa image and layers on Stampin’ Dimensionals and also the greeting. I had to put the Dimensional under the greeting off to the one side so it would line up with the popped up Santa image. Otherwise, one side of the greeting would be above the Santa. I did add a Mini Glue Dot to the side of the greeting that would overlap the Santa image to hold it in place there.

Here is my card from last year, the Monochromatic Real Red Holly Jolly Santa Christmas Card. This card is even a little simpler, cutting just rectangle shapes and an oval.

You might enjoy making this Don’t Stop Believin’ Santa Christmas Card with this cute stamp set, no matter which card design you come up with!

Shop Stampin’ Up! Online HERE!

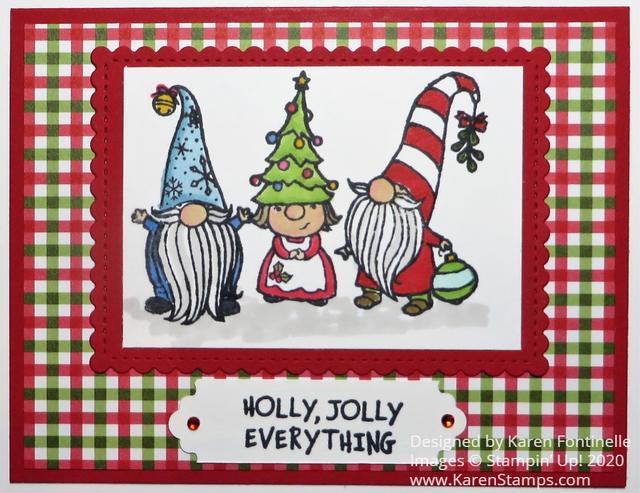
Gnome For The Holidays 3 Gnomes Christmas Card

Gnome For The Holidays 3 Gnomes Christmas Card

This little gnome stamp set is just too cute so I made a Gnome For The Holidays 3 Gnomes Christmas Card. All three gnomes have come together to send holiday wishes on this card!

To make this card, I stamped each gnome in the Gnome For the Holidays Stamp Set side by side. Even though they are cling stamps, you can stamp them close together and likely not overlap them. The gnomes are stamped in Memento Ink because I knew I would use my Stampin’ Blends to color them in. I stamped them on a large scrap of Whisper White, not exactly knowing how I would die-cut them to put them on the front of the card.

After looking through my dies and the large size I needed to fit in all the gnomes, I decided to just cut the paper into a rectangle that would fit inside the Stitched So Sweetly scalloped rectangle die that I could use as a layer. Then I looked through the Heartwarming Hugs Designer Series Paper to see what paper I wanted to use with the gnomes. I really liked this red and green plaid!

The card base is Real Red with the Heartwarming Hugs DSP layer and then the gnomes focal point on top of that. I decided not to pop up anything but you could.

After adhering all the layers together, I stamped the greeting, also from the Gnome For the Holidays Stamp Set. I cut the strip down to 3/4″ wide and used the Lovely Labels Pick a Punch to punch each end of the greeting. Then I added a Red Rhinestone Basic Jewel to each end for a little “bling”!

You likely will want to put a Whisper White layer inside the card unless you want to stamp on the Real Red cardstock base. You could stamp one gnome or the house on this Whisper White piece or adhere a strip of the matching designer paper along the bottom edge.

If you like coloring and wanted to make a few more of these Gnome For The Holidays 3 Gnomes Christmas Cards, you could make this card pretty easily (except for lots of coloring!). Always plan to make multiple cards of the same design assembly-line fashion because it goes faster that way!

You will find the Gnome For the Holidays Stamp Set in the August-December 2020 Mini Catalog on page 23. It’s a simple little stamp set and has fun greetings. Here is a link to the first gnome Christmas card I made! I really like the little Christmas lights on the gnome house! So cute!

Be sure to use your July Bonus Coupons by August 31 on your Stampin’ Up! order!

SHOP STAMPIN’ UP! ONLINE HERE!

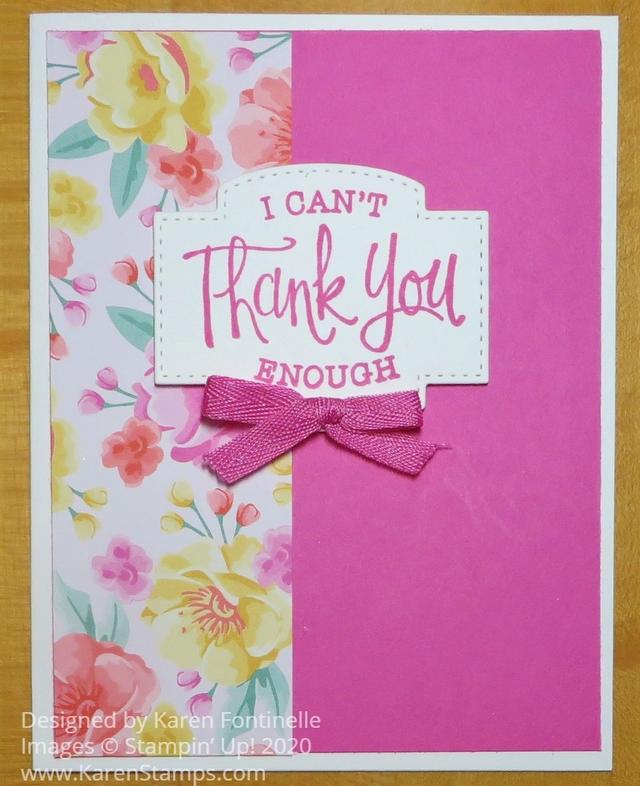
Flowers For Every Season Thank You Card

Flowers For Every Season Thank You Card

If you are in need of a cheerful, bright, and happy card, you most likely will want to choose this designer paper I used on my Flowers For Every Season Thank You Card. The bright florals on this piece of designer paper goes with the new In Color, Magenta Madness and that’s about all you need!

The card base is Whisper White with a Magenta Madness layer. I added a strip of the Flowers For Every Season 6″ x 6″ Designer Series Paper just to the side. You can make it whatever width you want. Almost any of the papers in this package are sure to brighten someone’s day!

The greeting is stamped with Magenta Madness ink on a piece of Whisper White Cardstock with the So Sentimental Stamp Set. This greeting fits perfectly in this die from the Stitched So Sweetly Dies. I love the stitched border around this die!

This is such a simple card design! Anyone can make it and you can change the greeting for lots of other occasions. And for just a little embellishment, I tied a bow with the Magenta Madness 1/4″ 2020-2022 In Color Ribbon and adhered it with a couple of Mini Glue Dots.

If you like the Flowers For Every Season Designer Series Paper, here is another card I made using this paper.

When you need some quick and easy cards, this card is the way to go!

This is the last week for Bonus Days at Stampin’ Up! For every $50 you spend in July, you will earn a $5 coupon to use in August! Bonus Days ends Friday, July 31!! Don’t delay!

Shop Stampin’ Up! Online Here!

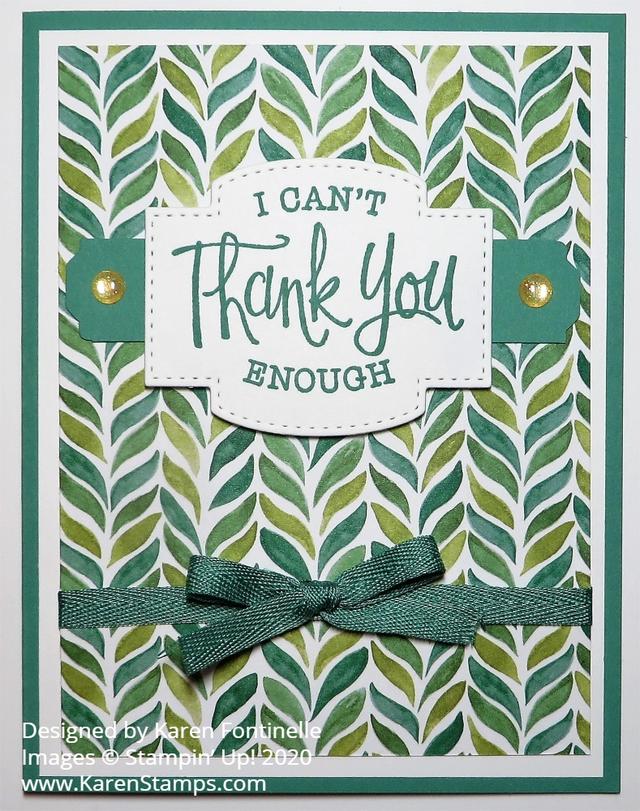
Forever Greenery Thank You Card

Forever Greenery Thank You Card

Talk about a quick and easy card to make, this Forever Greenery Thank You Card is one! I don’t think I’d even gotten around to using this designer paper so I thought it was about time.

I think every green color Stampin’ Up! has is included in this Forever Greenery Designer Series Paper. I love the new In Color 2020-22 called Just Jade. Normally I’m not a big fan of green, but I really like this color. Just Jade is the card base with a layer of Whisper White Cardstock. Then I added the designer paper layer. Originally, I planned to just have a very thin margin of the Whisper White to kind of separate the designer paper from the Just Jade. But I liked more of the white showing so I made all the standard layers.

Before adhering the designer paper layer to the Whisper White Cardstock, I wrapped around a strip of Just Jade 1/4″ Ribbon and adhered it to the back. After the layer is adhered to the card, you can tie a separate bow and adhere it to the ribbon with a Mini Glue Dot.

The greeting is stamped with Just Jade Ink with a stamp in the So Sentimental Stamp Set. This is a great stamp set for greetings! There are large ones and very small ones! Then I cut out the greeting with a Stitched So Sweetly Die.

To set off the greeting a little bit, I punched a strip of Just Jade Cardstock with the Lovely Labels Pick A Punch. Then of a little bling, I added a Gold Glitter Enamel Dot on each end.

That’s all there is to making this card! And so many pretty patterns to choose from in the Forever Greenery Designer Series Paper!

Check out all the new Stampin’ Up! catalog items and when you place your order, remember the Bonus Days promotion going on during July! With every $50 you spend in July, you will receive a $5 coupon to spend on your order in August! Be sure to look for the email from Stampin’ Up! right after you order!

SHOP STAMPIN’ UP! ONLINE!

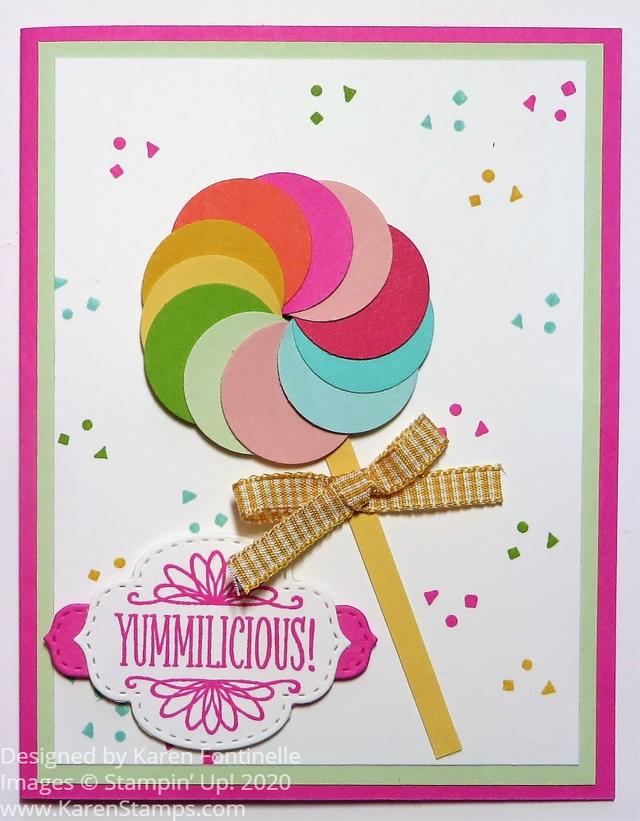
Colorful Lollipop Greeting Card

Colorful Lollipop Greeting Card

I had saved a magazine photo from YEARS ago with a card like this Colorful Lollipop Greeting Card. It has survived the purging of the file of torn out magazine pages, mostly scrapbook page ideas, several times so I finally decided to leave it out on my coffee table so maybe I would finally make it someday soon. Well, the day came and I made a card with this cute lollipop made out of circles!

There weren’t any super specific instructions on how to make this but I thought it would be easy enough to figure out. It’s a great way to use up some scraps of cardstock or even designer paper or mix the two.

You can use various sizes of circles, whatever suits your fancy and fits on your card. I used a 1″ Circle Punch (retired) but you could use something larger or larger die cuts. I just chose a bunch of colors of cardstock that looked good together.

It may seem a little difficult to get the circles placed correctly in a circle to form the lollipop. It might help you to put a pencil dot on your card where you want the center of the lollipop to be and you can kind of arrange the circles around that. When you get to the last circle in the lollipop, tuck it under the beginning circle, otherwise the two pieces on either side of that first circle will overlap it. So you want the last circle to tuck under it.

Use the Multipurpose Liquid Glue to just dab in between the circles to adhere them together into the lollipop shape. That glue gives you a little “wiggle time” to get the circles shaped the way you want them. After you get the lollipop formed, you can either glue it down directly onto the card front or pop it up with Stampin’ Dimensionals® or cut down some Foam Adhesive Strips to fit.

If you have a real lollipop stick, that would be fun to use or just cut a very thin strip of cardstock. I had a white one but of course it didn’t show up against this white cardstock so I just use a strip of Bumblebee Cardstock instead. Then I tied a bow of Bumblebee Gingham Trim and adhered it to the stick with a Mini Glue Dot.

For the greeting, I thought this one in the So Sentimental Stamp Set was perfect! I stamped it in Magenta Madness Ink and die cut with a die in the Stitched So Sweetly Dies. Then I die-cut another piece out of Magenta Madness that was smaller and I just cut it in half so I could use each end under the greeting to help it stand out from the Whisper White card layer.

I also thought it would be fun to stamp the little confetti stamp around the card in different colors to fill in all the white space. I just used some of the lollipop colors. The card base is Magenta Madness with a layer of Soft Sea Foam cardstock.

This is certainly a fun card to make and something different. It would be fun to make a few and make them into birthday cards or just “Hello” cards to send to a friend to brighten their day! Who wouldn’t be happy to receive this special Colorful Lollipop Greeting Card card?!

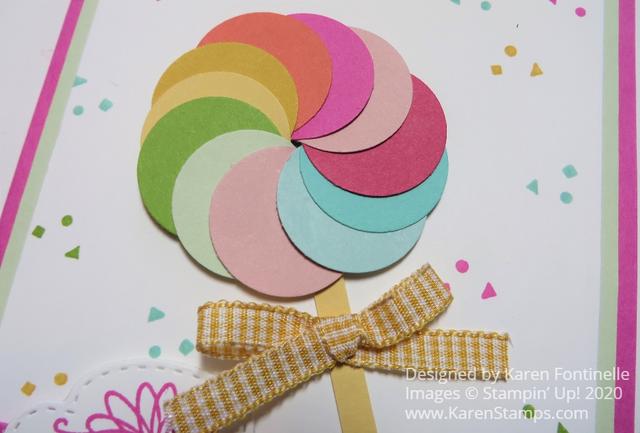
Colorful Lollipop Greeting Card Closeup

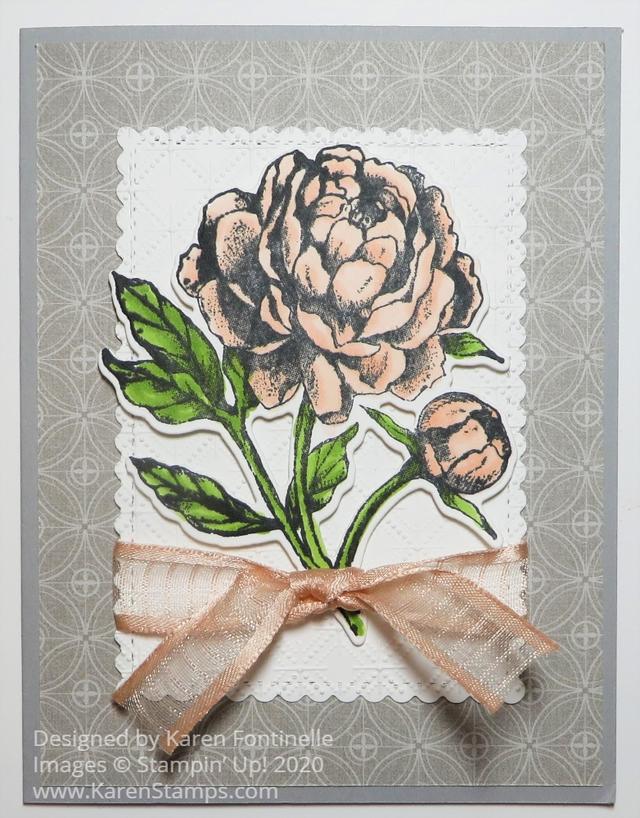
Prized Peony Die-Cut Flower Card

Prized Peony Die-Cut Flower

If you get some or all of this Peony Garden Suite, you will have so many ways to create that you will come up with many kinds of cards and projects like this simple Prized Peony Die-Cut Flower Card.

For this card, I wanted to stamp the flower, color in, and then die cut it! I stamped the flower from the Prized Peony Stamp Set in Memento Ink and colored in the flower and bud with Petal Pink Stampin’ Blend Markers plus Granny Apple Green Stampin’ Blend Markers for the leaves. Then I cut it out with the Peony Dies.

My original idea was to use the Peony Garden Designer Series Paper just in a basic card design way using one side of a pattern of designer paper on half the card and the other side of paper on the lower half (or so), with maybe a ribbon across the seam where the papers join or overlap a little. I thought I would use this gray pattern plus the pink floral design on the other side – but then I decided I liked using just the gray pattern for the card layer! You never know what you will really come up with once you start making a card!

The card base is Gray Granite with the designer paper adhered to the front. I had already colored and die cut the peony flower, but I thought maybe it needed some background to help it stand out. I looked through my dies and choose the largest rectangle in the Stitched So Sweetly Dies. That would have been fine as is, but I wanted to try out the Dainty Diamonds Embossing Folder so I embossed the die cut. It was very pretty!

Before adhering the embossed piece to the card, I wrapped a piece of the pretty Petal Pink 5/8″ Organdy Striped Ribbon around near the bottom. Then I adhered the peony using Stampin’ Dimensionals® and placed it underneath the ribbon. For the final touch, I tied on a small piece of ribbon just in a knot in the center. I didn’t even want to add a greeting.

Inside, since the cardstock was gray, I added a Whisper White layer inside the card, stamping and coloring one of the small flowers in the stamp set in the bottom corner. It has such a pretty vintage floral look! Now I can stamp a greeting inside the card or write my own note or personal message when I want to use the card. Be sure to check out my first card using the Prized Peony Stamp Set in this post yesterday.

Stamping and coloring the peony is another step to take but is easy enough, even the coloring, and certainly the die-cutting. Then I just used a piece behind the flower to help showcase the peony and added a ribbon to my Prized Peony Die-Cut Flower Card.

SHOP STAMPIN’ UP! ONLINE HERE!

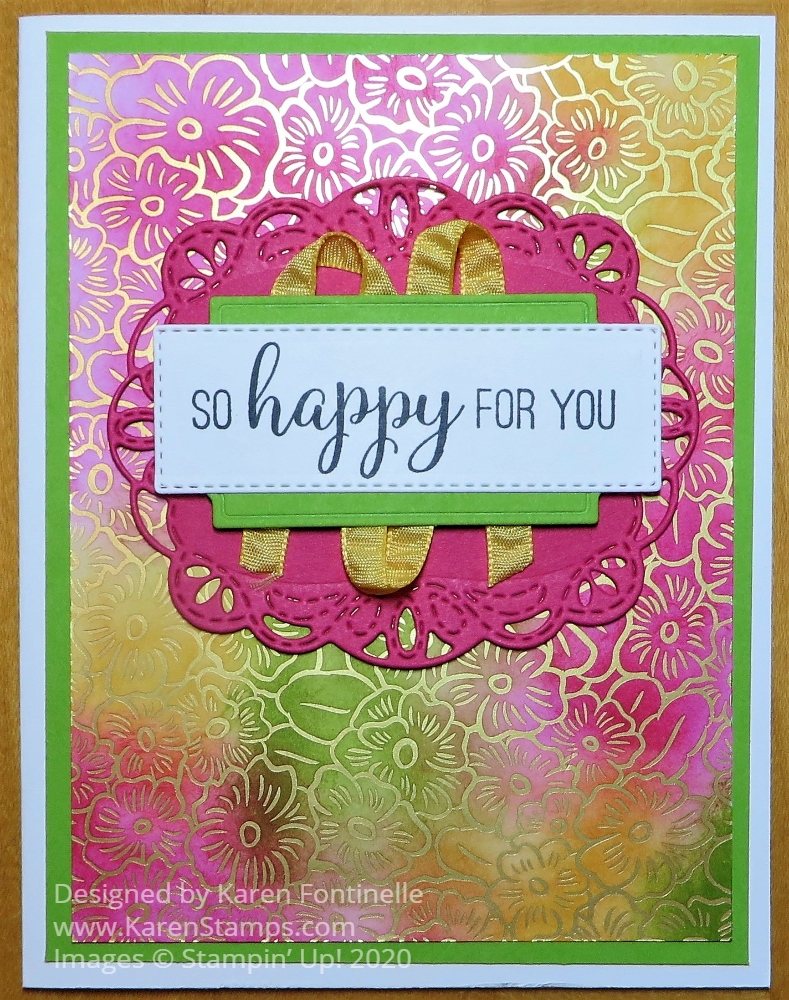
Ornate Garden Sponged Happy Card

Ornate Garden Sponged Happy Card

This Ornate Garden Sponged Happy Card came about it two ways today. First, I felt like I was either having an anxiety attack or coming down with “the virus” when one second before I was fine AND I saw a sample of a card online that was embossed but reminded me of this Ornate Garden Specialty Designer Series Paper with the gold foil accents on some sheets that made me think of sponging different colors of ink on the paper.

Here’s your anxiety tip of the day: Start looking online at cards and stamping videos and maybe better yet, force yourself to get up and start stamping! Get your mind off the news or whatever is going on in your mind that is not good for you!

Obviously I need a “Happy” card today so I chose three colors of ink from the Brights family (my favorite!)…..Melon Mambo, Daffodil Delight, and Granny Apple Green. I could have used Sponge Daubers, but I grabbed a small piece of sponge and just used a different side of it for each color of ink. Yes, you will get ink on your fingers but that’s okay. It will keep you happy all day! I just sponged around on the Ornate Garden Paper and then wiped off a bit with a tissue. Next, I just played around with those three colors of cardstock plus Whisper White to see what combination would look best, or at least that I liked, to actually assemble the card.

I finally decided on a Whisper White card base with a layer of Granny Apple Green. I found the Melon Mambo die cut from the Stitched Labels Dies in with my Melon Mambo paper but at first decided not to use it. I found the greeting I liked in the Modern Heart Stamp Set. I used a rectangular die in the Ornate Layers Dies but I used the technique of cutting it and then replacing the die over the same stitched lines to shorten the greeting piece.

I looked through my dies again to see what to layer the greeting on and found a die in the Stitched So Sweetly Dies that seemed to work. I cut that out of Granny Apple Green. As I thought about how that looked, I saw that Melon Mambo die-cut piece laying on the table and tried that behind it. I think it works! But I still felt like I wanted something else and finally adhered some Daffodil Delight 1/4″ Ruched Ribbon behind the Granny Apple Green and also popped that piece up on Stampin’ Dimensionals. I think the whole thing brings in all the colors of the ink and works out well with the sponged paper behind it and with the original intent of the card…. a Happy card!

Maybe today is the day for you to try some new technique or one like this. Remember to check the Last-Chance Products and the Clearance Rack in the Online Store! You will find some good bargains! Be sure to get what you need before it sells out!

SHOP STAMPIN’ UP! ONLINE!