Tag Archives: Tailor Made Tags Dies

Two Bee Mine Cards After OnStage 2023

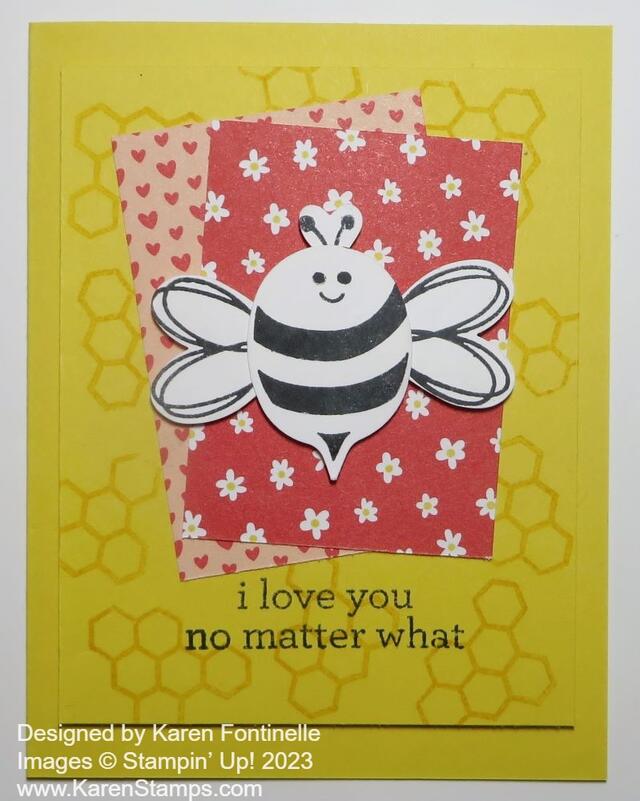
Bee Mine I Love You Card

On Saturday Stampin’ Up! held a virtual event called Onstage 2023 for Demonstrators, somewhat like a mini-convention, to introduce upcoming Spring Mini Catalog products as well as the big promotion called Sale-A-Bration. One of the fun Suites they showed, stamped with, and allowed us to purchase ahead of the event is the Bee Mine Suite, coming in the January-April 2024 Mini Catalog. I hadn’t had a chance to use it beforehand, but after watching the event I opened the package and got stamping!

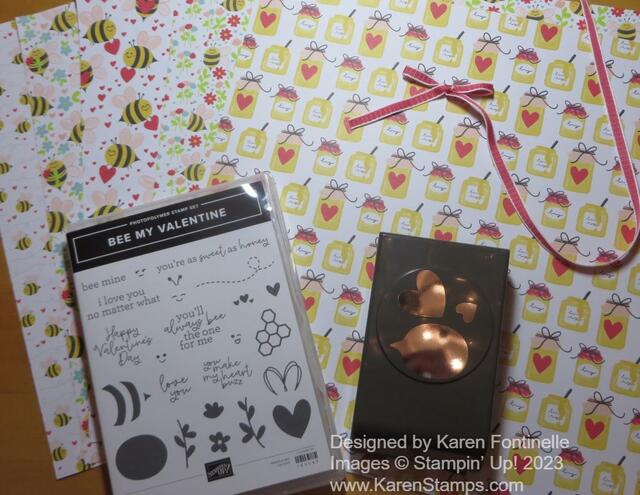
Here are some of the Bee Mine Designer Series Papers, the Sweet Sorbet 1/4″ Bordered Ribbon, the Bee My Valentine Stamp Set, and the Bee Builder Punch. There are also adorable Adhesive-Backed Hearts & Flowers (you’ll probably want more than one package!) and Square Pillow Boxes that I forgot to put in the photo. If you like bees, and they are popular these days, you will want this Suite! And if you are not “into” bees, you will find these papers and stamp set so cute you will love them anyway!

Bee Mine Suite

The card I posted was one that Shannon made during the online event yesterday. The card base is Daffodil Delight as is the first layer which is stamped randomly with the honeycomb stamp in Daffodil Delight ink. This layer is cut at 3 3/4″ x 4 3/4″. Be sure to stamp the greeting at the bottom before adhering that top layer. It is stamped in Memento ink and is in the Bee My Valentine Stamp Set.

The two layers of designer paper, the little hearts and the little white flowers, are cut at 2 1/4″ x 3 1/4″ and 2 1/4″ x 3″. They are both placed on angles and staggered, not lined up straight.

The bee is made by stamping on Basic White with Memento Ink and then punched out with the Bee Builder Punch. If you look at the bottom of the punch and line up your images somewhat in the same direction as they are arranged in the punch (and allow space in between images!) you will find punching them out a little easier. Or you can punch a template and then use that to place the stamps when you are stamping the images. You could color the bee or use yellow cardstock, but I was copying the card as Shannon made it. Then just put a drop of glue to adhere the wings to the body and the antennae to the top of his head. You can pop up the bee with Stampin’ Dimensionals and even place them on the back where the wings and antennae meet on the bee’s body to hold them in place perfectly.

Once you have everything adhered, use Stampin’ Dimensionals to pop up the Daffodil Delight finished layer on the card base. On the inside of the card, you could use a strip of designer paper or cut out a small bee from the paper to decorate the inside of the card.

Then I had to make another card right away because I just loved the designer paper! It is all so cute!

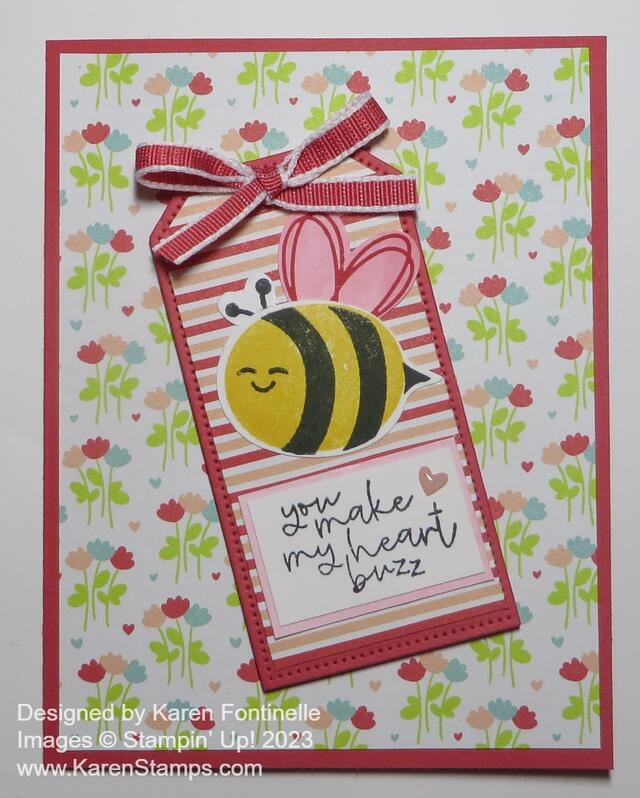
Bee Mine You Make My Heart Buzz Card

I love that Sweet Sorbet is one of the coordinating colors with the designer series paper because I haven’t used it in a while and I love that color! It is one of the In Colors from last year but on its second year right now in the Annual Catalog. I used Sweet Sorbet for the card base. Next, I chose this flowered pattern in the Bee Mine Designer Series Paper for the background.

For the focal part of the card, I decided to diecut the largest tag in the Tailor Made Tags Dies out of Sweet Sorbet. Then I cut another tag, the same size, out of the same paper but used the striped side. This striped pattern I trimmed down with my Paper Trimmer just inside the stitched perforations to make it a layer on the Sweet Sorbet.

The bee body is stamped with Daffodil Delight ink on Basic White (or you could just use Daffodil Delight cardstock) and then the stripes and antennae are stamped in Memento ink. The face is another tiny stamp. There are several faces to choose from!

I stamped the wing in Sweet Sorbet for something fun, but first I watercolored a piece of Basic White with Sweet Sorbet ink and one of the Water Painters. Then it was punched out with the Bee Builder Punch and adhered to the top of the bee body along with the antennae. The bee was adhered flat to the tag along with the stamped greeting. I felt like the greeting needed a little layer, so I watercolored another little piece of Basic White with the Sweet Sorbet ink and trimmed a tiny layer behind the greeting. The whole tag is popped up on Stampin’ Dimensionals.

To embellish the tag, I tied a bow with the Sweet Sorbet 1/4″ Bordered Ribbon and adhered it on the top of the tag over the hole (I didn’t thread it through) with Mini Glue Dots. I also used just one tiny Petal Pink heart in the Hearts & Flowers embellishments to the greeting.

There you have two card ideas you can make with the Bee Mine Suite when it becomes available in January! If you want it sooner, sign up to be a Demonstrator and be able to preorder select products before January! And remember, Sale-A-Bration will be coming up in January at the same time. When you spend $50 you get to choose one FREE Sale-A-Bration product! With a $100 purchase, you can choose a Level 2 item or two Level 1 products. Your choice! It’s a VERY popular promotion Stampin’ Up! has been doing almost forever! Lots to look forward to in January!

True Beauty Stamped Card

True Beauty Stamped Card

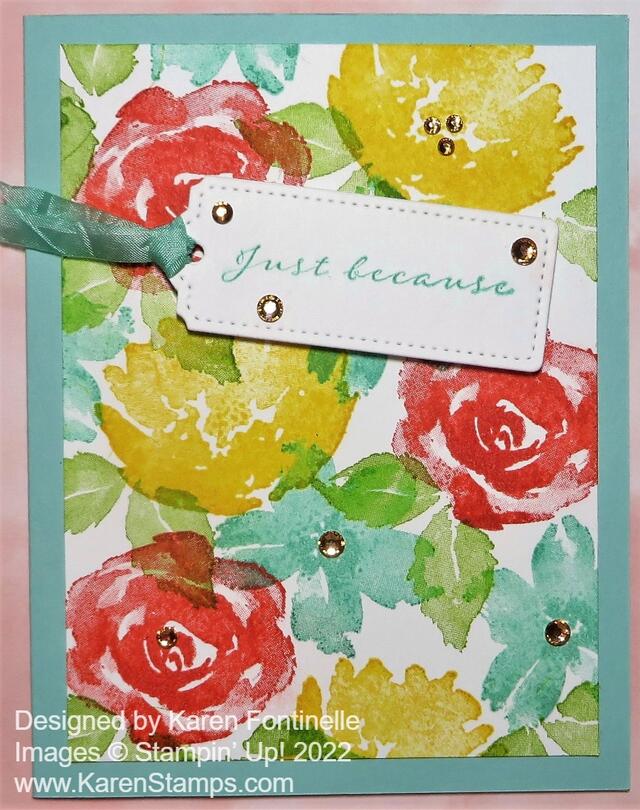
This True Beauty Stamped Card is not at all what I had in mind when I started to make a card! So you never know what you will end up creating, no matter what idea you have in your mind! And it’s okay if you don’t even have an idea in your mind, you will still create something.

I already had this True Beauty Stamp Set out as I used it on another project and some of the ink colors as well. I had some diecut flowers as well on my table, but in the moment I decided to stamp the flowers directly on the Basic White Cardstock. These flowers are a little large for a card front so it was difficult not to overlap them. But I decided that was okay! I still liked the way it looked and continued on with more flowers and leaves stamped in the spaces without getting too overdone!

The card base is Pool Party Cardstock with the Basic White stamped layer. I thought about putting an extra layer, either Basic White or Daffodil Delight under the stamped layer, but I liked it as it was. The stamped layer is a little smaller so the margins of the Pool Party show better. The Basic White layer is 5″ x 3 3/4″. The flowers are stamped in Calypso Coral, Daffodil Delight, and Pool Party inks with the leaves done in Granny Apple Green ink.

I chose a greeting from the same True Beauty Stamp Set, stamped it in Pool Party ink, and die cut it with one of the Tailor Made Tag Dies. I thought a Daffodil Delight ribbon would be good, but I changed my mind to Pool Party and colored the White Crinkled Seam Binding Ribbon with a Dark Pool Party Stampin’ Blend Marker. I popped up the tag with Stampin’ Dimensionals®. Since I saw some ink smudges on the tag (oops!) and added some Champagne Rhinestones Basic Jewels on the tag and around the card. It’s hard to stop!! There are a lot of other “bling” choices I could have used so use what you have.

Here is another card using the True Beauty Stamp Set with the flowers diecut and then adhered to the card front.

That’s all there is to this easy card. It’s fun to do some real stamping all over the page instead of doing a lot of diecuts and designer paper. In fact, if you wanted to make several cards at once, you could stamp randomly all over a piece of 8 1/2″ x 11″ cardstock and then cut it down for individual cards. Then you have made your own background and designer paper for your card! It feels good to stamp and stamp and stamp! Try it! I hope this True Beauty Stamped Card gives you an idea for a simple card using basic stamping!

Shop Stampin’ Up! Online Here! Don’t Forget the Last Chance Products!

Cute Halloween Ghost Boo Card

Cute Halloween Ghost Boo Card

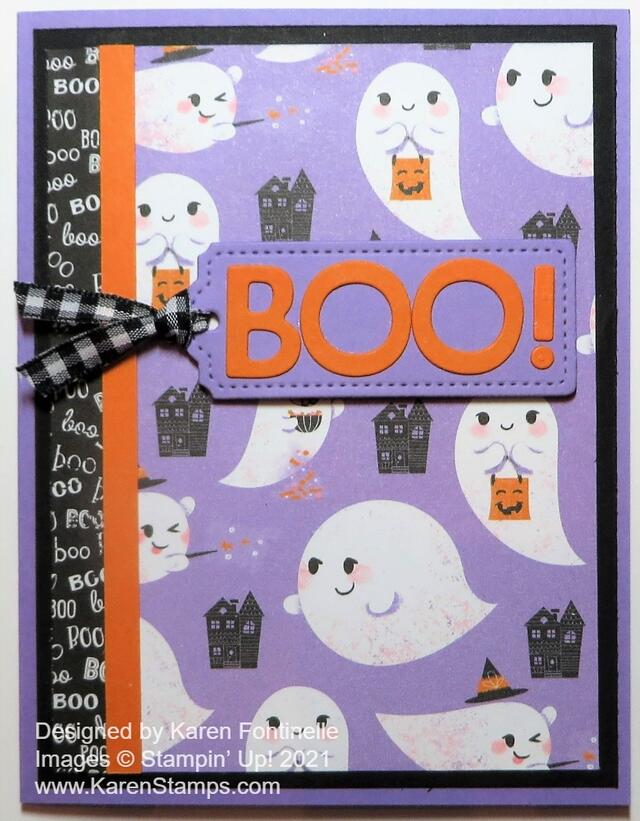
My first Halloween card of the season! I love this cute pack of 6″ x 6″ paper with Halloween designs! I love the cute and whimsical Halloween styles, not the scary, dark ones. I’m hoping we can have normal trick-or-treating this year because I love handing out candy to the little ones, especially. Last year I had to block off my front door and put out a sign saying “See you next year!”

This card uses the Cute Halloween Designer Series Paper which is the 6″ x 6″ size. I just picked out the top sheet in the pack with these cute flying ghosts with their trick-or-treat bags! Isn’t that cute??!!! When I turned the paper over, I saw the design was the tiny printed “Boos”. I just had to use that on the front of the card along with the ghosts! That section started out being wider but I didn’t want to cover up much of the ghost paper.

The card base is Highland Heather with a layer of Basic Black. I played around with those two colors and Pumpkin Pie to see which ones I wanted to use and in which order. I think any other combination would also look good. I ended up with a very thin strip of the Boo paper on the left side of the card. To cover the seam and to add another color, I cut a very thin strip of Pumpkin Pie cardstock in between the two designs.

For a greeting, I got the idea to cut out the letters to spell “Boo” with the Playful Alphabet Dies. I haven’t used these dies much, but I love how they turned out on this card! I cut the letters and exclamation point out of Pumpkin Pie cardstock and layered them on one of the Tailor Made Tags Dies. You would think I shouldn’t use Highland Heather as a color for the tag because it blends into the background color of the designer paper too much, but I kind of liked that because it helped the letters stand out without detracting too much from the ghosts. I popped up the tag on Stampin’ Dimensionals® and tied on a piece of the Black & White 1/4″ Gingham Ribbon.

Sometimes you make a card and it’s just fine and you like it, and sometimes you make a card and LOVE how it turned out! That is how I feel about this Cute Halloween Ghost Boo Card and I hope it will inspire you to make some fun Halloween cards with this cute Cute Halloween paper!

SHOP STAMPIN’ UP! ONLINE HERE!

Beautifully Penned Floral Tag Card

Beautifully Penned Floral Tag Card

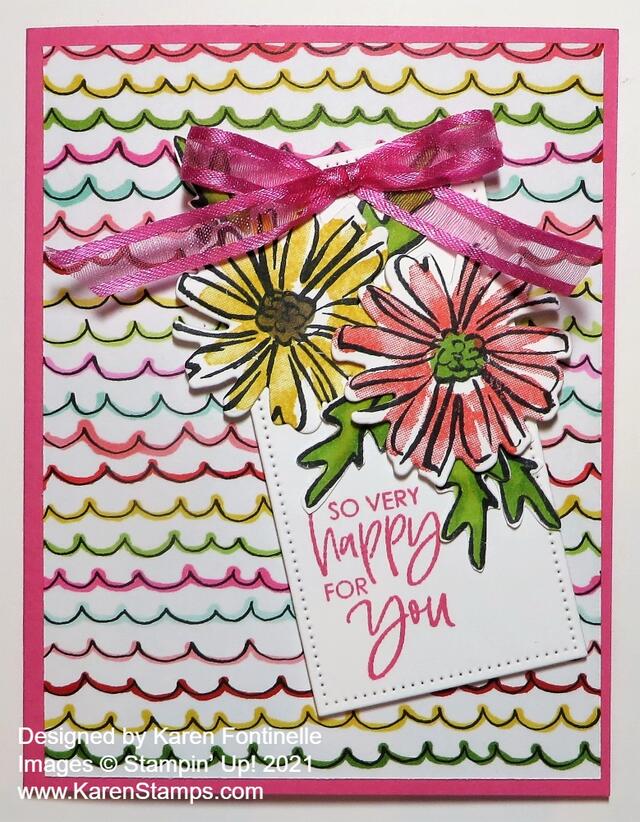
You won’t believe where this Beautifully Penned Floral Tag Card came from! I opened the package of Beautifully Penned Paper that I got free during Sale-A-Bration on my recent order which is all black and white in design. I saw this design with the squiggly lines and I immediately thought it looked like a fun paper to use!

My first inclination was to color in between all the lines! But that might have taken a while so I pulled out different Stampin’ Blends and just drew ON the lines in between the lines! Sometimes I used the brush tip and sometimes the bullet tip, but I think the bullet tip is a little easier. I decided it did not have to be perfect. In fact, since the curves are irregular, your hand doesn’t get into a set pattern after coloring a few lines so each one is different. This paper is only available during Sale-A-Bration through September and coordinates with the Hand-Penned Designer Series Paper in the Stampin’ Up! Annual Catalog. You will find this Beautifully Penned 12″ x 12″ Designer Series Paper on page 7 of the Sale-A-Bration Brochure.

This paper with its black and white designs is perfect for coloring using various techniques! You can color with markers, Watercolor Pencils, Blender Pen and Ink, pastels, or Blending Brushes. Or just leave it as is and have a black and white card or add a splash of color by adding some colorful flowers or other designs. Just play!

This card has a card base of Polished Pink. Black would have been interesting, too, or a layer of black on the pink under the designer paper. Or vice versa. The tag is die-cut from the Tailor Made Tags Dies. The flowers are stamped with the Color & Contour Stamp Set and cut out with the Scalloped Contours Dies. The leaves I stamped and cut out by hand. The flowers are two-step stamping but the stamps don’t line up perfectly so don’t knock yourself out trying! The tag is popped up on Stampin’ Dimensionals as is the pink flower. I had a third flower stamped and die cut but I thought the tag would be too crowded with it, so I added a Basic White layer inside the card and adhered the third flower to the inside of the card! It’s fun to decorate the inside of cards. We should really do it more often!

These are the colors I used in Stampin’ Blends markers and also the ink. These colors are in order starting from the top of the card: Poppy Parade, Daffodil Delight, Granny Apple Green, Polished Pink, Pool Party, and Flirty Flamingo.

The greeting is also in the Color & Contour Stamp Set, stamped in Polished Pink ink. And to finish the card, I added a bow tied with the Polished Pink 3/8″ Open Weave Ribbon. All of these new In Color ribbons are so pretty! I just love the style!

With every $50 you spend during Sale-A-Bration, you can choose a FREE product in the Sale-A-Bration Brochure. This Beautifully Penned Paper is available with a $50 purchase! What is better than free paper?!