Tag Archives: thank you card

Nests of Winter Sending Thanks Card

Nests of Winter Sending Thanks Card

I realized I hadn’t used this pretty designer paper in a while so I looked through it and picked out this pussy willow pattern. I hadn’t even used this In Color cardstock in a long time so all in all, this Nests of Winter Sending Thanks Card is what turned out.

The card base is the 2023-2025 In Color Copper Clay. The pussy willow layer is in the Nests of Winter Designer Series Paper. I bought this Suite for a virtual Stampin’ Up! event back in June. Honestly, I wasn’t too thrilled with the choice for this event, but after seeing the Demonstrators making their cards and projects with products in this Nests of Winter Suite, I was enthused to use it!

The focal point of the card, in the center, is made with a base layer of Copper Clay cardstock cut at 3 1/2″ x 3 1/2″. The layer is a bark-like pattern on the other side of the pussy willow pattern cut at 3 1/4″ x 3 1/4″. The two birds are easily cut out with the die in the Winterly Tree Tops Dies. This is such a great idea Stampin’ Up! has been doing with a lot of the designer paper. Certain images can be cut out with one of the dies in the Suite or Bundle! It’s great! I simply glued everything down flat on the card using the Multipurpose Liquid Glue and Stampin’ Seal.

The greeting is in the Winterly Tree Tops Stamp Set although it is longer than you see on this card. The stamp also includes “& much love” but I only wanted the “Sending Thanks”. I inked up the stamp, but then I wiped off the “& much love” at the bottom of the stamp using my Simply Shammy. It was then diecut with one of the Stylish Shapes Dies. The greeting is stamped in Copper Clay ink.

That’s all there is to this card! Pretty easy and you can swap out some of the different designer papers if you like.

If you’d like to see some other cards I made with the Winterly Tree Tops Stamp Set and Dies and Nests of Winter Designer Series Paper, click HERE. These are cards that I made during the Creativity Now virtual event I “attended” last summer as a preview for new products coming in the Holiday Mini Catalog. That is where you will find this Suite and products.d

Don’t forget the 3-day Stamp Sale going on at Stampin’ Up! today and tomorrow!

SHOP STAMPIN’ UP!

Thanks So Much A Little Latte Card

Thanks So Much A Little Latte Card

This Thanks So Much A Little Latte Card is one I made a little while ago but don’t think I posted. This A Little Latte Suite Collection is still available as one of the Online Exclusives and in stock! It’s such a fun group of products, especially the designer series paper, so don’t miss out! Remember that Online Exclusives are not available in catalogs, just online, so Stampin’ Up! doesn’t have to wait for a new catalog to release new products. However, they can disappear whenever Stampin’ Up! decides not to reorder them so be sure to get what you want!

The card base is Pecan Pie. You could also use Early Espresso cardstock or even match one of the cup colors. I chose two different patterns of the A Little Latte Designer Series Paper for the card layer. The top layer has all the cute little cups and spoons. The bottom layer is probably really meant to be swirly coffee patterns but I thought it could also look like a wooden table top on which to set the coffee cups! To hide the seam between the two, I added a strip of Lemon Lolly cardstock.

The coffee cups were all fussy-cut out of the designer series paper. I didn’t order the dies but knew I would be happy with the designer paper, stamp set, and embellishments. That’s the great part of a Suite. You can order the whole thing using one order number or you can see a number of products that all go together and pick and choose what you want!

The greeting is stamped from the Latte Love Stamp Set in Pecan Pie ink. It is then die cut and layered on a piece of Calypso Coral cardstock to help it stand out. I think the rectangle die I used is a retired one but you can use something similar, like maybe the Everyday Details Dies. Behind the greeting I added some Lemon Lolly twine wound around in several circles and then twisted and adhered to the back. You’ll find the twine in the Baker’s Twine Three Color Pack.

For another embellishment, I used the Adhesive-Backed Swirl Dots which were a little hard to get a hold of for awhile! They are so cute to use with this A Little Latte Suite but you can also use them on other kinds of cards and projects.

Here is another card I made previously with this Suite.

Remember that Stampin’ Up! Bonus Days are going on now in July during which you will receive one $5 coupon for your next order in August with every $50 purchase in July.

SHOP STAMPIN’ UP! TODAY!

A Little Latte Thank So Much Card

A Little Latte Thank So Much Card

Here’s a card I don’t think I posted before but if you are a coffee-lover or know someone who is, don’t forget about the Latte Love Bundle, which is on the Bundle Sale right now! This A Little Latte Thanks So Much Card uses the A Little Latte Designer Series Paper and the Latte Love Stamp Set, which has my greeting. Be sure to take advantage of the Bundle Sale and save an additional 10%.

This card has a base of Early Espresso Cardstock and a layer of the cute latte art pattern in the A Little Latte Designer Paper. That pattern is one of my favorites in this package. The two coffee cups are fussy-cut (cut by hand) from another sheet of the designer paper. Two of the dies in the Latte Love Dies will cut out certain coffee cups from the designer paper.

The greeting is stamped from the Latte Love Stamp Set, as I mentioned. You can use these greetings on other cards that have nothing to do with coffee so you do get more opportunities out of this stamp set. The Latte Love Dies will cut out a coffee pot, a french press, cups, and extra little things like coffee beans and a spoon. You can create a whole coffee scene on your card, scrapbook page, or other project!

The ribbon on my card is the Pecan Pie 3/8″ Center Stripe Ribbon. This is a nice, soft ribbon that I like to use. It is a little easier to tie into a bow than the ribbon in the A Little Latte Suite Collection. That ribbon is the Natural 3/8″ Polka Dot Trim. I like it, too, but it is a little stiffer. Another embellishment on the card are the Adhesive-Backed Swirl Dots. They look a little like a swirled latte but you can use them lots of places! You may have missed them when they were out of stock awhile back.

Check out the Bundles on the Stampin’ Up! Bundle Sale!

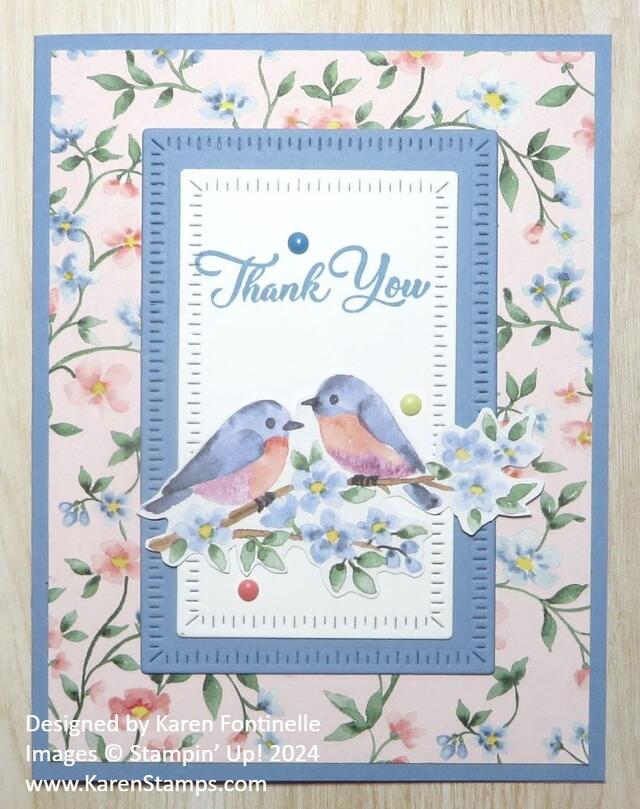
Flight & Airy Thank You Card With Birds

Flight & Airy Thank You Card With Birds

Continuing with my cardmaking with one of the beautiful Sale-A-Bration papers, I am showing you this Flight & Airy Thank You Card With Birds. I really like this Flight & Airy Designer Series Paper that I got FREE with my $50 purchase at Stampin’ Up! If you haven’t taken advantage of Sale-A-Bration yet, you have one more month to go! Sale-A-Bration ends February 29!

This card uses two different patterns of the Flight & Airy Designer Paper. The background design is just a floral pattern. It actually reminds me of years ago when maybe you would see a pattern like this on bedsheets or a bedspread. I think the soft pink in the background of the flowers is so pretty. The birds sitting on the flowery branch come from another paper in the package with medium size birds that can be cut out with Paper Snips by hand.

The card base is Boho Blue, but you could choose another coordinating color easily. I used the Radiating Stitches Dies to cut out the two rectangles on the center front of the card. I used Boho Blue and Basic White. If you do not own these dies, you can just cut rectangles out of cardstock to whatever size you want or maybe use one of the tag dies or something else in your die collection. The greeting is stamped in Boho Blue ink and is in the Go To Greetings Stamp Set.

The birds on the front of the card must be cut out by hand unless you want to use a circle die or something. It is not difficult to cut out. You do not need to cut deeply in between all the leaves or flowers. Just cut easily around the edges and it will be fine. It works best to turn the paper rather than the scissors. Don’t worry about perfection. You could pop up these birds with Stampin’ Dimensionals, but I glued them flat on the card. Then I added three colored Rainbow Dots for a little embellishment. I love these Rainbow Dots! They are flatter than some jewels and things so they are not a worry about mailing.

If you missed my card the other day using the Flight & Airy DSP, click HERE.

If you wanted to add a little something to the inside of the card, you could add a Basic White layer for a stamped greeting or personal message and cut out some other birds to adhere in the corner or a scrap strip of the flowered paper.

Don’t wait too long to take advantage of Sale-A-Bration! But stay tuned for February 1st when there might be something new for Sale-A-Bration!

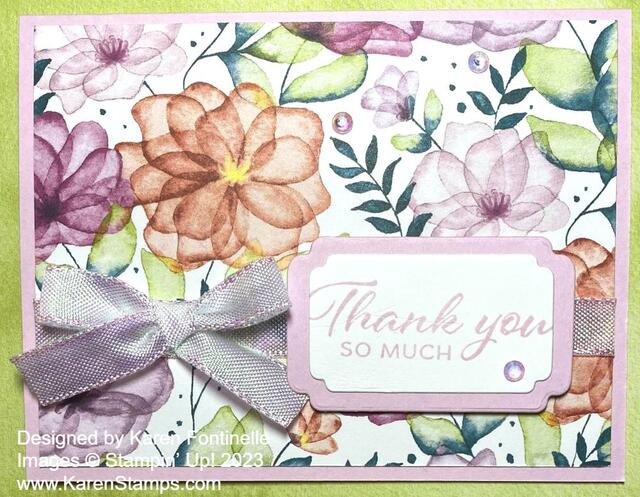
Delightful Floral Thank You Card

Delightful Floral Thank You Card

This Delightful Floral Thank You Card is made with the brand-new designer paper of the same name, Delightful Floral Designer Series Paper. This paper was just released by Stampin’ Up! last week in the Online Exclusives category. You may have noticed a stamp set and dies in the Holiday Mini Catalog called the Translucent Florals Bundle. This paper looks to me like it coordinates very well with the stamps and dies, but I only have the paper.

This card is made with a card base of Bubble Bath cardstock. I intended to use two different designs of the designer paper on this card but once I laid this floral pattern on the card front, I thought it looked beautiful as is! It is way prettier in person than in this photograph.

Before adhering the paper to the card front I wrapped a piece of the Iridescent White Ribbon around the front and adhered the ends to the back of the paper. I tied a separate bow and adhered that with several Glue Dots on the back center of the bow.

For the greeting, I chose one in the Layering Leaves Stamp Set. These fonts and sentiments are so pretty and useful. There are a lot of sentiments out there, and I may even like them, but a majority of them are not things that I am going to say on a card, so I really appreciate basic greetings like the ones in this stamp set. This greeting is stamped in Bubble Bath ink (although I also tried Berry Burst). The greeting and layer underneath of Bubble Bath cardstock were both cut with dies in the Something Fancy Dies. I popped it up with Stampin’ Dimensionals to fit over the ribbon. And for my favorite finishing touch, I added three Iridescent Rhinestone Jewels for a little sparkle, along with the sparkle of the ribbon!

Every page of this Delightful Floral Designer Paper has beautiful watercolor flowers and botanicals that you can use for all kinds of occasions. It has beautiful jewel-toned colors: Berry Burst, Blackberry Bliss, Bubble Bath, Calypso Coral, Fresh Freesia, Lemon Lolly, Parakeet Party, Pool Party, and Pretty Peacock. This paper would make beautiful scrapbook pages as well. Remember, you will find it in the Online Exclusives in the Stampin’ Up! Online Store or just write the name in the search box and it will come up!

You won’t be disappointed to have this paper on hand for your cardmaking and scrapbooking!

SHOP STAMPIN’ UP! ONLINE HERE!

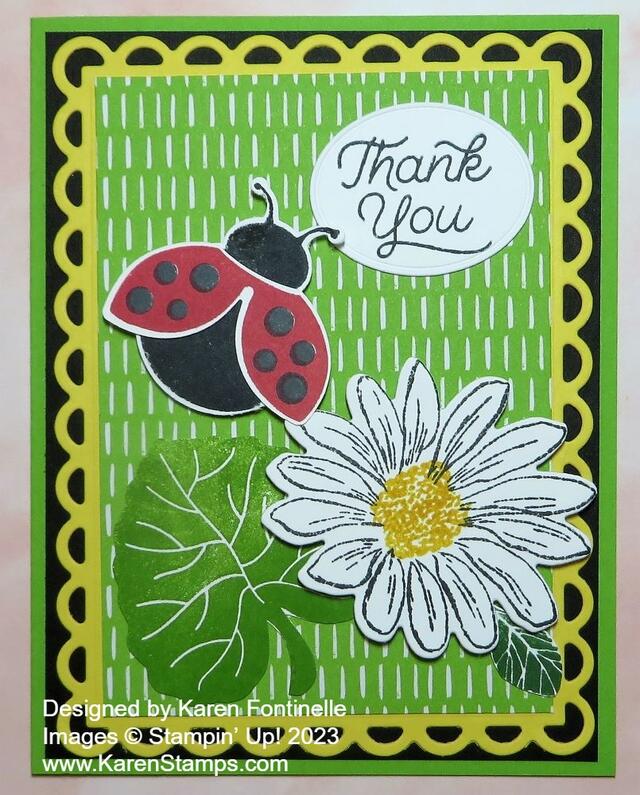
Hello Ladybug Thank You Card

Hello Ladybug Thank You Card

This Hello Ladybug Thank You Card is a little of the old mixed with the new! For some reason, this Hello, Ladybug Stamp Set caught my eye! Sometimes when you think you have no ideas or no inspiration, something will jump out at you. I hadn’t used this set in so long that I forgot that it coordinates with the Ladybug Punch! I was looking for the dies!

The card base is Granny Apple Green to match the Brights 6″ x 6″ Designer Series Paper I chose to use. At this time, that designer paper is unavailable until the week of September 25! Sorry!

Since there was black on the ladybug, I thought maybe a layer of Basic Black cardstock would look good. The black is cut at the usual layer size of 4″ x 5 1/4″. Then I thought maybe some Daffodil Delight would look good so I used the largest scalloped rectangle in the Scalloped Contours Dies. To fit the designer paper inside, I just measured the inside area and used the Paper Trimmer to cut a rectangle of designer paper.

The ladybug in the Hello, Ladybug Stamp Set is stamped with a black body and Real Red for the wings. You can either stamp the dots or simply color them in with a marker. Then use the Ladybug Builder Punch to punch out those pieces. The big leaf is also in the stamp set. It is stamped in Granny Apple Green ink and I just cut it out by hand with Paper Snips. No dies!

When this set came out last year, we often paired it with the Daisy Punch (retired). So for something new, I used the Cheerful Daisies Bundle. The daisy is stamped and then die cut, plus there are some little green leaves. The daisy and the ladybug are both popped up on Stampin’ Dimensionals, but the large leaf is glued down flat.

I wasn’t sure what greeting I wanted to use. I found this “Thank You” in the Circle Sayings Stamp Set and cut it out with the oval die in the All That Dies.

Sometimes it’s good to look through ALL your current stamp sets and find one you haven’t used in a while before it retires! This Hello Ladybug Bundle is a great one to use for summertime cards and to make this Hello Ladybug Thank You Card.

Today is the LAST DAY to earn a Bonus Coupon with every $50 purchase at Stampin’ Up! (before tax and shipping, of course!). You will get an email with your coupon code and you can spend your $5 coupon (and hopefully more coupons!) in August!

SHOP STAMPIN’ UP! AND DON’T MISS OUT!

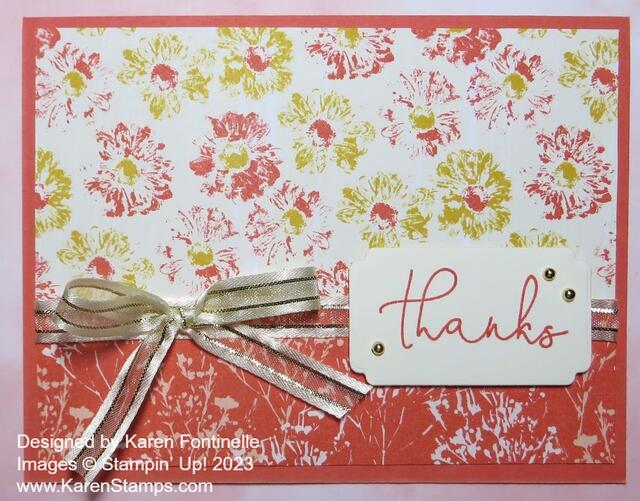
Inked Botanicals Thank You Card

Inked Botanicals Thank You Card

This Inked Botanicals Thank You Card is one of those super easy cards to make. And that’s okay to make super easy cards! We like the fancy folds and the multi-layered textured cards a lot of times, but this card design is a basic one and you should keep it in mind because you can still make beautiful cards with a basic design.

I just love the colors on this card! The card base is Calypso Coral. The designer paper is the pretty Inked Botanicals 6″ x 6″ Designer Series Paper. This paper is extra-special because it was hand-crafted by the Stampin’ Up! in-house artists. They inked up these florals and pressed them onto paper to create the design. This gives a textured design of all these botanicals, which results in this beautiful paper! Don’t you just love to hear how the artists come up with all these beautiful products?

This Inked Botanicals Paper is 48 sheets, four sheets each of 12 double-sided designs so you will have lots of designs to choose from for your cards and projects!

This card uses two different patterns of the designer paper. There are so many combinations you could choose, all of which would be pretty together. The top paper is cut at 5 1/4″ x 2 3/4″ and the bottom portion is 5 1/4″ x 1 1/2″. When I use two papers like this, I leave some extra room for them to overlap. In this case, the overlap is about 1/4″. The measurements can be modified according to how wide you want each part to be so you can make them whatever works for you.

I usually like to add a ribbon or at least some piece of cardstock covering the seam of where the two papers meet. I think it adds to the design of the card. On this card, I added the beautiful Gold & Vanilla 3/8″ Satin Edged Ribbon around the seam and then I added a separate bow and adhered with Glue Dots.

The greeting is diecut from Very Vanilla cardstock using the label in the Something Fancy Dies. The greeting is stamped in Calypso Coral ink using the Sentimental Park Stamp Set. I love the font they used on some of the words in this set. For a little more embellishment, I added three gold Festive Pearls.

Here’s another card I made with different patterns of the Inked Botanicals Paper.

Don’t overlook this pretty Inked Botanicals 6″ x 6″ Designer Series Paper! You can purchase the whole Inked Botanicals Suite Collection and get the paper, the stamp set, two punches, and ribbon. You will be all set with perfectly coordinated products. Take advantage of the Bonus Days at Stampin’ Up! and earn a $5 coupon for every $50 you spend in July.

SHOP STAMPIN’ UP! ONLINE DURING BONUS DAYS!

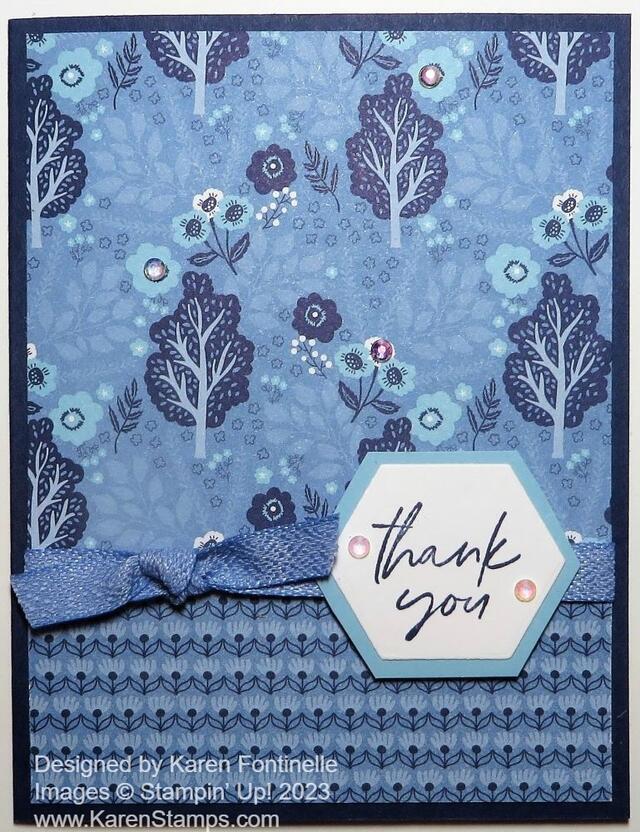
Countryside Inn Thank You Card

Countryside Inn Thank You Card

On this Countryside Inn Thank You Card, I used two sides of the same paper in the Countryside Inn Designer Series Paper. I really liked this paper with the trees and then I saw the other side was cute, too, with the small little lines of flowers. There are lots of interesting designs in this package of paper once you look at them! At first, you just think it’s only about little blue and white flowers! But there is even bunny paper in there, which I used on this card.

To make this card, I just used one of the simplest designs! I cut the card layer out of the designer paper, then cut a piece 4″ x 1 3/4″ of the same paper, but turned it over and used the “other side” for the bottom portion of the card. I usually like to hide the seam where two papers meet, so I covered it with a piece of Boho Blue 3/8″ Textured Ribbon. I just tied a knot rather than a bow. I think that was just enough.

The greeting is stamped from the Something Fancy Stamp Set in Night of Navy ink. Then I diecut the greeting with the hexagon die in the Something Fancy Dies. To make the Balmy Blue layer, I just cut it by hand! Stampin’ Up! should have asked me if they should make a hexagon layer die to layer with this die! I would have said “Yes!” I popped up the greeting over the ribbon with Stampin’ Dimensionals.

The card base is Night of Navy, but I could have used one of the other coordinating blues.

Of course, for a little bling, I added some Iridescent Rhinestone Basic Jewels, both to the greeting and on a few of the flowers on the designer paper.

This is always an easy and good way to design a card! You can use any designer papers you like, colors, greetings, and embellishments.

SHOP STAMPIN’ UP! ONLINE HERE!

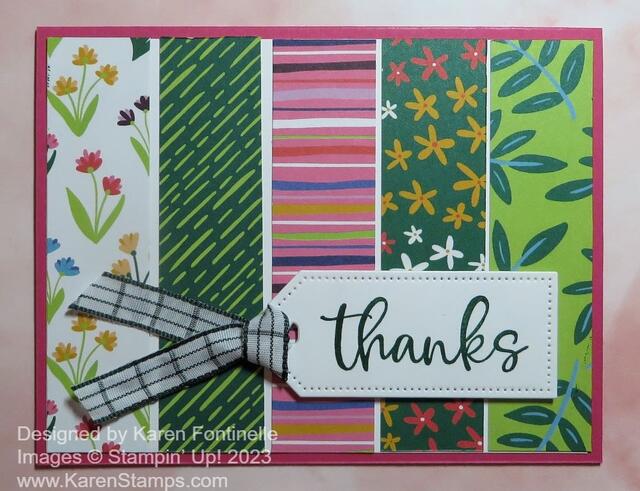
Flowers & More Scraps Card

Flowers & More Scraps Card

As I was going through my designer papers, I had lots of scraps of this one that I was tempted to throw out, but then I got the idea to make this Flowers & More Scraps Card. You can vary the width of the strips and you can make them laid out vertically as on this card or horizontally. It’s really a fun way to use up your scraps!

The paper I used is the Flowers & More 12″ x 12″ Designer Series Paper. It’s a Host Reward in the Spring Mini that you can choose for your Stampin’ Rewards if you have an order of $150 or more. You’ll find it on page 90 and you’ll see it in the upper left-hand corner. It will be retiring along with the Spring Mini but if you want a huge pack of colorful and fun paper, get this!

I think it is easiest to use a backing of Basic White cardstock or even a color if you are leaving some spaces in between the strips and want to see the coordinating color. This way if you need to trim off a tiny bit on the sides or top or bottom you could do that before adhering to the card base.

These five strips are cut at 1″ x 4″ and layered on a 4″ x 5 1/4″ piece of Basic White cardstock. You can do the math and change the width, the number of strips, the length of the scrap piece, or whatever you want to do. My card has the tiniest little space in between the strips. It might work best to adhere the strips for the ends down first and then fit the other three into the empty space in between.

The card base for this card is Melon Mambo but this designer paper has SO many coordinating colors you could use almost anything. Here is another card I made not long ago with some designer paper for Sale-A-Bration, Dandy Designs.

For the greeting, I stamped “thanks” in Shady Spruce ink and diecut it with one of the Tailor Made Tags. Because it is retiring, I used the Evening Evergreen 3/8″ Windowpane Ribbon. It’s on the Last Chance Sale for only $3.00, less than half the regular price of $7.50. Even though I used different greens I think it still goes with the card.

So if you have used up a lot of designer paper and have small scraps, try a card like this Flowers & More Scraps Card. You can go crazy with the combinations of the paper on the card!

SHOP THE LAST CHANCE SALE HERE!

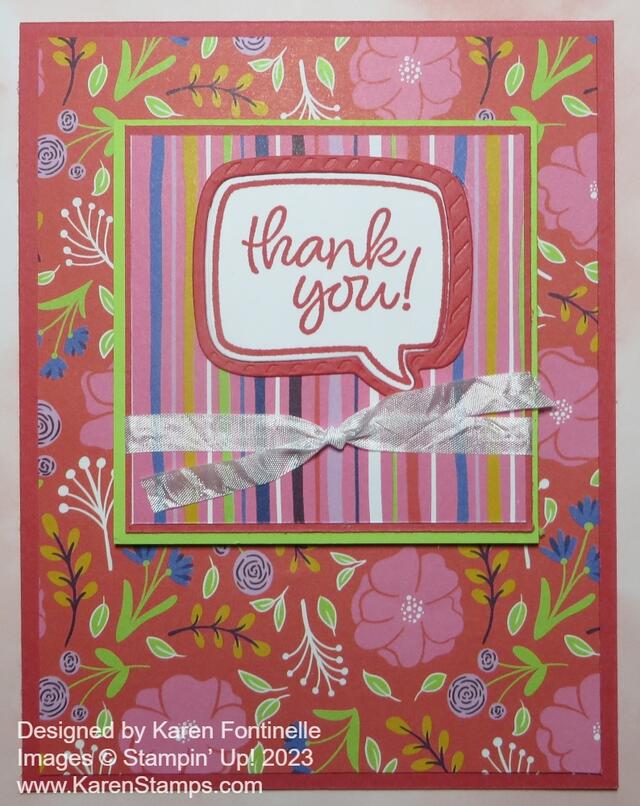
Conversation Bubbles Thank You Card

Conversation Bubbles Thank You Card

I simply can’t get enough of this designer paper, especially this pattern, but I finally got a chance to play with the Conversation Bubbles Bundle which I used for the greeting on this Conversation Bubbles Thank You Card. I think it stands out well against this busy paper and makes the whole card look fun!

Years ago Stampin’ Up! had a set with conversation bubbles as I recall, but this one takes it up a level with the diecut bubbles and borders. There are interesting edges, sizes, and textures to the bubbles, plus extra little dies like hearts, flowers, and stars. In the stamp set are fun phrases and expressions in cute fonts to use or use any other sentiments you have. The Bundle is really something you have to play with to see for yourself. Just looking at the catalog doesn’t do it justice.

This package of designer paper, Flowers & More 12″ x 12″ Designer Series Paper, is available as a Host Reward in the Spring Mini Catalog. With an order of $150 or more, you can choose it as your host benefit. It’s not your regular package of 12 sheets of paper. It has 48 sheets of paper, 4 sheets each of 12 designs! Be sure to consider it if you have a large order of $150 or more before the end of Spring Mini on May 1st! Check it out on page 90 on the top edge of the page!

This designer paper has the best coordinating colors! Some In Colors and some regular colors! For the card base, I chose Sweet Sorbet and then added a full layer of the floral pattern in the Flowers & More Designer Paper.

The center focal point is a piece of Parakeet Party Cardstock, cut at 3″ x 3″. The designer paper, this time a stripe in the same Flowers & More paper is cut at 2 3/4″ x 2 3/4″. Underneath the striped paper is a layer of Sweet Sorbet cut at 2 7/8″ x 2 7/8″. That layer is really optional, but I liked it.

The greeting uses the Conversation Bubbles Bundle and is stamped in Sweet Sorbet ink on Basic White. Then I used the die again, this time with Sweet Sorbet cardstock to get the textured border to go around the “thank you”. In the photo, you can see the little diagonal lines for texture on that border piece. I could have used just the white bubble and not used the outer border or layered it just on a small Parakeet Party rectangle or something to give it a layer.

Before I adhered the striped greeting piece to the layer of Parakeet Party, I tied around a piece of the White 1/4″ Crinkled Seam Binding Ribbon just in a knot. What would we do without that ribbon?! I use it all the time and I hope it doesn’t retire! You can even color it easily with markers or ink if you want a colored ribbon.

The center panel is popped up on Stampin’ Dimensionals, but it could be adhered flat on the card. On the inside, I would suggest putting a layer of Basic White with a little strip of designer paper or maybe even one of the other bubble greetings or die cuts. You can stamp another message on that or write your personal note without it being on dark cardstock. It would be fun to use this bright and happy paper on the envelope flap and really make the recipient excited to open your card!

There is only about a month left to shop the Spring Mini Catalog! I think by the end of the week we will have the Last Chance List and any discounts on retiring products. If there are any products in the catalog that you really really want, it might be best to order them BEFORE the Last Chance list comes out just in case things sell out. Some will for sure.

SHOP STAMPIN’ UP! ONLINE HERE!

Flowers & More Floral Print Thank You Card

Flowers & More Floral Print Thank You Card

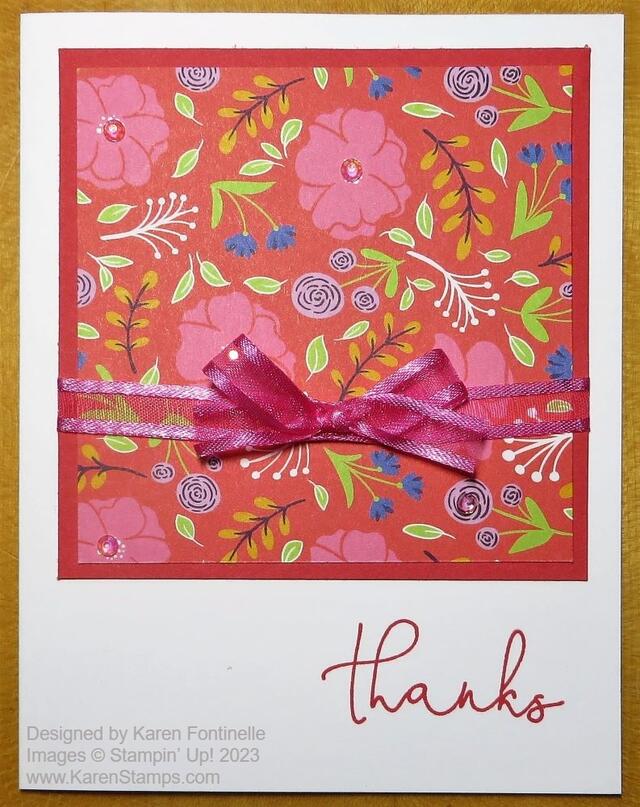
Here is basically a quick and easy card to make for any occasion. I have been dying to make a card with this particular pattern in the Flowers & More Designer Series Paper, and finally, here is my Flowers & More Floral Print Thank You Card.

This card is so simple to make! The card base is Basic White Cardstock and I just used a square piece of the designer paper for the focal point of the card. The designer paper is cut at 3 1/2″ x 3 1/2″ and is layered on a piece of Sweet Sorbet Cardstock that is cut at 3 3/4″ x 3 3/4″. Even though the card is very simple in design, I played around with it a lot! This is the design I intended to make, but I played around with adding another pattern of designer paper as a regular layer on the card and a smaller square of the floral designer paper. I also played around with the layer under the designer paper square. I tried several different colors and settled on Sweet Sorbet.

Before adhering the designer paper square to the card, I tied around my last little bit of the Polished Pink 3/8″ Open Weave Ribbon. I also added a few Iridescent Rhinestone Basic Jewels in the flower centers.

For the greeting, I stamped a simple “thanks” in Sweet Sorbet ink from the Sentimental Park Stamp Set.

You could use this card design with any paper design and greeting that goes with the occasion, whatever you want it to be!

This Flowers & More Designer Series Paper is available only as a Host Reward that you can choose with an order of $150 or more. You’ll find it in the back of the Spring Mini Catalog at the top of page 90. Since it’s in the Spring Mini, you only have until May 1st to earn this paper. It has beautiful bright patterns in its 48 sheets of paper, 4 each of 12 designs! That’s a lot of paper!!

This card design on my Flowers & More Floral Print Thank You Card is so easy to make, you could make several with different designer papers and then leave the bottom space blank until you need the card for a specific occasion!

SHOP STAMPIN’ UP! ONLINE HERE!

Sentimental Park Thank You Card

Sentimental Park Thank You Card

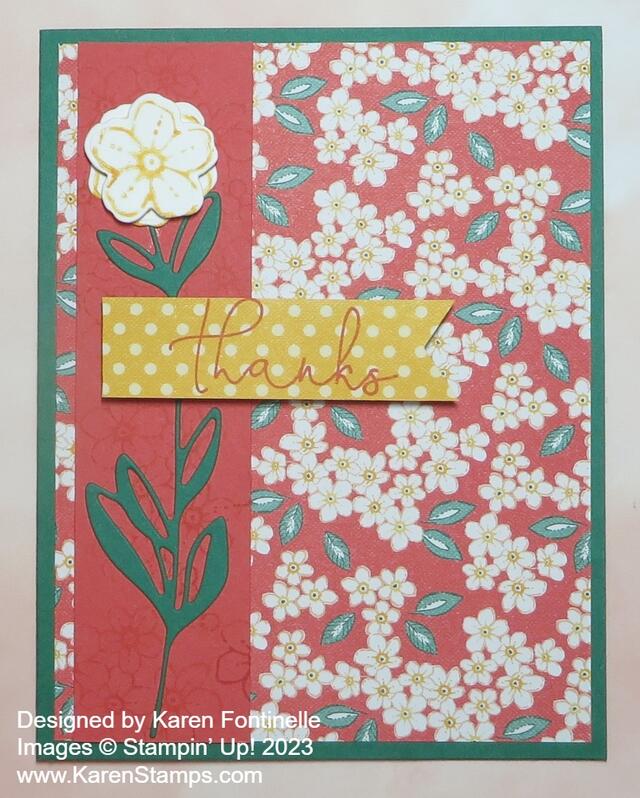
This Sentimental Park Thank You Card is my first attempt working with the Sentimental Park Bundle in the Regency Park Suite. I didn’t even look around at ideas online although I did look in the Spring Mini Catalog. I just pulled out the Regency Park 6″ x 6″ Designer Series Paper, picked out a paper I liked, and started playing around with it and the stamp set.

I first checked the coordinating colors with the designer paper and wrote the names in marker on the back of the cardboard so they are easier to read! I do this with all my designer paper. For this pattern, I pulled out the Shaded Spruce cardstock, which I haven’t used all that often.

I was curious about some of the dies in the Sentimental Park Dies, especially the LONG flower stem! I cut out the Shaded Spruce cardstock with that die and then stamped two flowers to layer together. The flowers are stamped with the daisy stamp which I inked up using the Mango Melody Stampin’ Write Marker to make two flowers I layered them with the Black Stampin’ Dimensionals.

The card needed something to offset the flower and stem to show up better so I cut a strip of Sweet Sorbet cardstock about 1 1/4″ wide. For a little more interest, I stamped a group of flowers in the stamp set with Sweet Sorbet ink but I stamped off first. You could also use Versamark ink. That gave just a little background on the Sweet Sorbet strip without clashing with the designer paper on the front of the card. I glued the flower stem carefully on the Sweet Sorbet strip with the layered flowers at the top.

For the greeting, I stamped the word “thanks” from the Sentimental Park Stamp Set. I first stamped it on Basic White, but then I got the idea to stamp it on a strip of designer paper, the piece with white dots on the Mango Melody background. I just flagged one side and adhered it, popped up on small pieces of Foam Adhesive Strips.

On the inside, adhere a layer of Basic White or another light color, and consider putting a strip of matching designer paper to decorate the inside of the card I little bit!

Don’t forget, there is only about a week left of Stampin’ Up! Sale-A-Bration, your chance to earn some FREE products!

SHOP STAMPIN’ UP! ONLINE HERE!

Flowers & More Flowers Thank You Card

Flowers & More Flowers Thank You Card

If you begin with pretty paper, it’s easy to make a pretty card without hardly thinking about it! This card is one of those!

Each Stampin’ Up! catalog has some special goodies in the back for party Hosts. Even if you do not have a stamping party with guests who order, you may order these Host specials based on your own personal order total. A single personal order, or even one with a couple of friends together, earns Host Rewards at $150 or more.

If you look in the back of the Spring Mini Catalog on page 90 you will see the Host Rewards and a little chart. Up at the top is a special package of designer paper, Flowers & More 12″ x 12″ Designer Series Paper with 48 sheets of paper!! That’s a lot of paper! You receive four each of 12 double-sided designs. Another Host special is the At The Pond Stamp Set with a couple of frog images and accessory stamps to stamp a little scene. The only way to get these two items is to earn Stampin’ Rewards.

I just recently chose this package of designer paper as my Host Reward for my order. Even though it has a higher value, you can add this paper to your Rewards and it will be valued at $18.00. So instead of choosing $18.00 worth of other merchandise, you can choose this. I think a lot of us forget about these Host special items!

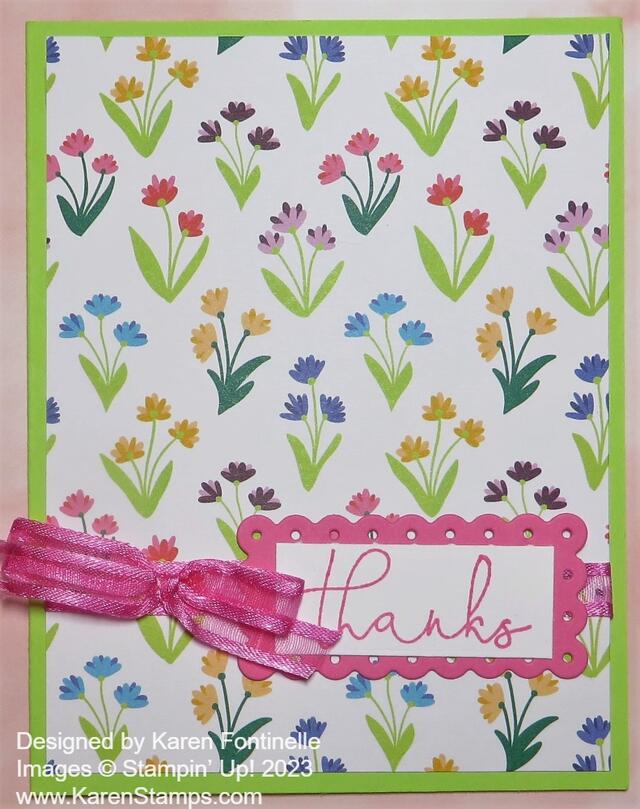
To make this card I chose a Parakeet Party card base and layered this pattern with the little flower bouquets on the front of the card. That’s really all it needs, except for a greeting! The paper makes the card on its own, I think!

For the greeting, I chose the word “thanks” in the Sentimental Park Stamp Set in the Spring Mini. I cut out a rectangle to fit on the Polished Pink die-cut scalloped rectangle in the Scalloped Contours Dies in the Stampin’ Up! Annual Catalog. For a little extra, I tied around a piece of Polished Pink 3/8″ Open Weave Ribbon and adhered a small bow.

That’s all there is to this card! Next time to have an order that qualifies for Host Rewards, be sure to check out the Flowers & More Paper or the special stamp set, At The Pond.

SHOP STAMPIN’ UP! ONLINE HERE!

Expressions in Ink Thanks Card

Expressions in Ink Thanks Card

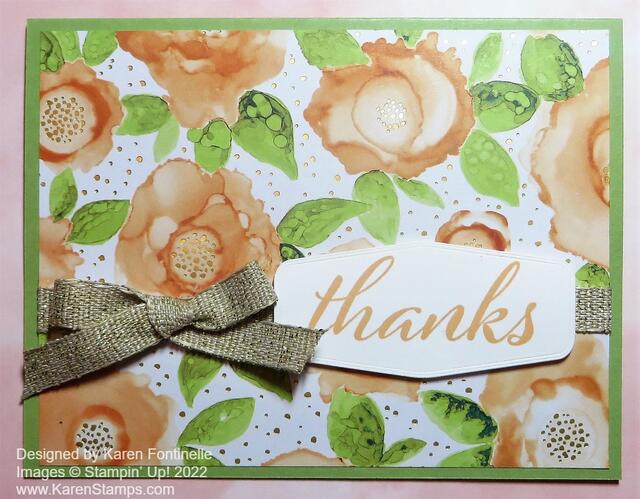
I have loved this Expressions In Ink Designer Series Paper and thought I would just make a simple card with it to enjoy the paper some more before it retires. Yes, it is on the Last Chance List but is still available as I write this so grab some if you want to stock up or finally get it. I made this basic Expressions In Ink Thanks Card because it is easy and it really shows off the gorgeous paper with gold foil accents.

The card base is Mint Macaron to match the leaves on the designer paper. There are several greens in the whole package of paper, actually quite a long list of coordinating colors that go with the paper. I intended to use the opposite side of the paper for the bottom portion of the card, but the papaya-colored florals on the front were too pretty to cover up even a small area!

I adhered a piece of the 3/8″ Fine Art Ribbon across the front of the card. This is a beautiful soft, natural ribbon with shiny gold threads in it. It is easy to tie and use since it is soft. I tied a separate bow and adhered it to the card using Mini Glue Dots. This ribbon is on sale right now on the Last Chance List so get some before it retires!

The greeting is in the Artistically Inked Stamp Set which may no longer be available. You can use any greeting you would like for the occasion. It is stamped in Pale Papaya Ink and die cut with one of the Tasteful Labels Dies. These dies are another thing on the Last Chance List, retiring soon, while supplies last. I hate to see these go! The greeting is adhered with Stampin’ Dimensionals®.

The photo of this card really doesn’t do it justice! If you could see it in person it is so pretty! It’s all about the paper! Here is another card I made with this same paper design but with a lot more embellishment.

Be sure to check the Last Chance Sale and list of retiring products from the current Annual Stampin’ Up! Catalog because, as you can see, some products are selling out already. Not everything is on sale but some things are. You can also check the Clearance Rack any time you are ordering to see if any bargains there are for you!

SHOP STAMPIN’ UP! ONLINE TODAY!

Delicate Dahlias Thank You Card

Delicate Dahlias Thank You Card

This Delicate Dahlias Thank You Card is one that you can make if you earn the Delicate Dahlias Stamp Set during these last two weeks of Sale-A-Bration at Stampin’ Up! During Sale-A-Bration you can qualify for a FREE product in the Sale-A-Bration Brochure with every $50 purchase, or with a $100 purchase, you can earn an extra special $100 Level product such as this Delicate Dahlias Stamp Set. This stamp set has been quite popular because the flowers are so beautiful! As I write this, it is still available, but I wouldn’t wait until the last minute! Sale-A-Bration ends on Thursday, September 30. Don’t miss the fun!

I envisioned this card having a background of a black and white stripe with bright colored flowers to contrast. As I started looking through my designer paper, I found this paper in the Beautifully Penned Designer Series Paper, one of the $50 Level products you can earn for FREE during Sale-A-Bration. This paper coordinates with the Hand-Penned Designer Series Paper in the Stampin’ Up! Annual Catalog except it is in black and white! Sometimes it is fun to leave it as is and sometimes it is fun to color in or use any of various coloring techniques. The card base is Basic Black with this scalloped pattern paper as a layer,

The dahlias were all stamped in Memento Black although perhaps Stazon would have been the better ink choice with watercoloring. It wasn’t exactly watercoloring but I used a Blender Pen and added ink from an ink refill bottle in the lid of the ink pad. The colors I used were Real Red, Pumpkin Pie, and Daffodil Delight. I didn’t worry about proper shading or anything like that! I just colored in with the ink letting some areas be lighter if I was running low on ink on the Blender Pen and darker if I just touched it to the ink. There are no dies so I just cut the flowers out by hand using my Paper Snips! The trick is to just relax and enjoy the experience! Don’t try to cut perfectly because there are lots of ins and outs with these flowers. A little white showing on the edges of the petals is no big deal. Same way with the coloring. If you leave some white spaces, don’t worry about it! I also stamped and colored the leaves in the set.

Before adhering the designer paper to the card base, I wrapped the Black & White 1/4″ Gingham Ribbon around to the backside of the paper. Then I tied a separate bow and adhered it to the ribbon with Mini Glue Dots.

Two of the flowers are glued right on the designer paper using Multipurpose Liquid Glue. The yellow dahlia is popped up on Stampin’ Dimensionals®. I just placed the leaves around randomly.

The greeting is in the stamp set and I cut it out with the Messages Die. You can just cut one greeting using the die, you don’t have to stamp and die cut the whole sheet!

On the inside of the card, I stamped a partial dahlia in Daffodil Delight in the lower right-hand corner on a layer of Basic White. You have to have a white or light-colored card layer inside with a black card base!

If you wanted to make this card a little easier, you could just stamp the flower outline in whatever color(s) you wanted and then not color them in. You can also stamp with the two-step stamp. Lots of choices!

So if you want to earn this FREE Delicate Dahlias Stamp set, you must place a $100 Stampin’ Up! order and then you can choose this stamp set as your Sale-A-Bration choice. Or you can choose 2 $50 Level products. You will get a reminder to choose the free Sale-A-Bration items you are entitled to as you place your order online. Then you can have fun making a card like this Delicate Dahlias Thank You Card or use one of the other greetings for another occasion.

SHOP STAMPIN’ UP! ONLINE HERE!