Tag Archives: thank you card

Delicate Dahlias Thank You Card

Delicate Dahlias Thank You Card

This Delicate Dahlias Thank You Card is one that you can make if you earn the Delicate Dahlias Stamp Set during these last two weeks of Sale-A-Bration at Stampin’ Up! During Sale-A-Bration you can qualify for a FREE product in the Sale-A-Bration Brochure with every $50 purchase, or with a $100 purchase, you can earn an extra special $100 Level product such as this Delicate Dahlias Stamp Set. This stamp set has been quite popular because the flowers are so beautiful! As I write this, it is still available, but I wouldn’t wait until the last minute! Sale-A-Bration ends on Thursday, September 30. Don’t miss the fun!

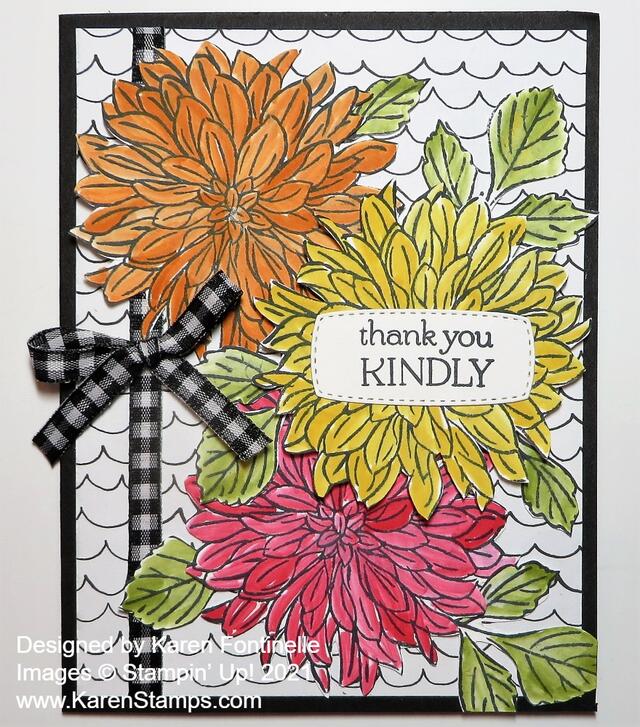
I envisioned this card having a background of a black and white stripe with bright colored flowers to contrast. As I started looking through my designer paper, I found this paper in the Beautifully Penned Designer Series Paper, one of the $50 Level products you can earn for FREE during Sale-A-Bration. This paper coordinates with the Hand-Penned Designer Series Paper in the Stampin’ Up! Annual Catalog except it is in black and white! Sometimes it is fun to leave it as is and sometimes it is fun to color in or use any of various coloring techniques. The card base is Basic Black with this scalloped pattern paper as a layer,

The dahlias were all stamped in Memento Black although perhaps Stazon would have been the better ink choice with watercoloring. It wasn’t exactly watercoloring but I used a Blender Pen and added ink from an ink refill bottle in the lid of the ink pad. The colors I used were Real Red, Pumpkin Pie, and Daffodil Delight. I didn’t worry about proper shading or anything like that! I just colored in with the ink letting some areas be lighter if I was running low on ink on the Blender Pen and darker if I just touched it to the ink. There are no dies so I just cut the flowers out by hand using my Paper Snips! The trick is to just relax and enjoy the experience! Don’t try to cut perfectly because there are lots of ins and outs with these flowers. A little white showing on the edges of the petals is no big deal. Same way with the coloring. If you leave some white spaces, don’t worry about it! I also stamped and colored the leaves in the set.

Before adhering the designer paper to the card base, I wrapped the Black & White 1/4″ Gingham Ribbon around to the backside of the paper. Then I tied a separate bow and adhered it to the ribbon with Mini Glue Dots.

Two of the flowers are glued right on the designer paper using Multipurpose Liquid Glue. The yellow dahlia is popped up on Stampin’ Dimensionals®. I just placed the leaves around randomly.

The greeting is in the stamp set and I cut it out with the Messages Die. You can just cut one greeting using the die, you don’t have to stamp and die cut the whole sheet!

On the inside of the card, I stamped a partial dahlia in Daffodil Delight in the lower right-hand corner on a layer of Basic White. You have to have a white or light-colored card layer inside with a black card base!

If you wanted to make this card a little easier, you could just stamp the flower outline in whatever color(s) you wanted and then not color them in. You can also stamp with the two-step stamp. Lots of choices!

So if you want to earn this FREE Delicate Dahlias Stamp set, you must place a $100 Stampin’ Up! order and then you can choose this stamp set as your Sale-A-Bration choice. Or you can choose 2 $50 Level products. You will get a reminder to choose the free Sale-A-Bration items you are entitled to as you place your order online. Then you can have fun making a card like this Delicate Dahlias Thank You Card or use one of the other greetings for another occasion.

SHOP STAMPIN’ UP! ONLINE HERE!

Black and White Pattern Party Thank You Card

Black and White Pattern Party Thank You Card

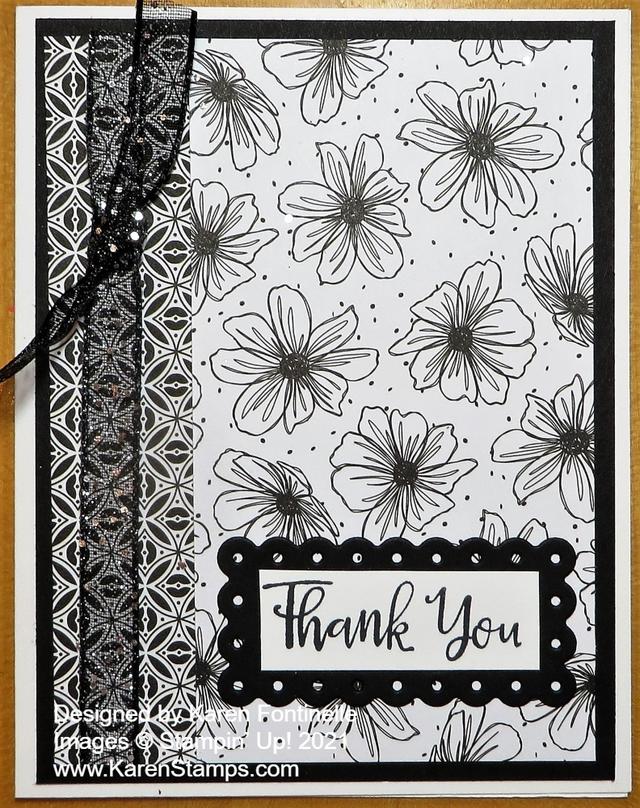
This Black and White Pattern Party Thank You Card is NOT the card I was planning to make AT ALL! It just happened! So when you start to stamp, you don’t really know what you are going to end up making! Even when you think you know!

I was planning to make a card with the Art Gallery Stamp Set, stamped on our new Linen Paper, and was looking for designer paper to go with the card, possibly. When I caught a glimpse of these two black and white patterns together in the package, that was it! I’ll do the Art Gallery card another time!

The card base is Basic White Cardstock with a layer of Basic Black. Then I just layered the two patterns of the Pattern Play black and white paper, one a narrow strip. I added a strip of the Black 3/8″ Glittered Organdy Ribbon and tied a knot with a smaller piece. I think it dresses up the card and makes it fun! I tried a bow but that seemed like too much with the glittery ribbon. It’s not a “fancy” card, just a fun one with the ribbon!

The “Thank You” greeting is stamped from the Peaceful Moments Stamp Set, one carried over into the new catalog. I die-cut it with the same die as the black layer underneath from the Scalloped Contours Dies. I could have measured the empty space in the middle of the black piece and then cut the white greeting piece down, but I cut the white die-cut and then used the little lines from the die-cut to cut the white piece.

I want you to know about the Pattern Party Designer Series Paper. It is a Host item which means you can only purchase it when you have a order of $150 or more. We often don’t pay that much attention to the Host items, there are also a few stamp sets, and these products are available to Hosts (or for your individual order) as Rewards at a reduced price from their value. This Pattern Party DSP is a package of 48 sheets of paper, 4 each of 12 double-sided designs. Lots of different coordinating colors and will be lots of fun to use! Just remember this package when you are placing a “Hostess” order of $150 or more. This term comes from when we had more home parties and the person holding the stamping party with her friends was the Hostess and got free merchandise based on the total for the party. Now with people ordering individually online, it also works for your own orders of $150 to choose Stampin’ Rewards. You will find this paper in the back of the catalog on page 171. You will love it!

This Black and White Pattern Party Thank You Card is easy to make but so striking with just the black and white design. You could use a plainer black or white ribbon on the side too. It would also be fun to color in the white flowers on another card! It reminds me of the True Love Designer Paper in the Spring Mini Catalog that is all black and white as on this card. Be sure to check out the Pattern Play DSP to see all the colors and patterns next time you have a large order or combine orders with friends!

Today is the LAST DAY to get the May Paper Pumpkin Kit in your mailbox with enough supplies to make 9 cards for ONLY $5.00, including shipping!! It’s a real “steal” with the baseball-themed cards so don’t “strike out” by missing it! If you have subscribed before but would like to try Paper Pumpkin again, the same email address may not work again but you could use another one. Use Promo Code HOMERUN0521.

Paper Pumpkin Batter Up Kit

JOIN PAPER PUMPKIN TODAY HERE WITH MY LINK!

Pansy Petals Thank You Card

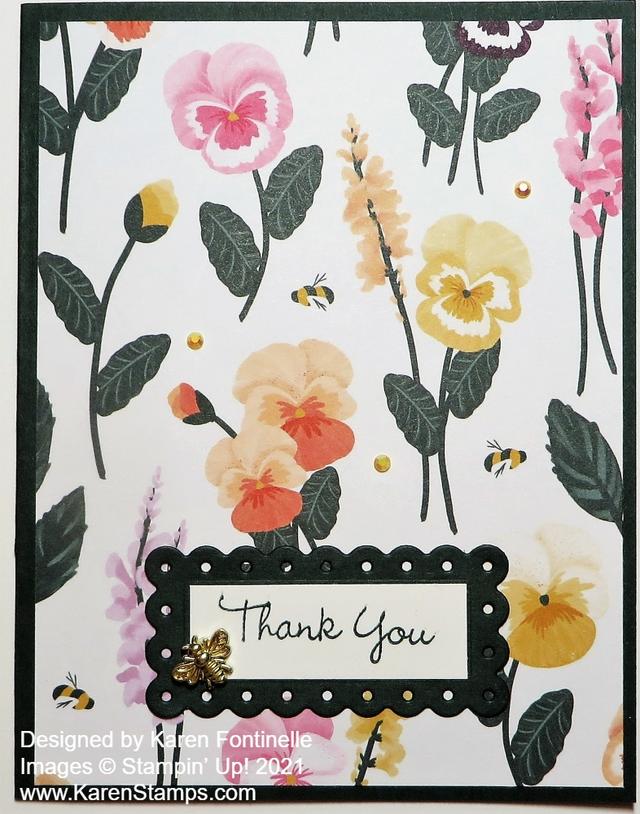
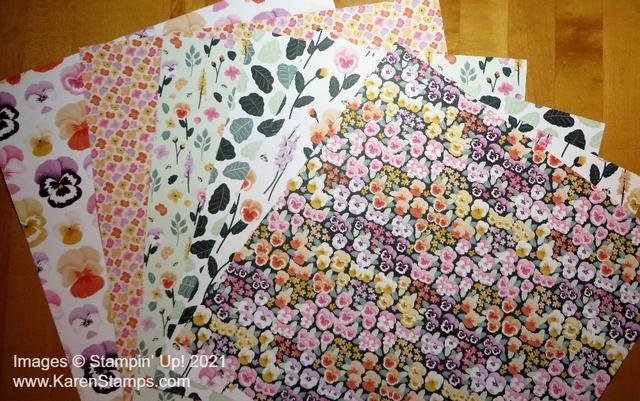
I couldn’t delay showing you this card any longer! This Pansy Petals Thank You Card is a simple card made with one of the designer papers coming soon in the new Stampin’ Up! Annual Catalog. I just wanted to make an easy card to showcase this beautiful designer paper. If you like pansies, this paper, and the whole Suite is for you!

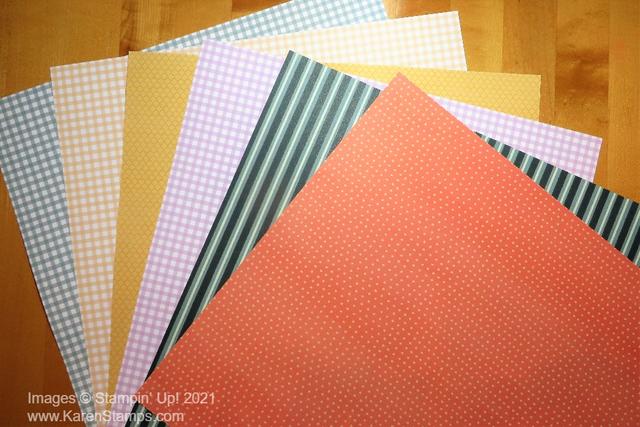
The card base is one of the new In Colors, Evening Evergreen. It’s a very dark green, different than anything we’ve had before through the years. The card front layer is from the Pansy Petals Designer Series Paper. Every paper is pretty in this package! At least one of the papers, you can use the coordinating dies to die-cut some of the printed pansies on the paper! The “other side” of the paper has gingham checks, dots, and stripes! Also, very pretty and easy to use for our cards and projects.

Pansy Petals Designer Series Paper other side

For the greeting on this card, I chose the “Thank You” in the Pansy Patch Stamp Set. It’s such a pretty font! This is stamped on Basic White Cardstock and then layered on a die-cut of Evening Evergreen Cardstock from the Scalloped Contours Dies. These are not the dies that coordinate with the Pansy Patch Stamp Set, but goes with a cute stamp set, Color & Contour.

For a little bling, I added some of the new 2021-2023 In Color Jewels in Pale Papaya scattered around on the card front. And for the finishing touch, I added a Bumblebee Trinket to the corner of the greeting! The bee trinket matches the little bees printed on the designer paper!

The new catalog begins May 4th, which will be here before we know it! In the meantime, check out the Last-Chance Product Sale and whatever is still available on the Clearance Rack, just refreshed yesterday!

Fine Art Floral Thank You Card

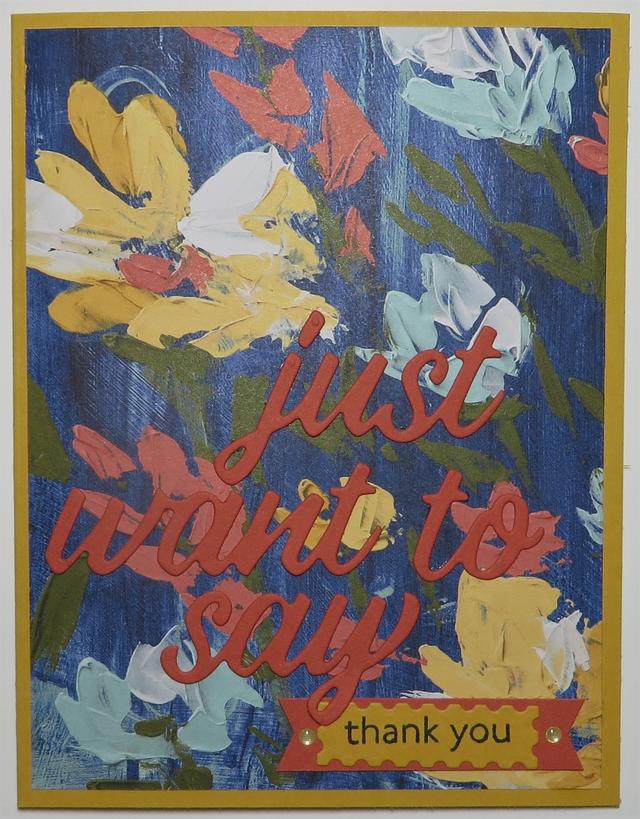
Fine Art Floral Thank You Card

It was another cold day in Houston yesterday (although 40 degrees!) and a hard freeze during the night. At least our power has stayed on except for one evening. But instead of winter, I felt the need for a colorful, bright, springtime card! We will soon be back to warmer temperatures here.

This was actually an easy card to make even though with the die-cut greeting you might think it was harder than it is! The greeting is part of the Floral Gallery Dies. It is all one die but cuts out all the words separately. It would be handy to remember to use the Adhesive Sheets on the piece of cardstock so that when the words were die-cut, they would already have adhesive on the back. I never remember to do that, so I just put teeny tiny drops of the Multipurpose Liquid Glue on the back of the words. The good part of using this liquid glue is there is a little wiggle room to get the piece placed exactly where you want it. Be sure to save the little piece that is the dot above the letter “j” when you die cut. If you lose it, as I did, just put a tiny scrap under that part of the letter and die cut it again or just punch a dot.

The card base is Bumblebee Cardstock with a layer of the dark blue pattern in the Fine Art Floral Designer Series Paper. The die-cut words are Terracotta Tile in the previous In Color collection.

Here is another way to use just one of the die-cut words on a card along with a stamped greeting on this Fine Art Floral Thinking of You Card I made previously.

To finish the greeting, I stamped the words “thank you” in Night of Navy Ink from the Art Gallery Stamp Set on a scrap of Bumblebee Cardstock and cut out with a die in the same Floral Gallery Dies. Then I layered it on a strip of Terracotta Tile Cardstock and just flagged the ends. For a little pizzazz, I added two of the smallest Gold Glitter Enamel Dots.

Get the Art Gallery Stamp Set and Floral Gallery Dies together in the Art Gallery Bundle and save 10%!

All in all a very easy card to make and yet looks impressive! Just think of putting adhesive sheets on the FRONT of the words and then using the Gilded Leafing on the die-cut words! That would be impressive! I may try that! You can’t go wrong using this Fine Art Floral Paper on quick and easy cards like this Fine Art Floral Thank You Card.

SHOP STAMPIN’ UP! ONLINE HERE!

Flower & Field Red Floral Thank You Card

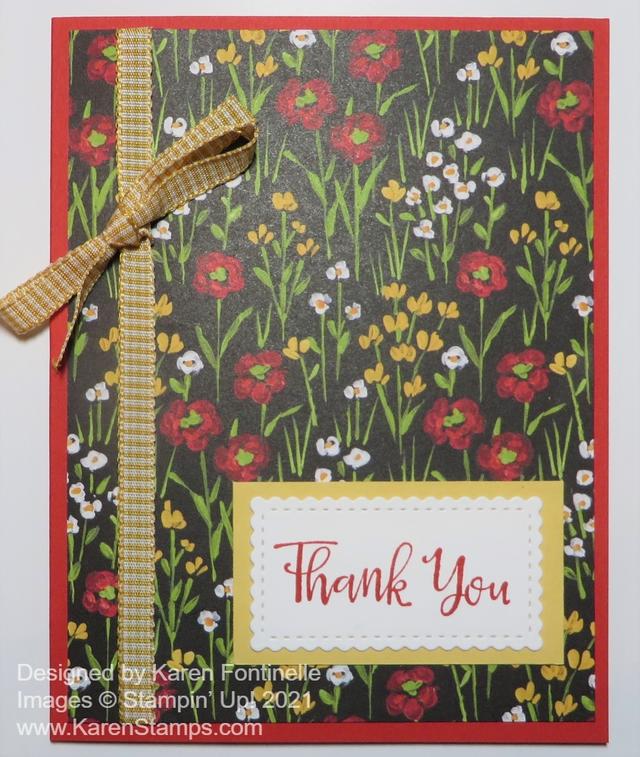
Flower & Field Red Floral Thank You Card

I may have mentioned before that I LOVE this designer paper on this Flower & Field Red Floral Thank You Card. The best part is that you can earn it FREE during Sale-A-Bration! This is an easy card design, you can change it up a little bit and still use the basic design and layout.

Sale-A-Bration is a special promotion from Stampin’ Up! that happens every year! With each $50 you spend on any Stampin’ Up! products, you can choose a free product in the Sale-A-Bration brochure. If you spend $100, you can choose from special Level 2 choices, or choose two Level 1 ($50) products. No limits!

This is the Flower & Field Designer Series Paper and you’ll find it on page 10 in the Sale-A-Bration Brochure! You can choose it FREE with a $50 purchase of Stampin’ Up! products. I just love the colors of this paper on the black background! There are many colors that coordinate with this paper. It doesn’t list Real Red but I used that on another card here and liked it just fine.

For this card, I started with a card base of Poppy Parade. Before adhering the paper to the card, I added some Bumblebee 1/4″ Gingham Ribbon and tied on a bow. I think this ribbon is really cute with this paper! I stamped the greeting from the Peaceful Moments Stamp Set in Poppy Parade Ink. the greeting is then die cut with a stitched, scalloped rectangle from the Stitched So Sweetly Dies. Rather than find one to layer this diecut on, I took the easy way out and just cut a rectangle layer of So Saffron to layer behind the greeting!

That’s all there is to this card! I love to use a piece of really pretty designer paper this way, with it being the focal point of the card.

We have just one month left of Stampin’ Up! Sale-A-Bration! If you like this Flower & Field Red Floral Thank You Card, you might want to grab a package of this paper with your $50 order!

SHOP STAMPIN’ UP! ONLINE!

Easy Sweet Strawberry Bundle Thank You Card

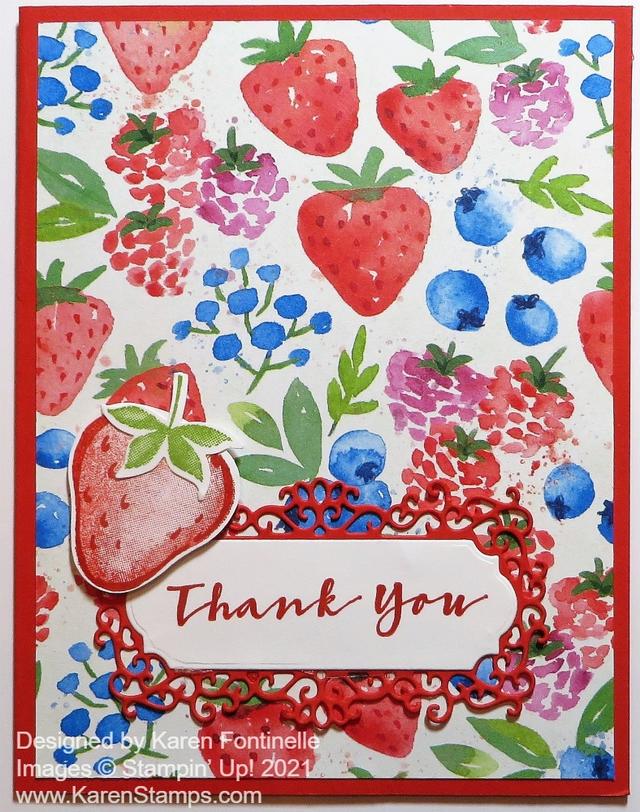
Easy Sweet Strawberry Bundle Thank You Card

This Easy Sweet Strawberry Bundle Thank You Card was quick and easy to make! I had just baked Blueberry Scones so when I saw this paper with blueberries plus strawberries I just had to use it!

I picked Poppy Parade for the card base because it is one of the coordinating colors for this Berry Delightful Designer Series Paper. This paper plus the Berry Blessings Stamp Set come together in the Berry Blessings Bundle. Would you believe you can get this fun paper plus a stamp set FREE during Stampin’ Up! Sale-A-Bration?! When you spend $100, instead of choosing two Level 1 free products, you can choose this Bundle!

This Berry Blessings Bundle also coordinates with the Sweet Strawberry Bundle in the Spring Mini Catalog! You’ll find it on page 44. Along with the Sweet Strawberry Stamp Set, you get a Strawberry Builder Punch in the Bundle! If you like strawberries, you’ve got to get all this good stuff!

The card base is Poppy Parade and then I just adhered a piece of the Berry Delightful Designer Paper to the front of the card. I found an already die cut piece from the Ornate Frames Dies in my package of cardstock so I just used that! That was easy! For the greeting, I stamped the “Thank You” from the Sweet Strawberry Stamp Set in Poppy Parade Ink and then cut that out with the matching die in the same Ornate Frames set.

Of course, I wanted to use my new Strawberry Punch. I stamped the strawberry in two-steps from the Sweet Strawberry Stamp Set along with the leaflet that goes on top of the strawberry. I punched out the strawberry and leaf with the punch and popped it up next to the greeting. Cute and done!

Unbelievably, Sale-A-Bration is about half over already! Be sure to make your shopping list so you don’t miss out on any products you really want! This Sweet Strawberry Bundle and the Berry Blessings Bundle are going to be fun to make cards with and other projects with spring and strawberry season coming up!

SHOP STAMPIN’ UP! ONLINE HERE!

Heartwarming Hugs Thank You Card

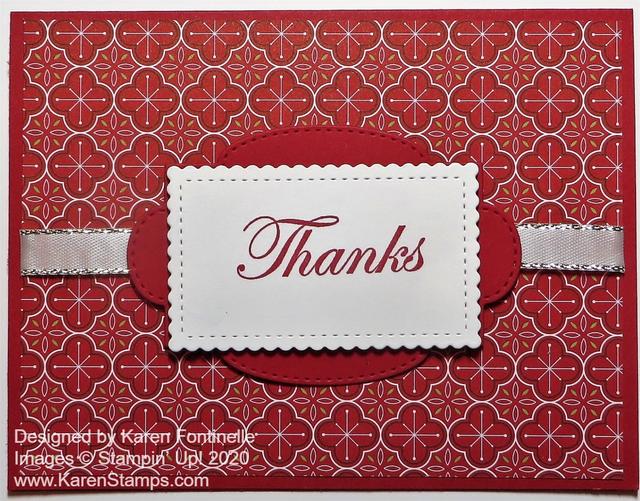
Heartwarming Hugs Thank You Card

Now that the holidays are over, it’s time to write a few thank you notes for gifts you received. At least that is the old-fashioned way of doing things and I think still the best! Which would you rather receive? An email on your computer or a handmade card in the mail with a handwritten note thanking you for a gift you gave or sent to someone?

Christmas may be over but you can still get out any leftover Heartwarming Hugs Designer Series Paper that you have and make a whole assortment of cards! If you look closely at the paper, it has no Christmas or holiday designs, just reds and greens. You can still use this paper for almost anything because it is not specifically designed for Christmas!

This easy card just starts with a Real Red card base with a layer of one of the patterns in Heartwarming Hugs. This paper is on the Year-End Closeout Sale at Stampin’ Up! but the inventory is running low so if you want it, order it soon! I wrapped a piece of Silver 3/8″ Metallic Edge Ribbon around the middle of the designer paper before adhering it to the card base.

The greeting is stamped in Real Red Ink in the Good Morning Magnolia Stamp Set. I die cut the greeting with a scalloped rectangle in the Stitched So Sweetly Dies. Then this was layered on another die in the set in Real Red. If you wanted to embellish this card further, you could add one kind of jewel or another on the sides of the Real Red die-cut.

Add a Whisper White layer to the inside and write your thank you note for your lovely gift or gathering or whatever you want to write! The recipient is sure to be impressed with your manners and cardmaking skills!

Dandy Garden Thank You Card

Dandy Garden Thank You Card

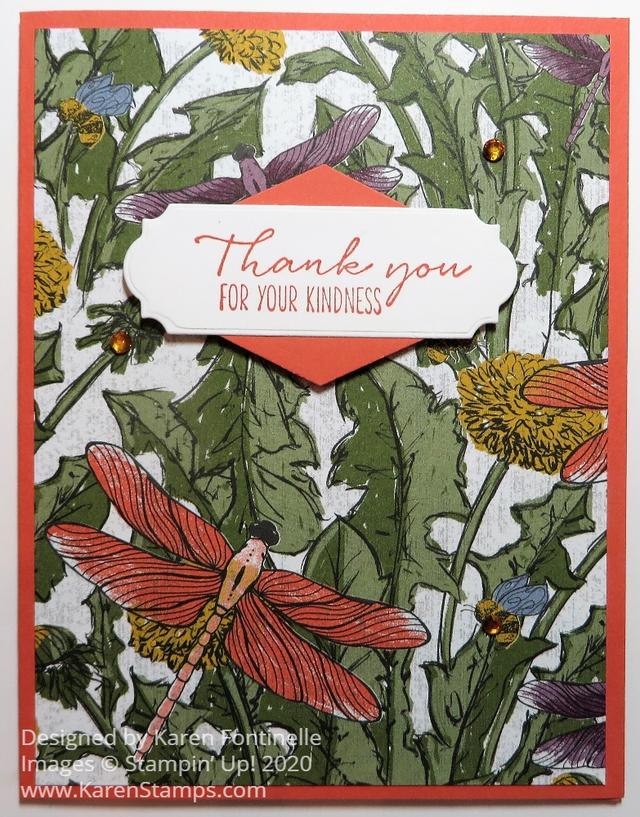
If you want to make a quick and easy card, make something like this Dandy Garden Thank You Card. This designer paper is one that is coming in January 2021 in the Spring Mini Catalog that is bright and colorful and easy to use. One side of the sheets has colorful plants and dragonflies and the other side has generic patterns that are also fun to use with the nature patterns or on their own.

For something bright and different, I used Calypso Coral as the card base. It IS one of the coordinating colors for this designer paper, but it might not be your first choice seeing all the greenery in the papers. But on this paper, some of the dragonflies were Calypso Coral so I wanted to showcase that color. I think it might have been pretty, too, to use Blackberry Bliss cardstock as a layer under the designer paper.

The greeting is stamped in Calypso Coral Ink and is from the Dragonfly Garden Stamp Set. It is cut out with one of the Ornate Frames Dies. Then the greeting is layered over a piece of Calypso Coral punched with the Tailored Tag Punch. I popped that up on Stampin’ Dimensionals.

For a little bit more pizzazz, I added some Holiday Rhinestone Jewels on the card front in the yellowish color which might be named Pumpkin Pie!

That’s how easy this card is! Make a card base. Layer on a piece of designer paper. Stamp a greeting and layer it on another piece if you like. Add some jewels or sequins for a bit of bling! You could do this with any designer paper for any occasion. If you wanted to step it up, you could add a bit of ribbon or some jewels on the greeting itself.

Remember, these new products will be available in January in the January-June 2021 Mini Catalog along with two months of Sale-A-Bration! If you need an easy card, use this card design like I did on this Dandy Garden Thank You Card.

Flowers For Every Season Thank You Slimline Card

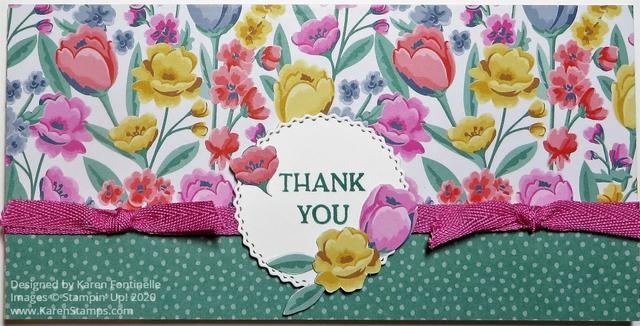
If you are looking to make a “happy card”, look no further than this Flowers For Every Season Thank You Slimline Card! Some days you just need something “happy” and the flowers and colors in this pretty paper will improve anyone’s mood or day!

This is what is called a slimline card since it is long and narrow. You can make these cards longer and a little less narrow and they will still fit in a business-size envelope. Since this paper is 6″ x 6″, I thought 6″ wide would be plenty slim-enough. Half a sheet of the designer paper would fit on the card front. This card will fit in that smaller regular size envelope that people use, not our good Stampin’ Up! envelopes.

For this card, I just made a card base of Whisper White at 6″ x 6″ folded in half to 6″ x 3″. I chose two patterns of the Flowers For Every Season Designer Series Paper for this card. There isn’t any margin, the designer paper is the full size of the card base. Actually the flowers and the polka dots are the same sheet of paper, opposite sides. I just cut each piece wide enough to overlap on the front of the card and adhered a ribbon across the seam of the two papers. It’s a very easy card to make.

The ribbon is the pretty Magenta Madness In Color Ribbon. I adhered it around the designer paper layer and then adhered the designer paper to the card base. I also tied a knot on each side of the greeting.

The greeting is in the Blossoms In Bloom Stamp Set. I wanted it to fit on this particular circle die cut so I stamped the words individually one above the other. Make sure the stamp is completely clean so you don’t get a bit of ink where you don’t want it. It is stamped in Just Jade Ink to match the polka dot paper, then die-cut with that pretty circle in the Tasteful Labels Dies. As extra little accents on the greeting, I cut out by hand a few flowers from the designer paper and adhered them to the greeting die cut. The greeting is popped up on Stampin’ Dimensionals®

If you would like to try something a little bit different but easy, try one of these narrow, slimline cards. Here is another one I made recently that I really liked making.

While we are all getting excited and beginning to get wrapped up in making holiday cards and projects out of the new August-December 2020 Mini Catalog, let’s not forget the pretty things in the Stampin’ Up! Annual Catalog. There is still time for colorful flowers like on this lovely designer paper and we could all use some bright and happy colors and cards in our lives right now so try something like this Flowers For Every Season Thank You Slimline Card.

Flowers For Every Season Thank You Card

Flowers For Every Season Thank You Card

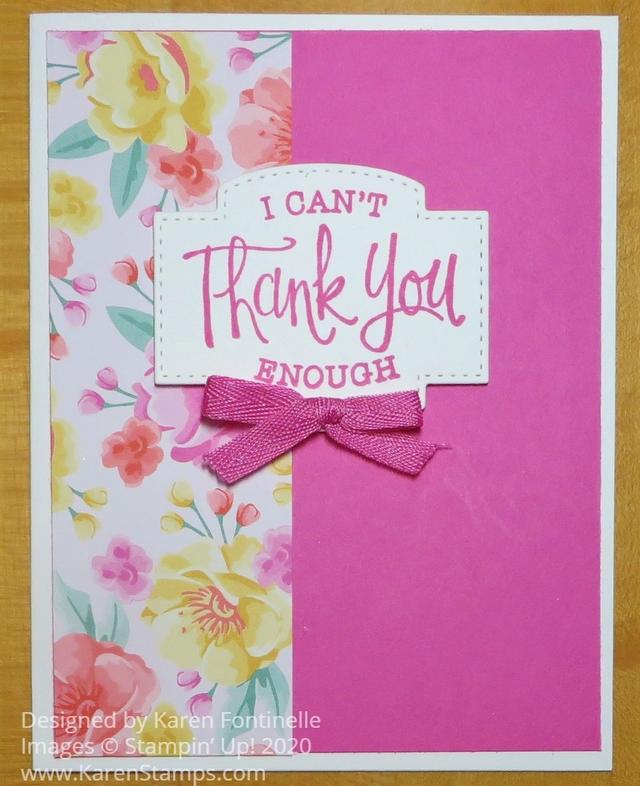
If you are in need of a cheerful, bright, and happy card, you most likely will want to choose this designer paper I used on my Flowers For Every Season Thank You Card. The bright florals on this piece of designer paper goes with the new In Color, Magenta Madness and that’s about all you need!

The card base is Whisper White with a Magenta Madness layer. I added a strip of the Flowers For Every Season 6″ x 6″ Designer Series Paper just to the side. You can make it whatever width you want. Almost any of the papers in this package are sure to brighten someone’s day!

The greeting is stamped with Magenta Madness ink on a piece of Whisper White Cardstock with the So Sentimental Stamp Set. This greeting fits perfectly in this die from the Stitched So Sweetly Dies. I love the stitched border around this die!

This is such a simple card design! Anyone can make it and you can change the greeting for lots of other occasions. And for just a little embellishment, I tied a bow with the Magenta Madness 1/4″ 2020-2022 In Color Ribbon and adhered it with a couple of Mini Glue Dots.

If you like the Flowers For Every Season Designer Series Paper, here is another card I made using this paper.

When you need some quick and easy cards, this card is the way to go!

This is the last week for Bonus Days at Stampin’ Up! For every $50 you spend in July, you will earn a $5 coupon to use in August! Bonus Days ends Friday, July 31!! Don’t delay!

Shop Stampin’ Up! Online Here!

In Good Taste Navy Z-Fold Thank You Card

In Good Taste Navy Z-Fold Thank You Card

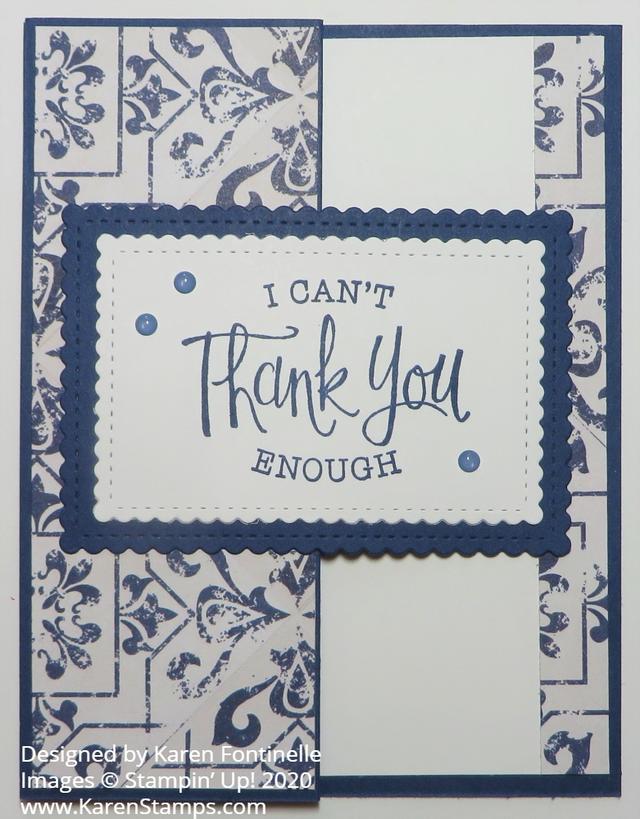
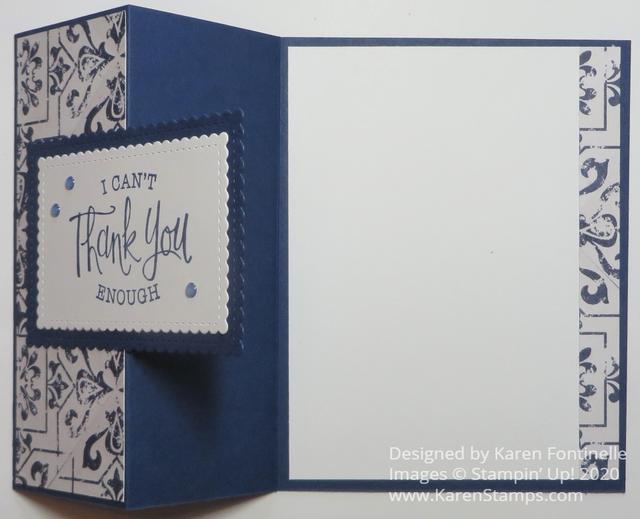
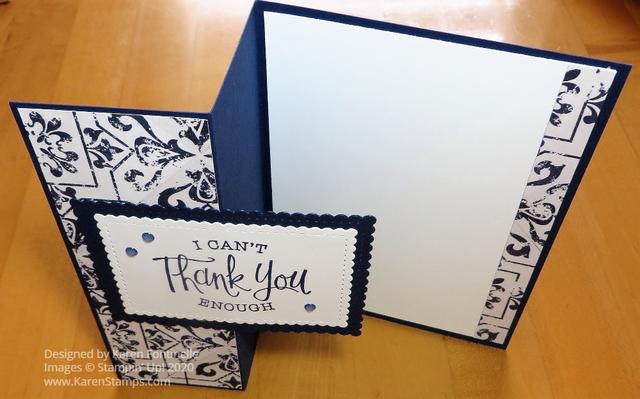
I always think it is fun and impressive to make a card with a different fold and this In Good Taste Navy Z-Fold Thank You Card uses the easiest one there is! I was working on another project with this same designer paper which I really like so I used it on this card. You can use any designer paper and change the sentiment for almost any kind of card. You can even change the shape of the greeting layer on the card.

The basic z-fold card is so easy to make! The card base starts off like any card, 8 1/2″ x 5 1/2″, scored and folded at 4 1/4″. But then you will fold the card front back on itself, in half. After scoring the card normally at 4 1/4″, next score the front of the card at half of that, 2 1/8″ and fold that part back like you see in the following photos in this post.

Next, decide on what designer paper you want to use on your card or even stamp the panels you want to add. Just do whatever you like or whatever the occasion requires. This card base is Night of Navy and the designer paper is the In Good Taste Designer Series Paper. This designer paper comes in a large package with many patterns – 12 designs, 2 sheets of each! When I first saw it in the catalog, wasn’t really interested, but after I saw how many different textures were captured on this paper, I was quite intrigued. This Night of Navy print resembles tile or china I think.

Since that folded back front panel measures 2 1/8″ x 5 1/2″, you probably want your designer paper or panel to measure 2″ x 5 3/8″ for a narrow margin around the edge or 1 7/8″ x 5 1/4″ for a wider margin. Figure it just like you would for a card.

Since the cardstock is dark, I added a Whisper White layer inside the card and put a strip of the designer paper along the edge. This was just a scrap, but it is about 1/2″ wide by 5 1/4″.

For the greeting on the front of the card, I wanted to use something kind of large. I chose one from the So Sentimental Stamp Set. It is stamped in Night of Navy ink. The die-cut scalloped rectangles I used are in the Stitched So Sweetly Dies set. When you adhere it to the front of the card, remember to only add adhesive to half of the back of the greeting so it only sticks to that folded front panel and not the rest of the card. If you are going to have a greeting on the inside of the card, you probably want that front greeting to cover up what is inside the card.

For a little bling, I added some Misty Moonlight 2020-22 In Color Enamel Dots. They are not the exact same color as the Night of Navy used on the card, but I thought they were close enough.

I could have added another color with the greeting layer and the enamel dots and ink if I didn’t want it to be the monochromatic look.

Here’s another card I made with the z-fold using really pretty designer paper from 2019, some ribbon, and a different shaped greeting on the front of the card, just to give you another idea.

Here are some other views of this card so you can see how the folds go.

In Good Taste Navy Z-Fold Thank You Card Inside
In Good Taste Navy Z-Fold Thank You Card Folds

Try your hand at making an easy Z-Fold card like this In Good Taste Navy Z-Fold Thank You Card.

SHOP STAMPIN’ UP! ONLINE!

Ornate Garden So Grateful Card

Ornate Garden So Grateful Card

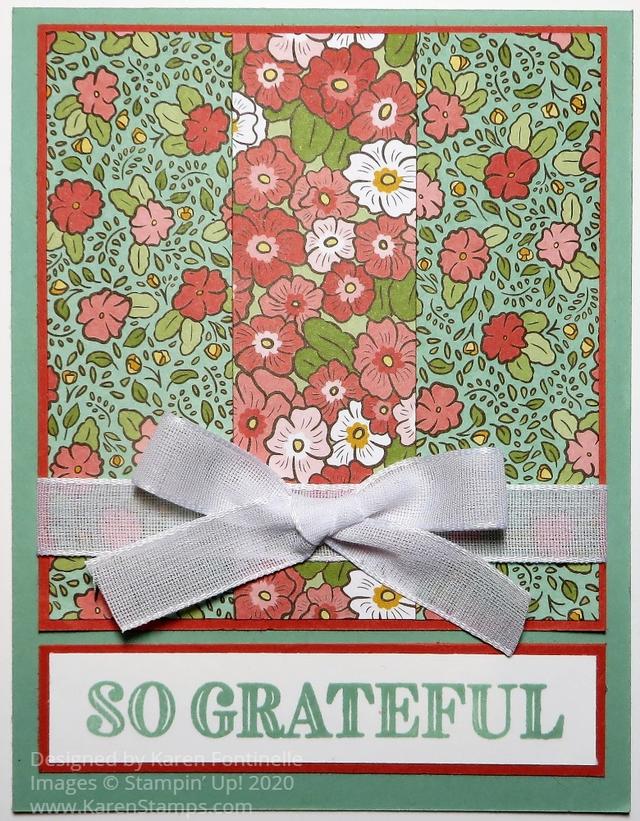
For this card, I was in the mood to use the paper in the Ornate Garden Suite and this Ornate Garden So Grateful Card is what turned out! This is a great all-occasion card that has a little different style than maybe you normally make. It’s also a great way to use up some smaller pieces of designer paper! Just change the greeting for a birthday or congratulations or even sympathy.

The card base is Mint Macaron, one of the coordinating colors for the Ornate Garden Specialty Designer Series Paper. Some of these sheets in this collection have gold foil accents.

At first I was going to just adhere the floral strips directly to the card base, but it’s a little easier to adhere to another piece of cardstock first, whether it shows or not. I started with a Whisper White piece under the floral strips with a narrow margin showing but I wasn’t crazy about that. Then I realized Terracotta Tile, another coordinating color, very evident in these floral strips, might be perfect!

You might want to make your card pieces slightly different sizes, but here are the sizes I used:

Floral Strips 1 1/4″ x 4″, Terracotta Tile layer under strips 3 7/8″ x 4 1/8″.

For the greeting, since I was using the Ornate Garden paper, I decided to use a greeting in the Ornate Thanks Stamp Set. First I stamped it in Terracotta Tile on Whisper White but I didn’t like it. I thought it looked too bold. I changed it to Mint Macaron and I could have changed the layer to Mint Macaron but I just used the Terracotta layer.

Before adhering the layer with the paper strips, I adhered a piece of ribbon around to the back on both sides and then added a separate bow. Just use a Mini Glue Dot or two to hold the bow on the card. Often this works easier than trying to tie the bow with the ribbon on the card. This white ribbon is in the Flowers For Every Season Ribbon Combo Pack. It looks like a linen ribbon and is very pretty with this paper.

I forgot to mention, I cut the sheet of Mint Macaron Cardstock in half lengthwise, rather than horizontally, so it is 4 1/4″ x 11″, scored at 5 1/2″. This produces a top of the card fold rather than the usual side fold. You can do it either way, it’s just something a little different!

Here’s another card I made using the Ornate Garden Suite, using one of the papers with larger flowers. You can use whichever floral pattern you are in the mood for!

Get out whatever designer paper you like or scraps you have and see if you can make a card similar to this one. Once you get started you may change the idea completely! It’s up to you! Start with my Ornate Garden So Grateful Card to possibly give you an idea and then let your own creativity take you wherever it wants to go!

SHOP STAMPIN’ UP! ONLINE!

Forever Greenery Thank You Card

Forever Greenery Thank You Card

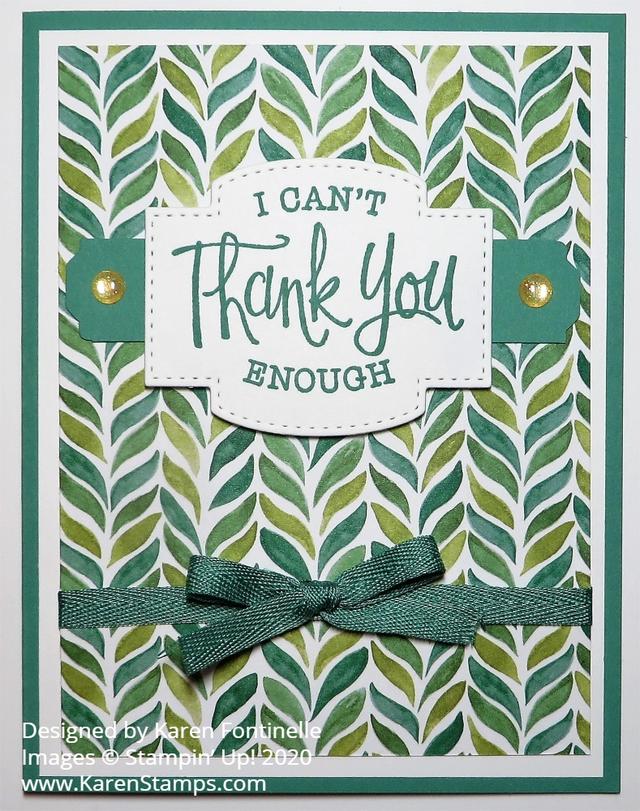
Talk about a quick and easy card to make, this Forever Greenery Thank You Card is one! I don’t think I’d even gotten around to using this designer paper so I thought it was about time.

I think every green color Stampin’ Up! has is included in this Forever Greenery Designer Series Paper. I love the new In Color 2020-22 called Just Jade. Normally I’m not a big fan of green, but I really like this color. Just Jade is the card base with a layer of Whisper White Cardstock. Then I added the designer paper layer. Originally, I planned to just have a very thin margin of the Whisper White to kind of separate the designer paper from the Just Jade. But I liked more of the white showing so I made all the standard layers.

Before adhering the designer paper layer to the Whisper White Cardstock, I wrapped around a strip of Just Jade 1/4″ Ribbon and adhered it to the back. After the layer is adhered to the card, you can tie a separate bow and adhere it to the ribbon with a Mini Glue Dot.

The greeting is stamped with Just Jade Ink with a stamp in the So Sentimental Stamp Set. This is a great stamp set for greetings! There are large ones and very small ones! Then I cut out the greeting with a Stitched So Sweetly Die.

To set off the greeting a little bit, I punched a strip of Just Jade Cardstock with the Lovely Labels Pick A Punch. Then of a little bling, I added a Gold Glitter Enamel Dot on each end.

That’s all there is to making this card! And so many pretty patterns to choose from in the Forever Greenery Designer Series Paper!

Check out all the new Stampin’ Up! catalog items and when you place your order, remember the Bonus Days promotion going on during July! With every $50 you spend in July, you will receive a $5 coupon to spend on your order in August! Be sure to look for the email from Stampin’ Up! right after you order!

SHOP STAMPIN’ UP! ONLINE!

Highland Heather Sunflower Thank You Card

Highland Heather Sunflower Thank You Card

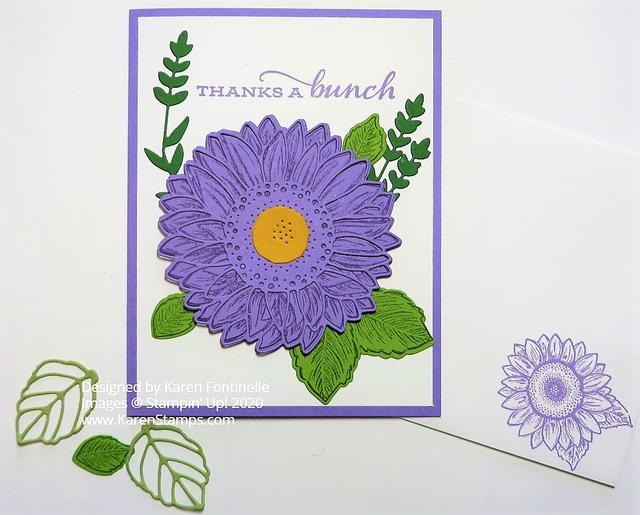
This started out not to be a card! I was going to stamp a sunflower and die cut it and decorate a glass votive candle holder. The sunflower was going to be a little large for that project and when I laid it down on the table I thought it would look pretty on a card. That is how this Highland Heather Sunflower Thank You Card came to be! Don’t be afraid t change your mind from your original idea!

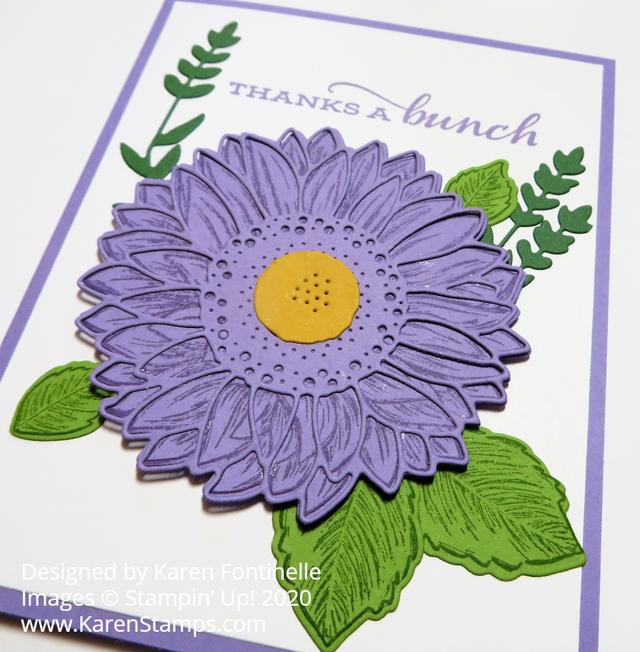
I decided to make my sunflower a different color than yellow, so I happened to choose Highland Heather for the color. I stamped the largest sunflower in the Celebrate Sunflowers Stamp Set in Highland Heather Ink. I die cut that sunflower, as well as the outline, with the Sunflowers Dies also out of Highland Heather Cardstock. I didn’t know if this would be enough contrast or not, but I liked it. I added the die-cut center out of Bumblebee cardstock.

The leaves are stamped in Granny Apple Green Ink on the same color cardstock, then die cut. The leafy stems are cut out of Garden Green Cardstock. The sunflower is popped up on Stampin’ Dimensionals and then I slid the leaves partially underneath. The greeting is also in the stamp set and is stamped in Highland Heather ink. The card base is Highland Heather.

In spite of not planning to even make this card, I was really pleased with it and may even copy myself and make some more, maybe in different colors! We are artists and can be creative with whatever we make!

The sunflower’s name comes from its tendency to face toward the sun. I didn’t even think of any symbolism about the sunflower, but I’ve read that it can symbolize adoration and loyalty. And it may mean something a little different across other cultures. Apparently it is an easy plant to grow because it is heat and drought tolerant and grows in the summer. If heat is good for sunflowers, I could be growing sunflowers filling my whole backyard because it is so hot here in Houston!!

I also stamped a Whisper White layer for inside the card with the smaller sunflower in the set just with Highland Heather Ink. That makes it easier to stamp or write a message inside the card on white instead of purple. While I had the stamp and ink out, I also stamped a corner of the envelope to make it pretty as well! Hopefully the envelope will not get separated from the card and I’ll remember to use it!

If you like sunflowers, this is a popular stamp set so check it out in the Online Store. And if you like the Sunflower Dies as well, you can buy both the stamp set and dies in the Celebrate Sunflowers Bundle at a 10% discount.

SHOP STAMPIN’ UP! ONLINE HERE!

Highland Heather Sunflower Thank You Card

Celebrate Sunflowers Stamped Thank You Card

Celebrate Sunflowers Stamped Thank You Card

I wanted to try out this stamp set but in an easy card, so I came up with this Celebrate Sunflowers Stamped Thank You Card. Demonstrators who were able to pre-order this stamp set have been making beautiful cards with it and with the coordinating dies! So be sure to check it out when you get your catalog!

Ordering from the new Stampin’ Up! Catalog begins Wednesday, June 3, no later than Noon (Mountain Time/Stampin’ Up! Time). That’s 1:00 PM Central Time. That’s the plan anyway! Stampin’ Up! will be setting up the website with the new catalog products from midnight until Noon MT so ordering will be unavailable until it IS available again!

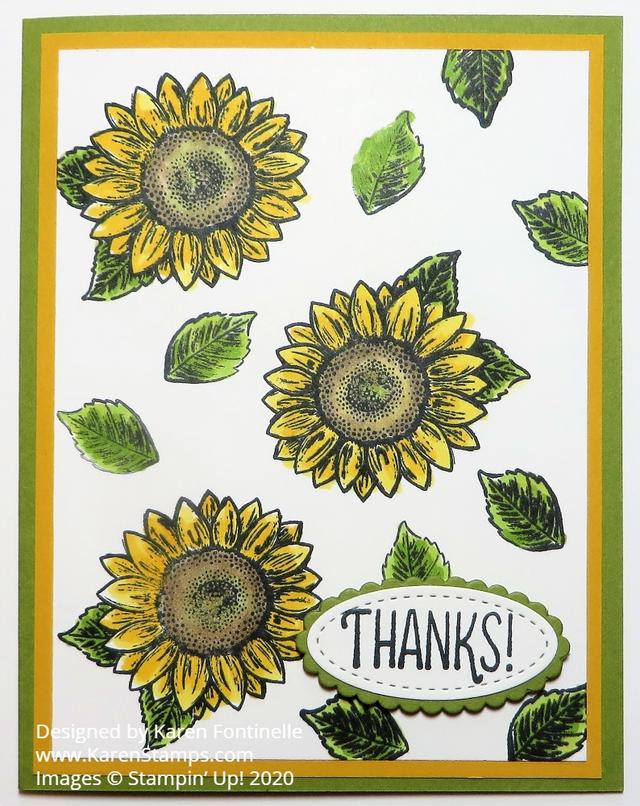
I wanted to try out the Celebrate Sunflowers Stamp Set but I wanted it to be easy. I chose the smaller sunflower and decided to just stamp a few randomly on the Whisper White card layer along with some leaves. I stamped all of these in Memento Ink and then colored in with Stampin’ Blends.

The card base is Old Olive and the next layer is Crushed Curry. I could have used the new Bumblebee color of cardstock but I didn’t think about it and I didn’t have a matching Stampin’ Blend marker.

After stamping with Memento Ink, I used various Stampin’ Blends to color in the sunflowers and leaves. If you aren’t sure which color to use on any project, get a piece of scrap Whisper White Cardstock and try out some colors on that. You get a better view of the actual color than if you color on Grid Paper or computer paper. Use the real cardstock!

For the flower centers, I used the Dark and Light Crumb Cake plus a touch of Old Olive. Maybe even a touch of yellow. For the petals, I used Light and Dark Daffodil Delight (I think) but I also had Mango Melody handy. Mango Melody has a little more orange in it. But just try out some colors and see what you are in the mood for!

The greeting I took from another new stamp set just because of space. This “Thank You” is in the Many Mates Stamp Set which has lots of great greetings. I used a die from the Stitched Shapes Dies (one of my favorite die sets!) and then layered it on an Old Olive scalloped oval from the Layering Ovals Dies.

This card would also be pretty made with Shimmery White Cardstock with just that faint hint of glimmer, plus if you wanted to watercolor the sunflowers, the Shimmery White paper holds up a little better to water than the regular Whisper White cardstock. Shimmery White is probably my favorite paper except for Real Red!

So, basically an easy card to make although it does take a little bit of time to color the sunflowers and leaves, but that’s good therapy and relaxation! And we all need that right now! Just take your time stamping and enjoy!

Remember, the last day for the current annual catalog is Tuesday, June 2 until around midnight (Mountain Time). If you want any SINGLE Stampin’ Blends, get them by Tuesday because in the new catalog they are only sold in the Combo sets of Light and Dark. So if you only need one of the colors, order now. Also, check the Last-Chance products and the Clearance Rack! Get all the bargains!

AND Stampin’ Up! has extended the early release ordering of the Ornate Garden Suite of products through June 2 since it has been so popular, I think it was to end May 31. It is in the new catalog so you can also order it with a new catalog order.

I hope you like these new sunflowers in the Celebrate Sunflowers Stamp Set! And if you like dies, you can get the Celebrate Sunflowers Bundle and save 10% off the total price! It’s all on page 13 of the new Stampin’ Up! Catalog.

SHOP STAMPIN’ UP! ONLINE HERE!