Tag Archives: Valentine card

Celebrate Love Valentine Card

Celebrate Love Valentine Card

Valentine’s Day is coming up soon and if you have this ephemera pack, you can make this Celebrate Love Valentine Card very easily! And then you can make the same card but change the greeting and have a card for another occasion.

For this card, I used the Celebrate Love Mix & Match Ephemera Pack. These ephemera packs are so handy for just punching out some diecuts and making a card with no stamping. Of course, you can add stamping and anything else you want, but if you are looking for super quick and easy, usually any of the ephemera pack Stampin’ Up! has been offering for awhile really offer the solution. You will find this Celebrate Love Ephemera Pack in the Spring Mini (January-April 2025 Mini).

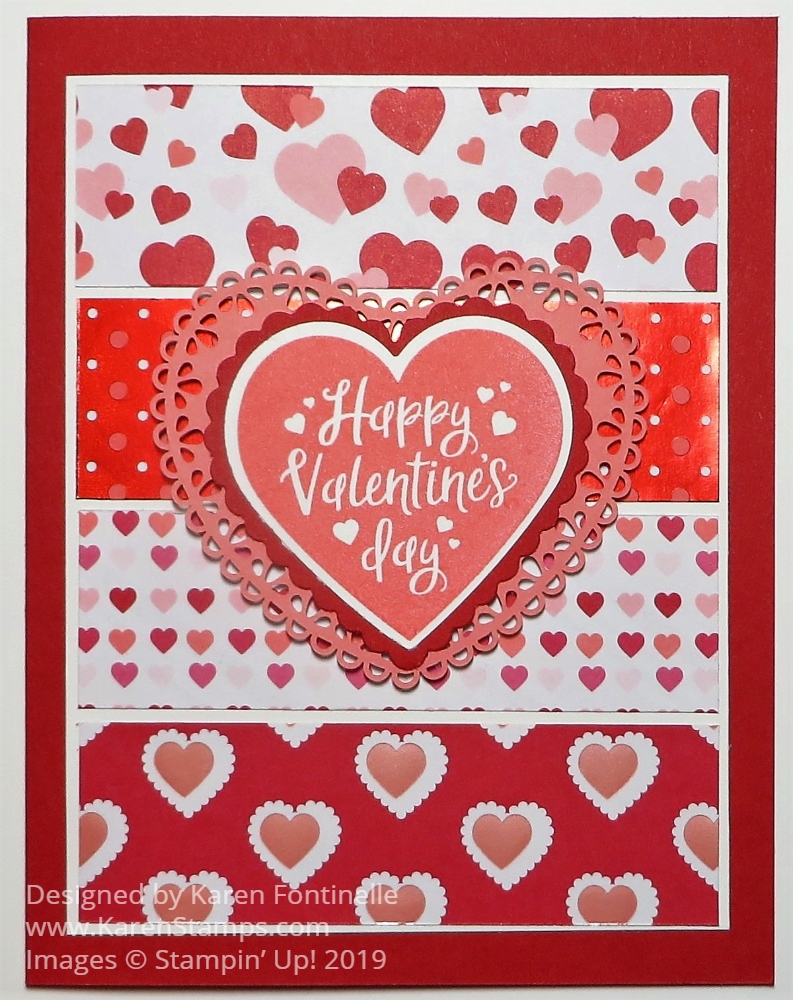
This card begins with a card base of Soft Sea Foam Cardstock with a layer of Pool Party cardstock cut at 4 1/2″ x 3 1/4″. You could make the layer 5 1/4″ x 4″ as we normally do. To the Pool Party center piece, I simply adhered the ephemera pieces using Multipurpose Liquid Glue.

I began with the white crisscross piece which to me looked like it could be a flower box or a cute little fence. Before glueing it down, I placed the flower diecuts where I wanted them so they “fit” into the flower box and just applied a little bit of glue at the top of those flowers so I could be sure they were where I wanted them to be. Then I went back and added more glue to the base of the flowers on the back to hold them securely. Adding glue to the flower box requires teeny tiny dots of glue in as many places as you can put it with a very light hand.

Above the flowers I added one of the hearts in the ephemera pack. This heart could be popped up with Stampin’ Dimensionals but I adhered it flat. Then I added a “Happy Valentine’s Day” banner in the Celebrate Love Ephemera Pack right across the heart. If you like you can add some gems or jewels for embellishments. I used the Heart Sequins which are unavailable right now but hopefully will be back in stock. You can use hearts any time for embellishments so even though Valentine’s Day will be past when they are available again, you can still order them if you like and use them on lots of kinds of cards and projects.

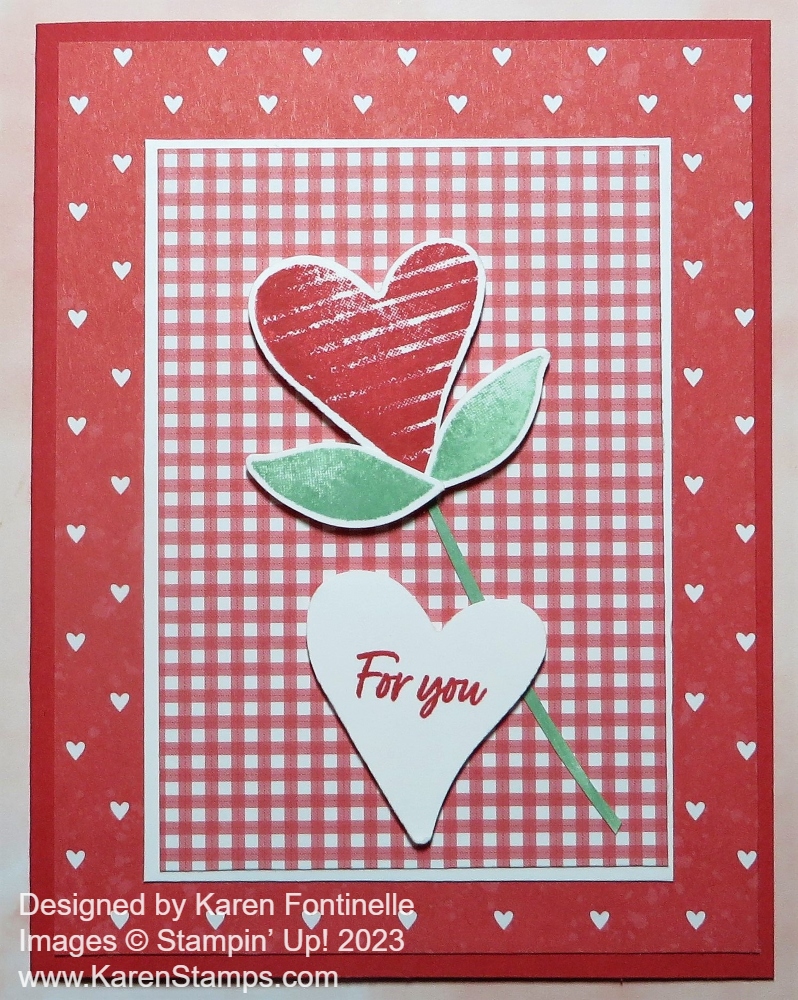
Now for an alternative card made the same way but with a different greeting. You could use this same card for a birthday, thinking of you, celebrate, congratulations, miss you, and lots more.

Celebrate Love Alternate Valentine Card

You can see this card is the same but I used a different greeting. I could have stamped any kind of greeting but I chose one in the Celebrate Love Ephemera Pack. This greeting is printed on one of the labels in the ephemera pack, but the size was too large for the heart. I simply cut around the words to make it smaller and it fit perfectly on the heart!

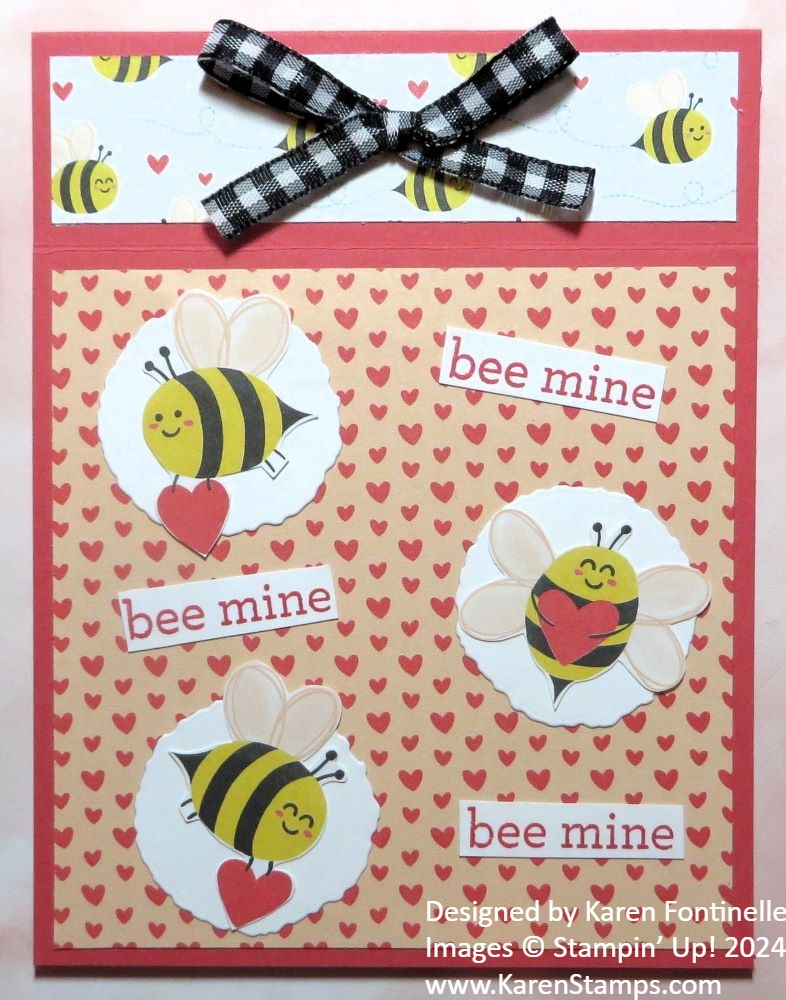
Here is another card on which I used pieces from this same ephemera pack.

I’m having fun using these new ephemera packs. The first ones were in the Holiday Mini Catalog and now we have more in the Spring Mini. They make a card easy to design and still pretty! Sometimes simple cards are the best. Check out all the ephemera packs in the Spring Mini on page 13.

SHOP STAMPIN’ UP! ONLINE HERE!

Hearts For a Valentine’s Day Card

This Hearts For a Valentine’s Day Card has to be one of the quickest and easiest cards I’ve ever made with no idea of what I was going to make! I know that sounds crazy, but yes, I didn’t know what I was going to make until I got out the Marbled Elegance Specialty Designer Series Paper and looked at the Hearts of Elegance Dies. Since I hadn’t tried all the dies yet, I just chose one. Then after diecutting with that, I chose another heart shape, and another one, and another one. Pretty quickly I had this card made!

The card base is Melon Mambo cardstock. There are several coordinating colors listed for these designer papers, but I mostly keep coming back to Melon Mambo….or Real Red on some cards I made. First I chose the second largest heart die, the one with the pierced border around the edge. I used a piece of the Marbled Elegance Paper, thinking at first I would use “the other side” and not the marbled size. Luckily, in my package I already had a 4″ x 5 1/4″ piece cut and luckily, I centered the heart die on this paper. After I cut it out it looked like the best idea was the adhere the negative piece to the card base with the marbled side up. I thought it was so pretty with that heart opening in the center. I didn’t even use the heart I had just cut out, but I saved it for another card another time.

Next I cut out another smaller heart from another piece of the marbled paper and placed it in the center of the open heart space. It needed something, so I cut out a larger heart from Gold Foil. Then for one more heart, I diecut a small gold heart with the decorative edge to place in the center. As you can see, once the hearts were all stacked on top of each other they looked so pretty!

I already had this greeting stamped and cut out in my scraps so I just adhered that flat in the corner of the card. For a moment, I thought about using the banner in the Mixed Labels Stamp Set to go across the hearts, but I liked the greeting I already had so I kept it simple and just used that. If you are trying to make a quick card, don’t overthink everything.

You could pop up some of the hearts or the negative piece on the card base. You could add some embellishments for a little sparkle. Or you can just leave it simple as is because the Marbled Elegance Designer Paper is so pretty on its own! It’s named Marbled Elegance for a reason!

You’ll find these supplies in the Stampin’ Up! Online Exclusives!

Don’t forget…Sale-A-Bration is going on! Try to have a total of $60 or more on your order before tax and shipping or with $120 order you can choose from a couple of special Bundles or get TWO $60 Level products for FREE!

SHOP STAMPIN’ UP! ONLINE HERE!

Bee Mine Book Fold Valentine Card

Bee Mine Book Fold Valentine Card

February is coming soon so it’s time to get those Valentines ready to send and give! This is one of those fun book fold cards but the fold is at the top instead of on the side. Try this Bee Mine Book Fold Valentine Card for a fun card Valentine to send to someone!

This book fold card starts with a card base of Sweet Sorbet. The card base is cut at 11″ x 4 1/4″, then scored at 4 1/4″ and 5 1/2″. The 5 1/2″ score line is the center fold of the card. The 4 1/4″ score line makes the “binding” on the top of the card. Glue that area to the card base so that only the 4 1/4″ portion of the card opens. Once you have the book fold card base made, you can decorate the card for Valentine’s Day or for any occasion you need.

I used the Bee Mine Designer Series Paper in the Spring Mini Catalog. It is part of a big collection of products, the Bee Mine Suite Collection. You can purchase all of it or just some of it. The Bee Mine DSP is cute and is not exclusively for Valentine’s Day but you can use it for Valentine’s Day! Even if you exclude the obvious hearts papers, there are still plenty of patterns you can use for any occasion!

To decorate the card, I adhered a strip of 1″ x 4″ to the top book fold area. I chose the pattern with the little bees flying around. For the larger front of the card, I adhered a tiny heart pattern cut at 4″ x 4″. The three little white circles are die-cut from the Deckled Circles Dies. I cut out the larger bees with hearts on one pattern of paper and adhered each to one of the white circles. I glued them flat to the card but you could pop up the circle and bee or just the bee. For the greeting, I stamped one from the Bee My Valentine Stamp Set in Sweet Sorbet ink. There wasn’t one good place to put a greeting so I just made three and placed them around on the card.

I really like the Sweet Sorbet Ribbon that comes in the Suite, but to go with the black on the bees and for something different, I added a bow at the top with the Black & White 1/4″ Gingham Ribbon.

On the inside of the card, I added a 4″ x 4″ piece of Basic White and cut out another bee to put in the corner.

Here is another card I made in the book fold style with the fold on the side of the card and also using the Bee Mine Designer Series Paper.

Remember that Sale-A-Bration is still going on and will continue through January. With every $50 purchase, you may choose one FREE product in the Sale-A-Bration Brochure. There are some great choices from stamp sets, to paper, to embellishments. And what’s better than getting stamping products FREE?!

SHOP STAMPIN’ UP! ONLINE HERE!

Country Floral Lane Hearts Valentine Card

Country Floral Lane Hearts Valentine Card

It’s less than a month until Valentine’s Day so I guess it is time to get busy making some cards! This Country Floral Lane Hearts Valentine Card is pretty easy to make! As usual, it turned out a little different than my original idea!

This card is made with products in the Country Floral Lane Suite. The card base is Sweet Sorbet, one of the coordinating colors in the designer papers in the Suite. The little strip of hearts on the left side of the card is a pattern in the Country Floral Lane 12″ x 12″ Designer Series Paper. I adhered it to the Basic White cardstock but didn’t adhere it to the card base until I added the ribbon first.

For the hearts, I intended to stamp different colors of hearts but then I grabbed the Country Bouquet Punch and punched out the bottom row of hearts and leaves on the designer paper. I decided not to use the leaves that punched out from the paper, just the hearts. The top and bottom hearts are popped up on Stampin’ Dimensionals and the middle one is adhered flat on the card front.

I did do some stamping with the pair of little hearts in Sweet Sorbet ink. After attaching the White 1/4″ Crinkled Seam Binding Ribbon to the card and tying on a bow, I adhered the card front to the card base. At first, I wasn’t sure how a greeting was going to fit on this card, but I stamped the “Happy Valentine’s Day” greeting in the Country Bouquet Stamp Set on an already die-cut banner from the Stylish Shapes Dies. It just fit! I adhered it with Stampin’ Dimensionals across the middle of the card. Then, yes, I had to add three Iridescent Rhinestone Jewels for a little sparkle!

There you have it, my first Valentine card of the year! It’s time to get started!

SHOP STAMPIN’ UP! ONLINE HERE!

Country Bouquet For You Card

Country Bouquet For You Card

Once again, the Stampin’ Up! catalog was the inspiration for this card. I noticed a sample on page 8 in the new Stampin’ Up! Spring Mini that is really a candy bar treat holder, but I made this Country Bouquet For You Card instead of a treat holder.

This card uses the two kinds of designer paper in the Country Floral Lane Suite plus the Country Bouquet Bundle. If you want it “all”, as they say, just order the Suite Collection (160390)! That saves you from entering all the product numbers!

The card base is Sweet Sorbet with a layer of the paper with tiny white hearts in the Country Floral Lane Designer Paper. Then I added a smaller layer of the Sweet Sorbet gingham pattern in the Country Gingham 6″ x 6″ Designer Series Paper. It is 2 7/8″ x 4 1/8″. To help it stand out a bit, I adhered that gingham paper to a layer of Basic White that is 3″ x 4 1/4″.

The heart and leaves in the Country Bouquet Stamp Set are stamped with Sweet Sorbet and Mint Macaron inks then punched with the new Country Bouquet Punch. You can purchase the stamp set and the punch in a Bundle and save 10%. You can swipe some green ink on a scrap of Basic White and then cut out a stem or just cut it out of cardstock. The heart and leaves are popped up on Stampin’ Dimensionals. The stem is adhered flat on the card.

The plain Basic White heart is just punched out and then stamped with a greeting in the Country Bouquet Stamp Set. This card could be a Valentine or it could just be an all-occasion card to send a happy greeting to a friend or loved one.

You can keep this card simple as is, or add some jewel embellishments of some kind or more hearts or whatever you like!

This Country Floral Lane can definitely be for Valentine’s Day but it can easily be for any cards. Check out this card I made on the first day of the Spring Mini.

Buy the Suite and add a little more and get TWO $50 Level free products during Sale-A-Bration or choose a special $100 Level free product! You will be all set for making valentines to send! Maybe instead of making a card like this Country Bouquet For You Card try making a treat holder like the sample in the catalog!

SHOP STAMPIN’ UP! ONLINE HERE!

From My Heart Valentine With Paper Strips

From My Heart Valentine With Paper Strips

Doesn’t making valentines like this From My Heart Valentine With Paper Strips just take you back to your childhood?! Maybe it’s the doily because who of us did not use that white paste and doilies to make our valentines in elementary school?

I love this new From My Heart Specialty Designer Series Paper in the new Occasions Mini Catalog on page 9. Some of the papers have foil accents which makes them especially pretty! You can’t really tell from my photo above, but the second and fourth strips on my card have the foil accents. As usual, it’s so pretty you hate to cut into the paper, but cut you must in order to make these pretty cards and projects!

This is how this valentine came about! I got out the paper, saw a rectangle scrap in the package and it popped into my head to use several paper strips for the background of the valentine. Often cardmaking ideas just pop into your head or come about after working on your idea and then changing it when something else sparks your creativity.

The card base is Real Red. Real Red has probably always been my favorite Stampin’ Up! color because they have captured such a perfect red. With the switching around of the colors in the Color Families, it seemed like I wasn’t using it as much and that was sad! With Valentine’s Day approaching, how can you not be using Real Red again?

Now I should have gotten out my calculator or pencil and paper and did the math to figure out what size the strips should be and the size paper they are mounted on. But I didn’t! I just made the card, trimmed things down once or twice and when I still had a bigger margin at the bottom of the Whisper White, I simply trimmed that off. The card looks fine to me. If it is not mathematically perfect on the strips and margins, it’s just a valentine….it doesn’t have to be perfect.

If you want some measurements, the Whisper White layer on which I adhered the paper strips is 3 3/4″ wide and 4 7/8″ long. The designer paper strips are each 1 1/8″ wide and 3 5/8″ long with about a 1/16″ space in between the layers. And there is about the same 1/16″ margin around the edge, but you could also not have any margins and totally cover the Whisper White piece. Please don’t go crazy trying to make everything exact and fit perfectly. Just get it as balanced as you can and it will be fine.

The greeting is stamped in Flirty Flamingo Ink with a heart in the Heartfelt Stamp Set in the Suite. Then that stamped heart and the Real Red heart on which it is layered were punched out with the two punches in the Heart Punch Pack. You can purchase the stamp set and punches together in the Heartfelt Bundle and save 10%. These two hearts are then adhered to the Flirty Flamingo doily in the Heart Doilies Package. This large heart is then popped up with Stampin’ Dimensionals®.

If you want EVERYTHING in this From My Heart Suite (as I did, because who wouldn’t?!), just put the number #153931 on your order and you will get the coordinating selection of products on pages 8-10 without having to put in all the individual numbers. This won’t all only be good for Valentine’s Day, you will be able to use hearts on lots of occasions, the punches, the stamp set, etc.

Overall, this From My Heart Valentine With Paper Strips is fairly easy to make so give it a try with the beautiful From My Heart DSP and the Heart Punch Pack!

SHOP STAMPIN’ UP! ONLINE HERE!