Tag Archives: Valentine

Nuts & Bolts Valentine For a Girl

Robot card IG

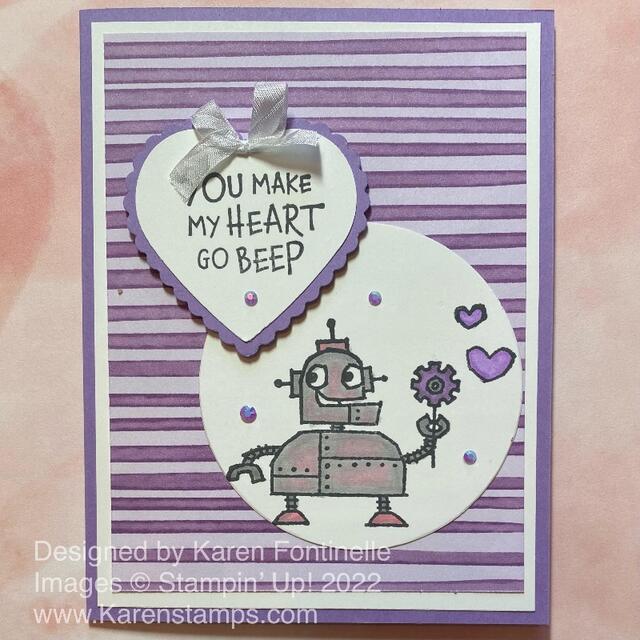
If you envisioned the Nuts & Bolts Stamp Set to be only for making cards for boys, I decided to be “woke” enough (LOL!) to think why not a Nuts & Bolts Valentine For a Girl! I certainly know girls and women work in the field of robotics and science, so why not use this stamp set and card designs for everyone?!

I got the idea for this card from one I saw online when I was looking for ideas. This Demonstrator, Angie Pyjas, made her card into a shadow box so at first, I passed it up, but then I realized I could just use her card for inspiration for a card front. I even simplified her design a little bit, but it was the striped purple paper and the punched hearts that caught my eye!

That striped paper is in the Sweet Talk Designer Series Paper that I love so much! As you can see, once Valentine’s Day is over, use the “other side” of the themed side of the papers which are more generic. You can use these stripes for anything! To go with the striped paper, I used Highland Heather for a card base with a layer of Basic White. The sample I was “copying” used a robot that was cut out and the hearts lower down. I thought I was going to copy that, but I found a scrap of this robot already stamped on a Layering Circle Die. I decided why not use that and see how everything fits?

The robot is colored in with Stampin’ Blends markers. I always get the gray colors mixed up so I don’t remember which ones I used, maybe all of them, plus some Basic Black. I wanted this robot to have a little “feminine” color to it, so instead of light pink, I used Flirty Flamingo that I thought might show up better. I just scribbled on some Flirty Flamingo here and there and blended it with one of the grays, maybe Light Smoky Slate. This robot initially had solid Flirty Flamingo “shoes” or feet but I blended those, too. The gear flower is colored with Highland Heather.

The greeting is stamped on Basic White and punched with one of the punches in the Heart Punch Pack and layered on a Highland Heather scalloped heart in the same punch pack.

I just played around with the placement of everything on the card front and decided the stamped circle would fit and look fine without cutting out the robot! Then I placed the hearts in the upper left of the circle. I added a tiny bow with the White 1/4″ Crinkled Seam Binding Ribbon. I also added some In Color 2021-23 Jewels for some bling. I think I need one more jewel on there so I have an odd number!

As you can see, this Nuts & Bolts Stamp Set is fun for everyone! I liked using this striped paper for a Valentine, but it could have been a birthday card instead of a valentine.

SHOP STAMPIN’ UP!

Nuts & Bolts Heart Robot Valentine

Nuts & Bolts Heart Robot Valentine

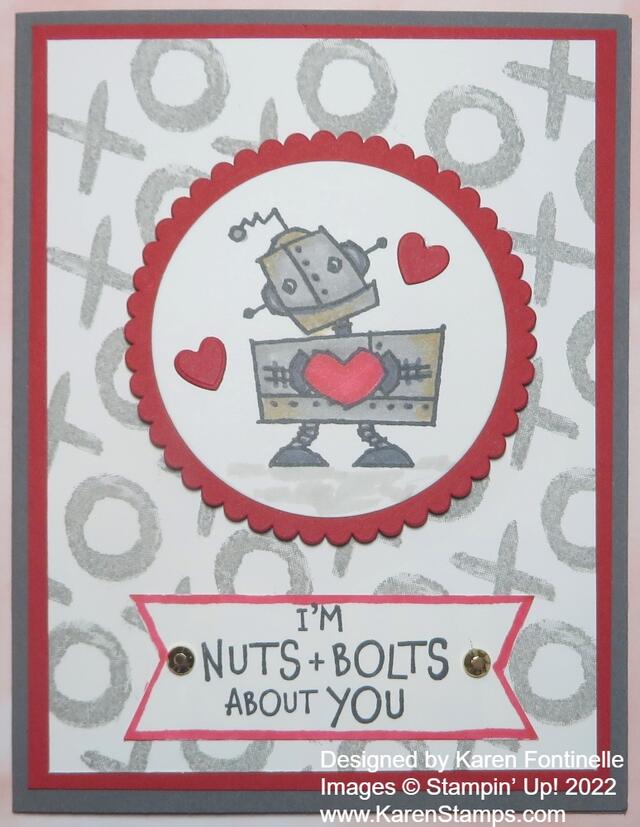
I just got this Nuts & Bolts Stamp Set recently in the Spring Mini Catalog and one of the first valentines I made was this Nuts & Bolts Heart Robot Valentine. This is just a cute stamp set that I couldn’t resist, plus something a little different. I only wish I had two elementary-age little boys who needed to make a pile of valentines for their class parties! Ah, the good old days!!

This little robot stamp set is cute and fun to work with! There are three robot stamps to choose from. You can stamp the robot in one color to match the card or stamp and then color it in with a variety of techniques. For this card, I stamped the robot holding a heart with Memento Ink and then colored him with several different Stampin’ Blends markers. I thought about using my Watercolor Pencils, though, for something different, but the Blends are hard to resist! I pulled out Gray Granite and Smoky Slate plus Basic Black and used probably all of them here and there. To add a little interest to the robot, I used some Pumpkin Pie orange for a little rust and blended it in. You could even use other fun colors for your robots!

I did cut the robot with one of the Layering Circles Dies plus the Real Red layer with one of the scalloped circle dies. I didn’t have a heart diecut the right size so I just used circles!

The card base is Basic Gray with a layer of Real Red. The top layer is Basic White. I stamped the X and O in the Sweet Conversations Stamp Set all across the white cardstock, making my own designer paper! I love to stamp like that! I used one of the lighter grays.

The sentiment is in the stamp set, of course. I happened to have a strip of Basic White that was just the right width, then I trimmed the ends and punched the banner ends with the Tailored Tag Punch. You can use the top point of that tag to make those flagged ends. Really easy!

AFTER I adhered the saying to the card, I decided it didn’t stand out enough so I took my Real Red Stampin’ Blend marker and drew on the edge of that greeting! Pretty risky but it worked! I didn’t mess it up! Since we were talking about nuts & bolts, I used two gold Gilded Gems on each end of the greeting. I think they kind of go with the robot!

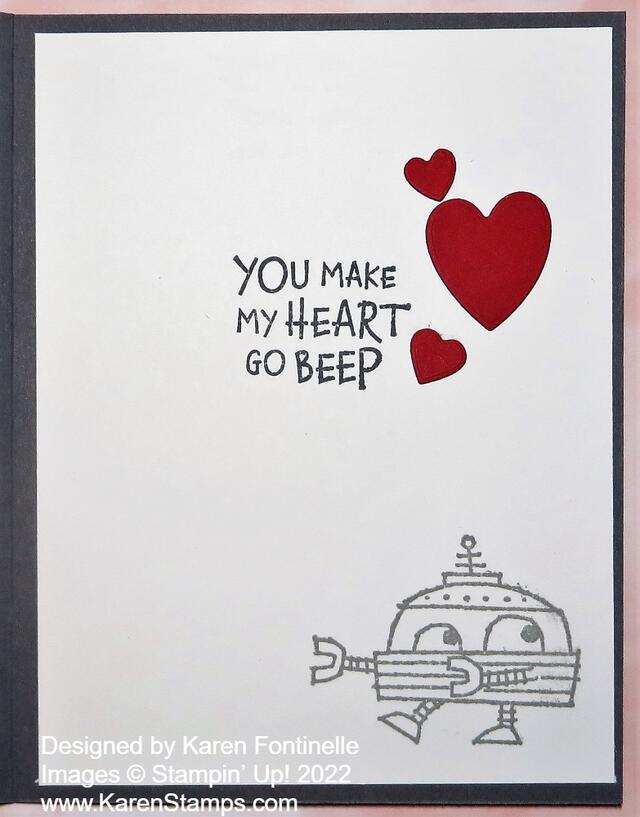
Check out the photo below for the rare peek inside the card! I added a Basic White layer stamped with another of the Nuts & Bolts sentiments in the set and another robot. This robot I didn’t color in, just stamped in one of the gray inks. Since I tried stamping the two little hearts and got an extra ink line off to the side, I had to fix it. I simply covered the boo boo with some die cut hearts from the Sweet Hearts Dies! There are no mistakes in stamping!

Nuts & Bolts Heart Robot Valentine Inside

You still might have time to order this Nuts & Bolts Stamp Set or anything else you need for making valentines, but if you don’t get it in time, you can use these cute robots for birthdays or other fun cards!

SHOP STAMPIN’ UP! ONLINE!

Sweet Talk Conversation Hearts Valentine

Sweet Talk Conversation Hearts Valentine

It’s time to be busy making valentines to send or give out! Valentine’s Day is coming up in about ten days so here is an idea you can use, the Sweet Talk Conversation Hearts Valentine. This is a fairly simple card to make if you like to do some embossing and diecutting.

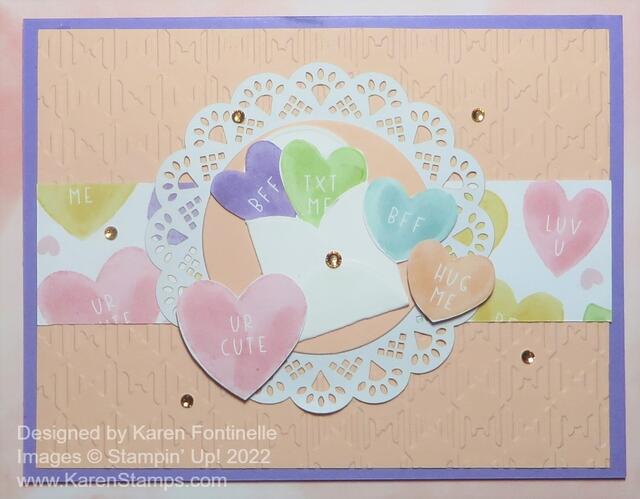
The card base is Highland Heather, one of the coordinating colors with the Sweet Talk Designer Series Paper. It has a layer of Petal Pink cardstock that is embossed with the Gingham Embossing Folder. I can’t say that this looks like a “gingham” design, but whatever it is, it is fine and makes for a good textured background with no special theme so you can use it on almost anything.

For the focal point of this card, I used one of the Heart & Home Doilies but turned it over to the “other” side, which is white. Maybe not as white as our Basic White cardstock, but not the colored side. So you can get double use out this pack of doilies that have three colors in the package. Underneath the doily, I added a strip of the cute Sweet Talk DSP, the pattern with the conversation hearts, like the popular candy.

In the center of the doily, I found a Layering Circle die that fit in the center for a contrasting background. The cute little envelope is a diecut from the Sweet Hearts Dies. It even makes the score lines for you so it is easy to fold and assemble.

The conversation hearts are cut out from one of the sheets in the Sweet Talk DSP. You could also stamp them with the Sweet Conversations Stamp Set. You can diecut the hearts from the paper or just trim them by hand as I did. Sometimes that is quicker and easier. I just cut out an assortment and placed a couple as if they were inside the envelope and the rest scattered around. I let the hearts act as the greeting on the card and I can still stamp “Happy Valentine’s Day” inside the card. For some sparkle, I added several Champagne Rhinestone Basic Jewels. I have found these rhinestones to be very versatile to use on lots of cards. The color and sparkle goes with a lot of other colors and designs.

On the inside of the card, put a layer of Basic White so you have a lighter place to stamp or write a message. Stamp a few hearts inside or adhere some of the little conversation hearts! Something like that is always a nice surprise for the recipient! Try this Sweet Talk Conversation Hearts Valentine and if you don’t own the paper, just cut plain hearts out of your cardstock and make some similar design!

SHOP STAMPIN’ UP! AND SALE-A-BRATION!

Sweet Conversations Envelope With Hearts Card

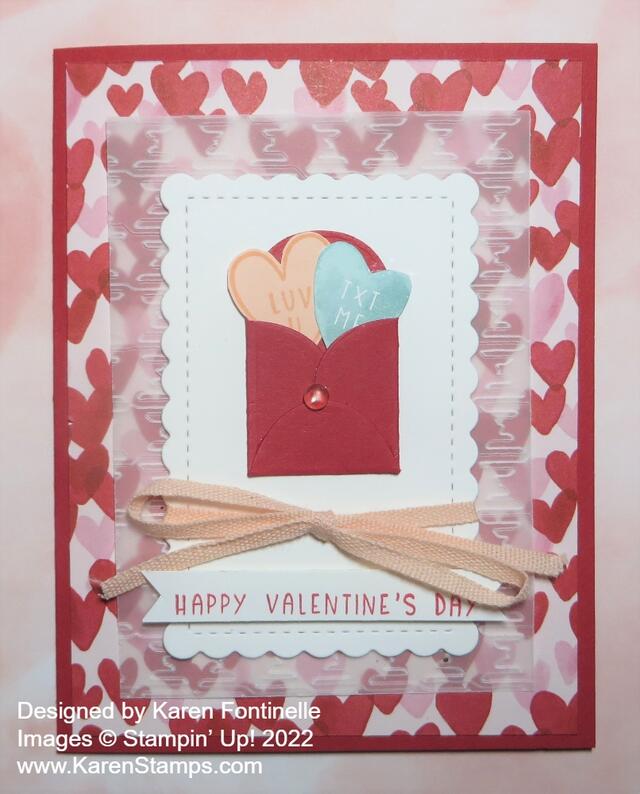
We have this week and next to make valentines for our loved ones and friends so here is another card idea. I got this idea, Sweet Conversations Envelope With Hearts Card, from a similar one I saw on the virtual Stampin’ Up! event OnStage I watched back in November but reviewed the other day to make sure I got all the notes I wanted from it!

This card has a Real Red card base and a layer of pink and red hearts on a pattern from the Sweet Talk Designer Series Paper in the Spring Mini Catalog. This has been a really fun designer paper to work with and one of my favorite valentine’s papers! However, we will be able to use the “other side” of the patterns that look more “valentine-y” for more cards throughout the year. I love the stripe on one of the papers, for example!

Copying from the OnStage card I saw, I cut a piece of Vellum Cardstock smaller than normal for a layer and embossed it with the Gingham Embossing Folder. It is cut at 3 1/4″ x 4 1/2″. This Gingham Embossing Folder will be good for almost any background, very versatile.

On top of the vellum is a die-cut rectangle from the Stitched So Sweetly Dies in Basic White. The cute little envelope on top is made with one of the dies in the Sweet Hearts Dies. This die will be cute to use on future cards, as well, not just Valentine’s Day. Just cut it out, then fold on the already scored lines and add a little glue where the edges overlap, especially being careful if you want to stick something down into the envelope. I stamped and cut out two hearts from the Sweet Talk Designer Series Paper or you could stamp them from the Sweet Conversations Stamp Set.

Before adhering the rectangle to the card, I wrapped around the pink ribbon in the 1/8″ Cotton Ribbon Combo and tied a bow. Before adhering the vellum to the card, see where the embossed vellum is going to be and then add adhesive underneath where that rectangle will be placed so the adhesive will not show under the vellum as it is prone to do with vellum.

The greeting is stamped on a narrow strip of Basic White from the Sweet Conversations Stamp Set and flagged the ends to look like a little banner. It is popped up on Stampin’ Dimensionals®. And finally, a Polished Dot embellishment was added to the cute little red envelope adhered to the scalloped rectangle.

On the inside, I added a piece of Basic White on which to stamp a greeting or write a message. To decorate that a bit, I had a scrap of the hearts designer paper 3/4″ x 4″ that I adhered to the bottom of the white cardstock. You could also stamp a few hearts or cut out hearts from the designer paper.

Time to make those valentines and get them in the mail soon if need be! If you’d like to see another card using this same hearts pattern of designer paper, click HERE to see this post. It’s actually a similar design using the rectangle in the center with a decoration on top of it. To see more Valentine ideas, click on the Valentine category in the right sidebar of my blog under “Categories”. I hope you can get some ideas from this Sweet Conversations Envelope With Hearts Card!

SHOP STAMPIN’ UP! HERE!

Sweet Talk Candy Heart Valentine Card

Sweet Talk Candy Hearts Valentine Card

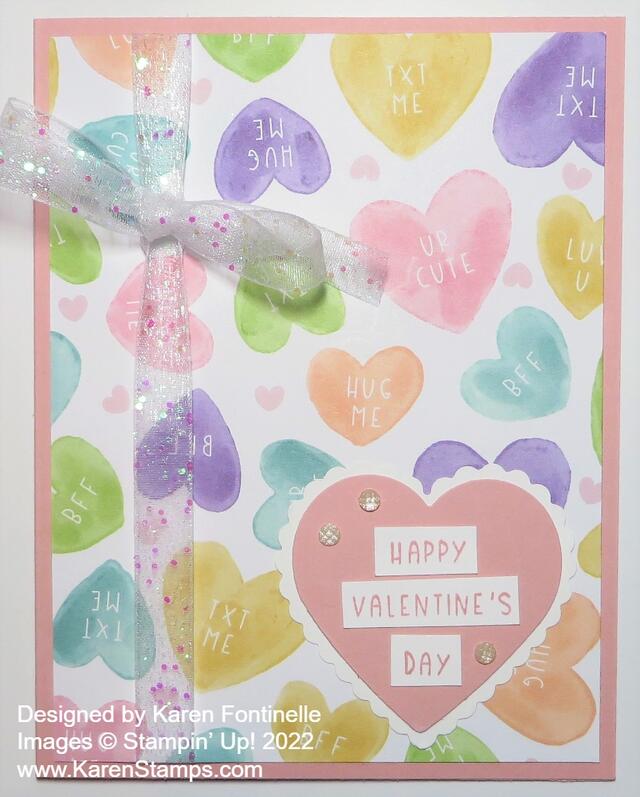
This Sweet Talk Candy Heart Valentine Card is another idea for you as Valentine’s Day creeps up on us! It’s almost February!! This designer paper is so cute you will want to make lots of Valentines to give and send to those you love! Think of how a card with this cute paper, handmade by you, will brighten someone’s day!

The card base is Blushing Bride cardstock, one of the coordinating colors. This paper is the Sweet Talk Designer Series Paper on page 9 of the January-June 2022 Mini Catalog. Every paper in this collection is one you will like. It’s “happy” paper! I chose the print with the conversation hearts. You could use any of those colors of hearts as the card base. Before adhering the designer paper to the card base, I added a strip of the White 3/8″ Glittered Organdy Ribbon vertically on the card, then tied a bow onto the strip of ribbon. The white is sheer but the little pink glitter speckles show up nicely against the card!

Instead of die-cutting, I punched two hearts with the Heart Punch Pack. You get two heart punches, one with a scalloped edge that you can use as a layer to the smaller one, or use the hearts individually. I used these punches on a card in THIS POST just the other day. The scalloped punch is Basic White and the smaller heart is Blushing Bride to match the card base.

To stamp the greeting on this card, I had to use a different technique since the heart wasn’t large enough for the long greeting. I wanted to use the “Happy Valentine’s Day” greeting in the Sweet Conversations Stamp Set but it is long and narrow. I simply stamped it on a strip of Basic White cardstock and then cut the words apart and glued them in place on the heart. To jazz it up a little bit, I added three of the smallest Elegant Faceted Gems.

This, of course, is one of the easiest basic card designs there is! Just change out the designer paper or the color of the card base and add a greeting and you are set! With all the cute and fun designs in the Sweet Talk Designer Series Paper, almost any paper you pick will make for an adorable Valentine!

SHOP STAMPIN’ UP! ONLINE HERE!

Sweet Talk Lots of Love Valentine

Sweet Talk Lots of Love Valentine

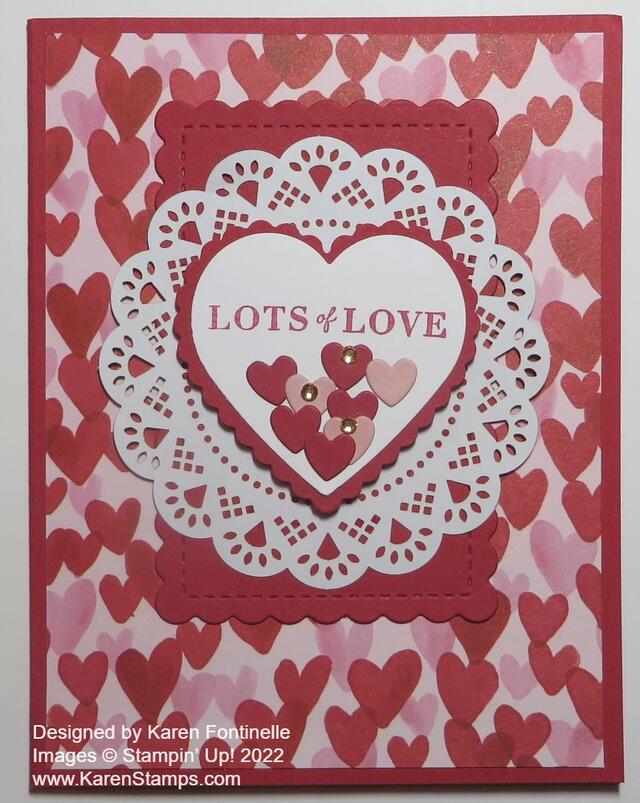
This Sweet Talk Lots of Love Valentine seems like one of those traditional valentine cards you would make or send to someone! Lots of hearts, red paper, red and pink hearts, and a doily! Nothing else can say “Valentine” more than that!

Of course, this paper is in the Sweet Talk Designer Series Paper and is layered on a card base of Real Red cardstock. That’s a simple start! All those hearts crowded onto that designer paper really gets you in the mood for Valentine’s Day!

I wanted to use a doily on this card so I pulled out the new Heart & Home Doilies in the new Spring Mini Catalog as part of the Heart & Home Suite Collection. They come in three colors but you can turn them over and use the white side!.

Just because there was a Real Red die cut rectangle from the Scalloped Contours Dies already in my bag of cardstock, I decided to use it behind the doily. I think it helps it stand out a tiny bit against that busy background of all the little hearts.

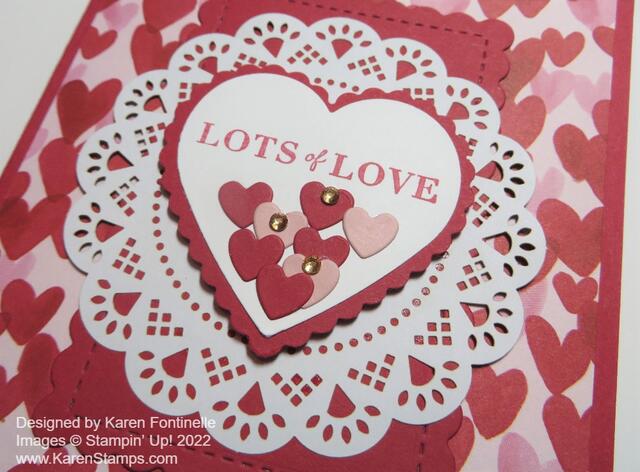
Instead of using dies, I remembered we actually had a Heart Punch Pack of two coordinating punches! Dies are great but punches are faster! One heart has little scallops around the edge and the other is smaller and plain. I punched the scalloped heart in Real Red and the plain heart in Basic White. The greeting (actually stamped first before punching) is in the Celebrating You Stamp Set in the Spring Mini Catalog. The doily is glued down flat on the card but the hearts are popped up on Stampin’ Dimensionals®.

Since the Sweet Hearts Dies have some little bitty hearts dies, I decided to die cut a bunch of hearts in Real Red and Blushing Bride colors. They are adhered to the Basic White heart to mimic the many hearts on the designer paper. Partly for the sparkle and partly to cover up any bit of glue seeping behind the hearts, I added just three Champagne Rhinestone Jewels to the little hearts!

On the inside of the card, I added a layer of Basic White stamped with “Happy Valentine’s Day” from the Sweet Conversations Stamp Set and two little bitty die-cut hearts I had leftover!

Get Your Valentine Supplies at Stampin’ Up! Today!

Sweet Talk Lots of Love Valentine Closeup

Valentine’s Day Is Coming Soon!

Sweet_Talk_Suite_Collection
Images © Stampin’ Up! 2022

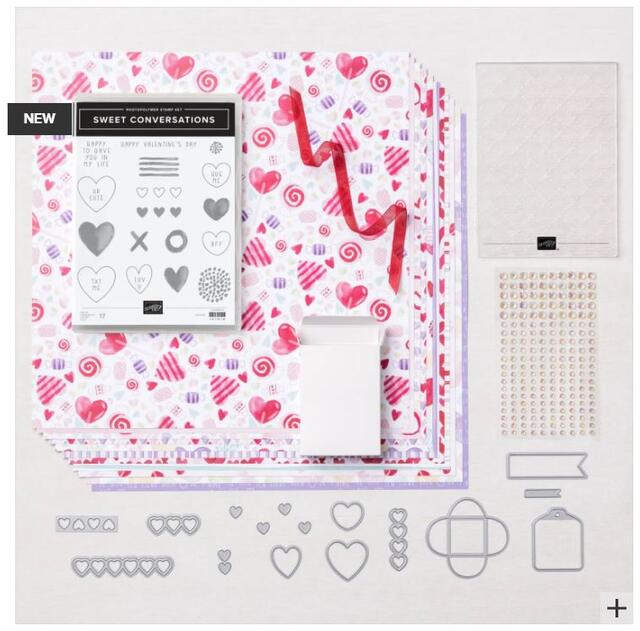
Valentine’s Day is coming soon! I feel like it is really sneaking up on us, as I still try to get all Christmas not just down but put away! February 14th is only three weeks and one day away so if you are planning to mail valentines, you probably have two weeks to make them! If you want a great collection of products for making valentines, and later on many other kinds of cards because hearts are always appropriate no matter the time of year or holiday, check out this Sweet Talk Suite Collection in the January-June 2022 Mini Catalog (the Spring Mini).

The Sweet Talk Designer Series Paper is some of the cutest Valentine paper we have ever had! I love the colorful hearts and especially the sheet with the candies and heart lollipops! We’ll be able to use “the other side” of lots of the papers even after Valentine’s Day. I also love the embellishments and little boxes that come in the Suite. The Real Red Faux Linen Ribbon is very nice and the Iridescent Rhinestones go with almost any project. We’re going to use the little tag in the die set a lot, plus the hearts of course, and the cute little piece that folds into a small envelope.

Watch the Stampin’ Up! video below and get a better idea of the Sweet Talk Suite Collection!

Think back to your school days of making valentines or decorating shoe boxes for mailboxes for all the valentines you would receive. We used doilies, white paste and glue, construction paper, and crayons! Just look at the marvelous supplies we have now for making valentines for our families and friends!

SHOP STAMPIN’ UP! ONLINE!

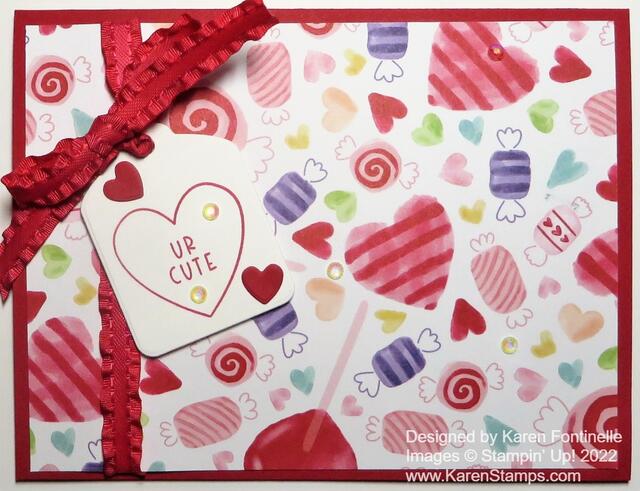
Sweet Talk Candy Valentine Card

All of the papers in the Sweet Talk Designer Series Paper are so cute, but I especially love this paper with the candy! I decided to make a very simple and easy card to show as much of this paper as possible. As simple as it is, when I placed that paper layer on the Real Red card base to make this Sweet Talk Candy Valentine Card I just loved it! You have lots of color choices for a card base using this paper, too!

As I said, this card begins with a base of Real Red cardstock. Why not? It’s for Valentine’s Day! The Sweet Talk paper is cut at 4″ x 5 1/4″. Before adhering to the base, I adhered a piece of Real Red Mini Ruffled Ribbon around the side and then adhered that layer to the card base. Those candies just look so cute and colorful on the card!

For a greeting, I die cut the tag in the Sweet Hearts Dies and stamped the heart with greeting on it with Real Red ink. This little tag is a perfect size! Not too big and not too small. I tied it to the ribbon already on the card with a longer piece and tied a bow. To jazz up the tag a little bit, I added two Real Red die-cut hearts. I could have also stamped two little hearts as well. And of course, what would a Valentine be without a little sparkle, so I added a few Iridescent Rhinestone Basic Jewels to the tag and to the designer paper.

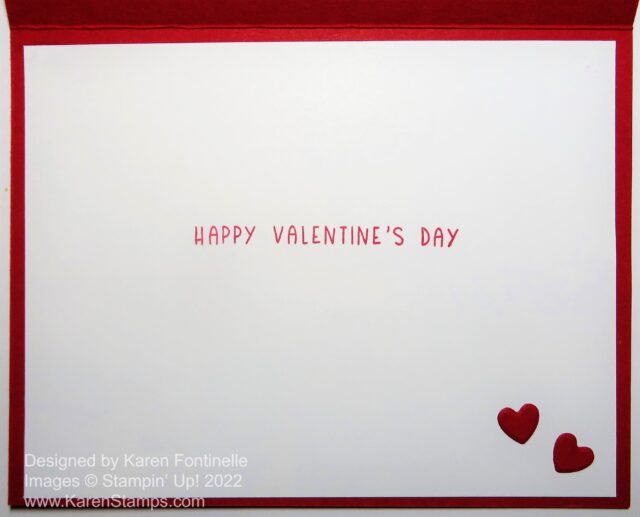
We don’t often show the inside of the card, but I added a layer of Basic White since the Real Red is rather dark for signing or writing a message. The greeting is from the Sweet Conversations Stamp Set. Since I had some extra die cut hearts, I put two of those on the corner of the inside of the card. I could have stamped something as well from that stamp set.

You can purchase the dies and stamp set together in the Sweet Conversations Bundle and save 10% by buying them together! I like that the dies come with one to make a little envelope and that tag I mentioned, plus lots of hearts!

Valentine’s Day is really sneaking up on us fast this year it seems! It’s less than a month away and if you consider a week ahead to mail cards, we have even less time! Think about how much fun making valentines were in elementary school with the construction paper, doilies, and paste! Now we have much better materials to use! Order what you need now so you have plenty of time for Valentine-making fun!

SHOP STAMPIN’ UP! ONLINE!

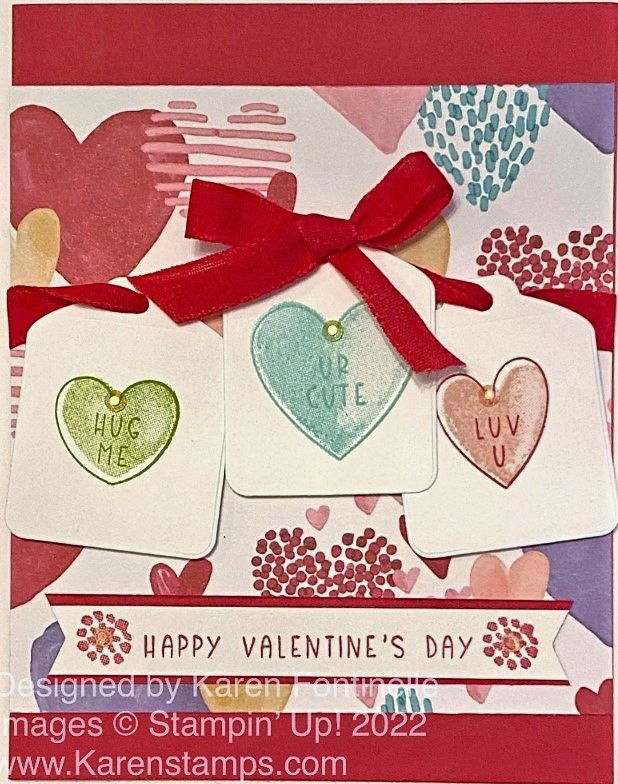
Sweet Talk Valentine’s Day Card With Tags

Sweet Talk Valentine's Day Card with Tags

Believe it or not, as I’m putting away my Christmas decorations, Valentine’s Day is not so far off, only a month away so here is my first Valentine sample card, Sweet Talk Valentine’s Day Card With Tags. I started this card by simply looking through the very cute Sweet Talk 12″ x 12″ Designer Series Paper and picking out one paper I especially liked. I liked a lot of them, probably all of them!

I decided to place the designer paper on the Real Red card base in a slightly different way. I cut it as wide as the card (4 1/4″) but only 4 1/2″ long. If you place it in the center of the card front, this leaves a 1/2″ margin at the top and bottom of the card. Just something a little different! Before you adhere any designer paper, think about if you want the ribbon to wrap around to the back or whatever else.

While trying to decide what else to do with the card, I looked at the Sweet Hearts Dies and got the idea to use the tag die in there. I decided to die cut and stamp three tags and then sort of string them across the card with some ribbon. I used the Sweet Conversations Stamp Set. You can get the stamp set and dies in the Sweet Conversations Bundle. I stamped a different heart, color, and saying on each one. I used Granny Apple Green, Pool Party, and Real Red outline with a Blushing Bride pink heart. The hearts are two-step stamping. Stamp the outline and words, the stamp the solid heart to fill in if you like.

I used the Real Red Faux Linen Ribbon to string the hearts together and adhered the ribbon around on the back of the designer paper before adhering the paper to the card base. I used Stampin’ Dimensionals® under each tag to hold it in place but you could let them dangle if you wanted to! I also tied a separate bow and adhered it to the top of the middle tag with Mini Glue Dots.

The greeting at the bottom is also in that stamp set. I just stamped it in Real Red ink on a scrap strip of Basic White and also stamped the little flower design on each end. The strip is layered on Real Red just 1/4″ wider and then made the banner ends with the Tailored Tag Punch.

For the grand finale, I had to add some of the new Iridescent Rhinestones Basic Jewels, one on each flower at the end of the greeting and one on each heart on the tags! They look prettier in person than they do on the photo!

When you are trying to think of a card design, just pull out some designer paper and see what speaks to you and see what you come up with! Some ideas will come to you for sure, even if they are simple!

Start thinking about Valentine’s Day because it is only a month away!!

SHOP STAMPIN’ UP! ONLINE HERE!

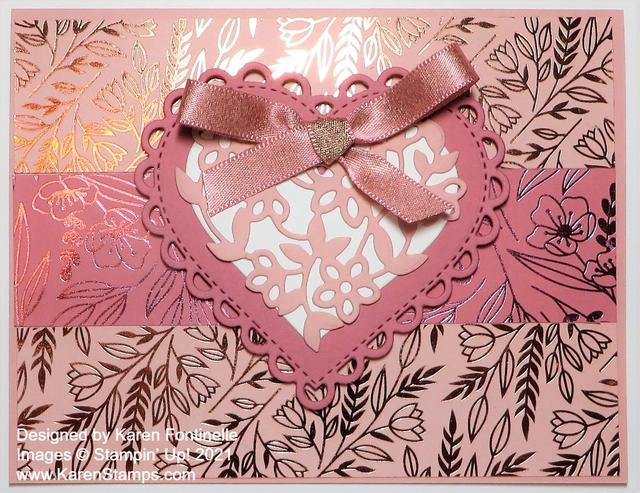
Love You Always Fancy Heart Card

Love You Always Fancy Heart Card

This Love You Always Fancy Heart Card can certainly be for Valentine’s Day tomorrow or it can be for other occasions! I left off a greeting just to show that you can use this card design in multiple ways.

The card base is Blushing Bride because it coordinates with the beautiful designer paper I used on the card. The Love You Always Specialty Designer Series Paper is so pretty on this card. It’s always a little hard to photograph paper that has foil accents as this one does. You always get a little glare! But I think you can see the shine a little bit of the foil.

Can you tell that I used three strips of paper on this card front? I cut two strips from the light Blushing Bride pink paper and then a strip of the Rococo Rose darker pink paper. You can cut the sizes however you like. I have a very narrow margin around the edge of the card. You can cut the strips larger than you want them and then trim down to see what will fit on the card base. These strips were glued right down onto the card base.

The die-cut scalloped heart I just love and is in the Many Hearts Dies. I cut it out of Rococo Rose Cardstock. In the center is a plain die-cut Basic White heart overlaid with the floral heart die in the same set cut out of Blushing Bride. The Basic White behind the floral heart makes it show up against the Rococo Rose heart. I like the way it turned out.

For an embellishment, I tied a bow with the very pretty Blushing Bride 3/8″ Metallic Ribbon and adhered it to the top of the heart with a few Mini Glue Dots. The ribbon has one satin side and one metallic side so you get a little bit of both when you tie a bow!

You can add a greeting to this card, but I thought it looked pretty enough without one. It would make a special Valentine, or a gorgeous engagement, wedding or anniversary card. I always say hearts are for any time so you can get a lot of use out of heart stamps or dies!

If you don’t have contrasting designer paper to use on a card design like this, you can stamp different designs on strips of paper and use it the same way! Maybe this Love You Always Fancy Heart Card will give you an idea of a card to make for Valentine’s Day or some other occasion.

SHOP STAMPIN’ UP! ONLINE!

Die-cut Hearts For a Valentine

Die-cut Hearts For a Valentine

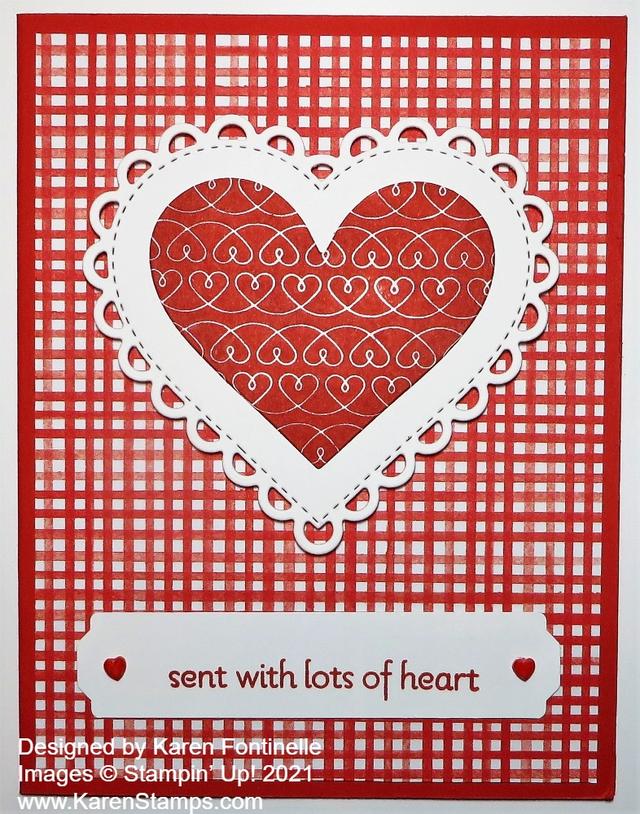
It’s time for making, sending, giving Valentines like this Die-cut Hearts For a Valentine card. I am so happy about this background designer paper on this card! This year we do not have a whole package of “Valentine” paper to use so I looked to see what I could maybe use. You can use this card for other times, not just Valentine’s Day.

Other years at Stampin’ Up! we have maybe had “Valentine” paper that had assorted hearts or a lot of red and white patterns. It wouldn’t HAVE to be for Valentine’s Day but it suggested it. So I looked through my packages of current designer paper and I found this red and white plaid paper in the Sale-A-Bration Berry Delightful Designer Series Paper in the Berry Blessings Bundle! It’s on the opposite side of a beautiful, soft-colored strawberry images. I wouldn’t have even thought to tell you this was a pattern in this package of designer paper, but when I found it, was thrilled to use it on my valentine card! It’s just a different look!

The coordinating color is Poppy Parade so I used that cardstock as a card base with this plaid paper as a layer. I stamped the center heart with Poppy Parade Ink from the Lots of Heart Stamp Set in the Spring Mini. It is just stamped on Basic White and then die cut with one of the Many Hearts Dies. If you want both the stamp set and dies, then get the Lots of Heart Bundle and save 10%! I also die-cut the “fancy” heart from the Many Hearts Dies and layered them. Then the hearts are popped up on Stampin’ Dimensionals.

The greeting, in the same stamp set, is stamped in Poppy Parade Ink and punched with the Lovely Labels Pick A Punch. I just adhered it flat on the card so I could add an embellishment that would not stick up too high for mailing. I wanted to use the Resin Hearts Embellishments, but the colors were white (which wouldn’t show up very well) or red (which might be okay but the rest of the card is Poppy Parade). I decided to try coloring the white hearts Poppy Parade with the Poppy Parade Dark Stampin’ Blends. It worked! I went over it a couple of times and around the sides a little bit. So the next time you want something to be a different color, try coloring with Stampin’ Blends!

Overall, this was an easy card to make for Valentine’s Day because it has hearts or any time because the greeting isn’t just for Valentine’s Day! Hearts can be for any time, also! And I do love the little Resin Hearts!

Shop Stampin’ Up! Online During Sale-A-Bration!

Playful Alphabet Valentine

Playful Alphabet Valentine

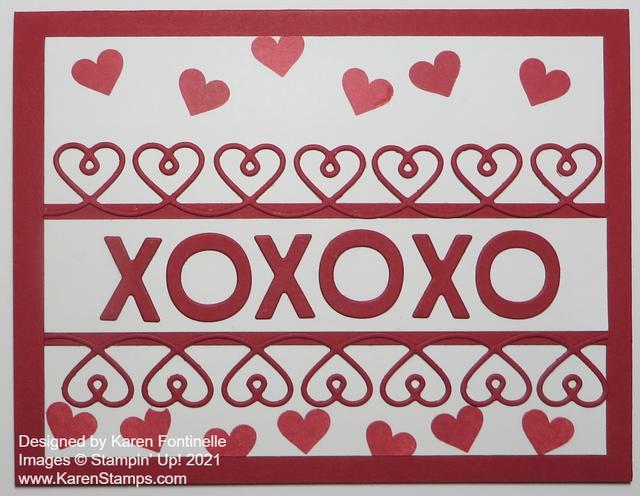
Express your love with some “X’s” and “O’s” plus hearts on a card like this Playful Alphabet Valentine. It requires some die-cutting and a little stamping, but it’s a fun card to make and I’m sure to receive!

The card base is Real Red with a layer of Basic White Cardstock. I cut it a little smaller than normal (5″ x 3 3/4″) to allow more of the Real Red card base to show. I also cut a strip of Basic White (5″ x 1″) layered on a wider strip of Real Red (5″ x 1 1/4″) for the center (or so) of the card on which to layer the X’s and O’s.

I used the Playful Alphabet Dies to cut out the X’s and O’s and adhered them to the Basic White Strip with tiny dots of Multipurpose Liquid Glue. For an extra embellishment, I die-cut two strips of hearts in the Many Hearts Dies.

The little red hearts at the top and bottom of the card are from the Lots of Heart Stamp Set. Normally I might stamp the little hearts randomly on the area where I want them to show, but with the strips of die-cut hearts having open hearts, I didn’t want stamping interfering behind them. I probably should have positioned the center portion of the card better so the hearts at the bottom weren’t so crowded. But I doubt the recipient will be as critical as we are of our own work! We should remember that as we are making and stamping our cards!

That’s all there is to this card. On the inside, you might add a Basic White layer either stamped with a few hearts in the corner or along the top or bottom, or maybe add another X and O for fun! You could just stamp a greeting on the Real Red in black ink, too.

On the front of the card, if you wanted to embellish more, you could add the little Resin Hearts or rhinestones at the beginning and ending of the X’s and O’s. I might have done that, but I also thought maybe the card was busy enough and didn’t need anything extra.

Valentine’s Day is coming soon so take some time to make some valentines for your family or maybe some to mail! Receiving your card might be the only Valentine celebration they have this year! Use this Playful Alphabet Valentine to give you some ideas for making your own valentines today!

Ice Cream Corner Valentine Card

Ice Cream Corner Valentine Card

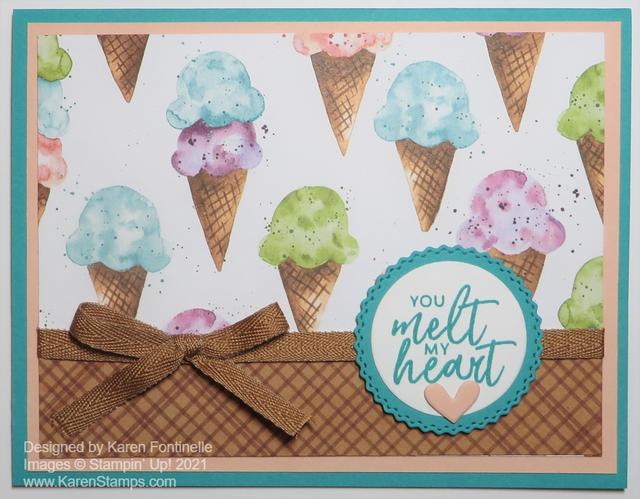
While it is time to be making Valentines and mailing them, this ice cream paper just stole my heart and I had to use it! But with the greeting, I think this Ice Cream Corner Valentine Card could be used as a Valentine! Why not?!

I hadn’t made anything yet with the cute Ice Cream Corner Designer Series Paper and some of the patterns in the package I don’t really care for. But the ice cream patterns are adorable, and then they can be paired with the generic designs as I did here on this card.

There are lots of coordinating colors with this paper so you have a wide choice of colors to use making cards and projects! I chose Bermuda Bay for the card base and a layer of Petal Pink. Once I cut the ice cream cone paper to layer on the card front, the card looked plenty finished and cute as it was! So you could make a very simple card just like that and add a greeting

I also liked the underside of the ice cream cone pattern, which is this cross-hatch paper that looks like an ice cream cone. I cut a narrow strip of it and adhered it over the bottom of the ice cream cone paper, then added some Cinnamon Cider Ribbon and bow over the seam of the two papers.

I originally thought I would have to make this cute card a birthday card, but when I looked at the Sweet Ice Cream Stamp Set and saw the “You Melt My Heart” greeting, I knew that was the one I had to use! I didn’t want it to be too large and take away from the cute ice cream cones in the background, so these dies seemed to work well.

The greeting is stamped in Bermuda Bay Ink on Basic White (the new replacement for Whisper White) and die cut with one of the smaller Layering Circles Dies. This was layered on a Bermuda Bay die-cut (one of my favorite ones!) from the Tasteful Labels Dies and popped up on Stampin’ Dimensionals®.

For a final touch, I die cut some hearts with the Many Hearts Dies. I chose a small one to add just below the greeting to convey a little bit of a valentine feeling or at least “love”. So I think you can use this Ice Cream Corner Paper for a Valentine like this Ice Cream Corner Valentine Card.

SHOP STAMPIN’ UP! ONLINE HERE!

Lots of Heart Happy Valentine’s Day Card

Lots of Heart Happy Valentine's Day Card

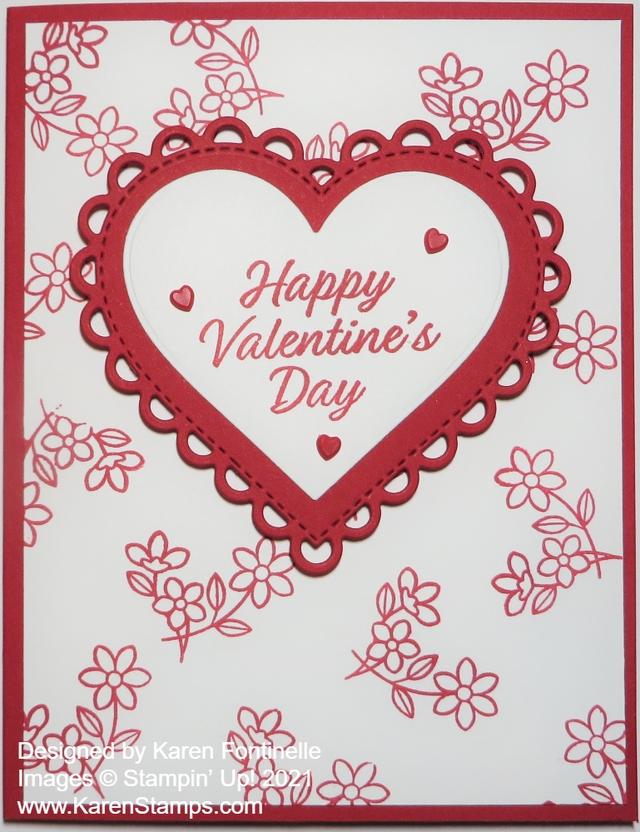
It’s time to make some Valentines and this Lots of Heart Happy Valentine’s Day Card is an easy, traditional one to make! I like Valentines made with other colors, but what says Happy Valentine’s Day better than Real Red?!

The card base is Real Red. I think Stampin’ Up!’s best color is Real Red. There are other “reds” out there in the world but when you compare to Real Red, which is a full, true, “real” red color, you can’t beat Stampin’ Up!

For the Basic White layer, (formerly Whisper White) before I even knew exactly what card I was going to make, I just stamped randomly with the little flowers in the Lots of Heart Stamp Set in Real Red Ink. Certainly don’t put this stamp set away after Valentine’s Day because it’s not just for Valentines! I’m already thinking what a pretty spring card I could make with this little flower stamp!

Coordinating with the Lots of Heart Stamp Set are the Many Hearts Dies. You can purchase both these items in the Lots of Heart Bundle. I just love this scalloped heart die-cut! I cut that out of Real Red and layered with a plain white die-cut heart. I thought about different ideas, but in the end, I just wanted to stamp “Happy Valentine’s Day” on the heart. I found that greeting in my Meant To Be Stamp Set in the Annual Catalog on page 69. You may already have this stamp set! (There are dies to go with this stamp set, too, which you may already have!)

The scalloped heart is popped up with Stampin’ Dimensionals®. For a little bit of bling, I decided to see if the Resin Hearts Embellishments would work. They are very small and I thought that was perfect for this card! Just a little something without being too much around the greeting. I doubt they would show up very well on the background.

So there you have a basic, traditional, easy-to-make Valentine card! We better get busy if we want to have Valentines to mail soon! Have fun making something like this Lots of Heart Happy Valentine’s Day Card.

True Love Many Hearts Valentines and Cards

True Love Many Hearts Valentines and Cards

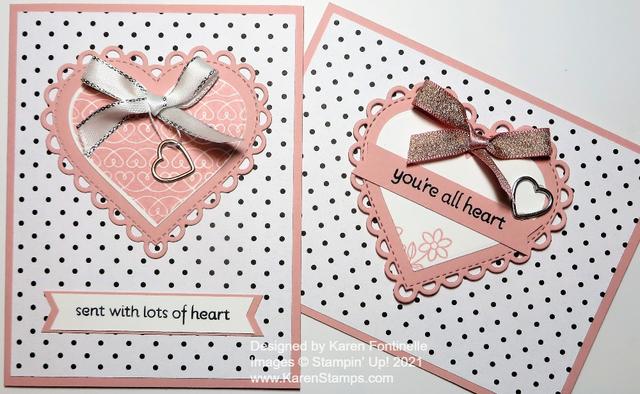
These True Love Many Hearts Valentines and Cards were really going to be two identical cards. I often have suggested while you are making one card, make two, three or four of the same card while you have decided on the design and have all your supplies out. So after I cut my cardstock in half to make a card, I thought why not go ahead and use the other half right now to make two cards. And I was going to make both cards the same!

After looking through the January-June 2021 Mini Catalog for ideas, I took my inspiration from the small square card on page 10 with the polka dot paper. Our Stampin’ Up! catalogs are great places for ideas, by the way! My two cards don’t resemble the actual sample in the catalog, but the sample gave me the idea of how I wanted to proceed.

The card base is Blushing Bride and the polka dot paper is in the black and white True Love Designer Series Paper. (As I write this, this paper has been backordered but should be back in stock this week.) This True Love paper has really been interesting because you can use it as is or color it like a coloring book (maybe not the whole 12″ x 12″ page!), or just add shades of color to some of the images without really staying in the lines. Here is another card I made with a stripe pattern in this package.

I used the Many Hearts Dies for these cards to die cut the large scalloped heart out of Blushing Bride cardstock and a plain heart out of white cardstock. I wasn’t exactly sure how I was going to do the greeting or what I was going to do with the white heart, but what I really wanted to do for sure was use the silver Heart Charms. I was thinking in terms of having one dangling on the card from the top of the heart.

I decided to stamp a greeting on the heart and then also stamp the little flower in the Lots of Heart Stamp Set. With one swipe of my finger across the greeting moments later, I smeared the ink so for sure I had to go to Plan B. I stamped the greeting on a strip of Blushing Bride and adhered it over the smeary greeting!

The ribbon at the top of the heart is the Blushing Bride 3/8″ Metallic Ribbon. (As I write this, this ribbon is backordered until March!) It doesn’t photograph too well but it has one sparkling side and one satin side. I tried slipping the heart charm onto the ribbon while I was tying it but I couldn’t get it how I wanted it and I didn’t want to take a lot of time to figure it out! I just adhered the bow to the top of the heart with Mini Glue Dots and adhered the heart charm separately.

When adhering the Heart Charms you can roll up a Mini Glue Dot very small to fit on the very narrow backside of the charm and even then work with it to make it fit. I put them on two places on this heart charm. The scalloped heart is popped up with Stampin’ Dimensionals®.

As I said, I started off planning to make the two cards identical, but on the second one, I changed it up! My white heart was already die cut but I took a chance and stamped it with Blushing Bride using the Lots of Heart Stamp Set. I got it a little off, that’s why you see a white edge, especially on the left side, but that just proves it is handmade! You can get this stamp set and the Many Hearts Dies together in the Lots of Heart Bundle and save 10% (plus be on your way to spending $50 and earning a FREE Sale-A-Bration product!) (And, it’s not backordered as I write this!!)

I turned the card to a vertical position and put a greeting at the bottom. This time I tied a little piece of white twine around the heart charm and placed it around the Silver 3/8″ Metallic Edge Ribbon already tied in a bow and adhered both to the top of the heart with Mini Glue Dots. I like the way it just hangs, not even perfectly.

I really liked the black and white polka dot paper with the pink of the Blushing Bride Cardstock. While it is now February and you might want to make cards like these for Valentine’s Day, I think you could send both of these cards with the exact same design any time during the year. They don’t “scream” Valentine! They could be for a birthday, a thank you, a thinking of you-type of card. Use the catalogs for inspiration and if your creativity takes you elsewhere after you get started, like it did me with these True Love Many Hearts Valentines and Cards, just go with it!