Tag Archives: Wink of Stella Glitter Brush

Tag Buffet Stocking Christmas Card

Tag Buffet Stocking Christmas Card

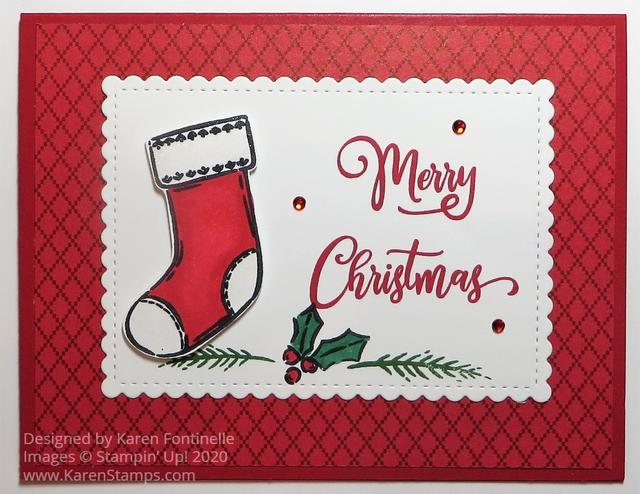
If you need to make a lot of Christmas cards, you might want to consider a simpler card design, like this Tag Buffet Stocking Christmas Card, because not every card has to be elaborate to be beautiful. This card was not the result of a lot of planning and thinking. I had in mind making a simple Christmas card, pulled out the designer paper and then thought of using this stamp set. An already diecut Whisper White piece in my cardstock package inspired me to use it for the focal point. One thing just followed another.

The card base is Real Red and the designer paper I used is ‘Tis the Season 6″ x 6″ Designer Series Paper, which I just purchased. Originally I wasn’t too crazy about the paper designs and I was already buying other holiday papers so I didn’t think I needed it. But of course, eventually, I wanted it! The 6″ x 6″ size is very handy for cardmaking and you don’t feel so bad cutting up a 12″ x 12″ piece of DSP!

I also decided to use the Tag Buffet Stamp Set, which goes with the Tag Buffet Project Kit to make tags. I already made the tags in the kit, but the stamp set is very Christmas-y and good to use making cards or other projects for the holidays.

I found a die-cut Whisper White piece in my bag of cardstock and that gave me the idea to use the big “Merry Christmas” greeting stamped on it with the stamped and cut out Christmas stocking off to the side. The piece was die cut with the Rectangle Stitched Die. It has a really pretty edge on it which is why I like those dies so much. But when I stamped the Merry Christmas greeting across the rectangle, there really was no space for the stocking! I thought my original idea was ruined, but no fear! It occurred to me to cut the two words of the stamp apart! I know it is like heresy to cut stamps apart, but in this case, I could see no downside. I could still stamp the words side by side easily, but if I separated them I could stamp one on top of another in smaller areas. All it took was one snip of the scissors! Then there was room for the stocking!

I stamped the stocking on Whisper White in Memento Ink because I knew I would color with my Stampin’ Blends alcohol markers. I used the Light and Dark Real Red markers. I also could have used Cherry Cobbler since that is a coordinating color with the designer paper. I found the Real Red markers a little light but I just added some more coloring to the stocking.

After stamping and coloring the stocking, I cut it out by hand with my Paper Snips. Before adhering it to the greeting, I couldn’t resist stamping some greenery and holly on the cardstock. It was all in the stamp set and I wanted to play with more stamps! Then I popped up the stocking with Stampin’ Dimensionals®. For some bling, I added some Red Rhinestone Basic Jewels. And for just a little bit of glimmer, I used Clear Wink of Stella on the white areas of the stocking with the glitter brush.

On the inside of the card, I added a layer of Whisper White on top of the Real Red and stamped the long sentiment that is in the stamp set in Real Red Ink. The I also added two stamped pieces of the same greenery I used on the front of the card.

If you are interested in the Tag Buffet Stamp Set, you might enjoy the Tag Buffet Project Kit for making some tags (or even using the tags to make cards!). I loved working on these tags! The only stamping was the greeting, everything else was supplied and I just had to assemble. They are very pretty. Check out my post about the tags HERE.

I like to make a variety of Christmas cards to send out. Some I might make easy and some fancier. This Tag Buffet Stocking Christmas Card is a simpler one that you might enjoy and still would impress the recipient!

Shop Stampin’ Up! Online HERE!

Path of Petals Thank You Card

Path of Petals Thank You Card

We often say, “Stamping is therapy” and it certainly is, like with this Path of Petals Thank You Card and many other cards! Sometimes you just need to stop and sit down and stamp.

It’s been such a busy week and everywhere I went traffic, traffic, traffic! I think everybody is in town with all the schools back in session so no one is on vacation anymore. Everybody is home and going to work and on the roads! Not to mention construction everywhere which causes backups and slowdowns! I think I need to allow an hour to get anywhere I go just to keep the drive less stressful! I don’t know when it’s been quite like this in all the years I have lived here.

So what is the best thing to do to alleviate a little stress?? Stamp, of course! This card uses the Pressed Petals Specialty Designer Series Paper and stamping with the Path of Petals Stamp Set. Although I have used the Pressed Petals DSP on lots of cards, I had difficulty stamping the flowers and leaves with this stamp set so this is the first time I actually used the flowers and stems! Here is a card I made with a piece of the Pressed Petals Designer Paper. I love these dark-colored flowers so much!

The card base is Mossy Meadow, one of the coordinating colors of the Pressed Petals Designer Paper. I started with the design with the leaves and ferns (I guess!), although originally I had the top and bottom designs reversed. This is actually the same paper, the leaves on one side and the cloth-looking design on the other.

The die-cut piece going across the front of the card is from the Flourish Dies using Merry Merlot Cardstock. I like to have something, usually ribbon, where I have two different patterns of paper coming together. It just finishes off that edge nicely. But this time I thought of using some kind of border die or something and finally, I found this one. It is a little bit fancy but doesn’t overwhelm the card. The secret is that the piece is not long enough to reach all the way across the card. But since part of the die-cut was going underneath the stamped piece, I was able to cut it, leaving a space underneath the stamping making the ends reach to each side of the card, and no one will be the wiser!

Maybe you won’t have trouble stamping the flowers, but just in case, this is what I found out. I think it was easier to stamp the flower stems and leaves first. I stamped these in Pear Pizzazz Ink. Next, I stamped the flowers in Merry Merlot Ink. I think you will have to move the stamp around until you feel like the flower blossoms are fitting with the stems. Past stamps we have had had a notch on each of the stamps that were to be stamped in the same direction so you could tell how to line them up. These stamps do not, so you just have to line them up as best you can. I could not get the other leafy stamp to line up correctly, so I just stopped with what I had as you see on the card.

For a little pizzazz on the stamping, I used the Clear Wink of Stella Glitter Brush to brush on a little Merry Merlot ink from the ink pad onto each flower, trying to keep it fairly light, which also added a bit of glimmer. Then I did the same with the leaves with the Pear Pizzazz ink. As much trouble as these stamps were to line up, I really liked the stamped image after adding a little bit of color and the glimmer from the Wink of Stella brush!

The greeting is from the same stamp set. It is stamped on Very Vanilla Cardstock in Merry Merlot Ink and then punched out with the Classic Label Punch. However, I snipped off the pointy ends of the punched piece to just make it plain. I could have layered it on a piece of Merry Merlot but I liked it just adhered to the card by itself.

So there you have it! A little stress relief from the demands of the week and a simple card design that you could vary in many different ways!

Just Stamping Beautiful Friendship Card

Just Stamping Beautiful Friendship Card

Sometimes it is good to “just stamp” and that led to this Just Stamping Beautiful Friendship Card. I started off with a different stamp set but it just wasn’t working right for me so I switched to the Beautiful Friendship Stamp Set. Without knowing exactly what I wanted to make, I decided to just stamp some flowers on the piece of Whisper White I had ready. Sometimes you just have to go with where stamping takes you!

This is a beautiful stamp set with the hydrangea-like flowers and the more traditional-shaped roses or whatever flower you think it is. It comes with a few different leaves to stamp and I think that’s how I ended up filling up the whole paper.

I already had a Mint Macaron Cardstock card base ready which I layered with Petal Pink Cardstock. I decided to stamp the hydrangea flower with Petal Pink. I think it’s a little surprising how more “orangish” this Petal Pink looks with the ink when the paper looks “pink”. I originally thought I would only stamp those flowers, but I couldn’t resist the other flowers, stamped in Rococo Rose. Next, I added some leaves stamped in Mint Macaron Ink around the flowers. Then I noticed another kind of leaf stamp so I stamped that in Soft Sea Foam to kind of go with the hydrangea flowers. It looked good so I just keep filling in all the empty spaces!

Perhaps I should have left well enough alone, but I stamped the center of the flower in black. I thought it should look okay but I wasn’t happy with the result. But it’s not SO bad so I left it and didn’t try to start over! I simply stamped the greeting from the Beautiful Friendship Stamp Set right on the card front. Luckily I didn’t mess it up or I would have kicked myself for not using the Stamparatus!! And finally, I decided to add some glimmer with the Wink of Stella Glitter Brush. In the photo, if you notice some speckles on the flowers, that is the glitter! Kind of hard to photograph but looks so pretty!

Check out another card I made with other stamps and colors with the Beautiful Friendship stamp set HERE.

It’s great to use all our fancy products and tools but sometimes it is nice to “just stamp”. Get back to our roots when we first started stamping!

Stamp something today and don’t forget the Bonus Days going on at Stampin’ Up! with every $50 purchase!

SHOP STAMPIN’ UP! TODAY!