Tag Archives: Winter Snow Embossing Folde

Freezin’ Fun Snowflake Card

Freezin Fun Snowflake Card

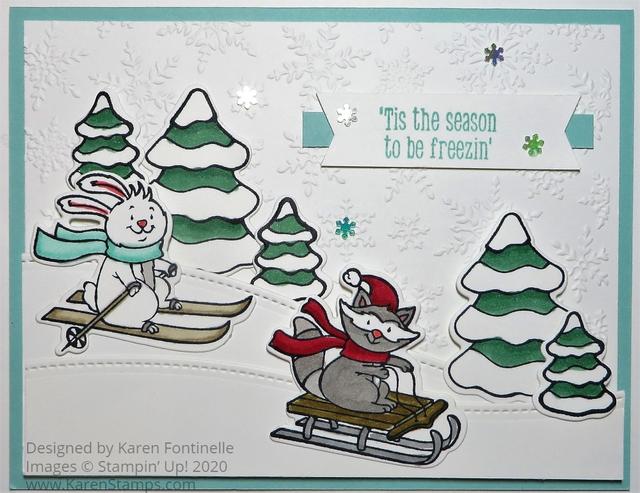
If you are interested in a variety of fun cards to make for the holidays, this Freezin’ Fun Snowflake Card might just get your creative juices flowing with ideas. There are so many possibilities with this stamp set and bundle, whether you “just stamp” or use the dies and create a whole winter scene.

I have to admit, this Freezin’ Fun Stamp Set was not one that I was interested in in the least in the Holiday Catalog. But then, recently, I saw some super-cute samples and I had to have it! The little critters are so cute and you can use one or all of them to show them having fun in the snow! Stamp them in Memento Ink and color in with Stampin’ Blends or Watercolor Pencils, perhaps.

There are also Freezin’ Friends Dies to go along with the stamp set. This makes it easy to die-cut the characters and as many trees as you want plus all the other fun things that are in the stamp set. If you want to save 10% on the stamp set and dies, buy the Freezin’ Fun Bundle.

To make this card I started with a card base of Pool Party. That color just reminded me of coolness and ice so I thought it would work for this card. For the layer, I embossed the Whisper White piece with the Winter Snow Embossing Folder to make a snowy background easily!

There is an odd long die that you can use to make a snowy hill. I die-cut two pieces, one higher than the other, for the snow for my characters to sled and ski down! You can just make these different widths and then layer then however you like. They have a pretty stitched edge, too. I popped up the back snowhill with Stampin’ Dimensionals and then adhered the front one directly on top of the back one.

The bunny and the raccoon are stamped and colored, the die-cut. I used the new Magnetic Plate with my new Stampin’ Cut & Emboss Machine and it worked perfectly. It is a self-healing mat and is actually used as a cutting plate, plus is magnetic all over! In fact, you are encouraged to place your dies around different spots on the Magnetic Plate, not just in the center, to help it wear better. I stamped and colored a bunch of large and small trees, to save a couple for another card.

This isn’t necessarily a card you want to make a bunch of because it takes a little time with the die-cutting. But you will be able to make so many fun cards and other projects with this Bundle or even just the stamp set.

Then I had to try out the new Adhesive-Backed Snowflakes! The description says they are two colors, Iridescent and Just Jade. I can certainly tell they are Iridescent. I thought maybe there were some pinks in there too! Anyway, they are pretty and I stuck a few on this card right on top of the embossed snowflakes. Also on the greeting, which is included in the Freezin’ Fun Stamp Set.

If you are ready for some wintry fun, get this Freezin’ Fun Bundle and stamp and die-cut away! It’s really a fun and cute set to have! Check it out on page 69 of the Holiday Catalog, the Stampin’ Up! August-December 2020 Mini Catalog. Then start making some cards like my Freezin’ Fun Snowflake Card!

Pine Tree Punch Christmas Card

Pine Tree Punch Christmas Card

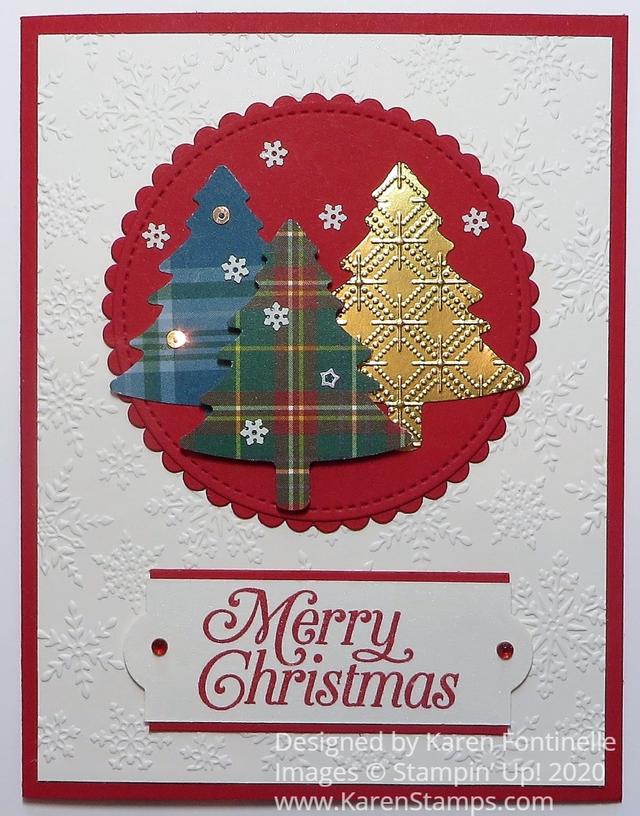
Even though we always want new things, I was happy to see a few things I already purchased last year show up in the new Stampin’ Up! Annual Catalog. Two things I used on this Pine Tree Punch Christmas Card were the Perfectly Plaid Stamp Set for the greeting and the Pine Tree Punch for the Christmas trees.

I got the idea for this card by looking back at last year’s Holiday Catalog at a sample of a tag. I changed it a little bit plus made it into a card. Of course, I could have stamped the trees from the Perfectly Plaid Stamp Set and punched them out as they did on the sample from last year’s catalog, but instead, I wanted to use our new Plaid Tidings 6″ x 6″ Designer Series Paper for the trees. One punch and done!

Instead of doing all three trees in plaid, I punched one out of Gold Foil, but then I embossed it with the new Dainty Diamonds Embossing Folder. Two trees are adhered flat to the background and the front green and red plaid tree is popped up on Black Stampin’ Dimensionals.

The card base is Real Red with a layer of Shimmery White Cardstock. I love the Shimmery White Cardstock for its very subtle shimmer. It is basically white but just a tiny shade off-white. I embossed this layer with the new Winter Snow Embossing Folder.

The circle behind the trees is actually two die cuts in Real Red. The outer one is the largest Layering Circle Die with a scalloped edge and then a Stitched Shapes Die circle on top of that.

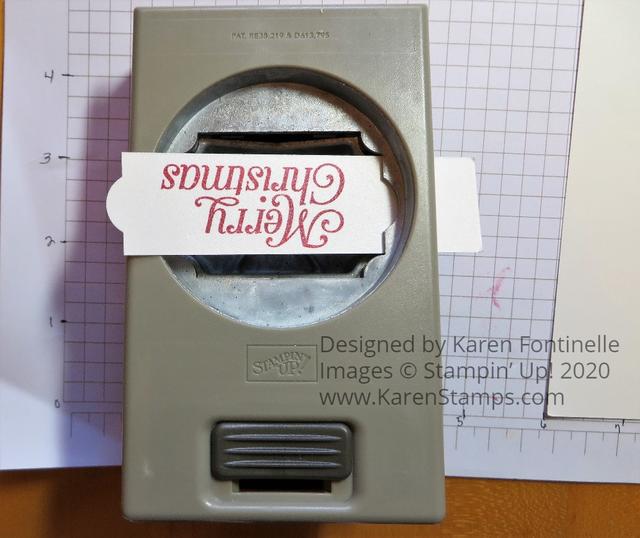
The greeting is stamped in Real Red Ink from the same Perfectly Plaid Stamp Set on Shimmery White. I got the idea to punch just the ends out of this narrow strip using the Everyday Label Punch.

Be sure you stick in the label from the top of the punch, not from the side like usual or you will punch both ends, unless that would happen to fit perfectly, but usually when you do a trick like this you have to punch one end at a time.

I tried various ways of layering some color underneath the greeting, even thinking about leaving the greeting without a layer, but finally, I came up with red just under the top and bottom of the greeting. Then I added a Red Rhinestone on each end. If you don’t have the Red Rhinestones, just color one of your clear rhinestones with a Stampin’ Blend marker! You can have rhinestones in any color!

I also added some Snowflake Sequins on the layer behind the trees and also on two of the trees. The gold embossed tree didn’t seem to need anything else! Mixed in with the sequins are other sequins that are not snowflakes so I used a few of those on the trees almost like ornaments. Put just the teeny tiniest dab of Multipurpose Liquid Glue where you want the sequin and place the sequin with the Take Your Pick tool. If you don’t already own this tool, you should put it on your next order! It is handy for picking up sequins with the sticky end and the pointy end or spatula end are great for picking rhinestones and other things up off their sheet getting underneath the adhesive. You will use it a lot!

Once you make one of this Christmas card, you could easily do an assembly-line process of making more. Get all the pieces punched or embossed or stamped and then just assemble. Don’t make one whole card at a time, except for maybe the first one for a sample. Cut all the strips for the greeting, emboss all the card layers, punch all the trees of one color, punch all the trees of the other color, etc. etc. In some ways, you almost get muscle-memory while you are working doing the same thing over and over and it makes assembly go faster! And it’s fun to make multiple cards without having to thing of designing each one! Try it with this Pine Tree Punch Christmas Card.

SHOP STAMPIN’ UP! ONLINE HERE!