Category Archives: Thanksgiving

Thanksgiving Punch Art Turkey Candy Bar Wrapper

Thanksgiving Punch Art Turkey Candy Bar Wrapper

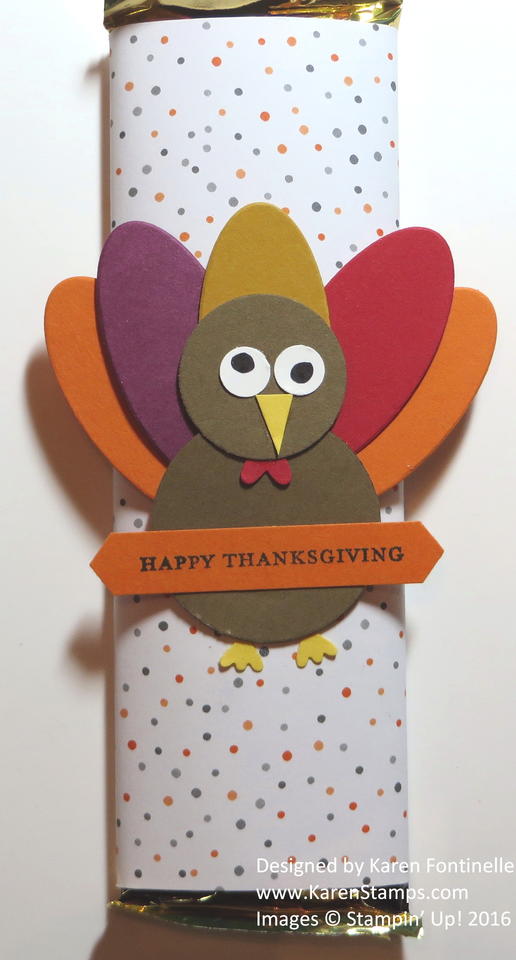
If you want a quick and easy favor for your Thanksgiving dinner, try this Thanksgiving Punch Art Turkey Candy Bar Wrapper. Just get some chocolate bars and wrap them in designer paper.  I used this generic sheet from the Halloween Night Specialty Designer Series Paper.

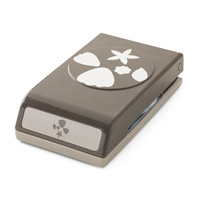
To make the punch art turkey to fit on the candy bar, I used the 1 3/8″ Circle Punch for the body and the 1″ Circle Punch for the turkey head. The feathers were cut out with the Layering Ovals Framelits Dies  and Big Shot, but you could also use an oval punch. The turkey feet are punched with the feet of the Owl Punch!  What would we do without the Owl Punch?! The eyes are also punched with the Owl Punch but I just colored in the pupil with a black marker. The red waddle on the turkey is the little heart from the …..Owl Punch! Just cut the beak freehand.

The Thanksgiving greeting is from the ever-useful stamp set, Teeny Tiny Wishes and punched with the Classic Label Punch.  I still love and use the Teeny Tiny Wishes Stamp Set a lot.  It has almost every greeting in it that you could possibly need.

Just a fun punch art turkey to make for a  Thanksgiving candy bar wrapper or you could make the same one on a Thanksgiving card. Play with the idea and make something fun!

Shop Stampin’ Up! Online 24/7


Thanksgiving Candy Turkey Cookie Favor

Thanksgiving Candy Turkey Cookie Favor

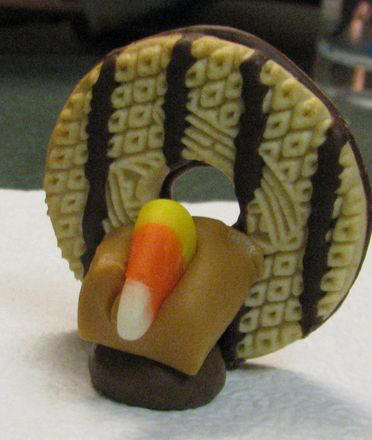
This Thanksgiving Candy Turkey Cookie Favor is not made with stamps, ink, or paper but it still is one of my favorite things at Thanksgiving! I think I found the idea in a family magazine way back when my kids were little and I made lots of them for preschool parties and elementary school or Scouts or whatever at Thanksgiving. There are similar ideas out there, usually involving Oreos, candy corn and frosting as glue. Those are cute, too, but I always thought these were the easiest to make and so cute!!

You will need Keebler Fudge Stripe Cookies, Hershey Kisses, candy corn and Kraft Caramels (or whatever similar brands you find at your store).

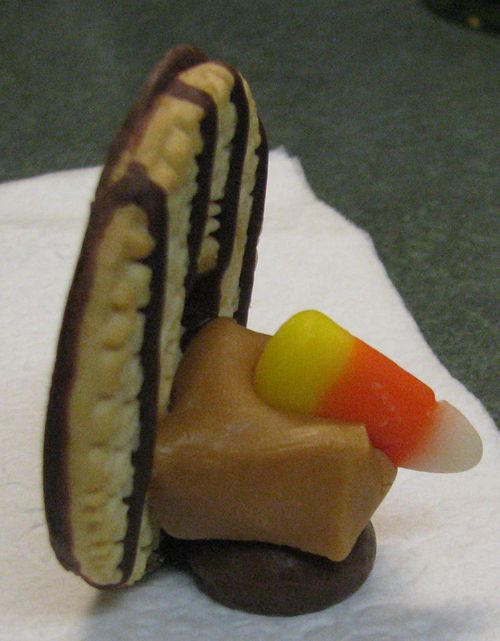
Unwrap several Hershey Kisses and have them sitting on a plate or napkin so they are ready, with a cookie and candy corn handy also. Put a caramel on a plate nad microwave it just a few seconds until it is slightly soft, but not melted or too soft. When the caramel comes out of the microwave, plop it on top of the Hershey’s Kiss. Immediately “smoosh” the cookie against the backside of the caramel until it sticks. Take the candy corn on edge and stick it into the caramel! There you have a turkey!

These turkeys are so fun to make for Thanksgiving! To make multiples, just have your ingredients ready to go. You can soften several caramels at a time on a paper plate in the microwave, maybe about six. You want to be able to work quickly when the caramels come out of the microwave so you can stick everything together. Have extras on hand because there will be some broken cookies! And you will need to kind of test your microwave and caramel softening factor to get the timing right. So just have extra ingredients on hand. And of course you can eat any malfunctions or leftover ingredients!

You can place these at each setting at your Thanksgiving table. If you want to add a placecard with someone’s name, can probably do that one way or another. My, how I used to like making placecards for family dinners when I was little!!

Pick up these ingredients at the store and try your hand at these Thanksgiving Candy Turkey Cookie Favors! Something different for Thanksgiving!

Thanksgiving Candy Turkey Cookie Favor Side

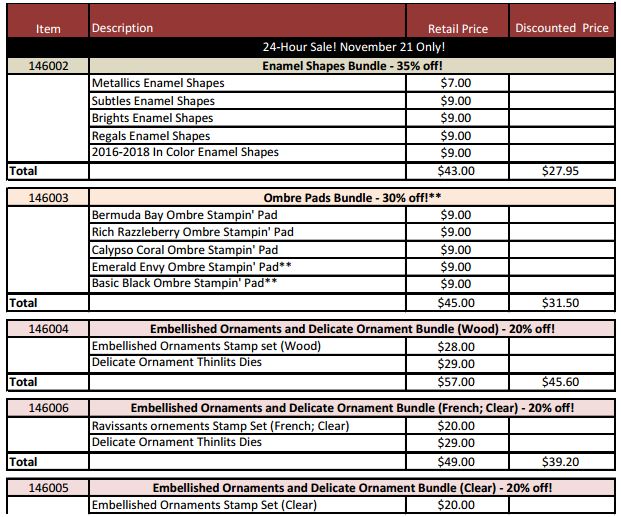
Don’t forget the Stampin’ Up! Online Extravaganza starting Monday, November 21!  Lots of products and special bundles on sale up to 40% off all week plus a Flash Sale on Monday ONLY, plus another Flash Sale on the last day, November 28. Get your wish list ready this weekend so you don’t waste time on Monday! You may be cleaning and cooking, but you deserve a break and some shopping!

Download the Online Extravaganza List HERE.

Shop Stampin’ Up! HERE!

(On Monday when you click the store link you will undoubtedly see a banner about the Online Extravaganza but it’s not there today yet.)


Stampin’ Up! Online Extravaganza 2016

Stampin' Up! Online Extravaganza 2016 Shop with Karen

MONDAY, NOV. 21 – MONDAY, NOV. 28

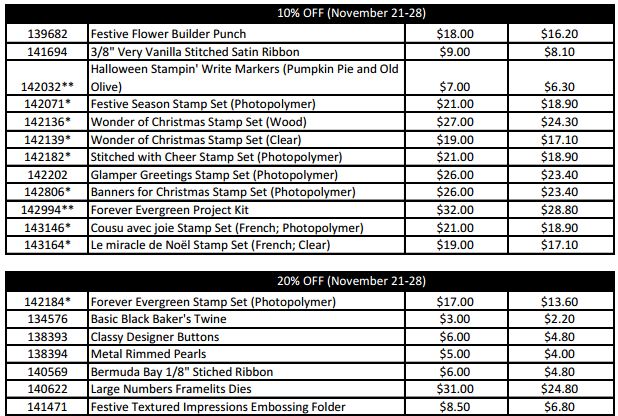
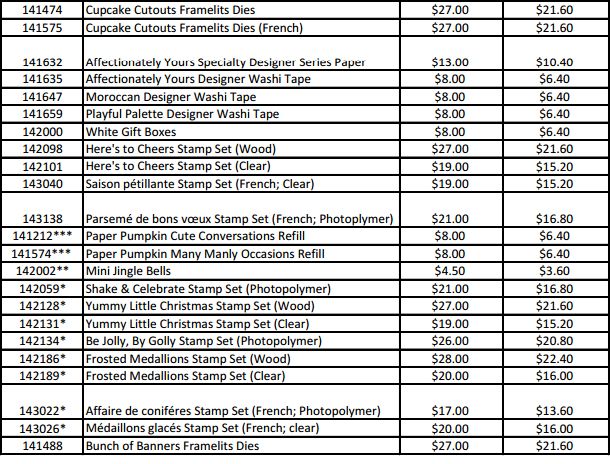
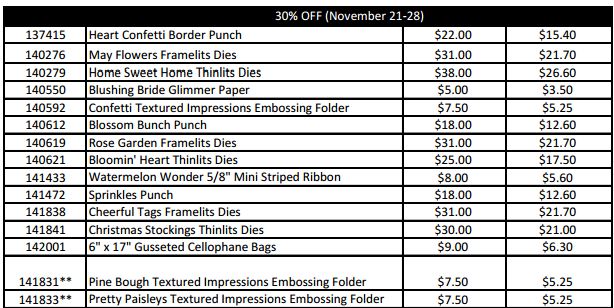
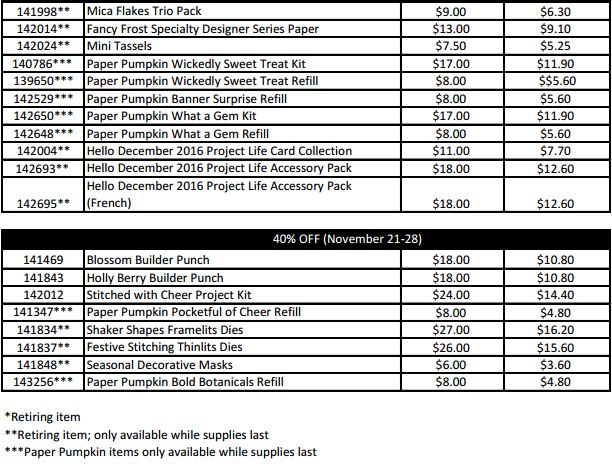
Stampin’ Up! Online Extravaganza only happens once a year, so be sure to take advantage of it. For one week only, November 21-28, you can save up to 40% on select products. To sweeten the deals, Stampin’ Up! will be having 24-hour sales on the first and last day of the promotion,featuring special products available for that day only. You can even get a sneak peek AND save on products that will be on the future holiday catalog retiring list. Don’t miss out on this great opportunity to stock up and save!

FLASH SALE MONDAY, NOV. 21 ONLY

Stampin' Up! Online Extravaganza 2016 Product List Flash Sale Nov 21

Stampin' Up! Online Extravaganza 2016 Product List Flash Sale Nov 21 Part 2

Stampin' Up! Online Extravaganza 2016 Weeklong Products Part 1

Stampin' Up! Online Extravaganza 2016 Weeklong Products Part 2

Stampin' Up! Online Extravaganza 2016 Weeklong Products Part 3

Stampin' Up! Online Extravaganza 2016 Weeklong Products Part 4

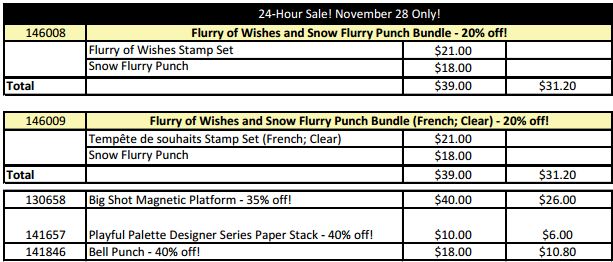
FLASH SALE MONDAY NOV. 28 ONLY

Stampin' Up! Online Exravaganza 2016 Flash Sale Nov 28

DOWNLOAD THE ONLINE EXTRAVAGANZA LIST OF PRODUCTS HERE!

Details

• Promotion period: November 21-28, 2016
• Discounted items/bundles available on all order types (customer, demonstrator, workshop, starter kit, and online).
• You must use the bundle item codes provided. Discounts will not be applied if individual item numbers are entered separately.
• Some bundles have been created exclusively for Online Extravaganza and will not be available after the promotion ends.
• There is no minimum purchase required in order to receive the discounted price.
• Additional products from current catalogs may be purchased on the same order.
• Discounts range from 10-40 percent and may vary per market. Note: While some retiring holiday products may be discounted during the retiring list promotion in December, no discounts will be greater than the discounts being offered during Online Extravaganza.
• During Online Extravaganza, a selection of past Paper Pumpkin kits and refill kits will be available to both subscribers and non-subscribers.
• Online Extravaganza includes two 24-hour sales.
• The first 24-hour sale begins at 12:01 AM (MT) on November 21 and runs
through 11:50 PM (MT) that same day.
• The second 24-hour sale begins at 12:01 AM (MT) on November 28 and
runs through 11:50 PM (MT) that same day.

Paper Pumpkin kits and products on the future holiday catalog retiring list, except stamp sets, are only available while supplies last.
• All products that are while supplies last have been noted in the Online Extravaganza deals list.

AND DON’T FORGET THE ONGOING NOVEMBER STAMP SALE!

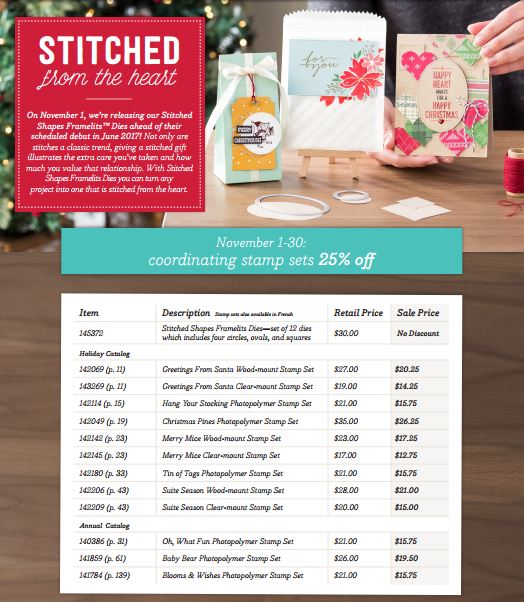
Stitched Framelits and Stamps Flyer

Remember, these stamps are on sale and available through the end of November.  You can add them to your Online Extravaganza order! Remember, too, that the very popular Stitched Shapes Framelits Dies will be unorderable starting Monday, right now are backordered. I think that if you ordered those before Monday you would receive them sooner than if you wait until they are orderable again. Either way, you won’t be able to combine the dies with an Online Extravaganza order.

Check out the Stampin’ Up! November Stamp Sale HERE!


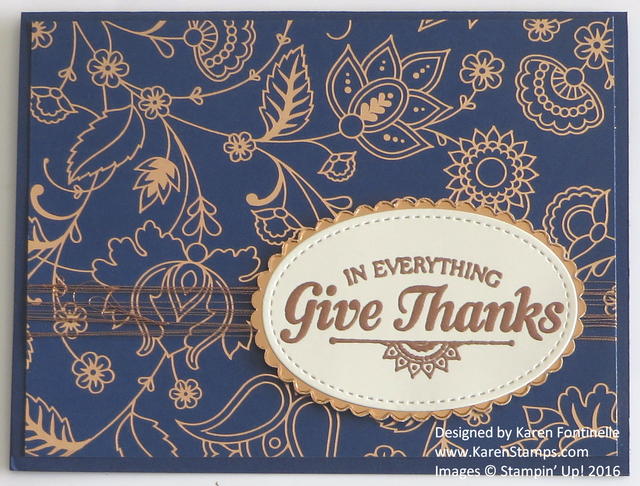
Petals & Paisleys Copper Foil Thanksgiving Card

Petals & Paisleys Copper Foil Thanksgiving Card

I will say the photograph of this Petals & Paisleys Copper Foil Thanksgiving Card does not do it justice!  I think it is one of the prettiest cards I have ever made, not because I made it because it is a very simple design, but because of the materials! Just get the Petals & Paisleys Specialty Designer Series Paper and you will see why! Inside that package is this gorgeous Night of Navy paper with copper foil embossing on it! So pretty!!

I made the card base with Night of Navy Cardstock. When you are not sure what color to use with Stampin’ Up! designer paper, just look on the back of the package to see the list of coordinating colors (you might need your reading glasses though!)! It’s a great resource right at hand!

The greeting is from the Suite Seasons Stamp Set and is perfect for Thanksgiving. I wiped a piece of Very Vanilla Cardstock with my Embossing Buddywhich lessens the static on the paper and prevents the stray specks of embossing powder, for the most part. I stamped with Versamark Ink, sprinkled on the Copper Stampin’ Emboss Powderand heated with the Heat Tool. I can guarantee that each time you do heat embossing you will be amazed like the first time you ever saw it! It is just magical!

After looking through my framelits, I decided on the Stitched Shapes Framelits Dies to cut the stitched oval shape around the greeting.  Then I die cut a layer from Copper Foil with the Layering Ovals Framelits DiesI choose the scalloped edge die.  Love it! Then I decided to use my Copper Metallic Thread to wrap around the designer paper. It’s very thin so I had to wrap it around many times!  It barely shows on the photo but it’s there and very pretty.

I like this card so much I think I will make more cards with the rest of that foil designer paper to send out at Thanksgiving! I often forget my own piece of advice – I used to always say “when you make one card, make three” because as long as you have the supplies out and the design in mind, make extras to have on hand!

Remember, the Stitched Shapes Framelits Dies are or will go on backorder this week and by next week they will not be able to be ordered until Stampin’ Up! receives sufficient supply to fill orders. If you want them, I would add them to an order and hope that you still get one of the thousands of sets coming in to the warehouse by the end of the month.  Otherwise it might be a longer wait.

The stamp sets on the November sale are still available so be sure to check those out!

I hope you will make a few Thanksgiving cards to mail out to special people. Just think how happy that will make their holiday!

Shop Stampin’ Up! Online HERE!

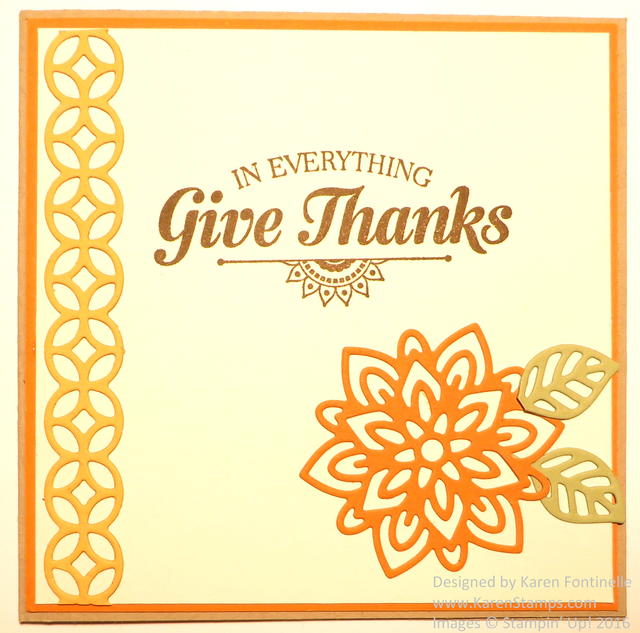
Flourish Thinlits Dies Thanksgiving Card

Flourish Thinlits Dies Thanksgiving Card

Can you believe it is the middle of November, the month that just started, and that Thanksgiving is on its way?! I realized I should probably make a card with fall colors and ended up with this Flourish Thinlits Dies Thanksgiving Card.  I really just kind of grabbed some scrap pieces of card stock in fall colors and I ended up with a 4 1/4″ x 4 1/4″ square card, Crumb Cake cardstock as the base. Later I decided to put the Very Vanilla front layer of the card over a piece of Pumpkin Pie cardstock for a thin border.

I just used my Big Shot and Flourish Thinlits Dies to cut as many pieces as I could fit on the cardstock scraps I had to make a bunch of pieces and then I could play with them and come up with something!  The greeting is stamped from the Suite Seasons Stamp Setone of the stamp sets on sale during November.  I ordered it, along with the new Stitched Shapes Framelits Dies, and I’m so glad I did.  I’ve already used it several times on cards and projects! You can never have too many greeting stamp sets.  As a side note, this stamp set has a greeting you can use for a sympathy card or some other kind of serious caring type card, and we often do not have a good saying to use for a card like that.

Be sure to check out the Stitched From the Heart collection of the new framelits and all the stamp sets on sale until November 31.

If you are new to stamping or do not have a Demonstrator, I’d be happy to mail you the current Stampin’ Up! catalogs! I have some extras right now and can send them out pronto!  They make the best reading material!!

Time to be making some Thanksgiving cards if you plan to mail some out or Thanksgiving favors or decorations, so let me know if you need any ideas or help.

Shop Stampin’ Up! Online HERE!

Gift Wrap Ideas With Cellophane Bags


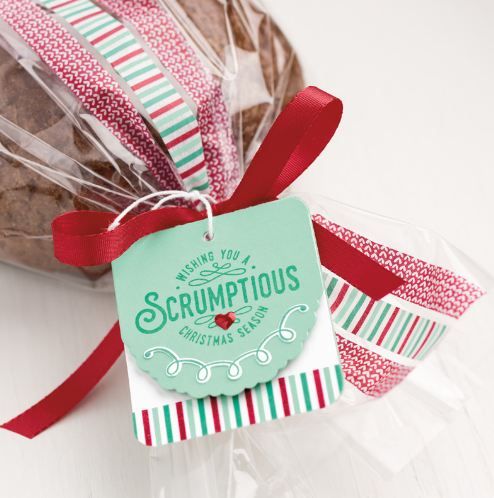
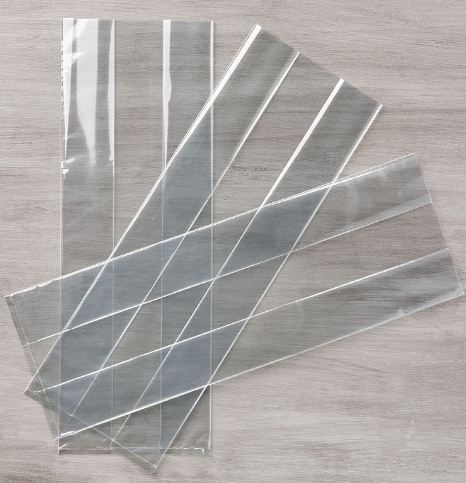
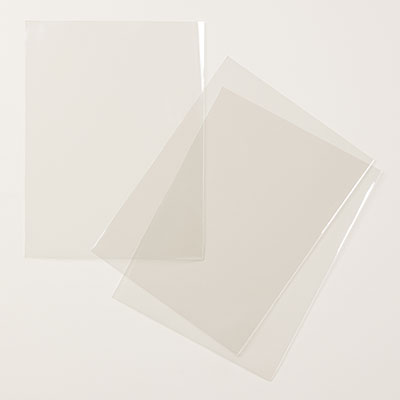
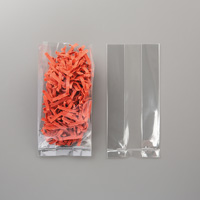
Enjoy this video from Stampin’ Up! and get wonderful gift wrap ideas and maybe just gift ideas themselves using the 6″ x 17″ Gusseted Cellophane Bags.  These are pretty large bags, given the 17″ length, so you can stick a large gift or treat inside! Think about when you are ready to make special treats for the neighbors or a group of friends, wouldn’t these bags be perfect to use for your holiday mix, special bread or cake, bag of cookies or candy, bottle of wine, and more? Just put your gift inside,  tie with a pretty ribbon and add a cute tag! If you don’t want the bag quite so long for a smaller gift, just cut off some of the length.

For another gift presentation when you want the gift to be hidden, just wrap pretty tissue paper all around the gift and insert it in the cello bag! You can also stamp on the outside of the bag if you use Stazon ink.

Remember, presentation is everything!! No matter what the gift, a big part of the thrill will be how you wrap and present the gift, and we stampers have all kinds of materials and ideas to make that the best part!

6x17 Cellophane Bag Gift Wrap

6x17 Cellophane Bags

Stampin’ Up! also carries other sizes of cellophane bags. These are nice bags, completely clear and crisp, not that kind of thick, cloudy, cheaper looking kind of bag you can sometimes buy at other places.

The Stampin’ Up! Holiday Catalog Is Ready For You!

Holiday Catalog 2016 Banner

Today is the day!  It’s September 1st (can you believe it?!) and the Stampin’ Up! Holiday Catalog is LIVE!

SHOP THE HOLIDAY CATALOG HERE!

VIEW THE HOLIDAY CATALOG HERE!

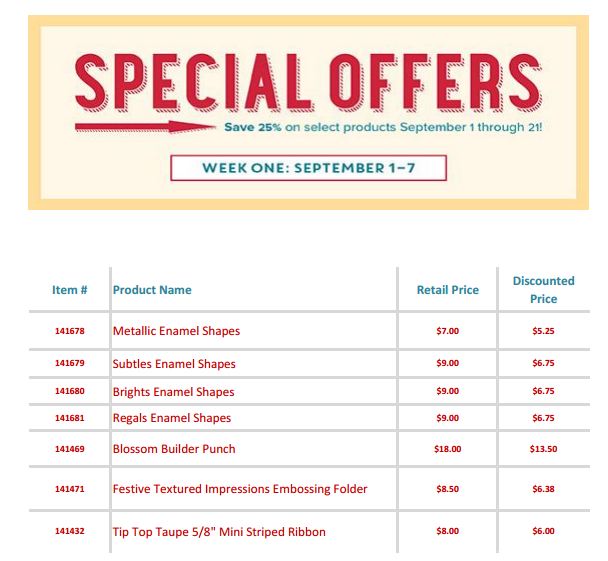
Special Offers Week 1

AND Special Offers September 1-7! (Kind of like the old Weekly Deals!) Add these to your order!

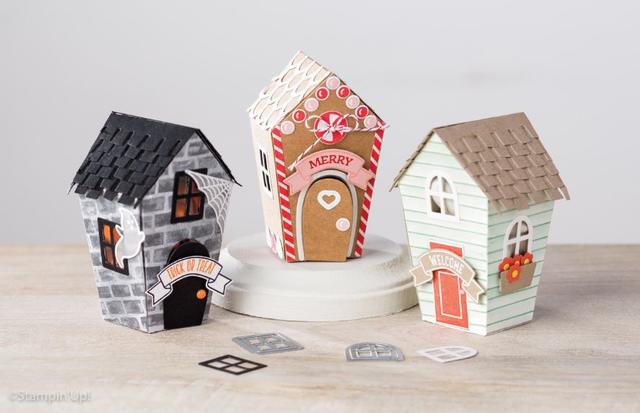
New offers Sept. 8 and Sept. 15 also. Don’t know what they are yet, though!  You will love the Enamel Shapes!  Think about the Metallic Enamel Shapes, the star shapes, for the tops of Christmas trees!Stampin' Up! Holiday Houses

Go check out the Stampin’ Up! Holiday Catalog now!  Let me know what you think! If you do not have a Stampin’ Up! Demonstrator you are working with currently, contact me and I would be happy to mail you a catalog!

Shop All Things Stampin’ Up!


For Your Viewing Pleasure: Holiday Catalog Videos by Stampin’ Up!

What could be more fun that watching videos using some of the new products in the Stampin’ Up! Holiday Catalog?!  Usually these are saved until after the catalog goes live, but this year Stampin’ Up! has released them early for all of you!

This new Holiday Catalog is so full of new products that 10 videos don’t even cover everything! But you will get a good idea while you wait for your catalog to arrive! One of my customers told me she received her catalog today so they must be on their way!

Once you watch the video above, the next one will appear.  But if you want to see the page where all the videos are or choose which ones you want to watch, just click HERE.

The new Stampin’ Up! Holiday Catalog goes live on September 1, 2016. Amazingly, August is half over so September is not far behind! It won’t be long!

If you are new to me and aren’t working with a Demonstrator currently, just email me with your contact information and I would be happy to mail you a catalog when they come out. Email me at Karen@KarenStamps.com.  You will love this catalog!!  It will be online Sept. 1st as well.

If you can’t wait until September 1st to order, you may want to become a Stampin’ Up! Demonstrator yourself!  We Demonstrators have been able to do a pre-order and you could too!  It only takes minutes to sign up!  Join the Stampin’ Up! family!  Let me know if you have any questions I can answer for you!

Enjoy the Stampin’ Up! Holiday Catalog videos!!

For All Things Thanksgiving Card

For All Things Thanksgiving Card

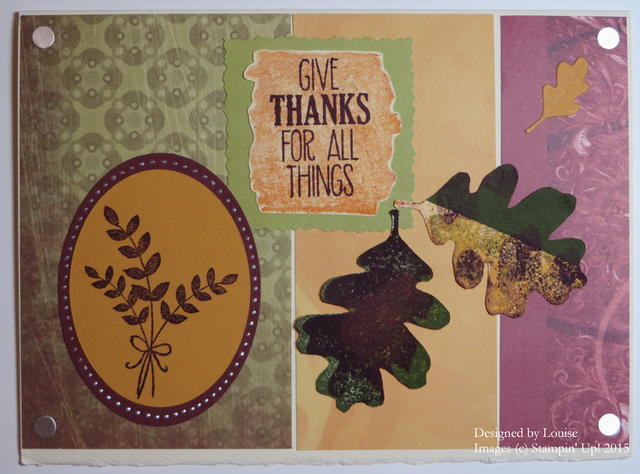
I am thankful to be a Stampin’ Up! Demonstrator for many reasons, perhaps the main one being the people I have met through the years, even customers who I have never met (yet!) in person.  My customer, Louise, sent me this beautiful card that she made for Thanksgiving with a sweet note inside. She probably didn’t know, but this For All Things Stamp Set has been one of my favorites since it came out last year. Not only do I love getting mail (who doesn’t?!) but in this day and age of so much junk mail, to get a real card, handmade, made my day! So never doubt what mailing one of your cards to someone might mean.

You may be very busy with Thanksgiving preparations, company coming, traveling yourself, or  who knows what, but don’t forget to take some time for yourself and check out the Stampin’ Up! Online Extravaganza! It’s Stampin’ Up!‘s answer to all the Black Friday sales! But it lasts for a week, so when you get time, check it out before Monday, November 30.  And on Monday is another Flash Sale! It’s all on the list HERE! Products are available while supplies last. At least you don’t have to go out and fight the crowds to order from Stampin’ Up! You can order online or contact me if you would like me to put your order in for you.

Online Extravaganza 2015

And if you aren’t on my Mailing List yet, there’s time!  Sign up right now, my special 12 Weeks of Christmas email with a new holiday project goes out this afternoon at 1:00 pm! Just put your name and email in the sign up box in the upper right.

Christmas Mailbox

And if you would like to meet the wonderful people who are or will become stampers and papercrafters by becoming a Stampin’ Up! Demonstrator, check out the information HEREThink about it and we can talk about it after Thanksgiving if you wish! The spring Occasions Catalog will come out in January and there will be the special Stampin’ Up! promotion called Sale-A-Bration so lots of excitement and you can get in on it early if you are a Demonstrator!

If you are already one of my mailing list subscribers, check your Inbox this afternoon for Week 9 of the 12 Weeks of Christmas!

Have a Happy Thanksgiving!

Thanksgiving Pumpkin Box

Embellished Pumpkin Box

Do you need some table favors for your guests at your Thanksgiving table or a little something to take to a hostess? If so, you might try this Thanksgiving Pumpkin box or something like it. You can put a little treat in the little open box behind the “pumpkin” on the front.

Here is where I got the inspiration for this project!  My friend gave me this little pumpkin box holding some pumpkin soaps and right away I said, “I could make something like this!” and she said, “I’m sure you could!”

Pumpkin Box with Soaps

So I got busy and figured out how to make the box that was going to be the base behind my pumpkin on the front. Here are the measurements I came up with for the size I was using, but feel free to modify for your project:  Cardstock 5 1/2″ x 6 1/4″. With the 5 1/2″ side at the top of your scoring tool, score at 1 1/4″ and 4 1/4″. Turn the cardstock so the 6 1/4″ side is at the top of your scoring tool.  Score at 2 1/2″ and 3 3/4″.  Crease all the scored lines so you can see how the box will go together.  Then cut as indicated in the photo to make the side flaps.  Apply adhesive and make your box. Actually, I intended for my box to be a little wider but must have made a boo-boo on the math!  But it is okay as is.  You can adjust yours.

Pumpkin Box Scored Piece

Just assemble the box, very simple to do with some good glue, like the Liquid Multipurpose Glue or Tear & Tape I added a handle and just stapled it on with my Stampin’ Up! Handheld Stapler, just for fun.

Pumpkin Box Assembled

I used my Big Shot and one of my Oval Framelit Dies to cut five ovals, all the same size from this pattern in the Into the Woods Designer Series PaperIn order to make each oval stand out a bit without making extra layers, I just sponged Tangelo Twist ink around each edge of the oval.

Pumpkin Box Ovals

I adhered the outer ovals to the box directly and the rest were popped up with Stampin’ Dimensionals.

To finish the pumpkin, I cut a little stem in green, just by hand and glued it to the top of the pumpkin. Then I added some 1/8″ Gold Ribbon and Gold Sequin Trim to the handle just for fun!  I also stamped a Thanksgiving from the Teeny Tiny Wishes Stamp Set and just glued it on like a little banner.

Look around at things you have at home or see in a store or in a catalog and think about how you can make it your own creation by papercrafting! You never know when inspiration will hit! Put a little treat in a cello bag and put it in this Thanksgiving Pumpkin Box!

Shop Stampin’ Up! Online!


Thankful Gift Bag

Thankful Gift Bag

The other day I had pulled out a past gift bag project as inspiration for something else I was making with a friend, and looking at that project inspired me to make this Thankful Gift Bag. So you never know where inspiration will strike!  I updated this gift bag by using the Gift Bag Punch Board. At first, though, I had pulled out the Gift BOX Punch Board and was wondering why this bag was not likely to come out right as I started to use the wrong punch board!! I wasted a few pieces of paper on that one!  Anyway, it’s easy to make a gift bag with the Gift BAG Punch Board.

You choose the size bag you want by the measurement you want on the bottom of the bag. Then you can make it any length (tallness) you want. This is a very basic bag with Soft Suede Cardstock. I think I would have liked it more with a little stamping or embossing, but sometimes plain is okay too. The tag on the front is stamped with a greeting from the Thankful Forest Friends Stamp Set in the Stampin’ Up! Holiday Catalog.  I used different colors of Stampin’ Write Markers to color in the stamp with multiple colors.  Just remember to “huff” (breathe) on the stamp after coloring with markers to remoisten the ink before you stamp. Then I stamped the acorns in the For All Things Stamp Set  (a beautiful fall stamp set from last year, still current, in the Annual Catalog).  I cut out a couple of the acorns and adhered them to my greeting, which was die cut with the Big Shot and the Deco Labels Collection Framelits.

Use this Thankful Gift Bag to tuck in a little gift for a hostess when you go out during the holiday season.

Gift Bag Punch Board

Thankful Forest Friends Animals Card

Thankful Forest Friends Animals Card

I absolutely love this Thankful Forest Friends Stamp Set, especially the cute animals, so today I made this Thankful Forest Friends Animals Card! After stamping the card, there wasn’t much room for a greeting, but I managed to fit one on.

The card base is Soft Suede, cut 6″ x 6″ and folded in half to be 3″ x 6″. The top layer is Very Vanilla. The animals are stampin in various brown inks, Soft Suede, Early Espresso and Cajun Craze for the fox. The leafy garland with acorns I colored in with various Stampin’ Write Markers. The grass is from the Sheltering Tree Stamp Set and I overstamped the blades of grass over the grass stamp. The greeting is also from the same stamp set.

You may think this stamp set is for Thanksgiving, but just think what cute baby cards you can make with these animals! Or make some cute scrapbook pages for baby or outdoor adventures!

Don’t forget to check out the Stampin’ Up! Weekly Deals!  Today is the last day for these.

Stampin' Up! Weekly Deal Nov 3 2015

If you need some stamps or accessories to make a card like my Thankful Forest Friends Animal Card, just click HERE to shop at Stampin’ Up!

Thankful Forest Friends Thankful for You Card

Thankful Forest Friends Thankful for You Card

As long as I had my supplies out after decorating a bag in THIS POST, I decided to make this Thankful Forest Friends Thankful for You Card. I used to always say when you make one card, go ahead and make three cards of the same.  You’ll be able to use them eventually and you won’t have to get all the stuff out again.

This card uses the Thankful Forest Friends Stamp Set which I just ordered recently and I do absolutely love! The animals are so cute for any occasion and the words are great for Thanksgiving and any other thankful time!  Just don’t ink up the acorns and leaves if you want to send it in the summertime! Use markers to ink up only the words!

I don’t know what the term is or if there is one, but I had never tried the “staggered paper” look before.   Maybe it should be called tipsy paper, I don’t know! Usually I like things straight and even, but I thought I would live dangerously and stack these layers differently today! It’s okay, not sure I love it, but it’s okay and something different.  Maybe I will grow to love it! The designer paper is the beautiful Into The Woods Designer Series PaperThis stamp set and paper pack are both available in the Stampin’ Up! Holiday Catalog. This paper originated with one of the Stampin’ Up! artists handpainting these designs and then Stampin’ Up! did all their magic to turn it into our designer paper. This paper really is gorgeous! Just remember, every Stampin’ Up! paper is more beautiful in person, no matter how good it already looks online!

For a little interest, I pulled some threads out of the  1 1/4″ Burlap Ribbon.  Just cut off a length that you want to use, cut off the selvage edge on one side and you will be able to fray the ribbon to get however many strands you want to use as its own embellishment.  I used this Burlap Ribbon so much I had to order more! You might not think you would use it a lot, but you will! Burlap is so on trend right now and has been for awhile.

My card still needed a little something, so I stamped the little leaf stamp in the background with Versamark Ink.  Versamark has many uses, one being matching the card stock that you are stamping on.  You could get the same look if you stamped on the Tangelo Twist card stock with Tangelo Twist ink – and sometimes I do that as well!  Versamark Ink is also used in heat embossing.  I think the Versamark stamping gave the background and the card just a little something that it needed.

You don’t need to make this exact Thankful Forest Friends Thankful for You Card, you can also use the same basic design to make any other card. Try it!

Click to Shop Stampin’ Up!

Thankful Friends Thanksgiving Gift Bag

Thankful Friends Thanksgiving Gift Bag

How about using some of those bags you are hoarding and turning them into gift bags such as this Thankful Friends Thanksgiving Gift Bag?! It’s so easy and fun and makes good use of the excess we all have around our house.

I was cleaning my house getting ready for company and just happened to notice how there were grocery bags and other store shopping bags stuck in a basket on a shelf in the utility room plus a whole grocery bag in itself filled/stuffed with all kinds of miscellaneous bags just sitting there on the floor.  These are the kinds of things you just live with until company is coming and then you (hopefully) notice them. I started pulling out bags and bags and bags and realized we certainly did not need to keep this many on hand (although my husband might disagree, just in case!). And while I had these bags pulled out, I separated out some of the smaller bags with the handles, like you can also buy at the craft store, and decided to do some decorating.

I love this Holiday Catalog stamp set, Thankful Forest Friends. I only recently ordered it because, of course, I can’t order everything the first time around! The animals are so cute and the greetings are perfect for Thanksgiving.  You will also be able to just ink up the words on the “Thankful for You” stamp and use that for any occasion, not just Thanksgiving.

This bag had the name of the store printed on the front, so that determined how wide my paper was going to be in order to cover it up, which was 4 inches.  The bag is 8″ wide. I used the Into The Woods Designer Series Paper and chose Old Olive as the back layer. Every package of designer paper comes with a list of coordinating colors so that makes matching easy.

I colored the greeting stamp with several Stampin’ Write Markers to get the various colors. Just breathe (huff) on the stamp after coloring on it with markers to remoisten the ink, then stamp. Next I used the Deco Labels Collection Framelits and the Big Shot to cut out the greeting and the layer underneath. You could add ribbon and other embellishments, but I kept it quick and simple.

So go through your bag stash today and pull out the ones you can turn into gift bags for free! And your house will look a little neater too!  If you need this beautiful paper or stamp set I used to make my Thankful Friends Thanksgiving Gift Bag  to take to your hostess this Thanksgiving, just visit the Stampin’ Up! Online Store or contact me to put your order in for you!

Stampin’ Up! Online Shopping HERE!